AUSTIN AND BARBEQUE AABQ 3.0 User manual

AABQ 3.0 | Four burner grill
User Manual
English | Svenska | Norsk


Table of content / Innehållsförteckning / Innholdsfortegnelse
English
Safety instructions ...........................................................4-5
Overview ............................................................................6
Operation ........................................................................7-9
Maintenance................................................................10-11
Specifications ..............................................................11-12
Other................................................................................13
Svenska
Säkerhetsinstruktioner .................................................14-15
Översikt............................................................................ 16
Användning .................................................................17-19
Vedlikehold..................................................................20-21
Specifikationer.............................................................21-22
Övrigt ...............................................................................23
Norsk
Sikkerhetsinstruksjoner................................................24-25
Oversikt............................................................................ 26
Bruk ............................................................................27-29
Vedligeholdelse ...........................................................30-31
Spesifikasjoner ............................................................31-32
Annet ...............................................................................33

English4
Safety instructions
WARNING:
FOR YOUR SAFETY
FOR OUTDOOR USE ONLY
´Read the instructions before using the
appliance.
´Use outdoors only.
´Warning! accessible parts may be very hot.
Keep young children away.
´Do not move the appliance during use.
´Retain for future reference.
´Turn off the gas supply at the gas cylinder after
use.
´This appliance must be kept away from
flammable materials during use.
´Never light the grill with the lid closed.
´The appliance and cylinder must be placed on
level surface and must not be used whilst alight.
´Changing the gas cylinder shall be carried out
away from any source of ignition.
´Recommend to use the protective gloves when
handling particularly hot components.
´The parts sealed by the manufacturer or his
agent shall not be manipulated by the user.
´Please ensure you only use your barbecue at
the correct pressure the appliance is designed
for.
´The wheels have been fitted to this unit for easy
manoeuvrability.
´Food can be barbecued on the cooking grid
either with or without the lid being closed.
When the lid is closed for 5 minutes, the lid
must be open at least 1 min to release heat.
´With a grease tray/cup under the case.
´Adequate ventilation is vital for combustion
and efficiency performance of the barbecue.
This will ensure the safety of the user and
other people in the vicinity of the area where
the appliance is being used. Never use the
appliance in any enclosed covered area.
´When the wind speed is above 2m/s, don’t use
gas grill facing to the wind.
´Any modification to the appliance may be
dangerous and may cause injury or property
damage.
´Any unauthorised modification of the appliance
will invalidate the guarantee on this appliance.
´The appliance must not have any overhead
obstruction. E.g. trees, shrubs, lean to
roofs. The appliance must be installed with a

5English
Safety instructions
clearance of 1M around the appliance.
´The appliance must not be used near
flammable materials. (Petroleum based
products, thinners or any other solid object that
carries a flammable warning label.)
´The use of this appliance in enclosed areas can
be dangerous and is prohibited.
´Avoid humidity of refractory material.
English6
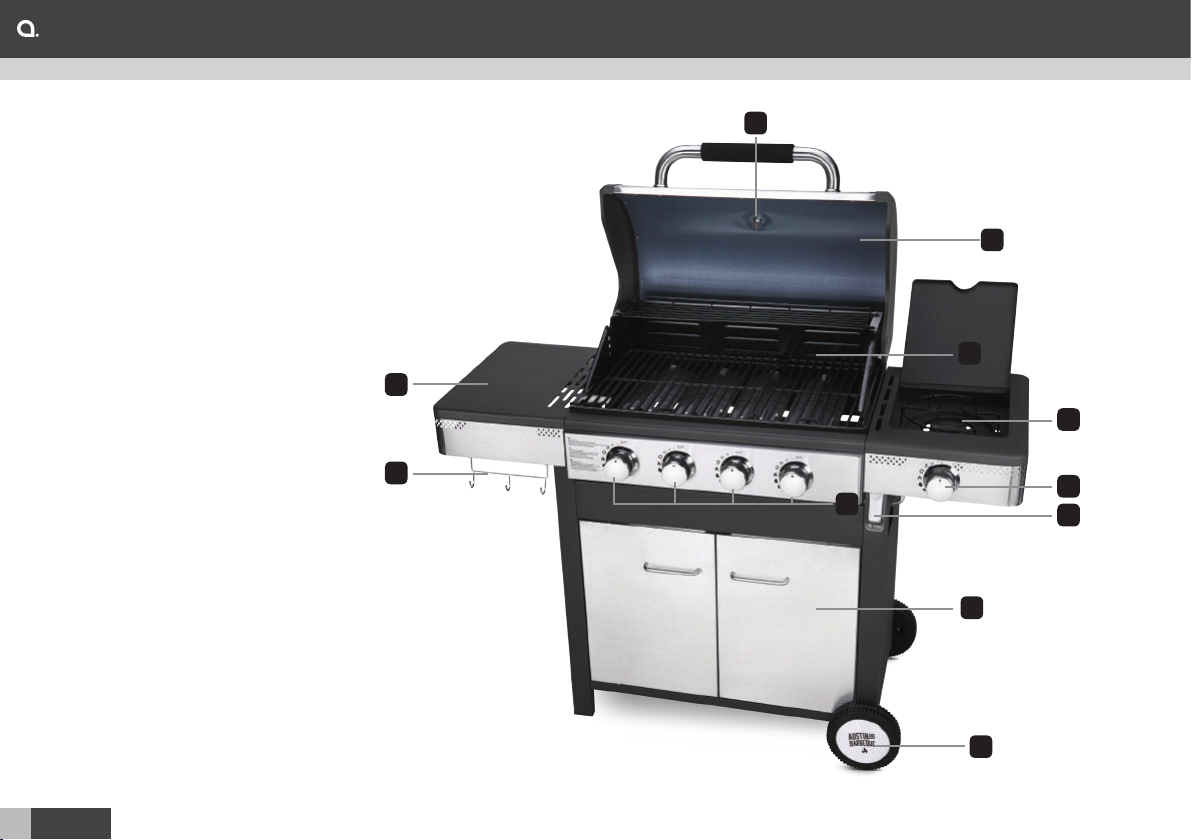
1. Lid
2. Thermometer
3. Cooking Grid
4. Side shelf
5. Control knob
6. Wheel
7. Door
8. Side burner
9. Side burner control knob
10. Opener
11. Hook
Overview
8
5
2
1
6
4
7
3
11 9
10

7English
Operation
Before use:
1. Assemble the barbecue by following the assembly
instructions carefully.
2. Connect the gas hose to the barbecue. Connect the
regulator to the hose.
3. Connect the regulator to the cylinder valve following the
regulator instructions supplied with the regulator.
4. Turn all of the control knobs to the ‘OFF’ position before
turning on the gas supply to the appliance.
5. Operate the regulator in accordance with the instructions
supplied with the regulator.
Get started:
1. Open the lid before lighting.
2. Turn all the control knobs to the ‘OFF’ position.
3. Connect the gas cylinder to the barbecue following the
instructions supplied with the regulator.
4. Turn ‘ON’ the gas supply at the cylinder or regulator
switch following the regulator connection and operating
instructions. Check the cylinder to regulator connection
and hose to barbecue hose inlet connection for leakage
using soapy water. Any leakage will show as bubbles
in the area of the leak. If leak is found, do not use the
barbecue. Consult your gas or barbecue supplier for
advice.
5. To light the burner, push down the control knob and turn
anti-clockwise to the “Full rate” position. This will light the
burner. If the burner does not light, repeat this process.
6. If the burner has not lit after two attempts, turn ‘OFF’ the
gas tap and wait 5 minutes before retrying the ignition
sequence.
7. When the burner has lit, the burner rate can be adjusted
by push down and turn the knob anti-clockwise to any
position between the full and low rate position.
8. To turn ‘OFF’ the barbecue, turn the cylinder valve
handle or regulator switch to the ‘OFF’ position by
following the regulator instructions. Once the burners
have extinguished turn all the control knobs to the ‘OFF’
position.
Warning: If any burner fails to ignite, turn the control
knob off (clockwise) and also turn the cylinder valve off.
Wait five minutes before attempting to relight with ignition
sequence.
9. After use, close the gas supply by either turning ‘OFF’
the switch on the regulator or turning ‘OFF’ the cylinder
valve.
10. In the event of light back whilst the appliance is in use.
Turn all the controls, cylinder valve and regulator switch
to the ‘OFF’ position. Wait 5 minutes before attempting
to relight the appliance. If the problem persists after
relighting, consult your gas dealer, or the store where
you purchased the barbecue, or a qualified gas engineer
for assistance or repair. Never try to rectify the problem
yourself as this could result in serious injury and/or
property damage.

English8
Side burner lighting instructions
1. Once the grill burner has been lit, the side burner can be
lit by following the instructions below.
2. Open the side burner lid before lighting the side burner
and turn the side burner control knob to the ‘O’ position.
3. Push down the side burner control knob and keep
pressing whilst turning anti-clockwise to the full rate
position, an audible click will be heard, this will light the
burner. If the burner does not light, repeat this process.
4. If the burner has not lit after two attempts, turn OFF the
gas tap, wait 5 minutes and then repeat step 3 in main
burner lighting instructions.
5. When the burner has lit, the burner rate can be adjusted
by pushing down and turning the knob anti-clockwise to
any position between the full and low rate position.
6. To turn the barbecue side burner off, turn the cylinder
valve or regulator switch to the ‘O’ position and then turn
all of the control knobs on the barbecue clockwise to the
‘O’ position untill the flames have been extinguished
Warning: If the burner fails to ignite, turn the control knob
to the ‘O’ position (clockwise) and also turn the cylinder
valve off. Wait five minutes before attempting to relight
with ignition sequence.
Connecting the gas cylinder to the appliance
´This appliance is only suitable for use with low-pressure
butane or propane gas and fitted with the appropriate
low-pressure regulator via a flexible hose. The hose
should be secured to the regulator and the appliance
with hose clips/nuts. This barbecue is set to operate a 28
mbar regulator with butane gas, and a 37mbar regulator
with propane gas, and a regulator with butane/propane
mixture at 37mbar, and a regulator with butane/propane
mixture at 50mbar and a regulator with butane/propane
mixture at 30mbar. Use a suitable regulator certified to
BSEN 16129: 2013. Please consult your LPG dealer
for information regarding a suitable regulator for the gas
cylinder.
To check for leaks
´Before use please check for leakage! Never check for
leaks with a naked flame, always use a soapy water
solution.
1. Make 2-3 fluid ounces of leak detecting solution by
mixing one part washing up liquid with 3 parts water.
2. Ensure the control valve is “OFF”.
3. Connect the regulator to the cylinder and ON/OFF valve
to the burner, ensure the connections are secure then
turn ON the gas.
4. Brush the soapy solution on to the hose and all joints. If
bubbles appear you have a leak, which must be rectified
before use.
5. Retest after fixing the fault. Turn OFF the gas at the
cylinder after testing.
6. If detected leakage can not be rectified, do not attempt to
cure leakage but consult your gas dealer.
Operation
9English
Regulator and hose
1. Use only regulators and hose approved for LPG at the
above pressures. The life expectancy of the regulator
is estimated as 10 years. It is recommended that the
regulator is changed within 10 years of the date of
manufacture.
Note: Take care of the blockage of the Venturi or
Venturis.
2. The use of the wrong regulator or hose is unsafe; always
check that you have the correct items before operating
the barbecue.
3. The hose used must conform to the relevant standard
for the country of use. The length of the hose must be
1.5 meters (maximum). Worn or damaged hose must be
replaced. Ensure that the hose is not obstructed, kinked,
or in contact with any part of the barbecue other than at
its connection.
4. The hose should not be twisted or kinked when attached
to the gas cylinder.
5. No part of the hose should touch any part of the
appliance.
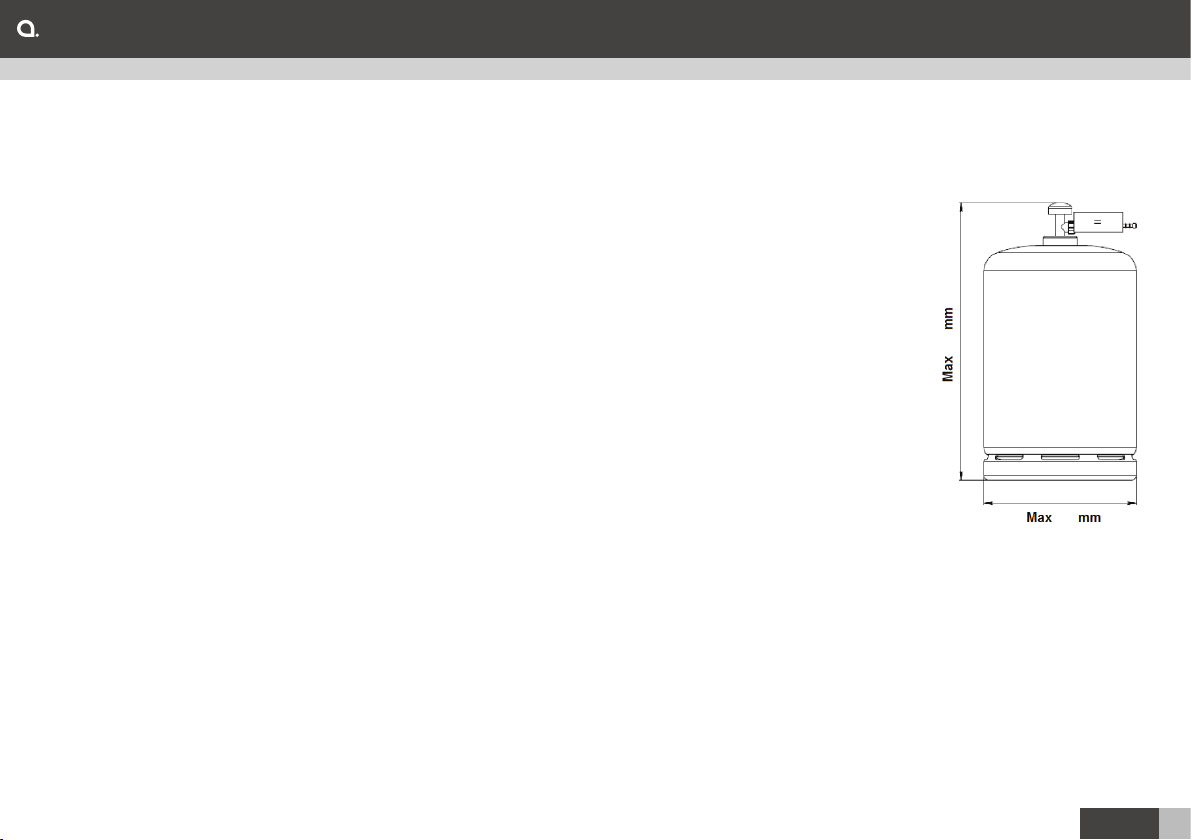
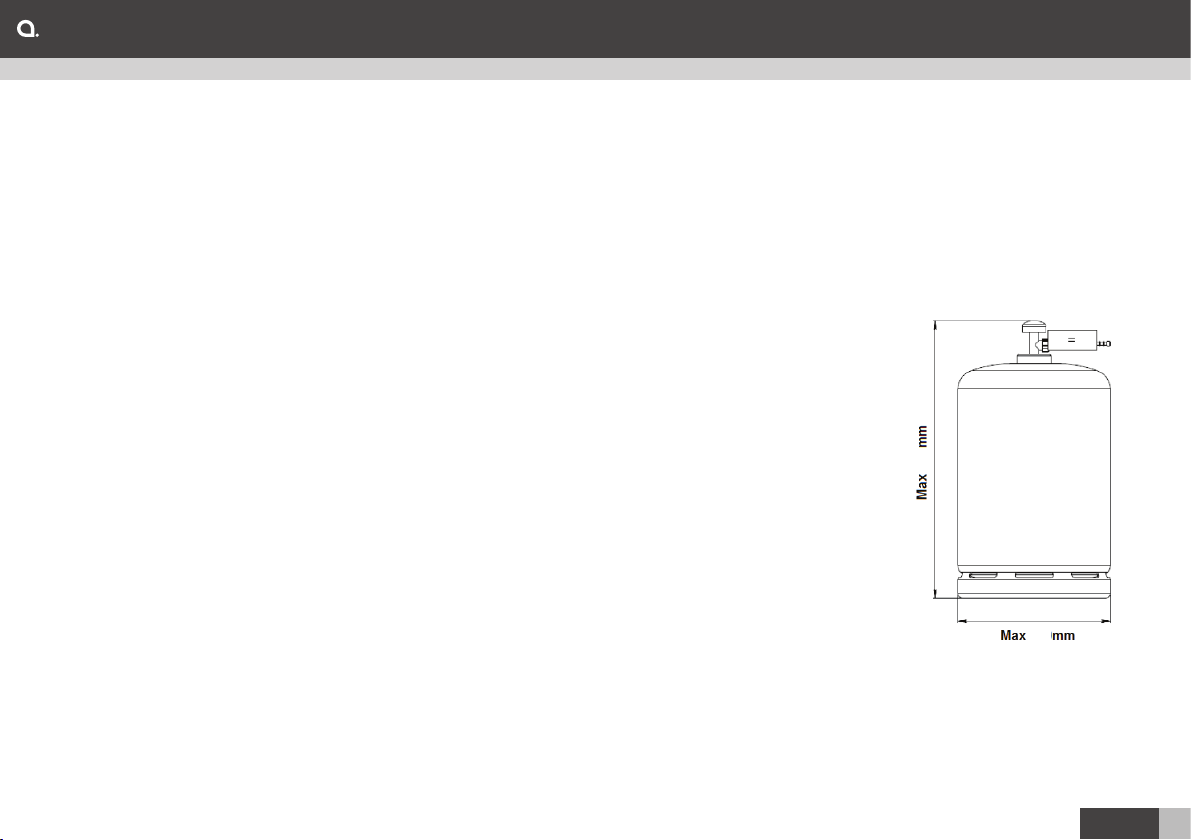
Gas cylinder
1. The appliance can be used with any gas cylinder of
weights between 4.5KGS and 15 KGS butane and 3.9
KGS to 13 KGS propane. The
gas cylinder should not be
dropped or handled roughly! If
the appliance is not in use, the
cylinder must be disconnected.
Replace the protective cap on
the cylinder after disconnecting
the cylinder from the appliance.
Warning: Close the valve on the
gas cylinder if you smell gas.
2. Cylinders must be stored
outdoors in an upright position
and out of the reach of children.
The cylinder must never be
stored where temperatures can
reach over 50oC.
Note: The gas cylinder is not allowed to be placed behind
the barbecue doors.
3. Do not store the cylinder near flames, pilot lights or other
sources of ignition. DO NOT SMOKE.
Operation
310
500

English10
Cleaning and Storage
´Caution: All cleaning and maintenance should be carried
out when the barbecue is cool and with the fuel supply
turned OFF at the gas cylinder.
1. Cleaning
“Burning off” the barbecue after every use (for approx 15
minutes) will keep excessive food residue to a minimum.
2. Outside surface
Use mild detergent or baking soda and hot water
solution. Non-abrasive scouring powder can be used on
stubborn stains, then rinse with water.
If the inside surface of the barbecue lid has the
appearance of pealing paint, baked on grease build up
has turned to carbon and is flaking off. Clean thoroughly
with strong hot soapy water solution. Rinse with water
and allow to completely dry. NEVER USE OVEN
CLEANER.
3. Interior of barbecue bottom
Remove residue using brush, scraper and/or cleaning
pad then wash with a soapy water solution. Rinse with
water and allow dry it.
4. Plastic surfaces
Wash with a soft cloth and hot soapy water solution.
Rinse with water. Do not use abrasive cleaners,
degreasers or a concentrated barbecue cleaner on
plastic parts.
5. Cooking Grid
Use a mild soapy water solution. Non-abrasive scouring
powder can be used on stubborn stains, then rinse with
water.
6. Grease tray and grease cup
Please do not open the grease tray/cup during use.
Please check the grease tray/cup on time and take away
the oil when 1/3 full.
Method: after the grease tray/cup cold, make grease
tray/cup up in horizontal line and move it with hook
reverse horizontally, this could take out the grease tray/
cup.
7. Cleaning the burner assembly
Turn the gas OFF at the control knob and disconnect the
cylinder.
Remove cooling grate.
Clean the burner with a soft brush or blow clean with
compressed air and wipe with a cloth.
Clean any clogged ports with a pipe cleaner or stiff wire
(such as an opened paper clip).
Inspect burner for any damage (cracks or holes). If
damage is found, replace with a new burner. Reinstall
the burner, check to ensure that the gas valve orifices are
correctly positioned and secured inside the burner inlet
(venturi).
In some cases your barbecue will light back because of
an insect crawling inside the burner venturi or a spider
spinning its web inside the burner. This can be rectified
by using a bottle brush inserted through the burner
venturi and pushing it into the burner over the burner
Maintenance
11English
length. If condition persists consult your gas dealer.
8. Storage of the appliance
Storage of an appliance indoors is only permissible
if the cylinder is disconnected and removed from the
appliance. When the appliance is not to be used for a
period of time it should be stored in its original packaging
in a dry dust free environment.
Do not store your gas cylinder indoors. Store in a well
ventilated area away from direct sunlight.
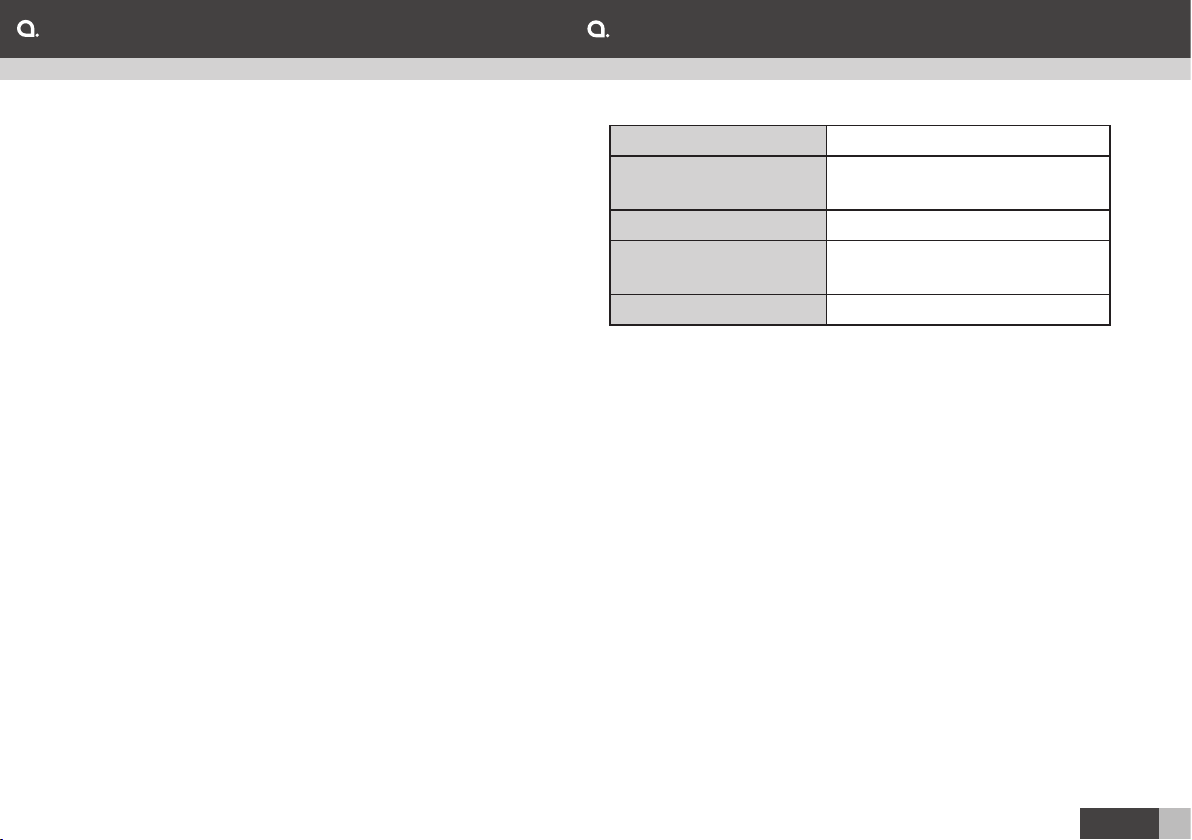
Product name AABQ 3.0
Power supply Main burner: 3,6kW x 4
Side burner: 2.15 kW
Cooking area 665 x 415 mm
Included in the
packaging
- 4 burner gas grill
- User manual
Dimensions 1330 x 580 x 1155 mm
Maintenance Specifications
English12
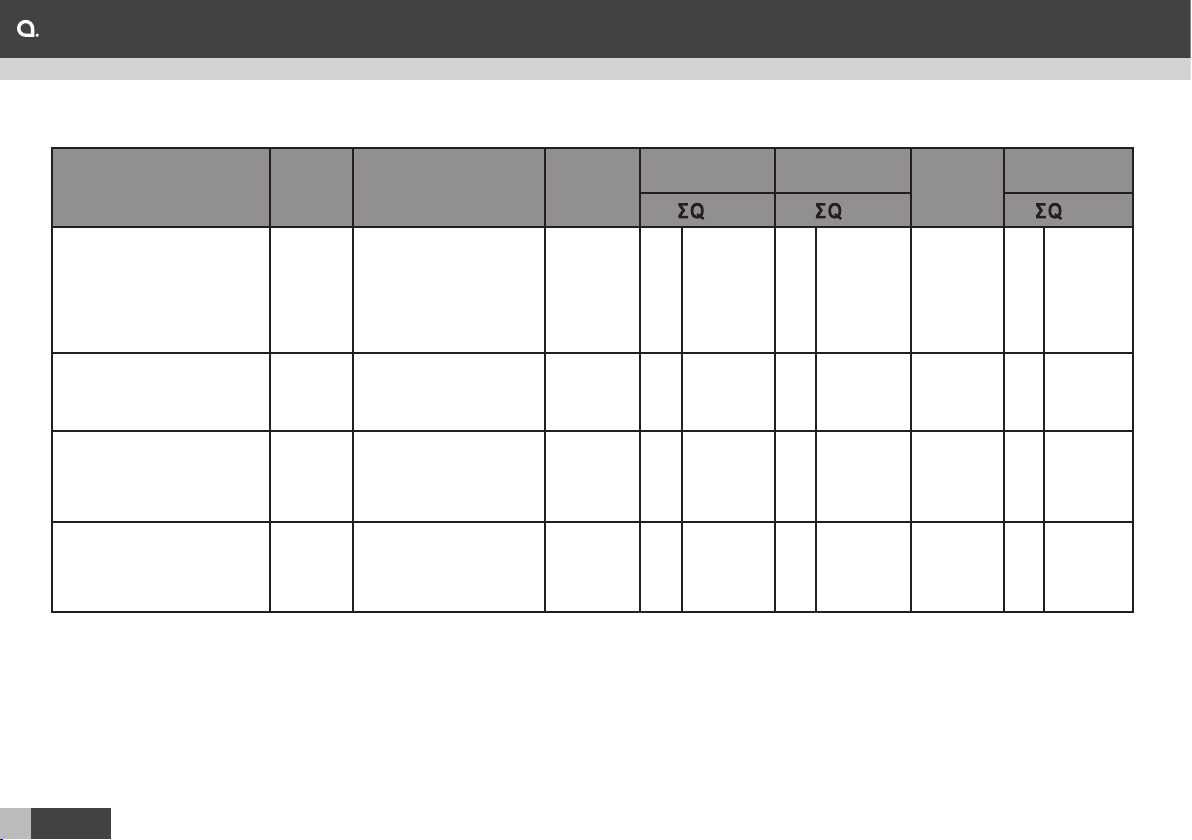
Technical information
Country CAT Pn Injector
size
Sydney 3 Sydney 4 Injector
size
Side burner
g/h g/h g/h
BE, CY, DK, EE, FI,FR,
HU, IT, LT, NL, NO,
SE, SI, SK, RO, HR,
TR, BG, IS, LU, MT,
CZ.
I3B/P Butane: 30 mbar
Propane: 30 mbar 0.92 mm 10.8 kW
786 g/h V14.4 kW
1048 g/h 0.7 mm V 2.15 kW
157 g/h
BE, CH, CY, CZ, ES,
FR, GB, GR, IE, IT, LT,
LU, LV, PT, SK, SI.
I3+Butane: 28-30 mbar
Propane: 37 mbar 0.92 mm 9 kW
655 g/h V12kW
874 g/h 0.7 mm V 2.15 kW
157 g/h
AT, CH, DE, SK, CZ.
I3B/P Butane: 50 mbar
Propane: 50 mbar 0.82 mm 9 kW
655 g/h V12kW
874 g/h 0.6 mm V 2.15 kW
157 g/h
PL
I3B/P Butane: 37 mbar
Propane: 37 mbar 0.88 mm 9 kW
655 g/h
12kW
874 g/h 0.68 mm 2.15 kW
157 g/h
Specification

13English
Copyright:
This manual is the copyright of CI no 556520-4137. No part
of this manual may be revised, copied or transmitted in any
way without written permission from CI no 556520-4137.
Recycling:
This product’s packaging materials are recyclable and
can be reused. This product and the accessories
packed together are the applicable product to the
WEEE directive except batteries. Please dispose of
any materials in accordance with your local recycling
regulations.
Batteries should never be thrown away or incinerated
but disposed of in accordance with your local regulations
concerning chemical wastes.
Law and Safety:
The CE mark indicates that this
product has been manufactured
according to current regulations
for electromagnetic fields, which means that it is safe to
use if used according to safety instructions. The product is
manufactured according to current regulations within the
EU legislation, limiting the use of hazardous substances in
electrical and electronic equipment.
Statement:
This manual does not provide any warranty or related
declarations. All information in this manual including the
product specification, pictures and literatures is just for
reference, CI no 556520-4137 reserves the rights to update
contents of this manual without further notice.
Other

Svenska14
Säkerhetsinstruktioner
VARNING::
FÖR DIN SÄKERHET
ENDAST FÖR UTOMHUSBRUK
´Läs instruktionerna innan du använder
utrustningen.
´Endast för utomhusbruk.
´Varning! Åtkomliga delar på grillen kan vara
mycket heta. Håll barn på behörigt avstånd.
´Flytta inte utrustningen under användning.
´Spara instruktionerna för framtida referens.
´Stäng av gastillförseln på gasflaskan efter
användning.
´Håll denna grill på avstånd från alla
lättantändliga material under användning.
´Tänd aldrig grillen med stängt lock.
´Utrustningen och gasflaskan ska placeras på
ett plant underlag och får inte flyttas när den är
tänd.
´Byte av gasflaska ska utföras på avstånd från
alla antändningskällor.
´Det rekommenderas att använda
skyddshandskar vid hatering av särskilt heta
delar.
´Delar förseglade av tillverkaren eller dennes
representant får inte manipuleras av
användaren.
´Se till att grillen endast används vid det tryck
som utrustningen är avsedd för.
´Hjulen har monterats på denna enhet för enkel
manövrering.
´Mat kan grillas på grillgallret, antingen med
locket stängt eller öppet. När locket är stängt i
5 minuter, måste locket öppnas i minst 1 minut
för att släppa ut värme.
´Med en fettuppsamlare under höljet.
´Tillräcklig ventilation är nödvändig för grillens
förbränning och effektiva prestanda. Detta
garanterar säkerheten för användaren och
andra personer i närheten där utrustningen
används. Använd aldrig utrustningen i
avgränsade, övertäckta områden.
´När vindhastigheten är mer än 2 m/s, använd
inte gasgrillen vänd mot vinden.
´Ändringar på utrustningen kan vara farliga
och kan leda till personskador eller materiella
skador.
´Alla otillåtna ändringar på utrustningen
upphäver garantin på denna utrustning.
´Utrustningen får inte ha några överhängande

15Svenska
Säkerhetsinstruktioner
hinder. T.ex. träd, buskar, tak. Utrustningen
måste installeras med ett avstånd på 1 m runt
utrustningen.
´Utrustningen får inte användas i närheten
av lättantändliga material. (Bensinbaserade
produkter, förtunningsmedel eller andra fasta
föremål som har en brännbar varningsetikett.)
´Användningen av denna utrustning i
begränsade utrymmen kan vara farlig och är
förbjuden.
´Undvik fukt kring det brandbeständiga
materialet.

Svenska16
Översikt
1. Lock
2. Termometer
3. Grillgaller
4. Sidohylla
5. Vred
6. Hjul
7. Dörr
8. Sidobrännare
9. Sidobrännarreglage
10. Öppnare
11. Krok
8
5
2
1
6
4
7
3
11 9
10

17Svenska
Användning
Innan användning:
1. Montera grillen genom att följa monteringsanvisningarna
noggrant.
2. Anslut gasslangen till grillen. Anslut regulatorn till slangen.
3. Anslut regulatorn till flaskventilen genom att följa
regulatoranvisningarna som kom med regulatorn.
4. Vrid alla kontrollvred till läge ”OFF” (AV) innan du öppnar
gastillförseln till utrustningen.
5. Använd regulatorn enligt instruktionerna som kom med
regulatorn.
Komma igång:
1. Öppna locket innan du tänder.
2. Sätt alla kontrollvreden i läget ”OFF” (AV).
3. Anslut gasflaskan till grillen genom att följa anvisningarna
som kom med regulatorn.
4. Slå på gastillförseln på gasflaskan eller med regulatorn
efter regulatoranslutning och enligt bruksanvisningen.
Kontrollera om anslutningen mellan gasflaska och
regulator samt inloppsanslutningen till grillen läcker med
såpvatten. Läckage visas som bubblor i området för
läckan. Vid läckage, använd inte grillen. Rådgör med gas-
eller grillåterförsäljaren för råd.
5. För att tända brännaren, tryck in kontrollvredet och vrid
moturs till läget ”Full rate” (Helt öppet). Detta tänder
brännaren. Om brännaren inte tänds, upprepa denna
process.
6. Om brännaren inte har tänts efter två försök, stäng av
(”OFF”) gaskranen och vänta 5 minuter innan du försöker
tända igen.
7. När brännaren har tänts, kan brännarens flöde justeras
genom att trycka in och vrida reglaget moturs för till ett
läge mellan helt öppet och nästan stängt läge.
8. För att stänga av grillen, vrid flaskventilen eller
regulatorbrytaren till läge ”OFF” (AV) genom att följa
regulatoranvisningarna. När brännarna har släckts, vrid
alla reglage till läge ”OFF” (AV).
Varning: Om någon brännare inte tänds, vrid
kontrollvredet till ”OFF” (AV) (medurs) och stäng även av
flaskventilen. Vänta fem minuter innan du försöker tända
brännaren igen med tändningssekvensen.
9. Efter användning, stänga av gastillförseln antingen genom
stänga av (”OFF”) omkopplaren på regulatorn eller genom
att vrida flaskventilen till läge ”OFF” (AV).
10. Vid problem när utrustning används. Vrid alla
kontrollvred, flaskventilen och regulatoromkopplaren
till läge ”OFF” (AV). Vänta 5 minuter innan du försöker
tända utrustningen igen. Om problemet kvarstår efter
omtändning, rådgör med gasåterförsäljaren eller butiken
där du köpte grillen, eller behörig gastekniker för hjälp
eller reparation. Försök aldrig att rätta till problemet själv
då detta kan leda till allvarliga personskador och/eller
materiella skador.

Svenska18
Tändanvisningar sidobrännare
1. När grillbrännaren har tänts, kan sidobrännare tändas
genom att följa instruktionerna nedan.
2. Öppna sidobrännarens lock innan du tänder
sidobrännaren och vrid sidobrännarreglaget till läge ”O”.
3. Tryck in sidobrännarreglaget och håll det intryckt
samtidigt som du vrider det moturs till helt öppet läget.
Ett klick hörs, detta tänder brännaren. Om brännaren inte
tänds, upprepa denna process.
4. Om brännaren inte har tänts efter två försök, stäng AV
gaskranen, vänta 5 minuter och upprepa sedan steg 3 i
huvudbrännarens tändanvisningar.
5. När brännaren har tänts, kan brännarens flöde justeras
genom att trycka in och vrida reglaget moturs för till ett
läge mellan helt öppet och nästan stängt läge.
6. För att stänga av grillens sidobrännare, vrid gasventil
eller regulator till läge ”O” och vrid alla reglage på grillen
medurs till läge ”O” tills lågorna har släckts
Varning! Om brännaren inte tänds, vrid reglaget till läge
”O” (medurs) och stäng även av flaskventilen. Vänta 5
minuter innan du försöker tända brännaren igen med
tändsekvensen.
Ansluta gasflaskan till utrustningen:
´Denna utrustning är endast avsedd för användning
med butan- eller propangas med lågt tryck och som är
försedd med lämpliga lågtrycksregulator via en flexibel
slang. Slangen bör fästas till regulatorn och utrustningen
med slangklämmor/muttrar. Denna grill är avsedd att
fungera med en 28 mbar regulator med butangas och en
37 mbar regulator med propangas och en regulator med
en butan-/propanbladning vid 37 mbar och en regulator
med en butan-/probanblandning vid 50 mbar och en
regulator med butan-/propanblandning vid 30 mbar.
Använd en lämplig regulator som certifierats enligt SS-EN
16129: 2013. Rådgör med din gasleverantör angående
en lämplig regulator till gascylindern.
För att leta efter läckor:
´Kontrollera om utrustningen läcker innan användning!
Leta aldrig efter läckor med en öppen låga. Använd alltid
en såpvattenlösning.
1. Gör iordning läckdetekteringslösning genom att blanda
en del diskmedel med 3 delar vatten.
2. Se till att kontrollventilen är i läge ”OFF” (AV).
3. Anslut regulatorn till gasflaskan och ”ON/OFF”-ventilen
(PÅ/AV) till brännaren, se till att anslutningarna är säkra
och slå sedan på gasen.
4. Borsta såpvattenlösning på slangen och alla skarvar. Om
bubblor bildas, har du ett läckage, som måste åtgärdas
Användning
19Svenska
innan användning.
5. Testa igen efter att felet har åtgärdats. Stäng av
gastillförseln på gasflaskan efter test.
6. Om det upptäckta läckaget inte kan åtgärdas, försök inte
att fixa läckaget. Kontakta i stället gasåtförsäljaren.
Regulator och slang:
1. Använd endast regulatorer och slang som godkänts för
LPG vid ovanstående tryck (se sidan 2). Regulatorns
förväntade livslängd är 10 år. Det rekommenderas att
regulatorn byts inom 10 år från tillverkningsdatumet.
Obs! Ta hand om blockeringen av Venturi eller Venturis.
2. Användningen av fel regulator eller slang är osäker;
kontrollera alltid att du har rätt saker innan du använder
grillen.
3. Slangen som används måste överensstämma med aktuell
standard i användningslandet. Slangens längd måste
vara 1,5 meter (max.). En sliten eller skadad slang måste
bytas ut. Se till att slangen inte är blockerad, knäckt eller
är i kontakt med någon del av grillen annat än vid dess
anslutning.
4. Slangen får inte vriden eller knäckt när den ansluts till
gasflaskan.
5. Ingen del av slangen får nudda vid någon del av
utrustningen.
Gasflaska:
1. Utrustningen kan användas med valfri gasflaska som
väger mellan 4,5 kg och 15 kg butan och 3,9 kg till 13
kg propan. Gasflaskan får inte tappas eller hanteras
ovarsamt! När utrustningen inte används, ska gasflaskan
kopplas från. Sätt tillbaka skyddslocket på flaskan efter
frånkoppling från utrustningen.
Varning! Stäng ventilen på gasflaskan om du känner
lukten av gas.
2. Gasflaskor måste förvaras
utomhus i ett upprätt läge
och oåtkomligt för barn.
Flaskan får aldrig förvaras på
platser där temperaturen kan
bli högre än 50 oC.
Obs! Gasflaskan får inte
placeras bakom grilldörrarna.
3. Förvara inte gasflaskan i
närheten av lågor, tändlågor
eller andra antändningskällor.
RÖK INTE.
Användning
310
500

Svenska20
Rengöring och förvaring:
´Försiktig! Allt rengörings- och underhållsarbete ska
utföras när grillen är kall och när bränsletillförseln är
avstängd på gasflaskan.
1. Rengöring
Genom att ”bränna av” grillen efter varje användning (i ca
15 minuter) hålls överblivna matrester till ett minimum.
2. Utsida
Använd ett milt rengöringsmedel eller bakpulver och
varmt vatten. Icke-slipande skurpulver kan användas på
envisa fläckar. Skölj sedan med vatten.
Om grillockets insida ser ut att flaga färg, har fastbränt
fett byggts på och omvandlats till kol och flagar bort.
Rengör ordentligt med starkt, hett såpvatten. Skölj
med vatten och låt torka helt. ANVÄND ALDRIG
UGNSRENGÖRARE
3. Grillbottens insida
Ta bort rester med en borste, skrapa och/eller
rengöringssvamp. Tvätta sedan med såpvatten. Skölj
med vatten och låt torka.
4. Plastytor
Tvätta med en mjuk trasa och hett såpvatten. Skölj
med vatten. Använd inte slipande rengöringsmedel,
avfettningsmedel eller ett koncentrerad
grillrengöringsmedel på plastdelar.
5. Grillgaller
Använd milt såpvatten. Icke-slipande skurpulver kan
användas på envisa fläckar. Skölj sedan med vatten.
6. Fettuppsamlare
Öppna inte fettuppsamlaren under användning.
Kontrollera fettuppsamlaren i tid och töm oljan när den är
1/3 full.
Gör så här: när fettuppsamlare har kallnat, ta upp den
horisontellt och flytta den med kroken vänd horisontellt.
7. Rengöring av brännarenheten
Stäng av gasen med kontrollvredet och koppla från
flaskan.
Ta bort brännargallret.
Rengör brännaren med en mjuk borste eller blås ren med
tryckluft och torka med en trasa.
Rengör tilltäppta portar med en piprensare eller styv tråd
(som ett utdraget gem).
Kontrollera om brännaren är skadad (sprickor eller hål).
Vid skador, byt mot en ny brännare. Installera brännaren,
se till att gasventilöppningarna är rätt placerade och
säkrade i brännarens inlopp (venturirör).
I vissa fall kan din grill tändas för att en insekt har
krupit in i brännarens venturirör eller en spindel har
vävt sitt nät i brännaren. Detta kan åtgärdas genom att
använda en flaskborste genom venturiröret och trycka
in den i brännaren hela brännarens längd. Rådgör med
gasåterförsäljaren om det inte blir bättre.
8. Förvaring av utrustningen
Förvaring av utrustningen inomhus är endast tillåten
om gasflaskan är frånkopplad och avlägsnad från
utrustningen. När utrustningen inte kommer att
Vedlikehold
Table of contents
Languages:
Other AUSTIN AND BARBEQUE Grill manuals

Popular Grill manuals by other brands

Fieldmann
Fieldmann FZG 3005 manual

Louisiana Grills
Louisiana Grills Founders Legacy Series owner's manual

Kenmore
Kenmore 146.23678310 Use & care guide

Kuppersbusch
Kuppersbusch VKEL3800.0 Instructions for use and installation

NORDIC SEASON
NORDIC SEASON CUSTER GG501799 Assembly, use and instruction manual

euron
euron FH824103-1 owner's manual


