euron FH824103-1 User manual

OWNER'S MANUAL
GAS BARBECUE
USE ONLY THE HOSE AND HOSE CONNECTOR PROVIDED!
If a replacement is necessary, please contact either our Customer Service
Department or your local dealer.
The use of unauthorised parts can create unsafe conditions and
environment.

1
APPLIANCE CODE: FH824103-1
TOTAL HEAT INPUT:
(ALL GAS CATEGORIES) 15.50 KW (1106 g/h)
GAS CATEGORY: I3+(28-30/37) I3B/P(30)
TYPES OF GAS: Butane Propane LPG GAS MIXTURES
IDENTIFICATION CODE: 359BT848
SERIAL NUMBER
DATE CODE Appliance code-08-0000000
FOR USE OUTDOORS AND IN WELL VENTILATED AREAS
WARNING: ACCESSIBLE PARTS MAY BE VERY HOT.
KEEP YOUNG CHILDREN AWAY
READ THE INSTRUCTION LITERATURE BEFORE USING THE APPLIANCE.
Close the valve of the gas cylinder or the regulator after use.
The use of this appliance in enclosed areas can be dangerous and is PROHIBITED.
Ignition:1.5 Volt battery operated multi spark ignition unit to both burners
GAS PRESSURE: 28-30 mbar 37 mbar 30 mbar
0.85 mm for grill 0.85 mm for grill
0.89 mm for side burner 0.89 mm for side burner
INJECTOR SIZE:
1.Open the hood before attempting to light the grill before
11.Put the heat distribution plates, cooking grills and warming rack inside the
right place of the grill body in turn. Then put the side burner grate inside
the right side table panel.
12.Make the grease tray install the back of the grill body. Then install the battery into
the button of ignition .After completing all the assembly stages your barbecue is
ready for use.
14

2
IMPORTANT:
Read the following instructions carefully and be sure your barbecue is properly installed,
assembled and cared for. Failure to follow these instructions may result in serious bodily
injury and/or property damage.
If you have any questions concerning assembly or operation, consult your dealer or LPG
Gas Company.
When used always place the appliance and cylinder on flat level ground.
Your barbecue can be used on gas cylinders between 11kg and 15 kg. Your barbecue will
perform better if propane or LPG mixtures are used. Butane can be used but because of
the rate of the appliance the cylinder will tend to freeze and supply gas at reduced
pressures affecting the performance of your barbecue.
NOTE FOR CONSUMER: Retain for future Reference
CONNECTING THE GAS CYLINDER TO THE APPLIANCE
The cylinder must be sited to the rear of the left hand side of the appliance not under the
side burner. The cylinder must not be sited in the cabinet of the appliance. This appliance
is only suitable for use with low-pressure butane or propane gas or LPG mixtures, fitted
with the appropriate low-pressure regulator via a flexible hose. The hose should be
secured to the regulator and the appliance with hose clips. This barbecue is set to operate
a 28 mbar regulator with butane gas and a 37 mbar regulator with propane gas 30 mbar for
LPG mixtures or 50 mbar for LPG mixtures. Use a suitable regulator certified to BSEN
12864: 2001. Please consult your LPG dealer for information regarding a suitable
regulator for the gas cylinder.
Regulator and Hose
These items are available from your equipment retailer or an authorised LPG gas stockist.
Use only regulators and hose approved for LP Gas at the above pressures. The life
expectancy of the regulator is estimated as 10 years. It is recommended that it the
regulator is changed within 10 years of the date of manufacture.
The use of the wrong regulator or hose is unsafe; always check that you have the correct
items before operating the barbecue.
The hose used must conform to the relevant standard for the country of use. The
length of the hose must be 1.5 metres (maximum). Worn or damaged hose must be
replaced. Ensure that the hose is not obstructed, kinked, or in contact with any part
of the barbecue other than at its connection.
Storage of Appliance
Storage of an appliance indoors is only permissible if the cylinder is disconnected and
removed from the appliance. When the appliance is not to be used for a period of time it
should be stored in its original packaging and stored in a dry dust free environment.
2.Open the side burner lid before attempting to light the side burner
3.Saucepans between 15cm and 22cm must only be used on the side burner.
These saucepans must have flat bottoms.
Note:The vestige on the lid is the oil for protecting stainless steel,
you can use dry wiper to clean it.
13
9.Make the left and right side table front panels be installed.
10.Make the left and right side table front panels install in the grill body.

3
Gas Cylinder
The gas cylinder should not be dropped or handled roughly! If the appliance is not in use,
the cylinder must be disconnected. Replace the protective cap on the cylinder after
disconnecting the cylinder from the appliance.
Cylinders must be stored outdoors in an upright position and out of the reach of children.
The cylinder must never be stored where temperatures can reach over 50C. Do not store
the cylinder near flames, pilot lights or other sources of ignition. DO NOT SMOKE.
Position the cylinder as far away form the appliance on the right hand as possible without
stressing the hose.
This barbecue is designed for use outdoors, away from any flammable materials. It
is important that there are no overhead obstructions and that there is a minimum
distance of 1 m from the side or rear of the appliance. It is important that the
ventilation openings of the appliance are not obstructed. The barbecue must be
used on a level, stable surface. The appliance should be protected from direct draughts
and shall be positioned or protected against direct penetration by any trickling water (e.g.
rain).
Parts sealed by the manufacturer or his agent must not be altered by the user. No
modifications should be made to any part of this barbecue and repairs and
maintenance should only be carried out by a CORGI registered service engineer.
Connection to Appliance
Before connection, ensure that there is no debris caught in the head of the gas cylinder,
regulator, burner and burner ports. Spiders and insects can nest within and clog the
burner/venturi tube at the orifice. A clogged burner can lead to a fire beneath the
appliance.
Clean burner holes with a heavy-duty pipe cleaner.
Fit the hose to the appliance using a spanner to tighten it onto the connection thread. If
the hose is replaced it must be secured to the appliance and regulator connections with
hose clips. Disconnect the regulator from the cylinder (according to the directions
supplied with the regulator) when the barbecue is not in use.
The Barbecue must be used in a well ventilated area. Do not obstruct the flow of
combustion air to the burner when the barbecue is in use. ONLY USE THIS BARBECUE
OUTDOORS.
Never check for leaks with a naked flame,
always use a soapy water solution
BEFORE USE CHECK FOR LEAKS
12
7.Install the grill body bracket of the cart.
8.Install the grill body in the frame.

4
Checking the leakage before using!
1. Mix the liquid by 50% water and 50% soapy water. Tighten any junction in the gas
transmission channel.
2. Set all the control knobs to the "OFF" position.
3. Spread the mixed liquid on every junction.
4. Open the gas supply switch.
5. 5 minutes later checking junction if there is bubbles or not. Bubbles appeared on the
junction means the leakage occurs. Stop the gas supply and check the junction again.
6. Repeat checking by point 2 to point5 till no leakage is found before using the grill.
DO NOT use the grill if the leakage cannot be stopped. Contact a qualified gas appliance
repair service.
NOTE: The leakage test must be performed in an area that has adequate lighting in order to
see if bubbles are developing. DO NOT use a flashlight to check for bubbles.
LIGHTING THE MAIN BURNERS:
1. Open lid before lighting burner.
2. Make sure all control knobs are in the "OFF" position.
3. Select the burner to be lit. Push and turn the control knob of that burner to the "HIGH"
position.
4.Press and turn the control knob to "HIGH" to light burner.
5. If the burner does NOT occur in 5 seconds, turn control knob to "OFF", wait 5 minutes to
allow gas to dissipate and repeat lighting procedure.
6. Repeat Steps 3-5 for lighting each burner. Always use the control knob for lighting each
burner.
7. To turn off, turn each control knob clockwise until it locks in the "OFF" position. This does
not turn off the gas flow from the cylinder.
NOTE: If burner does not light or flame is too low, your may have spider or other insect
blockage in burner, or the flow limiting device has been activated. See "Burner
Assembly/Maintenance" under Proper Care and Maintenance, or "Regulator Resetting
Procedure" under Connecting LP Cylinder and Hose /Regulator to Grill.
MATCH LIGHTING THE MAIN BURNERS
1. Open lid before lighting.
2. Turn the burner control knobs "OFF"
3. Strike the match and place approximately 1/2" (1 to 2 cm) above lighting hole located on
right and left hand side of the grill body.
4. Turn right or left burner control knob to the HIGH position. The burner should light within
5 seconds.
5. If the burner does not light, turn the control knob to "OFF" and wait 5 minutes for gas to
evacuate the grill ,Repeat Steps 1 through 5 until the burner ignites.
6. Once lit, light adjacent burners in sequence by pressing in and rotating the control knob
to the "HIGH" position.
7. If the burner does not light within the first few attempts of match lighting ,there is a
problem with the gas supply ,turn off the gas at the burner and cylinder, DO NOT attempt
to operate the grill until the problem is found and corrected, See"Trouble
Shooting"section of this manual.
LIGHTING THE SIDE BURNER:
1. Open lid before lighting side burner.
2. Make sure control knob is in the "OFF" position.
3. Push and turn side burner control knob to the "HIGH" position.
4.Press and turn th control knob to "HIGH" to ligt buner.
5. If the buner does NOT occur in 5 seconds, turn control knob to "OFF", wait 5 minutes to
allow gas to dissipate and repeat lighting procedure.
6. To turn off, turn each control knob clockwise until it locks in the "OFF" position.
11
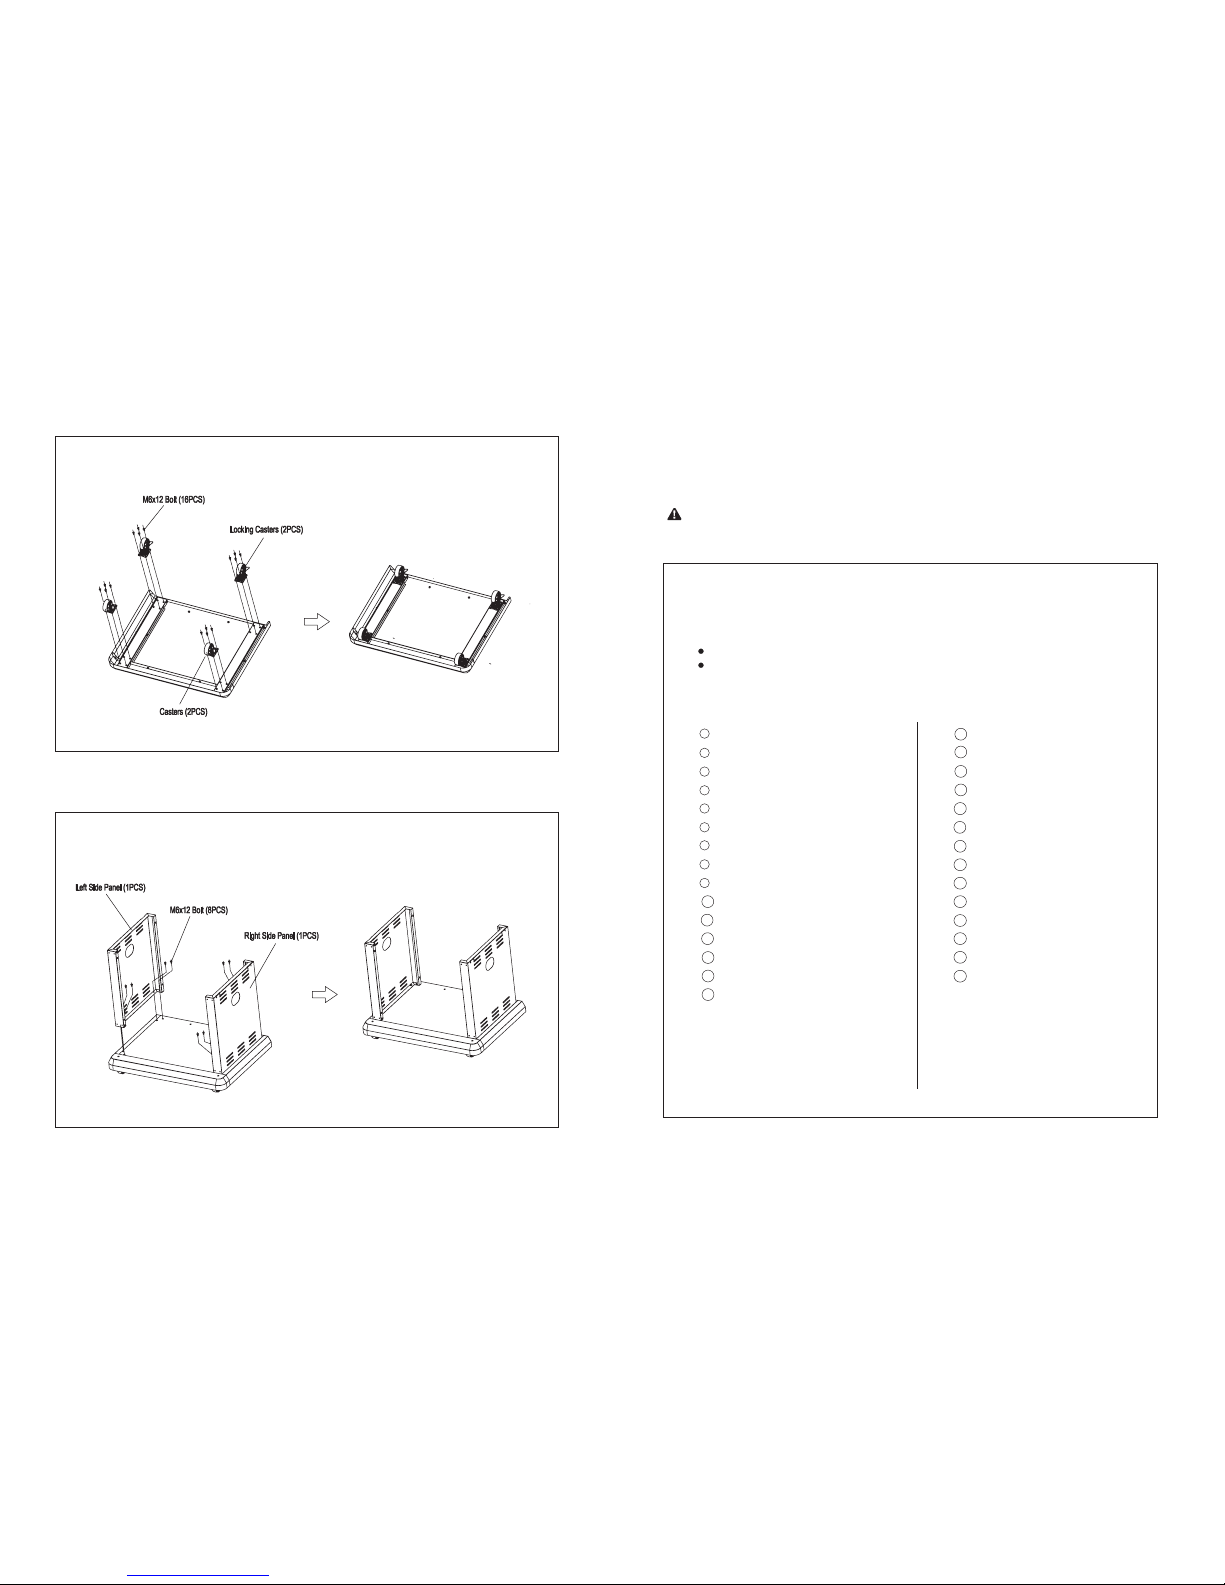
5.Install the door hinge.
6.Install the left and right hand doors.

5
NOTE: If burner does not light or flame is too Iow, you may have spider or other insect blockage in
burner, or the flow limiting device has been activated. See "Burner Assembly/Maintenance" under
Proper Care and Maintenance, or "Regulator Resetting Procedure" under Connecting LP Cylinder
and Hose/Regulator to Grill.
MATCH LIGHTING THE SIDE BURNER:
1. Open the lid to the side burner before lighting.
2. Make sure control knob is in the "OFF" position.
3. Strike and carefully place a match approximately 1/2" (1 to 2 cra) from the burner.
4. Turn the side burner control knob to the "HIGH" position. The burner should light immediately.
5. If the burner does not light, turn the control knob to "OFF" and wait 5 minutes for gas to dissipate
and repeat lighting procedure.
6. If the burner does not light within the first few attempts of match lighting, there is a problem with
the gas supply. Turn off the gas at the burner and cylinder. DO NOT attempt to operate the grill until
the problem is found and corrected. See "Trouble Shooting" section of this manual.
Warning: If the burner fails to ignite, turn the control knob off (clockwise) and also turn the cylinder
valve off. Wait five minutes before attempting to relight with ignition sequence.
CLEANING AND CARE
CAUTION: Open the lid.All cleaning and maintenance should be carried out when the
barbecue is cool and with the fuel supply turned OFF at the gas cylinder.
CLEANING
"Burning off" the barbecue after every use (for approx 15 minutes) will keep excessive food
residue to a minimum.
OUTSIDE SURFACE
Use mild detergent or baking soda and hot water solution. Non-abrasive scouring powder can be
used on stubborn stains, then rinse with water.
If the inside surface of the barbecue lid has the appearance of pealing paint, baked on grease build-
up has turned to carbon and is flaking off. Clean thoroughly with strong hot soapy water solution.
Rinse with water and allow to completely dry. NEVER USE OVEN CLEANER.
INTERIOR OF BARBECUE BOTTOM
Remove residue using brush, scraper and/or cleaning pad then wash with a soapy water solution.
Rinse with water and allow to dry.
WOODEN SURFACES
Wash with a soft cloth and hot soapy water solution. Rinse with water. Do not use abrasive
cleaners, degreasers or a concentrated barbecue cleaner on wooden parts.
COOKING GRID
Use a mild soapy water solution. Non-abrasive scouring power can be used on stubborn stains then
rinse with water.
CLEANING THE BURNER ASSEMBLY
Turn the gas OFF at the control knob and disconnect the cylinder.
Remove cooling grate.
Clean the burner with a soft brush or blow clean with compressed air and wipe with a cloth.
Clean any clogged ports with a pipe cleaner or stiff wire (such as an opened paper clip).
Inspect burner for any damage (cracks or holes). If damage is found, replace with a new burner.
Reinstall the burner, check to ensure that the Gas valve orifices are correctly positioned and secured
inside the burner inlet (venturi).
SERVICING
Your gas barbecue should be serviced annually by a competent registered person.
The drip tray must never be removed from the appliance whilst it is alight or hot. Wait for the
appliance to cool down completely before removing the drip tray. A fat fire or serious injury to
the user could result if the drip tray is removed whilst the appliance is alight.
10
3.Install the back panel of the frame.
4.Install the cart crossbeam and the magnet.

9
1.Turn over the frame and make two locking casters install in the back of the base panel.
Then make other two non-locking casters in the front of the base panel.
2.Turn over the base panel which had installed. Install the left and the right frames.
6
ASSEMBLY INSTRUCTIONS
READ ALL SAFETY WARNINGS & ASSEMBLY INSTRUCTIONS CAREFULLY
BEFORE ASSEMBLING OR OPERATING YOUR GRILL
WE RECOMMEND TWO PEOPLE WORK TOGETHER WHEN ASSEMBLING THIS UNIT.
The estimated time of assembly of this grill is approximately 45 minutes.
Flathead Screwdriver
Hex nut wrench
PARTS LIST:
1 1 Grill Body Assembly
2 1 Cooking plate
3 1 Cooking Grills
4 1 Warming Rack
5 4 Heat Distribution Plates
6 1 GreaseTray
7 1 Left Side Table Body Assembly
8 1 Left SideTable Front Panel
9 1 RightSide Table Body Assembly
10 1 RightSide Table Front Panel
11 1 Side Burner ControI Valve Assembly
12 1 Bezel Of Side Burner
13 1 Knob Of Side Bumer
14 1 Side Bumer Grate
15 1 Bottom CartPanel
16 2 Locking Casters
17 2 Casters
18 1 Left Side Upper Hinge
19 1 Left Side Lower Hinge
20 1 Right Side Upper Hinge
21 1 Right Side Lower Hinge
22 1 Left Side Door
23 1 Right Side Door
24 1 Left Side Panel
25 4 Bracket Of Cart
26 1 Right Side Panel
27 1 Back Panel
28 2 Cart Crossbeam
29 4 Nut Panel

7 8
(Proof of purchase will be required.)
Inspect contents of the box to ensure all parts are included and undamaged.
PARTS BAG CONTENTS
Make sure you have all items listed under PARTS LIST and PARTS BAG
CONTENTS before you begin the installation process.
PARTS BAG CONTENTS:
Table of contents
Popular Grill manuals by other brands

inventum
inventum MG630 instruction manual

Fritel
Fritel SG 2180 instruction manual

Kenmore
Kenmore 119.16126010 Use and care guide

Char-Broil
Char-Broil Patio Bistro 10601514 Assembly guide

Broil King
Broil King SSG-36 Installation instructions and owner's manual

Excel
Excel SASMX-100001-W8 instruction manual