Auto Vox M2 User manual
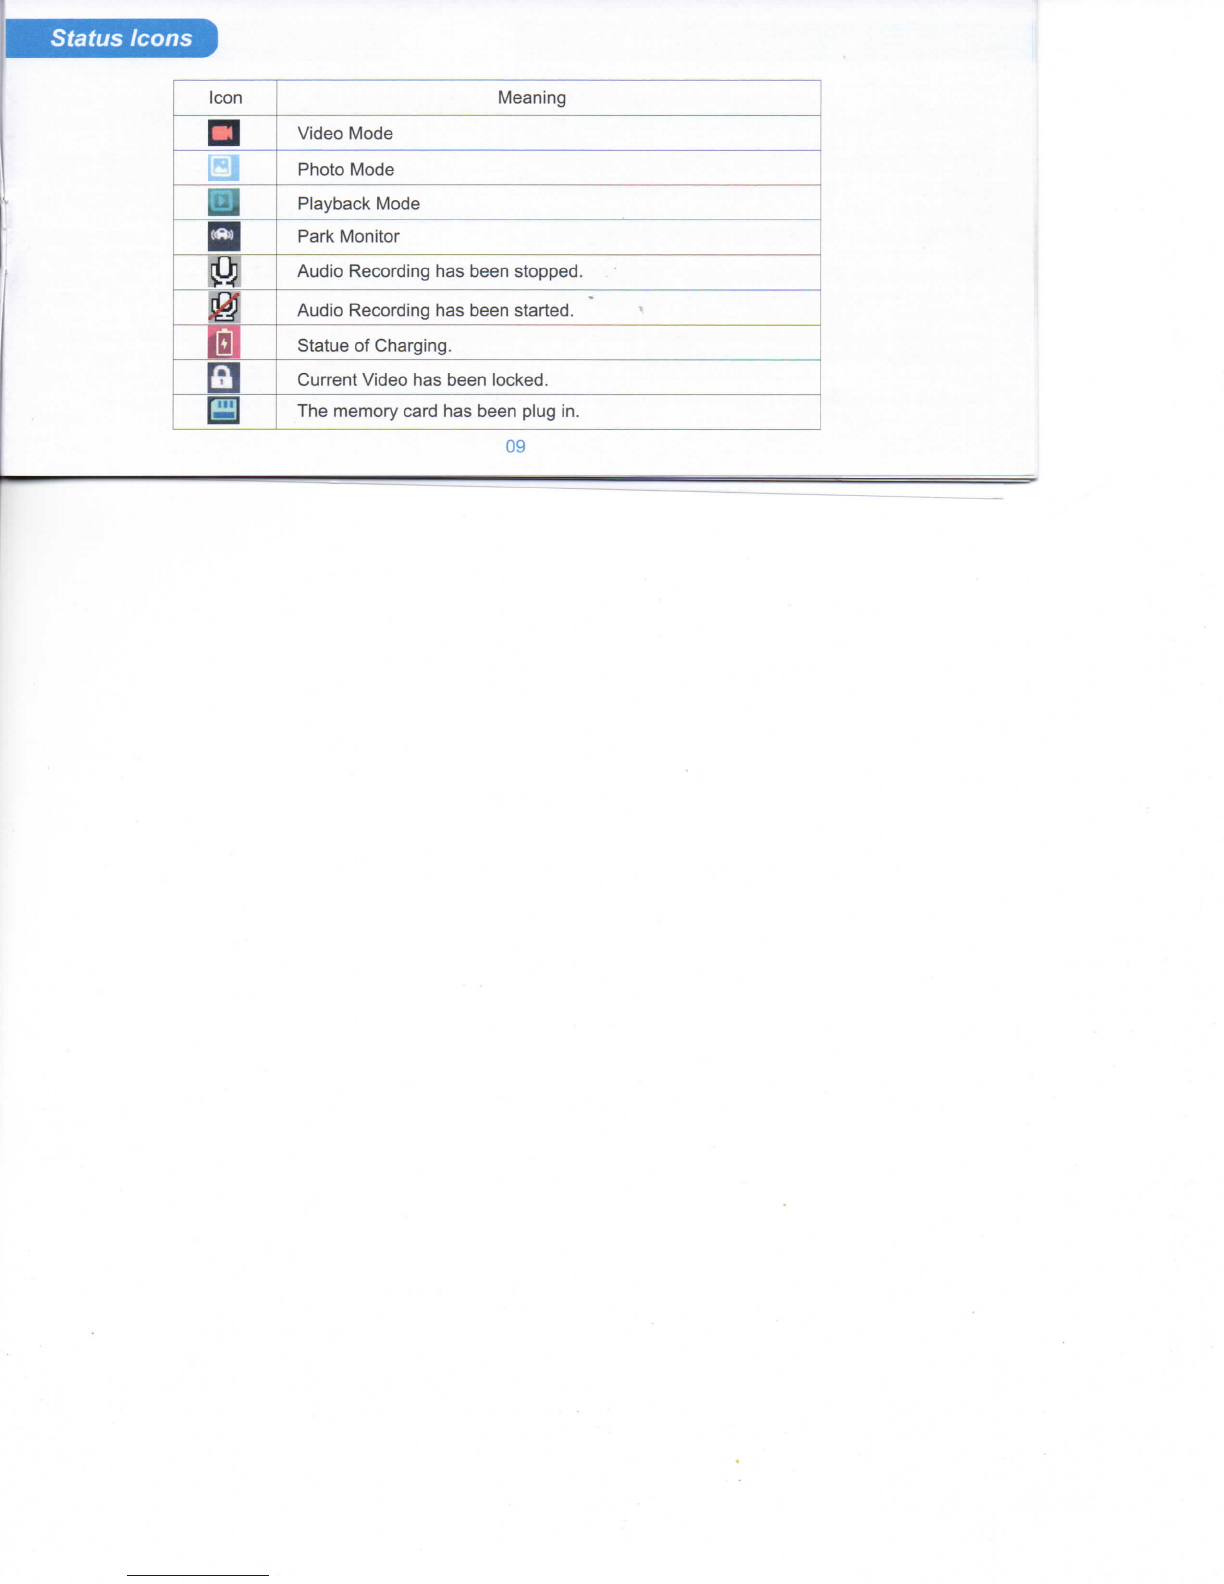
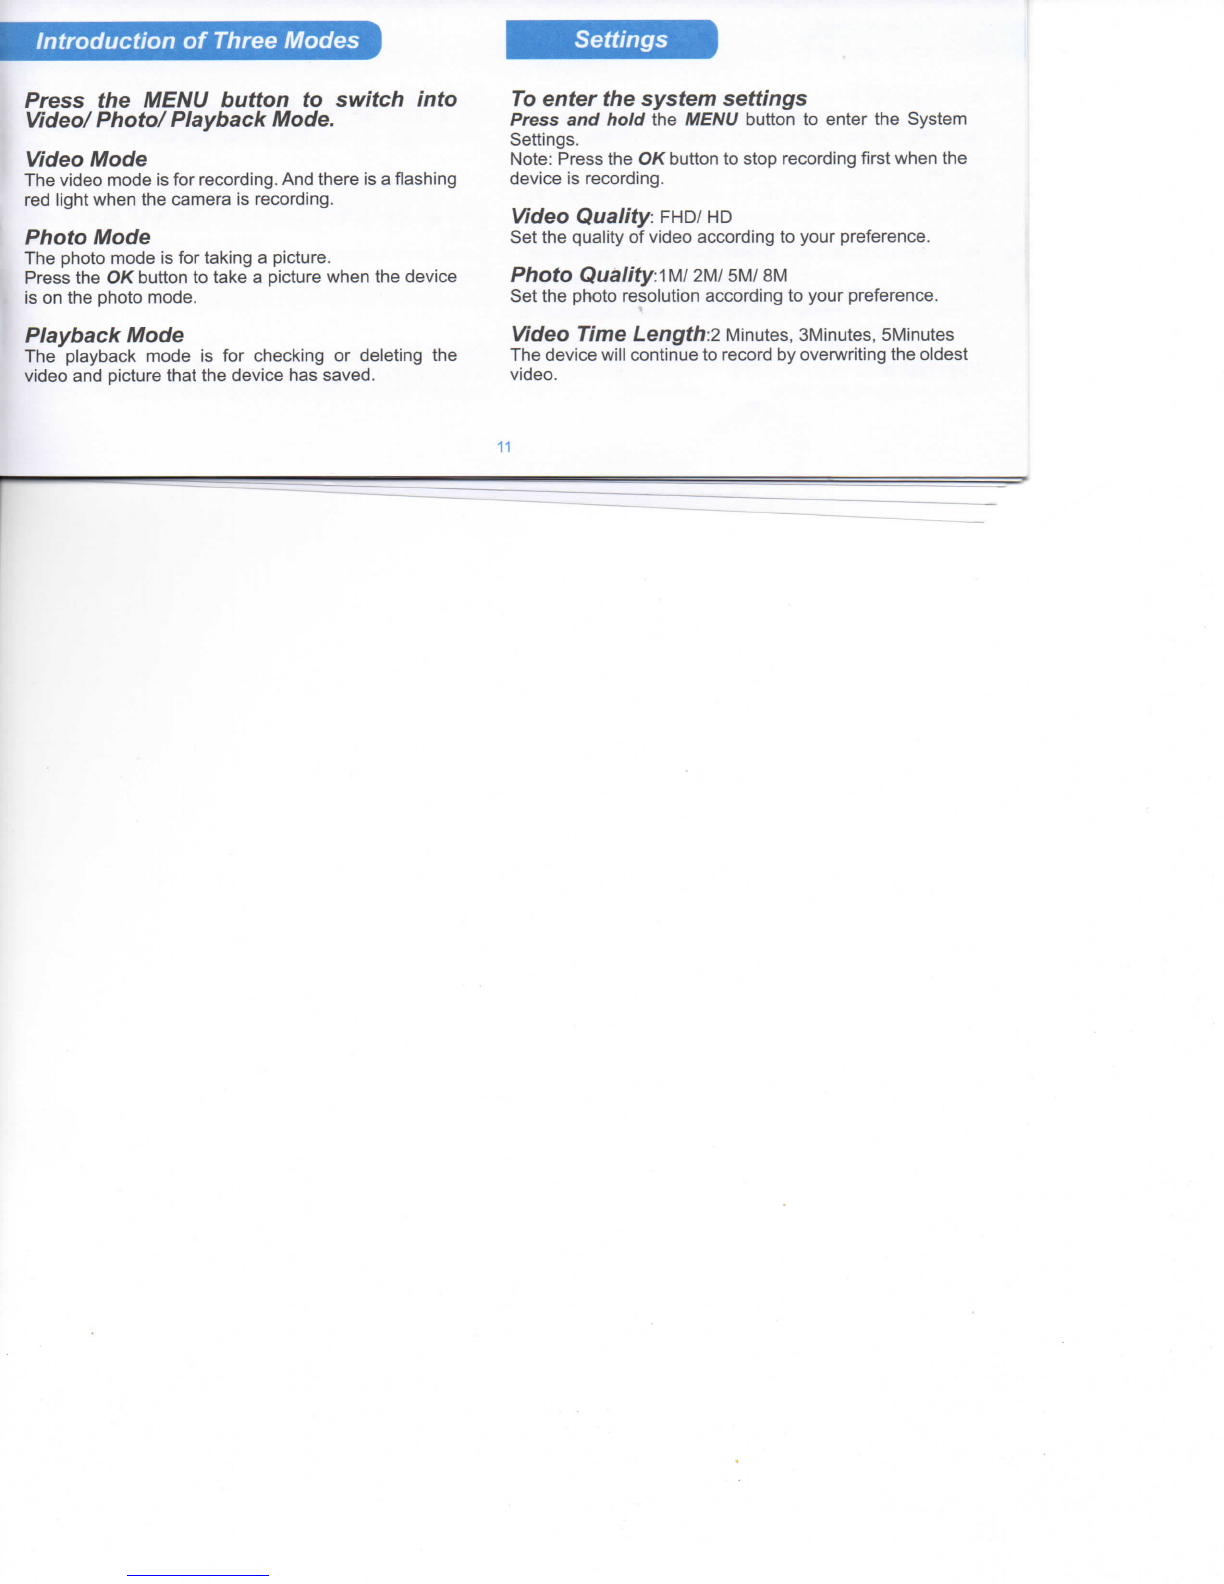
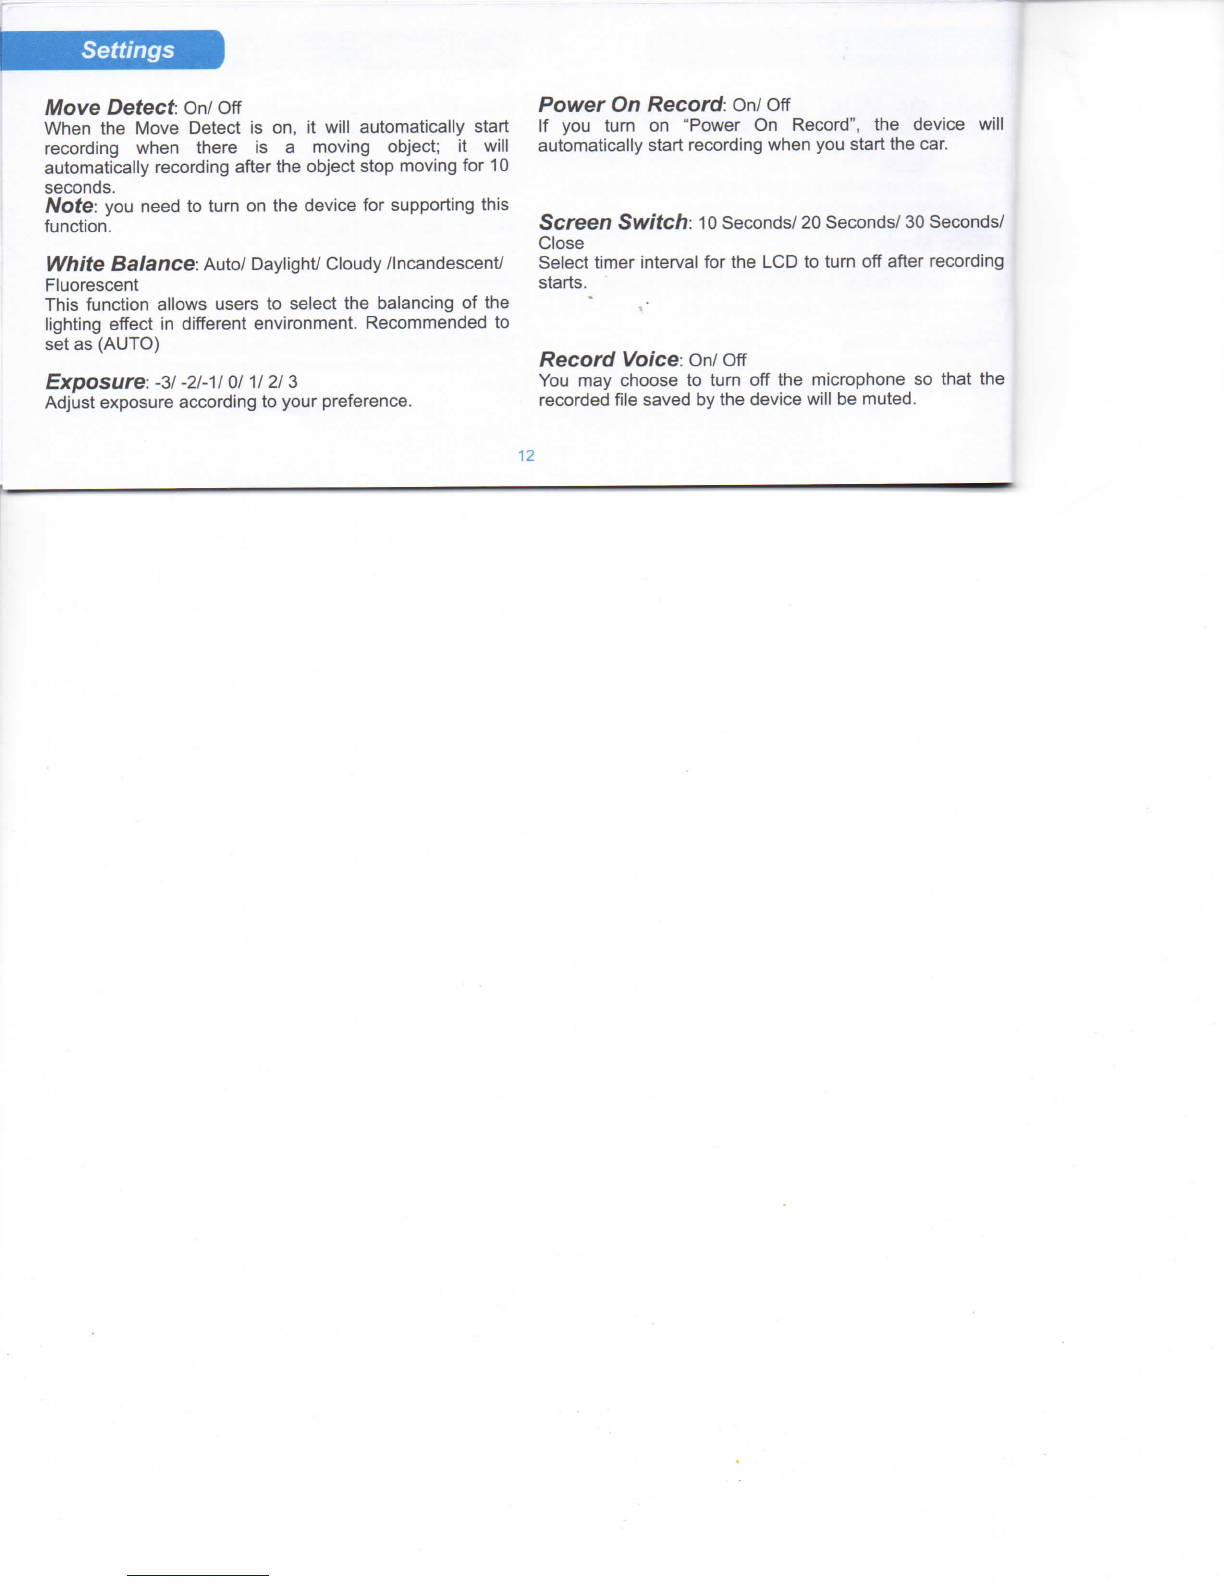
AUTD-VDX
User
Manual
M2
PerfBct
All-in-one
Mirror
Car
DVR & Car Parking
Assist System

Dear
user,
Thank
youforchoosing
AUTO-VOX
M2.
This
user
manuaiisdesignedtodetailthe
AUTO-VOX
M2functionsand
features.
Inordertooperateyourproductwith
ease
assoonaspossibleandgetmoreperfect
service,
please
readthe
manual
carefullyandproperlykeepit,thankyou!
This
manuaiissubjecttocopyrightprotection.Ourcompany
possesses
the
right
tomodifytheproductspecificationsand
related
informationmentionedinthemanual.Anymodificationsorchangesoftheproductspecificationswiilhavenoprior
notice.Withoutthewrittenpermissionofourcompany,anyformofreproduction,modification,use,disseminationor
publicationofthismanuaiisiliegai.
For
moreinformation:www.autovoxclub.com
Feel
freetocontactus:[email protected]m

Contents
Caution01
InstaiiationWay02
FrequentlyUsedOperations06
Device
Layout08
Status
Icons09
ProductSpecifications10
Introduction
ofThreeModes11
Settings11
Generai
Troubleshooting14

Caution
Failure
tocomply
witti
safetycautionscancauseinjuryor
property
damage.
(1)
Foryourownsafety,donotoperatethecontrolsofthe
product
whiledriving.
(2)
Makesure
that
noobjectisblockingthecameraiensandnoreflectivematerialappearsnearthelens.
(3)
Usethemanufacturer-approvedbatteries,chargers,suppliesandaccessories.
(4)
Donotexposethedevicetoheavysmokeorfumes.• .
(5)
Donottouchyourdevice
with
wethands.
01

Installation
Way
02

1.
Bind
the
rearview
mirror
3.
Instaiiation
of the
backup
camera
Take
offthestrapsand
bind
ittotheexisting
mirror,
piug
thecarcharger
into
thecigarette
lighter,the
mirror
will
automaticallystartwhenyoustarttheengine.
*
foilow
thesteps
with
thebracketyoureceived.
(Details
seeatthenextpage.)
(1) (2)
2.
Routing
the
wire
Run
the
long
videocabletothecardashboard,hidethe
cable
underthecarpetor
trim/from
theceilingasshownin
thefigureprevious.Ali
cars
varybutthisisgeneraiiyan
easy
task.
4.
Examination
of ali
wires
connection
Put
thecar
into
reversegear,andseeiftherearimagecan
perfectlybeshownonthescreen.(guidelines
wili
showup
onlywhenyoucutoffthegreencableonthecamera)
03

(1)
ABC123
Step1
Loosethe
screws
onthelicenseplate
with
wrench.
(2)
yf'*ABC123
'
Step1
Take
offthelicenseplate
with
wrench.
Step2
Installthecamerabracketbehindthelicenseplate.
Step2
Finda bestlocationandmakea mark.
ABC123 ABC123
Step3
Tightenthe
screws
with
wrench.
Screw
thecameraonyouriicenseplate.Runthe
camera's
cableinsideofthe
car's
taiigate
through
the
existingholeusualiybehindthelicenseplatelights.
B
Step3
Tear
offthe
film
A ofthe3Madhesiveandfixittothe
marked-location.Tearoffthe
fiim
B ofthe3Madhesivethen
attachthelicenseplate.Then
tighten
the
screws
with
wrench.
Step4
Connectthewire.theredconnecttherear
light.the
blackconnecttheground.
Opentheinnerplasticpaneiandremoveitofthehatchortaiigate.Thepanelsareusuallyattachedonthetailgatebyclips
This
maytakea bitlongertimetoavoidclipdamages.Oncethispanelisremovedthework
wili
besomucheasiertodo
Find
thereverse
iight
powerwires.Oarefuilypeelthewireskinandsecurelyattachthepowerwires
from
theiongcable.
04

Note
(1)
Onceyouhavethecameradown,routethecamerawiring
into
thevehicie.Itisbestto
find
anexistinggrommetto
runthewiringthrough.if
necessary,
drill
a holetorunthewiring
into
thevehicle.Ifyouusethismethod,besuretousea
rubbergrommettoprotectthewiring.
(2)
Usingthetestpenciltotestwhichcabieisreverse
light.
Andconnecttheblackwiretoanymetalscrew.
(3)
Please
mind"+/-"ofthewires.Useelectricaitapeto
seai.
"1
05

Frequently
Used
Operations
To
enter the
system
settings
Press
and hold theMENU
button
toenterthe
System
Settings.
Note:
Press
theOK
button
tostoprecordingfirstwhenthe
device
isrecording.
To
switch
into different
modes
Press
MENU
button
toswitch
into
thedifferentmodes:
Video
Mode/PhotoMode/
Playback
Mode.
Note: Ifthedeviceisrecording,youneedto
press
OK
button
tostoptherecordingfirst.
To
iock
the current video whiie recording
Press
theMENU
button
toiockthecurrentvideosoitwiil
notbeoverwrittenbythenewestone.
To
mute audio whiie recording
Press
theDOWN
button
todisabieaudioand
press
again
tostartit.
06

Frequently
Used
Operations
To
turn off the display whiie driving at night
Press
thePOWER
button
to
turn
offthedisplay.
Press
againto
turn
iton.
You
canalsosetthevalueof
Screen
Switch at System
Settingto
turn
offthedisplayautomatically.
To
change the display scale of front and
rear image
Press
theUP
button
tochangethedisplay
scale
while
recording.
To
delete or
check
files at this device or via
computer
On
Device:
Press
MENU
button
twicetoenterPlayback
Mode.
Press
theUP/DOWN
button
tonavigatethe
file
youwantto
delete.
Press
and
hold
MENU
button
toshow
OK/Cancel.
Note: Youcan'tdeletethelocked
file
inthisway.Butyou
can
chooseto
format
thecardtoemptyailthefiles.
On
Computer.
Take
outthememorycard
from
device,and
plug
it
into
thecardreader,thenconnectit
with
computer.
OpenthefoldernamedDCIMwhichcontainstwofolders
whileDCIMAisforthe
front
cameraandDCiMBisforthe
rear
camera.
07

Device
Layout Definition Function
®[OKl
Recording/
Stoprecording;ConfirmSetting.
@[Menul
Press
and
tiold
tostartthesetupmanual.
©[Power!
Press
and
hold
to
turn
on/off
device.
Press
to
turn
on/off
LCD.
®[UP1
Turn
upmenu,changethedisplay
scale
whilerecording.
©[DOWN!
Press
once
turn
downmenu,startorstoptheaudiorecording.
®[USB]
Charge
interface,connectto
PC
forfiletransfer.
®[AV-IN] Video
input
ofrearviewimage
®[TF-Siotl Support32GBmemorycard.
®[GPS1 Connected
with
GPS
module.
@[RESET!
Rebootthesystemwhenthesystem
crashes
orhasnoresponce.
©[Lens!
Capture
image
@
[Speaker]
Emit
sound
08

status
Icons
Icon Meaning
Video
Mode
Photo
Mode
•
Playback
Mode
Park
Monitor
AudioRecordinghasbeenstopped.
mAudioRecordinghasbeenstarted.
mm
Statue
ofCharging.
mCurrentVideohasbeenlocked.
The
memorycardhasbeen
plug
in.
09

Product
Specifications
I
Display
Screen
4.3"
LTPS
LCD. Date&TimeStampAvailableuponmenuselection.
Front
Lens
145
wideangle
lens.
Free
MemoryCard
32
GB
Rear
Lens
100%
waterproof140wideangle
lens.
Language
System
English/
SimplifiedChinese
Battery
320mAfirecfiargeable
litfiium
battery.
Language
System
English/
SimplifiedChinese
VideoResolution
FHD/HD
HDMJ
OptionalSupport.
File
Format
Image:
JPG
Video:AVI
AV-OUT
OptionalSupport.
File
Format
Image:
JPG
Video:AVI
TV
Standard
NTSC/PAL.
MoveDetect
Available
uponmenuselection.
TV
Standard
NTSC/PAL.
MoveDetect
Available
uponmenuselection.
USB
USB2.0
High
Speed.
Guarded
Parking
Available
uponmenuselection. AudioRecording
Available
uponmenuselection.
10

Introduction of Three Modes
Settings
Press
the MENU button to switch into
Video/
Photo/ Playback Mode.
Video
Mode
The
videomodeisforrecording.Andthereisa flashing
red
light
whenthecameraisrecording.
Photo
Mode
The
photo
modeisfortakinga picture.
Press
theOK
button
totakea picturewhenthedevice
is
onthe
photo
mode.
Playback Mode
The
piaybackmodeisforcheckingordeletingthe
videoandpicture
that
thedevicehas
saved.
To
enter the
system
settings
Press
and hold theMENU
button
toentertheSystem
Settings.
Note:
Press
theOK
button
tostoprecordingfirstwhenthe
deviceisrecording.
Video
Quality:
FHD/
HD
Set
thequalityofvideoaccordingtoyourpreference.
Photo
Quality mi 2Ui
5M/
8M
Set
the
photo
resoiutionaccordingtoyourpreference.
Video
Time Length:! Minutes,SMinutes,SMinutes
The
device
wiil
continuetorecordbyoverwritingtheoldest
video.
11

Settings
Move
Detect:
On/
Off
WfientheMoveDetectison,itwillautomaticallystart
recordingwhenthereisa movingobject;itwiii
automaticailyrecordingaftertheobjectstopmovingfor10
seconds.
Note, youneedto
turn
onthedeviceforsupportingthis
function.
White
Balance: Auto/Daylight/Oioudy
/Incandescent/
Fluorescent
This
functionailows
users
toselectthebalancingofthe
lighting
effectindifferentenvironment.Recommendedto
set
as
(AUTO)
Exposure
-31-2/-1
/
0/1/2/3
Adjustexposureaccordingtoyourpreference.
Power
On Record.
On/
Off
Ifyou
turn
on"PowerOn
Record",
thedevicewill
automaticallystartrecordingwhenyoustartthecar.
Screen
Switch. 10Seconds/20
Seconds/30
Seconds/
Ciose
Seiect
timerintervalfortheLCDto
turn
offafterrecording
starts.
Record
Voice.
On/
Off
You
maychooseto
turn
offthemicrophonesothatthe
recordedfile
saved
bythedevicewillbemuted.

Settings
Park Monitor
On/
Off
If
tfie
Park
Monitor
is
on,thisdevicewiliautomaticallystart
torecord
on
conditionthatthere
isa
shockaroundyour
car.
Coiiision
Sensitivity:
High/
Mid/
Low/
Close
Itmeasures
the
acceleration
and
gravityforcesdetected
by
the
camera.
At
such
case,
the
devicewiilauto
doa
file
lock.Recommend
toset
[Mid].
Dafe:Y/M/D
H/M/S
Access
the
foiiowingsettings
to
change
the
device'stime
and
date.
Language:
English/
Simplified
Chinese
Change
the
ianguageaccording
to
yourpreference.
Time Watermark
On/
Off
You
have
an
option
to
displayyourdate
in
yourvideos.
Time
Watermarkwiil
notbe
able
to
removeonce
you
have
activatedthisfeature.
Format:
OK/
Cancel
You
canformat
the
memorycard
atthe
device.
Factory
Reset: OK/
Cancei
Let
the
systemrestore
the
defaultvalue.
Firmware info
Itshows
the
firmwareinformationaboutthisdevice.
13

General
Troubleshooting
Question
Reason
Solution
Ttie
capturedimageis
notstored.
1.32GB
MemoryCard
migtit
be
full
ormalfunc-
tion.
2.
Imageisnot
saved
before
ttie
poweroutage.
1.
Reformat
tfie
cardorreplacea new
32GB
Memory
Card-
2.
Makesuretostoprecordingbeforesfiutting
down.
Allbuttonsareinvalid.
1
.ProceduralerrororfaultyOperation
2.32GB
MemoryCard
migfit
beerrororfaulty
1.
Press
RESET
button
torestart
tfie
DVR.
2.
Cfiange
a newcardorreformat
tfie
card.
Device
cannotbe
turn
on
Device
migfit
belowinbattery.
Cfiarge
tfie
Battery.
Screen
Autopower-off
1
.Screen
Saver
functionis
Enabled.
2.Low
Battery.
1
.Press
onUP
button
disable
ttie
screen
saver.
2.Cfiarge
ttie
battery
Hazy
Images
Lens
migtit
be
dirty.
Cfieck
iftfiereisduston
ttie
lens.
Clean
it
withfabriccloth.
Parking
guidelinesdo
notstiowup.
Ttie
greencableon
tfie
backupcamerawas
notcutoff.
Cut
thegreencable,parkingguidelinewillbe
enabled.
14

re
C
€
€)ROHS
Table of contents
Other Auto Vox Automobile Accessories manuals
Popular Automobile Accessories manuals by other brands

Metra Electronics
Metra Electronics 108-GM2B installation instructions

Trioma
Trioma SKIF quick guide

T-Mobile
T-Mobile SyncUP DRIVE Start guide

Fiamma
Fiamma CARRY-BIKE 02094-38A Installation and usage instructions

Menabo
Menabo DELTA DL FIX 201FP Fitting instructions

CoverCraft
CoverCraft Grommet Installation