AutoAqua TDS-100 User manual

Digital Inline TDS
TDS-100
TDS-100S
TDS-200S
TDS-300S
Measure Water Quality
Handbuch
Manuel

1
Installation
1. Remove the battery insulation tab.
2. Insert the sensor fully into the union tee and make sure the sensor
pins are perpendicular to the direction of the union tee as shown in
the diagram. Both pins should be seen when looking through the
union tee so the water will flow over both pins equally.
3. Turn off the RO/DI systems. Cut the tube at the desired monitoring
point and connect the cut tubes to the union tee.
2 3
1
PULL
Digital Inline TDS Description
TDS Indicator
TDS Level
Parts per million
Low Battery
Indicator
1
Button Cell
Battery
2Power/ TDS
Switching Button
Calibration
Button
3
Low Battery Indicator : We recommend to change the battery when
this icon shows. Battery Model : CR2032
Power/ TDS Switching Button :
i. Press to turn on TDS monitor. Press for 3 seconds to turn off (monitor
will automatically shut off after 3 minutes).
ii. Press to switch between different TDS sensors when TDS monitor is
on (S2 and S3 only).
Calibration Button : Please refer to “Calibration” below.
1
2
3
English

2
Calibration
1. Purchase a certified calibration solution that meets your requirements.
2. Disconnect the sensor from the union tee and dry.
3. Place the sensor in the calibration solution and keep the sensor
pins submerged.
4. Press the power button to turn on the TDS monitor. Check if each sensor
reading is correct by pressing the power button again to switch between
TDS sensors (S2 and S3 only). If the reading is not correct, follow the
steps below to perform the calibration.
5. Press the power button to select the TDS sensor required to be
calibrated (S2 and S3 only).
6. Press the power button twice quickly to enter calibration mode.*
7. Press the or button to adjust the reading to the level of the solution.
8. Press the power button to complete calibration . The Digital Inline TDS **
will automatically return to TDS measurement mode after 15 seconds.
The Digital Inline TDS can be reset to factory settings by pressing *
the and button at the same time after step 6. All sensors will
be reset at the same time.
Each sensor has to be calibrated separately. **
Notice
1. Avoid touching the sensor pins, as oils from skin may affect the TDS
measurement.
2. Clean sensor pins with rubbing alcohol and let air dry.
English

3
Specification
Range : 0-999 ppm
Resolution : 1ppm
Accuracy : +/- 2 %
Power Source : CR2032 Lithium Battery x1
Battery Life : 1 year
Size : 2 x 0.6 inch / 51 x 14.5 mm (Diameter x Thickness)
Limited Warranty
1. Limited warranty is provided by AUTOAQUA only if your AUTOAQUA
Product ("Product") was purchased from an authorized distributor or an
authorized reseller.
2. All warranty repairs or replacement are performed by the authorized
distributor or authorized reseller in the region where the Product was
first shipped by AUTOAQUA.
3. The limited warranty is valid for a period of 2 years under proper
installation and normal use from the date of the original purchase
listed on the proof of purchase or sales receipt.
4. In the event of a limited warranty claim, proof of purchase or sales
receipt (issued to the original purchaser) is required.
English

4
Installation
1. Entfernen Sie die Batterieisolierende Zuglasche
2. Setzen Sie den Sensor vollständig in den T-Verbinder ein und richten
Sie die Sensorstifte so aus, dass sie senkrecht zur T-Richtung liegen.
Das Wasser muss gleichmäßig über beide Stifte fließen. (Sie sollten die
2 Stifte durch den T-Verbinder sehen).
3. Schalten Sie das RO/DI-Osmosesystem aus. Schneiden Sie das Rohr
am gewünschten Überwachungspunkt ab und verbinden Sie die Rohre
mit dem T-Verbindungsstück.
2 3
1
PULL
Beschreibung des digitalen Inline-TDS
TDS-Anzeige
TDS-Wert
Teile pro Million
Batteriestandsanzeige
1
Knopfzellenbatterie
2Ein-Aus /
TDS-Umschaltknopf
Kalibrierungstaste
3
Batteriestandsanzeige : Wir empfehlen, die Batterie zu wechseln, wenn
dieses Symbol angezeigt wird. Batteriemodell : CR2032
Ein-Aus / TDS-Umschaltknopf :
i. Drücken um den TDS-Monitor einzuschalten. Zum Ausschalten 3
Sekunden lang drücken (der Monitor wird nach 3 Minuten automatisch
ausgeschaltet).
ii. Drücken Sie diese Taste, um zwischen verschiedenen TDS-Sensoren
zu wechseln, wenn der TDS-Monitor eingeschaltet ist (nur bei Modell
S2 und S3).
Kalibrierungstaste : Bitte beachten Sie den nachstehenden Abschnitt
„Kalibrierung“.
1
2
3
Deutsch

5
Kalibrierung
1. Kaufen Sie eine zertifizierte Kalibrierungslösung, die Ihren
Anforderungen entspricht.
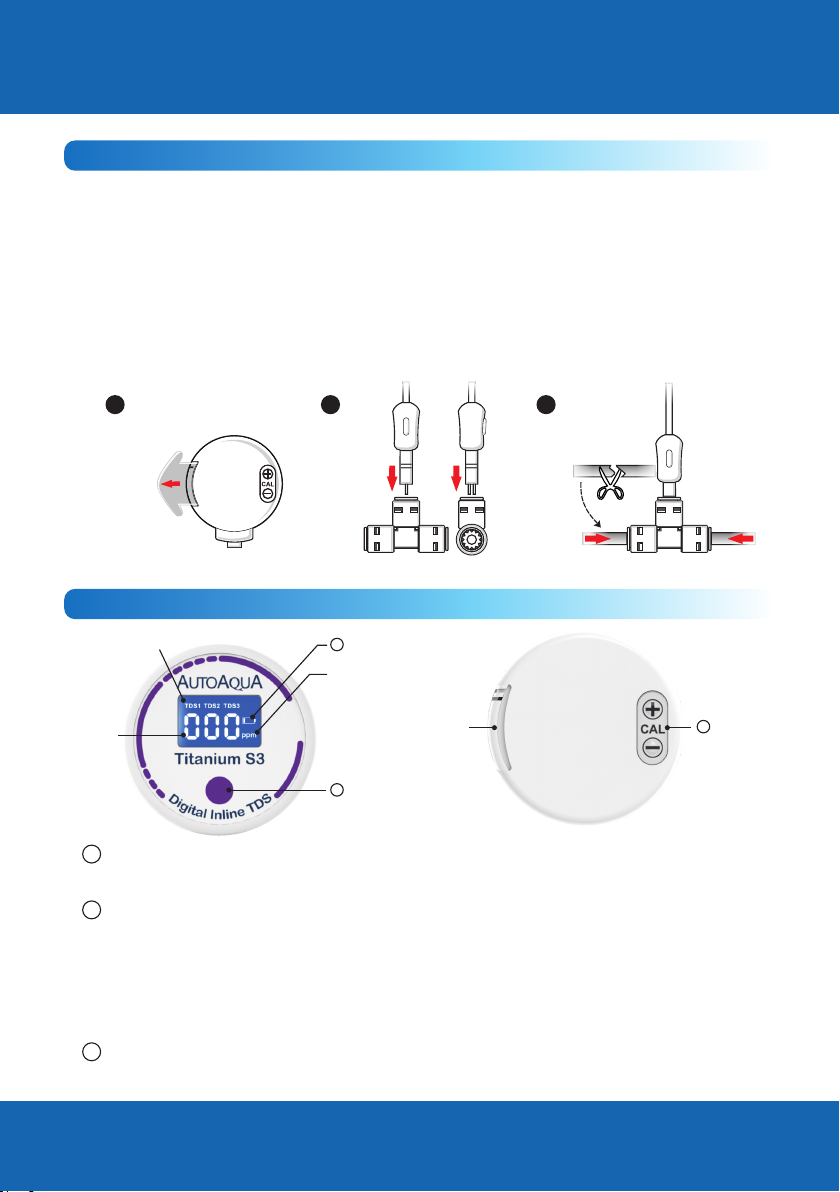
2. Entfernen Sie den Sensor aus der T-Verbindung und trocknen Sie ihn.
3. Legen Sie den Sensor in die Kalibrierungslösung und halten Sie die
Sensorstifte unter Wasser.
4. Drücken Sie die Ein-Aus-Taste, um den TDS-Monitor einzuschalten.
Prüfen Sie, ob die einzelnen Sensorwerte korrekt sind, indem Sie die
Taste erneut drücken, um zwischen den TDS-Sensoren zu wechseln
(nur bei Modell S2 und S3). Wenn der Messwert nicht korrekt ist, führen
Sie die folgenden Schritte aus, um die Kalibrierung durchzuführen.
5. Drücken Sie die Ein-Aus-Taste um den TDS-Sensor auszuwählen, der
kalibriert werden soll (nur bei Modell S2 und S3).
6. Drücken Sie zweimal kurz die Ein-Aus-Taste um den
Kalibrierungsmodus zu aktivieren. *
7. Drücken Sie die Tasten oder um den von der Lösung angegebenen
Wert anzupassen.
8. Drücken Sie die Ein-Aus-Taste um die Kalibrierung abzuschließen . **
Das Digital Inline TDS Gerät kehrt nach 15 Sekunden automatisch in den
TDS-Messmodus zurück.
Das Digital Inline TDS Gerät kann auf die Werkseinstellungen *
zurückgesetzt werden, indem Sie nach Schritt 6 gleichzeitig die Tasten
und drücken. Alle Sensoren werden gleichzeitig zurückgesetzt.
** Jeder Sensor muss separat kalibriert werden.
Hinweis
1. Berühren Sie die Sensorstifte nicht, da Hautöle die TDS-Messung
beeinflussen können.
2. Reinigen Sie die Sensorstifte mit Alkohol und lassen Sie sie an der
Luft trocknen.
Deutsch

6
Angaben
Bereich : 0-999ppm
Auflösung : 1 ppm
Genauigkeit : +/- 2%
Stromquelle : CR2032 Lithiumbatterie x1
Batterielebensdauer : 1 Jahr
Größe : 51 x 14,5 mm (Durchmesser x Dicke)
Eingeschränkte Garantie
1. AUTOAQUA gewährt nur eine eingeschränkte Garantie, wenn Ihr
AUTOAQUA-Produkt (das "Produkt") von einem autorisierten Händler
oder einem autorisierten Distributor erworben wurde.
2. Alle Garantiereparaturen oder -auswechslungen werden nur von
autorisierten Distributoren oder autorisierten Händler durchgeführt.
3. Die eingeschränkte Garantie gilt für einen Zeitraum von 2 Jahren bei
normaler Installation und Verwendung und ab dem ursprünglichen
Kaufdatum , das auf dem Kaufbeleg oder der Rechnung angegeben ist.
4. Im Falle eines beschränkten Garantieanspruchs ist eine Rechnung
oder Kaufbeleg (ausgestellt an den Erstkäufer) erforderlich.
Deutsch

7
Installation
1. Retirez la languette isolante de la batterie.
2. Insérez le capteur complètement dans le raccord en T et orientez les
broches du capteur de sorte qu'elles soient perpendiculaires à la
direction du T. L'eau doit circuler de manière égale sur les deux broches,
(Vous devriez voir les 2 broches en regardant à travers le raccord).
3. Éteignez le système d'osmose RO/DI. Coupez le tube au niveau du point
de contrôle souhaité et raccorder les tubes coupés au connecteur en T.
2 3
1
PULL
Description du TDS numériqueen ligne
Indicateur TDS
Valeur de
TDS
Parties par million
Indicateur de batterie
1
Pile bouton
2Bouton de
commutation
On-Off / TDS
Bouton
d'étalonnage
3
Indicateur de batterie : Nous vous recommandons de changer la batterie
lorsque cette icône apparaît. Modèle de pile bouton CR2032
Bouton de commutation On-Off / TDS :
i. Appuyez pour allumer le moniteur TDS. Appuyez pendant 3 secondes
pour l'éteindre (le moniteur s'éteindra automatiquement après 3 minutes).
ii. Appuyez sur cette touche pour basculer entre les différents capteurs
TDS lorsque le moniteur TDS est activé (modèles S2 et S3 uniquement).
Touche d'étalonnage : veuillez vous reporter à la section suivante
"Étalonnage".
1
2
3
Français

8
Étalonnage
1. Achetez une solution d'étalonnage certifiée qui répond à vos exigences.
2. Retirez le capteur du raccord en T et séchez-le.
3. Placez le capteur dans la solution d'étalonnage et maintenez les broches
du capteur immergées.
4. Appuyez sur le bouton On-Off pour allumer le moniteur TDS. Vérifiez si
les valeurs de chaque capteur sont correctes en appuyant de nouveau
sur la touche pour basculer entre les capteurs TDS (Modèles S2 et S3
uniquement). Si la valeur est incorrecte, suivez les étapes ci-dessous
pour effectuer l'étalonnage.
5. Appuyez sur le bouton On-Off pour sélectionner le capteur TDS à
étalonner (Modèles S2 et S3 uniquement)
6. Appuyez rapidement deux fois sur le bouton On-Off pour passer en
mode étalonnage. *
7. Appuyez sur les touches ou pour ajuster la valeur avec celle
indiquée par la solution.
8. Appuyez sur le bouton On-Off pour terminer l'étalonnage . Après 15 **
secondes, le système, TDS numérique en ligne, repassera
automatiquement en mode mesure de TDS
* Le système TDS numérique en ligne peut être réinitialisé aux paramètres
d'usine en appuyant simultanément sur les touches et après
l'étape 6. Tous les capteurs seront réinitialisés en même temps.
** Chaque capteur doit être étalonné séparément.
Remarque
1. Évitez de toucher les broches du capteur, car les graisses de la peau
peuvent affecter les mesures du TDS.
2. Nettoyez les broches du capteur avec de l'alcool et laisser les sécher
à l'air.
Français

9
Caractéristiques
Gamme : 0-999ppm
Résolution : 1 ppm
Précision : +/- 2%
Source d'alimentation : pile au lithium CR2032 x1
Durée de vie de la batterie : 1 an
Taille : 51 x 14,5 mm (diamètre x épaisseur)
Garantie limitée
1. AUTOAQUA ne fournit une garantie limitée que si votre produit
AUTOAQUA (le «produit») a été acheté auprès d'un distributeur agréé
ou d'un revendeur agréé.
2. Toutes les réparations ou les remplacements sont effectuées par le
distributeur agréé ou le revendeur agréé de la région.
3. La garantie limitée est valable pour une période de 2 ans dans des
conditions d'installation et d'utilisation normales et à compter de la
date d'achat d'origine indiquée sur la preuve d'achat ou le reçu d'achat.
4. Dans le cas d'une réclamation au titre de la garantie limitée, une preuve
d'achat ou un reçu d'achat (remis à l'acheteur initial) est requis.
Français
Other manuals for TDS-100
1
This manual suits for next models
3
Table of contents
Languages:
Other AutoAqua Measuring Instrument manuals