Autodesk CP100 User manual


© 2008 Autodesk, Inc. All rights reserved.
Except as otherwise permitted by Autodesk, Inc., this publication, or parts thereof, may not be reproduced
in any form, by any method, for any purpose.
Certain materials included in this publication are reprinted with the permission of the copyright holder.
Portions relating to ADOdb Copyright © 2000, 2001, 2002, 2003, 2004 John Lim. All rights reserved. Redistribution and use in source and binary forms,
with or without modification, are permitted provided that the following conditions are met: Redistributions of source code must retain theabove copyright
notice, this list of conditions and the following disclaimer. Redistributions in binary form must reproduce the above copyright notice, this list of conditions
and the following disclaimer in the documentation and/or other materials provided with the distribution. Neither the name of the John Lim nor the names
of its contributors may be used to endorse or promote products derived from this software without specific prior written permission. DISCLAIMER: THIS
SOFTWARE IS PROVIDED BY THE COPYRIGHT HOLDERS AND CONTRIBUTORS "AS IS" AND ANY EXPRESS OR IMPLIED WARRANTIES,
INCLUDING, BUT NOT LIMITED TO, THE IMPLIED WARRANTIES OF MERCHANTABILITY AND FITNESS FOR A PARTICULAR PURPOSE
ARE DISCLAIMED. IN NO EVENT SHALL JOHN LIM OR CONTRIBUTORS BE LIABLE FOR ANY DIRECT, INDIRECT, INCIDENTAL, SPECIAL,
EXEMPLARY, OR CONSEQUENTIAL DAMAGES (INCLUDING, BUT NOT LIMITED TO, PROCUREMENT OF SUBSTITUTE GOODS OR
SERVICES; LOSS OF USE, DATA, OR PROFITS; OR BUSINESS INTERRUPTION HOWEVER CAUSED AND ON ANY THEORY OF LIABILITY,
WHETHER IN CONTRACT, STRICT LIABILITY, OR TORT (INCLUDING NEGLIGENCE OR OTHERWISE) ARISING IN ANY WAY OUT OF
THE USE OF THIS SOFTWARE, EVEN IF ADVISED OF THE POSSIBILITY OF SUCH DAMAGE.
Portions relating to GetOpt Copyright © 1987, 1993, 1994. The Regents of the University of California. All rights reserved. Redistribution and use in source
and binary forms, with or withoutmodification, are permitted provided that the following conditions are met: 1. Redistributions of source code must retain
the above copyright notice, this list of conditions and the following disclaimer. 2. Redistributions inbinary form must reproduce the above copyright notice,
this list of conditions and the following disclaimer in the documentation and/or other materials provided with the distribution. 3. All advertising materials
mentioning features or use of this software must display the following acknowledgement: This product includes software developed by the University of
California, Berkeley andits contributors. 4. Neither the name of the University nor the names of its contributors may be used to endorse or promote products
derived from this software without specific prior written permission. THIS SOFTWARE IS PROVIDED BY THE REGENTS AND CONTRIBUTORS "AS
IS" AND ANY EXPRESS OR IMPLIED WARRANTIES, INCLUDING, BUT NOT LIMITED TO, THE IMPLIED WARRANTIES OF
MERCHANTABILITY AND FITNESS FOR A PARTICULAR PURPOSE ARE DISCLAIMED. IN NO EVENT SHALL THE REGENTS OR
CONTRIBUTORS BE LIABLE FOR ANY DIRECT, INDIRECT, INCIDENTAL, SPECIAL, EXEMPLARY, OR CONSEQUENTIAL DAMAGES
(INCLUDING, BUT NOT LIMITED TO, PROCUREMENT OF SUBSTITUTE GOODS OR SERVICES; LOSS OF USE, DATA, OR PROFITS; OR
BUSINESS INTERRUPTION) HOWEVER CAUSED AND ON ANY THEORY OF LIABILITY, WHETHER IN CONTRACT, STRICT LIABILITY, OR
TORT (INCLUDING NEGLIGENCE OR OTHERWISE) ARISING IN ANY WAY OUT OF THE USE OF THIS SOFTWARE, EVEN IF ADVISED OF
THE POSSIBILITY OF SUCH DAMAGE.
Portions relating to GetOpt Copyright ©1999, 2000 Politecnico di Torino. All rights reserved. Redistribution and use in source and binary forms, with or
without modification, are permitted provided that: (1) source code distributions retain the above copyright notice and this paragraph in its entirety, (2)
distributions including binary code include the above copyright notice and this paragraph in its entirety in the documentation or other materials provided
with the distribution, and (3) all advertising materials mentioning features or use of this software display the following acknowledgement:"This product
includes software developed by the Politecnico di Torino, and its contributors." Neither the name of the University nor the names of its contributors may be
used to endorse or promote products derived from this software without specific prior written permission. THIS SOFTWARE IS PROVIDED "AS IS" AND
WITHOUT ANY EXPRESS OR IMPLIED WARRANTIES, INCLUDING, WITHOUT LIMITATION, THE IMPLIED WARRANTIES OF
MERCHANTABILITY AND FITNESS FOR A PARTICULAR PURPOSE.
Portions relating to LibXML2 2.6.20 Copyright © 2005 Daniel Veillard. Permission is hereby granted, free of charge, to any person obtaining a copy of this
software and associated documentation files (the "Software"), to deal in the Software without restriction, including without limitation the rights to use,
copy, modify, merge, publish, distribute, sublicense, and/or sell copies of the Software, and to permit persons to whom the Software is furnished to do so,
subject to the following conditions: The above copyright notice and this permission notice shall be included in all copies or substantial portions of the
Software. THE SOFTWARE IS PROVIDED "AS IS", WITHOUT WARRANTY OF ANY KIND, EXPRESS OR IMPLIED, INCLUDING BUT NOT
LIMITED TO THE WARRANTIES OF MERCHANTABILITY, FITNESS FOR A PARTICULAR PURPOSE AND NONINFRINGEMENT. IN NO
EVENT SHALL THE AUTHORS OR COPYRIGHT HOLDERS BE LIABLE FOR ANY CLAIM, DAMAGES OR OTHER LIABILITY, WHETHER IN
AN ACTION OF CONTRACT, TORT OR OTHERWISE, ARISING FROM, OUT OF OR IN CONNECTION WITH THE SOFTWARE OR THE USE
OR OTHER DEALINGS IN THE SOFTWARE.
The following are registered trademarks or trademarks of Autodesk, Inc., in the USA and other countries: 3DEC (design/logo), 3December,
3December.com, 3ds Max, ADI, Alias, Alias (swirl design/logo), AliasStudio, Alias|Wavefront (design/logo), ATC, AUGI, AutoCAD, AutoCAD Learning
Assistance, AutoCAD LT, AutoCAD Simulator, AutoCAD SQL Extension, AutoCAD SQL Interface, Autodesk, Autodesk Envision, Autodesk Insight,
Autodesk Intent, Autodesk Inventor, Autodesk Map, Autodesk MapGuide, Autodesk Streamline, AutoLISP, AutoSnap, AutoSketch, AutoTrack, Backdraft,
Built with ObjectARX (logo), Burn, Buzzsaw, CAiCE, Can You Imagine, Character Studio, Cinestream, Civil 3D, Cleaner, Cleaner Central, ClearScale,
Colour Warper, Combustion, Communication Specification, Constructware, Content Explorer, Create>what's>Next> (design/logo), Dancing Baby
(image), DesignCenter, Design Doctor, Designer's Toolkit, DesignKids, DesignProf, DesignServer, DesignStudio, Design|Studio (design/logo), Design
Web Format, DWF, DWG, DWG (logo), DWG Extreme, DWG TrueConvert, DWG TrueView, DXF, Ecotect, Exposure, Extending the Design Team, FBX,
Filmbox, FMDesktop, Freewheel, GDX Driver, Gmax, Green Building Studio, Heads-up Design, Heidi, HumanIK, IDEA Server, i-drop, ImageModeler,
iMOUT, Incinerator, Inventor, Inventor LT, Kaydara, Kaydara (design/logo), Kynapse, Kynogon, LocationLogic, Lustre, Matchmover, Maya, Mechanical
Desktop, MotionBuilder, Movimento, Mudbox, NavisWorks, ObjectARX, ObjectDBX, Open Reality, Opticore, Opticore Opus, PolarSnap, PortfolioWall,
Powered with Autodesk Technology, Productstream, ProjectPoint, ProMaterials, RasterDWG, Reactor, RealDWG, Real-time Roto, REALVIZ, Recognize,
Render Queue, Retimer,Reveal, Revit, Showcase, ShowMotion, SketchBook, SteeringWheels, Stitcher, StudioTools, Topobase, Toxik, Tru ste d DWG,
ViewCube, Visual, Visual Construction, Visual Drainage, Visual Landscape, Visual Survey, Visual Toolbox, Visual LISP, Voice Reality, Volo, Vtour, Wiretap,
and WiretapCentral.

The following are registered trademarks or trademarks of Autodesk Canada Co. in the USA and/or Canada and other countries: Backburner,
Discreet, Fire, Flame, Flint, Frost, Inferno, Multi-Master Editing, River, Smoke, Sparks, Stone, and Wire.
The following are registered trademarks or trademarks of Moldflow Corp. in the USA and/or other countries: Moldflow MPA, MPA (design/logo),
Moldflow Plastics Advisers, MPI, MPI (design/logo), Moldflow Plastics Insight, MPX, MPX (design/logo), Moldflow Plastics Xpert.
All other brand names, product names or trademarks belong to their respective holders.
Disclaimer
THIS PUBLICATION AND THE INFORMATION CONTAINED HEREIN IS MADE AVAILABLE BY AUTODESK, INC. "AS IS." AUTODESK,
INC. DISCLAIMS ALL WARRANTIES, EITHER EXPRESS OR IMPLIED, INCLUDING BUT NOT LIMITED TO ANY IMPLIED
WARRANTIES OF MERCHANTABILITY OR FITNESS FOR A PARTICULAR PURPOSE REGARDING THESE MATERIALS.
Title: Autodesk Control Surface User Guide
Document Version: 1
Date: October 9, 2008


contents
v
Contents
1 The Autodesk Control Surface 1
Summary . . . . . . . . . . . . . . . . . . . . . . . . . . . . . . . . . . . . . . . . . . . . . . . . . . . . . . . . . . . . . . . 1
About the Autodesk Control Surface . . . . . . . . . . . . . . . . . . . . . . . . . . . . . . . . . . . . . . . 2
Control Surface Panel Descriptions. . . . . . . . . . . . . . . . . . . . . . . . . . . . . . . . . . . . . . . . . 2
Navigating the Storyboard. . . . . . . . . . . . . . . . . . . . . . . . . . . . . . . . . . . . . . . . . . . . . . . . . 5
Toggling Play Modes . . . . . . . . . . . . . . . . . . . . . . . . . . . . . . . . . . . . . . . . . . . . . . . . . . . . . 8
Activating Mouse Functionality . . . . . . . . . . . . . . . . . . . . . . . . . . . . . . . . . . . . . . . . . . . . 9
Panning and Zooming the Image. . . . . . . . . . . . . . . . . . . . . . . . . . . . . . . . . . . . . . . . . . . 9
Customizing the View . . . . . . . . . . . . . . . . . . . . . . . . . . . . . . . . . . . . . . . . . . . . . . . . . . . . 10
Customizing the Panel Sensitivity . . . . . . . . . . . . . . . . . . . . . . . . . . . . . . . . . . . . . . . . . . 13
Selective Backlighting of Active and Available Buttons . . . . . . . . . . . . . . . . . . . . . . . . 15
Toggling Playheads. . . . . . . . . . . . . . . . . . . . . . . . . . . . . . . . . . . . . . . . . . . . . . . . . . . . . . . 16
Using the Undo List . . . . . . . . . . . . . . . . . . . . . . . . . . . . . . . . . . . . . . . . . . . . . . . . . . . . . . 16
Working with the Grade Bin . . . . . . . . . . . . . . . . . . . . . . . . . . . . . . . . . . . . . . . . . . . . . . . 17
Saving the Current Grade . . . . . . . . . . . . . . . . . . . . . . . . . . . . . . . . . . . . . . . . . . . . . . . . . 19
Adjusting Printer Lights. . . . . . . . . . . . . . . . . . . . . . . . . . . . . . . . . . . . . . . . . . . . . . . . . . . 19
Copying Grades. . . . . . . . . . . . . . . . . . . . . . . . . . . . . . . . . . . . . . . . . . . . . . . . . . . . . . . . . . 20
Adding Keyframes . . . . . . . . . . . . . . . . . . . . . . . . . . . . . . . . . . . . . . . . . . . . . . . . . . . . . . . 21
Copying and Pasting Keyframes. . . . . . . . . . . . . . . . . . . . . . . . . . . . . . . . . . . . . . . . . . . . 22
Selecting Menus . . . . . . . . . . . . . . . . . . . . . . . . . . . . . . . . . . . . . . . . . . . . . . . . . . . . . . . . . 22
Caching Memory . . . . . . . . . . . . . . . . . . . . . . . . . . . . . . . . . . . . . . . . . . . . . . . . . . . . . . . . 24
Bypassing Functions. . . . . . . . . . . . . . . . . . . . . . . . . . . . . . . . . . . . . . . . . . . . . . . . . . . . . . 24
Resetting Functions . . . . . . . . . . . . . . . . . . . . . . . . . . . . . . . . . . . . . . . . . . . . . . . . . . . . . . 24
Repositioning Shots . . . . . . . . . . . . . . . . . . . . . . . . . . . . . . . . . . . . . . . . . . . . . . . . . . . . . . 25
Performing Colour Grading . . . . . . . . . . . . . . . . . . . . . . . . . . . . . . . . . . . . . . . . . . . . . . . 26
Performing Curves Grading . . . . . . . . . . . . . . . . . . . . . . . . . . . . . . . . . . . . . . . . . . . . . . . 36
Generating Keys . . . . . . . . . . . . . . . . . . . . . . . . . . . . . . . . . . . . . . . . . . . . . . . . . . . . . . . . . 39
Creating and Grading Geometries . . . . . . . . . . . . . . . . . . . . . . . . . . . . . . . . . . . . . . . . . . 43

tents
Con
vi
Cycling Among Geometries . . . . . . . . . . . . . . . . . . . . . . . . . . . . . . . . . . . . . . . . . . . . . . . 47
Modifying the Appearance of the Autodesk Control Surface . . . . . . . . . . . . . . . . . . . 48
2 The Tangent CP100 Control Surface 49
Summary . . . . . . . . . . . . . . . . . . . . . . . . . . . . . . . . . . . . . . . . . . . . . . . . . . . . . . . . . . . . . . . 49
About the Tangent CP100 Control Surface . . . . . . . . . . . . . . . . . . . . . . . . . . . . . . . . . . 49
Customizing the View . . . . . . . . . . . . . . . . . . . . . . . . . . . . . . . . . . . . . . . . . . . . . . . . . . . . 51
Toggling Play Mode . . . . . . . . . . . . . . . . . . . . . . . . . . . . . . . . . . . . . . . . . . . . . . . . . . . . . . 52
Caching Memory . . . . . . . . . . . . . . . . . . . . . . . . . . . . . . . . . . . . . . . . . . . . . . . . . . . . . . . . 52
Navigating the Storyboard. . . . . . . . . . . . . . . . . . . . . . . . . . . . . . . . . . . . . . . . . . . . . . . . . 53
Undo List . . . . . . . . . . . . . . . . . . . . . . . . . . . . . . . . . . . . . . . . . . . . . . . . . . . . . . . . . . . . . . . 54
Resetting Parameters . . . . . . . . . . . . . . . . . . . . . . . . . . . . . . . . . . . . . . . . . . . . . . . . . . . . . 56
Copying Grades. . . . . . . . . . . . . . . . . . . . . . . . . . . . . . . . . . . . . . . . . . . . . . . . . . . . . . . . . . 57
Adding and Moving Keyframes . . . . . . . . . . . . . . . . . . . . . . . . . . . . . . . . . . . . . . . . . . . . 58
Repositioning Shots . . . . . . . . . . . . . . . . . . . . . . . . . . . . . . . . . . . . . . . . . . . . . . . . . . . . . . 59
Primary Colour Grading . . . . . . . . . . . . . . . . . . . . . . . . . . . . . . . . . . . . . . . . . . . . . . . . . . 60
Modifying the Hue, Saturation, and Lightness Curves. . . . . . . . . . . . . . . . . . . . . . . . . 63
Secondary Colour Grading . . . . . . . . . . . . . . . . . . . . . . . . . . . . . . . . . . . . . . . . . . . . . . . . 63
Index 71

1
The Autodesk Control Surface
Summary
About the Autodesk Control Surface
. . . . . . . . . . . . . . . . . . . . . . . . . . . . . . . . . . . . . . . 2
Control Surface Panel Descriptions
. . . . . . . . . . . . . . . . . . . . . . . . . . . . . . . . . . . . . . . . 2
Navigating the Storyboard
. . . . . . . . . . . . . . . . . . . . . . . . . . . . . . . . . . . . . . . . . . . . . . . . 5
Toggling Play Modes
. . . . . . . . . . . . . . . . . . . . . . . . . . . . . . . . . . . . . . . . . . . . . . . . . . . . . . 8
Activating Mouse Functionality
. . . . . . . . . . . . . . . . . . . . . . . . . . . . . . . . . . . . . . . . . . . . 9
Panning and Zooming the Image
. . . . . . . . . . . . . . . . . . . . . . . . . . . . . . . . . . . . . . . . . . 9
Customizing the View
. . . . . . . . . . . . . . . . . . . . . . . . . . . . . . . . . . . . . . . . . . . . . . . . . . . . 10
Customizing the Panel Sensitivity
. . . . . . . . . . . . . . . . . . . . . . . . . . . . . . . . . . . . . . . . . 13
Selective Backlighting of Active and Available Buttons
. . . . . . . . . . . . . . . . . . . . . 15
Toggling Playheads
. . . . . . . . . . . . . . . . . . . . . . . . . . . . . . . . . . . . . . . . . . . . . . . . . . . . . . 16
Using the Undo List
. . . . . . . . . . . . . . . . . . . . . . . . . . . . . . . . . . . . . . . . . . . . . . . . . . . . . . 16
Working with the Grade Bin
. . . . . . . . . . . . . . . . . . . . . . . . . . . . . . . . . . . . . . . . . . . . . . 17
Saving the Current Grade
. . . . . . . . . . . . . . . . . . . . . . . . . . . . . . . . . . . . . . . . . . . . . . . . 19
Adjusting Printer Lights
. . . . . . . . . . . . . . . . . . . . . . . . . . . . . . . . . . . . . . . . . . . . . . . . . . 19
Copying Grades
. . . . . . . . . . . . . . . . . . . . . . . . . . . . . . . . . . . . . . . . . . . . . . . . . . . . . . . . . . 20
Adding Keyframes
. . . . . . . . . . . . . . . . . . . . . . . . . . . . . . . . . . . . . . . . . . . . . . . . . . . . . . . 21
Copying and Pasting Keyframes
. . . . . . . . . . . . . . . . . . . . . . . . . . . . . . . . . . . . . . . . . . 22
Selecting Menus
. . . . . . . . . . . . . . . . . . . . . . . . . . . . . . . . . . . . . . . . . . . . . . . . . . . . . . . . . 22
Caching Memory
. . . . . . . . . . . . . . . . . . . . . . . . . . . . . . . . . . . . . . . . . . . . . . . . . . . . . . . . 24
Bypassing Functions
. . . . . . . . . . . . . . . . . . . . . . . . . . . . . . . . . . . . . . . . . . . . . . . . . . . . . 24
Resetting Functions
. . . . . . . . . . . . . . . . . . . . . . . . . . . . . . . . . . . . . . . . . . . . . . . . . . . . . . 24
Repositioning Shots
. . . . . . . . . . . . . . . . . . . . . . . . . . . . . . . . . . . . . . . . . . . . . . . . . . . . . . 25
Performing Colour Grading
. . . . . . . . . . . . . . . . . . . . . . . . . . . . . . . . . . . . . . . . . . . . . . . 26
Performing Curves Grading
. . . . . . . . . . . . . . . . . . . . . . . . . . . . . . . . . . . . . . . . . . . . . . 36
Generating Keys
. . . . . . . . . . . . . . . . . . . . . . . . . . . . . . . . . . . . . . . . . . . . . . . . . . . . . . . . . 39
Creating and Grading Geometries
. . . . . . . . . . . . . . . . . . . . . . . . . . . . . . . . . . . . . . . . 43
Cycling Among Geometries
. . . . . . . . . . . . . . . . . . . . . . . . . . . . . . . . . . . . . . . . . . . . . . . 47

The Autodesk Control Surface
1
2
Modifying the Appearance of the Autodesk Control Surface
. . . . . . . . . . . . . . . . 48
About the Autodesk Control Surface
The Autodesk® control surface provides improved interactivity when colour grading film and
video footage. You can perform many of the same tasks you do in the Autodesk Lustre® user
interface using the control surface. The modular design of the control surface also allows you to
work on different grading stages simultaneously. For example, you can perform curves grading
while modifying the image lift.
The Autodesk control surface consists of three panels. Although licensed separately, they are
designed to work together.
For information on connecting the control surface, refer to the Autodesk Lustre Software
Installation Guide for your platform.
For technical information about the Autodesk control surface, see http://
www.tangentdevices.co.uk/downloads_documents.asp.
Control Surface Panel Descriptions
Each of the three control surface panels are designed to perform different functions.
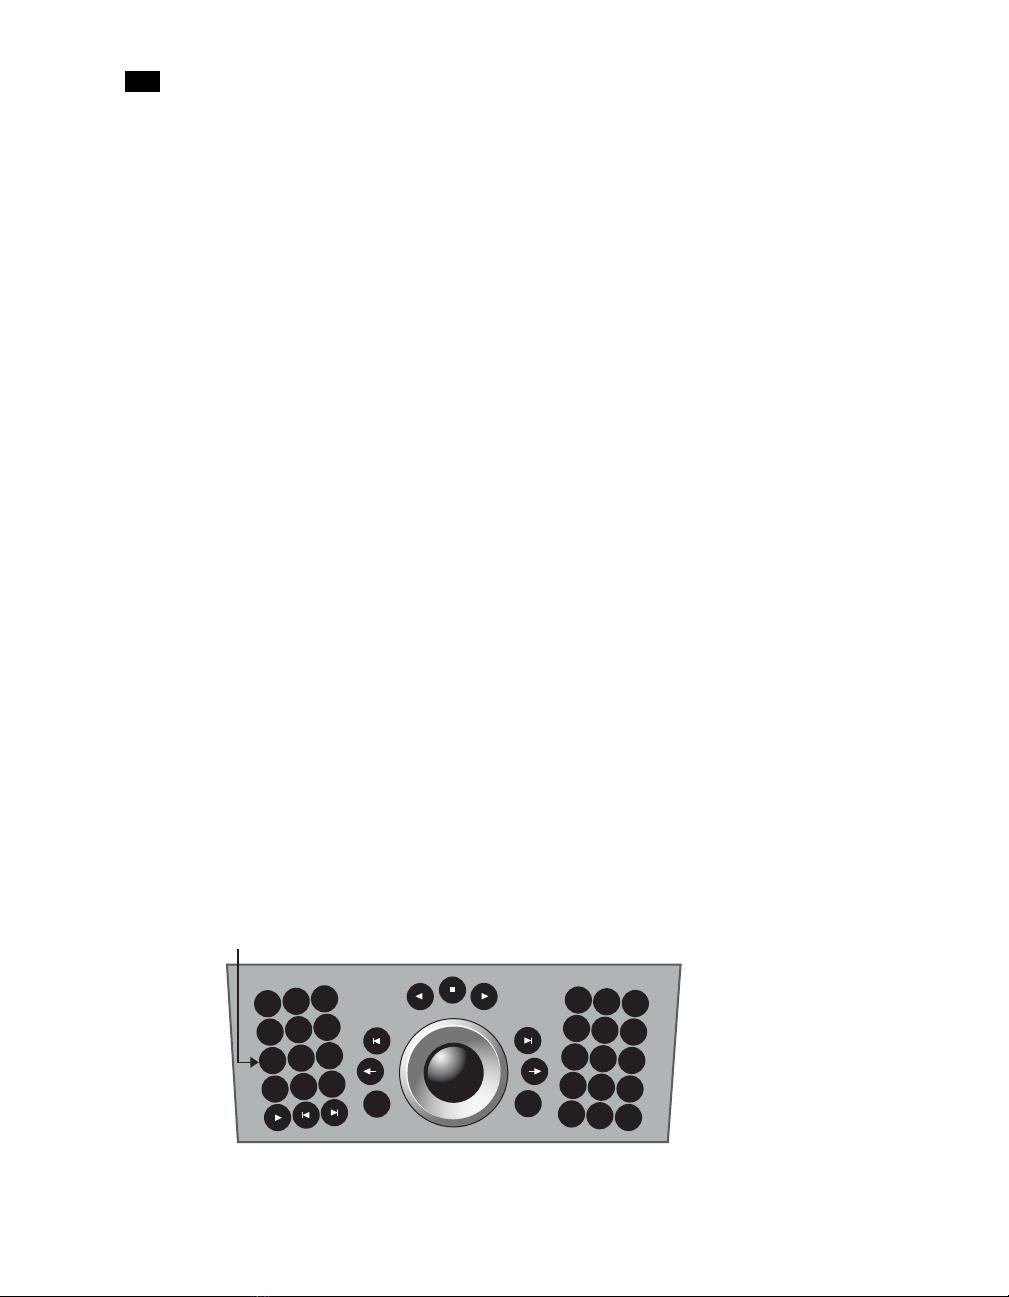
The following image shows the Navigation panel.

Control Surface Panel Descriptions
3
Use the Navigation panel to:
• Select menus. Pressing one of the menu buttons along the top of the panel activates a menu.
For example, pressing the Grade button activates grading functionality.
• Reset or bypass the currently selected menu.
• Cache memory.
• Navigate the Storyboard.
• Pan and zoom the image.
• Copy grades.
• Activate mouse functionality.
• Add keyframes.
• Revert and compare grades.
• Toggle playback mode between Storyboard and clip loop.
• Switch playheads.
• Scroll shots.
• Undo and redo actions.
• Perform actions with the Grade bin.
• Adjust printer lights.
.
Curve Key P&S
Inside Misc
Outside
#0001.000019
InPr OutPr GeomGrade
GRADE CURVES KEY GEOM P&S MISC MORE
1
-
4
7
56
9
8
2
0
+/-
RECALL GRADE
3
ALT ENTER
CURSOR
REVERT
COMP
UNDO
REDO
DO
RESET
OFFSET
SCROLL
CLIP A/B
MARK
MOREF1
F2
OUT
IN
MEM
F4F3
BYPASS

The Autodesk Control Surface
1
4
• Jump to specified frame number or timecode on the Storyboard.
• Show or hide user interface elements.
• Adjust the appearance of the panels.
The following image shows the Function panel.
Use the Function panel to work in the menu you activated in the Navigation panel. For example,
if you pressed the Key menu button in the Navigation panel, the functions for pulling a key are
activated in the Function panel. The features available on the Function panel depend entirely on
the menu selected in the Navigation panel. You can use the digital display at the top of the panel
as a guide for understanding how functionality is distributed when a given menu is active.
You can also use the Function panel to set viewing modes. Some of the viewing functions
included in the Function panel include multi-view, wipe, split, proxy, output, and print view.
The following image shows the Colour Grading panel.
High
Hue Brightness Saturation
G+ B+R+
R G B Sh Mid
BrightBright +
G - B -R - -
Multi
Matte
O/P
Still
ALT
Wipe
Split
Proxy
F1 F2 F3
F4 F5 F6
F7
F8
F1
F1
F2
F3
F4
F5
F6
F1
F2
F3
F4
F5
F6
F2
F3
F4
F5
SHOW

Navigating the Storyboard
5
Use the Colour Grading panel for most grading functions. Colour grading functionality is split
between the Colour Grading and the Function panels. The Colour Grading panel is always in
grading mode. Depending on the colour space selected in the Setup Project menu, either Linear
or Logarithmic functionality is available.
The Colour Grading panel also contains the tablet.
Navigating the Storyboard
You can use the Navigation panel to:
• Scrub the Storyboard.
• Scroll through the shots in the Storyboard.
• Toggle between the regular and large Storyboard viewing modes.
• Jump to a specified frame or timecode on the Storyboard.
• Jump ahead or back a frame at a time, or a shot at a time.
• Play forwards or backwards.
F1 F2 F3 F4 F5 F6 F7 F8 F9
Shadow Contrast Brightness
25 25 25

The Autodesk Control Surface
1
6
To scrub the Storyboard:
hUse the ring portion of the trackball.
To scroll through shots on the Storyboard:
1. Press the Scroll button.
2. Use the ring portion of the trackball.
3. Press the Scroll or Do button to confirm the move.
To switch between regular and large Storyboard viewing modes:
1. Press the top More button on the Navigation panel.
The Label, Tnails, and GUI options appear in the digital display at the top of the panel. The
location of each option in the digital display reflects their button position on the panel.
.
1
-
4
7
56
9
8
2
0
+/-
RECALL GRADE
3
ALT ENTER
CURSOR
REVERT
COMP
UNDO
REDO
DO
RESET
OFFSET
SCROLL
CLIP A/B
MARK
Shot back Shot forwardPlay / Stop
Enter
TC/Frm
Frame
back
Frame
forward
Scrub
timeline
Scroll
shots
Play & Shot
forward/back
Thumbs
Inside Outside
#0001.000019
InPr OutPr Label
GRADE CURVES KEY GEOM P&S MISC MORE
Gui
MOREF1
F2
OUT
IN
MEM
F4F3
BYPASS
Storyboard

Navigating the Storyboard
7
2. If the Storyboard option does not appear, press the button for Thumbs (the P&S button) to
display Storyboard thumbnails. This makes the Storyboard option appear in the digital
display.
3. Press the button for Storyboard (the Key button). This switches Storyboard thumbnails to
the large Storyboard option.
N
OTE
:
This is equivalent to using the
Q
hot key.
To jump to a specified frame on the Storyboard:
1. Press the Enter button.
2. Do one of the following:
• To jump ahead, enter the frame number using the numeric pad on the right side of the
panel.
• To jump back, press the +/- button on the numeric pad and then enter the frame number.
3. Press the Enter button to jump to the specified frame.
To jump to a specified timecode on the Storyboard:
1. Press the Enter button.
2. Enter a timecode using the numeric pad on the right side of the panel.
3. Press the Enter button to jump to the specified timecode.
To jump back or ahead a frame at a time:
1. To jump back a frame, do one of the following:
• Press the Frame Back button (left arrow button to the left of the trackball).
• Simultaneously press the Shot Back button (below the Redo button) and the Play button
(below the Do button).
Thumbs
Inside Outside
#0001.000019
InPr OutPr Label
GRADE CURVES KEY GEOM P&S MISC MORE
Gui
MOREF1
F2
OUT
IN
MEM
F4F3
BYPASS
Storyboard
Storyboard view mode switch
The Autodesk Control Surface
1
8
2. To jump ahead a frame, do one of the following:
• Press the Frame Forward button (right arrow button to the right of the trackball).
• Simultaneously press the Shot Forward button (below the Undo button) and the Play
button (below the Do button).
To jump to the beginning or end of a shot:
1. To jump to the first frame of the shot, press either of the two Shot Back buttons. One button
is located to the left of the trackball, and the other is below the Redo button.
2. To jump to the last frame of the shot, press either of the two Shot Forward buttons. One
button is located to the right of the trackball, and the other is below the Do button.
To play forwards or backwards:
1. To play the Storyboard forward, do one of the following:
• Press the Play Forward button (above the trackball).
• Press the Spacebar-style Play button (below the Undo button). This button operates like
the Spacebar on the keyboard, in that you use it both to start and stop playback.
2. To play the Storyboard backwards, press the Play Backwards button (above the trackball).
3. To stop playback, do one of the following:
• Press the Stop button (above the trackball).
• Press the Spacebar-style Play button.
Toggling Play Modes
You can toggle the playback mode between looping a shot or looping the entire Storyboard.
To toggle play modes:
hPress the Clip button on the Navigation panel.
This button corresponds to the Play Mode button in the user interface.
.
1
-
4
7
56
9
8
2
0
+/-
RECALL GRADE
3
ALT ENTER
CURSOR
REVERT
COMP
UNDO
REDO
DO
RESET
OFFSET
SCROLL
CLIP A/B
MARK

Activating Mouse Functionality
9
Activating Mouse Functionality
You can enable mouse functionality on the Navigation panel.
To activate mouse functionality:
1. Press the Cursor button on the Navigation panel.
2. Use the panel’s features as follows.
Panning and Zooming the Image
You can use the Navigation panel to pan and zoom the image.
Use the: As the:
Trackball Mouse.
Backward play button Left mouse button.
Stop button Middle mouse button.
Forward play button Right mouse button.
.
1
-
4
7
56
9
8
2
0
+/-
RECALL GRADE
3
ALT ENTER
CURSOR
REVERT
COMP
UNDO
REDO
DO
RESET
OFFSET
SCROLL
CLIP A/B
MARK
.
1
-
4
7
56
9
8
2
0
+/-
RECALL GRADE
3
ALT ENTER
CURSOR
REVERT
COMP
UNDO
REDO
DO
RESET
OFFSET
SCROLL
CLIP A/B
MARK
Alt Zoom Pan

The Autodesk Control Surface
1
10
To zoom the image:
hHold down the ALT button on the Navigation panel and use the ring on the trackball to
zoom in and out.
To pan the image:
hHold down the ALT button on the Navigation panel and use the jog ball on the trackball to
pan the image.
Resetting Zoom and Pan
You can now reset the zoom and pan.
To reset the zoom and pan:
hHold down the ALT button on the Navigation panel and press the Reset button.
N
OTE
:
The zoom and pan are always reset together.
Customizing the View
There are options for customizing the view on both the Navigation panel and the Function
panel.
When working with secondaries, users can use the Function panel to view them in Saturated
Mask view or Matte view. Saturated Mask view displays the range of colours you define through
a greyscale image. The unselected colours remain grey. Matte view displays a black and white
template indicating which parts of the image are transparent (black), and which are opaque and
selected (white).
.
1
-
4
7
56
9
8
2
0
+/-
RECALL GRADE
3
ALT ENTER
CURSOR
REVERT
COMP
UNDO
REDO
DO
RESET
OFFSET
SCROLL
CLIP A/B
MARK
ALT
Reset

Customizing the View
11
To access view options available on the Navigation panel:
1. Press the top MORE button on the Navigation panel.
The Panel, Storyboard, Label, Thumbs, and GUI options appear in the digital display at the
top of the panel. The location of each option in the digital display reflects their button
position on the panel.
2. Select one of the following options.
Press: To toggle the:
CURVES Panel sensitivity.
KEY Storyboard on or off.
GEOM Shot name on or off the image.
P&S Storyboard thumbnails on or off.
MISC Full-screen Player on or off.
Thumbs
Inside Outside
#0001.000019
InPr OutPr Label
GRADE CURVES KEY GEOM P&S MISC MORE
Gui
MOREF1
F2
OUT
IN
MEM
F4F3
BYPASS
Storyboard

The Autodesk Control Surface
1
12
To access view options available on the Function panel:
hUse the viewport options to change the view as you work on your grades. For example, press
PROXY to view a proxy version of your shot in the Player.
Viewport option Description
MULTI Toggles multi-shot display on and off in the Player. You can view up to
16 shots. In order for Multi to function, you must enable split-view first
by pressing the Split button on the panel, or
F5
on the keyboard.
WIPE Toggles between horizontal and vertical split view in the Player. In order
for Wipe to function, you must enable split-view first by pressing the
Split button on the panel, or
F5
on the keyboard.
SPLIT Enables split-view in the Player, and the Multi and Wipe buttons.
PROXY Toggles between the full-resolution and half-resolution (proxy) version
of your shot in the Player. If you have not rendered a proxy, an X appears
in the Player.
MATTE Toggles between secondary grading view and result view.
O/P Toggles between a rendered version of your shot (P) and the pre-
rendered version with grading applied (O). If you have not rendered the
shot, an X appears in the Player when in P mode. Press the ALT and O/P
buttons simultaneously to toggle to I mode (this displays the image
with colour corrections made in the Grading and Curves menus only).
STILL Displays the stored reference image. Press the ALT and Still buttons
simultaneously to store the current frame in the reference buffer.
High
Hue Brightness Saturation
G+ B+R+
R G B Sh Mid
BrightBright +
G - B -R - -
Multi
Matte
O/P
Still
ALT
Wipe
Split
Proxy
Viewport options
F1 F2 F3
F4 F5 F6
F7
F8
F1
F1
F2
F3
F4
F5
F6
F1
F2
F3
F4
F5
F6
F2
F3
F4
F5
SHOW

Customizing the Panel Sensitivity
13
N
OTE
:
You can also access the SHOW button in the Function panel. This button shows or hides
the geometry wireframe for the current secondary layer.
N
OTE
:
There is no functionality assigned to the Function panel’s ALT button for this release.
To change fonts in the digital display:
hOn the keyboard, press SHIFT+F until you obtain the desired font.
N
OTE
:
The change is only maintained for the current session.
To toggle between “O” view and Matte view:
1. Press the MATTE button on the Function panel.
2. Hold down the ALT button on the Function panel while pressing MATTE again to switch
between Saturated Mask view and black and white Matte view.
H
INT
:
You can go directly to Saturated Mask view mode from another mode, e.g. Output, by
holding down the ALT button and pressing Matte.
Customizing the Panel Sensitivity
When you enable the Edit function, you can modify the sensitivity of any modifier (e.g., knobs,
wheels, and rings). These items include the Grading, Curves, Key, Geom, P&S, and Misc menu.
High
Hue Brightness Saturation
G+ B+R+
R G B Sh Mid
BrightBright +
G - B -R - -
Multi
Matte
O/P
Still
ALT
Wipe
Split
Proxy
ALT
F1 F2 F3
F4 F5 F6
F7
F8
F1
F1
F2
F3
F4
F5
F6
F1
F2
F3
F4
F5
F6
F2
F3
F4
F5
SHOW
Matte

The Autodesk Control Surface
1
14
To edit the sensitivity of the Autodesk Control Surface panels:
1. On the Navigation panel, press the top MORE button.
2. Press the CURVES button to enter the Panel menu.
In the Panel menu you can Edit (F4 button), Save (IN button), and Revert (OUT button)
your panel sensitivity changes.
3. Press the F4 button to enable the Edit mode.
4. Touch any modifier you want to change its sensitivity on the panel. Turn the modifier
clockwise to increase the sensitivity or counter-clockwise to decrease the sensitivity.
N
OTE
:
The Function panel displays the Grade menu by default. To change the sensitivity of the
Curves, Geometry, Keyer, or Reposition menu, you must enable the menu you want to modify
first before entering the panel sensitivity option.
When a control is selected, its name and sensitivity are displayed on all the LCD panels. The
last line of the LCD displays the control you are modifying, its value, and the enabled Edit
mode.
N
OTE
:
Some control names are long and therefore are truncated on the Navigation panel LCD.
The Function and Grading panels display the full name and value.
5. Press the F4 button again to disable the Edit mode. You can now test out the new sensitivity
value.
N
OTE
:
Pressing F4 does not exit you from the Panel menu.
N
OTE
:
You need to save the rules file in order to commit your modification. If you do not save
the modification, you will lose the modified value(s) when you quit Lustre.
Saving the Sensitivity Modifications
When you have completed making modifications to the sensitivity of your Autodesk Control
Surface panel and tested the sensitivity, you must save your changes.
#0001.000019
GRADE CURVES KEY GEOM P&S MISC MORE
MOREF1
F2
OUT
IN
MEM
F4F3
BYPASS
Storyboard Save Revert
Edit
LabelPanel Thumbs Gui
Table of contents


