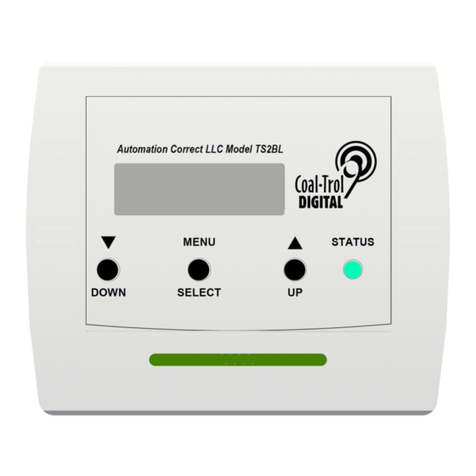
Automation Correct Coal-trol Digital TS2BL User manual

Coal-trol Digital™ TS2BL Thermostat
User Manual
© 2022 Automation Correct, LLC
The Coal-trol Digital™ system has
been specifically developed to
improve the performance and
convenience of your anthracite coal
stove. The TS2BL thermostat and
solid-state control module make this
possible.
An investment of a small amount of
time to review this manual will ensure
the proper performance of your
Coal-trol Digital™ system.
Features, compatibility and benefits of the TS2BL Thermostat:
● Fully compatible with Coal-trol TS2 Thermostat. Must be used with CM2-OEM, CM2-4,
and CM2-4-XX Control Modules.
● Custom backlit display for easy use and setup.
● Single Setpoint Mode (default, super easy to use), TS2 Mode (two setbacks), TS2ES
Mode (formerly Energy Star - 4 setbacks Weekdays, 4 setbacks Weekends). You
choose.
● New - power loss timer recovers fire or prevents fuel feed when fire is out after power
interruption.
● Variable speed convection fan speed - Automatic or manual control.
● New - two RJ45 connectors - choose behind wall or surface wiring.
● Standard on appliances by Leisure Line Stove and Hitzer Stoves.
● Use to upgrade control systems on Alaska, Keystoker, Reading, Harman (Magnum),
Triburn and other anthracite stoker stoves and furnaces.
MADE IN USA Automation Correct LLC • Syracuse NY

Contents
Welcome 3
Safety and Warnings 4
For Service or Repair 5
Coal-trol Digital™ Limited Warranty 5
Locating and Mounting the Thermostat 6
QuickStart 7
Recommended Settings by Stove Brand 9
Setpoint Modes and TS2 & TS2ES Compatibility 9
Power Outages 10
Test Mode 11
Menus 13
Round-Robin / Home 13
Quick Menu 15
Press and Hold MENU Sequence 15
FEED 16
SETUP 16
Setpoint Programming 18
“TS2” SPM Mode 18
“ES” SPM Mode 19
ADVANCED 20
RESET 23
Advanced Topics 24
Control Module Type 24
Dual Stoker 25
Tri-burner Stoves 25
Manual Fan Safe Threshold and Time Settings 26
Where did HLF go? 27
The Temperature Keeps Overshooting Way Above Setpoint 27
Generator and Off-Grid Power 28
Boiler, Biomass, Gasifier, and Other Heating Appliance Types 28
Specifications 29
TS2BL: User Manual © 2022 Automation Correct, LLC 2

Welcome
To a new era in solid fuel heating. You have chosen to improve your household comfort and
increase the efficiency of your heating dollars.
The TS2BL is designed to be mounted to an interior wall, out of direct sunlight. Mounting
hardware is provided and two thermostat control cord receptacles are available to
accommodate different mounting situations. The thermostat should not be placed on a shelf or
couch or placed in a location where it will be insulated from the flow of air in the space you are
heating. In your thermostat’s packaging you will find an insert that has thermostat wall mounting
instructions and a drilling template.
This manual assumes you have already installed and connected the Control Module to your
stove’s motors. Please reference the Control Module manual for installation instructions, or
contact a local automatic coal stove installer.
Connect the TS2BL to your Control Module using the thermostat control cord. Automation
Correct can supply you cords of different lengths if the one included in your system purchase is
not long enough. You can also use standard ethernet patch cords to connect the thermostat to
the control module. Do not connect either the TS2BL or control module to an ethernet network.
It may result in damage to the Coal-trol or your ethernet equipment.
Power will be supplied to the TS2BL thermostat once the control module is plugged into an
electrical outlet and your thermostat is connected to your control module. Any switch integrated
in your CM-OEM or CM2 control module only controls power to the motor outputs, not to the
connected thermostat.
TS2BL: User Manual © 2022 Automation Correct, LLC 3

Safety and Warnings
ATTENTION - Please follow all manufacturer instructions that came with your stove or
furnace. The Coal-trol Digital is designed to complement and enhance the safe operation
of your appliance. Specifically, the Coal-trol Digital control system has been designed for
use with appliances tested to ANSI Standard Designation: E1509-95, Standard
Specification for Room Heaters, Pellet Fuel-Burning Type and/or UL1482, Room Heaters,
Solid Fuel Type.
Use of the Coal-trol Digital™ on appliances not permanently marked with one of the above
designations voids all warranties and may be unsafe. Contact us or your stove manufacturer if
you are not sure that your stove/furnace is built in compliance with these safety standards.
WARNING - The Coal-trol Digital™ is capable of regulating a coal fire smaller than required to
maintain a proper chimney draft. Follow all manufacturer's recommendations for minimum draft
pressures and temperature. The use of mechanical means such as a draft inducer fan may be
required to ensure proper draft at low fire. Installation of a carbon monoxide detector (not
included) is highly recommended.
Please keep reading… Additional Safety Information:
THIS PRODUCT HAS A GROUNDING TYPE PLUG AND REQUIRES A GROUNDING TYPE
OUTLET. IF THE PLUG DOES NOT FIT, CONTACT A QUALIFIED ELECTRICIAN. DO NOT
MODIFY THE PLUG IN ANY WAY.
TO REDUCE THE RISK OF ELECTRIC SHOCK, DO NOT CONNECT TO A CIRCUIT AT
MORE THAN 150 VOLTS TO GROUND.
RISK OF ELECTRICAL SHOCK: THE CONTROL MODULE AND THERMOSTAT HAVE NO
SERVICEABLE PARTS INSIDE. SEE WARRANTY FOR SERVICE.
WARNING: BYPASS OF MECHANICAL VENT SPILLAGE SWITCH (FUME SWITCH) OR
BONNET TEMPERATURE LIMIT, IF INSTALLED IS DANGEROUS. OPERATION MAY CAUSE
SERIOUS INJURY OR DEATH, DUE TO CO POISONING OR FIRE.
FOR INDOOR USE ONLY
TS2BL: User Manual © 2022 Automation Correct, LLC 4

For Service or Repair
Contact your dealer or our company.
Phone: (315) 299-3589 (Leave a message. We get too many junk calls)
Email: [email protected]
Web: www.automationcorrect.com
Coal-trol Digital™ Limited Warranty
THREE-YEAR WARRANTY - Automation Correct LLC (us) warrants TS2BL Thermostat and Control Module to
be free from defects in material and workmanship. If a defect is found within three years from the date of
original installation of the product (whether or not actual use begins on that date) Automation Correct LLC will
provide a new or remanufactured part, at our sole option, to replace any defective part, without charge for the
part itself.
This warranty does not include labor or other costs incurred for diagnosing, repairing, removing, installing,
shipping, servicing, or handling either defective parts or replacement parts.
Warranty Conditions:
1. Warranties only apply to products in their original installation location.
2. Installation, use, care, and maintenance must be normal and in accordance with the instructions
contained in the Operation Manual, Installation Manual and Automation Correct LLC's Service
Information.
3. Defective parts must be returned to us or an authorized dealer for credit.
4. All work is performed during normal business hours.
5. This warranty applies only to residential use.
LIMITATIONS OF WARRANTIES - All implied warranties (including implied warranties of merchantability
and fitness for a particular purpose) are hereby limited in duration to the period for which the LIMITED
WARRANTY is given and applies. Some states do not allow limitations on how long an implied warranty
lasts, so the above may not apply to you. The expressed warranties made in this warranty are exclusive
and may not be altered, enlarged, or changed by any distributor, dealer, or other person whatsoever.
Automation Correct LLC will not be responsible for:
1. Damage or repairs as a consequence of faulty installation, misapplication, abuse, improper servicing,
unauthorized alteration or improper operation.
2. Failure to operate due to voltage conditions, blown fuses, open circuit breakers or other conditions
beyond the control of Automation Correct LLC.
3. Parts not supplied or designated by us, or damages resulting from their use.
4. Automation Correct LLC products installed outside the 50 US states or Canada.
5. Cost of heating fuel of any kind whatsoever including electricity.
6. Any special indirect or consequential property or commercial damage of any nature whatsoever. Some
states do not allow the exclusion of incidental or consequential damages, so the above limitation may
not apply to you.
This warranty gives you specific legal rights, and you also may have other rights, which vary from state
to state.
TS2BL: User Manual © 2022 Automation Correct, LLC 5

Locating and Mounting the Thermostat
Mount the TS2BL thermostat at eye level, preferably on an interior wall. For proper operation
the thermostat must either be in the same room as the stove, or must readily sense the diffuse
heat from a heat discharge and return air duct system. Avoid the direct breeze of warm
discharge air on the thermostat. To the side or rear, or across the room from a stove is good.
The TS2BL connects to the Control Module on the appliance with a RJ45 wire.
Choose either behind the wall wiring method or wall surface wiring method. Use the template
included with your thermostat to assist in mounting.
TS2BL: User Manual © 2022 Automation Correct, LLC 6

QuickStart
The TS2BL is compatible with the vast majority of forced air automatic coal stoker stoves on the
market and in use. It can be used straight out of the box with no setup needed for users of
Leisure Line and Hitzer brand stoker stoves. If you are using a Coal-trol Digital system on a
Keystoker, Alaska, Reading, Harman, or other brand automatic stoker stove you will need to
adjust your IDLE, MAX, and possibly your TRBN settings. The recommended settings for which
are detailed in the Recommended Settings by Stove Brand section below. Applying those
settings is detailed in the SETUP and ADVANCED menu sections below.
Button and Display Basic Description
Operation of the TS2BL thermostat is accomplished with two types of button presses. First is
the “tap” which is a short duration press and release of a button lasting no more than one
second. The second type of press is the “press and hold” where you press a button and hold it
down for an extended period of seconds, releasing only after reaching a desired screen or
result.
Upon power up from an extended loss of power, the thermostat will go through an initialization
that displays the version number of the software, the manufacturer the thermostat is sold by,
and then “PWR LOSS” with the LCD flashing. The Coal-trol Digital Control Module outputs will
all be off in this power outage recovery mode. This is a safety that waits for the user to
acknowledge the restart from complete loss of power before it will operate the stove’s feeder.
This will prevent the Coal-trol system from dumping a hopper of coal into the ash pan after a
power outage event that lasted long enough for the fire to have gone out.
TS2BL: User Manual © 2022 Automation Correct, LLC 7

Acknowledge the power up and get your stove running by tapping the MENU button. More
information on how the TS2BL handles power outages and the four different restart modes is
contained in the Power Outages section.
The thermostat comes pre-configured for Single Setpoint mode (SSP). In this mode there is
only one setpoint used for all times and days of the week. Adjusting that setpoint is as simple
as tapping the UP/ DOWN buttons (or pressing and holding them to make larger adjustments)
while the unit is in the round-robin screens. The thermostat will adjust the stove’s fire to reach
and maintain the set temperature. More details on the three available setpoint modes can be
found in the Setpoint Modes and TS2 & TS2ES Compatibility section.
For many people, that’s all there is to it!
If you wish to use multiple setpoints, as were available with the TS2 or TS2ES; if you need to
adjust settings for one of the above mentioned stove brands; if you have a dual stoker Coal-trol
Digital system or other customized configuration; or if you wish to learn more about the
capabilities and features of your new Coal-trol Digital TS2BL thermostat, please read on.
TS2BL: User Manual © 2022 Automation Correct, LLC 8

Recommended Settings by Stove Brand
The TS2BL comes pre-loaded with settings appropriate for most Leisure Line and Hitzer brand
automatic stoker stoves. If you have another brand stove please reference this table and adjust
the TS2BL’s settings to the recommended defaults for your stove. These, like the pre-loaded
settings, are our recommended starting points. Manufacturing differences, tolerances, and parts
changes can result in the user needing to adjust from these recommendations to achieve the
optimal range of operation for their stove.
Setting
Display
Leisure Line
Hitzer
Keystoker
90/105/Koker
Reading
(Tri-burner)
Reading
(separate
combustion
blower)
Alaska
(paddle)
Harman
(Magnum)
Idle Feed
Rate
IDLE
6
10
50
5
4
6
Maximum
Feed Rate
MAX
40
85
99
25
30
99
Triburn
TBRN
N
N
Y
N
N
N
Mechanical
N/A
Set feeder
screw to full
clockwise.
Set red nut to
⅝” from acorn
nut.
Set red nut to
tight against
acorn nut, then
back off 2
turns.
N/A
Set adjustment
handle to 11/16”
from the acorn
nut.
Follow the instructions in the sections below for accessing the IDLE and MAX settings in the
SETUP menu and, if necessary, the TBRN setting in the ADVANCED menu, to apply these
recommended settings.
Setpoint Modes and TS2 & TS2ES Compatibility
As mentioned in the QuickStart section above, the Coal-trol Digital TS2BL thermostat comes
with the Single Setpoint, or SSP, mode of operation pre-loaded from the factory. In this mode
there is only one setpoint and it is adjustable directly from the round-robin screens by using the
UP/DOWN buttons.
The TS2BL offers two additional modes of operation:
The TS2 mode provides the setpoint experience of the original TS2 thermostat by providing 2
programmable set points, one for daytime and one for nighttime. These two setpoints are used
on all days of the week. You get to control the time of the setpoint as well as the temperature
setting. While in this mode, on the round-robin screens, you can perform a temporary override
TS2BL: User Manual © 2022 Automation Correct, LLC 9

of the currently programmed setpoint by using the UP/DOWN buttons to adjust the temperature
setting. When the next programmed setpoint time comes, the programmed setpoint will take
over. In this mode, you will need to set the thermostat’s time setting in the SETUP menu.
Setpoint programming is also available in the SETUP menu, detailed in the SETUP menu
section below.
Lastly, there is the ES mode, which replicates the setpoint programming capability of the original
TS2ES thermostat. In this mode, you have 8 programmable setpoints, 4 for weekdays
(morning, day, evening, and night) and 4 more for weekends. Like with the TS2 mode, setpoint
programming is accomplished in the SETUP menu. You will have to set a time as well as the
day, also done in the SETUP menu. Temporary overrides of setpoint temperatures is
accomplished by using the UP/DOWN buttons from the round-robin screens. An override will
revert to the programmed setpoint temperature when the next programmed setpoint time is
reached.
If you wish to make a long-term override of programmed setpoints, such as for a vacation, it is
recommended you switch the thermostat back into Single Setpoint (SSP) mode and set the
temperature where you want it. Any programmed setpoints you have set up while in TS2 or ES
mode will be remembered and reinstated when you return the TS2BL back to the TS2 or ES
mode.
Power Outages
The TS2BL has a new feature that better handles power outage situations. In the event of a
power outage, one of four things will happen.
No Warning
Screen
Less than 5
minutes
If power is removed for less than 5 minutes the TS2BL will
restart and operate normally as if nothing has happened.
Time will be kept during the outage and the clock adjusted
accordingly if using TS2 or ES mode, but there will be no
change in the operation of the stove from before the power
outage.
“PRW IDLE”
5 to 8
minutes
If power is removed for between 5 and 8 minutes, the TS2BL
will restart into an idling mode and flash “PRW IDLE” on the
screen. This is to attempt to maintain a fire, but allow you
time to check on the fire condition before normal operation
resumes. Normal operation will not resume until you
acknowledge the warning by tapping the MENU button.
While in this power outage recovery mode the stove will
operate at the IDLE feed rate. Normal temperature control
will not happen until you acknowledge the warning. Time is
kept during the outage and will be adjusted automatically
when power is restored, if using TS2 or ES mode.
TS2BL: User Manual © 2022 Automation Correct, LLC 10

“PRW OUT”
8 or more
minutes
If power is removed for 8 or more minutes, but not long
enough for the thermostat’s backup power to be depleted, the
TS2BL will restart into a power out mode and flash “PRW
OUT” on the screen. In this mode the stoves motors will be
turned off and the control will wait for you to acknowledge the
warning screen by tapping the MENU button, when it will
resume normal operation. This mode assumes that the fire
has gone out after 8+ minutes and will prevent coal being
dumped into the ash bin. Time is kept during the outage and
will be adjusted automatically when power is restored, if using
TS2 or ES mode.
“PWR LOSS”
1 hour or
more
If power is removed for more than an hour the TS2BL’s
backup power will likely be depleted. When power is restored
the control will startup in the power loss mode and flash
“PWR LOSS” on the screen. Tap the MENU button to start
normal operation. This is the mode the thermostat will start
up in when you first power it up after installation. Time will
not be kept during this outage duration, so you will need to
manually adjust the time setting as needed if you are using
TS2 or ES mode.
Test Mode
When setting up your stove, after reconnecting it from the off-season, or when you’re
troubleshooting a problem it is often useful to run the TEST mode of the thermostat, to cycle
through the outputs of the control module. The TEST mode is located in the SETUP menu
under the TEST action item.
To enter the TEST mode:
● Press and hold the MENU button for 10 seconds, until the screen reads “SETUP”, then
release.
● Tap the MENU button until you see the word “TEST” on the display.
● To start the TEST mode cycle, tap the UP or DOWN button.
If you go past the TEST item, you can keep tapping MENU to loop through the SETUP menu,
until you get back to it.
While in the TEST mode cycle, the display will show what stage of the test is being run. These
stages will auto-advance in a continuous cycle, changing every 10 seconds.
TS2BL: User Manual © 2022 Automation Correct, LLC 11

The stages and what it’s doing are:
Stage
Description
“ALL OFF”
Turn off all outputs.
“STOKER”
Turn on only the stoker output.
“COMBSTN”
Turn on only the combustion blower output.
“CONVCTN”
Turn on only the convection blower output.
“VENT”
Turn on only the power vent output. Only shown if CMT mode is set
to “SV” or “SFV”, see ADVANCED menu for more information.
“SUPP FAN”
Turn on only the supplemental/aux fan output. Only shown if the
CMT mode is set to “SF” or “SFV”.
“ALL ON”
Turn on all outputs at the same time.
The cycle will repeat until you turn off the mode by tapping any button.
If you are using a CMT setting of “D” (Dual Stoker) please see below in the Control Module
Type,SETUP, and ADVANCED sections for more details on how to use Dual Stoker features in
the TS2BL thermostat and to find out how TEST mode and its cycle stages when Dual Stoker
mode is set.
TS2BL: User Manual © 2022 Automation Correct, LLC 12

Menus
In this section you’ll learn all about the menus of the TS2BL. Here are some general principles
to help you navigate around.
1) Tapping any button while the backlight is off will turn the backlight on. This tap to turn on
the backlight will not modify any setting or influence the menus. The backlight will turn
off after 2 minutes of no button presses.
2) In almost all menu screens if you wait for 60 seconds the TS2BL will return to the
round-robin display. This is called round-robin auto-return. If you do not want to wait,
you can exit from most menu screens back to the round-robin by pressing and holding
MENU for about 3 seconds (you will see the current temperature screen show up on the
display). This is called jumping to the round-robin. The few menu screens where these
two behaviors do not work will be noted in the descriptions below.
3) Use the UP and DOWN buttons to adjust menu settings. Tap for minimum increments.
Press and hold to move faster through the available setting range.
4) Some items in the menus are sub-menus or action locations. To enter the sub-menu or
activate the action, tap the UP or DOWN button.
Round-Robin / Home
The round-robin screens auto-advance on a timed loop to show important information quickly, at
a glance.
Screen Example
Name
Description
“ 75℉”
Current
Temperature
Displays current temperature.
“DAY 71℉”
“OVR 82℉”
Setpoint
Temperature
Displays current setpoint.
In SSP mode this is not shown. It will only show when
the thermostat is in “TS2” or “ES” mode (see ADVANCED
menu section).
In TS2 or ES modes this will show “MOR”, “DAY”, “EVE”,
“NIT”, “OVR” for Morning, Day, Evening, Night, or
Override as is appropriate for the mode and the current
setpoint setting being used.
“FR 99%”
Feed Rate
Displays the current stoker feed rate.
That’s the end of the round-robin screens. If you use the UP/DOWN buttons while in the
round-robin screens, you will be brought to the Change Setpoint screen.
TS2BL: User Manual © 2022 Automation Correct, LLC 13

“SET 76℉”
“OVR 73℉”
“NIT 62℉”
Change
Setpoint
By using UP/DOWN buttons from any round-robin
screen, you will be put into this screen where you can
adjust the setpoint. You will notice that the display
flashes rapidly to help indicate you are in temperature
adjustment mode.
In SSP this screen will read “SET” followed by the
setpoint setting. This setting will be maintained until you
change it again.
In TS2 or ES modes this adjustment is a temporary
override until the next programmed setpoint time is
reached. When the setpoint temperature does not match
the currently programmed setpoint, it will read “OVR”
followed by the temperature setting. If the setting
matches the currently programmed setpoint, it will show
the currently programmed setpoint name – “MOR”,
“DAY”, “EVE”, or “NIT” – followed by the temperature
setting.
Tap the MENU button to return to the round-robin, or wait
5 seconds.
Lastly, if the thermostat detects a temperature higher than 95℉, it will go into a “HITEMP” alarm
mode where the control will shut down all outputs and flash “HITEMP” on the screen. To exit
this alarm state you must wait until the room temperature has fallen below 95℉ and then tap the
MENU button to acknowledge the condition and allow the control to start operating normally
again.
The round-robin screens will look like this when you’re in “SSP” (Single Setpoint) mode
(default):
These screens will look like this in “TS2” mode:
And in “ES” mode:
TS2BL: User Manual © 2022 Automation Correct, LLC 14

Quick Menu
Enter the quick menu by tapping MENU once while in any of the round-robin screens. Tap
MENU to move through each screen. Tap MENU again on the last screen to return to the
round-robin screens.
Screen Example
Name
Description
“AUTO FAN”
“FS 25%”
Fan Speed
Displays the fan speed setting. It will read “AUTO FAN”
when the fan is being controlled by the TS2BL’s logic. It
will read “FS” followed by a percentage value between 1
and 99% when you have it in manual fan speed mode.
You can adjust from auto control to manual by using the
UP/DOWN buttons. Reset it to AUTO mode by trying to
set a value of 0% or 100%.
“
5:10AM”
“THU
10:13PM”
Current Day
and Time
Displays the current day and time. This screen is not
shown if the SPM setting (see ADVANCED section) is set
to “SSP” (default). If set to “TS2” then only the time will
be shown. If set to “ES” then both day and time will be
shown.
If you tap UP or DOWN while on this screen you will be
able to adjust your time and day settings. The display
initially show just the time and it will flash rapidly to
indicate you are in adjustment mode. Press and hold
UP/DOWN to make large adjustments.
Once time is set, tap MENU. If you are in “TS2” SPM
mode the control will return to the normal time display. If
you are in “ES” SPM mode you will see the day setting
flashing rapidly. Use the UP/DOWN buttons to adjust the
setting. Tap MENU to return to the day/time display.
Press and Hold MENU Sequence
To reach the menus described in the sections below you need to press and hold the MENU
button. As you press and hold the menus will show up in sequence at roughly the number of
TS2BL: User Manual © 2022 Automation Correct, LLC 15

seconds listed. Press and hold until you see the menu you wish to enter, then release the
MENU button and you will be placed at the first setting in that menu section.
3 seconds
Jump back to the round-robin. This works in most locations, exceptions are
noted in screen descriptions in the sections below.
5 seconds
FEED Stoker (action item)
10 seconds
SETUP Menu
20 seconds
ADVANCED Menu
30 seconds
RESET (action item)
FEED
The “FEED” display is an action item. Press and hold MENU for 5 seconds until you see the
word “FEED” on the screen, then release. You will enter the FEED cycle upon releasing the
MENU button, shown by a countdown starting (“FEED 5” on the screen). While in this mode
the stoker motor will run at full speed. The number will countdown each minute. At the end of
the FEED cycle the thermostat will return to the FEED entry screen. You can exit the FEED
mode countdown by tapping any button, which will return you to the FEED action item screen.
While in the FEED countdown, round-robin auto-return and jump to round-robin with a 3 second
press and hold of the MENU button will not work. You must exit the FEED countdown first with
a button tap.
SETUP
The SETUP menu is where the most commonly used and accessed settings options are
located. To enter the SETUP menu press and hold MENU button for 10 seconds, until you
see the word “SETUP” on the screen, then release. Once in the menu, tap the MENU button
to move through the different settings, sub-menus, and action items. Tap the UP or DOWN
button to enter sub-menus or activate action items. This menu wraps to the first item when you
tap MENU button on the last item.
Screen Example
Name
Description
“SETPTS”
Setpoints
Sub-menu
Entry point for setpoint programming sub-menu. Tap UP or
DOWN to enter this sub-menu. See below for details on
the items inside this sub-menu. Only shows in SPM mode
“TS2” or “ES”, not in “SSP” (see ADVANCED menu
section).
TS2BL: User Manual © 2022 Automation Correct, LLC 16

“IDLE 6”
Idle Stoker
Rate
Adjust the idle (or minimum) fire setting. Lower values will
reduce the fire size. Higher will increase. See the
“Recommended Settings by Stove Brand” for suggested
values. While on this screen temperature control is
disabled and the stoker is forced to run at the idle rate
indicated. This menu screen will not auto-return to
round-robin.This screen remains displayed indefinitely
and the stoker is run at the speed indicated as long as you
stay on this screen. Use this screen to adjust your
minimum stable fire setting. Use care when you have a
natural draft chimney so that you maintain a proper draft
pressure.
“MAX 40”
Max Stoker
Rate
Adjust the maximum fire setting. Lower values will reduce
the fire size. Higher will increase. See the
“Recommended Settings by Stove Brand” for suggested
values. While on this screen temperature control is
disabled and the stoker is forced to run at the max rate
indicated. This menu screen will not auto-return to the
round-robin.This screen remains displayed indefinitely
and the stoker is run at the speed indicated as long as you
stay on this screen. Use this screen to adjust your
maximum fire size, without pushing burning coal off the
end of the grate. Use care not to overheat your stove by
running on this screen for extended periods of time. If
you’re having trouble adjusting, leave the screen, let the
stove cool down, and return to making adjustments later.
“PVS 99%”
Power Vent
Speed
Adjust the speed of the power vent. This is only available
with a properly equipped control module and when the
TS2BL’s “CMT” setting is set to “SV” or “SFV” (see
ADVANCED menu section). Use care to maintain a proper
draft pressure when adjusting. Follow your stove or power
vent manufacturer’s recommendations on power vent
installation, draft pressure, and motor speed settings.
“CFT 12”
Convection
Fan
Threshold
Adjusts the minimum feed rate at which the convection fan
will first turn on when fan speed is in the “AUTO FAN”
mode (see above in the Quick Menu section). The default
setting is usually good, but some stoves benefit from a
higher or lower setting to let more or less heat build-up in
the stove body before the fan is turned on.
“FDR 2”
Feeder
Selection
This controls whether 1 or 2 stokers are being run on a
Dual Stoker stove setup. Can only be used with a properly
equipped control module and is only shown when the CMT
advanced menu setting is set to “D” (see ADVANCED
menu section).
“TEST”
Test Mode
This is the action item to enter the control module output
TS2BL: User Manual © 2022 Automation Correct, LLC 17

TEST mode. Press the UP or DOWN button to activate it.
When in this mode the display will cycle through the
outputs of the control module, turning them all off first, then
each output on individually, and then finally all them on
together. This cycle will repeat until you exit the TEST
cycle. To exit back to the “TEST” prompt, tap any button.
While running the TEST cycle, the thermostat will not
auto-return to the round-robin and the jump to the
round-robin by pressing and holding MENU for 3 seconds
will not work. You must exit the TEST cycle by tapping a
button first. More information on TEST mode can be found
in the Test Mode section.
“INFO”
About Info
Sub-menu
Tap the UP or DOWN button on this menu screen to enter
the INFO sub-menu. Once in this sub-menu, you will be
able to tap the MENU button to cycle through the screens
that display version information and manufacturer
information. The last item in this sub-menu is “EXIT”. Tap
the UP or DOWN button on this item to EXIT back to the
“INFO” menu screen.
“EXIT”
Exit the
SETUP
menu
Tap the UP or DOWN button on this menu screen to exit
the SETUP menu back to the round-robin screens.
Tapping MENU on this screen will cycle you back to the top
of this SETUP menu screen set.
Setpoint Programming
Setpoints are programmed via the SETPTS sub-menu in the SETUP menu. To enter the
sub-menu tap UP or DOWN on the SETPTS sub-menu item. This sub-menu is only displayed if
the thermostat is in the “TS2” or “ES” mode (see SPM in ADVANCED menu section below and
the Setpoint Modes and TS2 & TS2ES Compatibility section above for more information on this
setting).
Remember, after making any adjustments, you do not need to exit via the “EXIT” menu options,
you can press and hold the MENU button for 3 seconds to jump back out to the round-robin, or
you can simply leave the thermostat alone and in 60 seconds it will auto-return to the
round-robin.
“TS2” SPM Mode
If your control is in the “TS2” SPM mode, you will see these options:
Screen Example
Name
Description
“DAY
6:00AM”
Day Setpoint
Use to set the day setpoint time.
TS2BL: User Manual © 2022 Automation Correct, LLC 18

Time
“DAY 75℉”
Day Setpoint
Temperature
Use to set the day setpoint temperature.
“NIT
10:00PM”
Night Setpoint
Time
Use to set the night setpoint time.
“NIT 62℉”
Night Setpoint
Temperature
Use to set the night setpoint temperature.
“EXIT”
Exit Setpoint
Menu
Tap UP or DOWN button to exit the SETPTS
sub-menu.
“ES” SPM Mode
If your control is in the “ES” SPM mode, you will see these options:
Screen Example
Name
Description
“WKDAY”
Weekday Setpoint
Sub-Menu
Tap UP or DOWN button to enter the weekday
setpoint sub-menu.
“WKEND”
Weekend Setpoint
Sub-Menu
Tap UP or DOWN button to enter the weekend
setpoint sub-menu.
“EXIT”
Exit Setpoint
Sub-Menu
Tap UP or DOWN button to exit the SETPTS
sub-menu.
Within the “WKDAY” and “WKEND” sub-menus you will find this set of options:
Screen Example
Name
Description
“MOR
6:00AM”
Morning Setpoint
Time
Use to set the morning setpoint time.
“MOR 75℉”
Morning Setpoint
Temperature
Use to set the morning setpoint temperature.
“DAY
10:00PM”
Day Setpoint
Time
Use to set the day setpoint time.
“DAY 62℉”
Day Setpoint
Temperature
Use to set the day setpoint temperature.
“EVE
6:00AM”
Evening Setpoint
Time
Use to set the evening setpoint time.
“EVE 75℉”
Evening Setpoint
Use to set the evening setpoint temperature.
TS2BL: User Manual © 2022 Automation Correct, LLC 19

Temperature
“NIT
10:00PM”
Night Setpoint
Time
Use to set the night setpoint time.
“NIT 62℉”
Night Setpoint
Temperature
Use to set the night setpoint temperature.
“EXIT”
Exit weekday or
weekend
sub-menu
Tap UP or DOWN button to exit the WKDAY or
WKEND sub-menu.
ADVANCED
WARNING: You can modify settings in this menu that can make your stove and the thermostat
behave unexpectedly. It is highly suggested that you write down current settings before making
adjustments, so you can return back to the prior setting if an adjustment does not work the way
you expect. This menu is intended for infrequent use and only by those who have a specific
need to do so.
To access the ADVANCED menu press and hold the MENU button for 20 seconds, until the
screen reads “ADVNCD”, then release the button. Tap the MENU button to move through the
various settings. Use the UP and DOWN buttons to make adjustments to settings. Exit via the
EXIT item at the end of the menu set, or press and hold MENU for 3 seconds, or wait for 60
seconds to auto-return to the round-robin.
Screen Example
Name
Description
“A 76.3℉”
Temperature
Calibration
Use this screen to adjust the temperature reading
calibration. If you notice that the TS2BL’s temperature
readings do not match with another thermostat. Tap or
press and hold the UP and DOWN buttons to adjust to the
value you believe the temperature should read. The
temperature will change in the smallest increments the
TS2BL is able to work in, but you will notice that it is not a
consistent change of 0.1℉. There are roughly 7
UP/DOWN taps per degree Fahrenheit of resolution
available.
“DEG F”
Degree Mode
Use this screen to change the thermostat between
degrees Fahrenheit and Celcius.
“SPM SSP”
Setpoint Mode
Use this screen to select the Setpoint Mode the
thermostat will use. By default, it is shipped in Single
Setpoint Mode (SSP). In this mode, there is only one
setpoint and it is used all the time. Changes to it carry
TS2BL: User Manual © 2022 Automation Correct, LLC 20
Other manuals for Coal-trol Digital TS2BL
1
Table of contents
Other Automation Correct Thermostat manuals
Popular Thermostat manuals by other brands

Venstar
Venstar T2900 owner's manual
ICM Controls
ICM Controls SC2201 Installation, operation & application guide
ICM Controls
ICM Controls SC 3201 Installation, operation & application guide
Heat Controller
Heat Controller 7602-443 user manual
TOTALINE
TOTALINE 1 For All owner's manual
RADSON
RADSON Tempco Digital 51022 user guide
