AutoMeter BEX-1500 User manual
20
�
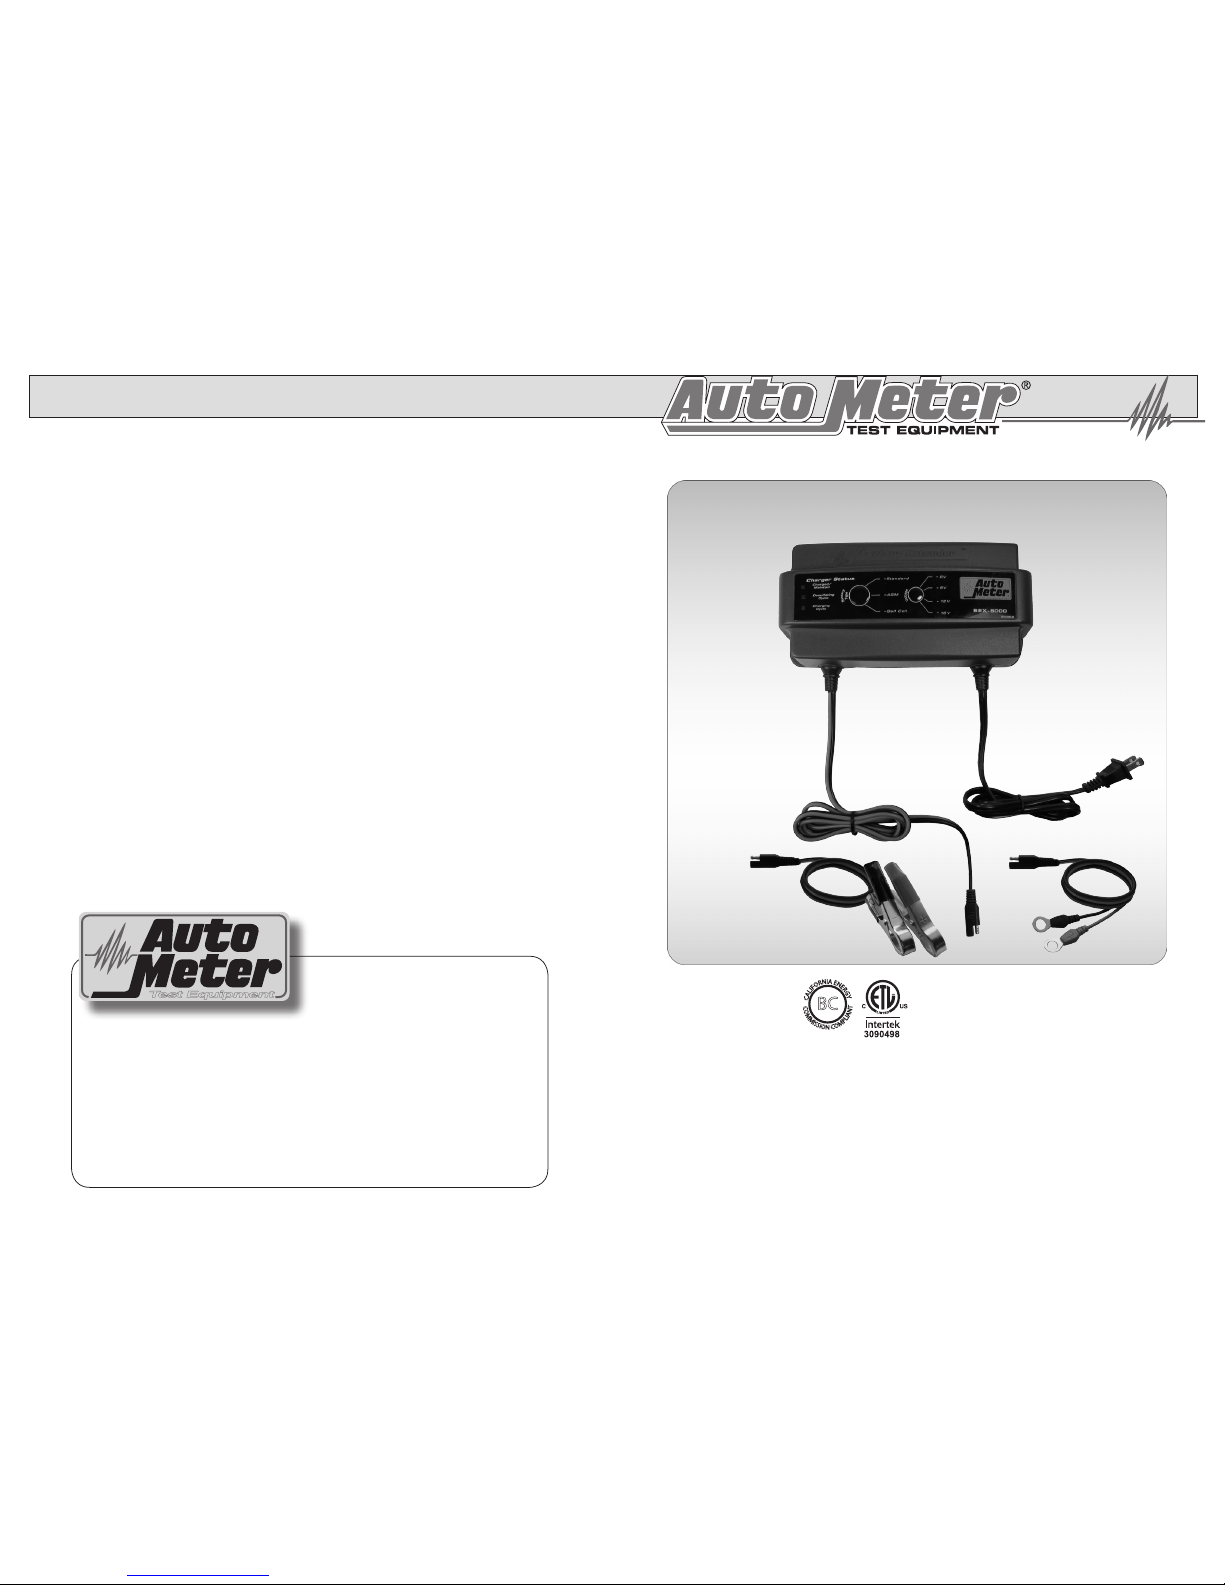
Battery Extender
Owner’s Manual
Models: BEX-1500, BEX-3000, BEX-5000
Warning: Failure to follow instructions may result in damage
or explosion. READ ENTIRE MANUAL BEFORE USE.
2650-1753-77 Rev. C 1/12/16
Test Equipment
Auto Meter Products Inc.
413 West Elm Street
Sycamore, IL 60178
Toll Free (866)-883-TEST (8378)
www.autometer.com/test
Fully Automatic Battery
Charger and Maintainer
BC
C
A
L
I
F
O
R
N
I
A
E
N
E
R
G
Y
C
O
M
M
I
S
S
I
O
N
C
O
M
P
L
I
A
N
T
Conforms to UL Std. 1236
Certified to CAN/CSA Std.
C22.2 No. 107.2-01

2 19
CONTENTS NOTES
Specifications .........................................................................................3
Safety ..................................................................................................4-7
Inspection ...............................................................................................8
Introduction.............................................................................................9
Operating Instructions .....................................................................10-15
What to Expect ................................................................................16-17
Warranty and Service Information ........................................................18
Contact Information ..............................................................................20

18 3
You have purchased an Auto Meter Battery Extender. This is a fully
automatic battery charger and battery maintainer. It is designed to
work on all types of lead acid batteries, including Standard Flooded, AGM, and
Gel Cell. If you should have any questions about your Extender or charging
procedures, please see the back cover for contact information.
CONGRATULATIONS!
SPECIFICATIONS
Model Number BEX-1500 BEX-3000 BEX-5000
Charger Type Fully Automatic Fully Automatic Fully Automatic
Battery Voltage 12 V 12 V 6 V, 8 V, 12 V &
16 V
Charge Current (Max.) 1.5 A 3.0 A 5.0 A (3.0 A in 16
V mode)
Battery Compatibility Flooded, AGM,
Gel
Flooded, AGM,
Gel
Flooded, AGM,
Gel
Charging Modes
(Desulfation, Bulk,
Absorption, and Maintain)
Ye s Ye s Ye s
Fully Automatic /
Overcharge Protection
Ye s Ye s Ye s
Reverse Polarity Protection Ye s Ye s Ye s
Spark Free Connection Ye s Ye s Ye s
Ingress Protection IP65 Water
Resistant
IP65 Water
Resistant
IP65 Water
Resistant
LED Indicators 3 6 10
AC Input 100 - 240V AC /
50 - 60Hz 0.5A
108 -132V AC /
60Hz 1.0A
108 -132V AC /
60Hz 1.5A
Ambient Temperature -4 ºF to +122 ºF -4 ºF to +122 ºF -4 ºF to +122 ºF
Size 5.2" L x 3.2" W x
2.0" H
6.7" L x 3.2" W
x 2.2" H
7.9" L x 3.9" W x
2.4" H
Weight 1.0 lbs 1.4 lbs 2.0 lbs
Conforms to UL Std. 1236 Ye s Ye s Ye s
Certified to CAN/CSA Std.
C22.2 No. 107.2-01
Ye s Ye s Ye s
California Energy
Commission (CEC)
Compliant
Ye s Ye s Ye s
RoHS Compliant Ye s Ye s Ye s
CE Mark Ye s No No
36 MONTHS FROM DATE OF PURCHASE
The manufacturer warrants to the consumer that this product will be
free from defects in material or workmanship for a period of thirty-six
(36) months from the date of original purchase.
Products that fail within this 36 month warranty period will be repaired
or replaced at the manufacturer's option to the consumer, when
determined by the manufacturer that the product failed due to defects
in material or workmanship. This warranty is limited to the repair or
replacement of parts and the necessary labor by the manufacturer to
effect the repair or replacement of the product. In no event shall the
manufacturer be responsible for special, incidental or consequential
damages or costs incurred due to the failure of this product.
Improper use, accident, water damage, abuse, unauthorized repairs
or alterations voids this warranty. The manufacturer disclaims any
liability or consequential damages due to breach of any written or
implied warranty on its test equipment.
WARRANTY AND SERVICE INFORMATION
Warranty claims to the manufacturer's service department must be
transportation prepaid and accompanied with dated proof of purchase.
This warranty applies only to the original purchaser and is non-
transferable. Shipper damage incurred during return shipments is not
covered under this warranty. It is the responsibility of the shipper (the
customer returning the Test Equipment) to package the tester properly
to prevent any damage during return shipment. Repair costs for such
damages will be charged back to shipper (customer returning the Test
Equipment). Protect the product by shipping in original carton or add
plenty of over-pack cushioning such as crumpled up newspaper.
LIMITED WARRANTY

4 17
IMPORTANT SAFETY INSTRUCTIONS
SAVE THESE INSTRUCTIONS
1. This manual contains important safety and operating instructions for battery
charger Models BEX-1500, BEX-3000, and BEX-5000.
2. Do not expose charger to rain or snow.
3. Use of an attachment not recommended or sold by the battery charger
manufacturer may result in a risk of fire, electric shock, or injury to persons.
4. To reduce risk of damage to electric plug and cord, pull by plug rather than
cord when disconnecting charger.
5. An extension cord should not be used unless absolutely necessary. Use
of improper extension cord could result in a risk of fire and electric shock. If
an extension cord must be used, make sure:
a) That pins on plug of extension cord are the same number, size, and
shape as those of plug on charger;
b) That extension cord is properly wired and in good electrical
condition; and
c) That wire size is large enough for ac ampere rating of charger as
specified in Table 1.
6. Do not operate charger with damaged cord or plug, replace the cord or plug
immediately.
7. Do not operate charger if it has received a sharp blow, been dropped, or
otherwise damaged in any way; take it to a qualified serviceman.
8. Do not disassemble charger; take it to a qualified serviceman when service
or repair is required. Incorrect reassembly may result in a risk of electric
shock or fire.
9. To reduce risk of electric shock, unplug charger from outlet before
attempting any maintenance or cleaning. Turning off controls will not
reduce this risk.
10. WARNING – RISK OF EXPLOSIVE GASES.
a) WORKING IN VICINITY OF A LEAD-ACID BATTERY IS
DANGEROUS. BATTERIES GENERATE EXPLOSIVE GASES
DURING NORMAL BATTERY OPERATION. FOR THIS REASON,
IT IS OF UTMOST IMPORTANCE THAT YOU FOLLOW THE
INSTRUCTIONS EACH TIME YOU USE THE CHARGER.
b) To reduce risk of battery explosion, follow these instructions and
those published by battery manufacturer and manufacturer of any
equipment you intend to use in vicinity of battery. Review cautionary
marking on these products and on engine
.
11. PERSONAL PRECAUTIONS
a) Consider having someone close enough by to come to your aid when
you work near a lead-acid battery.
b) Have plenty of fresh water and soap nearby in case battery acid
contacts skin, clothing, or eyes.
c) Wear complete eye protection and clothing protection. Avoid touching
eyes while working near battery.
d) If battery acid contacts skin or clothing, wash immediately with soap
and water. If acid enters eye, immediately flood eye with running cold
water for at least 10 minutes and get medical attention
immediately.
e) NEVER smoke or allow a spark or flame in vicinity of battery or engine.
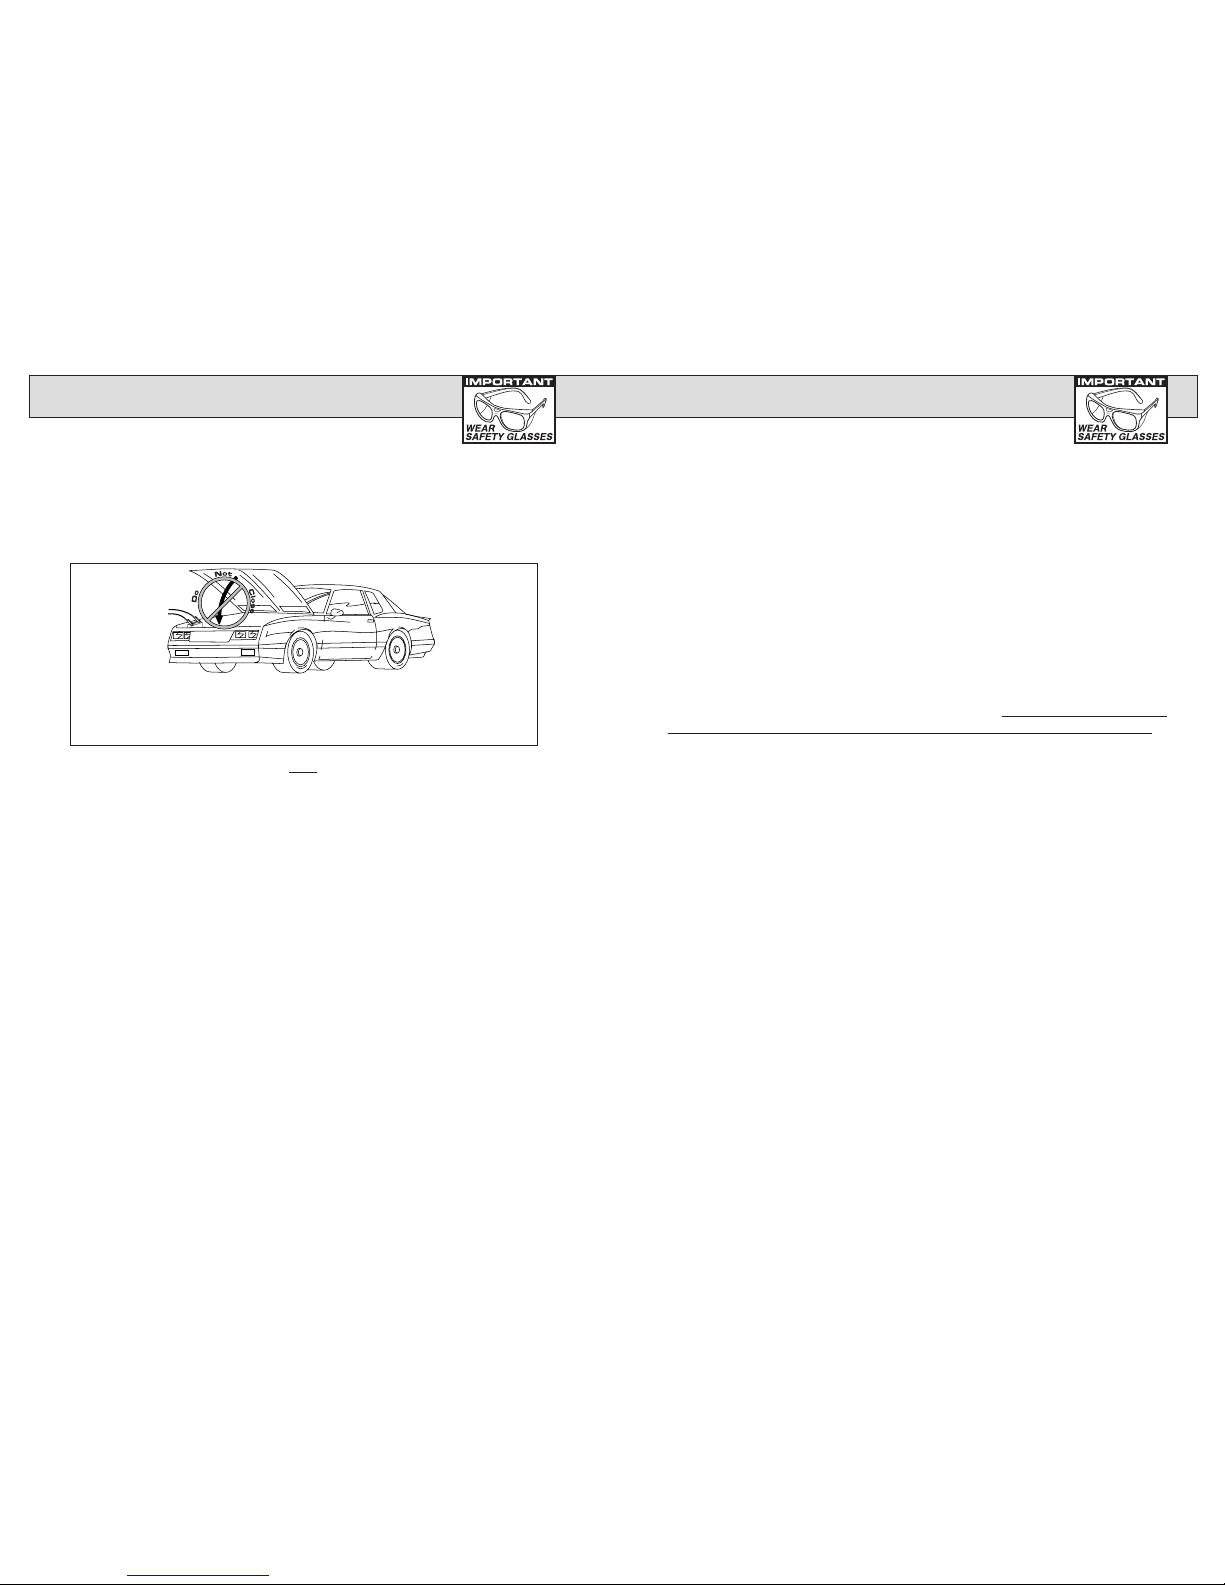
MOUNTING
Mounting holes are provided on both ends of the unit. It is recommended that
you mount the Battery Extender to a wall or other secure surface. This will keep
it out of the way and prevent damage due to accidents.
IMPORTANT!
A clean battery and battery terminals insure proper operation of the Battery
Extender and the vehicle charging system. Dirty terminals may put a constant
slow drain on the battery. If your battery and terminals have a white or blueish
crust on them, your charging system may be having problems. Have the vehicle
electrical system checked by a qualified automotive service technician.
MAINTENANCE AND CLEANING
Always keep your Battery Extender clean and looking like new! Unplug the
Battery Extender, and use a slightly dampened cloth to clean the housing and
lead sets. Use no solvents or soaps.
OVERLOAD AND PROTECTIVE DEVICES
The Battery Extender is equipped with two overload protectors.
In the event of minor overloads, power will be reduced to a safe level to allow
continued use in maintenance mode only. The second protector will activate
in the event of major overload and completely turn the unit off. The second
protector is temporary and will reset automatically in a short amount of time.
WHAT TO EXPECT

16 5
SAFETY
f) Be extra cautious to reduce risk of dropping a metal
tool onto battery. It might spark or short-circuit battery
or other electrical part that may cause explosion.
g) Remove personal metal items such as rings, bracelets, necklaces,
and watches when working with a lead-acid battery. A lead-acid
battery can produce a short-circuit current high enough to weld a
ring or the like to metal, causing a severe burn.
h) Use charger for charging a LEAD-ACID battery only. It is not
intended to supply power to a low voltage electrical system other than
in a starter-motor application. Do not use battery charger for charging
dry-cell batteries that are commonly used with home appliances.
These batteries may burst and cause injury to persons and damage to
property.
i) NEVER charge a frozen battery.
12. PREPARING TO CHARGE
a) If necessary to remove battery from vehicle to charge, always remove
grounded terminal from battery first. Make sure all accessories in the
vehicle are off, so as not to cause an arc.
b) Be sure area around battery is well ventilated while battery is being
charged.
c) Clean battery terminals. Be careful to keep corrosion from coming in
contact with eyes.
d) Add distilled water in each cell until battery acid reaches level specified
by battery manufacturer. Do not overfill. For a battery without
removable cell caps, such as valve regulated lead acid batteries,
carefully follow manufacturer’s recharging instructions.
e) Study all battery manufacturer’s specific precautions while charging
and recommended rates of charge.
f) Determine voltage of battery by referring to car owner’s manual and
make sure that output voltage selector switch is set at correct voltage.
If charger has adjustable charge rate, charge battery initially at lowest
rate. (For BEX-5000 Only)
g) Determine voltage of battery by referring to car owner’s manual and
make sure it matches output rating of battery charger.
(For BEX-1500 and BEX-3000 only)
13. CHARGER LOCATION
a) Locate charger as far away from battery as dc cables permit.
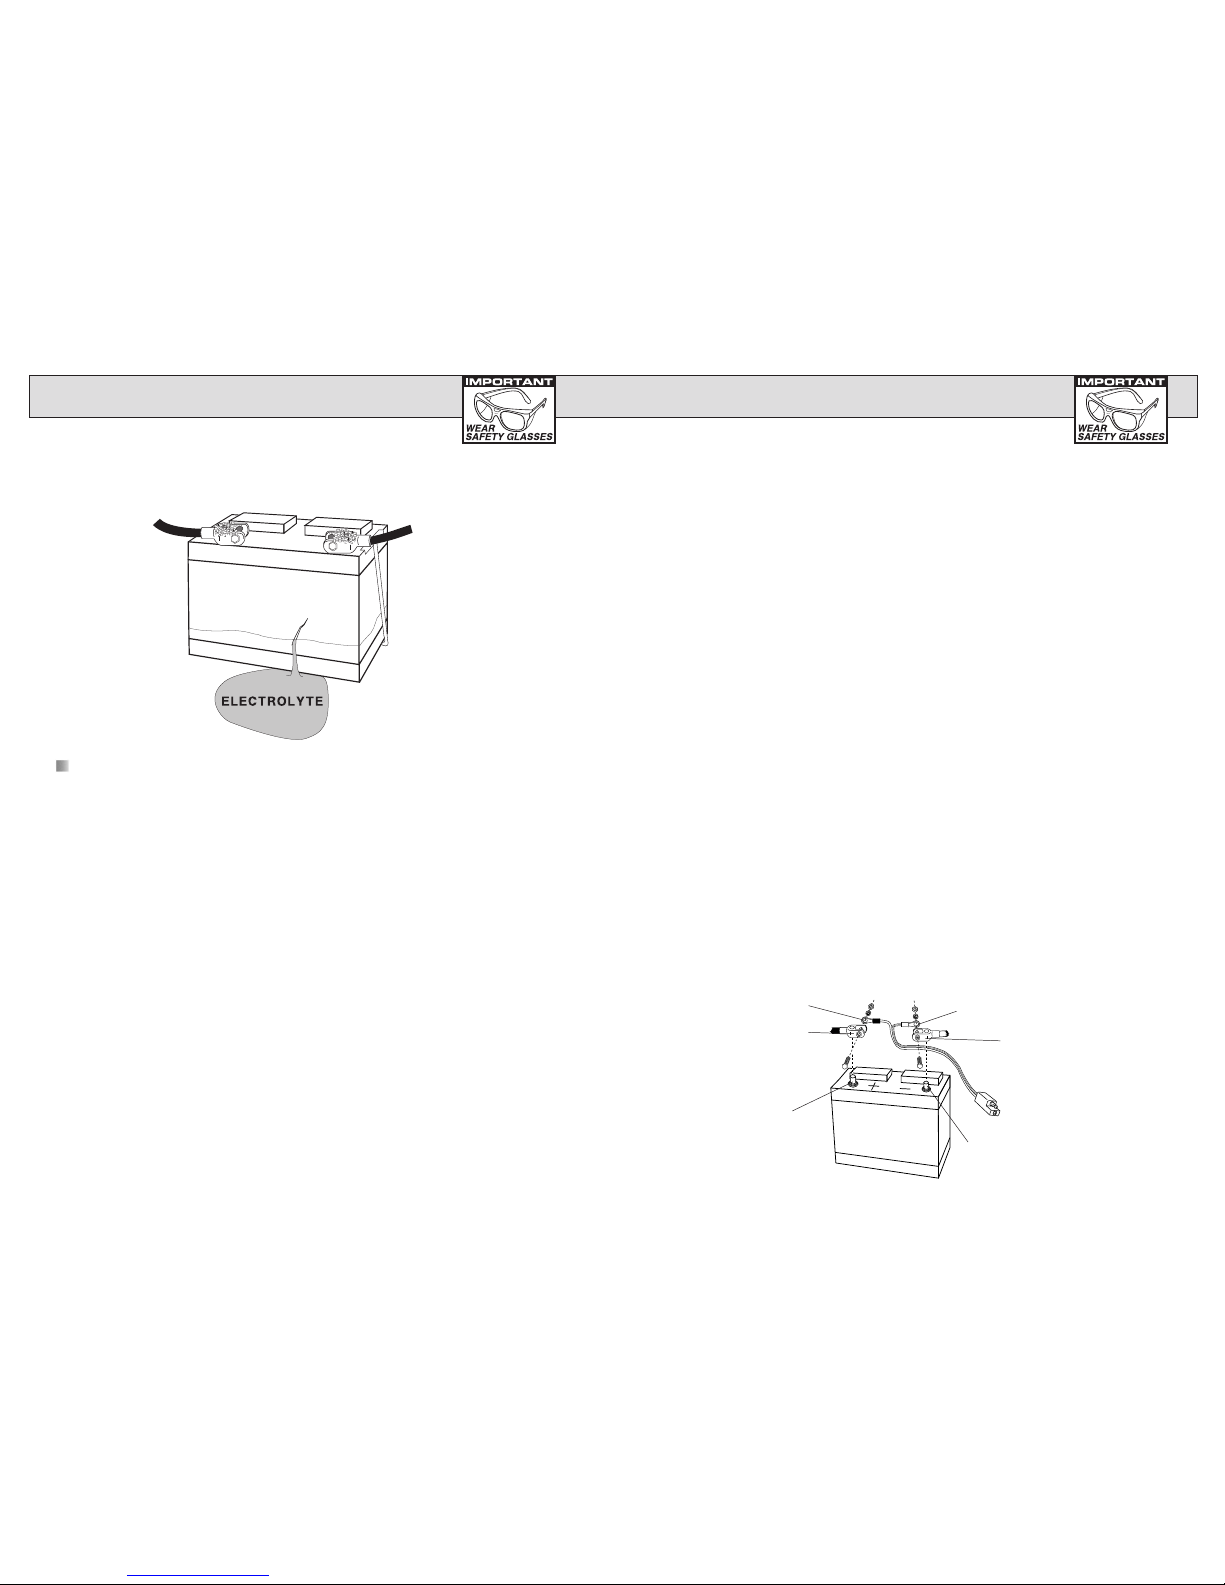
b) Never place charger directly above battery being charged; gases
from battery will corrode and damage charger.
c) Never allow battery acid to drip on charger when reading electrolyte
specific gravity or filling battery.
d) Do not operate charger in a closed-in area or restrict ventilation in
any way.
e) Do not set a battery on top of charger.
14. DC CONNECTION PRECAUTIONS
a) Connect and disconnect dc output clips only after setting any charger
switches to "off" position and removing ac cord from electric outlet.
Never allow clips to touch each other.
b) Attach clips to battery and chassis as indicated in 15(e), 15(f), and 16(b).
NOTE: SEE ILLUSTRATION ON NEXT PAGE
WHAT TO EXPECT
AVOID THE ANNUAL DEAD BATTERY
SURPRISE WHEN YOUR VEHICLE COMES OUT OF STORAGE.
MAXIMIZES BATTERY LIFE
The Battery Extender is designed to maximize the life of a
serviceable lead acid battery. A serviceable battery is a battery that is not
defective or damaged.
PREVENTS PREMATURE BATTERY FAILURE
The Battery Extender keeps your battery at full charge on a continuous basis.
Batteries not kept at a full charge become sulfated, which is the main reason for
premature battery failure.
MAINTAINS STORED BATTERIES AT FULL CHARGE
The Battery Extender should be used to charge and maintain all starting and
deep cycle batteries in storage or that don’t receive daily use. Some examples
are: automobiles, boats, race cars, campers, RV’s, 4 wheelers, motorcycles,
personal water craft, farm machinery (tractors, combines, etc.), heavy
equipment, rental equipment (trucks, compressors, portable signs, bulldozers,
stationary pumps, etc.), and any equipment that receives occasional use or is
in storage. The Battery Extender is also fully compatible with Standard, AGM,
and Gel Cell batteries. (DO NOT USE WITH DRY CELL, NICKLE CADMIUM,
NICKLE METAL HYDRIDE, LITHUM ION OR SIMILAR BATTERIES. Refer to
the enclosed instructions.)
NOTE: Never use the Battery Extender in a boat or water craft. Always remove
the battery from the boat or water craft and use the Battery Extender on
shore.
VALUABLE PROTECTION
The Battery Extender provides full off-season protection for seasonally used
batteries. It keeps your stored batteries ready for their next use.
PROTECTION FROM COMPUTER DRAIN
Cars are often equipped with computers that require continuous battery power to
maintain data in memory. The Battery Extender’s superior circuitry automatically
delivers the correct charge to compensate.
LONG LASTING PERFORMANCE
The Battery Extender has been designed and manufactured to provide superior
performance from the High Tech housing to the last internal detail. Quality is built
in and assured with circuit burn-in, computerized testing and inspection. Care in
handling and occasional cleaning of the leads and housing will help keep it looking
like new, and give you many years of satisfaction.
6 15
15. FOLLOW THESE STEPS WHEN BATTERY IS INSTALLED IN VEHICLE.
A SPARK NEAR BATTERY MAY CAUSE BATTERY EXPLOSION.
TO REDUCE RISK OF A SPARK NEAR BATTERY:
a) Position ac and dc cords to reduce risk of damage by hood, door, or
moving engine part.
b) Stay clear of fan blades, belts, pulleys, and other parts that can cause
injury to persons.
c) Check polarity of battery posts. POSITIVE (POS, P, +) battery post
usually has larger diameter than NEGATIVE (NEG, N,–) post.
d) Determine which post of battery is grounded (connected) to the
chassis. If negative post is grounded to chassis (as in most vehicles),
see (e).If positive post is grounded to the chassis, see (f).
e) For negative-grounded vehicle, connect POSITIVE (RED) clip from
battery charger to POSITIVE (POS, P, +) ungrounded post of battery.
Do not connect clip to carburetor, fuel lines, or sheet-metal body parts.
f) For positive-grounded vehicle, connect NEGATIVE (BLACK) clip from
battery charger to NEGATIVE (NEG, N, –) ungrounded post of battery.
Do not connect clip to carburetor, fuel lines, or sheet-metal body parts.
g)
When disconnecting charger, turn switches to off, disconnect AC cord,
and then remove clip from battery terminal.
h) See operating instructions for length of charge information.
16. FOLLOW THESE STEPS WHEN BATTERY IS INSTALLED IN VEHICLE.
A SPARK NEAR BATTERY MAY CAUSE BATTERY EXPLOSION.
TO REDUCE RISK OF A SPARK NEAR BATTERY:
a) Check polarity of battery posts. POSITIVE (POS, P, +) battery post
usually has a larger diameter than NEGATIVE (NEG, N, –) post.
b) Connect POSITIVE (RED) charger clip to POSITIVE (POS, P, +)
post of battery.
c) Do not face battery when making final connection.
d) When disconnecting charger, always do so in reverse sequence of
connecting procedure.
e) A m
arine (boat) battery must be removed and charged on shore. To
charge it on board requires equipment specially designed for marine use.
SAFETY OPERATING INSTRUCTIONS
3. If you accidentally disconnect the
Battery Extender from the battery while
it is in operation, it will shut itself off in
approximately one second. You must
complete the disconnection procedure after
this happens by performing steps 1 and 2.
PROPER DISCONNECT PROCEDURE
2. a) Disconnect the square two pin
output connector for the ring
terminal lead set as shown.
b) For the spring clip lead set,
always disconnect the BLACK (-)
springcliprstandtheRED(+)
spring clip second.
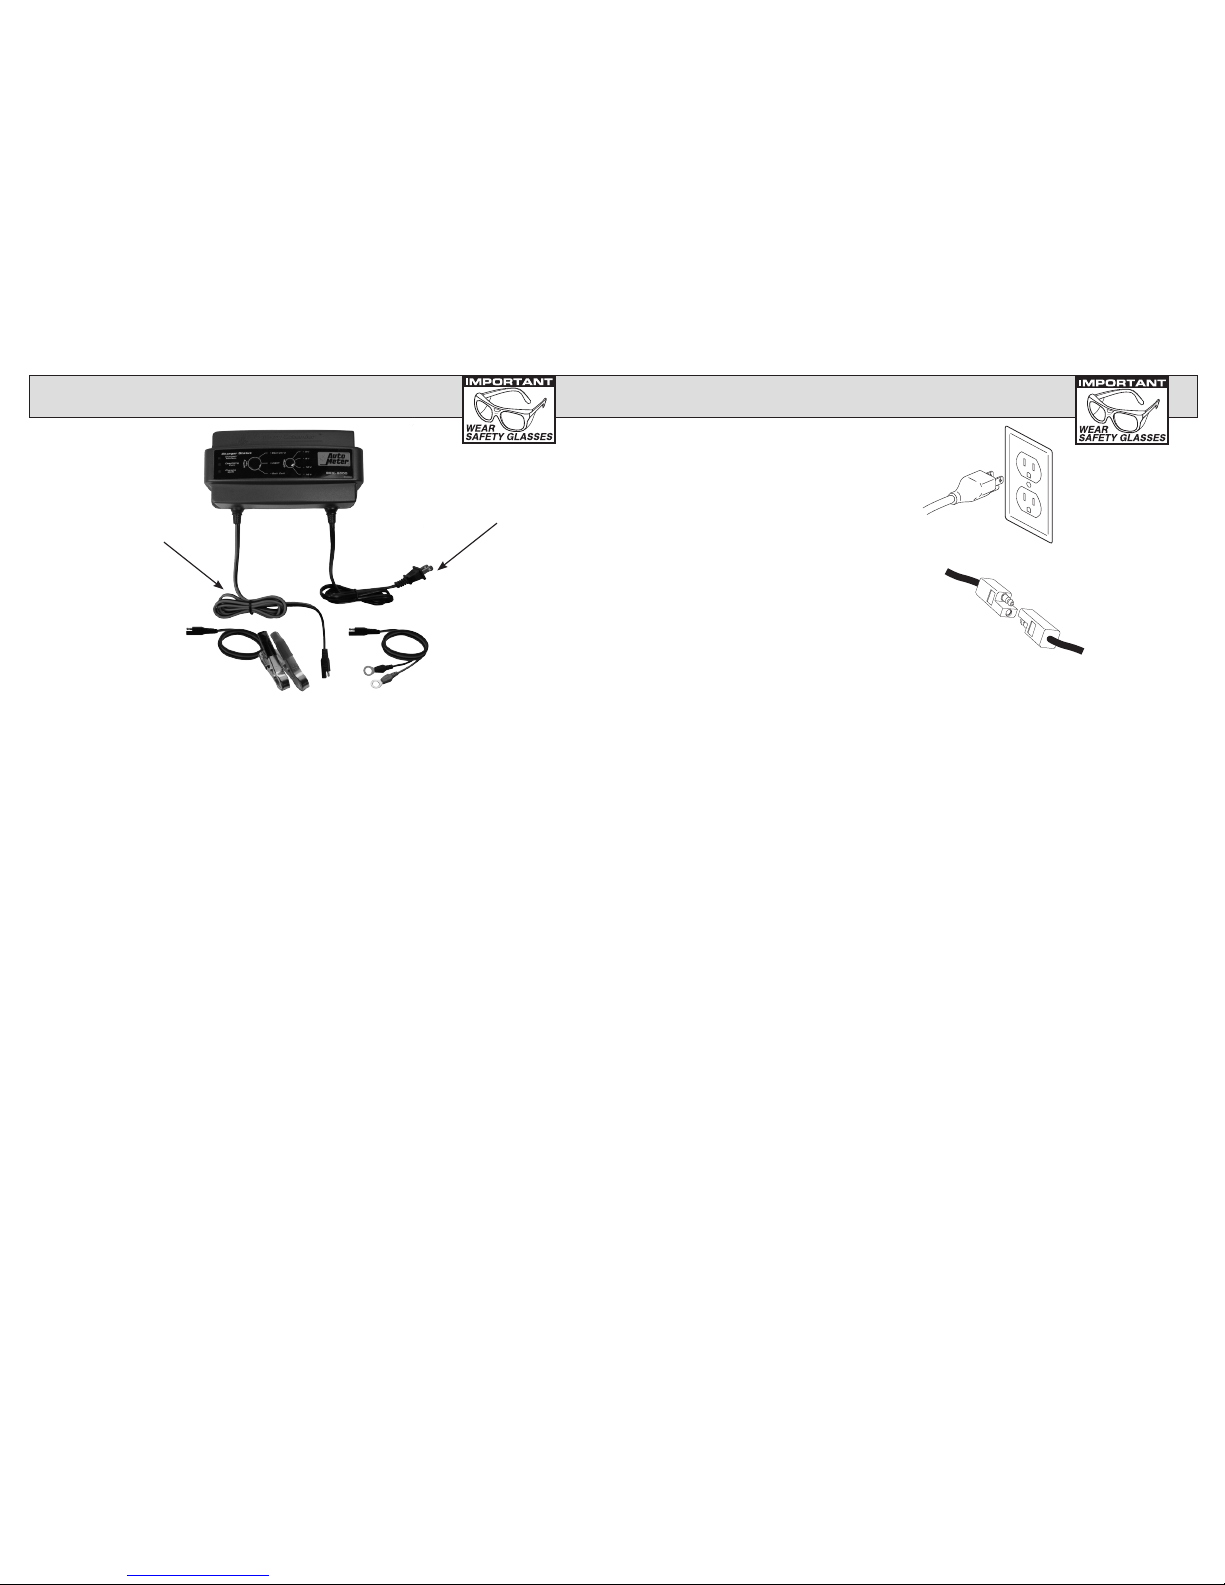
1. Always disconnect the AC
extensioncordrst(ifused).Then
unplug the AC power cord of the
Battery Extender.
NOTE: It is normal for case to be hot to the touch in charge mode. Thermal
protective circuitry provides for safe, unattended operation.
AC Cable
DC Cable

14 7
SAFETY
OPERATING INSTRUCTIONS
Table 1
PERSONAL SAFETY PRECAUTIONS
1. Wear protective goggles or a full face shield.
2. Wear protective clothing. Leave no exposed skin.
3. Have plenty of fresh water and hand soap available for use if acid should
contact your eyes, skin or clothing.
4. Remove all metal objects (pens, tools, jewelry etc.) from your body. These
items can create a direct short between the battery terminals and can cause
serious burns.
5. DO NOT carry tools or metal objects in the vicinity of a battery. These items
can fall on the battery terminals creating a high current short. This could
result in a fire, burns, explosion, etc.
6. DO NOT touch your face, eyes or other body parts without first washing your
hands. Battery acid can burn and irritate eye and skin tissue.
7. Use the one hand rule! Keep one hand in your pocket whenever you make an
electrical connection. This reduces the risk of electric shock to the user.
8. DO NOT attempt to open or modify the unit.
Recommended minimum AWG size for extension cords for battery chargers
AC input rating, amperesaAWG size of cord
Length of cord, feet (m)
Equal to or
greater than
But less than 25
(7.6)
50
(15.2)
100
(30.5)
150
(45.6)
0 2 18 18 18 16
2 3 18 18 16 14
aIf the input rating of a charger is given in watts rather than in amperes, the
corresponding ampere rating is to be determined by dividing the wattage rating
by the voltage rating – for example:
1250 watts/125 volts = 10 amperes
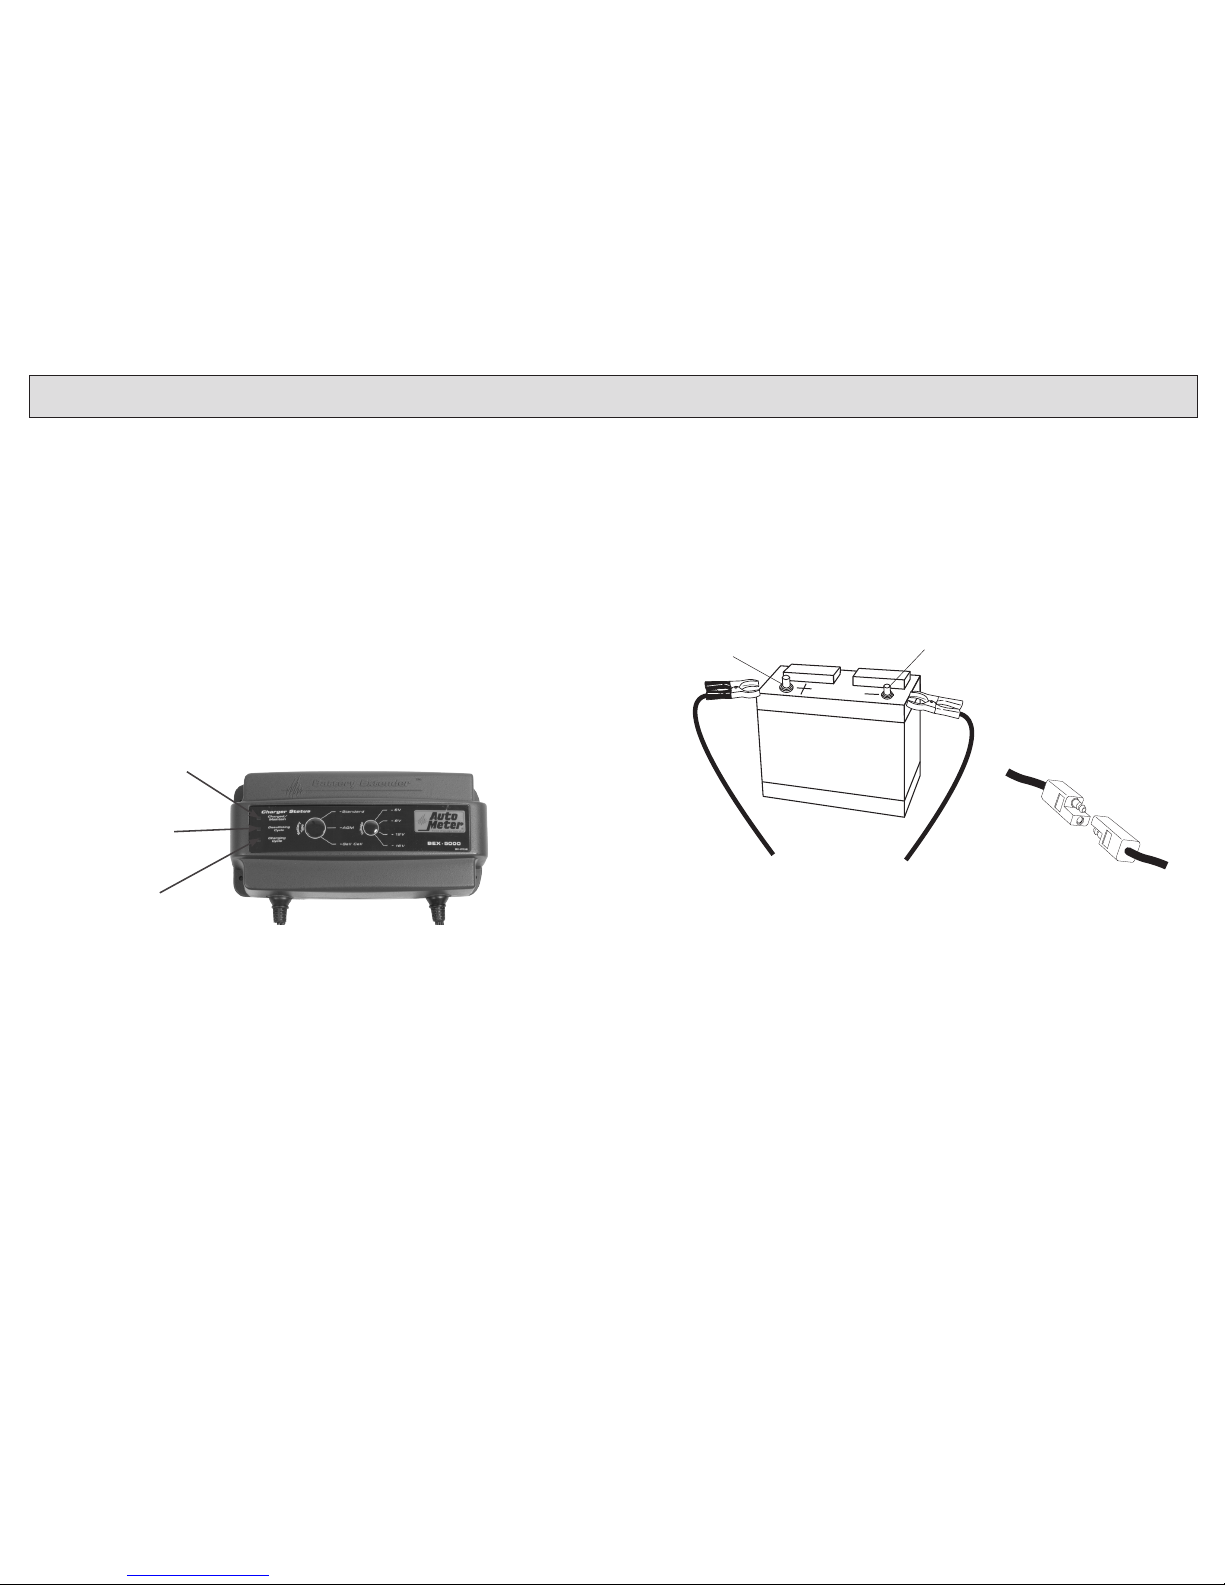
SMALL
SCREW
TERMINAL
BATTERY
Red (+)
Ring Terminal
Larger
Positive (+)
Post
Smaller
Negative (-)
Post
Black (-)
Ring Terminal
Red (+)
Battery Cable Black (-)
Battery Cable
2 Pin Connector
NOTE: Smaller batteries may have screws for terminals (see
illustration below). You may need to purchase smaller ring
terminals for these applications. Do not connect ring terminals to anything
but the battery. Other locations are hazardous.
WARNING: Do not use the BEX-1500 and BEX-3000 on any battery voltage
other than 12V. Do not use the BEX-5000 voltage set to a higher
setting than the battery you are charging. Damage to your battery
will occur.
8 13
Important Note: A damaged battery must be replaced before
proceeding.
Carefully perform the following before attempting any battery
charging.
VISUAL CHECK OPERATING INSTRUCTIONS
1. Check that the Battery Extender is NOT plugged in to an AC outlet before
connecting the ring terminals to the battery.
2. Locate the positive (+) terminal post of the battery, it is usually larger than
the negative (-) terminal post. Connect the RED (+) ring terminal to this
battery terminal.
3. Connect BLACK (-) ring terminal to negative (-) battery terminal.
4. Double check that the square two pin connector on the lead set is firmly
plugged into the square out put connector of the Battery Extender
(see illustration in “FOR USE WITH SPRING CLIPS”).
5. Secure the lead set out of the way of fan blades, belts, pulleys, and hot
items like exhaust manifolds. Nylon ties work great in this situation.
6. Make sure the Battery Extender is safely located away from the battery and
in a nonhazardous location.
7. Plug the AC cord in to a grounded outlet.
8. Set the Battery Type button to match the battery type you are charging.
(Standard, AGM, Gel Cell). (Model BEX-3000 and BEX-5000 only)
9. Set the 6/8/12/16 volt button to the voltage rating of the battery you are
connecting to. (Model BEX-5000 only.)
BA T T E R Y
Red (+)
Ring
Terminal
Smaller
Negative (-)
Post
Larger
Positive (+)
Post
Black (-)
Ring Terminal
Red (+)
Battery
Cable
Black (-)
Battery Cable
2 Pin Connector
FOR USE WITH PERMANENT RING TERMINALS
For batteries installed in vehicles or other equipment we have
provided a lead set with ring terminals. Since many installed batteries are in
space-restricted locations or compartments, these ring terminals (see illustration
below) have been designed to provide a safe and convenient connection.
Follow these steps for connection and operation:
NOTE: The BEX-1500 and BEX-3000 must only be used with 12 Volt
batteries.
12 9
NOTE: The BEX-1500 and BEX-3000 must only be used with 12 Volt
batteries.
OPERATING INSTRUCTIONS INTRODUCTION
The charger does not force current into the battery. The charger makes available
a limited amount of charge current to the battery. The battery itself determines
how much charge current it needs.
Typically the lower the state of charge of the battery, the higher the charge
current will be. As the battery charges up, the charge current will taper off.
Some battery types require an activation period when they are deeply discharged
before they will accept charge current. The time may take many hours before
the battery begins to accept charge current. If your battery has been sitting in
a discharged state for a long period of time, it can become sulfated. Sulfated
batteries exhibit the characteristic of not accepting any charge current for a long
period of time. This may also take many hours. Once the sulfate barrier breaks
down, the battery will begin accepting charge current. Severely sulfated batteries
may never accept charge current and should be replaced. When a battery
charges, the electrolyte will bubble slowly. This is normal when charging a battery.
The gases given off while charging a battery can be very explosive. Make sure
there are no flames or sparks near a charging battery. Always unplug the charger
before connecting or disconnecting the clamps to the battery to prevent sparks.
How Batteries Charge:
WARNING: Do not close hood, doors, or covers when using spring
clips on installed batteries. This can cause dangerous high
current shorting across the battery terminals.
FOR USE WITH BATTERY CLIPS ON INSTALLED
BATTERIES
You may use the spring clip lead set for installed batteries on a temporary basis.
However we do not recommend doing this for long term connections. The clips
can accidentally come in contact with compartment covers, hoods and other
items that may cause dangerous high current shorts across the battery terminals.
To temporarily connect the spring clips to an installed battery, follow these steps:
1. Check that the Battery Extender is NOT plugged in to an AC
outlet before connecting the spring clips to the battery.
2. Locate the positive (+) terminal post of the battery, it is usually larger than
the negative (-) terminal post. Connect the RED (+) spring clip to this battery
terminal post.
3. Connect the BLACK (-) spring clip to a bolt or screw on the chassis or engine
block. These should be heavy steel parts not sheet metal. Do not connect to
fuel lines, carburetor, or moving parts. Make the connection as far from the
battery as the leads allow.
4. Plug in the AC cord, and observe the indicator lights for operation.
5. Set the Battery Type button to match the battery type you are charging.
(Standard, AGM, Gel Cell). (Model BEX-3000 and BEX-5000 only)
6. Set the 6/8/12/16 volt button to the voltage rating of the battery you are
connecting to. (Model BEX-5000 only)
10 11
OPERATING INSTRUCTIONS OPERATING INSTRUCTIONS
FOR USE WITH SPRING CLIPS
NOTE: The Battery Extender may switch back into full
charge mode (Red light ON) as required by your
battery, this is normal.
No Charge Status Lights: Means one of the following:
• Yo u reversed the connections by connecting the red spring clip to the negative
(-) battery post and the black spring clip to the positive (+) battery post.
• You have a poor connection at the battery.
• There is no AC power.
• Check all three conditions above before proceeding.
Your Battery Extender is equipped with sophisticated circuitry that will safely
charge and maintain batteries without overcharging. Make sure you read and
follow the “Safety” section of this manual before proceeding with this operating
instruction.
Green Light
(Maintenance Mode)
Amber Light
(Desulfation Mode)
BATTERY EXTENDER INDICATOR LIGHTS
Red Light
(Charging Mode)
Red Light (Charging): The Battery Extender is charging the battery.
Amber Light (Desulfation): The Battery Extender is in desulfation mode.
Green Light (Maintain): The Battery Extender is safely maintaining your battery
at a full charge.Your battery is ready to go when you need it.
NOTE: The BEX-1500 and BEX-3000 must only be used with 12 Volt
batteries.
Two Pin Connector
BATTERY
Red (+)
Spring
Clip
Larger
Positive (+)
Post
Smaller
Negative (-)
Post
Black (-)
Spring
Clip
For uninstalled batteries we have supplied a lead set with spring
clips. Follow these steps for connection and operation
(see illustration to below):
1. Double check that the square two pin connector on the lead set is firmly plugged
into the square output connector of the Battery Extender.
2. Make sure the Battery Extender is safely located away from
the battery and in a non hazardous location.
3. Plug the AC cord in to a grounded outlet.
4. Set the Battery Type button to match the battery type you are charging.
(Standard, AGM, Gel Cell). (Model BEX-3000 and BEX-5000 only)
5. Set the 6/8/12/16 volt button to the voltage of the battery you are connecting
to. (Model BEX-5000 only.)
6. Locate the positive (+) terminal post of the battery, it is usually larger than the
negative (-) terminal post. Connect the RED spring clip to this battery terminal
post. It’s a good idea to wiggle the clip on the battery post to insure a good
connection.
7. Connect the BLACK spring clip to the negative (-) battery terminal post.
This manual suits for next models
2
Table of contents
Other AutoMeter Batteries Charger manuals


Popular Batteries Charger manuals by other brands


JFM Engineering
JFM Engineering TCS-1 instruction manual

ChargePoint
ChargePoint Express 280 Design guide

Studer
Studer Cable Cover CFC-01 User's and installer's manual

APPLIED ACOUSTICS
APPLIED ACOUSTICS CSP-SNv 1250 Operation manual

GEONAUTE
GEONAUTE On channel 100 manual

NRS
NRS ELC 12/40D Installing, operating and service instructions

DeWalt
DeWalt DCB1104P3 Original instructions

Toro
Toro 88500 Operator's manual

Gembonics
Gembonics External Battery Charger instruction manual

Tejera Microsystems Engineering
Tejera Microsystems Engineering Xtrema quick start

Deltran
Deltran Battery Tender Junior instructions

Ravpower
Ravpower RP-PB170-BK user guide