Autotechnik24 569TR5887-4 User manual

1
Deutsche Bedienungsanleitung
Retrofit Wohnmobile/Transporter 8 Bar
4 oder 6 Reifen (Druck und Temperatur)
Sie haben sich dafür entschieden, Ihren Reifendruck und somit Ihre Sicherheit nicht dem Zufall
zu überlassen. Unser Retrofit-Nachrüstsatz leistet Ihnen hierbei wertvolle Dienste. Wir haben
diesen Nachrüstsatz so konzipiert, daß Sie 4 oder 6 Räder überwachen können, wobei die Sen-
soren bis zu 8 Bar Druck messen können und somit für die meisten Anwendungen ausreichend
Spielraum gegeben ist. Durch die Möglichkeit, jede Achse bei den Warnschwellen separat ein-
stellen zu können, und zusätzlich auch die Temperatur zu überwachen, haben Sie für alle er-
denklichen Probleme eine zuverlässige Überwachung dabei.
Wie bei unseren Nachrüstsätzen für PKW haben wir uns auch hier für Einbausensoren ent-
schieden, da eine Lösung mit Ventilkappen hier aufgrund der hohen Drücke nicht ausreichend
ist, durch Umgehung des Ventils bleibt nur eine Gummidichtung, um die Luft im Reifen zu
halten. Bei einem internen Sensor bleibt ihnen die konstruktive Sicherheit eines Ventils voll-
ständig erhalten und der Druck und die Temperatur werden zuverlässig im Innern des Reifens
gemessen, zusätzlich haben Sie so den bestmöglichen Schutz gegen Diebstahl der Sensoren.
Der Einbau der Sensoren sollte unbedingt von einem Fachmann vorgenommen werden, zu-
dem muß die Masse (ca. 44g) nach der Montage auch ausgewuchtet werden. Bei einem Ven-
tilservice, der bei jedem Reifenwechsel vorgenommen werden sollte, können Sie den U1-Kit
von Alligator verwenden oder aber gängige Ventile mit Kugelkalotte (z.B. Alligator Sens-It) ver-
wenden.
Ihr Gerät kann Reifendruck bis 8 Bar anzeigen, die möglichen Überwachungsbereiche liegen
zwischen 0,1 Bar und 9,9 Bar im Display, so daß Sie bei Bedarf auch den oberen Reifendruck
höhersetzen können als der Sensor mißt, um die obere Warnschwelle ganz zu deaktivieren,
wir empfehlen, die Druckeinstellung unten bei 20% zu setzen und oben bei ca. 30%, ausge-
hend vom normalen Druck. Ein Reifen mit einem Nenndruck von 3 Bar würde also unten bei
2,4 Bar einen Alarm auslösen und oben bei 3,9 Bar. Die Warntemperatur kann auf Werte zwi-
schen 25°C und 93°C eingestellt werden
Durch die Solarzelle im Gerät kann das Gerät völlig autark betrieben werden, bei Bedarf kann
es jedoch jederzeit auch mit dem beiliegenden Kabel an einer Bordsteckdose mit 12-24V ge-
laden werden, sollte die Ladung mit Sonnenlicht nicht möglich sein. Nach 10 Minuten Still-
stand geht das Gerät automatisch in Standby, durch Fahrzeugbewegungen schaltet es dann
automatisch wieder ein.
2
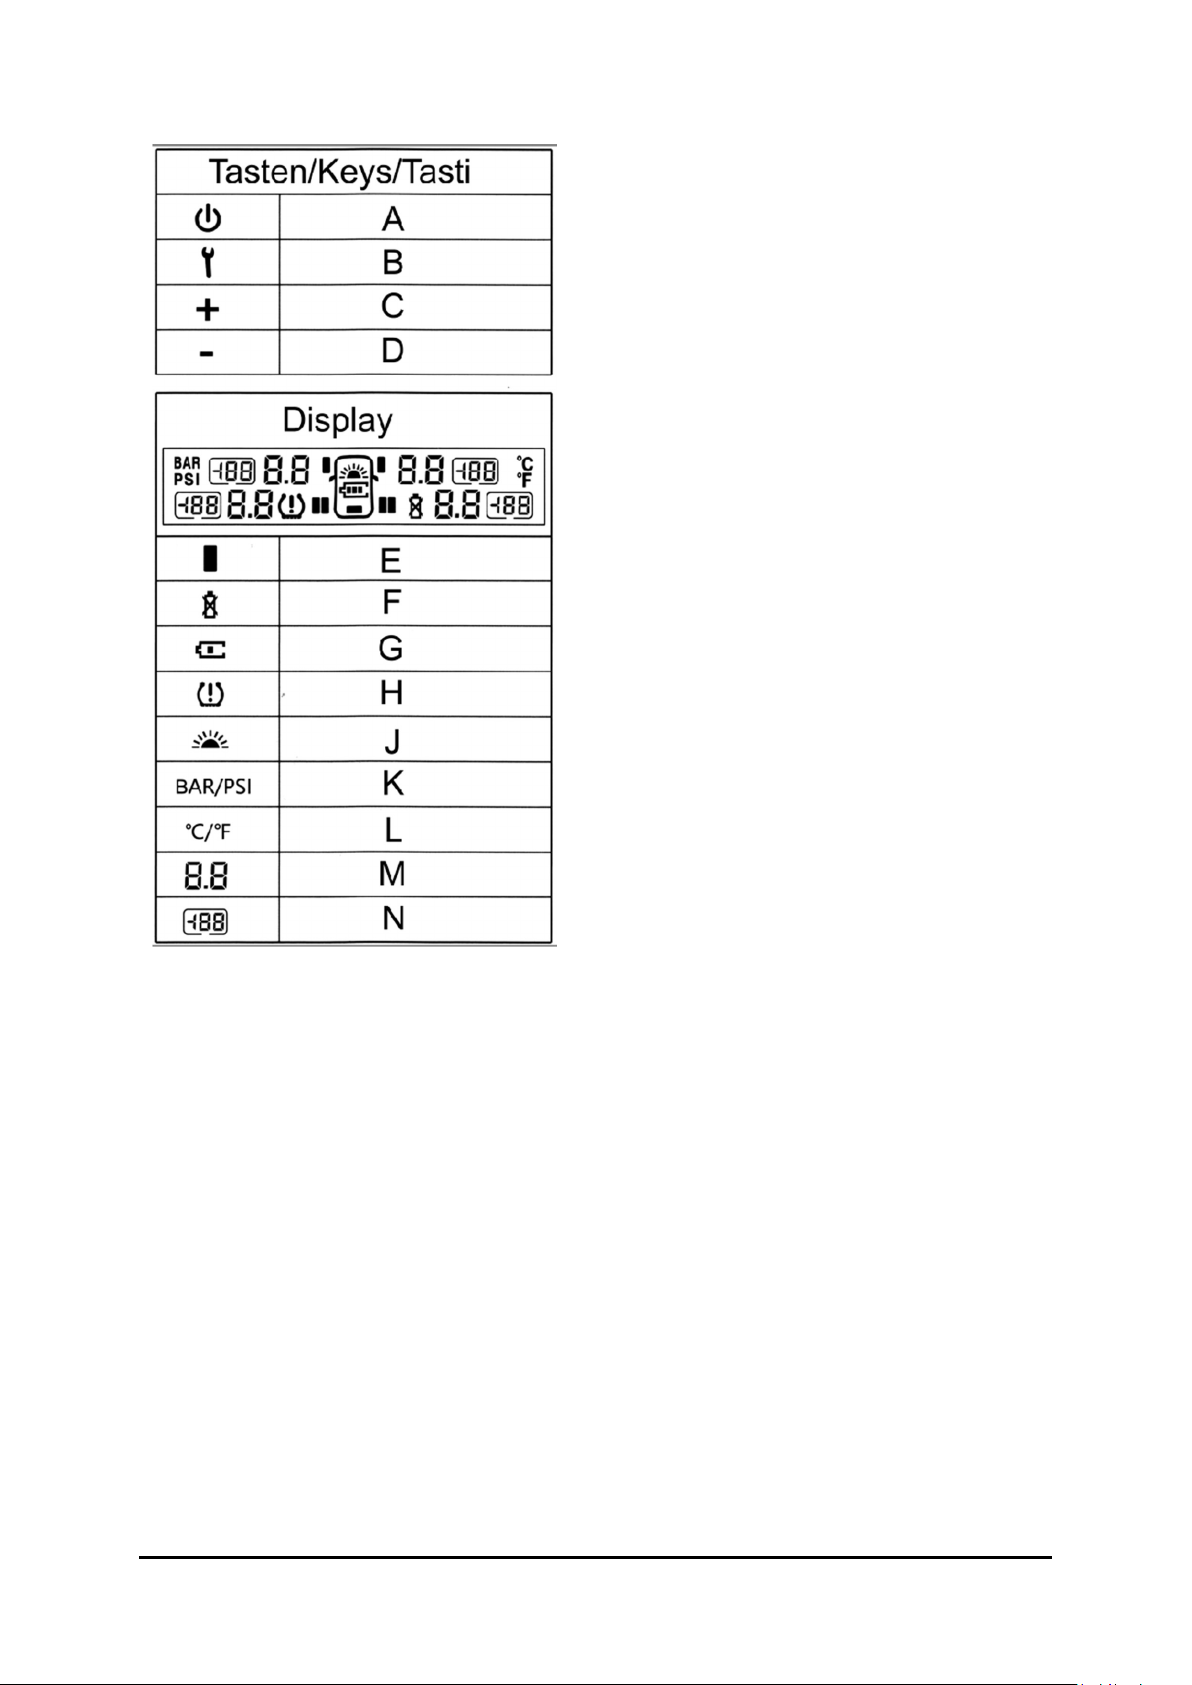
Das Display
Ein/Aus – Schalter
Setup / Einstellungen
Werte erhöhen
Werte verringern
Reifensymbol
Sensorbatterie leer/defekt
Ladezustand Display
Alarm (Druck/Temperatur/Defekt)
Ladesymbol Solarzelle
Druckeinheit
Temperatureinheit
Reifendruck
Reifentemperatur
Die Einstellungen für die Sensoren sind bereits ab Werk vorgenommen, daher die Sensoren
bitte gemäß der Konfiguration verbauen:
L1: Vorne Links R1: Vorne Rechts
L2: Hinten Links R2: Hinten Rechts
L3: Hinten Links Aussen* R3: Hinten Rechts Aussen*
*Entfällt bei Systemen mit 4 Sensoren
Optional können die Sensoren L3 und R3 auch in einen Anhänger verbaut werden, allerdings
ist es dann unter Umständen nötig, diese beiden Sensoren über unseren separat erhältli-
chen Repeater zu betreiben, um eine sichere Übertragung zum Display zu gewährleisten.
Weiter kann noch ein zusätzlicher Sensor in einem Ersatzrad betrieben werden, dies emp-
fehlen wir aber nur, wenn dieses Rad durch regelmäßigen Tausch in den Betrieb einbezogen
wird.
Wird zwischen Anhänger- und Solobetrieb gewechselt, sollte das Display manuell ausge-
schaltet und wieder eingeschaltet werden, um die Sensoren jeweils zu initialisieren und den
Betrieb mit 4 oder 6 Rädern ohne Warnungen wegen fehlender Sensoren zu ermöglichen.
3
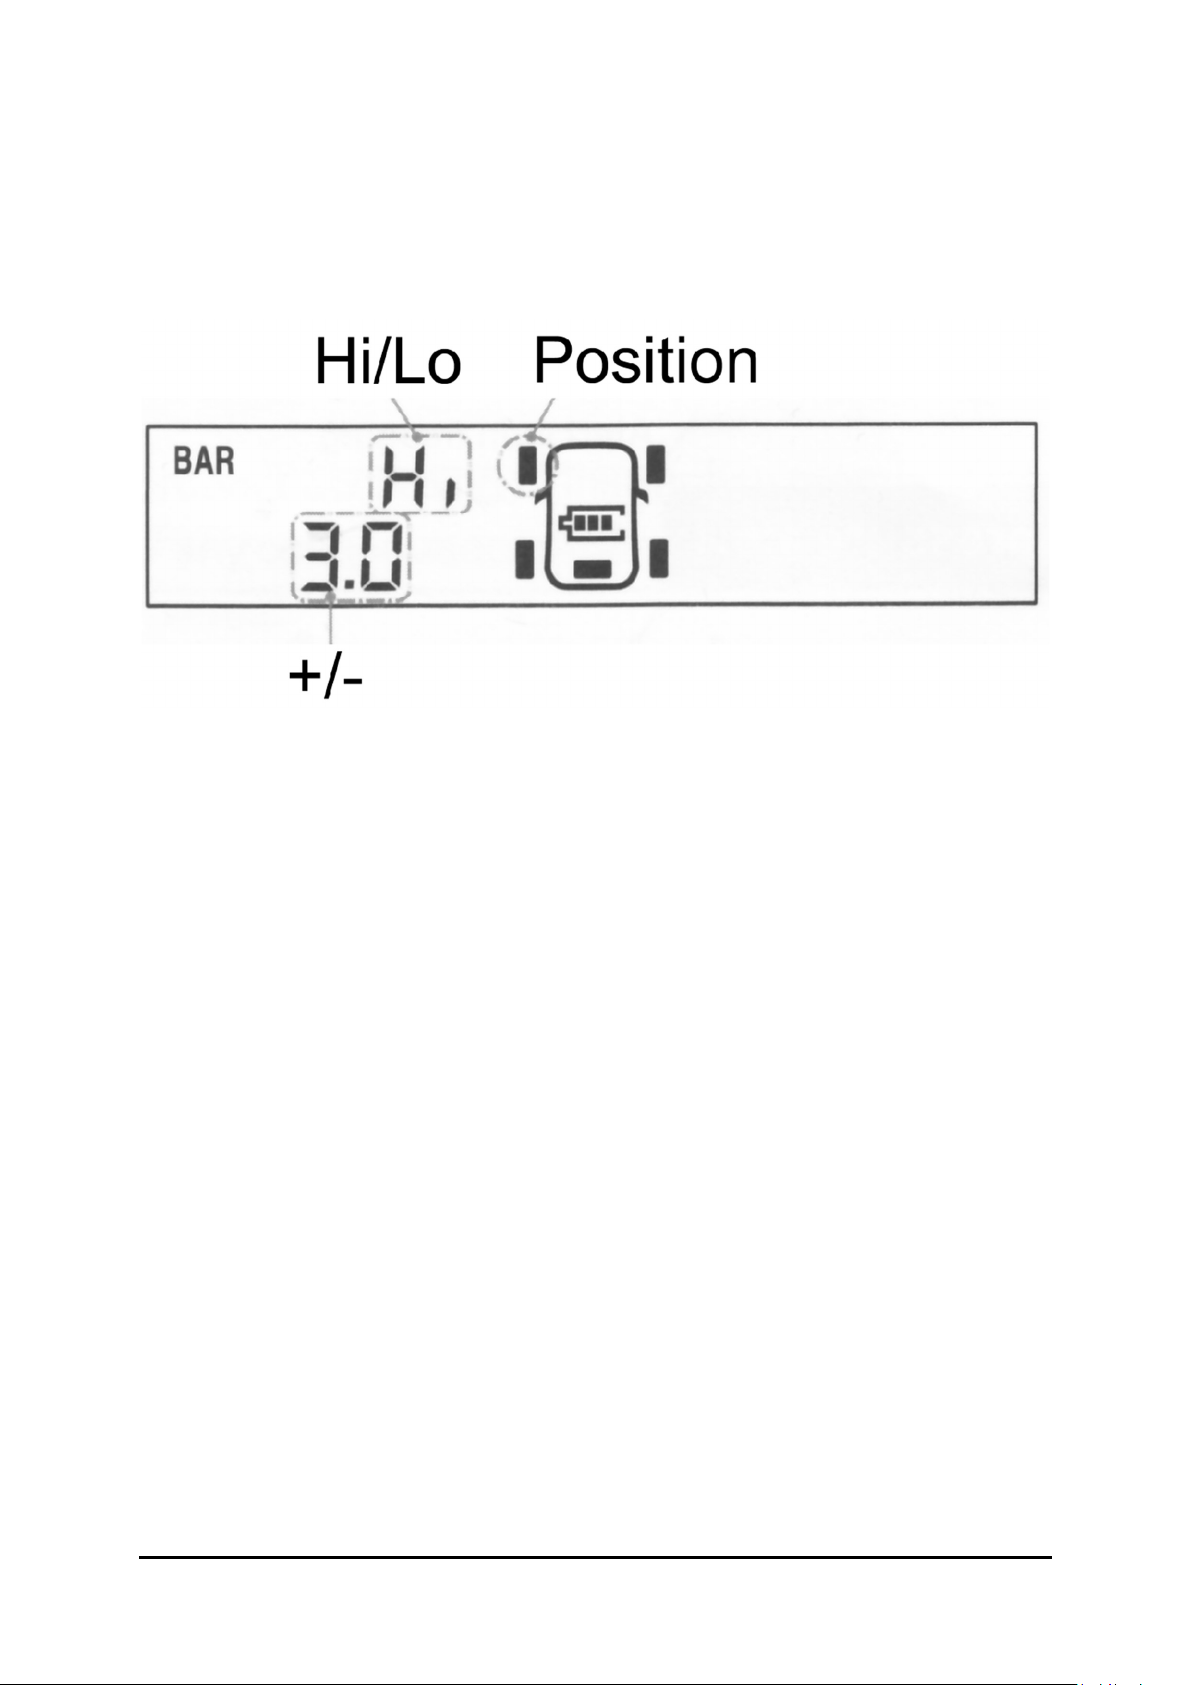
Durch einen langen Druck auf die Setup-Taste gelangen Sie ins Einstellmenü, die jeweiligen
Bereiche wechseln Sie durch jeweils einen kurzen Druck auf die Setup-Taste. Hier können dann
die Einheiten für Druck (Bar/Psi), die Temperatur (°C/°F) und die Minimal- und Maximaldrücke
der Achsen und ggf. des Ersatzrades sowie die Warnschwelle der Reifentemperatur eingestellt
werden. Die jeweiligen Einstellungen sind an den Blinkenden Symbolen erkennbar und wer-
den mit den Tasten + und – verändert.
Beispiel für die Einstellung der Druckwerte an der Vorderachse:
Anlernen von neuen Sensoren erfolgt durch einen langen Druck auf die Plustaste C, die ent-
sprechende Radposition wird durch kurzes Drücken der Plus- oder Minustaste (C bzw. D) vor-
genommen. Das Anlernen geschieht durch langsames Ablassen der Luft, bis das Anlernen mit
einem Signalton quittiert wird und die Sensor-ID im Display angezeigt wird. Möchte man Sen-
soren an bestimmten Positionen löschen, lernt man das Rad an einer anderen Position an und
danach das richtige Rad wieder an der entsprechenden Position, dadurch wird der Sensor
dann überschrieben und gelöscht, z.B. nützlich bei Entfall von Zwillingsbereifungen oder An-
hängerbetrieb.
Rädertausch erfolgt durch langen Druck auf die Minustaste, dadurch müssen die Sensoren bei
einem Tausch z.B. von vorne nach hinten nicht neu angelernt werden. Hier blinkt dann die
ursprüngliche Position, die mit Plus oder Minus gewählt werden kann, diese wird dann mit der
Setuptaste übernommen und danach mit Plus oder Minus die neue Position angewählt. Mit
einem Druck auf die Setuptaste wird der Tausch übernommen.
Die Menüs können mit einem langen Druck auf die Setuptaste verlassen werden, hierbei wer-
den die gemachten Einstellungen übernommen. Sollen diese nicht übernommen werden, ver-
lassen Sie die Menüs durch gleichzeitiges Drücken der Setup- und Plustaste.
Möchten Sie die Werkseinstellungen wiederherstellen, schalten Sie das Gerät kurz aus und
dann wieder ein. Während alle Symbole angezeigt werden, drücken und halten Sie die Setup-
taste, bis ein Quittungston kommt.
Möchten Sie das Gerät längere Zeit außer Betrieb setzen, schalten Sie es mit dem Ein/Aus-
Schalter aus, dann ist es komplett abgeschaltet und wird auch bei Fahrzeugbewegungen nicht
eingeschaltet.

4

5
English Manual
Retrofit motorhomes/vans 8 bar
4 or 6 tyres (pressure and temperature)
You have decided not to leave your tyre pressure and thus your safety to chance. Our retrofit
kit will provide you with valuable services in this regard. We have designed this retrofit kit in
such a way that you can monitor 4 or 6 wheels, whereby the sensors can measure up to 8 bar
pressure and thus there is sufficient scope for most applications. With the ability to set each
axle separately at the warning thresholds, and also monitor temperature, you have reliable
monitoring for every conceivable problem.
As with our retrofit kits for passenger cars, we have decided to use built-in sensors here as
well, since a solution with valve caps is not sufficient here due to the high pressures; by by-
passing the valve, only a rubber seal remains to keep the air in the tyre. With an internal sen-
sor, the constructional safety of a valve remains completely intact and the pressure and tem-
perature are reliably measured inside the tyre, in addition you have the best possible pro-
tection against theft of the sensors.
The installation of the sensors should definitely be carried out by a specialist, and the mass
(approx. 44g) must also be balanced after installation. For a valve service, which should be
carried out every time the tyre is changed, you can use the U1 kit from Alligator or use com-
mon valves with a spherical cap (e.g. Alligator Sens-It).
Your device can display tyre pressures up to 8 bar, the possible monitoring ranges are between
0.1 bar and 9.9 bar in the display, so if necessary you can also set the upper tyre pressure
higher than the sensor measures to deactivate the upper warning threshold altogether, we
recommend setting the pressure setting at 20% at the bottom and approx. 30% at the top,
based on the normal pressure. A tyre with a nominal pressure of 3 bar would thus trigger an
alarm at 2.4 bar at the bottom and at 3.9 bar at the top. The warning temperature can be set
to values between 25°C and 93°C.
Due to the solar cell in the unit, the unit can be operated completely self-sufficiently, but if
necessary, it can also be charged at any time with the enclosed cable at an on-board socket
with 12-24V, should charging with sunlight not be possible. After 10 minutes of standstill, the
unit automatically goes into standby and is then switched on again automatically by vehicle
movements.

6
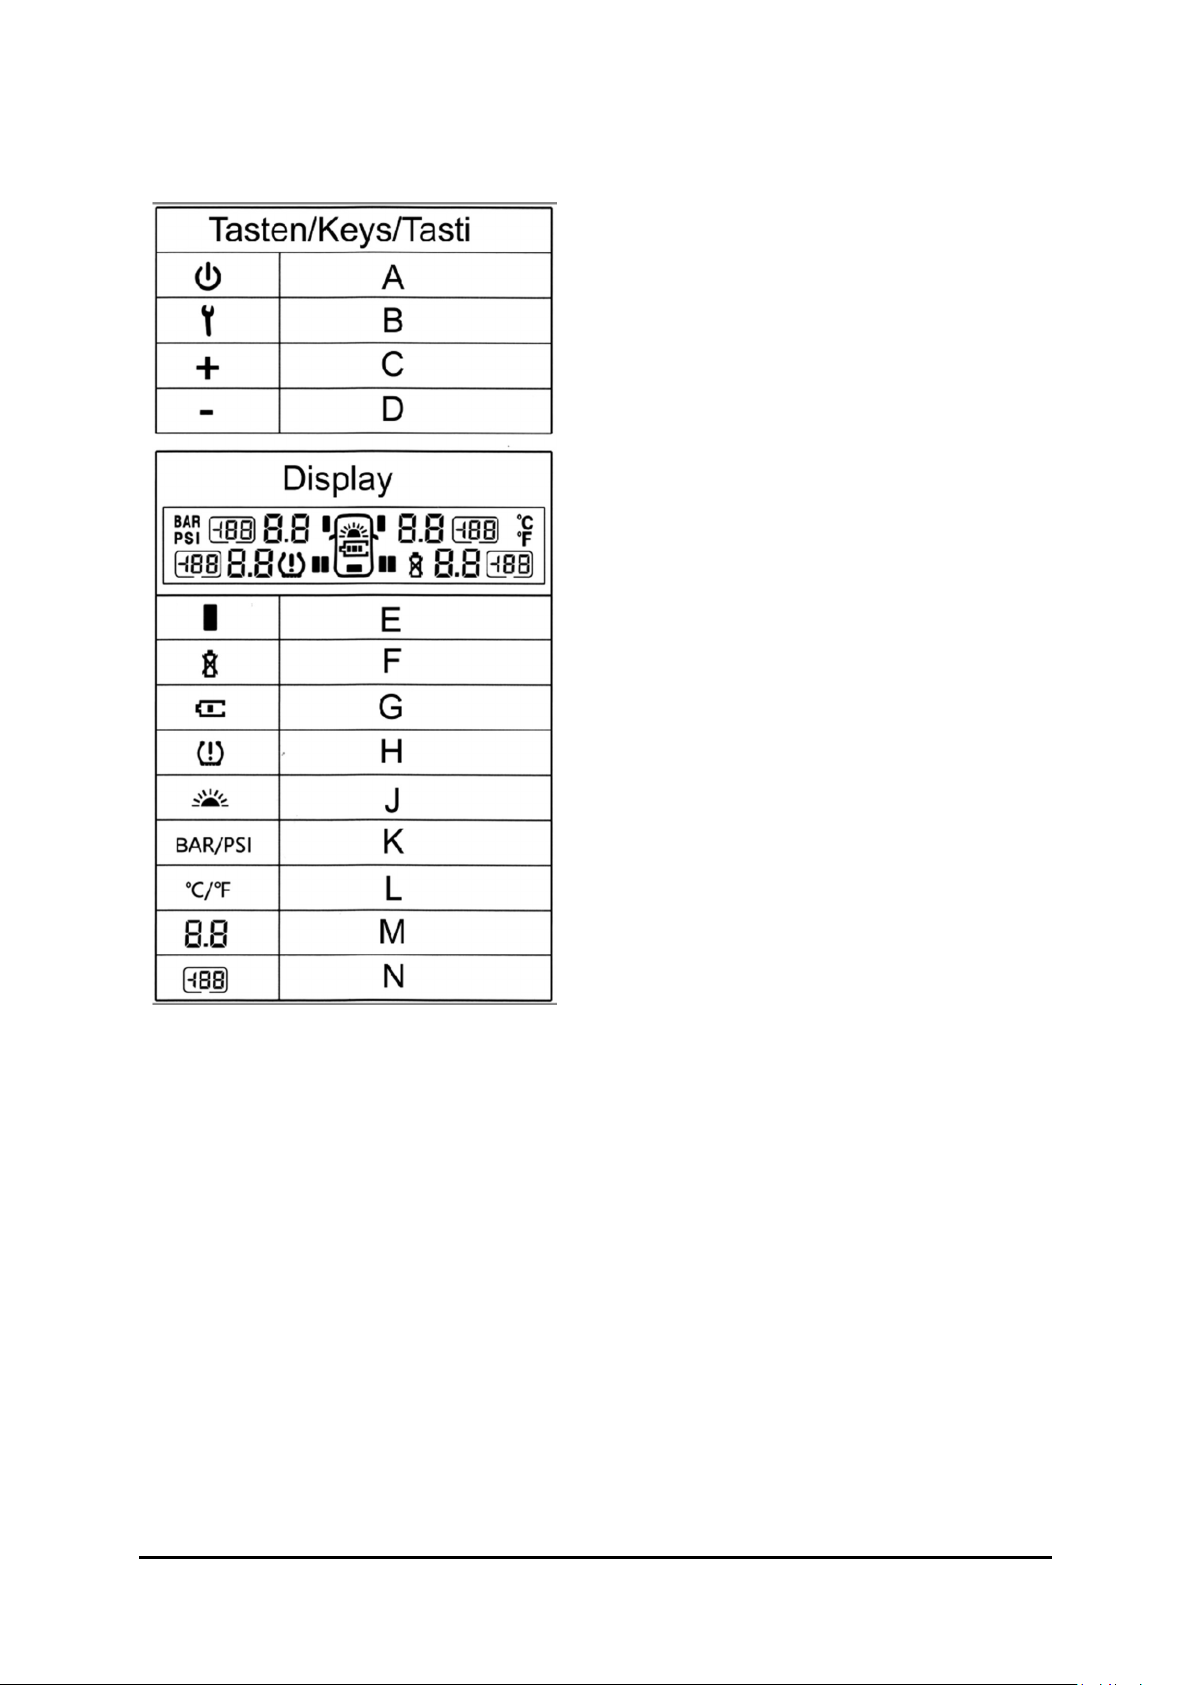
The Display
On/Off - Switch
Setup / Settings
Increase values
Decrease values
Tyre icon
Sensor battery empty/faulty
Charging status display
Alarm (pressure/temperature/defect)
Solar cell charging symbol
Pressure unit
Temperature unit
Tyre pressure
Tyre temperature
The settings for the sensors are already made at the factory, so please install the sensors ac-
cording to the configuration:
L1: Front left R1: Front Right
L2: Rear Left R2: Rear Right
L3: Rear Left Outside * R3: Rear Right Outside *
* Not applicable in systems with 4 sensors
Optionally, the sensors L3 and R3 can also be installed in a trailer, however, it may then be
necessary to operate these two sensors via our separately available repeater in order to
ensure reliable transmission to the display. Furthermore, an additional sensor can be ope-
rated in a spare wheel, but we recommend this only if this wheel is included in the operation
by regular exchange.
When switching between trailer and solo operation, the display should be manually swit-
ched off and on again to initialise the sensors and enable operation with 4 or 6 wheels
without warnings due to missing sensors.
A long press on the setup button takes you to the settings menu, the respective areas can be
changed by a short press on the setup button. Here you can set the units for pressure (bar/psi),
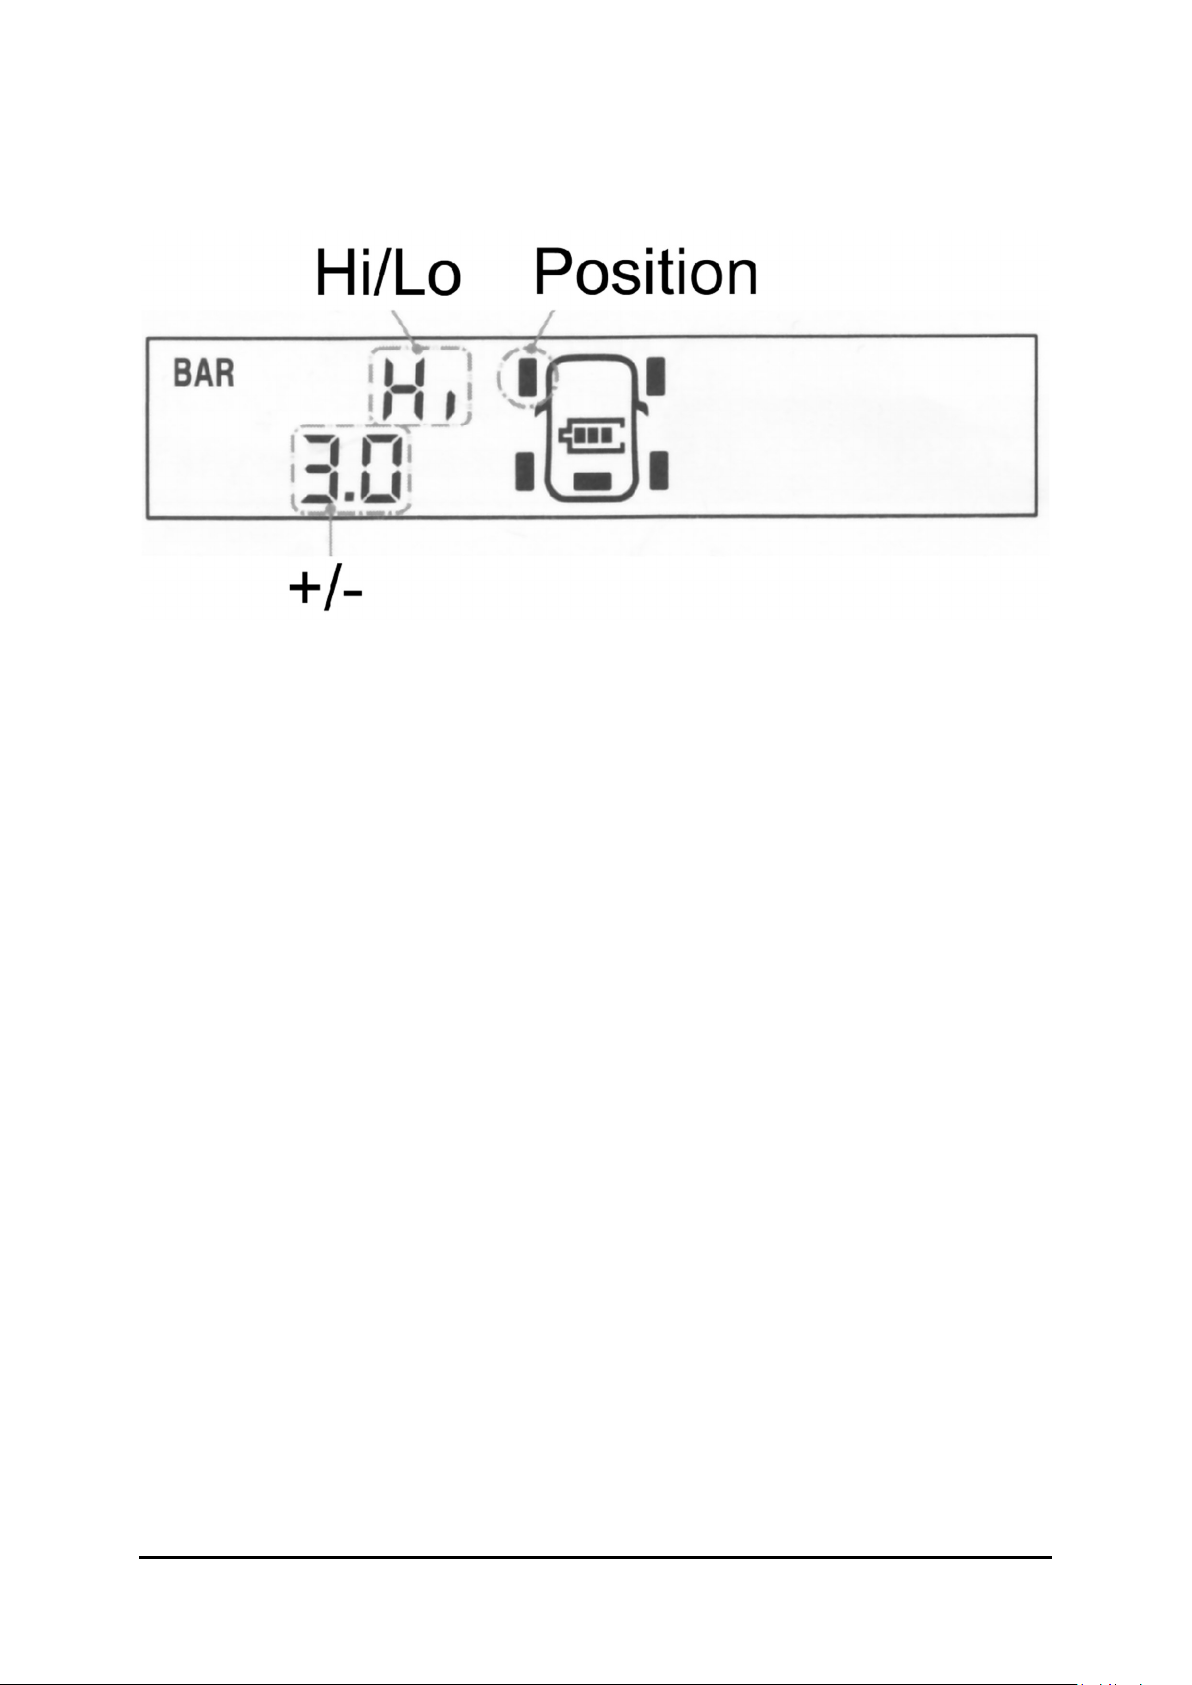
7
the temperature (°C/°F) and the minimum and maximum pressures of the axles and, if neces-
sary, of the spare wheel as well as the warning threshold of the tyre temperature. The respec-
tive settings can be recognised by the flashing symbols and are changed with the + and - keys.
Example of setting the pressure values on the front axle:
New sensors are taught-in by a long press on the + button C, the corresponding wheel position
is set by a short press on the plus or minus button (C or D). The teach-in is carried out by slowly
releasing the air until the teach-in is acknowledged with a signal tone and the sensor ID is
shown in the display. If you want to delete sensors at certain positions, teach-in the wheel at
another position and then the correct wheel again at the corresponding position, which then
overwrites and deletes the sensor, e.g. useful when dual tyres or trailer operation are omitted.
Wheel exchange is carried out by pressing the minus button for a long time, so that the sensors
do not have to be relearned when they are exchanged, e.g. from front to rear. The original
position flashes here and can be selected with plus or minus. This position is then accepted
with the set-up button and the new position is then selected with plus or minus. The change
is accepted by pressing the set button.
The menus can be exited with a long press on the set-up button; the settings made are then
accepted. If you do not want to accept the settings, exit the menus by pressing the Setup and
Plus keys simultaneously.
If you want to restore the factory settings, switch the unit off briefly and then on again. While
all symbols are displayed, press and hold the Setup button until you hear an acknowledgement
tone.
If you want to leave the unit out of operation for a longer period of time, switch it off with the
On/Off switch, then it is completely switched off and will not be switched on even if the vehicle
is moved.

8

9
Manuale italiano
Retrofit camper/furgoni 8 bar
4 o 6 gomme (pressione e temperatura)
Avete deciso di non lasciare al caso la pressione degli pneumatici e quindi la vostra sicurezza.
Il nostro kit di retrofit vi fornirà servizi preziosi a questo proposito. Abbiamo progettato questo
kit di retrofit in modo da poter monitorare 4 o 6 ruote, con i sensori in grado di misurare fino
a 8 bar di pressione e quindi con una portata sufficiente per la maggior parte delle applicazioni.
Grazie alla possibilità di impostare ogni asse separatamente alle soglie di allarme e di monito-
rare anche la temperatura, è possibile ottenere un monitoraggio affidabile per ogni possibile
problema.
Come per i nostri kit di retrofit per le autovetture, anche in questo caso abbiamo deciso di
utilizzare sensori integrati, poiché una soluzione con i tappi delle valvole non è sufficiente a
causa delle alte pressioni; bypassando la valvola, rimane solo una guarnizione di gomma per
mantenere l'aria nel pneumatico. Con un sensore interno, la sicurezza costruttiva di una
valvola rimane completamente intatta e la pressione e la temperatura vengono misurate in
modo affidabile all'interno del pneumatico; inoltre si ha la migliore protezione possibile contro
il furto dei sensori.
L'installazione dei sensori deve essere eseguita da uno specialista e la massa (circa 44 g) deve
essere bilanciata dopo l'installazione. Per la manutenzione delle valvole, che dovrebbe essere
effettuata a ogni cambio di pneumatico, è possibile utilizzare il kit U1 di Alligator o le comuni
valvole con tappo sferico (ad esempio Alligator Sens-It).
Il dispositivo è in grado di visualizzare la pressione degli pneumatici fino a 8 bar, gli intervalli
di monitoraggio possibili sono compresi tra 0,1 bar e 9,9 bar sul display, quindi, se necessario,
è anche possibile impostare la pressione superiore dello pneumatico più alta di quella
misurata dal sensore per disattivare completamente la soglia di avviso superiore; si consiglia
di impostare la pressione al 20% in basso e a circa il 30% in alto, in base alla pressione normale.
Un pneumatico con una pressione nominale di 3 bar farebbe quindi scattare un allarme a 2,4
bar in basso e a 3,9 bar in alto. La temperatura di avviso può essere impostata su valori com-
presi tra 25°C e 93°C.
Grazie alla cella solare presente nell'unità, l'apparecchio può funzionare in modo completa-
mente autosufficiente, ma, se necessario, può anche essere ricaricato in qualsiasi momento
con il cavo in dotazione a una presa di bordo da 12-24 V, qualora non fosse possibile la ricarica
10
con la luce solare. Dopo 10 minuti di sosta, l'unità va automaticamente in standby e si riac-
cende automaticamente grazie ai movimenti del veicolo.
Il Display
Interruttore On/Off
Configurazione / Impostazioni
Aumento dei valori
Diminuzione dei valori
Simbolo dei pneumatici
Batteria del sensore scarica/difettosa
Stato di carica Display
Allarme (pressione/temperatura/difetto)
Simbolo di carica cella solare
Unità di pressione
Unità di temperatura
Pressione pneumatici
Temperatura dei pneumatici
Le impostazioni dei sensori sono già state eseguite in fabbrica, quindi si prega di installare i
sensori in base alla configurazione:
L1: Anteriore sinistro R1: Anteriore destro
L2: Posteriore sinistro R2: Posteriore destro
L3: Posteriore esterno sinistro * R3: Esterno posteriore destro *
* Non applicabile a sistemi con 4 sensori
Opzionalmente, i sensori L3 e R3 possono essere installati anche in un rimorchio; tuttavia,
potrebbe essere necessario far funzionare questi due sensori tramite il nostro ripetitore
disponibile separatamente, per garantire una trasmissione affidabile al display. Inoltre, è
possibile utilizzare un sensore aggiuntivo in una ruota di scorta, ma si consiglia di farlo solo
se questa ruota è inclusa nell'operazione di sostituzione regolare.
Quando si passa dal funzionamento con rimorchio a quello in solitaria, il display deve essere
spento e riacceso manualmente per inizializzare i sensori e consentire il funzionamento con
4 o 6 ruote senza avvisi dovuti a sensori mancanti.

11
Premendo a lungo il pulsante di impostazione si accede al menu delle impostazioni; le rispet-
tive aree possono essere modificate premendo brevemente il pulsante di impostazione. Qui è
possibile impostare le unità di misura della pressione (bar/psi), la temperatura (°C/°F) e le
pressioni minima e massima degli assi e, se necessario, della ruota di scorta, nonché la soglia
di allarme della temperatura degli pneumatici. Le rispettive impostazioni sono riconoscibili dai
simboli lampeggianti e si modificano con i tasti + e -.
Esempio di impostazione dei valori di pressione sull'asse anteriore:
I nuovi sensori vengono appresi premendo a lungo il pulsante + (C), mentre la posizione cor-
rispondente della ruota viene impostata premendo brevemente il pulsante più o meno (C o
D). L'autoapprendimento viene eseguito rilasciando lentamente l'aria fino a quando l'auto-
apprendimento viene confermato da un segnale acustico e l'ID del sensore viene visualizzato
sul display. Se si desidera eliminare i sensori in determinate posizioni, inserire la ruota in un'al-
tra posizione e poi di nuovo la ruota corretta nella posizione corrispondente, che sovrascrive
e cancella il sensore, ad esempio quando si omettono i doppi pneumatici o il funzionamento
del rimorchio.
La sostituzione delle ruote si effettua premendo a lungo il pulsante meno, in modo da non
dover riapprendere i sensori quando vengono scambiati, ad esempio, dalla parte anteriore a
quella posteriore. La posizione originale lampeggia e può essere selezionata con più o meno.
Questa posizione viene accettata con il pulsante di impostazione e la nuova posizione viene
selezionata con più o meno. La modifica viene accettata premendo il pulsante di impostazione.
È possibile uscire dai menu premendo a lungo il pulsante di impostazione; le impostazioni ef-
fettuate vengono quindi accettate. Se non si desidera accettare le impostazioni, uscire dai
menu premendo contemporaneamente i tasti Setup e Più.
Se si desidera ripristinare le impostazioni di fabbrica, spegnere brevemente e riaccendere l'ap-
parecchio. Mentre sono visualizzati tutti i simboli, tenere premuto il tasto Setup finché non si
sente un tono di conferma.
Se si desidera lasciare l'unità fuori servizio per un periodo di tempo prolungato, spegnerla con
l'interruttore On/Off; in questo modo l'unità è completamente spenta e non si accenderà
nemmeno se il veicolo viene spostato.

12
Table of contents
Languages:
Popular Automobile Accessories manuals by other brands

SBS
SBS TECLIPHEADSETBTK user manual

Havis-Shields
Havis-Shields 2006-2007 Dodge Charger and Magnum... Install instructions

Trail-Gear
Trail-Gear Rock Assault 300563-KIT Install instructions

Metra Electronics
Metra Electronics 95-5817 installation instructions

Alfano
Alfano M4 Complete manual

Emerald
Emerald MB-NTG4-CP manual

Fiamma
Fiamma CARRY-BIKE VOLKSWAGEN T5 PRO Installation and usage instructions

Mazda
Mazda Connect manual

CCM
CCM 040-1193-8 instruction manual

Waeco
Waeco MagicComfort MSH200 Installation and operating instructions

STO N SHO
STO N SHO SNS 118 Installation procedures

Big Mikes Performance Parts
Big Mikes Performance Parts STO N SHO SNS 41 Installation procedures


