Autov M-288 User manual
INTELLIGENT CLEANER
OPERATING MANUAL
MODEL NO. M-288
AUTOV

Welcome dear customers:
Thank you for using our Intelligent Vacuum Cleaner!
The Intelligent Cleaner is our creation and manufactured by using our own mechanical,
electronic technology. It can be used widely in your family, office and entertainment
places. Also it can go to work in places where workers are not easily accessible. With
the help of this Intelligent Cleaner the quality of your life is enriched.
The Cleaner is only recommended for indoor use. It can be used to clean floor surfaces
including hardwood, linoleum, tile and low-to medium-pile carpets. If you want your
hardwood or tile floor brighter, you should clean the brush after it clean the floor, and
then scoop up some liquid wax use the spoon, start the Cleaner again. We request your
close attention to read this operating manual in order to make full use of this Cleaner
- 1 -
INTELLIGENT CLEANER
OPERATING MANUAL
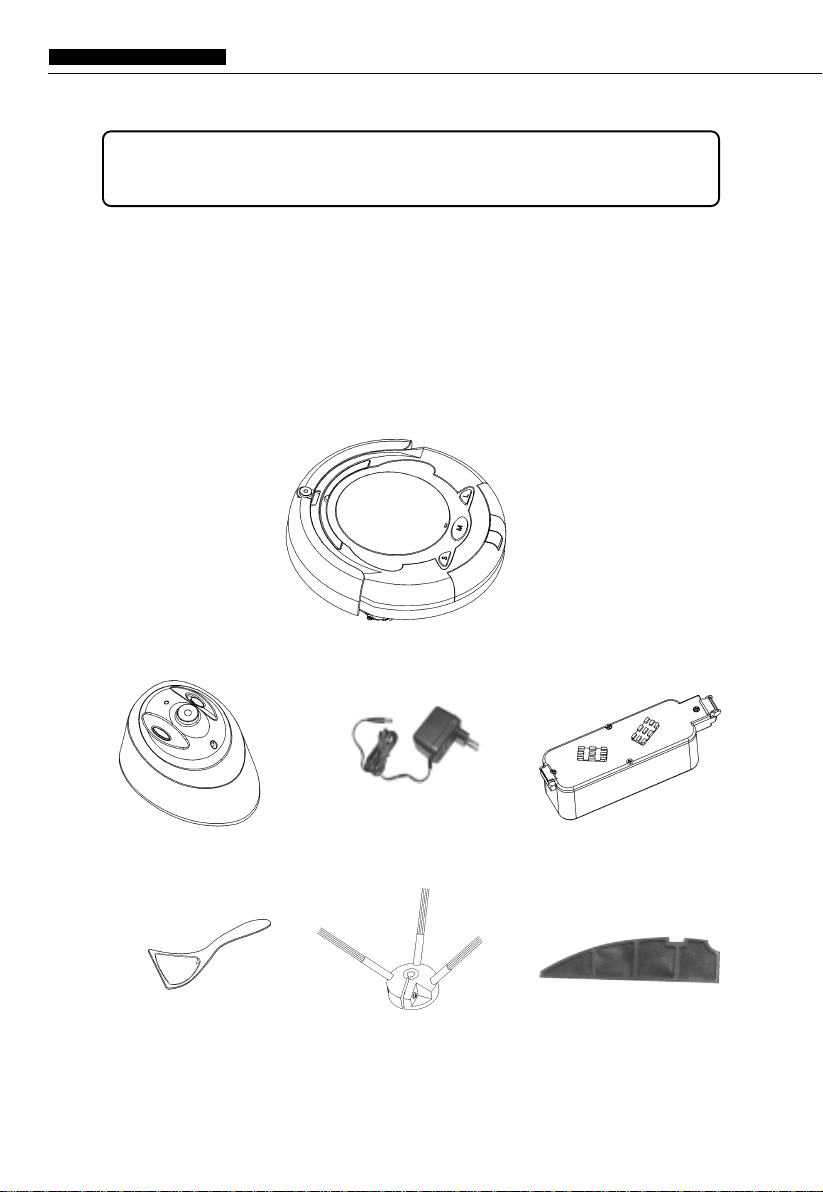
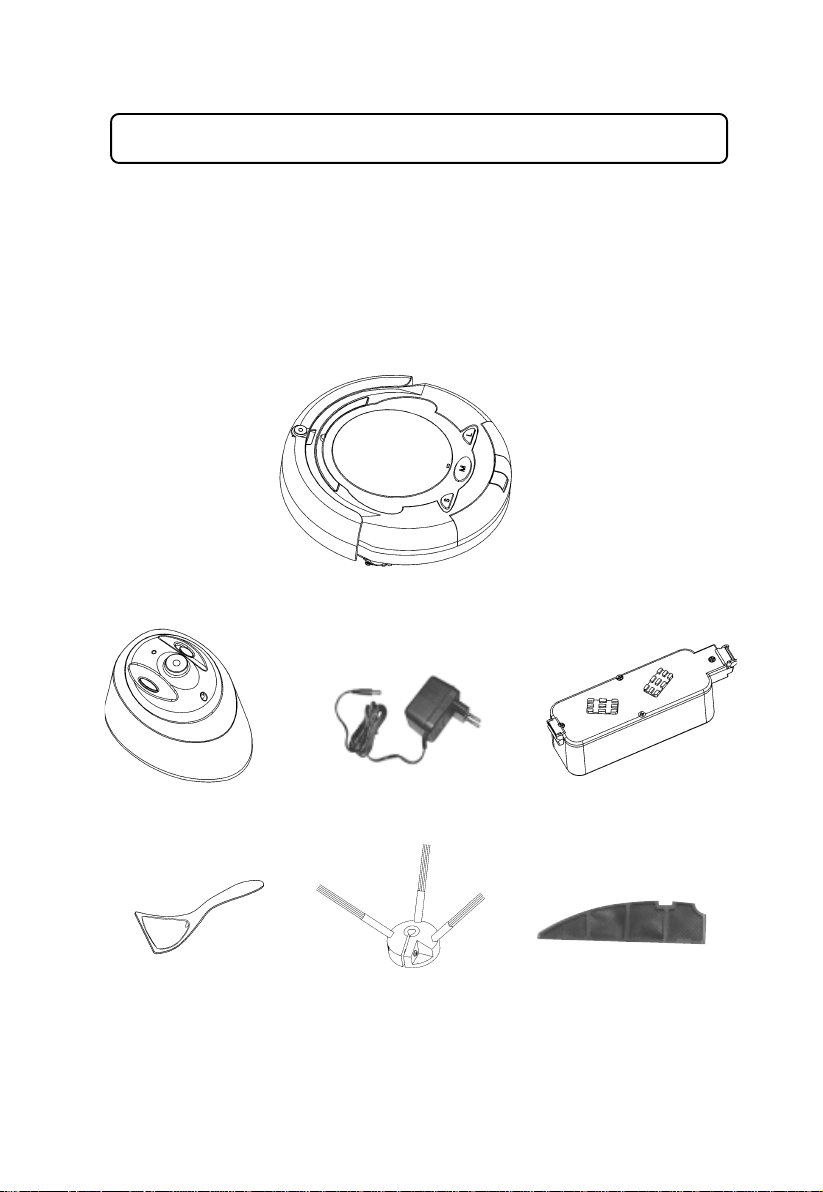
1. Virtual Wall Unit x 1
2. Battery Charger x 1
3. Rechargeable Battery Pack (Installed) x 1
4. Spoon x 1
5. Replacement Side Brush x 1
6. Replacement Filter x 1
7. Operating Manual x 1
This box is consisted of the following
accessories and attachments:
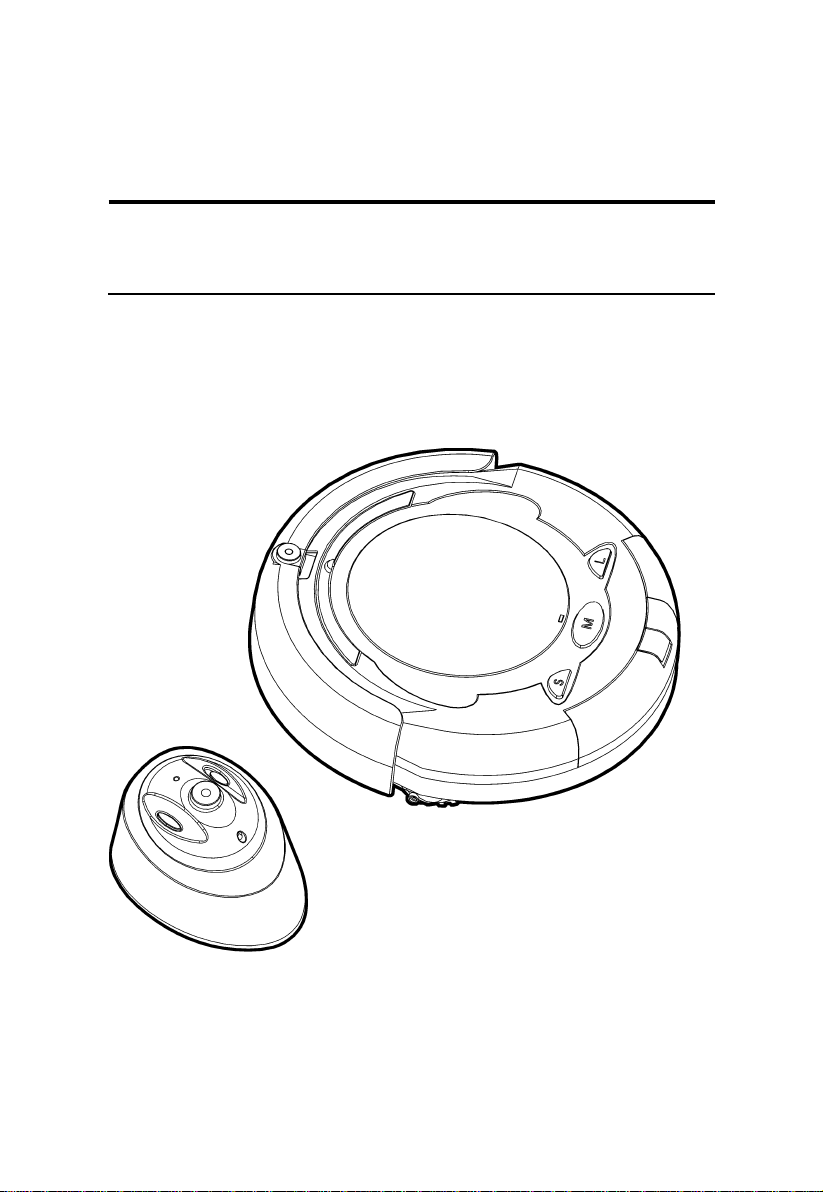
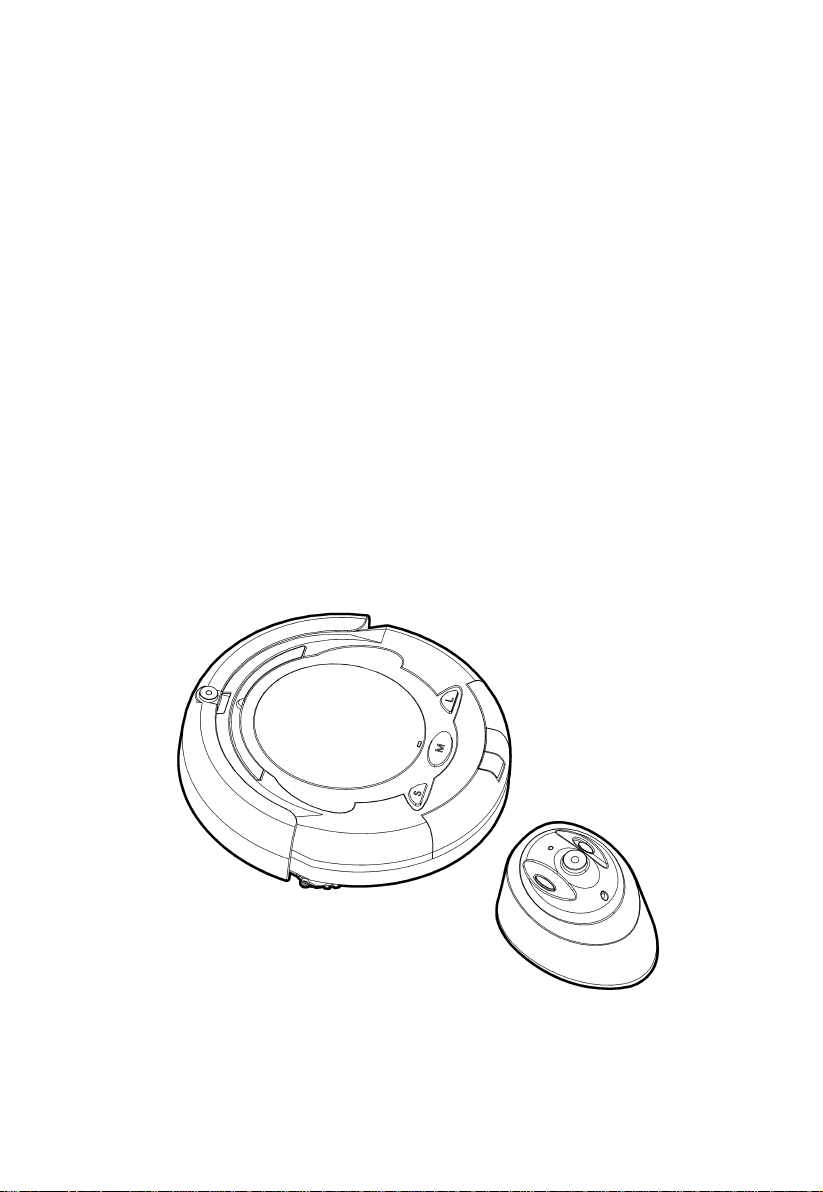
Intelligent Cleaner
Virtual Wall Unit
Battery Charger
Rechargeable Battery
Pack
Spoon Side Brush
- 2 -
INTELLIGENT CLEANER
OPERATING MANUAL
Filter

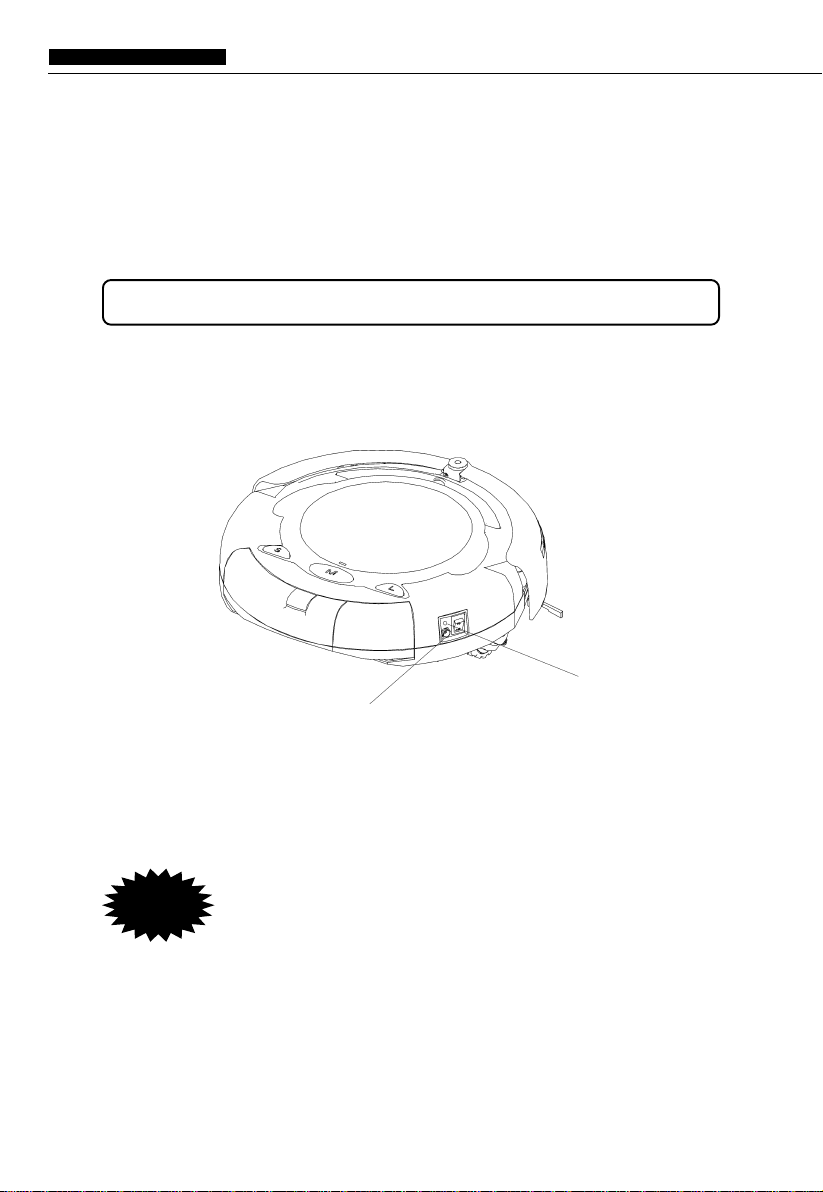
Intelligent Cleaner installed with :
6) Rechargeable battery
12) Battery charger socket
1) Infra-red sensor
2) Easy to grab handle
3) Battery life indicator
4) Start button
5) Removable particle bin
8) Side brush
9) Power switch
10) Main brush
11) Filter
11) Vacuum inlet lid
- 3 -
INTELLIGENT CLEANER
OPERATING MANUAL
Surface
7) Sensors
7) Sensors
Bottom
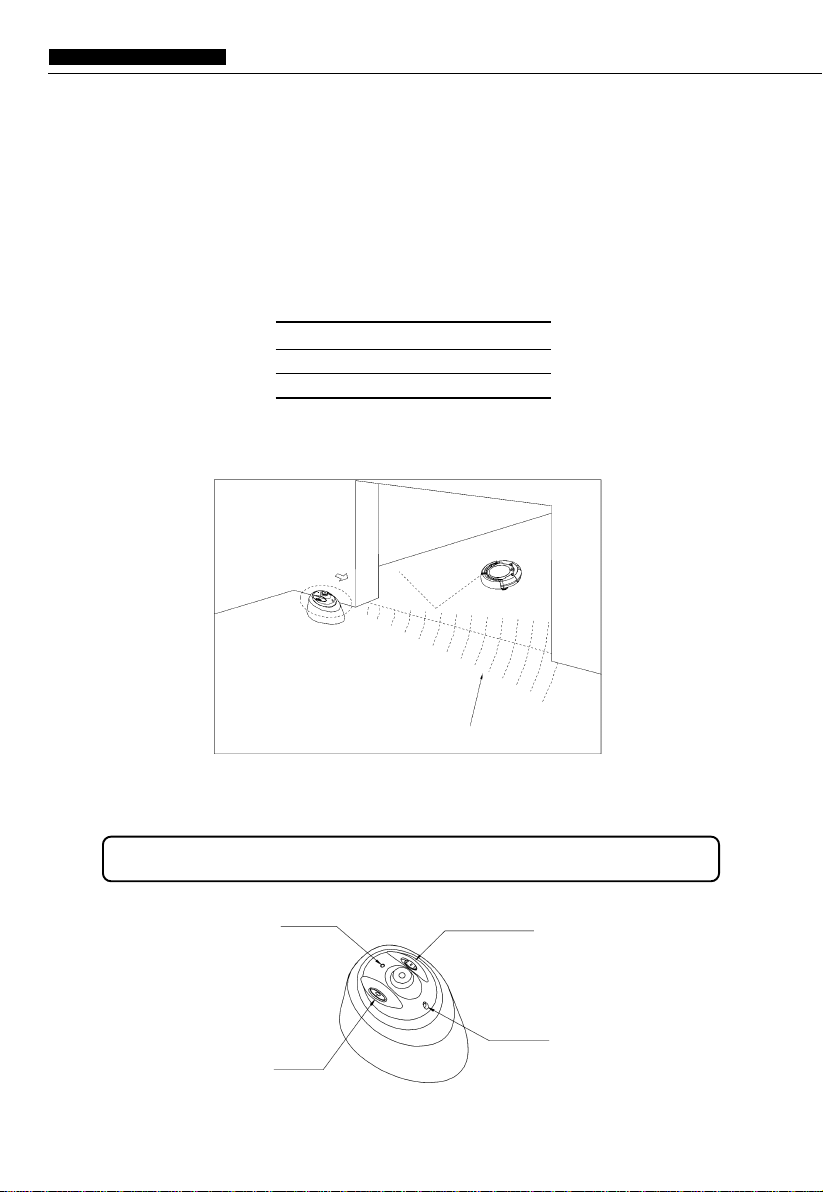
After the introduction of the Intelligent Cleaner, please
note the following operating procedures :
1) Before you start the Cleaner please ensure battery is fully charged. Normally
battery is pre-charged ex-factory.
2) Press its main power start button, there are three start buttons S.M.L.(Represent
small, medium and large) to select the room sizes you are going to clean. The room
dimensions and workable time represented by S, M and L are listed as below :
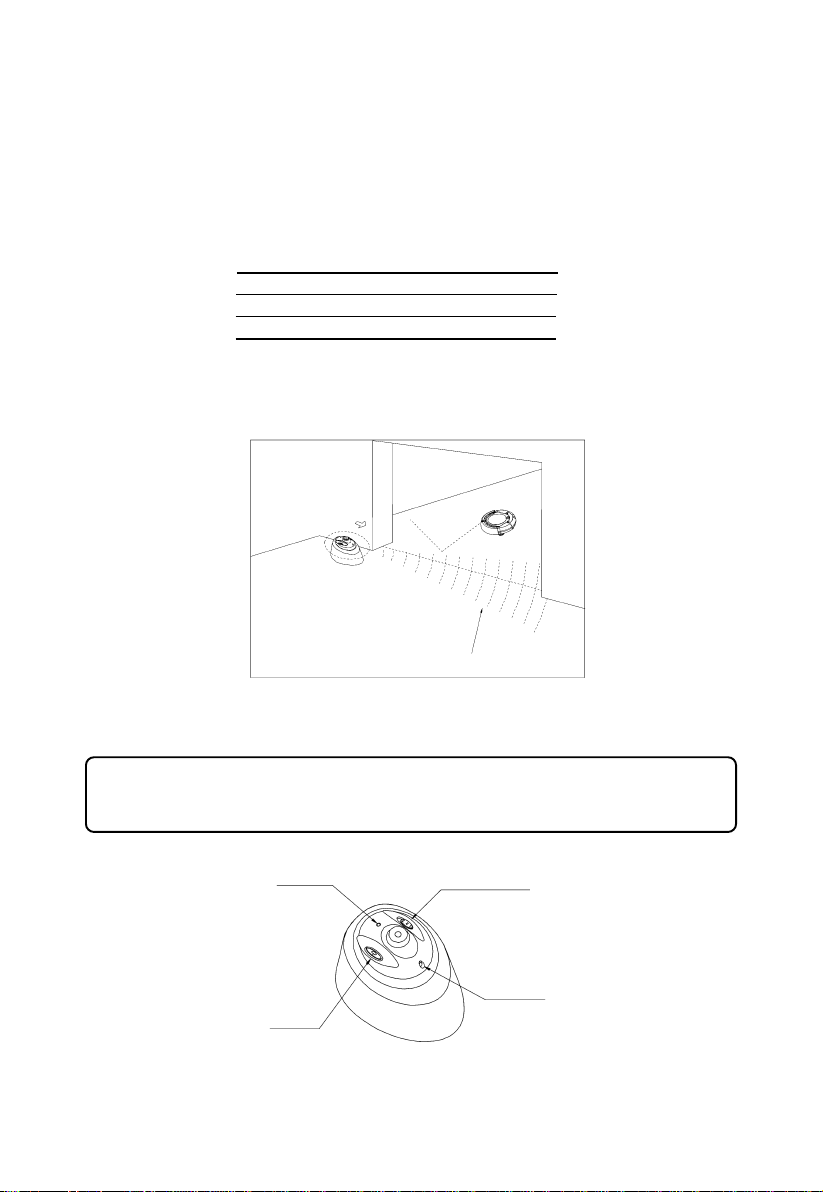
3) If you donÕt want your Cleaner to clean those area beyond your desired cleaning
area, please place the Virtual Wall Unit at the proper place such as the following
illustration
- 30 minutes
- 40 minutes
- 50 minutes
S:
M:
L:
10 - 15
15 - 25
over 25m2
m2
m2
Infra-red wave emitter
Power button
Power light
BesttoputVirtualWall
Unitbehindthedoor
Indicateinfra-redwave
To operate the Virtual Wall Unit please see following drawing :
- 4 -
Range Seletor Switch
INTELLIGENT CLEANER
OPERATING MANUAL
4. When wrong start button is pressed, the other start switch needs to be pressed
twice before cleaning.

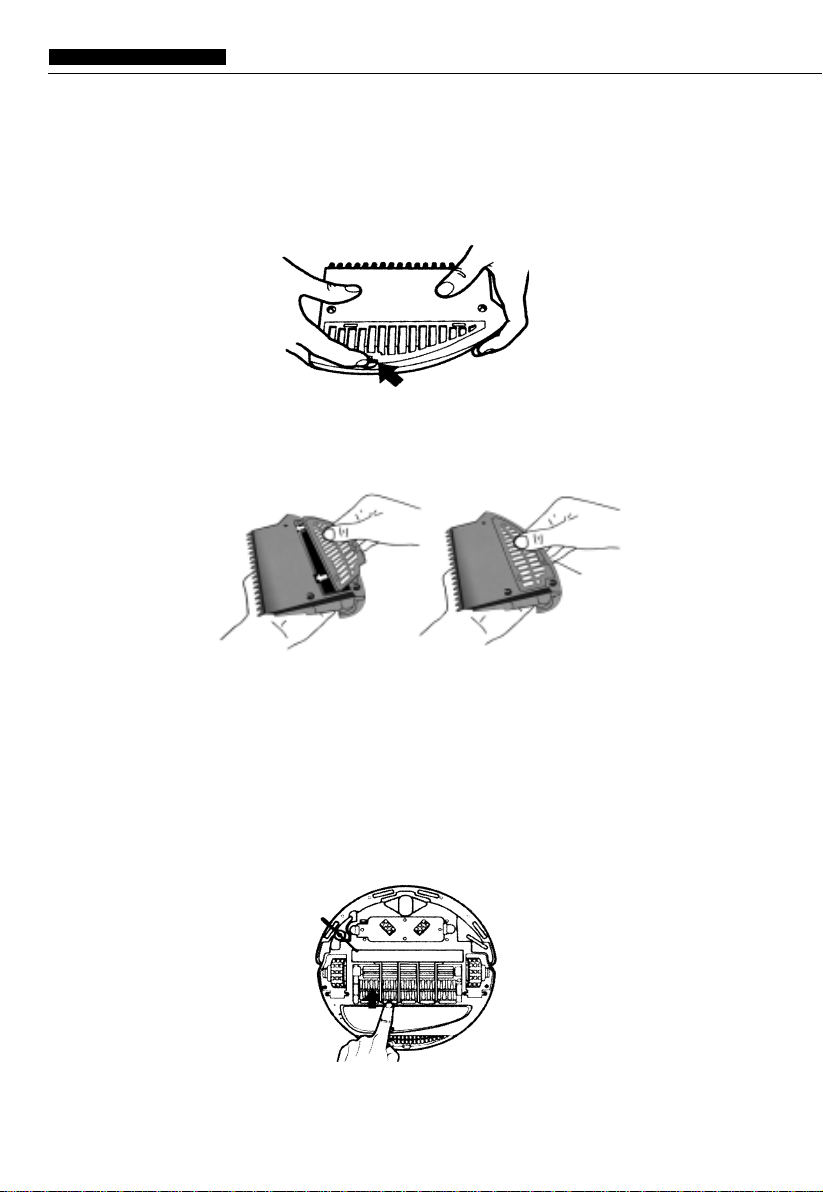
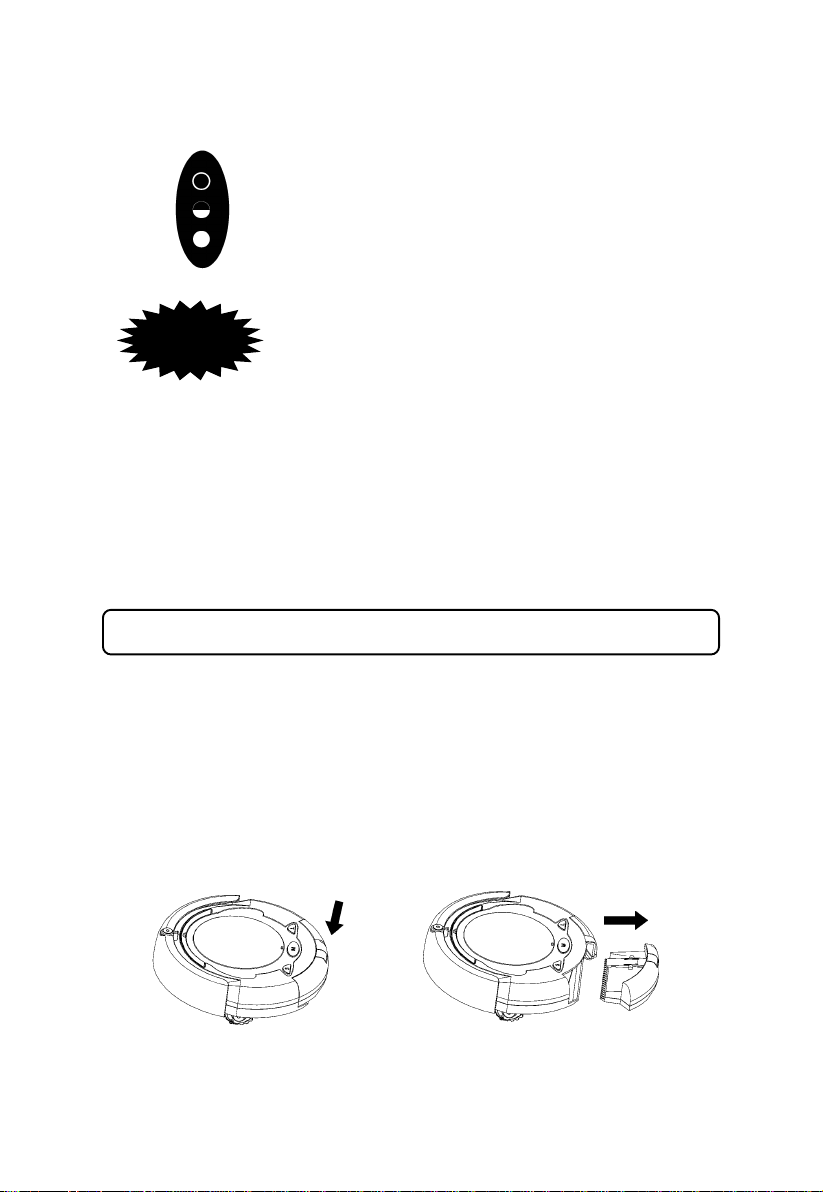
There are two processes to clean the particles and dirt in the bin :
1. Emptying the bin
A) Switch off power
B) Press down the bin clip and pull out the bin as following illustrations:
C) Clear the bin
Virtual Wall Unit uses two (1#dry battery) to divide the infra-red emission distance into
three gears as following drawing :
over 7 meters
3-7 meters
0-3 meters
You can select according to your
cleaning condition.
Please do not use the infra-red wave emitter to
point at the eyes!
CAUTION
5). When the start button is pressed, you can hear soft music for a while then the
Intelligent Cleaner starts to work.
6). It can work about 30-50 minutes this will clean a standard size room area. When
battery is weak, the battery life indicator will flush and the system will automatically cut off.
Intelligent Cleaner is user-friendly, very little maintenance required after use. To
ensure optimal performance please observe the following procedures:
Emptying the Removable Particle Bin
- 5 -
INTELLIGENT CLEANER
OPERATING MANUAL
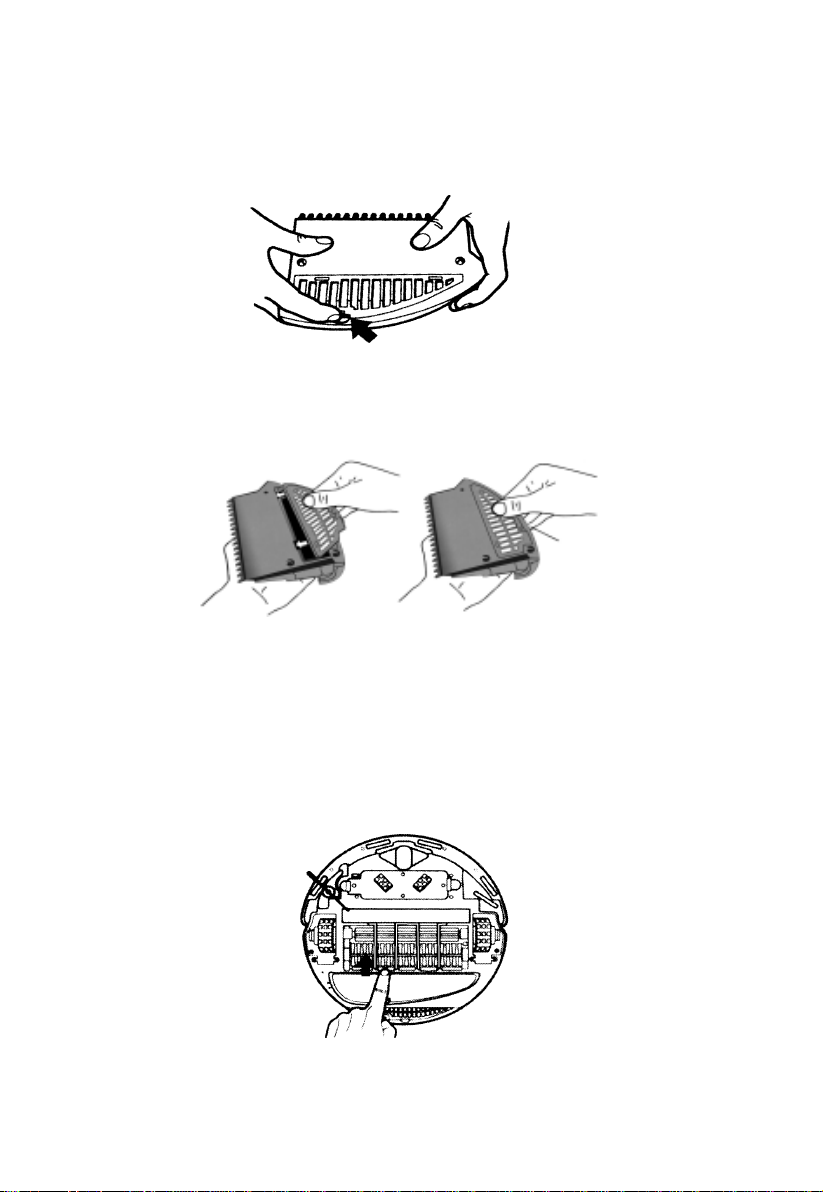
2. Clean the filter
A) Turn the bin upside down
B) Press the bottom slightly, take the filter out as following drawing
C) Clear the dirt of the filter
D) Fit the filter back to the bin
E) Press the clip slightly and put the bin back to the Cleaner
Clean the main brushes of the Cleaner
1) Switch off power and put Cleaner on flat surface with Cleaner bottom up
- 6 -
INTELLIGENT CLEANER
OPERATING MANUAL

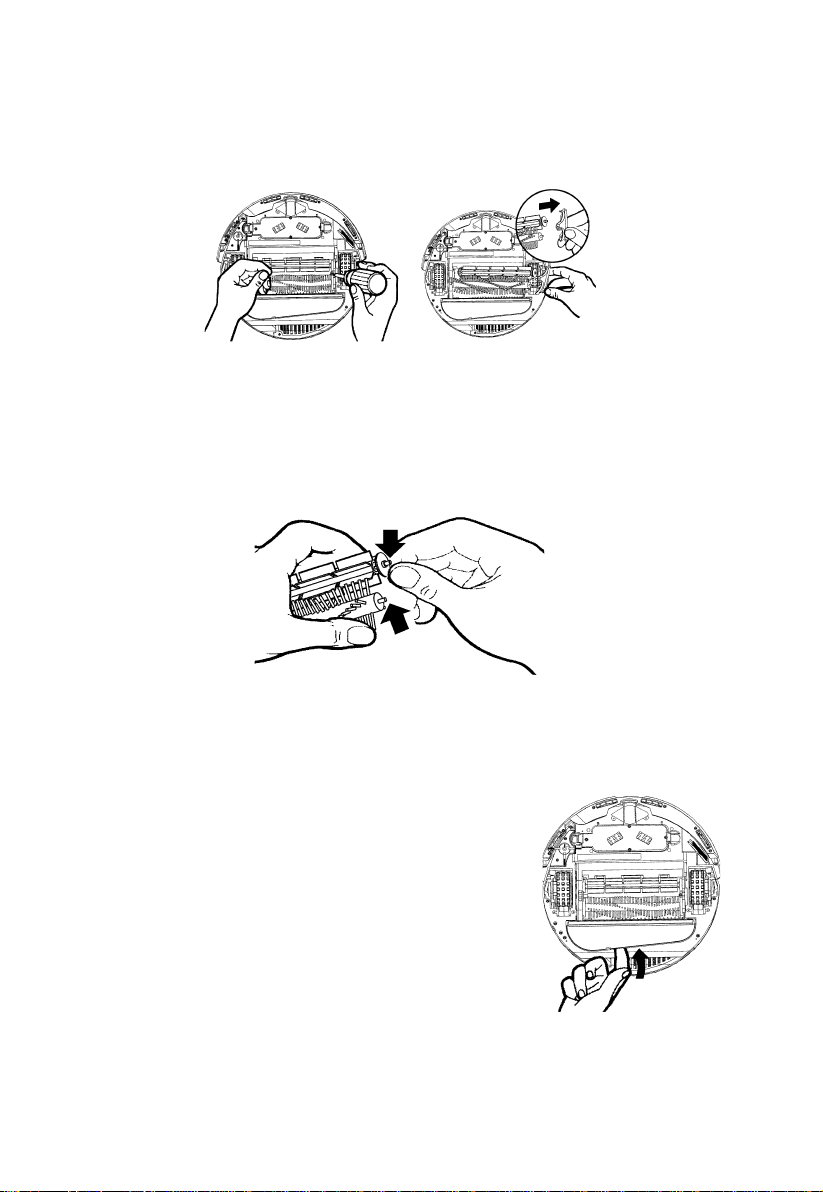
2 Use cross head screwdriver to remove the fixing screw on the right, and then take
out the main brush, rubber brush and brush coupler together as shown in the following
drawing.
5). Put the brush coupler and brushes back and tighten the screw.
Cleaning the Vacuum Inlet Lid
1) Switch off power. Turn the Cleaner upside
down on flat surface.
2) Take the Vacuum Inlet Lid out as per following
drawing
3) Clean the Vacuum Inlet Lid and the fan-shaped
mechanism to ensure good ventilation
4) Guide the hinge tabs on the Vacuum Inlet Lid
back into their holes carefully
- 7 -
INTELLIGENT CLEANER
OPERATING MANUAL
Brush coupler.
3 . Clean the chamber where the brush is located and the contaminants on brush and
rubber brush.
4 . Wipe out dirt on the metal shaft and bearing of the brush coupler and the brushes
(this may not be necessary to do after every cleaning) as per following drawings. If
necessary can put a little lubricant to it.
Charging
The Intelligent Cleaner needs recharging after every use. The charger is suitable to
operate at a voltage 230V (The voltages in different countries may be different), frequency
50/60Hz , it is small, light weight and stable. which is specially designed for our Cleaner
only, so please don’t use other chargers for our Cleaner.
1) Switch off power of the Cleaner. Put it in a safe place.
2) On the right of the Intelligent cleaner, there is a charging socket and a charging
indicator, as shown in the following figure. The total charging time is about 4-5 hours.
Charging socket
charging indicator
3) During charging, the chargig indicator of the cleaner is on, showing that the
charging is normal. In 4-5 hours, the battery is fully charged, and the charger should be
removed. When you go out, please take out the charger timely in case overcharge and
affects the battery life.
1.The charger enclosd with this unit has such features as broad
voltage, stable and reliable, specifically used together with the
rechargeable battery of this unit. Therefore, please don’t mix the
rechargeable battery and charger with other products.
2.To extend the battery service life, charge the battery for 8-9 hours
after the initial use or when it is used again after long period of
being not in use.
3.Only when the battery undergoes 2-3 times of fully charging and
discharging period before it can achieve its optimum performance.
Charging method
- 8 -
INTELLIGENT CLEANER
OPERATING MANUAL
CAUTION

Method for replacement of side brush
The side brush is consumable. See the following picture for the replacement method.
Intelligent path judgment
Intelligent Cleaner is intelligently controlled so it operates powerfully and can avoid
any obstruction or even will not fall down from a table, staircase or pathway.
Bottom
Fig. 1 Fig. 2
1. As shown in Fig.1, remove the two screws
2. As shown in Fig.2, turn the side brush to the extent when the screwdriver can
be inserted, loosen the screw, take out the old brush, and replace with the new
one..
3. Assemble the brush and bottom cover in a reverse order.
INTELLIGENT CLEANER
OPERATING MANUAL
- 9 -

1). It is switched on but stop after the soft music playing, this may mean the battery
is weak or off and need charging
2). Please do not use the Cleaner on high-pile carpets.
3). To avoid use Cleaner where there are objects such as clothing, power cords,
towels etc. As these may entangle the brushes of the Cleaner.
4) It must be first charged if is not used for a longer time. Take battery out of the unit
and store the battery and unit at a cooler place when it is not using
5) After the cleaner is used for certain period, use dry cloth to clean the surface and
bottom.
please remove small objects such as vase, small
paper box etc. Which can be subject to knock down
by cleaning so must clear these things before the
Cleaner to carry out its work.
CAUTION
The Intelligent Cleaner is a vacuum cleaning device and works
wonderfully please it is important to note the following points :
- 10 -
INTELLIGENT CLEANER
OPERATING MANUAL

1. When the front wheel of the robot cleaner falls from the edge of the staircase,
please use the spare side brush or dry cloth to remove the dust on the bottom sensor
head of the front bumper board.
2. When the robot cleaner has power shutdown during the cleaning process, if S/
M/L lamps and indicator are all on, it shows the robot is in normal working status. The
detailed troubleshooting method is as follows:
a. Turn off the power switch, turn over the robot cleaner, check the inside of mid
brush to see if there is any large rubbish or long hairy rubbish to block the mid brush
wheel, remove the rubbish, and then the unit can work properly.
b. Check to see if there is large rubbish lump entering the inside of left/right wheels.
If any, turn the wheel to remove the rubbish, and then the unit can work properly.
c. When the rubbish box is full, timely remove the rubbish to improve the cleaning
efficiency and prevent the overload operation of the unit resulting in protective shutdown.
3. When the robot cleaner rotates at its original position, please check if the left or
right wheel is blocked with rubbish. Please timely remove the lumpish particles inside.
4. When turning on the switch, if the lamp is not on and there is no melody, check the
bottom battery compartment of the robot cleaner to see if there is any loosening. If any,
just press the battery into the battery compartment. Besides, if the battery has no
power, please timely charge the battery.
5. If the virtual barrier emitter has no block function, please place it properly; when
the green indicator is flashing continuously, please timely replace the battery of the
virtual barrier emitter.
6. When the robot cleaner falls down inadvertently, please check the bottom battery
compartment of the robot cleaner to see if it is loose. If so, just press in the battery
compartment along the original direction.
7. Please don’t allow the children to arbitrarily knock the robot cleaner, and don’t
throw it from the staircase to avoid unnecessary damage to the robot cleaner.
INTELLIGENT CLEANER
OPERATING MANUAL
CAUTION To enable the cleaner providing better service for you,
please find the following description about the correct
troubleshooting method:
- 1 -
Sehr geehrter Kunde,
wir danken Ihnen für den Kauf des „Robo-Saugers“.
Der Robo-Sauger findet vielseitige Anwendung, sowohl in Ihrer Familie, als auch im Büro
oder an sonstigen Plätzen. Er ist besonders geeignet zum Einsatz an schwer zugänglichen
Bereichen. Mit Hilfe dieses intelligenten Robo-Saugers wird Ihre Lebensqualität erheblich
bereichert.
Der Robo-Sauger darf nur in Innenräumen verwendet werden. Er ist geeignet zum Saugen
von Bodenbelägen, wie z. B. Holzböden, Linoleum, Fliesen und Niedrig- bis Mittelflor-
Teppichen. Wenn Sie Ihre Holz- bzw. Fliesenböden noch glänzender haben möchten, dann
sollten Sie die Bürste des Robo-Saugers nach dem Reinigen des Fußbodens gründlich
säuberen, anschließend können Sie etwas Flüssigwachs von einem Löffel auftunken und
dann starten Sie den Robo-Sauger nochmals.
Um die ganze Bandbreite des Robo-Saugers ausnutzen zu können und um eine
ordnungsgemäße Verwendung des Produktes zu gewährleisten, sollten Sie bitte unbedingt
diese Gebrauchsanleitung sorgfältig durchlesen.
Artikel Nr. 717.355 Robo-Sauger
- 2 -
1. Virtuelles Wandelement 1 x
2. Batterie-Ladegerät 1 x
3. Wiederaufladbare Batterie (eingebaut) 1 x
4. Löffel 1 x
5. Ersatz-Seitenbürste 1 x
6. Ersatz-Filter 1 x
7. Gebrauchsanleitung
Lieferumfang:
Filter
Virtuelles Wandelement Batterie-Ladegerät Wiederaufladbare Batterie
Löffel Seitenbürste
Robo-Sauger

- 3 -
Eingebaute Bestandteile des Robo-Saugers:
Oberfläche
Unterseite
1) Infrarot-Sensor
2) Griff
3) Batterieanzeige
4) Start-Knopf
5) Abnehmbarer Schmutzbehälter
12) Saugöffnungs-Klappe
6) Wiederaufladbare Batterie 7) Sensoren
7) Sensoren
8) Seitenbürste
9) Schalter
10) Hauptbürste
11) Filter
13) Batterielade-Buchse
1) Bevor Sie den Robo-Sauger starten, stellen Sie bitte sicher, dass die Batterie
komplett aufgeladen ist. In der Regel ist die Batterie bereits von Werk aus
aufgeladen.
2) Drücken Sie nun den Haupt-Schalter, es gibt drei verschieden Start-Knöpfe: S,
M und L (klein, mittel und groß), um die entsprechende Raumgröße, die Sie
reinigen möchten, auszuwählen. Die Raumgrößen und die entsprechenden
Reinigungszeiten (S, M und L) sind nachstehend aufgeführt:
4) Falls Sie den falschen Startknopf gedrückt haben, dann muss der andere Start-
Knopf zweimal vor dem Reinigen gedrückt werden.
Zeigt die Infrarot-Wellen an.
Es empfiehlt sich das
virtuelle Wandelement
hinter einer Türe zu
platzieren.
Betriebsabläufe:
3) Wenn Sie nicht möchten, dass der Robo-Sauger außerhalb des von Ihnen
gewünschten Bereichs reinigt, dann müssen Sie das virtuelle Wandelement an
einen geeigneten Platz entsprechend der Abbildung platzieren.
S: 10 – 15 m² - 30 Minuten
M: 15 – 25 m² - 40 Minuten
L: über 25 m² - 60 Minuten
Betriebsleuchte Schalter Raumgröße
Start-Knopf
Sender Infrarotwellen
Zum Bedienen des virtuellen Wandelements, beachten
Sie bitte die folgende Abbildung:
- 4 -
- 5 -
Das virtuelle Wandelement funktioniert mit zwei Batterien, um die Infrarotwellen-
Sendungsdistanz in drei Stufen zu unterteilen, siehe auch entsprechende Abbildung:
Wahlweise je nach Reinigungszustand.
Der Infrarotwellen-Sender darf nicht direkt auf die Augen
gerichtet werden.
ACHTUNG
5) Sobald Sie den Start-Knopf gedrückt haben, ertönt eine kurze Musik, dann beginnt
der Robo-Sauger mit der Arbeit.
6) Der Robo-Sauger kann ca. 30 – 60 Minuten am Stück betrieben werden, diese Zeit
wird benötigt zur Reinigung einer Standard-Raumgröße. Sobald die Batterie schwächer
wird, leuchtet die Batterieanzeige auf und das Gerät schaltet sich automatisch aus.
Der Robo-Sauger ist sehr anwenderfreundlich, nach Gebrauch ist sehr wenig
Wartungsaufwand notwendig. Um ein optimales Ergebnis zu erhalten, sollten Sie unbedingt
die folgenden Punkte beachten:
über 7 Meter
3 – 7 Meter
0 – 3 Meter
Es gibt zwei Vorgehensweisen, um die Partikel und den Schmutz aus dem Behälter zu
entfernen:
Leeren des abnehmbaren Schmutzbehälters
1) Leeren des Schmutzbehälters
A) Schalten Sie das Gerät aus.
B) Drücken Sie den Klipp des Schmutzbehälters nach unten und ziehen Sie den
Behälter wie in der Abbildung gezeigt heraus.
C) Leeren Sie den Behälter.
- 6 -
2) Leeren des Schmutzbehälters
A) Drehen Sie die Oberseite des Schmutzbehälters nach unten.
B) Drücken Sie leicht auf die Unterseite und nehmen Sie den Filter wie in der
Abbildung gezeigt heraus.
C) Entfernen Sie den Schmutz vom Filter.
D) Bringen Sie den Filter wieder auf dem Schmutzbehälter an.
E) Drücken Sie leicht die Klammer und legen Sie den Schmutzbehälter wieder am
Robo-Sauger ein.
Reinigen der Hauptbürsten des Robo-Saugers
1) Schalten Sie das Gerät aus und legen Sie den Robo-Sauger auf eine flache
Unterlage mit der Reinigungsseite nach oben.
- 7 -
2) Schrauben Sie mit Hilfe eines Kreuzschlitz-Schraubendrehers die
Befestigungsschraube auf der rechten Seite heraus und nehmen Sie dann die
Hauptbürste, die Gummibürste und die Bürstenkupplung miteinander heraus,
wie in den Abbildungen gezeigt.
Bürstenkupplung
3) Reinigen Sie nun das Bürstenfach und entfernen Sie die Schmutzpartikel und
Fremdkörper von der Bürste und von der Gummibürste.
4) Wischen Sie den Schmutz vom Metallschaft und von den Lagern von
Bürstenkupplung und Bürsten weg (dies ist nicht unbedingt nach jedem
Saugvorgang notwendig), siehe auch entsprechende Abbildung. Bei Bedarf
können Sie auf die Lager etwas Schmieröl geben.
5) Nun legen Sie die Bürstenkupplung und die Bürsten zurück in das entsprechende
Fach und ziehen Sie die Schraube wieder fest.
Reinigen der Saugöffnungs-Klappe
1. Schalten Sie das Gerät aus. Legen Sie den
Robo-Sauger mit der Unterseite nach oben auf
eine flache Unterlage.
2. Nehmen Sie die Saugöffnungs-Klappe wie in
der Abbildung gezeigt ab.
3. Reinigen Sie nun die Saugöffnungs-Klappe und
den fächerförmigen Mechanismus, um eine gute
Belüftung zu gewährleisten.
4. Führen Sie anschließend die Scharniere der
Saugöffnungs-Klappe vorsichtig in die
entsprechenden Öffnungen ein.

- 8 -
Der Robo-Sauger muss nach jedem Gebrauch aufgeladen werden. Das Ladegerät wird
bei einer Spannung von 230 V betrieben (die Spannung in einzelnen Ländern könnte
eventuell davon abweichen), Frequenz 50/60 Hz. Das Ladegerät ist klein, leicht und sehr
stabil, und es ist speziell für den Gebrauch mit unserem Produkt „Robo-Sauger“ konzipiert.
Bitte verwenden Sie für unser Produkt „Robo-Sauger“ ausschließlich das mitgelieferte
Ladegerät.
1) Schalten Sie das Gerät aus. Legen Sie es an einen sicheren Ort.
2) Auf der rechten Seite des Robo-Saugers befinden sich die Ladebuchse und eine
Lade-Anzeige (siehe Abbildung). Die Gesamt-Ladezeit beträgt ca. 4 – 5 Stunden.
Batterie aufladen
Auflade-Technik
Lade-Buchse Lade-Anzeige
Während des Ladevorgangs leuchtet die Lade-Anzeige auf und zeigt an, dass
der Ladevorgang korrekt verläuft. Nach ca. 4 – 5 Stunden ist die Batterie komplett
aufgeladen und das Ladegerät sollte entfernt werden. Wenn Sie während des
Ladevorgangs das Haus verlassen möchten, sollten Sie das Ladegerät
vorübergehend entfernen, um ein Überladen zu vermeiden, da dies die
Lebensdauer der Batterie nachhaltig beeinflussen könnte.
3)
ACHTUNG 1.DasLadegerät, das zudiesemProduktmitgeliefertwirdistspeziell
auf unser Produkt ausgelegt, das bedeutet auf die entsprechende
Spannung. Es ist sehr stabil und zuverlässig und darf nur mit der
wiederaufladbaren Batterie dieses Produktes verwendet werden.
Mischen Sie deshalb niemals die wiederaufladbare Batterie und das
Ladegerät mit irgendwelchen anderen Produkten.
2. Um die Lebensdauer der Batterie zu verlängern, sollten Sie diese
für ca. 8 – 9 Stunden nach dem ersten Gebrauch oder wenn das
Gerät nach längerer Zeit das erste Mal wieder verwendet wird
aufladen.
3. Erst nachdem die Batterie 2 – 3 Mal komplett aufgeladen und
wieder entladen wurde, hat sie ihre optimale Effizienz erreicht.
Table of contents
Languages:
Popular Vacuum Cleaner manuals by other brands

POLTI
POLTI CINDERELLA TRIO user guide

Heinner
Heinner HSVC-H18.5GD instruction manual

Electrolux
Electrolux EP9110A - Professional Duralux Upright Vacuum... parts list

GV-INDUSTRIES
GV-INDUSTRIES Puma Super Mini user manual

AERTECNICA
AERTECNICA TUBO PERFETTO INOX TXA Operation and maintenance manual

POLTI
POLTI Vaporetto Lecoaspira FAV 80 TURBO... instruction manual


