Avalon La Petite-X User manual

The Petite-X Revision B 03/2010
SERVICE MANUAL AVALON La Petite-X Single-Cup Brewer
SERVICE MANUAL
Manufactured by:
Cafection Enterprises Inc.
2355, Dalton, Quebec, (Quebec) G1P 3S3 Canada
Tel.: 1-800-561-6162 Fax: 1-800-463-2739
[email protected] www.cafection.com

The Petite-X Revision B 03/2010
SERVICE MANUAL AVALON La Petite-X Single-Cup Brewer

The Petite-X Revision B 03/2010
SERVICE MANUAL AVALON La Petite-X Single-Cup Brewer
3
Table of Contents
Table of Contents
1 INTRODUCTION ......................................................................................................... 5
2 SAFETY INSTRUCTIONS............................................................................................ 6
3 WARRANTY................................................................................................................. 7
3.1 Warranty Policy ......................................................................................... 7
3.2 Returning Products ................................................................................... 7
3.3 Returned Product Procedures.................................................................. 8
4 REFERENCE DRAWINGS........................................................................................... 9
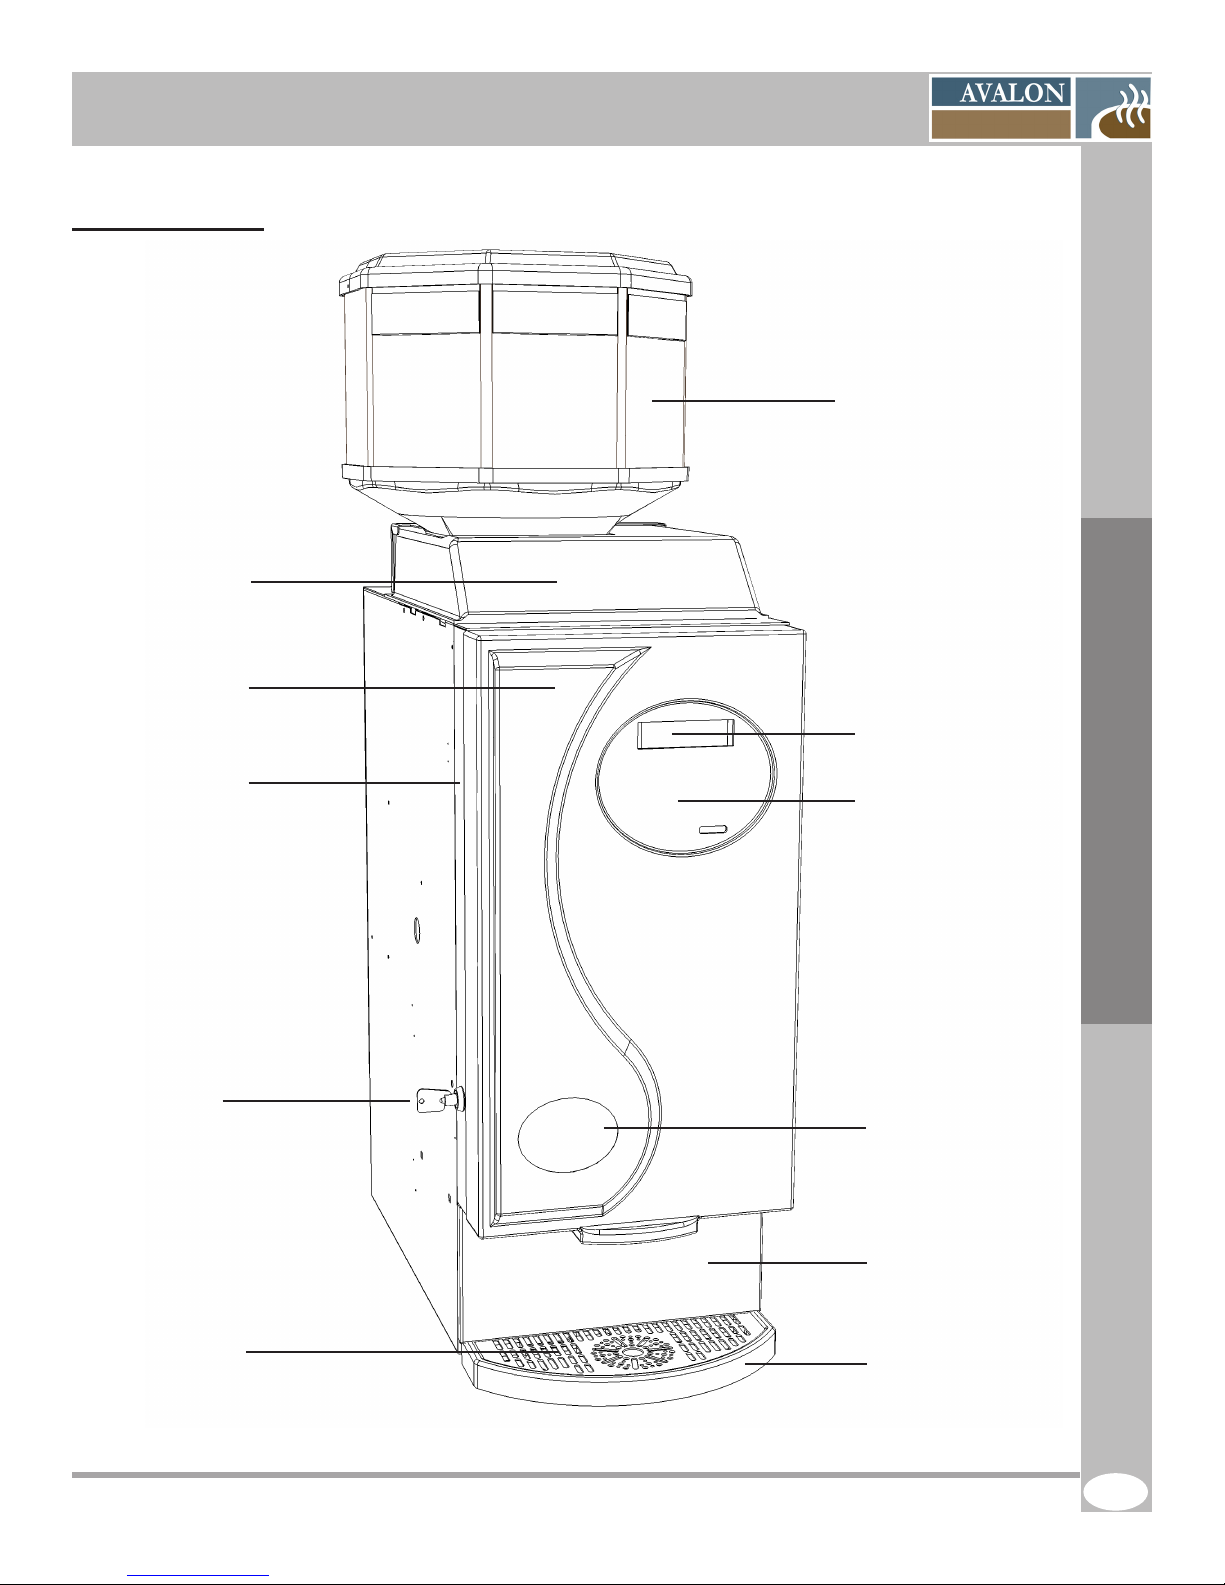
4.1 External View.............................................................................................. 9
4.2 Rear View .................................................................................................. 10
4.3 Internal View............................................................................................. 11
4.4 Membrane Keypad ................................................................................... 12
4.5 Brewer Assembly ..................................................................................... 13
4.6 Brewing Process ...................................................................................... 14
4.7 Hot Water Tank ......................................................................................... 15
4.8 Main Board (PCB)..................................................................................... 16
4.8.1 Main Board (PCB) Descriptions............................................. 17
5 CONTROLS & FEATURES........................................................................................ 18
5.1 Features & Benets ................................................................................. 18
5.2 Specications........................................................................................... 19
5.3 Automatic Safety Features...................................................................... 20
5.4 Brewing Instructions ............................................................................... 21
6 INITIAL SETUP .......................................................................................................... 22
6.1 Installation site requirements ................................................................. 22
6.1.1 Clearances ............................................................................... 23
6.2 Unpacking ................................................................................................ 24
6.3 Levelling the Equipment.......................................................................... 25
6.4 Hot Water Tank Preparation ................................................................... 25
6.4.1 Tank Lid Preparation............................................................... 25
6.4.2 Adjusting the Tank Overow Float ........................................ 26
6.5 3 Beans canister installation .................................................................. 26
6.5.1 Install the 3 Beans Canister ................................................... 26
6.5.2 Lock the 3 Bean canister........................................................ 27
6.5.3 Install the Plastic Top tting part........................................... 27
6.5.4 Install the Plastic Top ............................................................ 27
6.6 Water Line Connection ............................................................................ 28
6.7 Electrical Connection .............................................................................. 29
6.8 Water Temperature................................................................................... 30
6.9 Loading Products..................................................................................... 31
6.10 Chute System Installation ....................................................................... 32
6.11 Filter Paper Installation ........................................................................... 33
6.12 Installation Testing................................................................................... 34

The Petite-X Revision B 03/2010
SERVICE MANUAL AVALON La Petite-X Single-Cup Brewer
4
Table of Contents
Table of Contents Continued
7 SERVICE SOFTWARE............................................................................................ 35
7.1 Conguration: ....................................................................................... 35
7.1.1 Dictionnary ........................................................................... 36
7.2 Product Conguration.......................................................................... 36
7.3 Counter Display..................................................................................... 41
7.4 Counter Tracking Sheet........................................................................ 42
7.5 Setting Tracking Sheet ......................................................................... 43
7.6 Product Values ...................................................................................... 44
8 CLEANING AND SANITIZING................................................................................ 45
8.1 Cleaning and Sanitizing Instructions.................................................. 45
8.2 Recommended Cleaning Tools............................................................ 45
8.3 Cleaning and Sanitizing Schedule...................................... 46
8.4 Overall Cleaning ................................................................................... 47
8.5 Exterior Cleaning .................................................................................. 47
8.5.1 Cleaning the drip tray .......................................................... 47
8.5.2 Emptying the waste bin ....................................................... 48
8.6 Interior Parts Cleaning & Sanitizing.................................................... 49
8.6.1 Coffee Canisters................................................................... 49
8.6.2 Soluble Canisters................................................................. 50
8.6.3 Coffee Brewer....................................................................... 51
8.6.4 Fan......................................................................................... 52
8.6.5 Stainless coffee chute ......................................................... 53
8.6.6 Plastic chute of the 3 bean canister................................... 54
9 PREVENTIVE MAINTENANCE .............................................................................. 55
9.1 Preventive Maintenance (PM) Schedule ............................................. 55
9.2 Brewer Assembly ................................................................................. 56
9.3 Water Outlet Valves .............................................................................. 57
9.4 Hot Water Tank ...................................................................................... 58
10 SERVICING PARTS ................................................................................................ 59
10.1 Draining the Hot Water Tank ................................................................ 59
10.2 Shutdown / Storage .............................................................................. 60
10.2.1Storing the Brewer Assembly ............................................. 60
10.3 Brewer Assembly ................................................................................. 61
10.4 Microcontroller (EPROM) ..................................................................... 62
10.5 Main Board............................................................................................. 63
10.6 Keypad Membrane ................................................................................ 63
11 TROUBLESHOOTING ............................................................................................ 64
11.1 “Error” Appearing on the LCD Screen............................... 64
11.2 Other Message Possibilities on the LCD Screen ............................... 65
11.3 Particular Cases.................................................................................... 66
OTHER RELATED DOCUMENTS
A - Parts Manual
B - User Card
C - Service Card
D - Order Form
E - Parts Return Form

The Petite-X Revision B 03/2010
SERVICE MANUAL AVALON La Petite-X Single-Cup Brewer
5
Introduction
1 INTRODUCTION
Cafection manufactures the AVALON La Petite-X Brewer based on its original Avalon single-cup
technology and is complemented with the coffee of your choice!
The Avalon family of brewers are designed and engineered based on Cafection’s 35 year experience
in the ofce Coffee Service industry. This convenient, reliable and user friendly system assures fresh-
tasting gourmet coffee, delicious hot chocolate and succulent cappuccinos whipped to perfection,
every time, any time.
The Avalon La Petite-X brewer offers 3 choices of whole bean coffee that can be mixed with soluble
products upon request as well as gourmet hot chocolate, americano and hot water.
All products are available in 2 adjustable cup sizes;
Small and Large; from 5 to 12 oz.
In the following pages, you will nd clearly illustrated and easy-to-follow instructions regarding:
· Safety Instructions
· Reference Drawings
· Controls and Features
· Initial Setup
· Service Software
· Cleaning and Sanitizing
· Preventive Maintenance
· Servicing Parts
· Troubleshooting
BEFORE YOU START
These brewers have been manufactured to comply with the highest sanitation, safety and performance
standards. To maintain this degree of safety and performance, it is important that the installation and
maintenance be performed in accordance with the recommendations made in this service manual. Any
changes to the construction or wiring can be hazardous to the user. The brewer must not be altered
in any way and only genuine replacement parts from Cafection must be used for the preventive
maintenance and repair.
This document refers to the specications, parameters and user interface of the Avalon
La Petite-X Brewer and may differ from the previous Avalon models.
The steps outlined in “Initial Set-Up” of this manual must be completed before
plugging in the Brewer!!!

The Petite-X Revision B 03/2010
SERVICE MANUAL AVALON La Petite-X Single-Cup Brewer
6
Safety Instructions
2 SAFETY INSTRUCTIONS
Basic safety precautions should always be followed when using electrical appliances.
Read all instructions before using this brewing equipment.
Food-Contact Parts
We recommend that you clean and sanitize all food-contact parts prior to installation and use.
See the cleaning and sanitizing section for more details
Warnings
· To minimize the risk of re or electric shock, do not expose this equipment to rain or moisture.
· Do not immerse this equipment in water; it could lead to electric shock or other malfunctions.
· Do not use this equipment other than for its intended use.
· This equipment contains hot water; never move when full.
· This brewing equipment is intended for indoor installation only.
Power supply
· Always use a grounded 120V AC 60Hz socket outlet rated for 15Amps service.
· Each piece of brewing equipment must have its own electrical outlet, on a dedicated circuit.
· Extension cords must not be used.
· This equipment is equipped with a polarized alternating current line plug (one blade wider than the
other). Only use this plug with an outlet in which the prongs can be fully inserted. Avoid any exposure
of the prongs on the polarized plug.
Disconnect the equipment if:
· Damage is done to the power cord;
· The equipment doesn’t work properly;
· The temperature of the power cord or plug increases dramatically during use;
· Unusual conditions occur.
FAILURE TO COMPLY CAN CAUSE EQUIPMENT DAMAGE.

The Petite-X Revision B 03/2010
SERVICE MANUAL AVALON La Petite-X Single-Cup Brewer
7
Warranty
3 WARRANTY
Procedures and Conditions for Goods Returned
All warranty claims and products returns processed by our technical department is available Monday
3.1 Warranty Policy
Cafection provides a warranty period as follow unless otherwise conrmed in writing:
· All parts in contact with water (release valve, heating element, thermostat, sensor, valve
· water inlet and tank eet) 3 months after the invoice date.
· All other parts of the coffee brewer: 12 months from the invoice date.
The warranty covers any malfunction due to manufacturing defects and does not cover defects
resulting from negligence, improper installation or misuse of the product or equipment failure due to
excessive mineral deposits or the quality of local water. Any damage, alteration of serial #, date or
codes will void the warranty.
Obtaining a Return Merchandise Authorization number (RMA)
Before obtaining a return number, you should rst contact our Technical Department to discuss the
disruption and conrm that the product should be returned for further testing.
You will need to provide the following information:
· Company name and contact;
· Invoice #, product #;
· Quantity;
· Serial #;
· Detailed description of the problem.
Our Technical Department will then send you a return form with an RMA number and product (s)
authorized for return.
The return numbers are valid for 30 days after the date issued. Any RMA number over 30 days must
be revalidated with our Technical Department.
3.2 Returning Products
After obtaining a RMA number, you must ship the product or products to the following address:
Cafection Enterprises Inc.
Attn: Service Department
2355 Dalton
Quebec (Quebec) G1P 3S3
Canada

The Petite-X Revision B 03/2010
SERVICE MANUAL AVALON La Petite-X Single-Cup Brewer
8
Warranty
The return shipping charges will be assumed by us for products guaranteed (only under authorization
of the Technical Department). If we paid for the transportation and the product is not covered under
warranty, you will be charged back the freight.
All products must be packaged carefully to avoid damage during transportation. Whenever possible,
please use the original packaging. Any product damaged in transit or received in unsatisfactory conditions
will not be covered by the warranty.
Cafection will not be held responsible for any loss or damage incurred during shipment.
All products must be accompanied by the return form with the valid return number and the return number
must be clearly indicated on the outside of the package.
3.3 Returned Product Procedures
The RMA number does not guarantee the product will be accepted under guarantee.
Depending on the nature of the problem, after testing the defective product, we will authorize the repair or
replacement by identical or equivalent specications. It will then be determined whether there will be full
or partial refund of the product.
If the product is no longer covered under warranty or returned damaged, we can get your item repaired or
placed at a price that will be determined depending on the product.
If the product is returned in unsatisfactory conditions, it will be subject to management fees of $35 and the
guarantee may be refused.
All returned products involving no malfunction will be subject to administrative fees and test of
$35, plus the freight charges associated with the return.
Advance Replacement
You can also request an advance replacement. In this case, it will be necessary to send an order for the
anticipated replacement and follow the procedure explained above to return the defective product. You
will receive an invoice for the advance replacement.
After testing, if the product is found defective, we will send you a credit.
Cafection is committed to providing prompt and efcient service and an excellent customer service. Our intention is to
process all returns within 15 days after the date of receipt to ensure the ongoing satisfaction of our customers.
Last update, March 2010, G.A.
Cafection Enterprises Inc
2355, Dalton
Quebec, (Quebec) G1P 3S3 Canada
Tel.: 1-800-561-6162
Fax: 1-800-463-2739
E-mail order@cafection
www.cafection.com

The Petite-X Revision B 03/2010
SERVICE MANUAL AVALON La Petite-X Single-Cup Brewer
9
Reference Drawings
4 REFERENCE DRAWINGS
4.1 External View
Drip Tray Grill Drip Tray
Light
Back Splash
Membrane Keypad
Message Display
(LCD)
Door Lock
Metal Door
Plastic Front
(Fascia)
Plastic Top Lid
3 Whole Bean
Canister

The Petite-X Revision B 03/2010
SERVICE MANUAL AVALON La Petite-X Single-Cup Brewer
10
Reference Drawings
4.2 Rear View
Water Tank
Outlet Valve
Overow Cup
Water Inlet
Breaker Box
Back Panel
Level Glides
Overow Tray
Door for easy tank access
Plastic top tting part

The Petite-X Revision B 03/2010
SERVICE MANUAL AVALON La Petite-X Single-Cup Brewer
11
Reference Drawings
4.3 Internal View
Filter Paper
Soluble Mixing
Chamber
Brewer
Spout
Waste Basket
Main Board
(See P. 16)
Front Panel
Coffee Grinder
(Behind the protector)
Display (back)
Fan
Coffee
Hot Water
Soluble Products
#1 and #2
Soluble Canisters

The Petite-X Revision B 03/2010
SERVICE MANUAL AVALON La Petite-X Single-Cup Brewer
12
Reference Drawings
4.4 Membrane Keypad
The user-friendly membrane keypad buttons are clear
and simple:
1. Place your cup
2. Choose a size
3. Choose a beverage
4. Choose your strength
5. Press Start to brew
The LCD will indicate the steps and communicate
messages.

The Petite-X Revision B 03/2010
SERVICE MANUAL AVALON La Petite-X Single-Cup Brewer
13
Reference Drawings
4.5 Brewer Assembly
The platinum brewing system is in a class of it’s own in the single cup coffee business and is
specically designed for Avalon units. Its vacuum extraction process, joined with a high quality lter
paper, brews a coffee of unsurpassed quality to meet the taste prole of the most dicerning coffee
drinkers. Best of all, this is available for every cup of coffee at any time of day. See the following page
for the description of the brewing process.
Brew chamber
Cylinder
Piston
Coffee exit
Aluminum frame
Wheel
Serial number
Brewer funnel
Yoke

The Petite-X Revision B 03/2010
SERVICE MANUAL AVALON La Petite-X Single-Cup Brewer
14
4.6 Brewing Process
Reference Drawings
Step 1 Ascent of the piston
The ground coffee and the water are dispensed into the
brew chamber during the ascension of the piston. This
compresses the air in the cylinder and forces it through the
coffee mixture in the brew chamber thereby agitating the
brewing coffee.
Step 2 Pauses
Once the piston has reached its top dead point, it will pause to
allow the coffee to brew to the appropriate strength. There will
be one shot of water before the descent to rinse the chamber.
Step 3 Descent of the piston
The descent of the piston will create a vacuum thereby extracting
the coffee from the grounds through the lter paper and into the
cylinder. One last pause will be to allow all the coffee to drip from
the brew chamber.
Step 4 Product delivery
The piston follows its course heading to its low dead point.
Distribution of coffee through the spout begins once the piston is
below the coffee exit. Meanwhile, the brew chamber lifts to allow
the paper to advance thereby discarding the spent grounds into
the waste chute.
1
2
3
4

The Petite-X Revision B 03/2010
SERVICE MANUAL AVALON La Petite-X Single-Cup Brewer
15
Reference Drawings
4.7 Hot Water Tank
Overow Exit
Tank
Water Float
Thermostat Probe
Valve Exit
Heating Element
Water Tank Lid
Water Level Switch
Heater Safety Switch
Silicone Plug

The Petite-X Revision B 03/2010
SERVICE MANUAL AVALON La Petite-X Single-Cup Brewer
16
Reference Drawings
4.8 Main Board (PCB)
The equipment should always be unplugged from the
electrical outlet before servicing any components within
this main board assembly.
This is a schematic reference drawing only. Not to
scale.
J11 - MDB port - Coinchanger / bill acceptor
Expansion #2 - Thermostat board
J10 -
Numeric Input
J24 -
LCD Display
J16 -
Keypad Membrane
J14 - N/A
J18 - 24V
Output
J6 - 24V DC Output
J12 - 120V
Input
J19 - 120V
Output
HIGH VOLTAGE AREA
J3 - 24V AC Input
Reset
Microcontroller
SN #
Switch identication
J8 - LED
J27 - 24V
Output
FREE VEND BREWER INGREDIENT WATER

The Petite-X Revision B 03/2010
SERVICE MANUAL AVALON La Petite-X Single-Cup Brewer
17
Reference Drawings
4.8.1 Main Board (PCB) Descriptions
Interactive switches and buttons
1. Reset Button (Red)
Pressing this button initializes the 3 Bean
Brewer (same as the on/off switch)
2. Counter Button (SW1) White
Pressing this button gives you access to the tally
counter data.
3. Setup Button (SW2) Black
Allows access to the product and brewer software
parameters.
4. Free Vend Switch (SW3)
ON, this switch allows users to have free
beverages.
5. Brewer Switch (SW4)
ON, the switch lifts the brewer head to allow the
lter paper replacement. The switch must be in
the OFF position for default user mode. This will
reset the bin counter if activated.
6. Ingredient Switch (SW5)
Allows the neutralization of the ingredient
dispensing motors. At OFF, the motors will not
dispense ingredients.
7. Water Switch (SW6)
Allow the neutralization of the 4 water dispensing
valves. At OFF, the valves will not dispense water.
Interactive switches and buttons Green LEDs
The green leds will illuminate to indicate the
alarm that has been triggered.
DS18 - Drip tray overow
DS13 - Cam switch
DS14 - Filter paper required
DS15 - Water level switch ON
DS19 - Water level switch OFF
DS16 - N/A
DS17 - N/A
DS20 - N/A
DS25 - N/A
DS27 - N/A
DS26 - N/A
DS24 - N/A
DS23 - N/A
Red LEDs
The red leds will illuminate to indicate
the part is in use.
DS2 - Coffee #1 motor
DS3 - Coffee #2 motor
DS4 - Soluble #1 motor
DS5 - Soluble #2 motor
DS6 - Coffee hot water
DS7 - Soluble hot water
DS21 - Chute Solenoïde
DS22 - Brewer motor
DS10 - Inlet valve
DS8 - Hot water
DS9 - Brewer motor
DS12 - N/A
DS11 - Grinder
DS29 - Whipper
DS31 - Coffee #3

The Petite-X Revision B 03/2010
SERVICE MANUAL AVALON La Petite-X Single-Cup Brewer
18
Control & Features
5 CONTROLS & FEATURES
5.1 Features & Benets
We understand the need for individuality, that’s why we offer you all the possibilities, and you choose
the coffee - whether you prefer organic coffee, big brand names or locally roasted coffee, that choice is
yours with Avalon.
FEATURE BENEFIT
Electronically adjustable settings and features
Adjust the brewing settings to suit your
customer’s taste prole and the brand of coffee
they have chosen.
3 whole bean coffee selections Offer 3 different Whole bean coffee varieties or
3 different brands, all in one unit.
Multi-pricing capabilities Suit all your consumers’ needs - free vend,
vending.
2 premium soluble selections
Experience Hot Chocolate, Mokaccino, and
Café Latte whipped to perfection
any time a day.
State of the art brewing technology
The brewing system is in a class of it’s own in
the single cup business offering an unsurpassed
coffee beverage quality to meet the taste prole
of the best coffee connoisseurs.
Interface
Brewing steps and selection buttons are well
identied to guide the user through the ordering
process.
Service software
Allows the Operator to control features of the
machines, diagnostic messages and keep track
of all user data.

The Petite-X Revision B 03/2010
SERVICE MANUAL AVALON La Petite-X Single-Cup Brewer
19
Control & Features
5.2 Specications
Beverage Selections
· 3 Whole Bean coffee selections
· Hot Chocolate
· Café Latte (50% coffee of your choice + 50% Powdered Milk)
· Mokaccino (50% coffee of your choice + 50% Hot Chocolate)
· Hot water
Canisters Capacities
Whole Bean Hopper 1: 4lbs
Whole Bean Hopper 2 : 2 lbs
Whole Bean Hopper 3 : 4 lbs
Soluble Hot chocolate: 2.50 lbs
Soluble Powdered Milk : 0.70 lbs
Machine Dimensions Optional Stand Dimensions Total Dimensions
Height: 39.75” 31’’ 70.75’’
Width: 13.5” 24’’ 37.50’’
Depth: 23” 26’’ 49’’
Weight: 90 lbs
Water Tank
Capacity: 0.8 gallon us (3.0 l)
Water valves: 1 simple valve ; 1 double valve
Heating element:1250 watts
Electrical requirements
110 VAC
15 amp circuit
60 Hz
INTENDED FOR INDOOR USE ONLY

The Petite-X Revision B 03/2010
SERVICE MANUAL AVALON La Petite-X Single-Cup Brewer
20
Control & Features
5.3 Automatic Safety Features
There are various safety mechanisims on this brewing equipment to prevent a machine malfunction
resulting in material damages.
Water Level Switch and Heater Safety Switch
The water level switch and the heater safety switch work together to ensure that the heating element is
deactivated if there is insufcient water in the tank. The water level switch is controlled by a oat and will
shut off the inlet valve when the tank is full. If the level in the tank gets too low, the heater safety switch
will be triggered and the heating element will be turned off.
Overow Switch
If the water were to boil, the tank water would go into the overow cup and all machine functions would
be turned off. This is a fatal error. This could also be triggered if the oat in the tank was defective or if the
machine was moved while the tank was full. The unit would appear Off.
Overow Drip Tray
This will be triggered if the drip tray is full or if something is leaking inside the unit. This will deactivate the
water inlet valve thereby preventing the element to heat. The unit would indicate “Drip tray full’.
Software Safety Features
At the time of the rst tank ll, the water inlet valve will close after 4.5 minutes of continuous demand. This
is the amount of time necessary to completly ll the tank. After the initial tank ll, the inlet valve will close
after 20 seconds of continuous demand. This safety mechanism is designed to prevent water from owing
continuously into the machine due to a mechanical malfunction. The unit will indicate “Low water level”
If the low water level switch is triggered but not the heater safety switch, the element will automatically be
shutoff. This is in the event of a mechanical failure of the heater safety switch.
Table of contents
Other Avalon Coffee Maker manuals
Popular Coffee Maker manuals by other brands

Nespresso
Nespresso KRUPS VERTUO NEXT XN910C10 manual

Mr. Coffee
Mr. Coffee FT series user manual

MACCHIAVALLEY
MACCHIAVALLEY Tasman-Denali Installation and use manual

Silvercrest
Silvercrest SKAT 1000 EDS A1 operating instructions

O.K.
O.K. OCM 202-B user manual

Silvercrest
Silvercrest SEMS 1100 B2 operating instructions