Avantco 194KMCH530BA User manual

Modular Ice Machine User’s Manual
- 1 -
Please read the manual thoroughly prior to equipment set-up,
operation and maintenance.
10/2021
194MCF322A, 194MCH322A, 194MCF422A, 194MCH422A, 194MCF530A,
194MCH530A, 194KMCF322BA, 194KMCH322BA, 194KMCF422BA, 194KMCH422BA,
194KMCF530BA, 194KMCH530BA, 194BIN23022, 194BIN27530, 194KMCF322LA,
194KMCH322LA, 194KMCF422LA, 194KMCH422LA, 194KMCF530LA,
194KMCH530LA, 194BIN40022, 194BIN54030, 194KMCF322HA, 194KMCH322HA,
194KMCF422HA, 194KMCH422HA, 194KMCF530HA, 194KMCH530HA,
194HBN12022, 194HBN18030
User Manual
User Manual

User Manual
Table of Contents
1.Modular Ice Machine and Bin User'sManual
a. Warning and Safety................................................................................3
b. Installation............................................................................................4
c. Startup and Operation...........................................................................7
d. Maintenance........................................................................................12
e. Clean Function.....................................................................................13
f. Manual Cleaning & Sanitizing..................................................................14
g. Service Call..........................................................................................17
h. Troubleshooting...................................................................................18
2.Hotel Ice Dispenser User'sManual
a. General Description..............................................................................21
b. Basic Specifications & Dimensioned Illustrations.....................................21
c. Unpacking..........................................................................................26
d. Installation...........................................................................................27
e. Final Check List/Initial Start Up...............................................................29
f.Use.....................................................................................................30
g. General Care and Cleaning...................................................................31
h. Maintenance.......................................................................................33
i. Adjustments.........................................................................................34
j. Service Diagnosis.................................................................................35
3. Warranty
- 2 -

- 3 -
User Manual
Warning and Safety
DANGER – RISK OF FIRE OR EXPLOSION. FLAMMABLE REFRIGERANT USED. TO BE REPAIRED ONLY BY
TRAINED SERVICE PERSONNEL. DO NOT PUNCTURE REFRIGERANT TUBING.
PELIGRO - RIESGO DE INCENDIO O EXPLOSION. REFRIGERANTE INFLAMABLE UTILIZADO. PARA
SER REPARADO SOLAMENTE POR PERSONAL DE SERVICIO CALIFICADO. NO PINCHAR LA TUBERÍA
REFRIGERANTE.
DANGER – RISQUE DE FEU OU D’EXPLOSION. LE FRIGORIGÈNE EST INFLAMMABLE. CONFIER LES
RÉPARATIONS À UN TECHNICIEN SPÉCIALISÉ. NE PAS PERFORER LA TUBULURE CONTENANT LE
FRIGORIGENE.
CAUTION – RISK OF FIRE OR EXPLOSION. FLAMMABLE REFRIGERANT USED. CONSULT REPAIR
MANUAL/OWNER’S GUIDE BEFORE ATTEMPTING TO SERVICE THIS PRODUCT. ALL SAFETY
PRECAUTIONS MUST BE FOLLOWED.
ATENCION - RIESGO DE INCENDIO O EXPLOSIÓN. REFRIGERANTE INFLAMABLE UTILIZADO. CONSULTE
EL MANUAL DE REPARACIÓN / GUÍA DEL PROPIETARIO ANTES DE INTENTAR DAR SERVICIO A ESTE
PRODUCTO. DEBEN CUMPLIR CON TODAS LAS PRECAUCIONES DE SEGURIDAD.
ATTENTION – RISQUE DE FEU OU D’EXPLOSION. LE FRIGORIGÈNE EST INFLAMMABLE. CONSULTER LE
MANUEL DU PROPRIÉTAIRE/GUIDE DE RÉPARATION AVANT DE TENTER UNE RÉPARATION. TOUTES LE
MESURES DE SÉCURITÉ DOIVENT ÊTRE RESPECTÉES.
CAUTION – RISK OF FIRE OR EXPLOSION DUE TO PUNCTURE OF REFRIGERANT TUBING; FOLLOW
HANDLING INSTRUCTIONS CAREFULLY. FLAMMABLE REFRIGERANT USED.
ATENCION - RIESGO DE INCENDIO O EXPLOSIÓN DEBIDO A LA PERFORACION DE LA TUBERÍA
REFRIGERANTE; SIGA LAS INSTRUCCIONES DE MANIPULACIÓN CON CUIDADO. REFRIGERANTE
INFLAMABLE UTILIZADO.
ATTENTION – RISQUE DE FEU OU D’EXPLOSION SI LA TUBULURE CONTENTANT LE FRIGORIGÈNE
EST PERFORÉE; SUIVRE LES INSTRUCTIONS DE MANUTENTION AVEC SOIN. LE FRIGORIGÈNE EST
INFLAMMABLE.
CAUTION – RISK OF FIRE OR EXPLOSION DUE TO FLAMMABLE REFRIGERANT USED. FOLLOW
HANDLING INSTRUCTIONS CAREFULLY IN COMPLIANCE WITH LOCAL GOVERNMENT REGULATIONS.
ATENCIÓN – RIESGO DE INCENDIO O EXPLOSIÓN DEBIDO A REFRIGERANTE INFLAMABLE UTILIZADO.
SIGA LAS INSTRUCCIONES DE MANIPULACIÓN CON CUIDADO CONFORME A LAS REGLAS DE LA
MUNICIPALIDAD.
ATTENTION – RISQUE DE FEU OU D’EXPLOSION SI LE FRIGORIGÈNE EST INFLAMMABLE. SUIVRE
LES INSTRUCTIONS DE MANUTENTION AVEC SOIN CONFORMÉMENT AUX RÈGLEMENTATION
GOUVERNEMENTALE LOCAUX.
User Manual

- 4 -
User Manual
This product cannot be used in outdoor envrionments. Not intended for use by children,
persons with reduced physical, sensory or mental capabilities or lack of experience
and knowledge.
• The installation, repair or maintenance of this ice machine must be carried out by professional and
qualified personnel. Electric shock, fire, personal injury may result from incorrect operation.
• After the ice machine is delivered, please keep the machine upright for at least 24 hours to have the
refrigerant be fully precipitated before startup. Otherwise the compressor may be damaged.
• When handling, keep the cabinet upright with the inclination not exceeding 45 degrees. Do not invert the
machine or lay it horizontally.
• This ice machine should not be placed in wet or easily splashed areas.
• The grounding of this ice machine cannot be connected to a gas pipe, water pipe, telephone line or
lightning rods, etc.
• There are rotating components in this ice machine. Do not insert slim objects into ventilation or exhaust
ports, or serious mechanical damage and injury may occur.
• Do not store volatile or flammable substances in this ice machine or it may result in an explosion or fire.
• Do not store any sundries or freeze any food in the storage bin. Keep the ice scoop clean.
• The ice machine must be placed on a floor sufficient enough to support its weight. An insufficient base
may cause the equipment to fall over and cause injury.
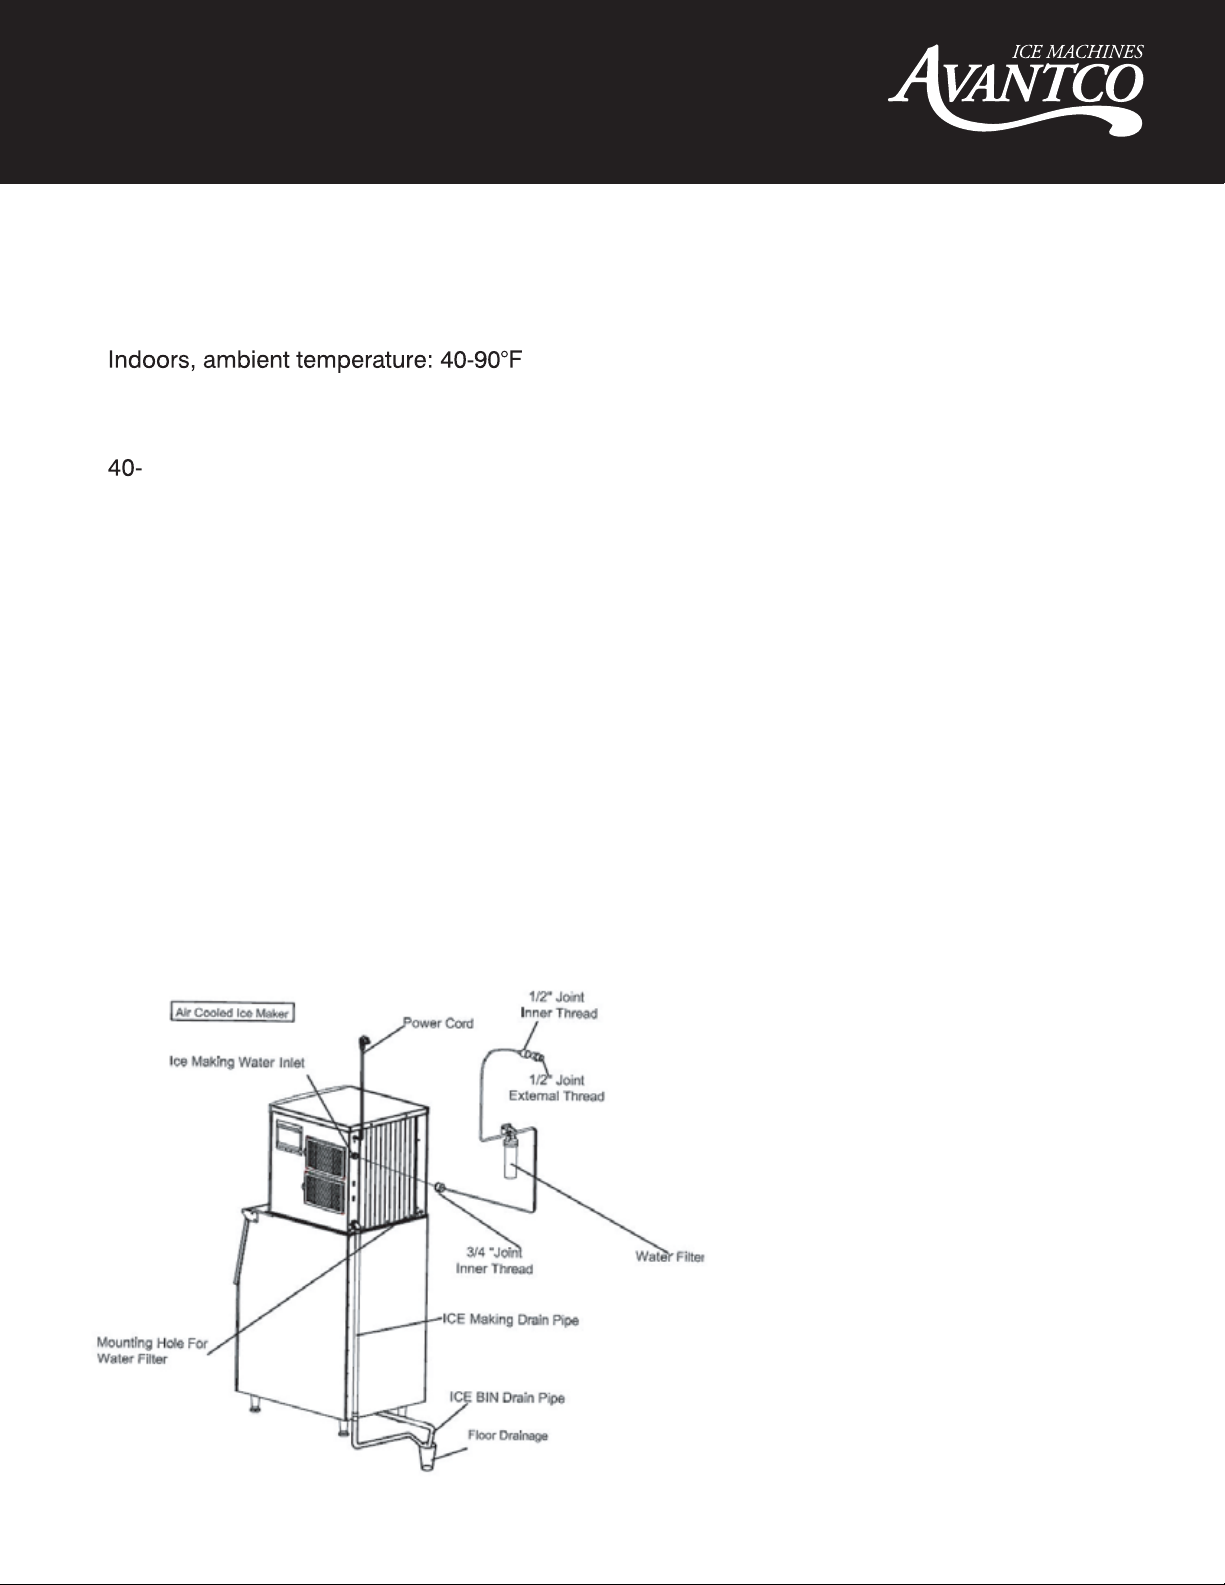
• There should be sufficient ventilation space around the ice machine. See page 5 for
clearance requirements.
• Only the power supply specified on the machine nameplate can be used with this ice machine.
• This ice machine cannot be connected to hot water.
• Outlet for this ice maker must be reliably grounded with leakage protection.
• The ice machine must be disconnected from power before manual cleaning, repairing and maintenance.
• Before cleaning, repairing and maintenance, the remaining ice in the ice bin should be removed from the
ice machine to avoid contamination to ice.
• Do not splash water directly onto the surface of the ice machine during the cleaning process; otherwise it
may cause short circuit, leakage or other faults.
• Flammable foaming agent is used during the foaming process. The ice maker should be disposed of and
recycled by qualified personnel and institutions.
• The ice machine should be properly managed to ensure that children will not play with the machine.
• When the ice machine malfunctions, turn off the power and contact professional personnel to be repaired.
User Manual

- 5-
User Manual
This ice machine is fully automatic. With proper installation and connection to potable water and power
source, the ice making will start properly. When the ice cubes fill up the storage bin, the machine will
automatically stop. The ice machine is generally used in the following and similar occasions:
• Indoor, ambient controlled environments only.
• The kitchen area of a store, office or other workplace;
• Hotel and restaurant;
• Catering and similar non-retail occasions;
• This ice machine is not intended for residential use
Item Number Ice Shape Ice Production
Per 24 Hrs.
Recommended Water
Filtration System
Replacement Cartridge
194MCF322A Full Dice 350 lbs. 790OCLOKITM 790OCLOCARTM
194MCH322A Half Dice 350 lbs. 790OCLOKITM 790OCLOCARTM
194MCF422A Full Dice 420 lbs. 790OCLOKITM 790OCLOCARTM
194MCH422A Half Dice 420 lbs. 790OCLOKITM 790OCLOCARTM
194MCF530A Full Dice 500 lbs. 790OCLOKITM 790OCLOCARTM
194MCH530A Half Dice 500 lbs. 790OCLOKITM 790OCLOCARTM
User Manual
Modular Ice Machine
C Pure creates specialty water filters to be used with common restaurant equipment, ensuring that the water
utilized by the equipment is both clean and clear. These filters are easily installed into water lines, and their
cartridges can be quickly swapped out for fast, easy and efficient replacements. The water filters below
are approved for use with Avantco Ice Machines. Failure to use and maintain an appropriate water filter will
void warranty coverage on your Avantco Ice Machine. For installation instructions, refer to the C Pure water
filtration manual or contact a C Pure water filtration dealer.

Avantco Ice warrants to theorigina
- 6 -
Item Number Ice Shape Ice Production
Per 24 Hrs.
Recommended Water
Filtration System
Replacement Cartridge
194KMCF322LA Full Dice 350 lbs. 790OCLOKITM 790OCLOCARTM
194KMCH322LA Half Dice 350 lbs. 790OCLOKITM 790OCLOCARTM
194KMCF422LA Full Dice 420 lbs. 790OCLOKITM 790OCLOCARTM
194KMCH422LA Half Dice 420 lbs. 790OCLOKITM 790OCLOCARTM
194KMCF530LA Full Dice 500 lbs. 790OCLOKITM 790OCLOCARTM
194KMCH530LA Half Dice 500 lbs. 790OCLOKITM 790OCLOCARTM
Item Number Ice Shape Ice Production
Per 24 Hrs.
Recommended Water
Filtration System
Replacement Cartridge
194KMCF322HA Full Dice 350 lbs. 790OCLOKITM 790OCLOCARTM
194KMCH322HA Half Dice 350 lbs. 790OCLOKITM 790OCLOCARTM
194KMCF422HA Full Dice 420 lbs. 790OCLOKITM 790OCLOCARTM
194KMCH422HA Half Dice 420 lbs. 790OCLOKITM 790OCLOCARTM
194KMCF530HA Full Dice 500 lbs. 790OCLOKITM 790OCLOCARTM
194KMCH530HA Half Dice 500 lbs. 790OCLOKITM 790OCLOCARTM
User Manual
Modular & Hotel Dispenser
194KMCF322BA Full Dice 350 lbs. 790OCLOKITM 790OCLOCARTM
194KMCH322BA Half Dice 350 lbs. 790OCLOKITM 790OCLOCARTM
194KMCF422BA Full Dice 420 lbs. 790OCLOKITM 790OCLOCARTM
194KMCH422BA Half Dice 420 lbs. 790OCLOKITM 790OCLOCARTM
194KMCF530BA Full Dice 500 lbs. 790OCLOKITM 790OCLOCARTM
194KMCH530BA Half Dice 500 lbs. 790OCLOKITM 790OCLOCARTM
Modular & Bin

purchaser of new equipment, that covered models of equipmentwill be free of defects
- 7 -
User Manual
Installation
The ice machine should be installed in a proper location meeting the following conditions:
•;
• Power supply: the rated voltage indicated on the machine nameplate ±6%;
• Water source: potable water, with water pressure from 18.75 psi to 80 psi; water temperature:
90°F;
• The ice machine should be kept away from heat sources, and should be prohibited to use in an
extremely high or low temperature environment, and should avoid direct sunlight.
• There should be sufficient ventilation space around the ice machine; the distance from the ice
maker to the wall should be no less than 12” for the front, 6” for the sides, and 8” for the rear.
• The ice machine must be placed on a floor sufficient to support its weight;
• The socket for the ice maker must be reliably grounded and have leakage protection;
• Proper floor drainage must be provided near the installation location of the ice machine.
Schematic Diagram
User Manual

- 8 -
User Manual
Installation Steps
1. Check to see if the ice machine is in good condition and the accessories are all present; check
the machine model and the machine nameplate.
2. Clean the ice storage bin and the food area inside with a sponge soaked in warm water and
soap. Then rinse with potable water and dry.
3. Place the ice machine in the operation area; ensure that the machine is placed on a leveled floor
so the water flows evenly into the evaporator.
4. The compressor chamber is located below the front of the ice bin where the compressor
and condenser are installed. It requires good ventilation so the ice maker must have ventilation
space of more than 8” in the rear, 6” on the sides, and 12” in the front.
5. The bottom of the ice machine is equipped with adjustable legs for level adjustment and
clearance for floor cleaning.
6. Connect the machine’s inlet water filter and water line referring to the installation instructions
of your water filter brand; if the installation site is already equipped with a drinking water system,
the water filter may not be needed.
7. Connect the machine to the water supply using the 3/4” inlet fitting supplied with the
machine. It is recommended to install a water ball valve (not supplied with this machine) on
the water supply line.
8. Connect the drain line to the drain connector. To achieve a proper draining, it is recommended
that the drain pipe should have a difference in level of more than 1” per 3’; and confirm that the
drain line is not blocked. It is recommended that the drain line be connected
to an open drainage port.
9. Any joint in the drain line must not be higher than the machine drainage port; any joint in the
drain line cannot be higher than the previous joint.
10.Confirm the power requirements stated in the machine’s nameplate; ensure that the power
supply meets the requirements.
11.A circuit breaker or switch with leakage protector and reliable grounding is required.
12.Turn off the switch on the power line and connect the machine to the power source.
NOTE: the filter flow direction should be correctly installed as per the direction marker on
the filter head cover or the filter body. The filter cartridge should be replaced every
3 to 6 months.
User Manual

- 9 -
User Manual
Startup and Operation
1. Before you start up the machine, please check and confirm:
• That the packaging tape inside the ice machine has been removed;
• The accessories or items in the ice bin have been taken out;
• The ice machine has been adjusted to a leveled state;
• The water line has been connected and the water valve is open;
• The plug has been connected to the power supply and the power switch is off.
• The ambient temperature, water temperature, and pressure of the water supply meet the
above requirements.
2. Start up: turn on the power switch. After power-on, the machine begins to make ice automatically.
3. For normal operation, please confirm:
• There is water in the water trough and no overflow occurs;
• The pump is working properly and water is flowing evenly in the evaporator;
• The compressor is running normally, the temperature of the evaporator and the ice making
water is gradually decreasing;
• For air cooled machines, make sure the fan is running normally, and there is stable air flow in
the inlet and outlet of the ice machine;
• The ice machine has no abnormal noise;
• The ice machine has no abnormal vibration;
• It takes about 10 to 20 minutes to make one batch of ice, depending on the ambient
temperature and the temperature of the water. The higher the temperature is, the longer the
ice making will take;
• Ice cubes can be properly harvested from the machine.
User Manual

- 10 -
User Manual
Operation Instructions
• Startup: after proper installation, connect the water source and turn on the power supply to
turn on the machine. Please confirm that the machine is operating normally when you turn it
on for the first time.
• Self-check: with power on for the first time, the ice maker will do a self-check and pump out
any remaining water.
• Preparing: after the ice machine has finished the self-check, the inlet valve opens and the
inlet water will flow in until it reaches the set level; then the ice maker will defrost one time.
• Ice making: after pre-cooling for 30 seconds, the water pump starts, the water flows through
the evaporator smoothly and evenly, the ice cubes are gradually formed in the ice cube tray.
• Ice Harvest (Drop): after the ice making process finishes and the water pump is turned off,
the defrosting valve is turned on. After the hot gas enters into the evaporator for about 1-2
minutes the ice cubes slide from the evaporator into the storage bin.
Warning: Do not put your hand into the ice storage bin during the ice-falling process to
prevent the ice from hitting your hand!
• Shutdown: The ice maker will stop working when you push the “on/off” button on the control
panel during the running process.
• Bin full stop: when the ice machine is running and the storage bin gets filled to the machine’s
•sensor, the machine will take 40 seconds and then stop producing ice.
• Repeat ice-making: when the ice cubes that are triggering the sensor are spread out or
moved, the ice maker will go back to the ice making process in a few seconds.
User Manual

- 11 -
User Manual
Control Panel
1. LED Display:
• Self-check: Display “ini” code.
• Preparing: Counts (in seconds) forwards.
• Ice making: Counts (in seconds) forwards prior to the water reaching 32 degrees F. Counts
seconds backwards to 0 seconds afterwards.
• Ice Harvest: Counts (in seconds) forwards.
• Clean: Display “CLE” during cleaning and descaling; Display “STL” during sanitizing; Display
“RIN” during rinsing.
2. LED Lamps: Turns lights on/off
3. Ice cube thickness adjustment: During the ice making process, if you are not satisfied with the
ice thickness, press the Ice cube “–” button for 3 seconds, then click the button “+” or “-” on the
panel to adjust the thickness of ice cube.
• Note: By clicking the “+” or “-“ button one time, the ice making time is extended or shortened
by 1.5 minutes.
User Manual

- 12 -
User Manual
4. Cleaning: During the normal operation, hold the cleaning button for 3 seconds to enter the
cleaning process. During the entire cleaning process, cleaning agents and disinfectants need
to be put into the water trough. When the cleaning process is finished, the ice maker will go to
the ice making process.
Note: All cleaning and sanitizing chemicals used must be nickel safe
5. ON/OFF: Press this button to switch the machine OFF/ON.
6. Please open and close the storage bin door gently. Do not slam the door. Keep door closed
when not removing ice.
7. If the ice maker is not in use for a long time, it should be energized and run for 2 to 4 hours
every 2 months.
Other Special Protection - Shutdown
• If the ice machine has not detected ice harvest in three cycles, it will shut down for safety
and protection. The ice maker needs to be checked.
• If the ice machine detects that the ambient temperature is too high it will stop for safety
and protection.
• The fault code and its comments are displayed as follows:
User Manual

- 13 -
User Manual
Noble Chemical offers a full line of products to clean and sanitize your commercial ice machine.
These chemicals are approved for use with Avantco Ice Machines. Failure to regularly clean and
sanitize your Avantco Ice Machine will void warranty coverage. For information and instructions,
contact a Noble Chemical dealer. The ice machine needs to be cleaned every other month,
or once a month for high yeast environments.
Cleaners
Sanitizers
Item Number Size Type
147ARCTIC 16 oz. Concentrate
147ARCTICRPT 16 oz. Ready to use
147ARCTICR1G 1 Gallon Ready to use
Item Number Size Type
147QKSANICE 12 Pack/16 oz. Bottles Concentrate
999QKSANICE 16 oz. Concentrate
User Manual

- 14 -
User Manual
Maintenance
NOTE: Maintenance must be done by a qualified technician.
WARNING: Before maintenance or manual cleaning, be sure to shut off the water source
and power supply.
Exterior Cleaning
• Frequently clean the environment around the ice machine to keep it clean.
Do not block the vents.
• The outer enclosure should be cleaned with a mild detergent and then wiped clean.
If necessary, use commercial stainless steel cleaners and polishes.
NOTE: Stainless steel may rust without proper maintenance.
Inlet Water Filter
• The water filter should be inspected regularly. It is recommended to replace the filter cartridge
every 3 to 6 months.
Interior Cleaning
• The inside of the ice storage bin can be washed with water and cleaner solution.
Rinse thoroughly with water. Repeat this process with a water and sanitizer solution.
• Note: Check and confirm the water pressure is lower than the maximum allowed pressure.
Do not flush the part above the water pump or the evaporator directly for water protection.
Condenser
• For the air-cooled ice maker, the condenser should be cleaned every three weeks. Use a soft
brush or a vacuum cleaner with a brush to brush it up and down along the fin direction, to
avoid damage to the fins and further affecting the cooling effect.
• The condenser filter should be cleaned every 2 weeks.
NOTE: Be careful when cleaning the condenser as the edges of the fins are sharp.
Water Line
• In order to ensure food safety, the water line of the ice machine should be cleaned regularly.
Winterizing
• Turn off the water and power supply, drain the residual water from the water trough
inlet pipe and drain pipe.
NOTE: The maintenance of the ice machine is not covered by the manufacturer’s warranty!
User Manual

User Manual
Clean Function
NOTE: Please empty the bin of ice in advance.
NOTE: Please clean and sanitize the bin and do a complete rinsing.
NOTE: Please clean and sanitize the ice sliding board, water distribution line,
water supply line, water pump, then do a complete rinsing.
•Turn on the ice maker; push “clean” button for 3 seconds, the ice maker will begin the
cleaning process. Put in the proper amount of cleaning solution manually into the water
trough followed by the clean and sanitizing process instruction.
• Push the “clean” button. The ice maker will do auto clean for about 15 minutes. Please spray
the evaporator with the cleaning solution in the meantime to ensure a complete clean. When
finished, the LED display will flash "Clean" slowly again.
• Put in the proper amount of sanitizing solution manually into the water trough followed by the
clean and sanitizing process instruction. Push the “clean” button again, the ice maker will do
auto sanitizing for about 15 minutes. Please spray the evaporator with the sanitizing solution
in the meantime to ensure complete sanitization. When finished, the ice maker will go into the
rinsing process, this process will take about 5 minutes, and do 5 rinsing cycles. Refer to your
cleaner and sanitizer for proper mixing & coding instructions.
• The ice maker will go back to making ice as soon as the cleaning process ends.
• Please throw away the next batch of ice in case of residual cleaner.
Manual Cleaning & Sanitizing
3. To empty the water from the tank
while the machine is running, press and
hold the “Clean” button for 3 seconds
and enter the cleaning mode to display
CLE. In the cleaning mode, press the “-”
button for 3 seconds to drain.
1. Remove all ice from
the ice bin to avoid
contamination.
2. Remove the 4 screws from
the top and bottom of the ice
machine’s front panel and
remove the front panel.
- 15 -
Note: Cut off
the power
supply after
draining
Cleaning Instructions
User Manual

- 16 -
User Manual
4. Make sure the power
supply is cut off. Remove
the water curtain.
5. Remove the 2 screws
which are securing the
spray pipe and remove it.
6. Remove the 2 screws
which are securing the
water pump.
7. Pull out the pump and
sensor wiring harness. 8. Pull out inlet water pipe. 9. Pull out the hose hoop
of the upper water pipe.
10. Disassemble fixed screws which are in the spray pipe. Dismantle the spray pipe.
11. Mix a solution of cleaner and water according to your ice machine cleaner instructions. Ensure
the cleaning agent dissolves completely. Soak the water pipe, inlet and outer spray pipe, head,
spray pipe fixing seat and screws, etc. in the cleaning solution for 5 minutes (or 15 minutes for
heavily scaled components). Rinse all components thoroughly with clean water.
User Manual

- 17 -
User Manual
12. After soaking, scrub the spray pipe, water curtain and pump base bracket with cleaning
solution, and rinse with clean water.
13. Spray the cleaning solution into the evaporator and wipe clean. Repeatedly wipe the water
tank, ice plate and its plastic parts, side plates, ice buckets and other sanitary areas with cleaning
solution. Rinse all areas thoroughly with clean water.
Sanitizing Instructions
1. Mix a solution of sanitizer and water according to your ice machine sanitizer instructions. Ensure
the sanitizer dissolves completely. Soak the water pipe, inner and outer spray pipe, head spray
pipe fixing seat and screws, etc. in the solution for 5 minutes. If using a no-rinse sanitizer, there is
no need to rinse.
User Manual

- 18 -
User Manual
Service Call
If the ice machine works abnormally, please confirm below before making a service call:
1. Check the water supply
• Whether there is water in the water trough;
• Whether the water pressure for the is 18.75 psi to 80 psi; the water temperature is 40-90°F;
• Whether the water valve is open;
• Whether there is no water leakage;
2. Check the power
• Whether the indicator on the display panel is ON;
• Whether the panel display does not display the OFF standby state;
• If the LED on the display panel is not ON, check whether the plug and socket are normal, and
whether the power supply switch is ON.
3. Spray the sanitizer solution into the ice evaporator with a spray bottle. Spray the water tank, ice
plate and its plastic parts, side plates, ice bin and other sanitary areas with sanitizer solution. If
using a no-rinse sanitizer, there is no need to rinse.
4. Allow the dismantled spray pipe, water pump, water pipe, and water curtain to dry.
Then install them back to their original position.
2. Spray the spray pipe, water curtain and pump base bracket with the sanitizer solution.
If using a no-rinse sanitizer, there is no need to rinse.
User Manual

- 19 -
User Manual
Fault Potential Cause Troubleshooting
Not working Power switch not turned on Turn on the power switch
Indicator is OFF Plug is loose Check plug and socket
Shutdown every 3 minutes after
startup;
The ambient temperature is
too high
Normal working temperature
range of 41-95°F
The display shows E04
high temperature
Condenser is dirty and blocked
High pressure switch wires
fallen off
Clean the condenser
The display shows E06
high pressure protection
Fan does not start Check and correct high pressure
switch wires
Check and correct the fan
Ice defrost abnormal Ambient temperature
too low
Normal working temperature
range of 41-95°F
Defrost valve does not
start normally
Check and correct the
defrosting valve
Ice thickness too thin or too thick Check and correct ice
thickness setting
Troubleshooting
3. Check nameplate and serial number
• Check the nameplate located on the side or back of the ice machine and record the model
and series number of the ice machine.
Note: If the machine fails due to the user’s faults, such as failure to use and maintain a
water filter, no supply of water, electricity or environmental factors, rather than the fault of
the ice maker, the door-to-door service will be charged.
User Manual

- 20 -
User Manual
Poor transparency of ice cubes;
ice cubes too thin or incomplete
Ice thickness is
too thin
Check and correct ice
thickness setting
Water pressure is
too low
Check that the water supply
pressure is 1.3 bar to 5.5 bar
Water temperature is
too high
Normal working temperature
range of 41-95°F
Inlet water valve does not work Check and correct the inlet
water valve
Inlet water valve is dirty and
blocked
Check whether water leaks
and correct
Water leaking Check and correct the inlet water
filter and water connection
Inlet water filter has not been
replaced for a long time
Too slow in ice making The condenser or air filter is dirty Clean the condenser and filter
screen
High ambient temperature Normal working temperature
range of 41-95°F
Poor ventilation Check the environment around
the ice machine
Water temperature is too high Check the water supply
temperature of 41-95°F
Too much noise The ice machine is not placed in
a leveled foundation or the ice
maker is not leveled
Level the ice machine
User Manual
Avantco Ice warrants to theorigina
This manual suits for next models
29
Table of contents
Other Avantco Ice Maker manuals

Avantco
Avantco 194CDIM50 User manual

Avantco
Avantco 194UCF120A User manual

Avantco
Avantco 194KMC350L2F User manual

Avantco
Avantco 194UC77BA User manual

Avantco
Avantco 194CGF900 User manual

Avantco
Avantco 194MCF322A User manual

Avantco
Avantco 194MC35022FA User manual

Avantco
Avantco 194UCB77A User manual

Avantco
Avantco 194MCF322A User manual
Popular Ice Maker manuals by other brands

Marvel
Marvel 30iMT Installation, operating and maintenance instructions

Cornelius
Cornelius 1400 Series Illustrated parts list

KitchenAid
KitchenAid KUIS18NNXW Use and care guide

KitchenAid
KitchenAid KUIS18PNJB7 parts list

Ice-O-Matic
Ice-O-Matic GEMD270A Service and installation manual

Jackson Grills
Jackson Grills BBQ10700 user manual