Princess Yonanas User manual

1
4
5
2
1
7
6
8
3
USER MANUAL
© 2013 PRINCESS
282700 Princess
Yonanas Ice Maker
21X14.6CM

2
4
5
2
1
7
6
8
3
2
Nederlands 4
English 9
Français 14
Deutsch 19
Español 24
Italiano 29
Svenska 34
Dansk 38
Norsk 42
Suomi 46
Português 50
Ελληνικά
55
ﺔﻴﺑﺮﻌﻟﺍ 63
Guarantee, CE & SSL
64
TABLE OF CONTENTS

3
4
5
2
1
7
6
8
3
3
B
4
5
2
1
7
6
8
3
A

4
4
5
2
1
7
6
8
3
4
NL
Gefeliciteerd!
U heeft een product van Princess aangeschaft.
Ons doel is om kwaliteitsproducten met een
smaakvol ontwerp en tegen een betaalbare
prijs te bieden. We hopen dat u vele jaren
plezier zult hebben van dit product.
Veiligheidsinstructies
Algemene veiligheid
Lees voor gebruik de gebruiks-•
aanwijzing zorgvuldig door.
Bewaar de gebruiksaanwijzing
voor toekomstig gebruik.
Gebruik het apparaat en de•
accessoires uitsluitend voor
de beoogde doeleinden.
Gebruik het apparaat en de
accessoires niet voor andere
doeleinden dan beschreven
in de gebruiksaanwijzing.
Gebruik het apparaat niet als•
een onderdeel of een accessoire
beschadigd of defect is. Laat
een beschadigd of defect
onderdeel of een accessoire
door de fabrikant of een erkend
servicecentrum vervangen.
Dit apparaat kan worden•
gebruikt door kinderen vanaf
8 jaar en door personen met
verminderde lichamelijke,
zintuiglijke of geestelijke
vermogens of gebrek aan de
benodigde ervaring en kennis
indien ze onder toezicht
staan of instructies krijgen
over hoe het apparaat op
een veilige manier kan worden
gebruikt alsook de gevaren
begrijpen die met het gebruik
samenhangen. Kinderen mogen
niet met het apparaat spelen.
Reiniging en onderhoud mogen
niet worden uitgevoerd door
kinderen tenzij ze ouder zijn
dan 8 jaar en onder toezicht
worden gehouden.
Dompel het apparaat niet•
onder in water of andere
vloeistoffen. Verwijder het
apparaat niet met uw
handen als het apparaat is
ondergedompeld in water of
andere vloeistoffen. Haal
onmiddellijk de stekker uit
het stopcontact. Gebruik het
apparaat niet langer als het in
water of andere vloeistoffen
ondergedompeld is geweest.
Reinig het apparaat en de•
accessoires. Zie het gedeelte
"Reiniging en onderhoud".
Elektrische veiligheid
Controleer voor gebruik altijd•
of de netspanning
overeenkomt met de
spanning op het typeplaatje
van het apparaat.

5
4
5
2
1
7
6
8
3
5
NL
Bedien het apparaat niet•
door middel van een externe
timer of een apart
afstandsbedieningssysteem.
Sluit het apparaat op een•
geaard stopcontact aan.
Gebruik indien nodig een
geaarde verlengkabel met
een geschikte diameter
(minimaal 3 x 1 mm
2
).
Installeer voor extra•
bescherming een
aardlekschakelaar (RCD) met
een nominale reststroom van
maximaal 30 mA.
Zorg dat er geen water in de•
aansluitpunten van het
netsnoer en het verlengsnoer
kan komen.
Wikkel netsnoer en het•
verlengsnoer altijd volledig af.
Zorg dat het netsnoer niet•
over de rand van een
werkblad hangt, dat het niet
per ongeluk verstrengeld kan
raken en dat niemand erover
kan struikelen.
Houd het netsnoer uit de•
buurt van warmtebronnen,
olie en scherpe randen.
Gebruik het apparaat niet als•
het netsnoer of de stekker
beschadigd of defect is.
Laat een beschadigd of defect
netsnoer of een stekker door
de fabrikant of een erkend
servicecentrum vervangen.
Trek de stekker niet aan het•
netsnoer uit het stopcontact.
Haal de stekker uit het•
stopcontact als het apparaat
niet in gebruik is, voordat u
het gaat monteren of
demonteren en voordat u
reinigings-en onderhouds-
werkzaamheden gaat uitvoeren.
Veiligheidsinstructies voor
ijsmachines
Het apparaat is alleen geschikt•
voor huishoudelijk gebruik.
Gebruik het apparaat niet•
buitenshuis.
Gebruik het apparaat niet in•
vochtige omgevingen.
Plaats het apparaat op een•
stabiel en vlak oppervlak.
Plaats het apparaat niet op•
een kookplaat.
Zorg ervoor dat het apparaat•
niet in contact komt met
brandbaar materiaal.
Houd het apparaat uit de•
buurt van warmtebronnen.
Plaats het apparaat niet op
hete oppervlakken of in de
buurt van open vlammen.

6
4
5
2
1
7
6
8
3
6
NL
Zorg dat uw handen droog•
zijn voordat u het apparaat
aanraakt.
Pas op voor scherpe delen.•
Houd uw handen uit de
buurt van de scherpe delen.
Houd uw handen uit de buurt•
van de bewegende delen.
Houd lang haar en losse•
kleding uit de buurt van de
bewegende delen.
Houd spatels en ander•
keukengerei uit de buurt van
de bewegende delen.
Steek geen vreemde•
voorwerpen in het apparaat.
Verplaats het apparaat niet•
wanneer het is ingeschakeld.
Laat het apparaat niet•
onbeheerd achter tijdens
gebruik.
Berg het apparaat als het niet•
in gebruik is op een droge
plaats op. Zorg dat kinderen
geen toegang hebben tot
opgeborgen apparaten.
Reiniging en onderhoud (fig. A)
Het apparaat moet na ieder gebruik worden
gereinigd.
Voordat u verder gaat, vragen wij graag uw
aandacht voor de volgende punten:
- Schakel voor reiniging en onderhoud het
apparaat uit, verwijder de netstekker uit
het stopcontact en wacht totdat het
apparaat is afgekoeld.
- Dompel het apparaat niet onder in water
of andere vloeistoffen.
Voordat u verder gaat, vragen wij graag u uw
aandacht voor de volgende punten:
- Reinig het apparaat niet met bijtende of
schurende reinigingsmiddelen.
- Gebruik geen scherpe voorwerpen om het
apparaat te reinigen.
- Reinig het apparaat niet in de vaatwasser.
De accessoires kunnen worden gereinigd in
de vaatwasser.
Controleer het apparaat regelmatig op•
mogelijke schade.
Reinig de buitenkant van het apparaat met•
een vochtige doek. Droog de buitenkant
van het apparaat grondig met een schone,
droge doek.
Reinig de accessoires:•
- Ontgrendel de invoerbuis (4) door hem
in de richting van het
ontgrendelsymbool te draaien.
- Verwijder de invoerbuis (4) van de
motorunit (2).
- Draai het onderdeksel (7) los van de
invoerbuis (4).
- Verwijder de meskegel (3) van de
pakking (6).
- Verwijder de pakking (6) van het
onderdeksel (7).
- Reinig de meskegel (3), de invoerbuis (4),
het duwstuk (5), de pakking (6) en het
onderdeksel (7) in sop of in de vaatwasser.
- Spoel de accessoires af onder stromend
water.
- Droog de accessoires grondig.
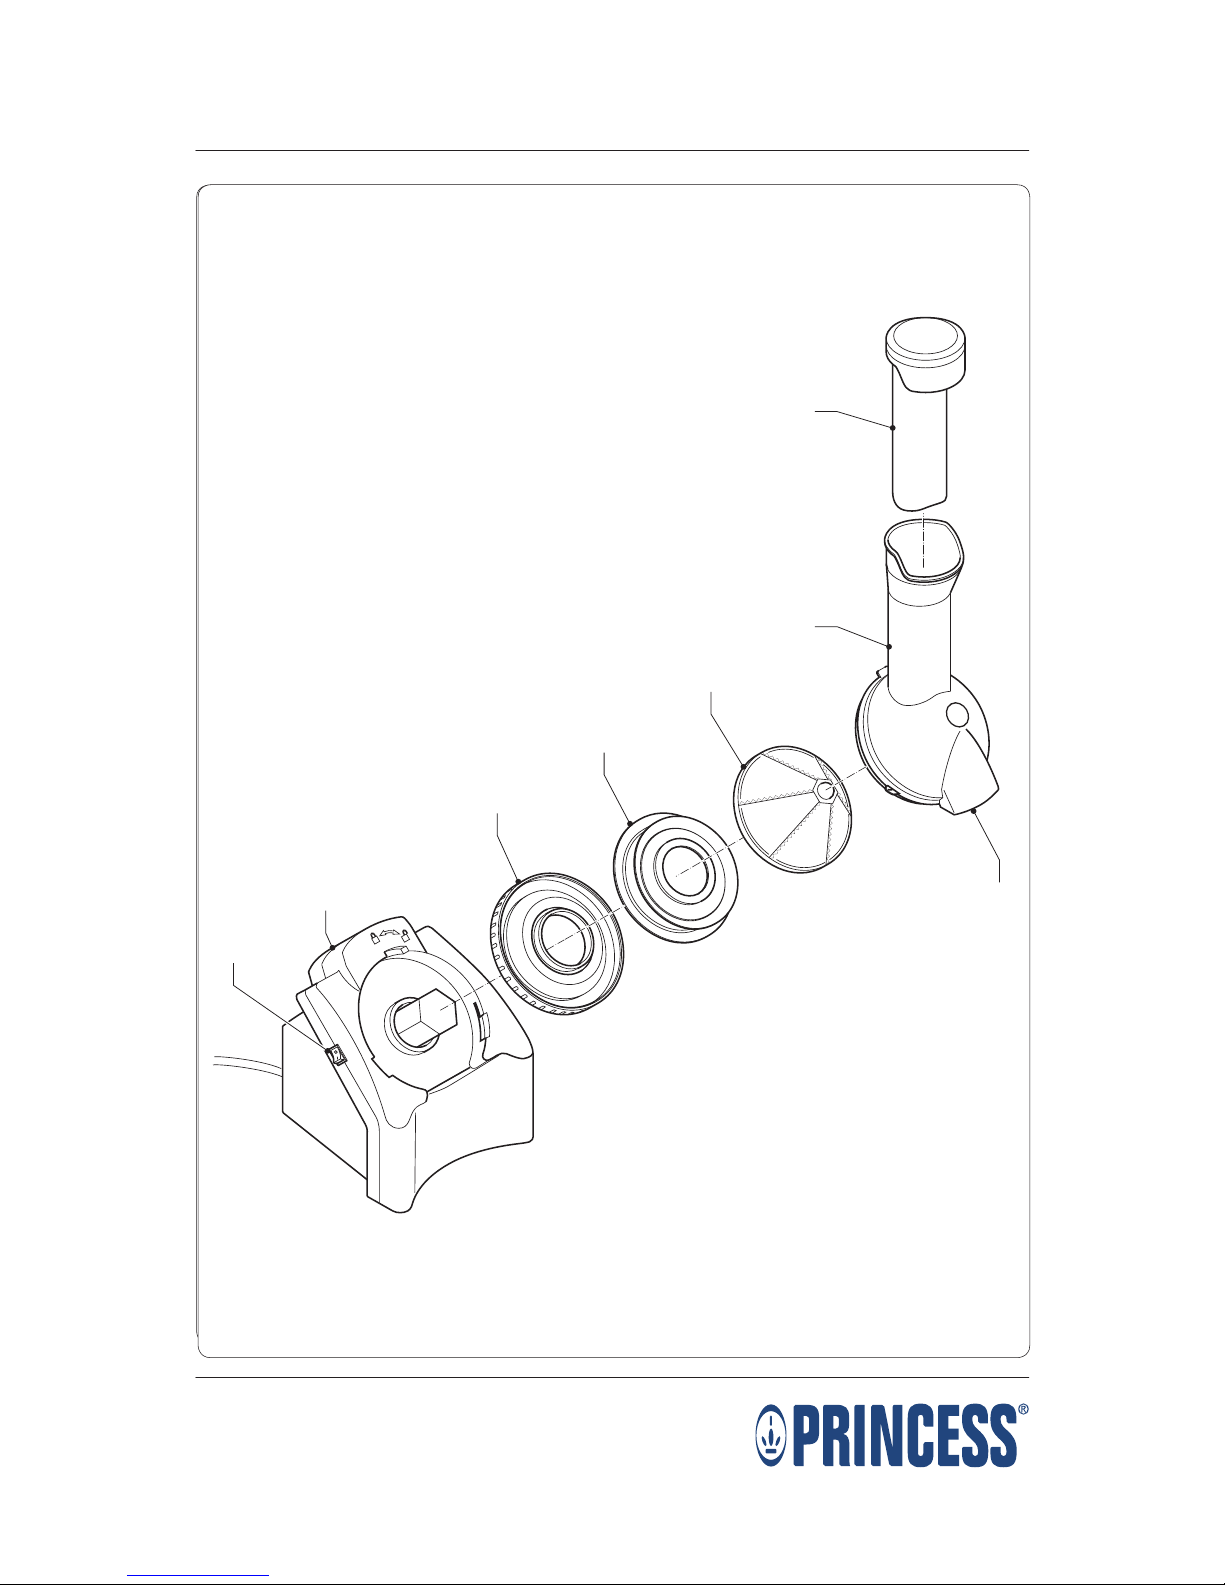
Beschrijving (fig. A)
Uw 282700 Princess ijsmachine is ontworpen
voor het maken van ijs van bevroren fruit. Het
apparaat is niet geschikt voor het maken van
ijs van vers fruit. Het apparaat is uitsluitend
geschikt voor gebruik binnenshuis. Het apparaat
is alleen geschikt voor huishoudelijk gebruik.
1. Aan/uit-schakelaar
2. Motorunit
3. Meskegel
4. Invoerbuis
5. Duwstuk
6. Pakking
7
NL
7. Onderdeksel
8. Tuit
Assemblage (fig. A)
Voordat u verder gaat, vragen wij graag uw
aandacht voor de volgende punten:
- Schakel voor montage of demontage het
apparaat uit, verwijder de netstekker uit
het stopcontact en wacht totdat het
apparaat is afgekoeld.
Plaats de motorunit (2) op een stabiel en•
vlak oppervlak.
Plaats de onderkant (10,8 cm) van de•
pakking (6) in het onderdeksel (7).
Let op: Plaats niet de bovenkant (9,5 cm) van
de pakking (6) in het onderdeksel (7).
Plaats de meskegel (3) op de pakking (6).•
Draai het onderdeksel (7) vast op de•
invoerbuis (4).
Plaats de invoerbuis (4) op de motorunit (2).•
Vergrendel de invoerbuis (4) door hem in•
de richting van het vergrendelsymbool te
draaien.
Gebruik (fig. A)
Voordat u verder gaat, vragen wij graag uw
aandacht voor de volgende punten:
- Laat het apparaat niet continu
ingeschakeld gedurende meer dan twee
minuten. Schakel na twee minuten het
apparaat uit en laat het apparaat één
minuut afkoelen alvorens het opnieuw in
te schakelen. Laat het apparaat volledig
afkoelen na iedere derde cyclus van "twee
minuten aan / één minuut uit".
- Steek uw handen niet in de invoerbuis om
bevroren fruit te persen. Gebruik altijd het
duwstuk. Oefen geen druk uit op het
duwstuk.
- Indien het apparaat sterk begint te trillen
en minder ijs begint te produceren, schakel
dan het apparaat uit en reinig vervolgens
de meskegel.
Voordat u verder gaat, vragen wij graag u uw
aandacht voor de volgende punten:
- Bedien het apparaat uitsluitend wanneer
een kom van een geschikte omvang onder
de tuit is geplaatst.
- Reinig regelmatig de meskegel bij het
verwerken van grotere hoeveelheden fruit.
Plaats het apparaat op een stabiel en vlak•
oppervlak.
Assembleer het apparaat. Zie het gedeelte•
"Assemblage".
Verwijder het duwstuk (5) uit de invoerbuis•
(4).
Plaats een kom van een geschikte omvang•
onder de tuit (8).
Zet de aan/uit-schakelaar (1) in positie 'I'•
om het apparaat in te schakelen.
Snijd het bevroren fruit in stukken die in de•
invoerbuis (4) passen.
Doe de stukken bevroren fruit in de•
invoerbuis (4). Gebruik het duwstuk (5) om
de stukken bevroren fruit door de
invoerbuis (4) te persen.
Reinig indien nodig de meskegel (3).•
Zet de aan/uit-schakelaar (1) in positie 'O'•
om het apparaat uit te schakelen.
Verwijder de netstekker uit het stopcontact.•
Laat het apparaat volledig afkoelen.•
Voedselbereiding (2 personen)
Voordat u verder gaat, vragen wij graag uw
aandacht voor de volgende punten:
- Gebruik geen fruit met pitten, noten of
ijsklontjes.
- Laat alle fruitsoorten een paar minuten
ontdooien alvorens het fruit met behulp
van het apparaat te persen. De ontdooitijd
is afhankelijk van de temperatuurinstelling
van uw vriezer en van de
kamertemperatuur. Experimenteer met de
gewenste tijd om de beste resultaten te
verkrijgen. Begin als richtlijn met 10-15
minuten voor zacht fruit en verhoog de tijd
naar 15-20 minuten voor hard fruit.
Pel overrijpe of bruingevlekte bananen en•
laat ze gedurende 24 uur bevriezen. Laat
de bananen gedurende 10-15 minuten op
kamertemperatuur ontdooien.
Gebruik verschillende soorten bessen:•
aardbeien, frambozen, bramen, bosbessen
of cranberry's. Laat de bessen gedurende
10-15 minuten op kamertemperatuur
ontdooien.

7
4
5
2
1
7
6
8
3
7
NL
7. Onderdeksel
8. Tuit
Assemblage (fig. A)
Voordat u verder gaat, vragen wij graag uw
aandacht voor de volgende punten:
- Schakel voor montage of demontage het
apparaat uit, verwijder de netstekker uit
het stopcontact en wacht totdat het
apparaat is afgekoeld.
Plaats de motorunit (2) op een stabiel en•
vlak oppervlak.
Plaats de onderkant (10,8 cm) van de•
pakking (6) in het onderdeksel (7).
Let op: Plaats niet de bovenkant (9,5 cm) van
de pakking (6) in het onderdeksel (7).
Plaats de meskegel (3) op de pakking (6).•
Draai het onderdeksel (7) vast op de•
invoerbuis (4).
Plaats de invoerbuis (4) op de motorunit (2).•
Vergrendel de invoerbuis (4) door hem in•
de richting van het vergrendelsymbool te
draaien.
Gebruik (fig. A)
Voordat u verder gaat, vragen wij graag uw
aandacht voor de volgende punten:
- Laat het apparaat niet continu
ingeschakeld gedurende meer dan twee
minuten. Schakel na twee minuten het
apparaat uit en laat het apparaat één
minuut afkoelen alvorens het opnieuw in
te schakelen. Laat het apparaat volledig
afkoelen na iedere derde cyclus van "twee
minuten aan / één minuut uit".
- Steek uw handen niet in de invoerbuis om
bevroren fruit te persen. Gebruik altijd het
duwstuk. Oefen geen druk uit op het
duwstuk.
- Indien het apparaat sterk begint te trillen
en minder ijs begint te produceren, schakel
dan het apparaat uit en reinig vervolgens
de meskegel.
Voordat u verder gaat, vragen wij graag u uw
aandacht voor de volgende punten:
- Bedien het apparaat uitsluitend wanneer
een kom van een geschikte omvang onder
de tuit is geplaatst.
- Reinig regelmatig de meskegel bij het
verwerken van grotere hoeveelheden fruit.
Plaats het apparaat op een stabiel en vlak•
oppervlak.
Assembleer het apparaat. Zie het gedeelte•
"Assemblage".
Verwijder het duwstuk (5) uit de invoerbuis•
(4).
Plaats een kom van een geschikte omvang•
onder de tuit (8).
Zet de aan/uit-schakelaar (1) in positie 'I'•
om het apparaat in te schakelen.
Snijd het bevroren fruit in stukken die in de•
invoerbuis (4) passen.
Doe de stukken bevroren fruit in de•
invoerbuis (4). Gebruik het duwstuk (5) om
de stukken bevroren fruit door de
invoerbuis (4) te persen.
Reinig indien nodig de meskegel (3).•
Zet de aan/uit-schakelaar (1) in positie 'O'•
om het apparaat uit te schakelen.
Verwijder de netstekker uit het stopcontact.•
Laat het apparaat volledig afkoelen.•
Voedselbereiding (2 personen)
Voordat u verder gaat, vragen wij graag uw
aandacht voor de volgende punten:
- Gebruik geen fruit met pitten, noten of
ijsklontjes.
- Laat alle fruitsoorten een paar minuten
ontdooien alvorens het fruit met behulp
van het apparaat te persen. De ontdooitijd
is afhankelijk van de temperatuurinstelling
van uw vriezer en van de
kamertemperatuur. Experimenteer met de
gewenste tijd om de beste resultaten te
verkrijgen. Begin als richtlijn met 10-15
minuten voor zacht fruit en verhoog de tijd
naar 15-20 minuten voor hard fruit.
Pel overrijpe of bruingevlekte bananen en•
laat ze gedurende 24 uur bevriezen. Laat
de bananen gedurende 10-15 minuten op
kamertemperatuur ontdooien.
Gebruik verschillende soorten bessen:•
aardbeien, frambozen, bramen, bosbessen
of cranberry's. Laat de bessen gedurende
10-15 minuten op kamertemperatuur
ontdooien.

8
4
5
2
1
7
6
8
3
8
NL
Wissel voor het beste resultaat af tussen de•
ingrediënten.
Opbergen
Plaats het apparaat en de accessoires in de•
originele verpakking.
Berg het apparaat met de accessoires op•
een droge en vorstvrije plaats buiten bereik
van kinderen op.
Disclaimer
Wijzigingen voorbehouden; specificaties
kunnen zonder opgave van redenen worden
gewijzigd.

9
4
5
2
1
7
6
8
3
9
EN
Congratulations!
You have purchased a Princess product. Our aim
is to provide quality products with a tasteful
design and at an affordable price. We hope
that you will enjoy this product for many years.
Safety instructions
General safety
Read the manual carefully•
before use. Keep the manual
for future reference.
Only use the appliance and the•
accessories for their intended
purposes. Do not use the
appliance and the accessories
for other purposes than
described in the manual.
Do not use the appliance if•
any part or any accessory is
damaged or defective. If a part
or an accessory is damaged
or defective, it must be
replaced by the manufacturer
or an authorised repair agent.
This appliance can be used by•
children aged from 8 years
and above and persons with
reduced physical, sensory or
mental capabilities or lack of
experience and knowledge if
they have been given supervision
or instruction concerning use
of the appliance in a safe way
and understand the hazards
involved. Children shall not
play with the appliance.
Cleaning and user maintenance
shall not be made by children
unless they are older than
8 and supervised.
Do not use the appliance near•
bathtubs, showers, basins or
other vessels containing water.
Do not immerse the appliance•
in water or other liquids. If
the appliance is immersed in
water or other liquids, do not
remove the appliance with
your hands. Immediately
remove the mains plug from
the wall socket. If the appliance
is immersed in water or other
liquids, do not use the
appliance again.
Clean the appliance and the•
accessories. Refer to the section
"Cleaning and maintenance".
Electrical safety
Before use, always check that•
the mains voltage is the same
as the voltage on the rating
plate of the appliance.
The appliance is not intended•
to be operated by means of
an external timer or separate
remote-control system.

10
4
5
2
1
7
6
8
3
10
EN
Connect the appliance to an•
earthed wall socket.
If necessary, use an earthed
extension cable of a suitable
diameter (at least 3 x 1 mm
2
).
For additional protection,•
install a residual current
device (RCD) with a rated
residual operating current
that does not exceed 30 mA.
Make sure that water cannot•
enter the contact plugs of
the mains cable and the
extension cable.
Always fully unwind the mains•
cable and the extension cable.
Make sure that the mains•
cable does not hang over the
edge of a worktop and cannot
be caught accidentally or
tripped over.
Keep the mains cable away•
from heat, oil and sharp edges.
Do not use the appliance if•
the mains cable or the mains
plug is damaged or defective.
If the mains cable or the
mains plug is damaged or
defective, it must be replaced
by the manufacturer or an
authorised repair agent.
Do not pull the mains cable•
to disconnect the mains plug
from the mains.
Disconnect the mains plug•
from the mains when the
appliance is not in use, before
assembly or disassembly and
before cleaning and
maintenance.
Safety instructions for ice-cream
makers
The appliance is suitable for•
domestic use only.
Do not use the appliance•
outdoors.
Do not use the appliance in•
damp environments.
Place the appliance on a•
stable and flat surface.
Do not place the appliance•
on a hob.
Make sure that the appliance•
does not come into contact
with flammable material.
Keep the appliance away•
from heat sources. Do not
place the appliance on hot
surfaces or near open flames.
Make sure that your hands•
are dry before touching the
appliance.
Beware of sharp parts. Keep•
your hands away from the
sharp parts.
Keep your hands away from•
the moving parts.

11
4
5
2
1
7
6
8
3
11
EN
Keep long hair and loose•
clothing away from the
moving parts.
Keep spatulas and other•
kitchen utensils away from
the moving parts.
Do not insert foreign objects•
into the appliance.
Do not move the appliance•
while it is switched on.
Do not leave the appliance•
unattended during use.
Store the appliance in a dry•
place when not in use. Make
sure that children do not have
access to stored appliances.
Cleaning and maintenance (fig. A)
The appliance must be cleaned after each use.
Before you proceed, we need you to pay
attention to the following notes:
- Before cleaning or maintenance, switch off
the appliance, remove the mains plug from
the wall socket and wait until the appliance
has cooled down.
- Do not immerse the appliance in water or
other liquids.
Before you proceed, we would like you to
focus your attention on the following notes:
- Do not use aggressive or abrasive cleaning
agents to clean the appliance.
- Do not use sharp objects to clean the
appliance.
- Do not clean the appliance in the
dishwasher. The accessories can be cleaned
in the dishwasher.
Regularly check the appliance for possible•
damage.
Clean the outside of the appliance with a•
damp cloth. Thoroughly dry the outside of
the appliance with a clean, dry cloth.
Clean the accessories:•
- Unlock the feeding tube (4) by turning it
into the direction of the unlock symbol.
- Remove the feeding tube (4) from the
motor unit (2).
- Loosen the bottom cover (7) from the
feeding tube (4).
- Remove the blade cone (3) from the
gasket (6).
- Remove the gasket (6) from the bottom
cover (7).
- Clean the blade cone (3), the feeding
tube (4), the pusher (5), the gasket (6)
and the bottom cover (7) in soapy water
or in the dishwasher.
- Rinse the accessories under running water.
- Thoroughly dry the accessories.
Description (fig. A)
Your 282700 Princess ice-cream maker has
been designed for making ice cream from
frozen fruits. The appliance is not suitable for
making ice cream from fresh fruits. The
appliance is suitable for indoor use only. The
appliance is suitable for domestic use only.
1. On/off switch
2. Motor unit
3. Blade cone
4. Feeding tube
5. Pusher
6. Gasket
7. Bottom cover
8. Spout
Assembly (fig. A)
Before you proceed, we need you to pay
attention to the following notes:
- Before assembly or disassembly, switch off
the appliance, remove the mains plug from
the wall socket and wait until the appliance
has cooled down.
Place the motor unit (2) on a stable and•
flat surface.

12
4
5
2
1
7
6
8
3
12
EN
Place the bottom (10.8 cm) of the gasket (6)•
into the bottom cover (7).
Note: Do not place the top (9.5 cm) of the
gasket (6) into the bottom cover (7).
Place the blade cone (3) onto the gasket (6).•
Tighten the bottom cover (7) onto the•
feeding tube (4).
Place the feeding tube (4) onto the motor•
unit (2).
Lock the feeding tube (4) by turning it into•
the direction of the lock symbol.
Use (fig. A)
Before you proceed, we need you to pay
attention to the following notes:
- Do not leave the appliance switched on
continuously for more than two minutes.
After two minutes, switch off the appliance
and allow it to cool down for one minute
before switching it on again. Allow the
appliance to cool down completely after
every three cycles of "two minutes on / one
minute off".
- Do not insert your hands into the feeding
tube to press frozen fruits. Always use the
pusher. Do not exert pressure on the pusher.
- If the appliance starts to vibrate strongly
and produce less ice cream, switch off the
appliance and subsequently clean the blade
cone.
Before you proceed, we would like you to
focus your attention on the following notes:
- Only operate the appliance when a bowl
of a suitable size is placed under the spout.
- Regularly clean the blade cone when
processing larger quantities of fruit.
Place the appliance on a stable and flat•
surface.
Assemble the appliance. Refer to the•
section "Assembly".
Remove the pusher (5) from the feeding•
tube (4).
Place a bowl of a suitable size under the•
spout (8).
To switch on the appliance, set the on/off•
switch (1) to the 'I' position.
Cut the frozen fruits into pieces that fit•
into the feeding tube (4).
Insert the pieces of frozen fruit into the•
feeding tube (4). Use the pusher (5) to
press the pieces of frozen fruit through the
feeding tube (4).
If necessary, clean the blade cone (3).•
To switch off the appliance, set the on/off•
switch (1) to the 'O' position.
Remove the mains plug from the wall socket.•
Allow the appliance to cool down•
completely.
Food preparation (2 persons)
Before you proceed, we need you to pay
attention to the following notes:
- Do not use fruits with pits, nuts or ice cubes.
- Defrost all types of fruit for a few minutes
before pressing the fruit using the
appliance. The defrost time depends on
the temperature setting of your freezer
and on the room temperature. Experiment
with the required time to achieve the best
results. As a guideline, start with 10-15
minutes for soft fruits and increase to
15-20 minutes for hard fruits.
If you use overripe or brown-spotted•
bananas, peel the bananas and freeze
them for 24 hours. Defrost the bananas at
room temperature for 10-15 minutes.
Use different types of frozen berries:•
strawberries, raspberries, blackberries,
blueberries or cranberries. Defrost the berries
at room temperature for 10-15 minutes.
To achieve the best results, alternate•
between the ingredients.
Storage
Put the appliance and the accessories in•
the original packaging.
Store the appliance with the accessories in•
a dry and frost-free place, out of the reach
of children.
U.K. Wiring instructions
The wires in the mains lead are coloured in
accordance with the following code:
BLUE NEUTRAL
BROWN LIVE

13
4
5
2
1
7
6
8
3
13
EN
As the colours of the wire in the mains lead of
this appliance may not correspond with the
colour markings identifying the terminals on
your plug, proceed as follows:
The wire which is coloured BLUE must be
connected to the terminal which is marked
with the letter N or coloured black.
The wire which is coloured BROWN must be
connected to the terminal which is marked
with the letter L or coloured red.
Should the fuse in the BS1363 plug require
replacement, a 3Amp BS1362 fuse must be
fitted.
This is a double-insulated appliance and does
not need an earth connection.
Warning! On no account should either the live
or neutral wires be connected to the earth
terminal.
Disclaimer
Subject to change; specifications can be
changed without further notice.

14
4
5
2
1
7
6
8
3
14
FR
Félicitations!
Vous avez acheté un produit Princess. Nous
souhaitons vous proposer des produits de
qualité associant un design raffiné et des prix
accessibles. Nous espérons que vous profiterez
longtemps de ce produit.
Instructions de sécurité
Sécurité générale
Lisez avec soin le manuel•
avant utilisation. Conservez le
manuel pour référence future.
Utilisez l'appareil et ses•
accessoires uniquement pour
leurs fins prévues. N'utilisez pas
l'appareil et ses accessoires
pour tout autre objet que
celui exposé dans le manuel.
N'utilisez pas l'appareil si une•
pièce ou un accessoire
quelconque est endommagé ou
défectueux. Si une pièce ou
un accessoire quelconque est
endommagé ou défectueux,
il doit être remplacé par le
fabricant ou par un réparateur
agréé.
Cet appareil peut être utilisé par•
des enfants de 8 ans ou plus et
des personnes présentant un
handicap physique, sensoriel
ou mental voire ne disposant
pas des connaissances et de
l'expérience nécessaires en
cas de surveillance ou
d'instructions sur l'usage de
cet appareil en toute sécurité
et de compréhension des
risques impliqués. Les enfants
ne doivent pas jouer avec
l'appareil. Le nettoyage et la
maintenance utilisateur ne
doivent pas être confiés à des
enfants sauf s'ils ont 8 ans ou
plus et sont sous surveillance.
N'utilisez pas l'appareil à•
proximité d'une baignoire,
d'une douche, d'un lavabo ou
d'autres récipients contenant
de l'eau.
Ne plongez pas l'appareil•
dans l'eau ou autres liquides.
Si l'appareil est plongé dans
l'eau ou d'autres liquides, ne
retirez pas l'appareil avec vos
mains. Débranchez
immédiatement la fiche
secteur de la prise murale.
Si l'appareil est plongé dans
l'eau ou autre liquide, ne
l'utilisez pas à nouveau.
Nettoyez l'appareil et les•
accessoires. Consultez la section
"Nettoyage et entretien".
Sécurité électrique
Avant toute utilisation, vérifiez•
que la tension du secteur
correspond à celle indiquée

15
4
5
2
1
7
6
8
3
15
FR
sur la plaque signalétique de
l'appareil.
L'appareil n'est pas conçu pour•
être utilisé avec une minuterie
externe ou un système de
télécommande séparé.
Connectez l'appareil à une•
prise murale mise à la terre.
Si nécessaire, vous pouvez
utiliser une rallonge d'un
diamètre adapté (au moins
3 x 1 mm
2
).
Pour maximiser la protection,•
installez un dispositif de
courant résiduel (RCD)
présentant une intensité de
service résiduelle nominale
inférieure ou égale à 30 mA.
Assurez-vous que l'eau ne•
peut pas s'infiltrer dans les
contacts de prise du cordon
d'alimentation et de la rallonge.
Déroulez toujours•
complètement le cordon
d'alimentation et la rallonge.
Assurez-vous que le cordon•
d'alimentation ne pend pas
sur le bord d'un plan de
travail et ne peut pas être
happé ou faire trébucher
quelqu'un accidentellement.
Maintenez le cordon•
d'alimentation à l'écart de la
chaleur, de l'huile et des
bords tranchants.
N'utilisez pas l'appareil si le•
cordon d'alimentation ou la
fiche secteur est endommagé
ou défectueux. Si le cordon
d'alimentation ou la fiche
secteur est endommagé ou
défectueux, il doit être
remplacé par le fabricant ou
par un réparateur agréé.
Ne tirez pas sur le cordon•
d'alimentation pour débrancher
la fiche secteur du secteur.
Débranchez la fiche secteur•
du secteur lorsque l'appareil
n'est pas utilisé, avant le
montage ou le démontage
de même qu'avant le
nettoyage ou l'entretien.
Instructions de sécurité pour
sorbetières
L'appareil est réservé à un•
usage domestique.
N'utilisez pas l'appareil à•
l'extérieur.
N'utilisez pas l'appareil dans•
un environnement humide.
Placez l'appareil sur une•
surface stable et plane.
Ne placez pas l'appareil sur•
une plaque de cuisson.

16
4
5
2
1
7
6
8
3
16
FR
Assurez-vous que l'appareil•
n'entre en contact avec
aucune matière inflammable.
Maintenez l'appareil à l'écart•
des sources de chaleur. Ne
placez pas l'appareil sur une
surface chaude ou à
proximité de flammes nues.
Assurez-vous d'avoir les mains•
sèches avant de toucher
l'appareil.
Attention aux pièces•
coupantes. Éloignez vos
mains des parties coupantes.
Éloignez vos mains des•
parties mobiles.
N’approchez pas les cheveux•
longs et les vêtements
amples des pièces mobiles.
Éloignez les spatules et autres•
ustensiles de cuisine des
pièces mobiles.
N'insérez pas de corps•
étrangers dans l'appareil.
Ne déplacez pas l’appareil•
lorsqu’il est en marche.
Ne laissez jamais l'appareil sans•
surveillance pendant l'utilisation.
Rangez l'appareil dans un•
endroit sec lorsqu'il n'est pas
utilisé. Assurez-vous que les
enfants ne puissent pas
accéder aux appareils rangés.
Nettoyage et entretien (fig. A)
L’appareil doit être nettoyé après chaque
utilisation.
Avant de procéder, vous devez faire attention
aux remarques suivantes :
- Avant le nettoyage ou l'entretien, arrêtez
l'appareil, débranchez la fiche secteur de la
prise murale et attendez que l'appareil
refroidisse.
- Ne plongez pas l'appareil dans l'eau ou
autres liquides.
Avant de procéder, nous souhaiterions que
vous preniez connaissance des remarques
suivantes :
- N'utilisez pas de produits de nettoyage
agressifs ou abrasifs pour nettoyer l'appareil.
- Ne nettoyez pas l'appareil avec des objets
coupants.
- Ne nettoyez pas l'appareil dans le lave-
vaisselle. Les accessoires peuvent être
nettoyés au lave-vaisselle.
Contrôlez régulièrement les éventuels•
dommages sur l'appareil.
Nettoyez l'extérieur de l'appareil avec un•
chiffon humide. Séchez soigneusement
l'extérieur de l'appareil avec un chiffon
propre et sec.
Nettoyez les accessoires :•
- Déverrouillez le tube d'alimentation (4)
en le tournant dans le sens du symbole
de déverrouillage.
- Retirez le tube d'alimentation (4) de
l'unité moteur (2).
- Desserrez le cache inférieur (7) du tube
d'alimentation (4).
- Retirez le cône à lame (3) du joint (6).
- Retirez le joint (6) du cache inférieur (7).
- Nettoyez le cône à lame (3), le tube
d'alimentation (4), le poussoir (5), le
joint (6) et le cache inférieur (7) à l'eau
savonneuse ou au lave-vaisselle.
- Rincez les accessoires sous l’eau
courante.
- Séchez soigneusement les accessoires.

17
4
5
2
1
7
6
8
3
17
FR
Description (fig. A)
Votre sorbetière 282700 Princess a été conçue
pour la préparation de glaces à partir de fruits
surgelés. L'appareil ne convient pas à la
préparation de glaces à partir de fruits frais.
L'appareil est réservé à un usage à l'intérieur.
L'appareil est réservé à un usage domestique.
1. Interrupteur marche/arrêt
2. Unité moteur
3. Cône à lame
4. Tube d'alimentation
5. Poussoir
6. Joint
7. Cache inférieur
8. Goulotte
Assemblage (fig. A)
Avant de procéder, vous devez faire attention
aux remarques suivantes :
- Avant le montage ou le démontage, arrêtez
l'appareil, débranchez la fiche secteur de la
prise murale et attendez que l'appareil
refroidisse.
Placez l'unité moteur (2) sur une surface•
plane et stable.
Placez le fond (10,8 cm) du joint (6) dans le•
cache inférieur (7).
Remarque : Ne placez pas le sommet (9,5 cm)
du joint (6) dans le cache inférieur (7).
Placez le cône à lame (2) sur le joint (3).•
Serrez le cache inférieur (7) sur le tube•
d'alimentation (4).
Placez le tube d'alimentation (4) sur l'unité•
moteur (2).
Verrouillez le tube d'alimentation (4) en le•
tournant dans le sens du symbole de
verrouillage.
Utilisation (fig. A)
Avant de procéder, vous devez faire attention
aux remarques suivantes :
- Ne faites pas fonctionner l’appareil en continu
pendant plus de deux minutes. Après deux
minutes, arrêtez l'appareil et laissez-le
refroidir pendant une minute avant de le
remettre en marche. Laissez l'appareil refroidir
complètement tous les trois cycles de "deux
minutes de marche / une minute d'arrêt".
- N'insérez pas vos mains dans le tube
d'alimentation pour presser les fruits surgelés.
Utilisez toujours le poussoir. N’exercez pas
de pression sur le poussoir.
- Si l'appareil commence à vibrer fortement
et produit moins de glace, arrêtez-le puis
nettoyez le cône à lame.
Avant de procéder, nous souhaiterions que
vous preniez connaissance des remarques
suivantes :
- Utilisez l'appareil uniquement si un bol
d'une taille adaptée est placé sous la
goulotte.
- Nettoyez régulièrement le cône à lame
pour traiter de grandes quantités de fruits.
Placez l'appareil sur une surface stable et•
plane.
Assemblez l’appareil. Consultez la section•
"Assemblage".
Retirez le poussoir (5) du tube d'alimentation•
(4).
Placez un bol d'une taille adaptée sous la•
goulotte (8).
Pour mettre l'appareil en marche, positionnez•
l'interrupteur marche/arrêt (1) sur 'I'.
Découpez les fruits surgelés en morceaux•
adaptés au tube d'alimentation (4).
Insérez les morceaux de fruits surgelés dans•
le tube d'alimentation (4). Utilisez le poussoir
(5) pour presser les morceaux de fruits
surgelés dans le tube d'alimentation (4).
Si nécessaire, nettoyez le cône à lame (3).•
Pour éteindre l'appareil, positionnez•
l'interrupteur marche/arrêt (1) sur 'O'.
Débranchez la fiche secteur de la prise•
murale.
Laissez l'appareil refroidir complètement.•
Préparation des aliments (2
personnes)
Avant de procéder, vous devez faire attention
aux remarques suivantes :
- N'utilisez pas des fruits avec des noyaux,
des noix ou des glaçons.
- Décongelez tous les types de fruits quelques
minutes avant de les presser avec l'appareil.
Le temps de décongélation dépend du
réglage de température de votre congélateur
et de la température ambiante.

18
4
5
2
1
7
6
8
3
18
FR
Expérimentez avec différentes durées pour
obtenir les meilleurs résultats. En règle
générale, commencez par 10-15 minutes
pour les fruits mous et augmentez à 15-20
minutes pour les fruits durs.
Si vous utilisez des bananes très mûres ou•
tachetées, pelez les bananes et congelez-les
24 heures. Décongelez les bananes à
température ambiante pendant 10-15
minutes.
Utilisez différents types de baies surgelées :•
fraises, framboises, mûres, myrtilles et
canneberge. Décongelez les baies à
température ambiante pendant 10-15
minutes.
Pour optimiser les résultats, faites alterner•
les ingrédients.
Rangement
Rangez l'appareil et les accessoires dans•
l'emballage d'origine.
Rangez l'appareil avec les accessoires dans•
un endroit sec, hors de portée des enfants
et à l'abri du gel.
Clause de non responsabilité
Sous réserve de modifications ; les spécifications
peuvent être modifiées sans préavis.

19
4
5
2
1
7
6
8
3
19
DE
Herzlichen Glückwunsch!
Sie haben ein Princess Produkt erworben.
Unser Ziel ist es, Qualitätsprodukte mit einem
geschmackvollen Design zu einem
erschwinglichen Preis anzubieten. Wir hoffen,
dass Sie viele Jahre Gefallen an diesem
Produkt finden.
Sicherheitsanweisungen
Allgemeine Sicherheit
Lesen Sie das Handbuch vor•
dem Gebrauch genau durch.
Bewahren Sie das Handbuch
zur künftigen Bezugnahme auf.
Verwenden Sie das Gerät•
und sein Zubehör nur für den
Zweck, für den es konstruiert
wurde. Verwenden Sie das
Gerät und sein Zubehör nicht
für Zwecke, die nicht in diesem
Handbuch beschrieben sind.
Verwenden Sie das Gerät nicht,•
wenn ein Teil oder Zubehör
beschädigt oder defekt ist. Ist
ein Teil oder Zubehör
beschädigt oder defekt, muss
es vom Hersteller oder einem
autorisierten Reparaturbetrieb
ausgetauscht werden.
Dieses Gerät kann von Kindern•
ab 8 Jahren und von Personen
mit eingeschränkten
körperlichen, sensorischen oder
geistigen Fähigkeiten oder
einem Mangel an Erfahrung
und Kenntnissen verwendet
werden, sofern diese Personen
beaufsichtigt oder über den
sicheren Gebrauch des Geräts
unterrichtet wurden und die
damit verbundenen Gefahren
verstanden haben. Kinder
dürfen mit dem Gerät nicht
spielen. Die Reinigung und
Wartung seitens des Benutzers
darf nur dann von Kindern
durchgeführt werden, wenn
diese älter als 8 Jahre sind und
beaufsichtigt werden.
Verwenden Sie das Gerät nicht•
in der Nähe von Badewannen,
Duschen, Bassins oder anderen
Wasserbehältern.
Tauchen Sie das Gerät niemals•
in Wasser oder andere
Flüssigkeiten ein. Falls das
Gerät in Wasser oder andere
Flüssigkeiten eingetaucht
wurde, nehmen Sie es nicht mit
Ihren Händen heraus. Ziehen
Sie sofort den Netzstecker
aus der Wandsteckdose.
Falls das Gerät in Wasser
oder andere Flüssigkeiten
eingetaucht wird, darf es nicht
mehr verwendet werden.
Reinigen Sie das Gerät und•
das Zubehör. Siehe Abschnitt
"Reinigung und Wartung".
Yonanas

20
4
5
2
1
7
6
8
3
20
DE
Elektrische Sicherheit
Vergewissern Sie sich vor•
dem Gebrauch stets, dass die
Netzspannung mit der
Spannung auf dem Typenschild
des Geräts übereinstimmt.
Das Gerät ist nicht dafür•
ausgelegt, von einer externen
Zeitschaltuhr oder einem
Fernsteuersystem betrieben
zu werden.
Schließen Sie das Gerät an eine•
geerdete Wandsteckdose an.
Verwenden Sie nötigenfalls ein
geerdetes Verlängerungskabel
mit einem geeigneten
Durchmesser (mindestens
3 x 1 mm
2
).
Lassen Sie als zusätzliche•
Schutzmaßnahme einen
Fehlerstromschutzschalter
(FI-Schutzschalter) installieren,
der einen Nenn-Fehlerstrom
von 30 mA nicht überschreitet.
Stellen Sie sicher, dass kein•
Wasser in die Steckkontakte
des Netzkabels und in das
Verlängerungskabel eindringen
kann.
Wickeln Sie das Netzkabel•
und das Verlängerungskabel
stets vollständig ab.
Vergewissern Sie sich, dass•
das Netzkabel nicht an der
Kante einer Arbeitsplatte
hängen bleibt und nicht
versehentlich daran gezogen
oder darüber gestolpert wird.
Halten Sie das Netzkabel von•
Hitzequellen, Öl und scharfen
Kanten fern.
Verwenden Sie das Gerät nicht,•
wenn das Netzkabel oder der
Netzstecker beschädigt oder
defekt ist. Ist das Netzkabel
oder der Netzstecker
beschädigt oder defekt, muss
das Teil vom Hersteller oder
einem autorisierten
Reparaturbetrieb ausgetauscht
werden.
Ziehen Sie niemals am•
Netzkabel, um den
Netzstecker aus der
Wandsteckdose zu ziehen.
Ziehen Sie den Netzstecker•
aus der Wandsteckdose,
wenn das Gerät nicht
gebraucht wird, sowie vor
der Zerlegung bzw. dem
Zusammenbau und vor der
Reinigung und Wartung.
Table of contents
Other Princess Ice Maker manuals