Avanti SED67D0W User manual

INSTRUCTION MANUAL
MANUAL DE INSTRUCCIONES
MANUEL D’INSTRUCTIONS
CLOTHES DRYER
SECADORA DE ROPA
SÉCHEUSE
Model /No de Modelo / No de
Modèle
SED67D0W (Electric)
SGD67D0WG (Gas)
BEFORE USE, PLEASE READ AND FOLLOW ALL SAFETY RULES AND OPERATING
INSTRUCTIONS.
Avanti has a policy of continuous improvement on its products and reserves the right
to change materials and specifications without notice.
Avanti Products LLC
3265 Meridian Pkwy # 114 - Weston, Florida 33331
www.avantiproducts.com

READ AND KEEP THESE INSTRUCTIONS FOR FUTURE
REFERENCE
This manual contains important information on the installation, use,
and care of your appliance. Please read this manual carefully before
installation and operation of this machine to prevent injury and property
damage.
Warnings and Important Safety Instructions in this manual DO NOT
cover all possible conditions and situations that may occur. It is your
responsibility to use common sense, caution and care when installing,
maintaining and operating your dryer.
Dryer Care
Troubleshooting
Appendix

4
This symbol indicates the possibility of injury or damage to
property.
For your safety the information in this manual must be followed to
minimize the risk of fire or explosion, or to prevent property damage,
personal injury or death.
●
Do not store or use gasoline or other flammable vapors and liquids in
the vicinity of this or any other appliance.
●
Installation and service must be performed by a qualified installer,
service agency, or the gas supplier.
WARNING
Fire Hazard
●
Failure to follow safety warnings exactly could result
in serious injury, death or property damage.
●
Do not install a booster fan in the exhaust duct.
●
Install all clothes dryers in accordance with the
installation instructions of the manufacturer of the
dryer.
YOUR SAFETY AND THE SAFETY OF OTHERS ARE VERY
IMPORTANT
To prevent injury to the user or other people and property damage, the
instructions shown here must be followed. Incorrect operation due to
ignoring of instructions may cause harm or damage, including death.
The level of risk is shown by the following indications.
WARNING
CAUTION
WARNING
WARNING
This symbol indicates the possibility of death or serious
injury.
This symbol indicates the possibility of dangerous voltage
constituting a risk of electrical shock is present that could
result in death or serious injury.

5
WARNING
IMPORTANT SAFETY INSTRUCTIONS
WARNING
To reduce the risk of fire, electric shock, or injury to persons when using
your appliance, follow basic precautions ,including the following:
•Read all instructions before using the appliance.
•Use this appliance only for its intended purpose as described in this
Owner’s Manual.
•Before use, the dryer must be properly installed as described in this
manual.
•ALWAYS follow the fabric care instructions supplied by the garment
manufacturer.
•Do not dry articles that have been previously cleaned in, washed
in, soaked in, or spotted with gasoline, dry-cleaning solvents, other
flammable or explosive substances as they give off vapors that could
ignite or explode.
•Do not use the dryer to dry clothes which have traces of any
flammable substance, such as vegetable oil, cooking oil, machine
oil, flammable chemicals, thinner, etc., or anything containing
wax or chemicals, such as mops and cleaning clothes. Flammable
substances may cause the fabric to catch fire by itself.
•Do not store or use gasoline or other flammable vapors and liquids
near this or any other appliance.
•Do not allow children to play on or in the appliance. Close
supervision of children is necessary when the appliance is used near
children.
•Before the appliance is removed from service or discarded, remove
the lid of the washing or door of the drying compartment.
•Do not reach into the appliance if the drum is moving.
•Do not install or store this appliance where it will be exposed to the
weather or freezing temperatures below 33°F.
•Do not tamper with the controls and latch.
•Do not install a booster fan in the exhaust duct.
•
•
•
•
•
What to do if you smell gas:
Do not try to light any appliance.
Do not touch any electrical switch; do not use any phone in your
building.
Clear the room, building, or area of all occupants.
Immediately call your gas supplier from a neighbor’s phone. Follow
the gas supplier’s instructions.
If you cannot reach your gas supplier, call the fire department.
Dryer
Safety
Operation
Requirements
Parts and
Features
Installation
Instructions
Dryer Use
Dryer Care
Troubleshooting
Appendix

6
•Do not repair or replace any part of the appliance or attempt
any servicing unless it is specifically recommended in the user-
maintenance instructions or in published user-repair instructions that
you understand and have the skills to carry out.
•Keep the area underneath and around your appliances free of
combustible materials (lint, paper, rags, etc.), gasoline, chemicals and
other flammable vapors and liquids.
•Do not place items exposed to cooking oils in your dryer. Items
contaminated with cooking oils may contribute to a chemical
reaction that could cause a load to catch fire. To reduce the risk of
fire due to contaminated loads, the final part of a tumble dryer cycle
occurs without heat (cool down period). Avoid stopping a tumble
dryer before the end of the drying cycle unless all items are quickly
removed and spread out so that the heat is dissipated.
•Unplug the dryer if the machine is to be left for an extended period
of time, such as during vacations.
•Packaging material can be dangerous for children. There is a risk of
suffocation! Keep all packaging from children.
•Always check the inside of the dryer for foreign objects before
loading laundry. Keep the door closed when not in use.
•Do not use fabric softeners or products to eliminate static unless
recommended by the manufacturer of the fabric softener or product
manufacture.
•
Clean the lint screen before or after each load.
•Keep the area around the exhaust opening and surrounding areas
free from lint, dust, and dirt.
•The interior of the dryer and exhaust duct should be cleaned
periodically by qualified service personnel.
•Do not place items exposed to cooking oils in your dryer. Items
contaminated with cooking oils may contribute to a chemical
reaction that could cause a load to catch fire.
•This appliance must be grounded. See “Electric Requirements”and
“Grounding”in the “Operation Requirements”section.
•This appliance must be properly grounded. Never plug the power
cord into a receptacle that is not grounded adequately and in
accordance with local and national codes. Refer to installation
instructions for grounding this appliance.
•Ensure pockets are free from small irregularly shaped hard objects
and foreign material, i.e. coins, knives, pins, etc. These objects could
damage your dryer.
•Do not use heat to dry articles containing foam rubber or similarly
textured rubber like - materials.
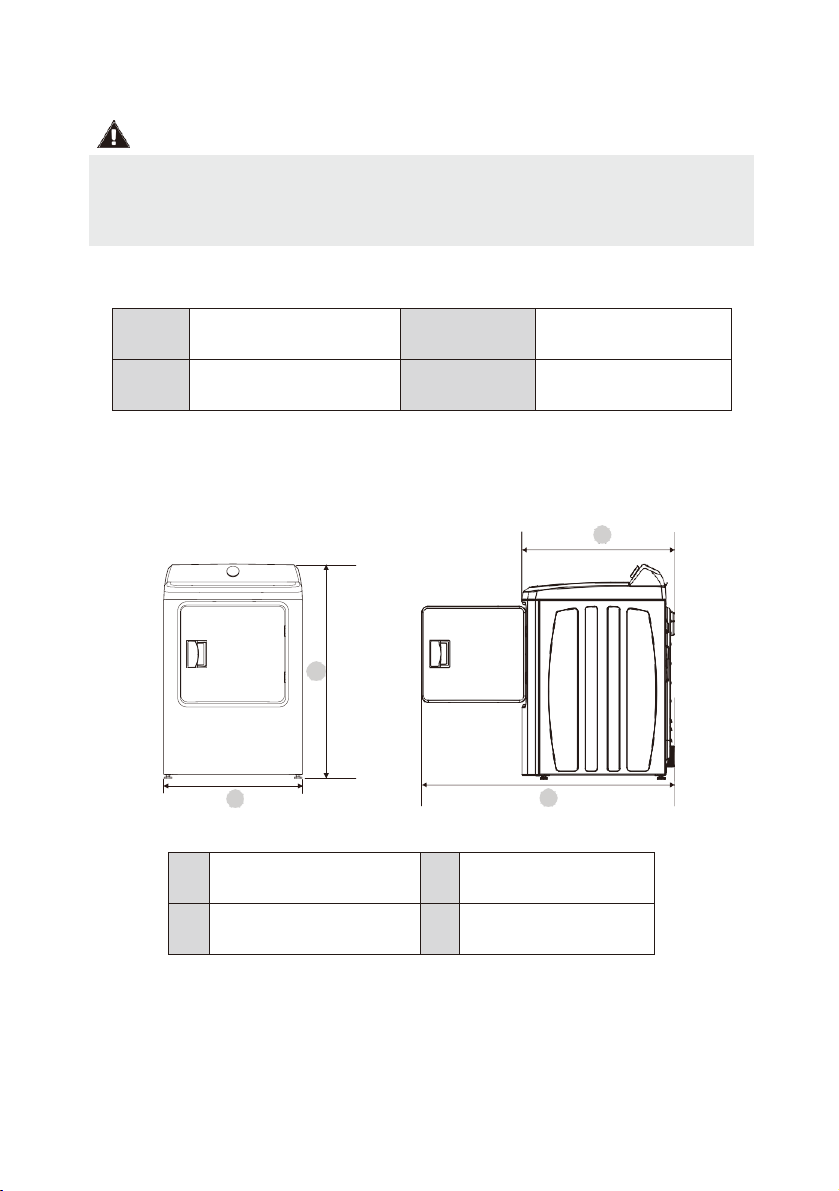
Dryer
Safety
Operation
Requirements
Parts and
Features
Installation
Instructions
Dryer Use
Dryer Care
Troubleshooting
Appendix

7
WARNING
CAUTION
•Do not sit on top of the dryer.
•Do not dry clothing with large buckles, buttons, or other heavy metal
or solid things.
•Install and use in accordance with the manufacturer’s instructions.
•Do not place items in your dryer that have been spotted or soaked
with vegetable oil or cooking oil. Even after being washed, these
items may contain significant amounts of these oils.
•Residual oil on clothing can ignite spontaneously. The potential for
spontaneous combustion increases when items containing vegetable
oil or cooking oil are exposed to heat. Heat source such as your dryer
can warm these items, allowing an oxidation reaction in the oil to
occur.
•Oxidation creates heat. If this heat cannot escape, the items can
become hot enough to catch fire. Piling, stacking, or storing these
kinds of items may prevent heat from escaping and can create a fire
hazard.
•Take care that children’s fingers are not caught in door when closing
it. This may result in injury.
•Gas leaks may occur in your system, resulting in a dangerous
situation.
•Gas leaks may not be detected by smell alone.
•Gas suppliers recommend you purchase and install a UL approved
gas detector.
To reduce the risk of fire or explosion
•Do not dry items that have been previously cleaned, washed, soaked,
or spotted with gasoline, dry cleaning solvents, or other flammable or
explosive substances. They emit vapors that could ignite or explode.
Any material that has been in contact with a cleaning solvent or
flammable liquids or solids should not be placed in the dryer until all
traces of these flammable liquids or solids and their fumes have been
removed.
•
•
There are many highly flammable items used in homes, such
as acetone, denatured alcohol, gasoline, kerosene, some liquid
household cleaners, some spot removers, turpentine, waxes, and wax
removers.
Do not dry items containing foam rubber (may be labeled latex
foam) or similarly textured rubber-like materials on a heat setting.
Heated foam rubber materials can, under certain circumstances,
produce fire by spontaneous combustion.
Dryer
Safety
Operation
Requirements
Parts and
Features
Installation
Instructions
Dryer Care
Troubleshooting
Appendix

8
WARNING: Cancer and Reproductive Harm
-www.P65Warnings.ca.gov.
•The dryer is not suitable for installation in a mobile home.
•Remove the door from all discarded appliances to avoid the danger
of a child being trapped and suffocating, after unplugging cut off
Power Cord.
State of California Proposition 65 Warnings:
SAVE THESE INSTRUCTIONS
THIS APPLIANCE IS FOR HOUSEHOLD USE ONLY
OPERATION REQUIREMENTS
IMPORTANT TO INSTALLER
Please read the following instructions carefully before installing the dryer.
These instructions should be kept for future reference.
CAUTION
Fire Hazard
•Clothes dryer installation must be performed by a
qualified installer.
Install the clothes dryer according to the
manufacturer’s instructions and local codes.
Do not install a clothes dryer with flexible plastic
venting materials. If flexible metal (foil type) duct is
installed, it must be of a specific type identified by
the appliance manufacturer as suitable for use with
clothes dryer. Flexible venting materials are known
to collapse, be easily crushed, and trap lint. These
conditions will obstruct with the clothes dryer’s
airflow and increase the risk of fire.
•To reduce the risk of severe injury or death, follow all
installation instructions
•Save these instructions.
WARNING
Dryer
Safety
Operation
Requirements
Parts and
Features
Installation
Instructions
Dryer Use
Dryer Care
Troubleshooting
Appendix

9
BASIC REQUIREMENTS
Make sure you have everything necessary for the proper installation.
•A GROUNDED ELECTRICAL OUTLET is required. Refer to the
“
Electrical requirements
”section.
•A POWER CORD electric dryer (except for Canada).
•GAS LINES (if a gas dryer) must meet national and local codes.
•The EXHAUST SYSTEM must be made of rigid metal or flexible stiff-
walled metal exhaust ducting.
LOCATION REQUIREMENTS
1. The dryer should be located where there is enough space at the front
for loading the dryer, and enough space behind for the exhaust system.
2. This dryer is factory-ready for the rear exhaust option. If you want to
change the vent location
,
see
“
Change the dryer vent location
”section.
3. Make sure the room in which the dryer is located has enough fresh air.
The dryer must be located where there are no air-flow obstructions.
Ambient temperature shall not be lower than 33°F.
4. For gas dryers, adequate clearance must be maintained as noted on
the data plate to ensure adequate air for combustion and the proper
dryer operation.
5. The dryer must not be installed or stored in an area where it will be
exposed to water and/or weather. The dryer area must be kept clear
of combustible materials, gasoline, and other flammable vapors and
liquids. A dryer produces combustible lint. The area around the dryer
should be kept lint-free.
Dryer
Safety
Operation
Requirements
Parts and
Features
Installation
Instructions
Dryer Use
Dryer Care
Troubleshooting
Appendix

10
•The dryer must be exhausted to the outside to reduce the risk of fire
when installed any place inside the house.
•No other fuel-burning appliance should be installed in the same
closet as the dryer.
A
B
C
D
ALCOVE OR CLOSET OR WALL INSERT/RECESSED
INSTALLATIONS
WARNING
Minimum clearances between the dryer and adjacent walls or other
surfaces:
Sides
1 in. (25 mm)
Rear
5 in. (127 mm)
Top
24 in. (610 mm)
Closet front
2 in. (51 mm)
A
41.7 in. (1059 mm)
B
27 in. (686 mm)
C
30 in. (763 mm)
D
49.2 in. (1250 mm)
Dryer
Safety
Operation
Requirements
Parts and
Features
Installation
Instructions
Dryer Use
Dryer Care
Troubleshooting
Appendix

11
I
J
K
L
E
1 in. (25 mm)
F
24 in. (610 mm)
G
2 in. (51 mm)
H
5 in. (127 mm)
I
3 in. (76 mm)
J
48 in.2(31000 mm2)
K
24 in.2(15500 mm2)
L
3 in. (76 mm)
NOTE:
The front of the closet must have two unobstructed air openings for a
combined minimum total area of 72 sq.in. (465 sq.cm) with a minimum
clearance of 3 in. (76 mm) at the top and bottom. A slatted door with
equivalent space clearance is acceptable.
F
G
H
E
E
E
Dryer
Safety
Operation
Requirements
Parts and
Features
Installation
Instructions
Dryer Use
Dryer Care
Troubleshooting
Appendix

12
DUCTING REQUIREMENTS
Recommended
Use only for short-run
installation
Weather Hood
Type
4" DIA 4" DIA
4"
4 inch. (10.2 cm)
4" DIA
2-1/2"
2.5 inch. (6.4 cm)
No. of 90°
elbows
Rigid Metallic
Rigid Metallic
0
90 ft. (27.4 m)
60 ft. (18.3 m)
1
60 ft. (18.3 m)
45 ft. (13.7 m)
2
45 ft. (13.7 m)
35 ft. (10.7 m)
3
35 ft. (10.7 m)
25 ft. ( 7.6 m)
If this new dryer is installed into an existing exhaust system you must
makesure:
•The exhaust system meets all local, state, and national codes.
•That a flexible plastic duct is not used.
•To inspect and clean all lint buildup from inside the existing duct.
•The duct is not dented or crushed.
•The exhaust hood damper opens and closes freely.
Manometer measurements
The static pressure in any exhaust system for best results shall be between
0.3 to 0.8 inches of water column, and cannot be less than 0 under any
circumstances. with installed duct of 4 inch diameter. Measurement must
be done with the empty dryer working with a manometer at the point
where the exhaust duct connects to the dryer. A no-heat setting should be
used. Lint filter must be clean.
Dryer
Safety
Operation
Requirements
Parts and
Features
Installation
Instructions
Dryer Use
Dryer Care
Troubleshooting
Appendix

13
WARNING
The correct exhaust installation is YOUR RESPONSIBILITY.
•Use a 4-inch (10.2cm) diameter rigid aluminum or rigid galvanized
steel duct.
•Do not use smaller diameter than recommended diameter duct.
•Ducts larger than 4 inches (10.2cm) in diameter can result in
increased accumulation of lint and changes in performance
•Lint should be removed regularly from internal filter every cycle and
from ducts.
•If a flexible metal duct must be used, use the type with a stiff sheet
metal wall. Do not use a flexible duct with a thin foil wall. A serious
blockage can result if the flexible metal duct is bent too sharply.
•Never install any type of flexible duct in walls, ceilings, or other
concealed spaces.
•Keep the exhaust duct as straight, short as possible, minimum elbows
•Secure joints with aluminum tape. Do not use screws.
•Plastic flexible ducts can kink, sag, be punctured, reduce airflow,
extend drying times, and affect the dryer operation.
•Exhaust systems longer than recommended 90 ft can extend drying
times, affect machine operations, and collect lint.
•The exhaust duct should end with an exhaust hood with a swing-out
damper to prevent back drafts and entry of wildlife. Never use an
exhaust hood with a magnetic damper.
•The hood should have at least 12 inches (30.5cm) of clearance
between the bottom of the hood and the ground or other
obstruction. The hood opening should point down.
•Never install a screen over the exhaust outlet.
•To avoid lint buildup, do not exhaust the dryer directly into a window
well. Do not exhaust under a house or porch.
•If the exhaust duct must run through an unheated area, the duct
should be insulated and slope slightly down towards the exhaust
hood to reduce condensation and lint buildup.
•Inspect and clean the interior of the exhaust system at least once a
year. Unplug the power cord before cleaning.
•Check frequently to make sure the exhaust hood damper opens and
closes freely.
•Check once per month, and clean at least once per year. NOTE:
If your clothes are not getting dry, then check the ducting for
obstructions.
•Do not exhaust the dryer into a wall, ceiling, crawl space, or
concealed space of a building, gas vent, or any other common duct
or chimney. This could create a fire hazard from the lint expelled by
the dryer.
•Do not use non-metallic flexible duct.
•To reduce the risk of fire, this dryer MUST BE EXHAUSTED
OUTDOORS.
Dryer
Safety
Operation
Requirements
Parts and
Features
Installation
Instructions
Dryer Use
Dryer Care
Troubleshooting
Appendix

14
•The dryer shall not be exhausted into a chimney, a wall, a ceiling, an
attic, a crawl space, or a concealed space of a building.
•The dryer must be exhausted to the outside to reduce the risk of fire
when installed in alcove or closet.
EXHAUSTING REQUIREMENTS
WARNING
Exhausting the dryer to the outside will prevent large amounts of lint and
moisture from being blown into the room.
WARNING
GAS REQUIREMENTS
Use only natural or LP (liquid propane) gases.
THE INSTALLATION MUST CONFORM WITH LOCAL CODES, OR IN THE
ABSENCE OF LOCAL CODES, WITH THE NATIONAL FUEL GAS CODE,
ANSIZ223.1/NFPA 54, LATEST REVISION (FOR THE UNITED STATES), OR
THE NATURAL GAS AND PROPANE INSTALLATION CODE, CSA B149.1,
LATESTREVISION (FOR CANADA).
Gas dryers are equipped with a burner vent for use with natural gas. If you
plan to use your dryer with LP (liquid propane) gas, it must be converted
for safe and proper performance by a qualified service technician.
A 1/2" (1.27 cm) gas supply line is recommended and must be reduced to
connect to the 3/8" (1 cm) gas line on your dryer. The National Fuel Gas
Code requires that an accessible, approved manual gas shut-off valve be
installed within 6" (15,24 cm) of your dryer.
Gas dryers installed in residential garages must be raised 18" (46cm)
above the floor.
NEVER USE A PLASTIC OR NON-METAL FLEXIBLE DUCT
If your existing ductwork is plastic, non-metal, or combustible, replace it
with metal before installation this appliance
Use only a metal exhaust duct that is non-flammable to ensure
containment of the exhaust air heat, and lint.
Refer to the “Ducting requirements” section on page 12 for the
maximum duct length and number of bends.
•All dryers must be exhausted to the outside.
•Do not assemble the duct with screws or other fastening means that
extend into the duct and catch lint.
•The exhaust duct should be 4 inches (102mm) in diameter.
•The total length of flexible metal duct shall not exceed 7.8 feet
(2.4 meters).
Dryer
Safety
Operation
Requirements
Parts and
Features
Installation
Instructions
Dryer Use
Dryer Care
Troubleshooting
Appendix

15
•Gas leaks may occur in your system, creating a dangerous situation.
•Gas leaks may not be detected by smell alone.
•Gas suppliers recommend that you purchase and install a UL-
approved gas detector.
•Install and use it in accordance with the manufacturer’s instructions.
Additionally, a 1/8" (0.3cm) N.P.T. (National Pipe Thread) plugged tapping,
accessible for test gauge connection, must be installed immediately
upstream of your dryer’s gas supply connection.
Your dryer must be disconnected from the gas supply pipe system during
any pressure testing of the system.
This dryer must be connected to the gas supply piping with a listed
flexible gas connector that complies with the standard for connectors for
gas appliances, ANSI Z21.24 or CSA 6.10.
DO NOT reuse old flexible metal gas lines. Flexible gas lines must be
design certified by the American Gas Association (CGA in Canada).
•Any pipe joint compound used must be resistant to the action of any
liquefied petroleum gas.
•As a courtesy, most local gas utilities will inspect a gas appliance
installation.
GAS IGNITION - Your dryer uses an automatic ignition system to ignite the
burner. There is no constant burning pilot.
COMMONWEALTH OF MASSACHUSETTS INSTALLATION INSTRUCTIONS
Your dryer must be installed by a licensed plumber or gas fitter. A “T”
handle manual gas valve must be installed in the gas supply line to
installed dryer at location of operation. If a flexible gas connector is used
to connect dryer, the connector may not be longer than 3' (36", 91.5 cm).
WARNING
Dryer
Safety
Operation
Requirements
Parts and
Features
Installation
Instructions
Dryer Use
Dryer Care
Troubleshooting
Appendix

16
ELECTRIC REQUIREMENTS
The wiring diagram is located on the back board of the unit.
WARNING
Electrical connections
An individual branch (or separate) circuit serving only your dryer is
recommended. DO NOT USE AN EXTENSION CORD.
Gas models - U.S. and Canada
A 120Volt, 60Hz AC approved electrical service, with a 15 ampere fuse or
circuit breaker is required.
Electric models - U.S. only
The dryers require a 120/240 volt, 60Hz AC approved electrical service.
The electric service requirements can be found on the data label located
behind the door. A 30-ampere fuse or circuit breaker on both sides of the
line is required.
•If a power cord is used, the cord should be plugged into a 30-ampere
receptacle.
•The power cord is NOT provided with U.S. electric model dryers.
•The improper connection of the equipment grounding conductor can
result in the risk of electric shock. Check with a qualified electrician
or serviceman if you are in doubt as to whether your dryer is properly
grounded. Do not modify the plug provided with your dryer - if it
doesn’t fit the outlet, have a proper outlet installed by a qualified
electrician.
•To prevent unnecessary risk of fire, electrical shock, or personal
injury, all wiring and grounding must be done in accordance with
local codes, or in the absence of local codes, with the National
Electrical Code, ANSI/NFPA No. 70 - Latest Revision (for the U.S.) or
the Canadian Electrical Code CSA C22.1 - Latest Revisions and local
codes and ordinances. It is your responsibility to provide adequate
electrical services for your dryer.
•All gas installations must be done in accordance with the National
Fuel Code ANSI/Z2231 - Latest Revision (for the U.S.) or CAN/CGA
- B149 Installation Codes - Latest Revision (for Canada) and local
codes and ordinances.
Dryer
Safety
Operation
Requirements
Parts and
Features
Installation
Instructions
Dryer Use
Dryer Care
Troubleshooting
Appendix

17
Electric models - Canada only
•A 120/240 volt, 60Hz AC approved electrical service fused through a
30-ampere fuse or circuit breaker on both sides of the line is required.
•All Canadian models are shipped with the power cord attached. The
power cord should be plugged into a 30-ampere receptacle.
WARNING
Electrical Shock Hazard
When local codes allow, the electrical supply of the dryer
may be connected by means of a new power supply cord
kit, marked for use with a dryer, that is UL listed and rated
at a minimum of 120/240 volts, 30-ampere with three No.
10 copper wire conductors terminated with closed loop
terminals, open-end spade lugs with turned up ends, or
with tinned leads.
•Do not reuse a power supply cord from an old dryer.
The power cord electric supply wiring must be retained
at the dryer cabinet with a suitable UL-listed strain
relief.
•Grounding through the neutral conductor is prohibited
for (1) new branch-circuit installations, (2) mobile
homes, (3) recreational vehicles, and (4) areas where
local codes prohibit grounding through the neutral
conductor. (Use a 4-prong plug for 4 wire receptacles,
NEMA type 14-30R.)
Dryer
Safety
Operation
Requirements
Parts and
Features
Installation
Instructions
Dryer Use
Dryer Care
Troubleshooting
Appendix

18
Gas and Electric models
•Certain internal parts are intentionally not grounded and may present
a risk of electric shock only during servicing. Service Personnel –Do
not contact the following parts while the appliance is energized: inlet
valve, control board and temperature-regulating thermistor (located
on blower housing).
Gas models
•Your dryer has a three prong power cord with grounding conductor.
120V 60 Hz
•The plug must be plugged into an appropriate individual outlet that
is properly installed and grounded in accordance with all local codes
and ordinances.
Electric models
Dryer must be grounded with 3 or 4 wire cord power cord with ground
grounding conductor and a grounding plug, which is sold separately.
•The plug must be plugged into an appropriate outlet that is properly
installed and grounded in accordance with all local codes and
ordinances.
•Do not modify the plug provided with your dryer - if it doesn’t fit the
outlet, have a proper outlet installed by a qualified electrician.
•If a power cord is not used and the electric dryer is to be
permanently wired, the dryer must be connected to a permanently
grounded metal wiring system, or an equipment grounding
conductor must be run with the circuit conductors and connected to
the equipment grounding terminal or lead on the dryer.
GROUNDING
This dryer must be grounded. In the event of a malfunction or breakdown,
the grounding the product will reduce the risk of electrical shock by
providing a path of least resistance for the electrical current.
WARNING
WARNING
WARNING
Dryer
Safety
Operation
Requirements
Parts and
Features
Installation
Instructions
Dryer Use
Dryer Care
Troubleshooting
Appendix

19
PARTS AND FEATURES
Back venting hole
Wiring box
For electric dryer only
Electric dryer Gas dryer
Control panel
Cabinet
Door
Filter
Left venting hole (for option)
Adjustable leg (Four legs)
Power cord
For gas dryer only
Gas inlet
Dryer
Safety
Operation
Requirements
Parts and
Features
Installation
Instructions
Dryer Use
Dryer Care
Troubleshooting
Appendix

20
Packaging materials can be dangerous to children;
Keep all packaging material (plastic bags, polystyrene, etc.) well out of
children’s reach.
INSTALLATION INSTRUCTIONS
For the proper installation, we recommend that you hire a qualified
installer.
REMOVING FROM THE PACKAGE
•Unpack your dryer and inspect it for shipping damage. Make sure you
have received all the items shown below.
•To prevent personal injury or strain, wear protective gloves whenever
lifting or carrying the unit.
WARNING
TOOLS REQUIRED
Phillips
screwdriver Flat screwdriver Level Pliers
Adjustable
wrench that
opens to 1"
(25 mm)
aluminum tape Cutting knife Pipe wrench
(gas only)
Dryer
Safety
Operation
Requirements
Parts and
Features
Installation
Instructions
Dryer Use
Dryer Care
Troubleshooting
Appendix
This manual suits for next models
1
Table of contents
Languages:
Other Avanti Dryer manuals