AVEGANT Glyph Founder's Edition User manual

1
Founder’s Edition
User Manual
Version 1.4
Copyright 2016

2
Welcome to the Avegant Experience!
Be ore you Begin
• Read the user manual including the health and sa ety sections thoroughly
• Download the Avegant app rom the Google Play or iTunes store.
• Familiarize yoursel with the device layout. Find the right ergonomic and optical it to suit your
experience
• Ensure that your device is ully charged.
For urther support including how-to videos, consult avegant.com/set-up-support

3
Table of Contents
Be ore you Begin ........................................................................................................................................... 2
Download the App ........................................................................................................................................ 4
Orientation .................................................................................................................................................... 4
Controls ..................................................................................................................................................... 4
Power on, Indicators and Bluetooth ......................................................................................................... 5
Charging ........................................................................................................................................................ 6
Setup ............................................................................................................................................................. 7
Ergonomic, Nosepad and Optical Adjustments ........................................................................................ 7
Tips or Long-Term Com ort in Video Mode ........................................................................................... 11
Connecting to Media ................................................................................................................................... 11
Supported 3D Media ................................................................................................................................... 12
Hal Frame Side-by-Side 3D .................................................................................................................... 12
Full Frame Side-by-Side 3D ..................................................................................................................... 12
Supported Uses o 360 (Headtracking) Mode ............................................................................................ 13
Troubleshooting .......................................................................................................................................... 13
Health and Sa ety Guide ............................................................................................................................. 16
Warranty In ormation ................................................................................................................................. 21
4
Download the App
Avegant’s mobile app, which walks through the setup process and acilitates irmware updates, is
available on both the Google Play and in the App Store. Be ore you orient yoursel with your new
hardware, download this app and walk through the setup.
Orientation
The headset can be worn both as a pair o over-ear headphones and as a personal, premium imaging
device.
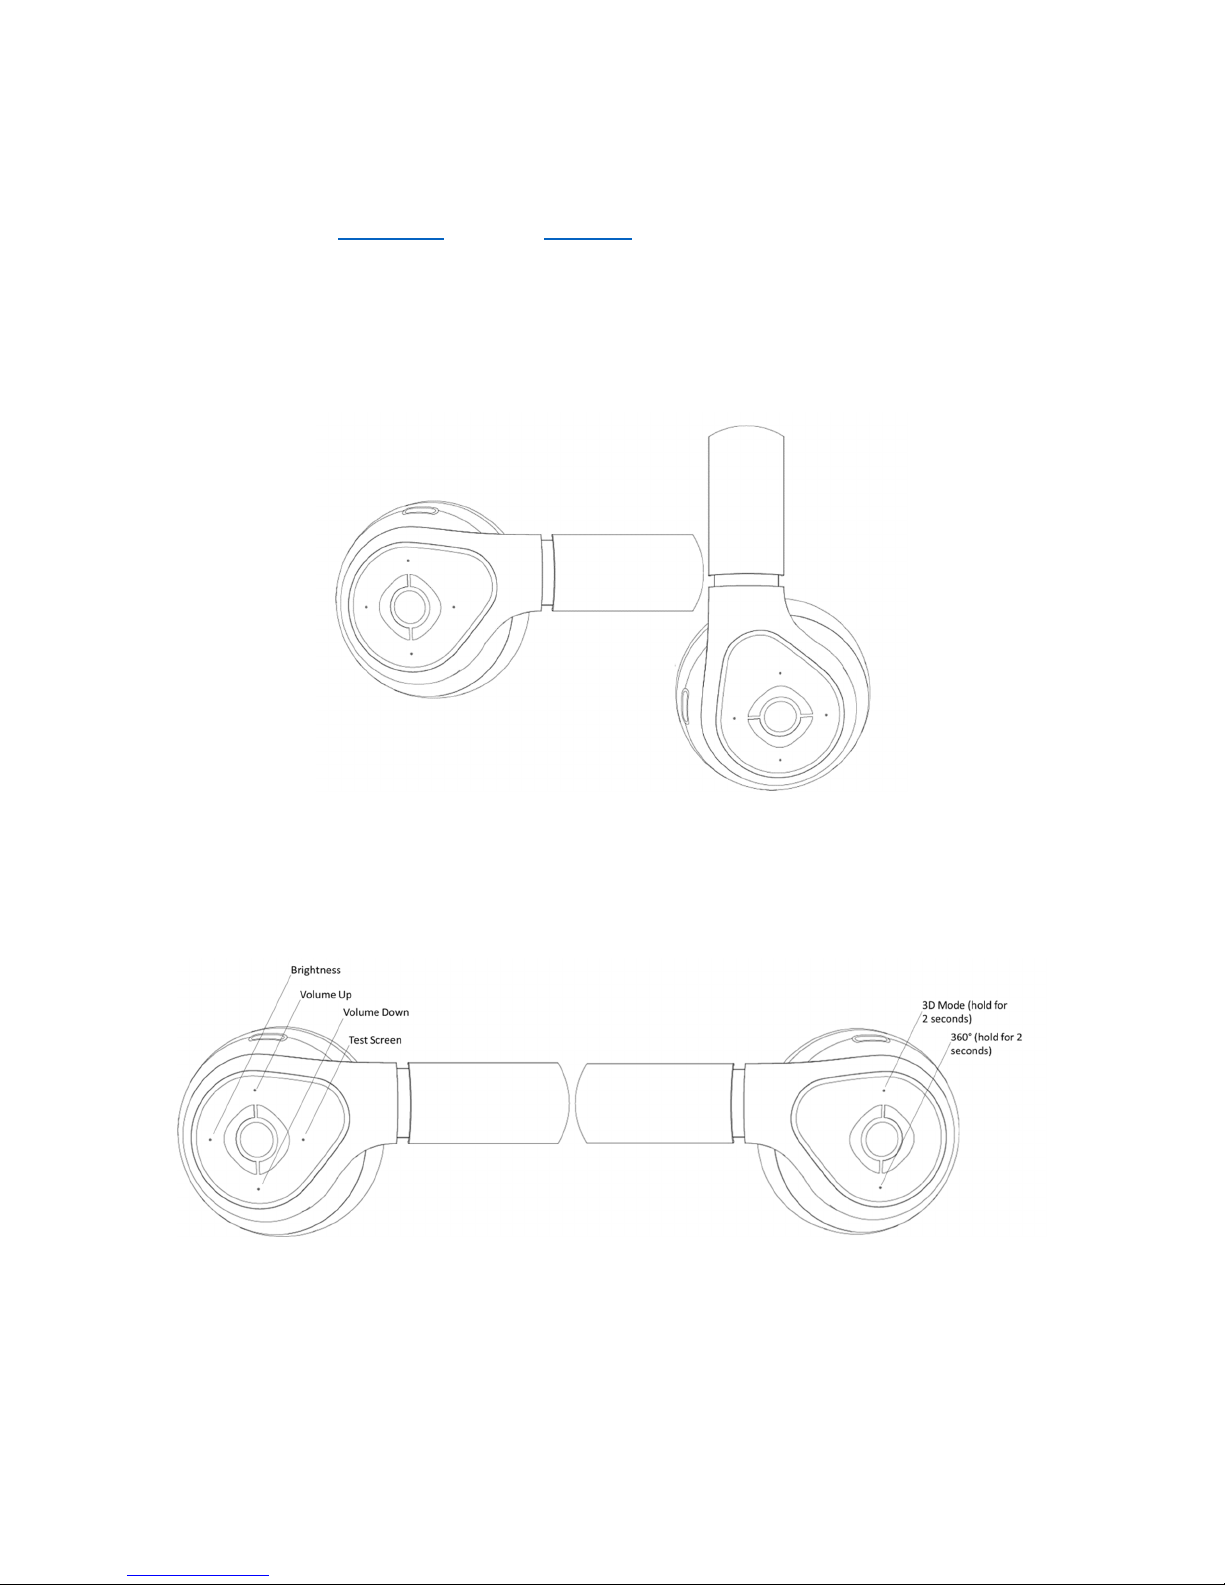
Figure 1: Video Mode (left) and Audio Mode (right)
Controls
Controls or the device are indicated by dimples on each ear can. In video mode, the right side controls
volume (up and down buttons respectively), brightness (back) and a test alignment screen ( ront).
Figure 2: Button Layout
The le t side controls hal - rame or ull- rame side by side 3D mode (top) and head tracking mode
engagement or interactive or 360° media (bottom).
5
In audio mode through the 3.5mm jack, volume level can be controlled through the source device, or
with an optional audio cable with in-line volume control.
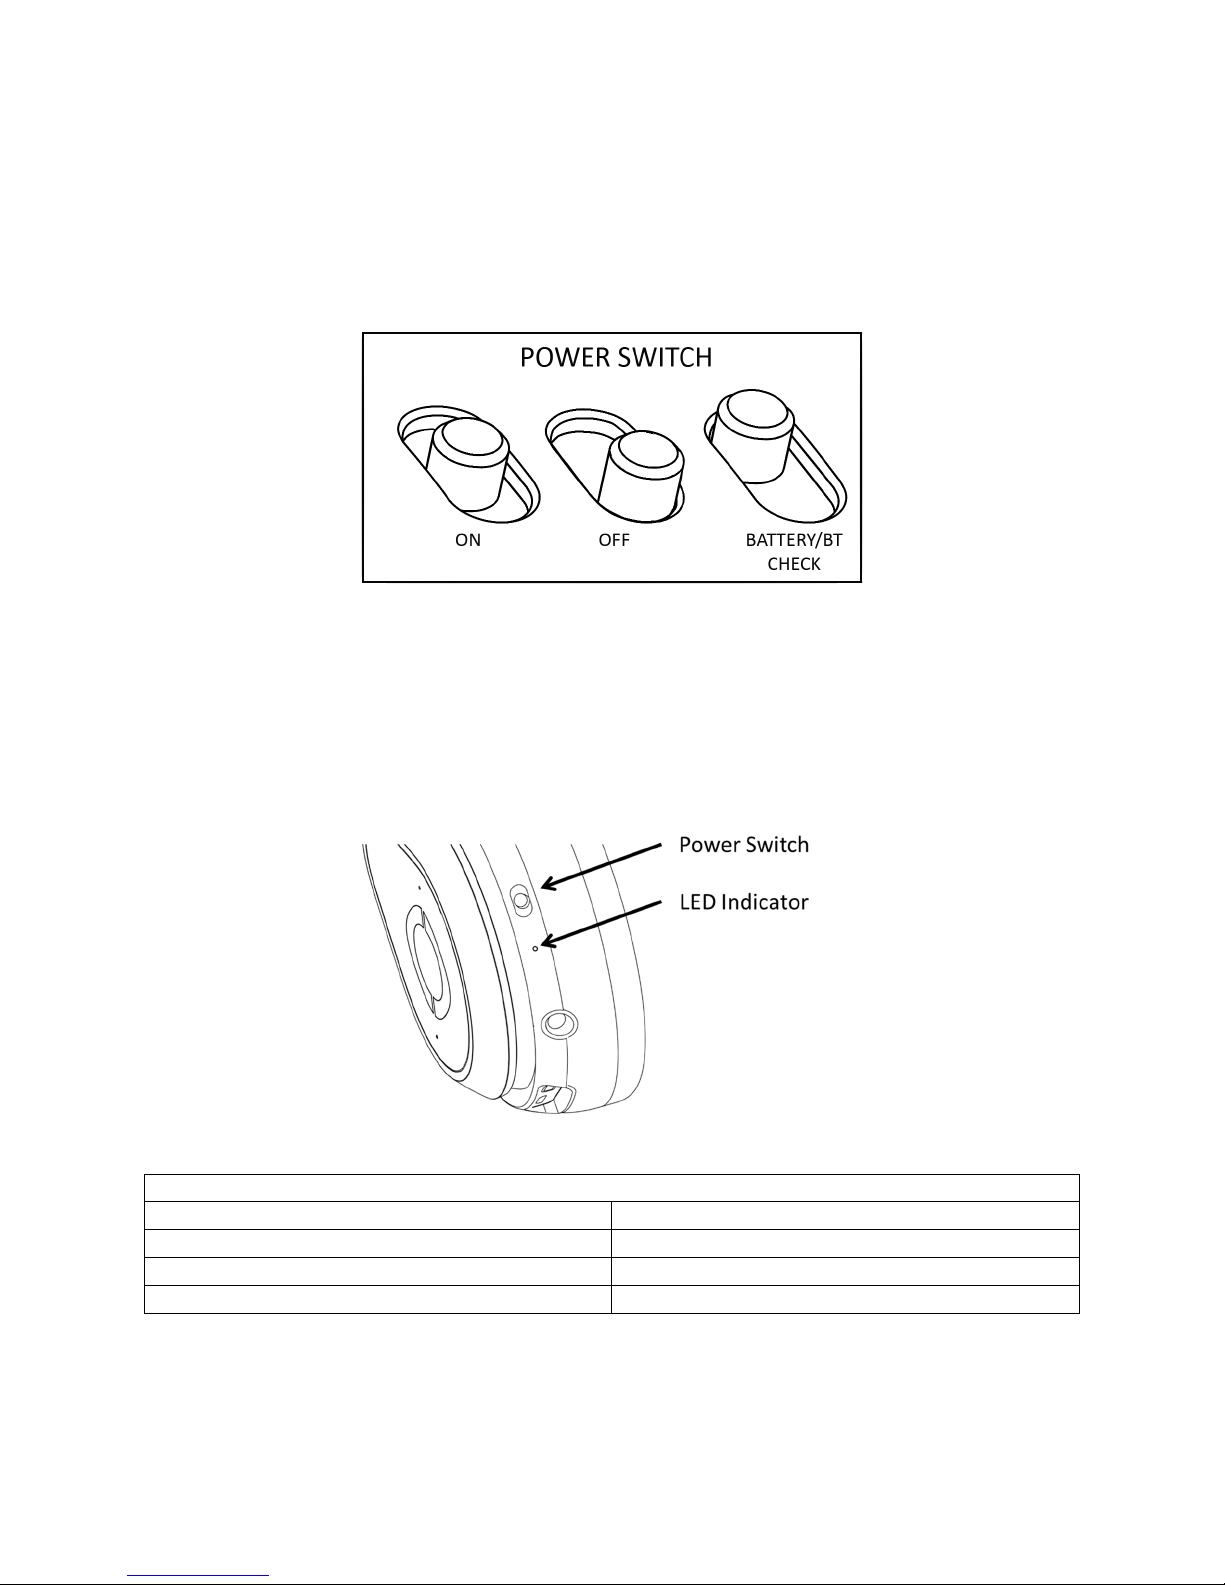
Power on, Indicators and Bluetooth
Video mode can be activated by switching the power button to the center position. To run passively in
audio mode, this button must be in the o position.
Figure 3: Power Switch onfigurations
To check the battery level, hold the power switch temporarily to the top position and release it into the
center position. The LED will indicate the level o charge. To turn on Bluetooth, hold the power switch in
the top position or ive seconds. The LED will lash blue to acknowledge that Bluetooth is on.
The LED indicator is located on the le t ear can between the power button and the audio jack. Use it to
check the battery level, Bluetooth status and general operating conditions.
Figure 4: Power Switch and Indicator Layout
General
Operation
LED Indications
LED Color
Status
Rainbow
Starting Up
Blue Blinking
Bluetooth On
Red
Firmware Fault
Table 1: General Operation LED Indications
6
Battery Check LED
Indications
LED Color
Po er Remaining
Green
> 80%
Yellow
80%
-
20%
Red
< 20%
Table 2: Battery heck LED Indications
Note that the de ault home screen will appear i no source content is streaming into the device. Turn o
your device a ter use to conserve battery li e.
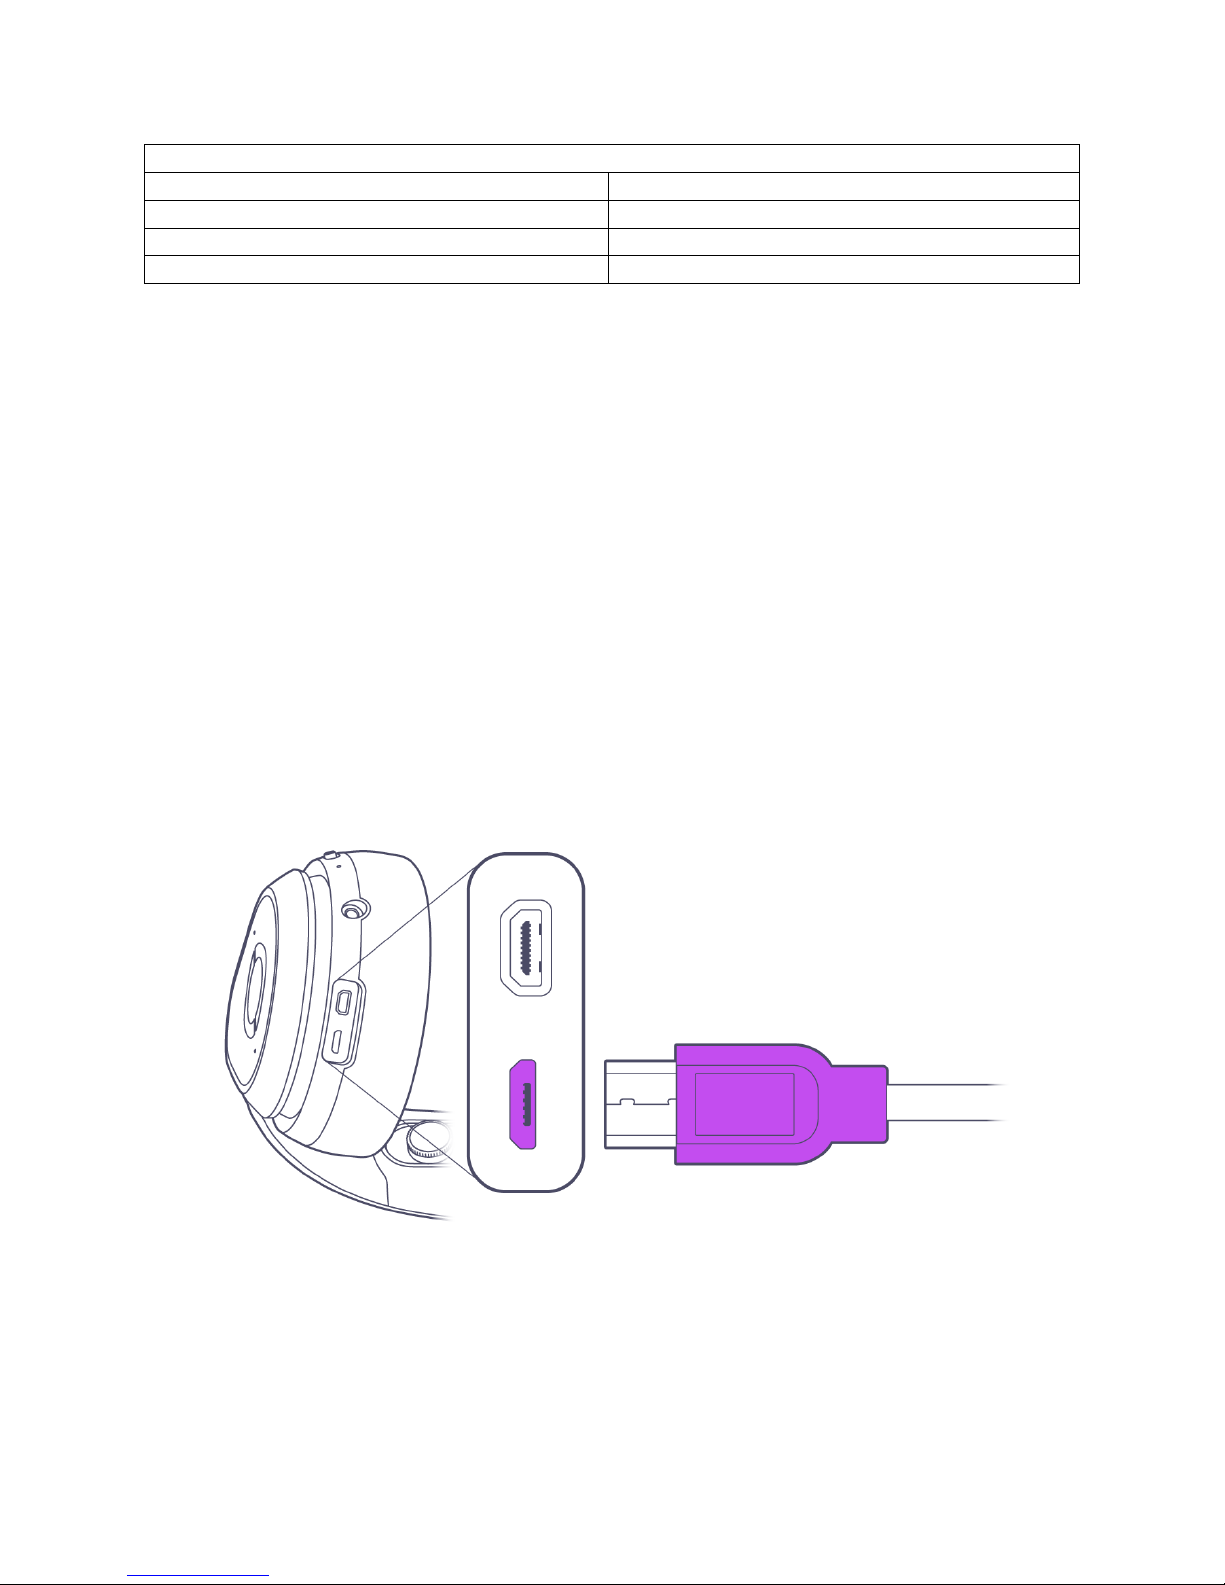
Charging
Out o the box, your device will come with the battery partially charged; please ully charge it be ore
initial use. The battery level and charging LED indicators will be the most accurate a ter the battery is
completely discharged and recharged one time.
To charge the device, plug the included black micro USB cable into the micro USB port on the le t ear
can and the other end to a USB wall charger or PC. Note that some PCs will take longer to charge the
unit than a wall charger, and some PCs will not charge the device i the PC is running on its own battery
power.
It should take about 2 hours to ully charge the battery rom a wall charger a ter an initial power cycle
has run.
Figure 5: MicroUSB charging port location
7
Charging LED Indications
LED Color/ State
Po er Remaining
Slow Flashing Green
> 80%
Slow Flashing Yellow
80%
-
20%
Slow Flashing Red
< 20%
Table 3: harging LED Indications
Setup
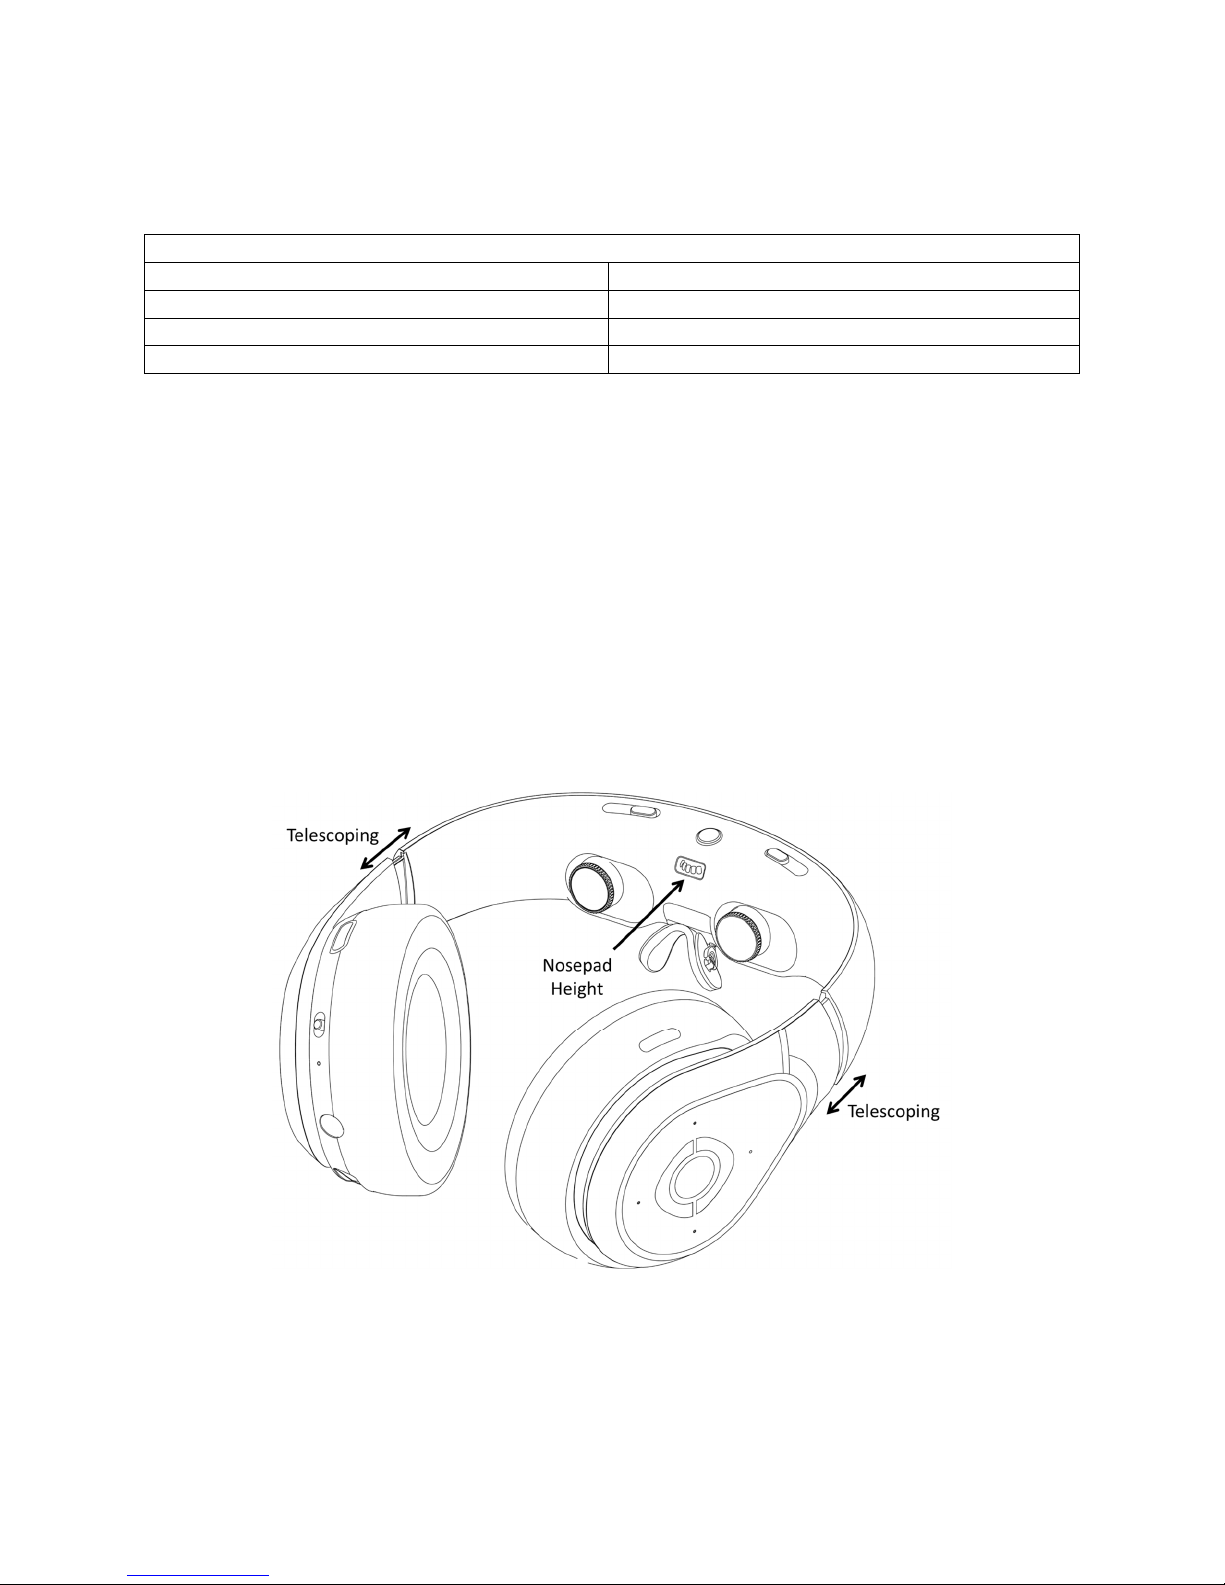
Ergonomic, osepad and Optical Adjustments
Getting the right ergonomic and optical it with the headset is very important to get the best visual
experience. Here’s a guide to walk you through the process o setting up your Avegant or best com ort
and optical per ormance.
1. Leave the rubber nosepiece insert in place.
2. Turn on the headset.
3. With two hands, gently pull the ear cans apart and pull the optics toward you. Slip the device on
your head so that the headphones cover your ears; the headband should be right in ront o
your ace and the optics close to your eyes. I needed, adjust the arms o the headband so the
lenses are not touching your eyes.
Figure 6: Ergonomic Adjustments
8
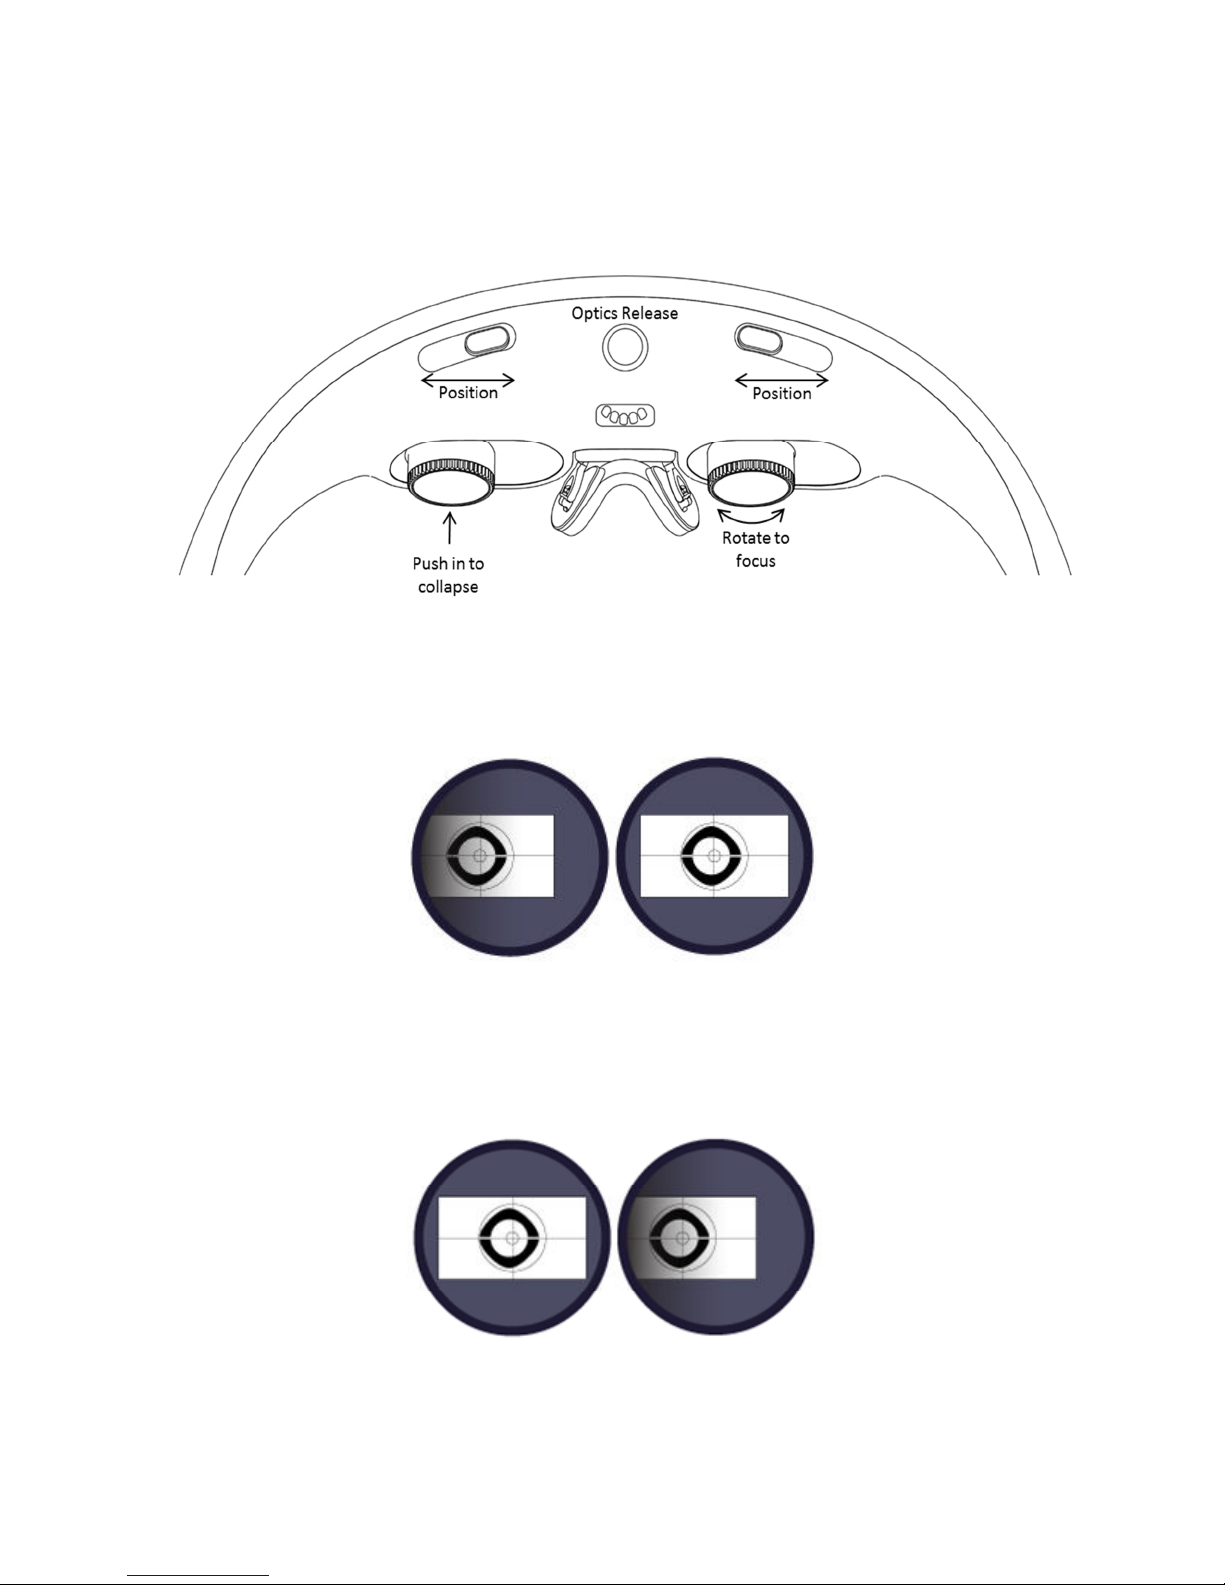
4. While holding the headset with your thumbs, adjust the IPD sliders and position the headband
until you can see all our corners o test screen image. Supporting the headband with the edges
o your thumbs, use thumb and ore inger to ocus the lens by turning them clockwise or
counter-clockwise.
Figure 9: Optical Adjustment Points
It may help to close one eye and adjust one eye at a time, here starting with the le t side.
Then the right side.

9
A well-aligned display should look like this.
5. I the rubber nosepiece insert rests com ortably on your nose and you can see the entire display,
you are done and ready to connect to your playback device or viewing. I not, remove the
rubber insert and try the other nose pads to ind the most com ortable one which keeps your
eyes in the right position to see all our corners o the screen. You may need to adjust the nose
pad up or down with the adjustment wheel between the lenses.
Figure 7: Removing the rubber nosepiece insert

10
Figure 8: Nosepads
6. I the headphones do not stay on your ears, try re ining the ergonomic adjustments or using the
head strap. Attach the headstrap by inserting the side marked “L” into the top o the le t
headphone and the side marked “R” into the right one. Adjust the headstrap length and
position on your head (it also swivels backward) until it holds the Glyph irmly on your
head. The headstrap can also be used or long-term viewing com ort.
Figure 10: Using the headstrap
7. I you still cannot get a com ortable it where you can see all our corners o the screen, please
contact customer service.
In audio mode, the optics can be collapsed by pushing each lens into the body o the headband. Release
the optics by pressing the center, circular button. Note that it is help ul to install the rubber nosepiece
insert and lens cover be ore using audio mode.

11
Tips for Long-Term Comfort in Video Mode
• Use o the head strap may increase long-term viewing com ort. I swiveled to the right position
on the top back o the head, some people ind they do not need to use a nose pad or can use
the rubber nosepiece insert instead.
• When properly calibrated, ensure that you are looking straight orward and can see the image
sharply rom corner to corner.
• Do not use the device i you are tired, intoxicated, dizzy, nauseous or in a public place. See the
Health and Safety section or urther reading.
Connecting to Media
To connect to a device to watch video, use the included blue HDMI cable by plugging the small, micro
HDMI end into the le t ear can and the other HDMI end into your playback device.
Devices that support HDMI output signals o 720p can be used. Most devices that are designed to be
connected to HDTVs and monitors typically will automatically switch output signals rom 1080p to 720p
depending upon what they are connected to. Please consult your device’s user manual to be sure.
Most mobile devices other than PCs will require an adapter. For most o the current iOS devices, an
Apple Lightning to HDMI adapter is necessary or connection. For most Android smartphones that
support HDMI out, an MHL to HDMI or SlimPort to HDMI adapter will be required. Please consult your
device’s user manual to be sure, or check the compatibility chart at avegant.com/set-up-support.
Turn on the headset and start playing your content. You might ind it necessary to ine-tune your it and
optical adjustments during the irst ew minutes o use.

12
To use headphone audio mode, turn o the device and plug an audio cable into the 3.5mm jack
between the power switch and the HDMI port. Make sure to retract the lenses and use the rubber
nosepiece insert and lens cover. Volume can be controlled on the playback device or with an optional
audio cable with in-line volume controls. Since the unit is o , you can use it as headphones without
worrying about battery power. When you are ready to go back to video mode, re-insert the nose pad
you use or video and extend the lenses using the lens release button at the top o the optical unit.
Make sure that both lenses are extended.
Supported 3D Media
Two types o 3D media are currently supported on the device:
Half Frame Side-by-Side 3D
Use the top button on the le t ear can to enable stereoscopic hal - rame side by side 3D mode. This
mode takes standard 1280 x 720 content and stretches it to ill both screens. No special source is
required, however the content must be ormatted to appear side-by-side when viewing through a
standard screen.
Full Frame Side-by-Side 3D
Full rame stereoscopic 3D (or rame packed 3D) is also supported and automatically recognized by the
hardware. This mode automatically handshakes and displays when the HDMI cable is plugged into a 3D
source and 3D content is played; no special button press is required and the hal - rame 3D button is
disabled in this mode.

13
It is important to remember that a suitable 3D rame-packed source is required in order to properly
receive stereoscopic content. Both the Playstation 4 and Windows 10-based PCs with recent NVidia
GPUs can output rame-packed 3D; consult Avegant’s orums or support or speci ic content sources.
Supported Uses of 360 (Headtracking) Mode
360 or headtracking mode can be used currently in the ollowing ways:
a) Control o the camera gimbal with FPV or DJI Inspire 1, Phantom 4, and Phantom 3 Pro and
Advanced with optional HDMI output module. See Avegant.com or details.
b) Most o the popular irst-person shooter PC games which take a mouse input, such as Doom and
Overwatch.
Headtracking must be currently be operated over USB. To enable the unctionality, connect the headset
to the source over USB and press the lower le t button on the le t ear can or two seconds to cycle
through tracking modes.
Note that i headtracking does not enable through the button-press, you may need to update your
irmware. Only irmware versions 1.14.1 and above have headtracking enabled.
Troubleshooting
Problem
Solution
I cannot produce a com ortable it on my nose, what should
I do?
A number o di erent nosepieces are included in the
accessory box. Try them all and ind one that its best. The
nosepieces have a magnet catch and can be removed by
pushing downward in the opposite direction rom the
nosepiece adjustment knob.
I the device reezes up, how do I reset the HW? Turn the device o then on by switching the power switch to
the bottom position and lipping it back up to middle
position.
I am plugged into an HDMI source but all I see is the de ault
screen, what should I do?
Turn o the unit and unplug the HDMI cable. Check your
HDMI source to make sure it’s output is set to 720p. Most
HDMI devices should automatically sense that the device is
720p and set itsel accordingly, but in case it does not, you
may want to check the display settings or turn the device o
and then on again. Then plug the HDMI cable back in, turn
the power on and check your screen.
Part o the screen seems to be cut o , or the corners o the
screen seem to be cut o : What should I do?
The picture may not be converged properly. Make sure the
device is itted properly to your head. The nose bridge
should it and secure on the top bridge o your nose and the
lenses should be very close to your eye so that your
eyelashes almost touch. Turn on the test screen by pressing
the test screen button on the ront side o the right ear can,
then using the IPD slider adjustments, converge the screen
image so that you see one rectangular screen with square
edges. Finally, closing one eye at a time turn the diopter
ocusing adjustments to see a sharp image.
I can see the video, but there is no sound; What should I
do?
Check your volume control by pressing the top button on the
le t ear can a ew times. I you still do not hear sound, turn

14
the unit o , unplug the HDMI cable, turn it on, then plug the
HDMI cable back in.
I am trying to view a side-by-side 3D video but I see two 2D
side-by-side images on the screen; What should I do?
You need to turn on the 3D mode by pressing and holding the
3D mode button, which is the top button on the le t ear can,
or 2 seconds. You should see the change rom two side by
side images to one 3D image right away. Release the Mute
button and press it again i the audio is muted.
The device is non-responsive and the LED is red. What
should I do?
There is a device irmware error. You should shut the device
o and check the battery level. I the LED is red, recharge the
device or plug the device into a wall charger be ore turning
the device back on.
The outer lens sur ace o the eyepieces is dirty and
a ecting picture quality; How should I clean them?
You can clean the lenses with any commercially-available lens
cleaning cloth or tissue and lens cleaning solution. Press
gently and use circular motions to clean the lenses. I the
lenses retract into the body, you can extend them again by
pressing the round button between the two IPD sliders.
I pressed the eyepieces and they have retracted into the
body o the headband; How do I get them to pop out?
I the lenses retract into the body, you can extend them again
by pressing the round button between the two IPD sliders.
The nosepiece has detached rom the headband; How do I
reattach it?
It is held into the device with strong magnets so you should
be able to merely point the two towers into the receptacle
and gently push it back into place
I cannot insert a 3.5mm audio cable into the 3.5mm
headphone jack on the device. What is wrong?
The housing around the plug may be too large to it into the
recessed audio jack. You should ind a 3.5mm audio cable
which has a slim, cylindrical housing around one o the
plugs.
I would like to use the headset as a pair o audio-only
headphones. What do I do to convert it?
First remove the nosepiece by gently pushing it downward o
o the optical unit. Store the nosepiece in a sa e place where
it will not get crushed or lost. With your ingernail or edge o
your inger, gently push in the lenses until they click into the
optical unit. Attach the lens cover to the inside o the
headband covering the lenses, extend the headband to
accommodate your head and slip the device on your head
with the headband acing upward. Plug your audio cable into
the recessed 3.5mm audio input and make sure the power is
OFF. Plug the other end o the audio jack into your music
playback device and adjust volume on that
device. NOTE: The recessed audio input is designed or use
with audio cables having a slim, cylindrical housing; Use o
cables with other housings may prevent the jack rom being
ully inserted into the receptacle.
When using as a set o audio-only headphones, the volume
buttons on the ear cans do not work.
In audio-only headphone mode, the power is o so volume
must be controlled rom the playback device or with an
optional audio cable with in-line volume controls.
My unit was accidentally splashed with water; What should
I do?
Although the device is not guaranteed to be splash proo , you
may be able to keep it working by wiping the unit o with a
towel and leaving it in a warm, dry area or several hours.
I think my battery is dead; How do I check battery level?
Push the power button to the upper (top) position or a
second and the LED will show Red (20% or lower battery le t),
Yellow (20%-80% battery le t) or Green (80% or more battery
le t).
My unit beeps and shows a red screen or a screen with a
low battery icon; What does it mean?
It means your battery is running low. Your device will shut
down automatically when the battery gets very low.

15
How do I ind my unit’s irmware version?
The easiest way to do it is to download the Avegant
application or iOS or Android and connect it to your device.
Under the Settings tab, you can check the irmware version
and irmware updates.
On Mac, go to About This Mac>Overview>System
Report>Hardware>USB>USB 3.0 Bus. The headset will show
up as USB device as GLYPH_ _ _ _ (last 4 digits o serial
number)(product-___-_ _ - _ _ _ _ _ _ _ _)
On PC, go to Control Panel or Windows Menu> Devices>
Connected Devices>GLYPH
The unit will show up as USB device as GLYPH_ _ _ _ (last 4
digits o serial number)(product-_ __ - _ _ _ _ _ _ _ _)
I cannot see a brightly lit display in one or two o the lenses
and cannot converge or ocus them.
Check to make sure that the lenses are extended by pressing
the lens release button located above the nose pad
adjustment knob.

16
Health and Safety Guide
This health and sa ety guide contains important sa ety and handling in ormation or your Avegant Founders Edition. Please
read all sa ety in ormation below be ore using your Avegant. Read and ollow all setup and operating instructions to become
amiliar with the eatures o the product. For more in ormation and additional support, please visit the main
www.avegant.com support page.
Failure to ollow sa ety instructions preceded by the word “Warning” could result in serious physical injury.
Failure to ollow sa ety instructions preceded by “Caution” or “Notice” could result in minor to moderate injury or damage to
equipment or other property.
General Health and Sa ety In ormation
• Extended use o your Avegant Founders Edition may result in losing track o your immediate surroundings or
becoming used to the non-standard physical “rules” o a virtual environment, causing discom ort, disorientation or
loss o balance when you take it o . To avoid risk o injury rom alling or tripping:
• Be sure to begin your enjoyment o the Avegant in small stages, building up to longer continued use.
• Use only while sitting or while standing in a clear area ree o obstacles
• Do not use while intoxicated
• The Avegant Founders Edition is NOT a toy and should not be used by children 13 years o age or younger. Young
children are at an increased health and sa ety risk. Adults should monitor children (age 14 and older) who are using
or have used the Avegant or any o the symptoms described below and should limit the time children spend using
the Avegant and ensure that they take breaks during use.
• Warning. Some people (about 1 in 4,000) may have severe dizziness, seizures, epileptic seizures or blackouts triggered
by light lashes or patterns. This may occur while they are watching TV, playing video games or experiencing a
personal display technology, even i they have never had a seizure or blackout be ore or have no history o seizures or
epilepsy. Such seizures are more common in children and young people under the age o 20. Anyone who has had a
seizure, loss o awareness or other symptom linked to an epileptic condition should consult with a doctor be ore
using the Avegant Founder’s Edition.
• Prop 65 Warning. This product contains chemicals known to the State o Cali ornia to cause cancer and birth de ects
or other reproductive harm. (Cali ornia law requires this warning to be given to customers in the State o Cali ornia.)
Speci ic Warnings and Precautions
“Video mode” shall herein re er to the Avegant Founder’s Edition as operating with the headband over the user’s eyes. “Audio
mode” shall herein re er to the Avegant Founder’s Edition as operating with the headband over the crown o the user’s head
with no obstruction to the user’s vision.
• Warning. Use only in a sa e environment. In Video mode, the Avegant Founder’s Edition produces a personal display
experience that distracts you rom and blocks your view o your actual surroundings. For the sa est experience,
always remain seated when using the Avegant Founder’s Edition in Video mode. Take special care to ensure that you
are not near other people, objects, stairs, balconies, windows, urniture or other items that you can bump into or
knock down when using – or immediately a ter using – the Avegant Founder’s Edition in Video mode. Do not handle
sharp or otherwise dangerous objects while using the Avegant Founder’s Edition in Video mode. Never wear the
Avegant Founder’s edition in Audio mode or Video mode in situations that require attention, such as walking,
bicycling or operating a motor vehicle or heavy machinery.
• Warning. Listening to sound at high volumes can cause irreparable damage to your hearing. Background noise, as well
as continued exposure to high volume levels, can make sounds seem quieter than they actually are. Due to the
immersive nature o the image created by the Avegant Founder’s Edition, do not use the device with the sound at
high volume so that you can maintain awareness o your surroundings and reduce the risk o hearing damage.

17
• Warning. Stop using the Avegant Founder’s Edition i it seems to be hot. Prolonged contact with an overheated device
can cause burns
• Warning. The Avegant Founder’s Edition can emit radio waves that can a ect the operation o nearby electronics,
including cardiac pacemakers. I you have a pacemaker or other implanted medical device, do not use the Avegant
Founder’s Edition without irst consulting your doctor or the manu acturer o your medical device.
• Make sure the Avegant Founder’s Edition is level and secured com ortably on your head and that you see a single,
clear image.
• Ensure that the optics are properly and squarely aligned in ront o the user’s eyes be ore use and that the image is in
ocus. Re er to the quick start guide or proper itting.
• Caution. Ensure that the cables utilized while operating the Avegant Founder’s Edition are care ully routed to and
rom the source content such that they do not become tangled and cause injury to the user or damage to the device.
• Caution. Do not use the Avegant Founder’s Edition when you are tired, need sleep, are under the in luence o alcohol
or drugs, are hung-over, have digestive problems, are under emotional stress or anxiety or when su ering rom cold,
lu, headaches, migraines or earaches, as this can increase your susceptibility to adverse symptoms.
• Caution. I you are using the Avegant Founder’s Edition as a passenger in a motor vehicle and eel dizziness or nausea,
discontinue use.
• Caution. Take at least a 10 to 15 minute break every 30 minutes, even i you don’t think you need it. Each person is
di erent, so take more requent and longer breaks i you eel discom ort. You should decide what works best.
• Ease into the use o the Avegant Founder’s Edition to allow your body to adjust; use or only a ew minutes at a time
at irst and only increase the amount o time using the Avegant Founder’s Edition gradually as you grow accustomed
to a personal display. Looking around the image when irst entering a personal display environment can help you
adjust to any small di erences between your real world movements and the resulting virtual experience.
• The Avegant Founder’s Edition can be a ected by magnetic inter erence created by items, such as computers, TVs or
electric cables. Avoid using the Avegant Founder’s Edition in areas a ected by magnetic inter erence.
Extended Use Precautions
• Warning. Immediately discontinue use i anyone using the Avegant Founder’s Edition experiences any o the ollowing
symptoms: seizures; loss o awareness; eye strain; eye or muscle twitching; involuntary movements; altered, blurred
or double vision or other visual abnormalities; dizziness; disorientation; impaired balance; impaired hand-eye
coordination; excessive sweating; increased salivation; nausea; lightheadedness; discom ort or pain in the head or
eyes; drowsiness; atigue; or any symptoms similar to motion sickness.
• Just as with the symptoms people can experience a ter they disembark a cruise ship, symptoms o immersive,
personal media exposure can persist and become more apparent hours a ter use. These post-use symptoms can
include the symptoms above as well as excessive drowsiness and decreased ability to multi-task. These symptoms
may put you at an increased risk o injury when engaging in normal activities in the real world.
• Do not drive, operate machinery or engage in other visually or physically demanding activities that have potentially
serious consequences (i.e., activities in which experiencing any symptoms could lead to death, personal injury or
damage to property), or other activities that require unimpaired balance and hand-eye coordination (such as playing
sports or riding a bicycle, etc.) until you have ully recovered rom any symptoms.
• Do not use the Avegant Founder’s Edition until all symptoms have completely subsided or several hours. Make sure
you have a properly con igured Avegant Founder’s Edition be ore resuming use.
• Be mind ul o the type o content that you were using prior to the onset o any symptoms because you may be more
prone to symptoms based on the content being used.
• Consult with a doctor i you have serious and/or persistent symptoms.

18
Multicopter Use
• Warning. While the Avegant Founder’s Edition is designed and intended or use as a way to experience the aerial
views taken by a camera mounted to a multicopter (a/k/a “drone,” “Unmanned Aerial Vehicle” or “UAV”), it is not
meant or use by, nor should it be used by, a single user who is simultaneously operating the multicopter. Doing so is
both unsa e and a violation o FAA regulations. Please read and become amiliar with all instructions and sa ety
guidelines or your multicopter be ore using. Using your Avegant Founder’s Edition with a multicopter in any way
that is unsa e, illegal or in violation o state, ederal, or local laws or regulations is prohibited.
Battery and Power Adapter In ormation and Care
• Warning. This product contains a lithium ion polymer battery. To reduce the risk o ire, electric shock or burn related
injuries, the batteries must be handled properly.
• Do not attempt to remove the battery, as you may damage the devise.
• Charge your device with any USB-compatible charger. Charger plug type may vary.
• The battery can be charged and discharged hundreds o times, but it will eventually wear out. When the operating
times are noticeably shorter than normal, contact support to arrange replacement or repair.
• To reduce risk o ire or burns, do not disassemble, crush, puncture, short external contacts or circuits, expose to
temperature above 60°C (140°F) or dispose o in ire or water. Recycle or dispose o used batteries according to the
local regulations or re erence guide supplied with your product.
• Charging temperature range is regulated between 0°/32°F and 45°C/113°F. Do not charge the battery out o
recommended temperature range. Charging out o recommended range might cause heat generation or serious
damage to the battery, as well as causing the deterioration o its characteristics and cycle li e.
• Always unplug the charger rom the wall socket a ter the Avegant Founder’s Edition is ully charged to save
unnecessary power consumption o the charger.
• Do not damage the power cord by bending, twisting or heating. Do not use the plug i it is loose as it may cause
electric shock or ire.
• Do not place any heavy items on the power cord. Do not allow the power cord to be crimped as it may cause electric
shock or ire.
• Unplug the power cord and power down your Avegant Founder’s Edition prior to cleaning, and clean only with a dry
cloth. When using the power plug, ensure that it’s irmly connected. I not, it may cause excessive heat or ire. I you
put your Avegant Founder’s Edition in a pocket or bag without covering the receptacle o the device, metallic articles
(such as a coin, paperclip or pen) may short-circuit the device. Always cover the receptacle when not in use.
• Do not use or leave the battery under the blazing sun, like in a sealed vehicle. The battery may generate heat, smoke
or lame and may also deteriorate in characteristic and cycle li e.
• The battery pack has a protection circuit to avoid danger. Do not the Avegant Founder’s Edition near places that
generate static electricity o more than 100V, which gives damage to the protection circuit. I the protection circuit
were broken, the battery would generate smoke, rupture or lame.
• I the skin or cloth is smeared with liquid rom the battery, wash with resh water. It may cause the skin in lammation.
• Do not handle the Avegant Founder’s Edition with wet hands or otherwise expose it or the power adapter to water or
moisture. It may cause an electric shock or seriously damage the device.
• The Avegant Founder’s Edition is intended or charging indoors only.
• Do not use the Avegant Founder’s Edition i any cable is damaged or any wires are exposed.
• Keep the Avegant Founder’s Edition and the power adapter away rom open lames and other heat sources.

19
Care and Maintenance
The Avegant Founder’s Edition is a product o superior design and cra tsmanship and should be treated with care. The
suggestions below will help you ul ill any warranty obligations and allow you to enjoy this product or many years.
• Warning. I the mobile device does get wet, do not accelerate drying with the use o an oven, microwave or dryer,
because this may damage the device and could cause a ire or explosion. Do not use the mobile device in very wet
conditions. Doing so may cause an electric shock to you or damage to the mobile device. Do not expose the straps to
very wet conditions. Wet straps can cause skin irritations. Dry the straps irst. I you experience skin irritation when
wearing the Avegant Founder’s Edition, stop wearing the device and consult a physician.
• Notice. Do not leave the Avegant Founder’s Edition in direct sunlight. Exposure to direct sunlight can damage the
Avegant Founder’s Edition.
• Keep your Avegant Founder’s Edition away rom exposure to liquids o any kind. Precipitation, humidity and liquids
contain minerals that will corrode electronic circuits.
• Avoid temperatures below -10°C / 14°F or above 40°C / 104°F.
• Do not expose your mobile device to dust, dirt or sand.
• Do not use harsh chemicals, cleaning solvents or strong detergents to clean the Avegant Founder’s Edition.
• Although your Avegant Founder’s Edition is quite sturdy, it is a complex piece o equipment and can be broken. Avoid
dropping, hitting, bending or sitting on it. Rough handling can break internal circuit boards.
• Do not paint the Avegant Founder’s Edition. Paint can clog the device’s moving parts or ventilation openings and
prevent proper operation.
• Ensure that the head strap is kept clean.
Any changes or modi ications to your Avegant Founder’s Edition not expressly approved by Avegant could void your warranty
or this equipment and void your authority to operate this equipment. Only use approved cables and chargers. The use o any
unauthorized accessories may be dangerous and void the Avegant Founder’s Edition warranty i said accessories cause damage
or a de ect to the device.
The Avegant Founder’s Edition and any connected device should only be used with irmware versions that have been approved
or use by the device manu acturer.
Regulatory Statements
FCC
Warning: Changes or modi ications to this unit not expressly approved by the party responsible or compliance could void the
user’s authority to operate the equipment.
This equipment has been tested and ound to comply with the limits or a Class B digital device, pursuant to Part 15 o the FCC
Rules. The inbox shielded USB and HDMI cable shall be used to comply with FCC Class B requirements. These limits are
designed to provide reasonable protection against harm ul inter erence in a residential installation. This equipment generates,
uses and can radiate radio requency energy and, i not installed and used in accordance with the instructions, may cause
harm ul inter erence to radio communications.
However, there is no guarantee that inter erence will not occur in a particular installation. I this equipment does cause
harm ul inter erence to radio or television reception, which can be determined by turning the equipment o and on, the user is
encouraged to try to correct the inter erence by one or more o the ollowing measures:
•Reorient or relocate the receiving antenna.
•Increase the separation between the equipment and receiver.
•Connect the equipment into an outlet on a circuit di erent rom that to which the receiver is connected.
•Consult the dealer or an experienced radio/TV technician or help.
This device complies with Part 15 o the FCC Rules. Operation is subject to the ollowing two conditions: (1) this device may not
cause harm ul inter erence and (2) this device must accept any inter erence received, including inter erence that may cause
undesired operation.

20
IC:
This device complies with Industry Canada license-exempt RSS standard(s). Operation is subject to the ollowing two conditions:
(1) this device may not cause inter erence, and (2) this device must accept any inter erence, including inter erence that may
cause undesired operation o the device.
Le présent appareil est con orme aux CNR d’Industrie Canada applicables aux appareils radio exempts de licence.
L’exploitation est autorisée aux deux conditions suivantes : (1) l’appareil ne doit pas produire de brouillage, et (2) l’utilisateur
de l’appareil doit accepter tout brouillage radioélectrique subi, même si le brouillage est susceptible d’en compromettre le
onctionnement.
CAN ICES-3 (B)/NMB-3(B)
CE
This device is in compliance with the essential requirements and other relevant provisions o directive 1995/5/EC
The symbol above means that according to local laws and regulations your product should be disposed o separately rom
household waste. When this product reaches its end o li e, take it to a collection point designated by local authorities. The
separate collection and recycling o your product at the time o disposal will help conserve natural resources and ensure that it
is recycled in a manner that protects human health and the environment. For more in ormation about where you can drop o
your waste equipment or recycling, please contact your local city o ice, your household waste disposal service, or the shop
where you purchased the product.
In the event the device is not working normally due to electrostatic shock, please reset the device by turning o the power and
turning it back on.
Intellectual Property
All intellectual Property, as de ined below, owned by or which is otherwise the property o Avegant or its respective suppliers
relating to the Avegant Founder’s Edition, including but not limited to, accessories, parts or so tware relating thereto (the
“device”), is proprietary to Avegant and protected under ederal laws, state laws and international treaty provisions.
Intellectual Property includes, but is not limited to, inventions (patentable or unpatentable,) patents, trade secrets, copyrights,
so tware, computer programs, and related documentation and other works o authorship. You may not in ringe or otherwise
violate the rights secured by the Intellectual Property. Moreover, you agree that you will not (and will not attempt to) modi y,
prepare derivative works o , reverse engineer, decompile, disassemble, or otherwise attempt to create source code rom the
so tware. No title to or ownership in the Intellectual Property is trans erred to you. All applicable rights o the Intellectual
Property shall remain with Avegant and its suppliers
Table of contents


