HTC VIVE FLOW User manual

User Guide

Contents
Getting started
VIVE Flow features 5
What's inside the box? 6
About VIVE Flow 6
Connecting to a power source 8
Putting on VIVE Flow 9
Adjusting the diopter dial 9
About the phone controller 11
About the VR controller 13
Setting up VIVE Flow using the VIVE app or VIVE Flow app 14
Setting up VIVE Flow using the VR controller 16
Signing in with your HTC account 16
Downloading free titles on VIVE Flow 17
Getting titles from VIVEPORT VR 17
Getting the most out of your VR glasses
Connecting to a Wi-Fi network 19
Changing boundary size 20
Turning on Eye comfort mode 20
Changing preferred way to hold phone or VR controller 20
Hand tracking 21
Turning on Passenger mode 22
Mirroring your phone on VIVE Flow 23
Taking screenshots and screen recordings 25
Copying screenshots and screen recordings to your computer 25
Copying files from your computer to VIVE Flow 26
Browsing files on a USB drive 26
Playing videos from local storage 28
Casting your screen 29
Seeing real surroundings (Passthrough) 29
Pairing VIVE Flow with another phone 29
Switching between paired phones or VR controller 30
Setting up holoride on VIVE Flow 31
Switching to holoride mode 31
Pairing Bluetooth devices 31
Setting up and using Kiosk mode 32
Uninstalling apps 32
Installing system and firmware updates 33
About cleaning and disinfecting VIVE Flow 33
VIVE app and VIVE Flow app
What is the VIVE app and VIVE Flow app? 35
What phones do the VIVE app and VIVE Flow app support, and how do I get it? 35
What languages do the VIVE app and VIVE Flow app support? 36
Managing phone notifications 36
Installing system and firmware updates from the VIVE app or VIVE Flow app 36
Uninstalling the VIVE app or VIVE Flow app 36
2 Contents


About this guide
We use the following symbols to indicate useful and important information:
This is a note. It provides detailed information for setup, common questions, and what to do in
specific situations.
This is a tip. It will give you an alternative way to do a particular step or procedure that you may
find helpful.
This indicates important information that you need in order to accomplish a certain task or to
get a feature to work properly.
This is a warning. Take note to avoid potential problems or prevent damage to your hardware.
Information contained in this guide may have changed. For the most up-to-date information,
including the latest version of this guide, go to VIVE Support.
Before using the product, carefully review VIVE safety information and follow all product safety
and operating instructions on https://www.vive.com/legal/.
4 About this guide

Getting started
VIVE Flow features
Lightweight and comfortable
The easy-to-wear VR glasses made for wellness and mindful productivity. Compact and
lightweight, VIVE Flow goes where you go. Check out how to put on VIVE Flow in Putting on VIVE
Flow on page 9.
Use your phone or VR controller
Use your phone or VR controller to interact in VR. Connect your Android™phone to VIVE Flow to
get phone notifications while in VR.
§Check out Setting up VIVE Flow using the VIVE app or VIVE Flow app on page 14 to learn
how to set up VIVE Flow using the VIVE app on an Android phone or VIVE Flow app on an
iPhone.
§Go to Setting up VIVE Flow using the VR controller on page 16 to learn how to set up
VIVE Flow using the VR controller.
Clear and warm view
VIVE Flow comes with adjustable diopter lenses so you can get a sharp and clear view. Using
VIVE Flow close to bedtime is also not a problem with Eye comfort mode.
§Go to Adjusting the diopter dial on page 9 to learn how to adjust the dials.
§Learn how to turn on eye comfort mode by going to Turning on Eye comfort mode on page
20.
Phone mirroring
Mirror your Android phone on VIVE Flow to enjoy phone apps on your own personal large screen.
§Learn how to mirror your Android phone in VR by going to Mirroring your phone on VIVE
Flow on page 23.
§Check the list of recommended Android phones for phone mirroring on https://
www.vive.com/vive-flow-phone-list/.
VIVE app and VIVE Flow app
Use the app to set up, configure Wi-Fi and language, perform system updates, and more for your
VIVE Flow.
5 Getting started

Learn more about the VIVE app and VIVE Flow app in What is the VIVE app and VIVE Flow app?
on page 35.
What's inside the box?
Your VIVE Flow comes with the following items, which you'll use to experience immersive VR
environments:
§VIVE Flow VR glasses
§Face cushion (attached)
§Nose rest (used only when adjusting the diopter dial)
§USB Type-C®cable
§Microfiber pouch
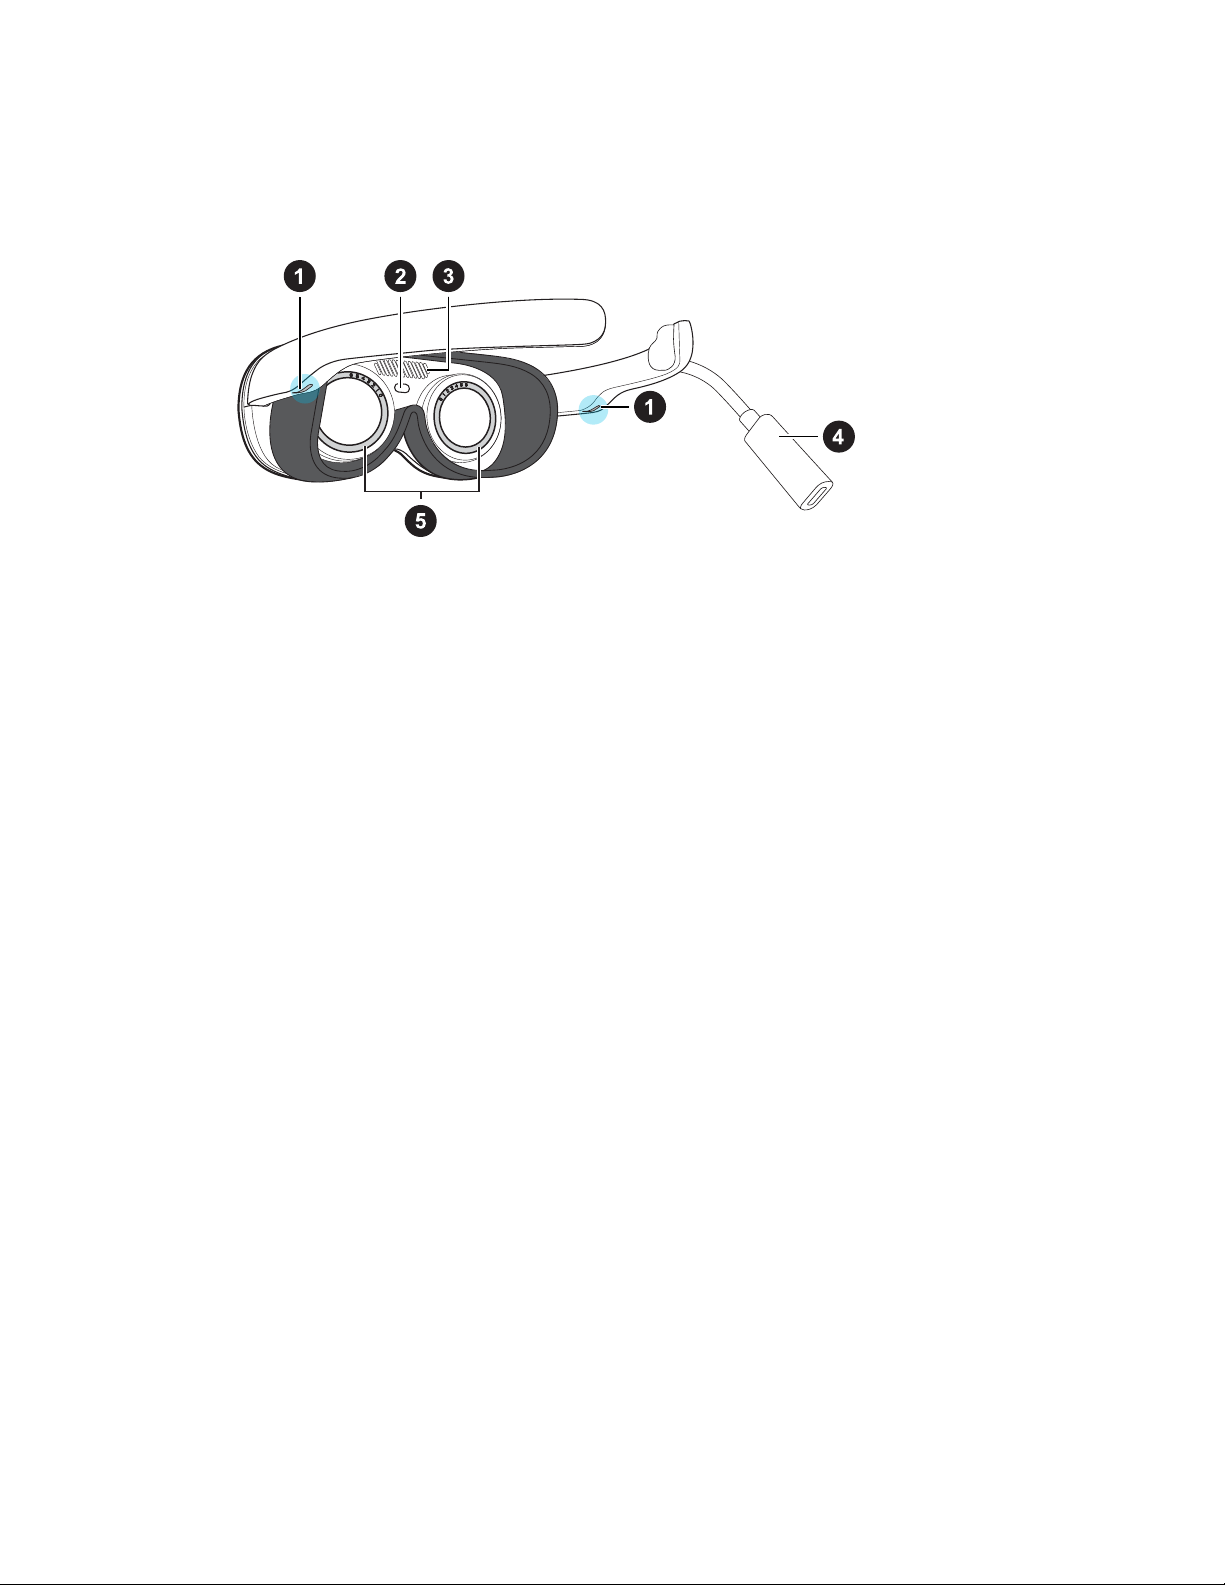
About VIVE Flow
VIVE Flow is your window to the VR environment. The VIVE Flow cameras track the position of the
VR glasses.
Front view
1. Headset button
2. LED (Status light)
3. Vent (Don't block or insert objects into it)
4. Temple pads (Removable)
5. Face cushion
6. Volume down button
6 Getting started
7. Volume up button
8. Device cameras
Inside view
1. Speakers
2. Proximity sensor
3. Vent (Don't block or insert objects into it)
4. USB Type-C receptacle cable
5. Diopter dials
7 Getting started
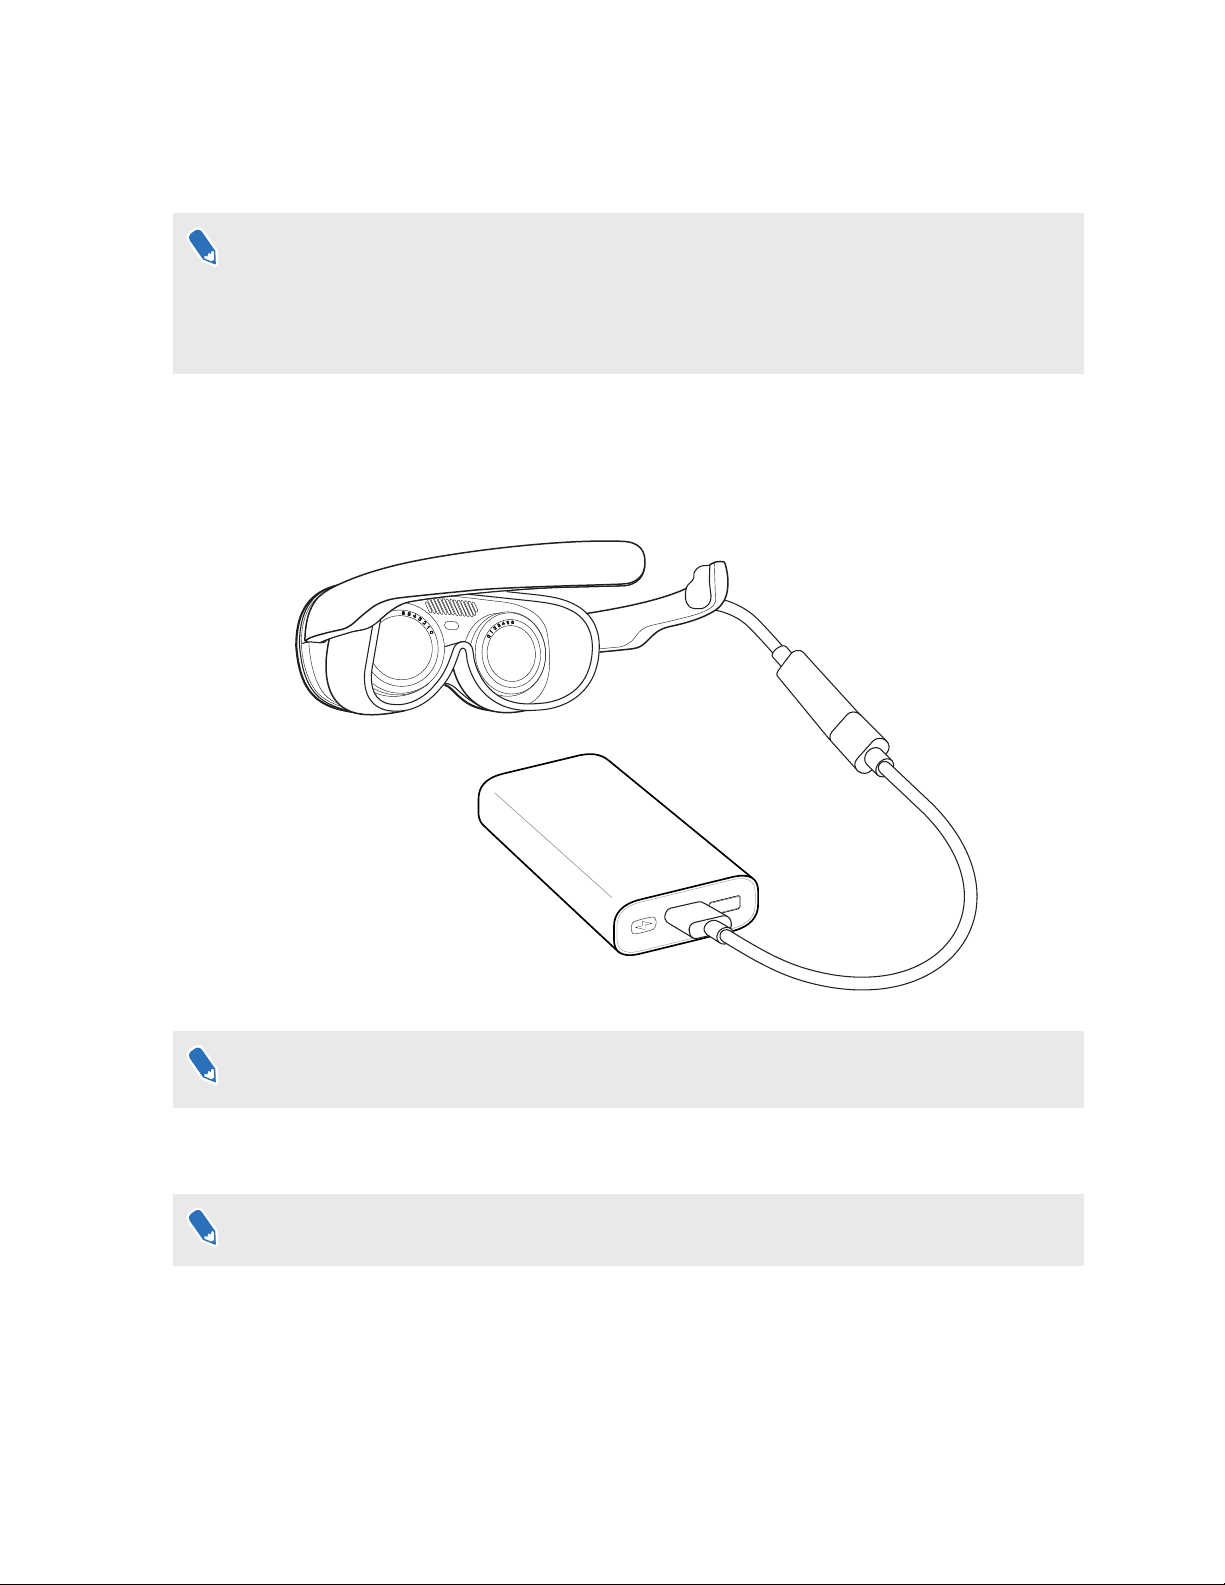
Connecting to a power source
VIVE Flow automatically turns on when plugged in to any power source such as a power bank.
Not all power banks or phones can provide enough power to VIVE Flow. VIVE Flow requires a
power source that delivers at least 7.5W of power. If you see an "Insufficient power supply"
message in VIVE Flow, connect the VR glasses to another power bank or to a power outlet
using an AC adapter. There's no need to press the Headset or Volume buttons after
connecting to a new power source.
1. Grab the USB Type-C cable from the box and connect one end to the USB Type-C
receptacle cable on VIVE Flow.
2. Connect the other end of the cable to a power source such as a power bank, power outlet,
or your phone.
If connecting to a power bank, make sure to connect the USB Type-C cable to the output port
of the power bank.
The LED indicator in front will light up when VIVE Flow turns on. After a few seconds, the
LED indicator will turn off.
To turn off VIVE Flow, unplug it from the power source.
8 Getting started
Putting on VIVE Flow
Open the frame of VIVE Flow, and then wear it as you would regular glasses.
§Before wearing VIVE Flow, connect it to a power source. See Connecting to a power source
on page 8.
§If you wear glasses, remove them first before putting on VIVE Flow.
§It is strongly recommended to take regular breaks. Stop using VIVE Flow if you feel any
discomfort.
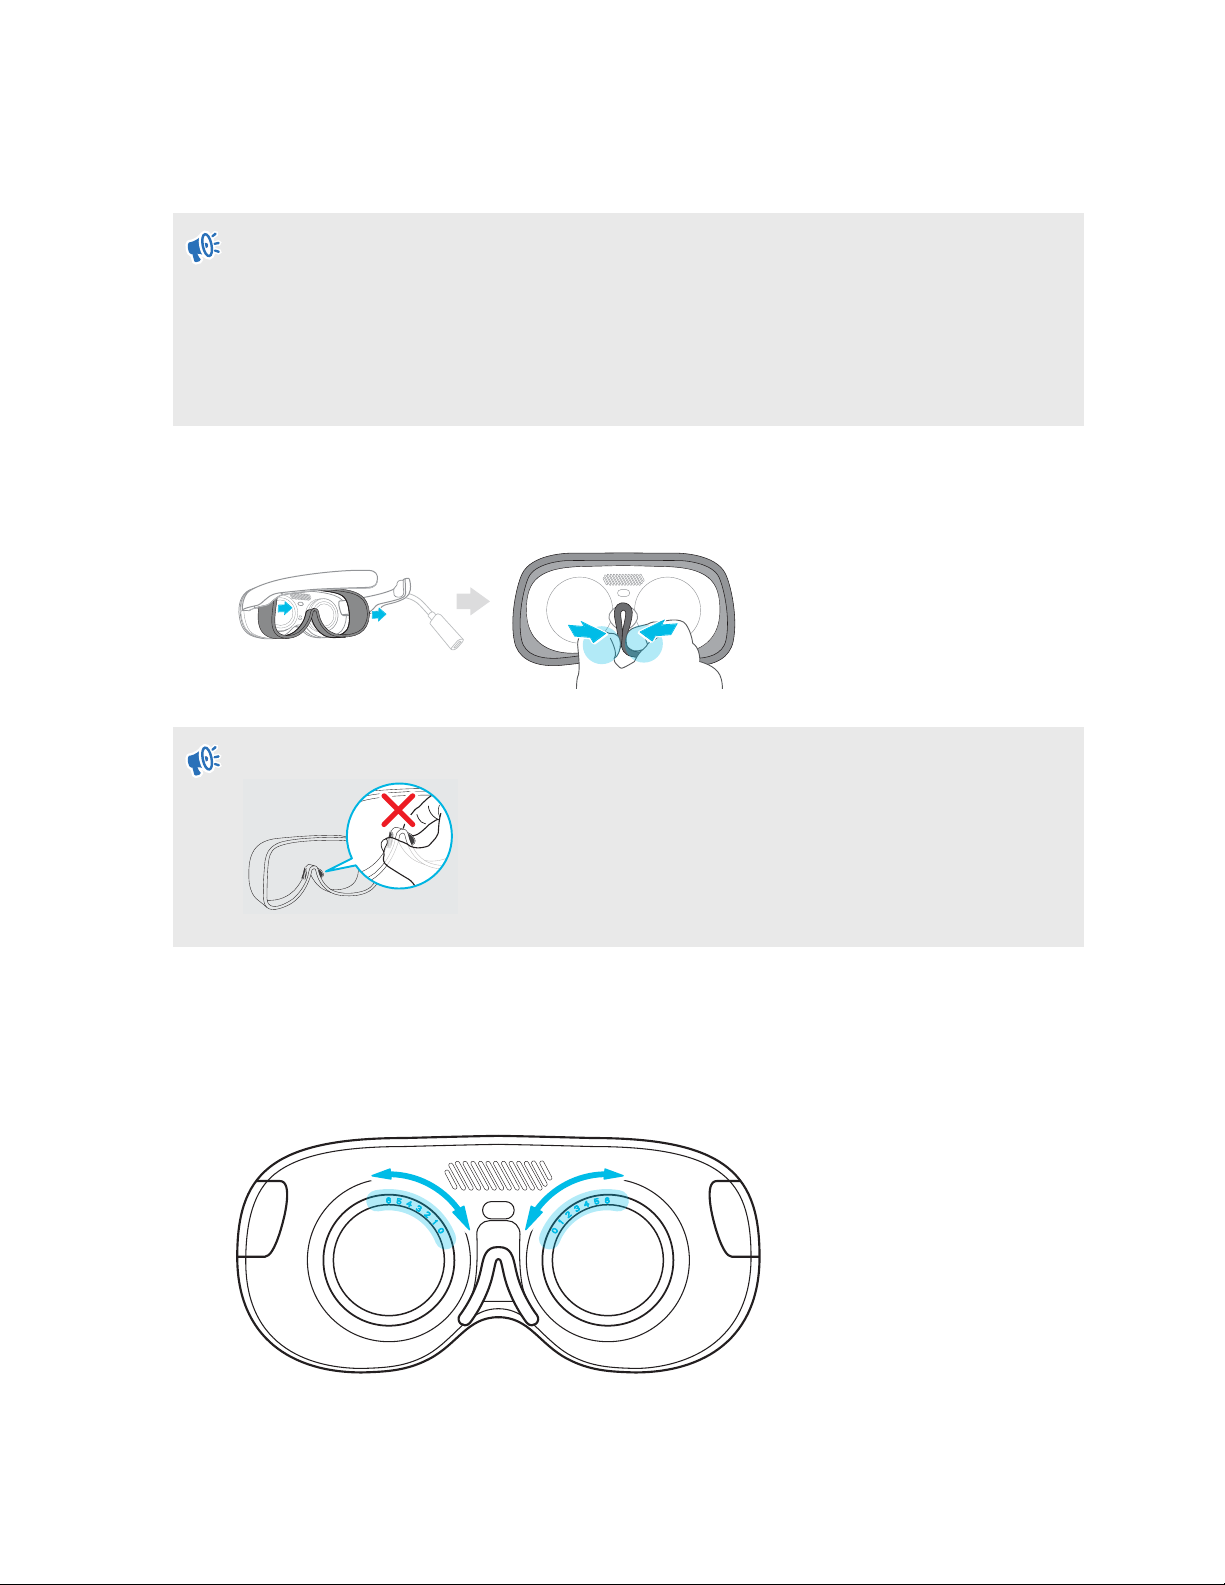
If VIVE Flow keeps slipping down your nose while using it, adjust the fit of the face cushion.
Remove the face cushion, and then squeeze the middle part of the face cushion, below the 2
plastic tabs, for a tighter fit.
Do not squeeze the 2 plastic tabs as it may damage the face cushion.
Adjusting the diopter dial
You can adjust the diopter dial even after setting up VIVE Flow. This is useful when sharing your
VR glasses with friends or family so they can adjust it to get a clear and sharp view.
1. If you're currently running an app, tap/press the VIVE button on the controller, and then
select Back to Home.
9 Getting started

2. Select Library Tutorial Diopter adjustment.
3. Follow the onscreen instructions to adjust the diopter dial to get a clear view.
Do not attach the face cushion when adjusting the diopter dial. You only need to attach the
nose rest.
When you've finished the steps, you'll be taken back to Home.
Remember to remove the nose rest and re-attach the face cushion when you're done.
10 Getting started
Other manuals for VIVE FLOW
1
Table of contents
Other HTC Virtual Reality Headset manuals

HTC
HTC Vive Enterprise Quick guide

HTC
HTC VIVE N CHILL User manual

HTC
HTC VIVE Operating instructions

HTC
HTC Vive Focus 3 User manual

HTC
HTC Vive Focus 3 User manual

HTC
HTC VIVE XR ELITE User manual

HTC
HTC Vive Pro User manual

HTC
HTC VIVE Focus Plus User manual

HTC
HTC Vive Pre User manual

HTC
HTC VIVE User manual

HTC
HTC VIVE Pro 2 User manual

HTC
HTC VIVE Owner's manual

HTC
HTC Vive Cosmos User manual

HTC
HTC Vive Focus 3 User manual

HTC
HTC VIVE DEVELOPER User manual

HTC
HTC VIVE Cosmos Elite User manual
HTC
HTC VIVE Tracker (3.0) User manual

HTC
HTC Vive Cosmos User manual

HTC
HTC VIVE Business Streaming User manual

HTC
HTC VIVE FLOW User manual


