Avermedia Dark Crystal HD Capture SDK User manual

AVer MediaCenter
User Manual

Disclaimer
All the screen shots in this documentation are only example images. The images may vary
depending on the product and software version. Information presented in this
documentation has been carefully checked for reliability; however, no responsibility is
assumed for inaccuracies. The information contained in this documentation is subject to
change without notice.
Copyright
©2010 by AVerMedia Technologies, Inc. All rights reserved.
No part of this document may be reproduced or transmitted in any form, or by any means
without the prior written permission of AVerMedia Technologies Inc. AVerMedia
Technologies Inc. reserves the right to modify its models, including their characteristics,
specifications, accessories and any other information stated herein without notice. The
official printout of any information shall prevail should there be any discrepancy between the
information contained herein and the information contained in that printout.
"AVerMedia" is a trademark (or registered trademark) of AVerMedia Technologies,
Inc. Other trademarks used herein for description purpose only belong to each of their
companies.
International Headquarter
Address No. 135, Jian-Yi Road Chung-Ho City, Taipei Hsien Taiwan
Website www.avermedia.com
Telephone 886-2-2226-3630
MCS-1.7.8
201006

Table of Contents
Chapter 1 Introduction.........................................................................5
1.1 Device Introduction .........................................................................................6
1.2 System Requirements .....................................................................................7
1.3 Activating AVer MediaCenter ..........................................................................7
1.4 Overview of AVer MediaCenter........................................................................8
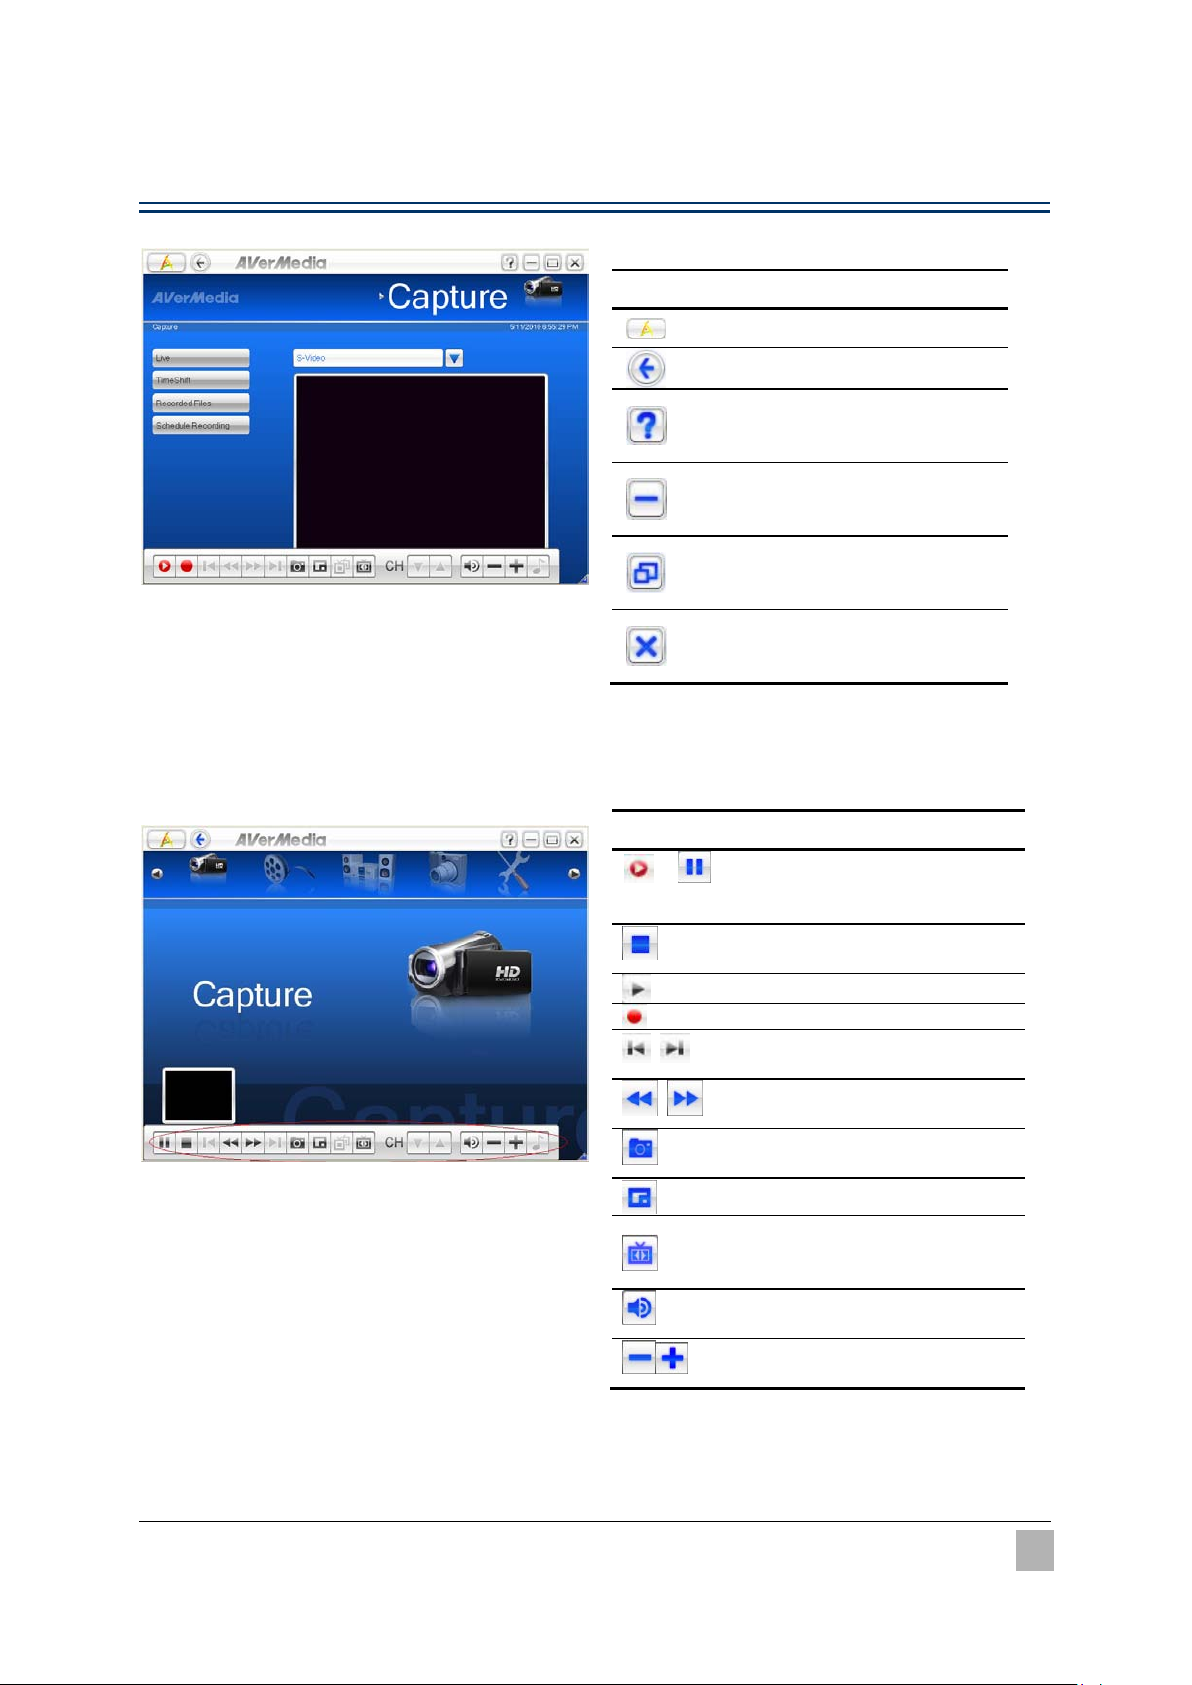
Aver MediaCenter Console....................................................................................................... 8
Control Buttons On Title Bar.................................................................................................... 9
Control Buttons On Playback Window Control Panel.............................................................. 9
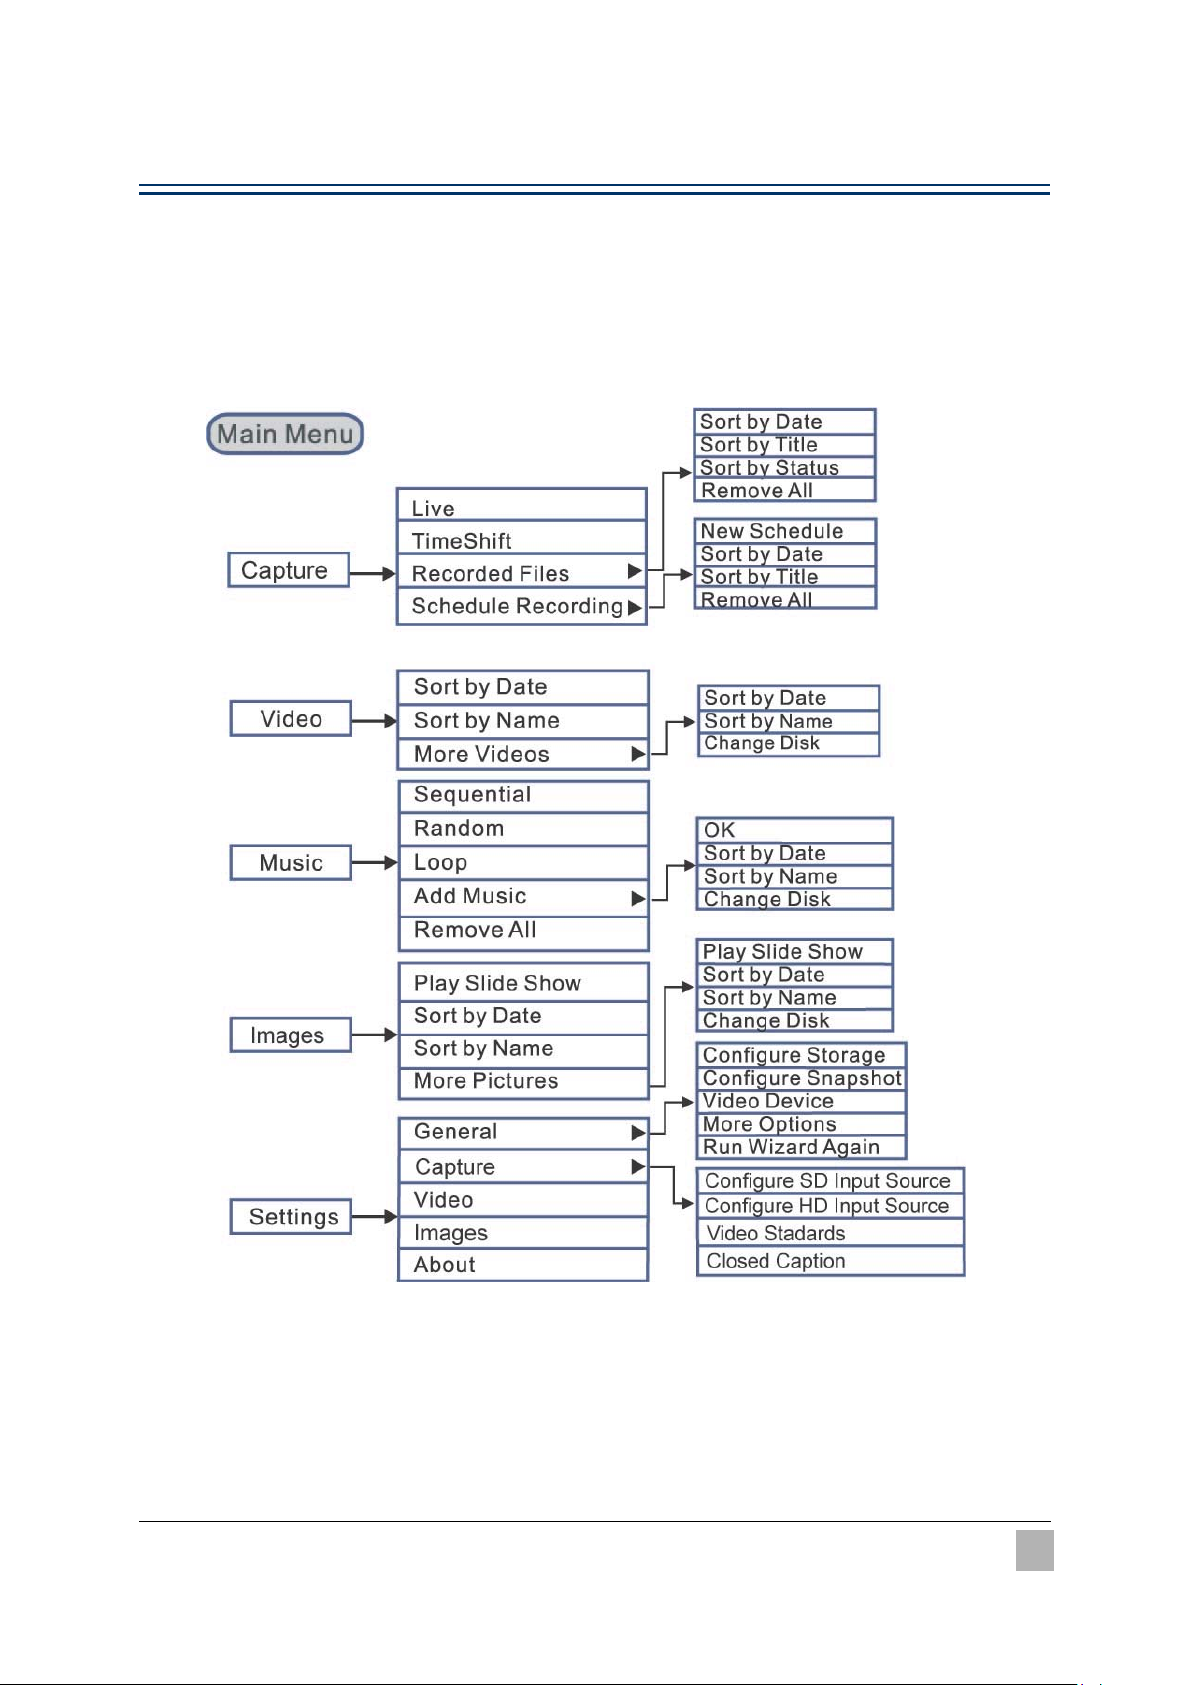
Navigation Tree....................................................................................................................... 10
1.5Running AVer MediaCenter for the First Time.................................................11
Chapter 2 Getting Started ..................................................................13
2.1 Capture...........................................................................................................14
Capture in Live ....................................................................................................................... 15
Operations of TimeShift.......................................................................................................... 16
Operations of Recorded Files.................................................................................................. 17
Using Schedule Recording...................................................................................................... 18
2.2 Video...............................................................................................................20
Playing Video Files................................................................................................................. 20
2.3 Music ..............................................................................................................21
Adding Music to your Playlist ................................................................................................ 21
Playing Music ......................................................................................................................... 22
2.4 Images............................................................................................................23
Viewing the Captured Images ................................................................................................. 23
Playing Slide Show................................................................................................................. 23
Chapter 3 Advanced Operations ........................................................24
3.1 General Settings............................................................................................25
Configure Recording............................................................................................................... 25
Configure Snapshot................................................................................................................. 26
More Options.......................................................................................................................... 27
3.2 Capture Settings............................................................................................28
Configure SD Input Source > SD recording format................................................................ 28
Configure SD Input Source > SD Timeshift & Color Adjustment.......................................... 29
Configure SD Input Source > SD Color Adjustment .............................................................. 29
Configure HD Input Source .................................................................................................... 30
Video Standards ...................................................................................................................... 31
Closed Caption........................................................................................................................ 31
3.3 Video Settings................................................................................................32

Picture-in-Picture(PIP) / Picture-by-Picture(PBP) Display .................................................... 32
3.4 Images Settings.............................................................................................33
3.5 About..............................................................................................................34
Appendix .............................................................................................35
Hot Keys ................................................................................................................................. 36
Glossary .................................................................................................................................. 37

Chapter 1
Introduction
Thanks for purchasing AVer Media DarkCrystal HD Capture SDK. This high quality
capture card is especially designed for professional players with high standards
towards image/ video quality.
AVer Media DarkCrystal HD Capture SDK also comes with a powerful application
AVer MediaCenter, allowing you to capture high resolution images, record HD
video clips, create your own slideshows with both the captured and images of other
sources, and even create your own music library for both audio and video luxury.
Each function of AVer MediaCenter goes further with detailed options for a more
professional taste. There is no more need to compromise yourself with all fixed
default settings using a capture card.
This Chapter will guide you through the essential information of AVer MediaCenter.
Please read this chapter before using AVer MediaCenter.
Device Introduction...........................6
System Requirement.........................7
Activating AVer MediaCenter............7
Overview of AVer MediaCenter.........8
Running AVer MediaCenter for the First
Time .................................................11

Introduction
6
1.1 Device Introduction
What is video capture card and what can it do?
Video capture cards are a class of video capture devices designed to plug directly into expansion
slots in personal computers and servers.
A video capture card product typically includes a driver to get the device going and a bundled
software to bring out the best features of it. The bundled software usually further processes the video
for specific purposes. The functions of the video capture cards vary from one another. Some are
used to capture base band analog composite video, S-Video, some are equipped with tuners,
RF-modulated video, some others are specialized cards that support digital video via digital video
delivery standards including Serial Digital Interface (SDI) and some, with the emerging hi-tech HDMI
standard becoming more popular, support both standard definition (SD) and high definition (HD)
variants, and this AVer Media DarkCrystal HD Capture SDK you just purchased belongs to the last
model.
The functions of the supplied AVer MediaCenter for video capture cards include converting a live
analog source into some type of analog or digital media, (such as a VHS tape to a DVD), archiving,
video editing, scheduled recording (such as a DVR), etc.
Product Name AVerMedia DarkCrystal HD Capture SDK
Model No. C727
Supported Signal
Sources S-Video / Composite (RCA) / Component (YPbPr, 1080i/720p) /
HDMI (HDCP spupport, 1080i/720p) / Analog Audio L/R

Introduction
7
1.2 System Requirements
System requirements are described in details below. Before using AVer MediaCenter, please verify
that your PC meets the requirements below.
For SD Video Capturing:
Intel Pentium 4 3.0 GHz (Hyper-Threading)
AMD Athlon 64 3200+
For HD Video Real-time Capturing (MPEG-2 Format):
Intel Core 2 Duo 2.4 GHz
AMD Athlon 64x2 Dual Core 2.8 GHz
For HD Video Real-time Capturing (H.264 Format):
Intel Core i5 750 or AMD equivalent
VGA card with DirectiveX9.0c or above
512 MB RAM
PCI-E Slot
Sound card
Windows 7/ Vista/ XP (32/ 64-Bit)
Standalone graphics card is recommended for HD video capturing.
2GB RAM is recommended for HD video capturing
1.3 Activating AVer MediaCenter
To launch AVer MediaCenter, double-click shortcut on desktop, or go to Start -> Programs ->
AVerMedia. If AVer MediaCenter is launched, double-click AVer Quick “ ”icon on the lower right
of the system tray.

Introduction
8
1.4 Overview of AVer MediaCenter
The functions of AVer MediaCenter are categorized into five buttons on the main menu, including
“Capture”, “Video”, “Music”, “Images” and “Settings”. This section briefly introduces main menu,
sub menus and initial setups. For more information on advanced operations, please refer to contents
from Chapter 2.
AVer MediaCenter Console
Description
Title bar: Control over AVerMedia Console
Main function menu: Capture, Video, Music, Images, Settings
Playback window: Display of the selected source/ file
Playback window control panel: Control over the Playback window
System time display: indication of current time

Introduction
9
Control Buttons On Title Bar
Click To …
Go back to the main menu
Go back to a previous level
Bring out the user’s manual
Minimize AVerMedia Console to
system tray
Restore AVerMedia Console to
previous size
Exit AVerMedia Console
Control Buttons On Playback Window Control Panel
Click To …
/ Switch from real-time video to
TimeShift mode. / Pause the
playback temporarily.
Stop playback, recording,
TimeShift, etc.
Play the selected file.
Record the current program.
Play the previous/next file on
the playlist.
Move backward or skip forward
in intervals.
Capture a single image or a
sequence of images.
Enable the PIP function.
Switch to different aspect
ratios.
Mute/ Unmute the audio
volume.
Increase or decrease the audio
Volume.

Introduction
10
Navigation Tree
This is an overview of the operations under each main function. For specific
operation of each function, please refer to the table of contents and go to its
according page.

Introduction
11
1.5 Running AVer MediaCenter for the First Time
When you run the AVer MediaCenter for the first time, the Setup Wizard will automatically pop up
and take you through all the necessary steps for a complete setup.
1
1.
.
When Setup Wizard
dialog box appears,
click Yes.
2
2.
.
Select AVerMedia
C727 HD Capture
Device under Primary
Device dropdown
menu and click Next to
continue.

Introduction
12
3
3.
.
Select from the
dropdown menu of
Country/ S-Video/
Composite Video/ HD
Input according to the
place you use this
device, the signals
provided in your region,
and the signals of the
equipment connected
to your PC. Then click
Next.
4
4.
.
The wizard will guide
you through to
complete the setups for
the available signals.
Click Next to continue
or click Skip to ignore
the setups.
5
5.
.
Click Finish to
complete the initial
settings or click Next to
set up other devices if
any.
Note: To re-configure all the
settings, go to
“Settings”“General”
“Run Wizard Again.”

Getting Started
13
Chapter 2
Getting Started
This Chapter includes descriptions of the five main functions on AVer MediaCenter
main menu. Each basic operation is followed by more detailed information on sub
menu under each function.
Before using the AVer MediaCenter, it is highly recommended to read through the
contents of this chapter.
Capture ............................................14
Video................................................20
Music................................................21
Images .............................................23

Getting Started
14
2.1 Capture
You can capture a high quality still image, a sequence of continuous images, or record a video clip
when watching videos either from live or previously recorded sources or playing games in AVer
MediaCenter.
Basic Operations
1
1.
.
Select a video source from the left menu and then the desired input signal source from the
dropdown menu on the upper right.
2
2.
.
Click to capture a still image or to record a clip of video during the video playback.
The captured/ recorded files are saved under Recorded Files.

Getting Started
15
Capture in Live
Live video refers to any available current video source ready for playback. This can refer to any
supported signal coming from the connected device, such as a DVD player or a video gaming device.
Note : Video source setup is supposed to be completed when running AVer MediaCenter for the first
time. If not, please go to Settings -> General for reconfiguration.
1
1.
.
Select an input source from the dropdown menu on top of the main playback window.
2
2.
.
Click on the control panel to start the playback.
3
3.
.
Click to get a still image or to start recording a clip of video. Click again to stop
the recording. The captured images/ video clips are saved in Recorded Files.
Note
1. To find the captured/ recorded files, click Recorded File button on the left.
2. To change the storage location of the captured/ recorded files, go to Settings -> General ->
Configure Storage.

Getting Started
16
Operations of TimeShift
The TimeShift function performs background recording of a video playback, and allows you return to
any part of the recorded program. At the same time, the live program continues to be recorded and
played back so you won’t miss any part of the show. You can also advance forward to skip
commercials or rewind to replay scenes again.
1
1.
.
Select an input source from the dropdown list on the right. When the playback starts, click
TimeShift on the left menu.
2
2.
.
Click on the control panel. Both the background recording time and the current-show time
are shown on the upper-right of the main playback window.
3
3.
.
Click to move backward in fixed intervals until reaching the part where you left off.
Note
The application will create a temporarily recorded file when the TimeShift function is on for an
ongoing video. This file will be removed when you select .

Getting Started
17
Operations of Recorded Files
All the recorded files are listed with recording time and date. Reorganize the files with the menu on
the left.
1
1.
.
Go to Capture -> Recorded Files.
2
2.
.
Reorganize the recorded files by checking the options provided on the left menu.
3
3.
.
Select the desired file from the list and then click on the control panel to start playback.

Getting Started
18
Using Schedule Recording
The TimeShift function performs background recording of a program, and lets you return to any part
of the recorded program.
1
1.
.
Go to Capture -> Schedule
Recording.
2
2.
.
Click New Schedule to go to
detail setting window.
3
3.
.
Edit a name for the schedule,
and select the desired option
from the dropdown menu
under Task and After
Playback Mode.
Click Save on the left menu to
save your settings and bring up
the next edit window.

Getting Started
19
4
4.
.
Select the desired signal
Source under Source.
5
5.
.
Check the desired recurrent
frequency and enter the date of
the program for the schedule.
Click Save on the left menu to
save your settings and bring up
the next edit window.
6
6.
.
Enter the airing time of the
program to be recorded.
7
7.
.
Select the file format for the
program to be recorded.
8
8.
.
Enter the duration of the
program to be recorded.
9
9.
.
Check Split file Size if the file
size of the program to be
recorded is estimated to be
over the capacity of one DVD.
This is useful if you want to
burn the file onto DVD disks.
1
10
0.
.
Click to change the
default destination folder for
recorded files.

Getting Started
20
2.2 Video
You can watch video files besides the recorded files in Video.
Playing Video Files
1
1
.
.
Go to “Video”.
2
2.
.
The video files recorded by
AVer MediaCenter are listed
on the right. Double click to
start playing the selected file.
Use the main playback
window control panel to
control the playback.
3
3
.
.
To find more videos, click
Change Disk on the left
menu, all available disks on
your PC are shown in
thumbnail icons on the right.
4
4.
.
Click on the icon to locate
where other video files are.
This manual suits for next models
1
Table of contents
Other Avermedia Video Card manuals

Avermedia
Avermedia SA5000 User manual

Avermedia
Avermedia LIVE GAMER HD LITE C985E User manual

Avermedia
Avermedia DarkCrystal C199 User manual

Avermedia
Avermedia GC573 User manual

Avermedia
Avermedia LIVE GAMER HD 2 User manual

Avermedia
Avermedia DarkCrystal HD Capture SDK II C729 User manual

Avermedia
Avermedia GC573 User manual
Popular Video Card manuals by other brands

ATI Technologies
ATI Technologies RADEON 9800 PRO user guide

Matrox
Matrox Millenium installation guide

Nvidia
Nvidia VCQFX4600 supplementary guide

HP
HP Workstation x1000 user guide

Diamond Multimedia
Diamond Multimedia Stealth S9250PCI256 Specification sheet

Diamond Multimedia
Diamond Multimedia ATI Radeon HD 4650 PCIE Specification sheet