Avid Power ACVB432 User manual
2x20V MAX BRUSHLESS CORDLESS BLOWER
MODEL: ACVB432

2
SYMBOLS
SYMBOL NAME DESIGNATION/EXPLANATION
Safety Alert Precautions that involve your safety.
Read the user’s manual
To reduce the risk of injury, user must read
and understand user’s manual before using
this product.
Eye protection
Wear eye protection that is marked to
comply with ANSI Z87.1 when operating this
equipment.
Wet conditions alert Do not expose to rain or use in damp
locations.
Long hair Failure to keep long hair away from the air
inlet could result in personal injury.
Loose clothing
Failure to keep loose clothing from being
drawn into air intake could result in personal
injury.
Keep Bystanders away Keep all bystanders at least 50 ft. away.
Blower tubes Do not operate without tubes in place.
Electric shock alert Beware of electric shock hazard.

3
Read all instructions. Failure to follow the warnings and instructions may result in
electric shock, re and/or serious injury. Retain this manual for future reference.
1. Work area safety
a. Keep work area clean and well lit. Cluttered or dark areas invite accidents.
b. Do not operate power tools in explosive atmospheres, such as in the presence of
ammable liquids, gases or dust. Power tools create sparks which may ignite the dust or
fumes.
c. Keep children and bystanders away while operating a power tool. Distractions can
cause you to lose control.
2. Electrical safety
a. Power tool plugs must match the outlet. Never modify the plug in any way. Do not use
any adapter plugs with earthed (grounded) power tools. Unmodied plugs and matching
outlets will reduce risk of electric shock.
b. Avoid body contact with earthed or grounded surfaces such as pipes, radiators,
ranges and refrigerators. There is an increased risk of electric shock if your body is
earthed or grounded.
c. Do not expose power tools to rain or wet conditions. Water entering a power tool will
increase the risk of electric shock.
d. Do not abuse the cord. Never use the cord for carrying, pulling or unplugging the
power tool. Keep cord away from heat, oil, sharp edges or moving parts. Damaged or
entangled cords increase the risk of electric shock.
e. When operating a power tool outdoors, use an extension cord suitable for outdoor
use. Use of a cord suitable for outdoor use reduces the risk of electric shock.
3. Personal safety
a. Stay alert, watch what you are doing and use common sense when operating a power
tool. Do not use a power tools while you are tired or under the inuence of drugs, alcohol
or medication. A moment of inattention while operating power tools may result in serious
personal injury.
b. Use personal protective equipment. Always wear eye protection. Protective equipment
such as dust mask, nonskid safety shoes, hard hat, or hearing protection used for
appropriate conditions will reduce personal injuries.
c. Prevent unintentional starting. Ensure the switch is in the o-position before
GENERAL POWER TOOL SAFETY INSTR UCTIONS

4
connecting to power source and/or battery pack, picking up or carrying the tool. Carrying
power tools with your nger on the switch or energising power tools that have the switch
on invites accidents.
d. Remove any adjusting key or wrench before turning the power tool on. A wrench or a
key left attached to a rotating part of the power tool may result in personal injury.
e. Do not overreach. Keep proper footing and balance at all times. This enables better
control of the power tool in unexpected situations.
f. Dress properly. Do not wear loose clothing or jewellery. Keep your hair, clothing and
gloves away from moving parts. Loose clothes, jewellery or long hair can be caught in
moving parts.
g. If devices are provided for the connection of dust extraction and collection facilities,
ensure these are connected and properly used. Use of dust collection can reduce dust-
related hazards.
4. Personal protection
a. Risk of eye injury. Wear safety glasses or similar eye protection marked. Use a face
or dust mask whenever the operations may produce dust or ying particles.
b. Wear ear protection whenever the sound level seems uncomfortable.
c. Do not overreach
d. Keep proper footing and balance at all times.
5. Use the appropriate tool
a. The intended use is described in this instruction manual. Do not force small tools or
attachments to do the job of a heavy-duty tool.
b. The tool will do the job better and safer at the rate for which it was intended. The use
of any accessory or attachment or performance of any operation with this tool other than
those recommended in this instruction manual may present a risk of personal injury. Do
not force the tool.
6. Maintain tools with care
a. Keep cutting tools sharp and clean for better and safer performance.
b. Follow the instructions for maintenance and changing accessories.
c. Keep handles and switches dry, clean, and free from oil and grease.
GENERAL POWER TOOL SAFETY INSTR UCTIONS

5
7. Check for damaged parts
a. Before using the tool, carefully check it for damage to ensure that it will operate
properly and perform its intended function.
b. Check for misalignment and seizure of moving parts, breakage of parts and any other
conditions that may eect its operation.
c. Have any defective parts repaired or replace by an authorized repair agent. Do not
use the tool if any part is defective.
d. Never attempt any repairs yourself.
8. Remove the battery
a. Reduce the risk of injury to persons. Remove the battery pack when the tool is not
in use, before changing any parts of the tool, accessories or attachments, and before
cleaning or servicing.
b. Avoid unintentional starting
c. Do not carry the tool with a nger on the on/o switch.
9. Never carry the charger by its cord or pull it to disconnect from the socket.
Keep the cord away from heat, oil, and sharp edges.
The personal protective equipment protects your own health and the health of others
and ensures the smooth operation of the device:
(1)Wear suitable work clothing, such as sturdy shoes with nonslip soles, long, robust
trousers, gloves, safety goggles and ear protection. Wear these at all times while
operating the machine. Never use the device barefooted or wearing open sandals.
Wear respiratory protection to protect against dust.
(2)Do not wear clothing or jewellery that could be sucked into the air intake. Wear
protective headwear to contain long hair. Keep long hair away from the suction
apertures.
Pay attention to people, especially children, pets, open windows, etc. The blown
material can be thrown in their direction. Stop working if they are in close proximity.
SPECIFIC SAFETY WARNINGS FOR BLOWER
GENERAL POWER TOOL SAFETY INSTR UCTIONS

6
Keep a safety distance of 5 m around you.
Be familiar with your surroundings and pay attention to potential dangers that may be
overlooked when working.
Carefully inspect the surface to be cleaned and remove all wires, stones, cans and
other foreign bodies. Remove all hard objects from work area. Do not blow debris in
the direction of people, animals or property.
In very dry conditions, lightly moisten the surface or use a sprayer to reduce the build-
up of dust.
Do not work with a damaged or incomplete device or one which has been converted
without the permission of the manufacturer. Before use, check the safety status of the
device, in particular the mains cable and the switch.
Do not put any object into openings. Do not use with any opening blocked; keep free
of dust, lint, hair, and anything that may reduce air ow.
Use extra care when cleaning on stairs.
Do not use to pick up ammable or combustible liquids, such as gasoline, or use in
areas where they may be present.
Maintain labels and nameplates on the appliance. These carry important safety
information.
People with pacemakers should consult their physician(s) before use. Electromagnetic
elds in close proximity to heart pacemaker could cause pacemaker interference or
pacemaker failure.
The warnings, precautions, and instructions discussed in this instruction manual
cannot cover all possible conditions and situations that may occur. It must be
understood by the operator that common sense and caution are factors which cannot
be built into this product, but must be supplied by the operator.
SPECIFIC SAFETY WARNINGS FOR BLOWER

7
Voltage: 2x20V Max
No-load speed: 9000-23000 RPM(4 speeds+ Turbo)
Max. Air speed: 100 MPH / Turbo: 130 MPH
Max. Air volume: 353 CFM / Turbo: 485 CFM
Includes:
1pc cordless leaf blower
1pc blower pipe
2pc battery pack
1pc charger
1pc user manual
1. Blower Tube
2. Release button
3. Handle
4. Left Battery
5. Right Battery
6. Volume control
SPECIFICATIONS
DESCRIPTION

8
If any parts are damaged or missing do not operate this product until the parts
are replaced. Do not attempt to modify this product or create accessories not
recommended for use with this product. Do not connect to power supply until
assembly is complete.
Installing / removing the blower tube(Fig.1)
Install the tube: align the fastener and insert it into the motor housing. Check whether
the air duct is rmly installed.
Remove the tube: Press the release button and pull out the air duct.
Note: Before disassembling the tube, ensure the On/O trigger switch is in o position.
Installing/removing battery(Fig.2)
To install the battery pack
Align the rails of the battery pack with the rails in the handle and push the battery into
the handle. Until the latch locks into place.
ASSEMBLY
Fig.1
Fig.2
9
To remove the battery pack
Press the battery release button , Slide the battery pack backward, and then pull or lift
the battery out of the tool.
NOTE: Before using the blower for the rst time, please full charge the battery pack at
rst. Make sure to read all safety precautions, and follow the instructions in the battery
charger section.
Battery pack
The battery is not fully charged. You’d better let it charge for 1-2 hours before the rst
use. Normal charging time is 1-2 hours when the battery is completely run out.
Replace a new battery when tool performance begins to diminish; Severe heat is most
destructive to a battery; The more heat it generates, the faster the battery loses power.
A battery that gets too hot can have a shortened life.
Never over-discharge a battery when using the tool even after tool performance has
decreased. When tool performance begins to diminish, please stop letting the tool
work and recharge the battery for optimal performance.
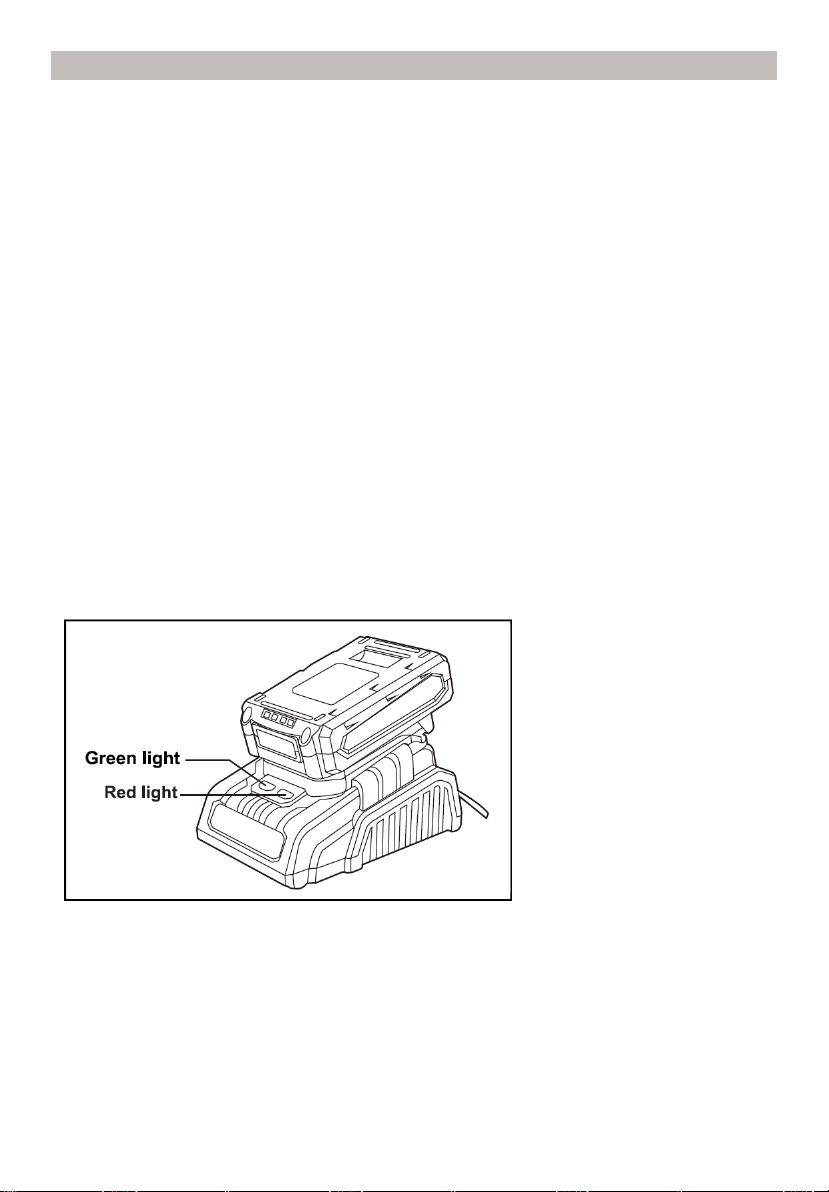
How to charge the battery pack?
Green light: Power indicator. When the charger is connected to AC household current,
the green light is on.
Red light: Charging indicator. When the battery is properly inserted into the charger and
charging, the red light is on.
Notice: Please push the battery pack forward until you hear a click sound. The click
sound means the battery is properly inserted into the charger.
ASSEMBLY
Fig.3

10
How do you know if the battery is fully charged?
Normal charging time is 1.5 to 2 hours when the battery is completely dead. The red
light will turn o and the green light remains lit once the battery is fully charged.
Caution!
Fully charge battery before rst use.
Avoid short periods of charging. Only charge battery pack when it is completely run
out.
Adaptor, charger and battery pack will be warm when charging.
Switching On/O(Fig.4)
The cordless leaf blower may only be used with two batteries of the AVID POWER.
Before switching the device on, make sure that it is not touching any objects. Ensure
secure positioning.
Press and hold the ON/OFF button to start the blower.
Press the lower speed button to lower the air speed, or press higher speed button
to higher the air speed.
OPERATING
Air speed indicator
Battery indicator
ASSEMBLY

11
The battery indicator is used to show the remaining power of the battery pack.
Air speed indicator shows four dierent air speed during your job.
To switch o, briey press the ON/OFF button.
Using the Blower
Holding and Controlling the Blower.
Hold and control the blower with one hand on the control handle - wrap your thumb
around the handle.
Point the nozzle at the ground, walk slowly and steadily forwards.
Temperature Control /Overload Protection
When the temperature of battery is too high and the machine switches o automatically.
Switch the blower o.
Allow the battery to cool down before continuing to work. When the blower is blocked
and it will turn o automatically.
Remove the blower from the work piece.
As soon as the blockage is corrected, the tool will continue to work at the set stroke
rate.
OPERATING

12
In order to avoid personal injury and the risk of re and electric shock, remove
the battery pack before adjusting, inspecting, or cleaning the blower. When
servicing, use only identical replacement parts. Use of any other parts could
create a hazard or cause product damage.
Be alert for battery packs that are nearing their end of life. If you notice decreased tool
performance or signicantly shorter running time between charges then it is time to
replace the battery pack. Failure to do so can cause the tool to operate improperly or
damage the charger.
Ventilation openings and switch levers must be kept clean and free of foreign matter.
Do not attempt to clean by inserting pointed objects through opening.
Avoid using solvents when cleaning plastic parts. Most plastics are susceptible to
damage from various types of commercial solvents and may be damaged by their use.
Use clean clothes to remove dirt, oil, grease, etc.
In order to maintain battery capacity, we recommend the battery to be completely
discharged every one month and fully recharged again .Only store with a fully charged
battery and top-up the charge from time to time if stored for a long time. Store in a dry
and frost-free place, the ambient temperature should not exceed 40°C.
MAINTENANCE

13
Read instruction manual rst! Remove battery pack from the tool before making
adjustments or assembling accessories.
Problem Possible Cause Possible Solution
Unit will not start
Battery pack not
installed properly Check battery pack installation
Battery pack not
charged
Check battery pack charging
requirements
Battery pack will
not charge.
Battery pack not
inserted into charger.
Insert battery pack into charger until
LED appears
Charger not plugged
in
Plug charger into a working outlet.
Please refer to the “BATTERY PACK”
instructions
Surrounding air tem-
perature too hot or too
cold
Move charger and battery to a
surrounding air temperature of above
40 degrees F(4.5°C) or below 105
degrees F(+40.5°C)
Unit shuts o
abruptly
Battery pack has
reached its maximum
thermal limit
Allow battery pack to cool down
Out of charge. (To
maximize the life of
the battery pack, it is
designed to shuto
abruptly when the
charger is depleted
Place on charger and allow to charge
TROUBLE SHOOTING

14
PARTS LIST
No. Description QTY
1Blower Tube 1
2Blower Rectier 1
3Diusion Duct 1
4Blower Rectier Cover 1
5 Right Handle 1
6 Self Tapping Screw St4*8 28
7 Right Housing 1
8 Self Tapping Screw St4*16 28
9Right Connecting Seat 1
10 Switch Panel 1
11 Brushless Motor Assembly 1
12 Controller 1
13 Left Handle 1
14 Left Connecting Seat 1
15 Left Housing 1
16 Strap Hook 1
17 Air Inlet Hood 1
18 Upper Battery Holder 1
19 Insert Seat Assembly 2
20 Lower Battery Holder 1
21 Duct Button 1
22 Spring 1
23 Pin Shaft 1
24 Motor Rear Fixing Frame 1
25 Switch Control Assembly 1

15
SCHEMATIC DRAWING

Table of contents


