Avint Goods Telescopisch Doucherek User manual

MANUAL / HANDLEIDING
Telescopisch
Doucherek
Top cap
Plafond Beschermer
Extendable
Uitschuifbaar
Twist lock
Draai Vergrendeling
Metal
Tube
Buis
Metal
Tube
Buis
Metal
Tube
Buis
Metal
Tube
Buis
Extendable Metal Tube with
preinstalled sping and twist
lock
Uitschuifbare buis met veer en
draaivergrendeling
Rubber stopper
(narrow side facing up)
Rubberen ring
(smalle kant naar boven)
Shampoo Caddy
Mandjes
Anti Slip Rubber Cap
Rubberen Anti Slip
poot
B C D EA
B
B
GX4
FX4
Deiling height chart
Plafondhoogte tabel
50” - 58.5”
Pole/Paal
A-B-D
58.5” - 63.5”
Pole/Paal
A-B-E
63.5” - 65.5”
Pole/Paal
A-B-D-E
65.5” - 76.5”
Pole/Paal
A-B-C
76.5 - 79.5”
Pole/Paal
A-B-C-D
79.5” - 86.5”
Pole/Paal
A-B-C-E
86.5” - 108”
Pole/Paal
A-B-C-D-E
127 - 149 cm
Pole/Paal
A-B-D
149 - 161 cm
Pole/Paal
A-B-E
161 - 166 cm
Pole/Paal
A-B-D-E
166 - 194 cm
Pole/Paal
A-B-C
194 - 202 cm
Pole/Paal
A-B-C-D
202 - 220 cm
Pole/Paal
A-B-C-E
220 - 274 cm
Pole/Paal
A-B-C-D-E
STEP 1STAP 1
Measure distance between ceiling and bottom surface,
and select appropriate pole congurations from
ceiling height chart (see other side instruction).
Meet de afstand tussen het plafond en de onderkant,
en kies de juiste onderdelen uit de plafondhoogte tabel
(zie achterzijde instructie).
Place anti-slip rubber cap on the pole.
Plaats de rubberen antislip poot op de paal.
Step 4 are based on the 86.5 to 108 pole conguration
Stap 4 is gebaseerd op 220-274 cm plafondhoogte
1.
STEP 2STAP 2
Assemble Pole structure as listed in the
Ceiling height chart, excluding Tube A and B
(which will be used later).
Monteer de constructie zoals vermeld in de
plafondhoogte tabel, met uitzondering van
buis A en B (die later zullen worden gebruikt).
1.
2.
A B
C
D
E
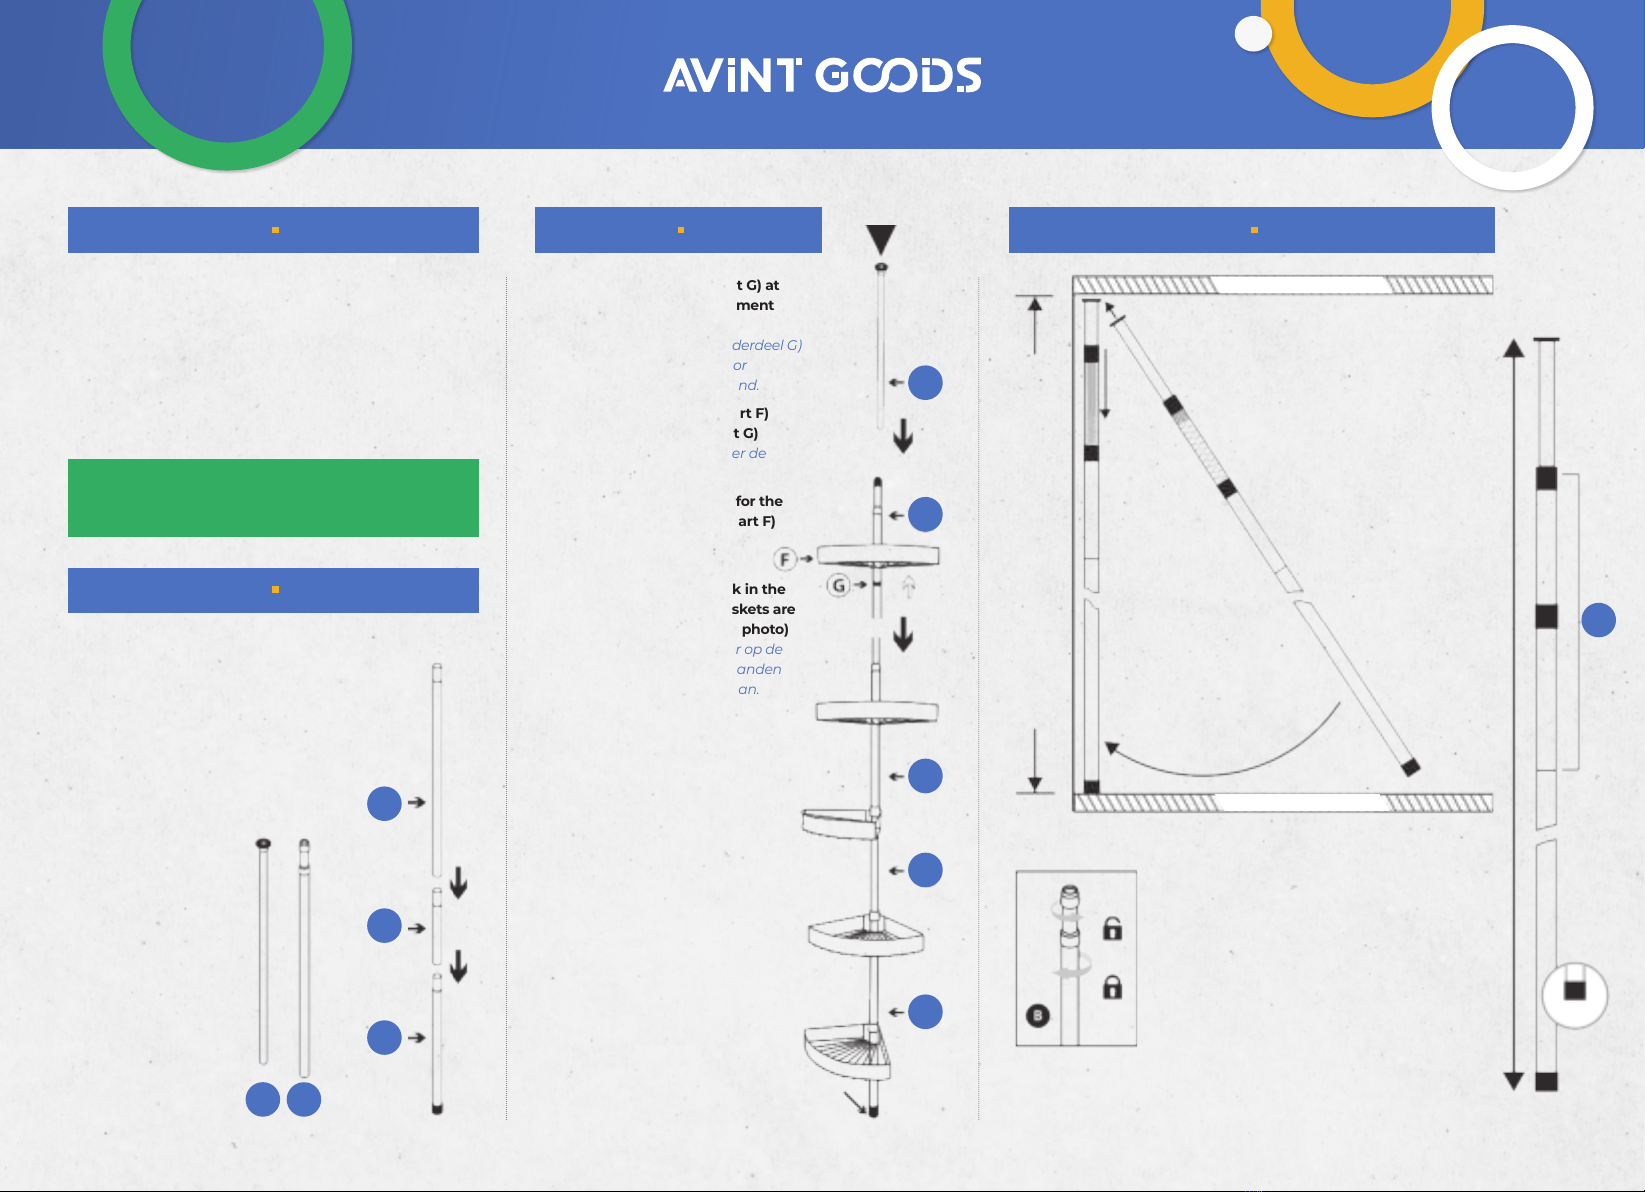
STEP 3STAP 3
Insert rubber stopper (part G) at
desired height for replacement
of the shampoo baskets
Plaats een rubber ring (onderdeel G)
op de gewenste hoogte voor
het vasthouden van de mand.
Place shampoo basket (part F)
over rubber stoppers (part G)
Plaats de mand(deel F) over de
rubberen ring (deel G)
Repeat the same process for the
other shampoo baskets (part F)
Herhaal dit proces bij de
overige 3 manden.
Assemble the shower rack in the
correct order after the baskets are
at the desired height. (see photo)
Zet het doucherek in elkaar op de
juiste volgorde nadat de manden
op de gewenste hoogte staan.
(zie foto)
1.
2.
3.
4.
A
B
C
D
E
Anti Slip Rubber Cap
Rubberen Anti Slip poot
220 - 274 cm
Pole/Paal
A-B-C-D-E
STEP 4STAP 4
measures distance between ceiling & bottom surface.
Meet de afstand tussen het plafond en de vloer.
Extend pole B so its overall length is 1 ½ in-
ches longer than ceiling to bottom surface.
Twistlocking tubeB tolock atthis length.
Verleng buis B tot de totale leng-
te 4 centimeter langer is dan de
afstand tussen het plafond en
de vloer. Draai linksom om de
buis te vergrendelen en draai
rechtsom om de vergrende-
ling eraf te halen (zie foto).
Locking tube
Vergrendeling
Aim pole at target ceiling position. Swing into
vertical position while compressing spring-
loaded top end in order to t pole snugly
Richt de buis op de gewenste plafondpositie.
Draai de buis in verticale positie terwijl de veer
de bovenkant samendrukt zodat de paal goed
past. PAS OP: Doe dit ten alle tijden met beleid,
als je merkt dat de doucherek niet helemaal
verticaal kan staan duw dan niet door. Dit kan
resulteren in het breken van de doucherek.
4cm
Top cap
Plafond
Beschermer
CEILING • PLAFOND
BOTTOM • VLOER
B
Popular Bathroom Fixture manuals by other brands

Kohler
Kohler Mira Sport Max J03G Installation and user guide

Moen
Moen 186117 Series installation guide

Hans Grohe
Hans Grohe Raindance Showerpipe 27235000 Instructions for use/assembly instructions

Signature Hardware
Signature Hardware ROUND SWIVEL BODY SPRAY 948942 Install

fine fixtures
fine fixtures AC3TH installation manual

LIXIL
LIXIL HP50 Series quick start guide


