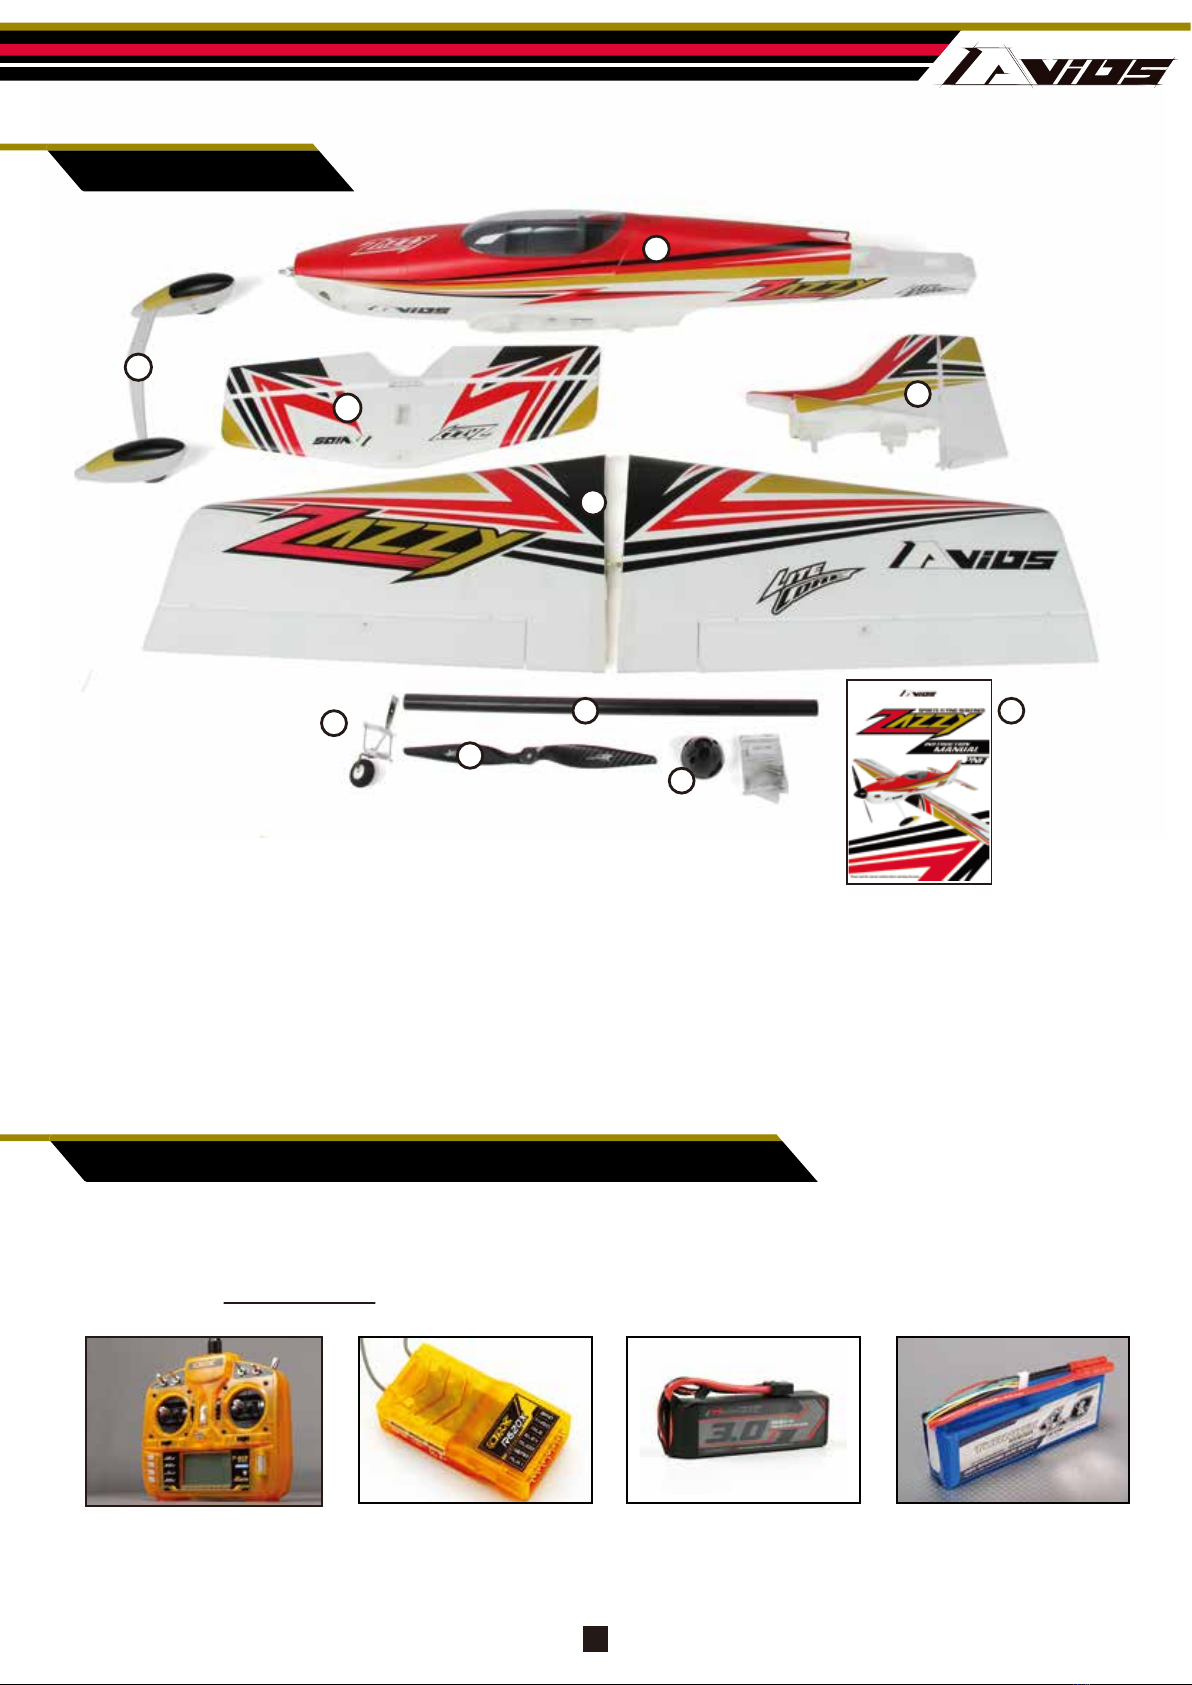
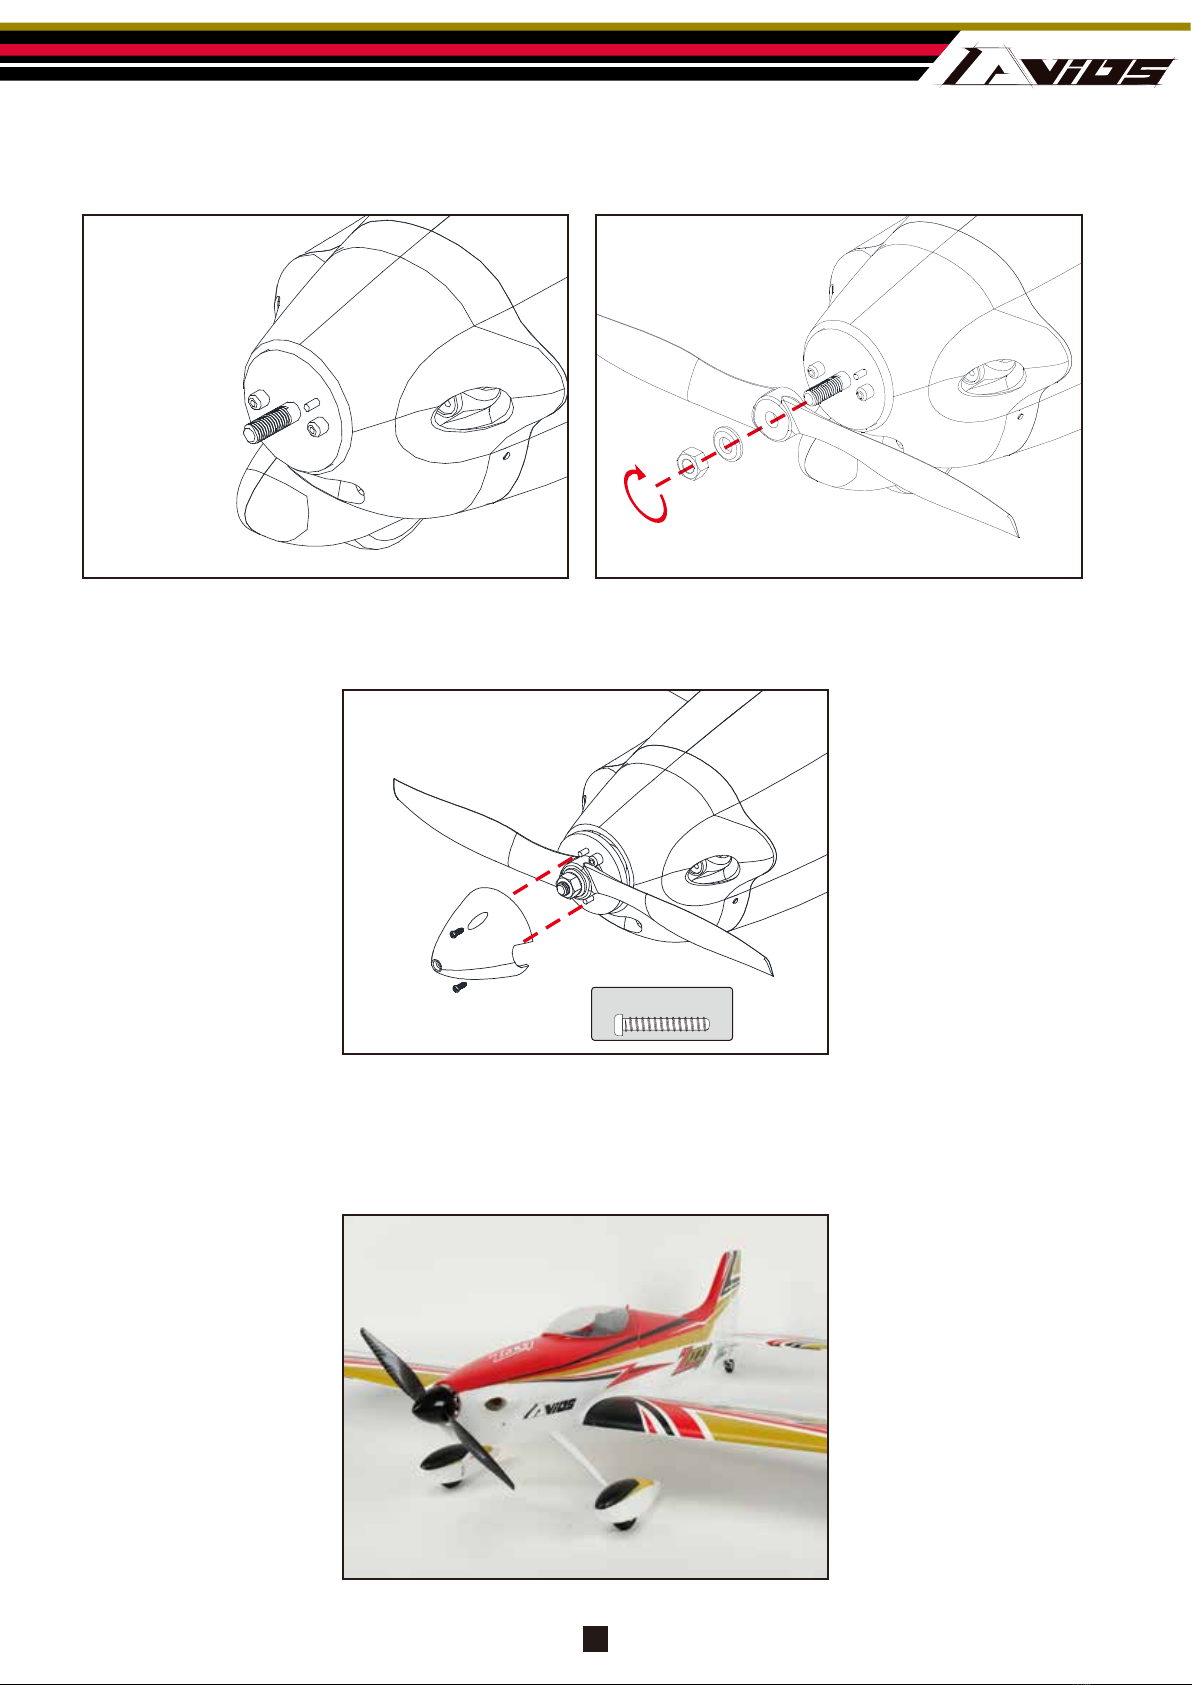
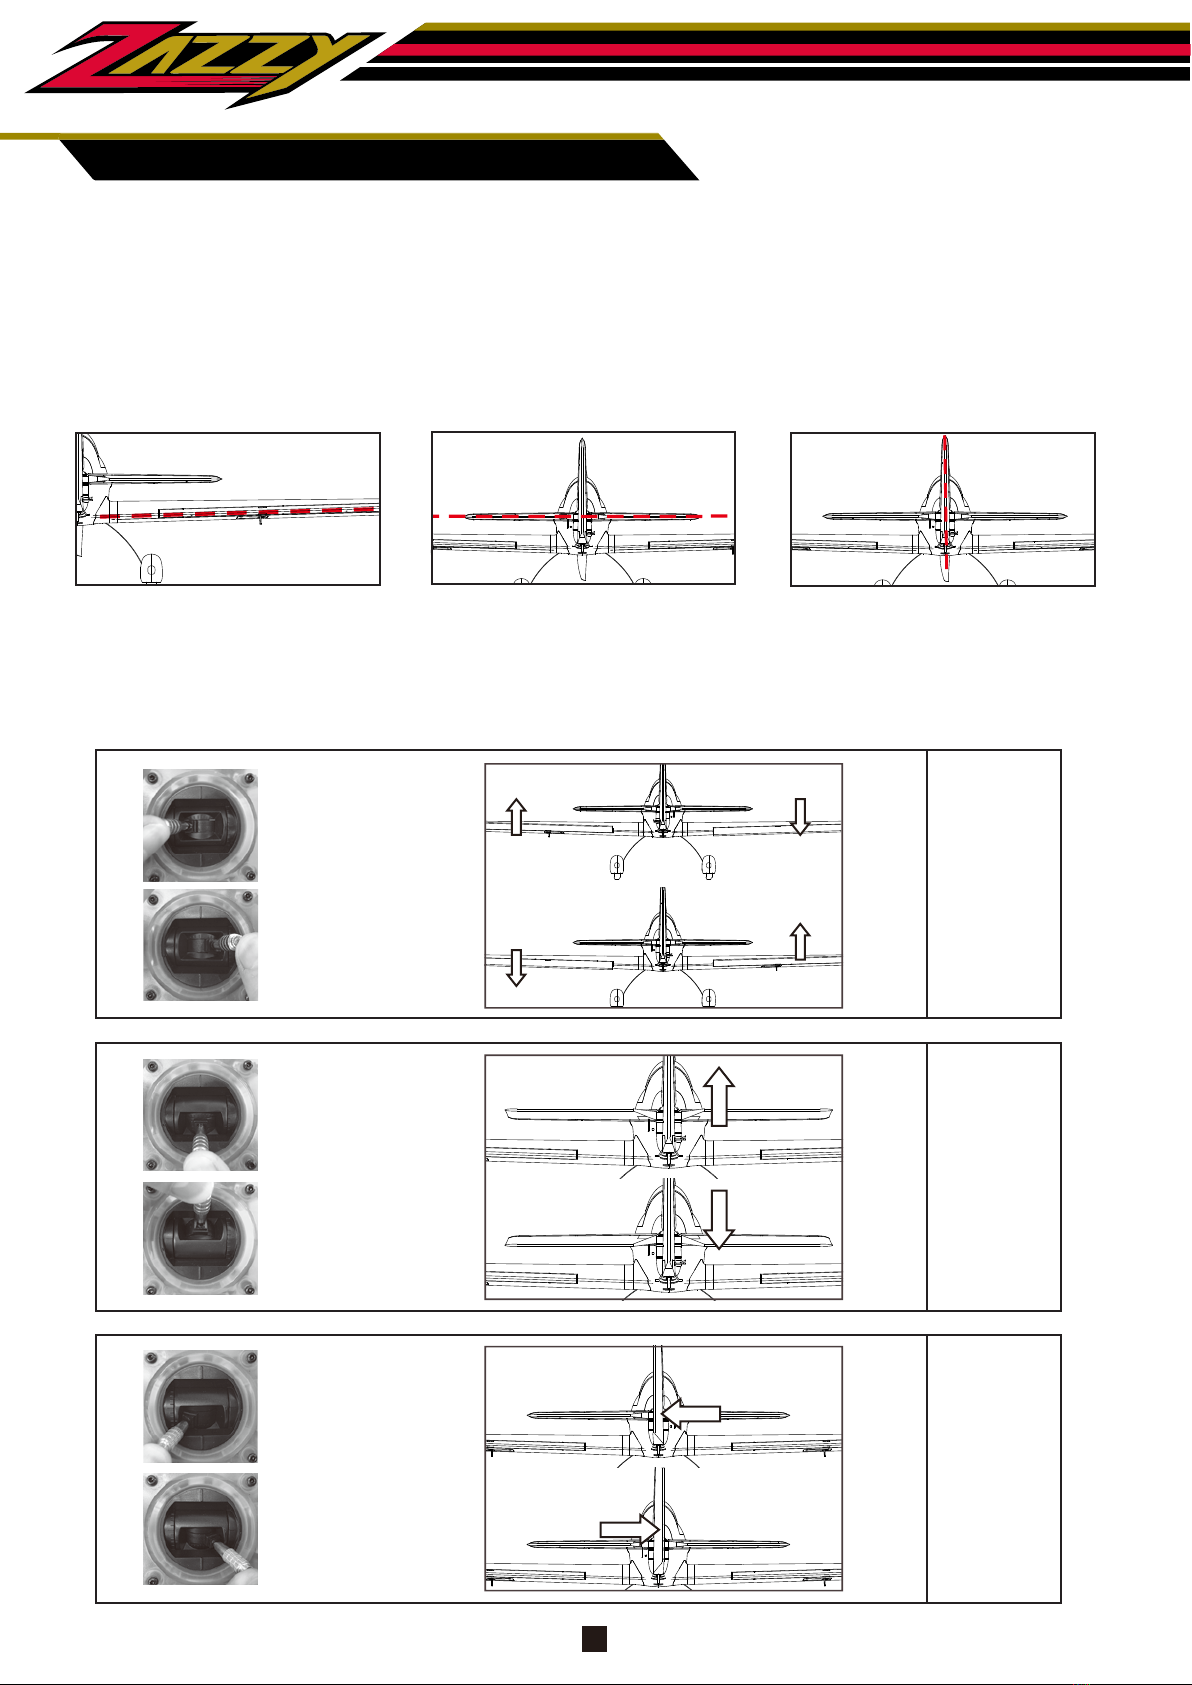
Avios Zazzy User manual

(Plug N Fly)
sports flying redefined
Please read this manual carefully before operating this plane.


CONTENTS
Introduction
Specifications
Contents Of Box
Required To Complete Model
Assembly
Setting Up Your Model
1
1
2
2
3-6
7-9
Model Flying Precautions
Pre-flight Checks
10
10
Flying Your Zazzy
Zazzy TIPS
Spare Parts Listing
11
12
13
Trouble Shooting 14
Notes 15-16

The Avios Zazzy is a sport aerobatic model intended to be a pilot’s first introduction to a low wing
model. A large tapered wing, combined with a long, generously sized tail gives the Zazzy docile
enough flight characteristics for newer pilots, while still agile enough to keep even veteran pilots
on their toes. This model is meant to be your “go-to” model with its easy setup, and great flight
characteristics.
The key feature of the Zazzy is the hollow molded LiteCore wings which drastically reduces the
model’s all up weight. All bolt together construction means you can be flying your Zazzy within as
little as 20 minutes from the time you open the box. Further increasing field assembly time is the
no hands PCB connectors at the wing roots. No more fussing with aileron servo extensions at the
field. Durable aluminum landing gear can handle rough ground with ease. All AeroStar electronics
including motor and speed control are already fitted, with a AeroStar 12x6 carbon fiber propeller
rounding out this beautiful model.
INTRODUCTION
SPECIFICATION
- Wingspan:1314mm (51.7”)
- Flying weight:1950g (68oz) with 4 cell
- Servos: 4 x 9g digital/metal geared (2 x aileron, 1 x elevator, 1 x rudder,)
- Motor: Aerostar 3550 900Kv brushless outrunner.
- Prop: Aerostar Carbon 12x6
- ESC: Aerostar 50amp.
- Battery: 3000-4000mah 4S 40-65C.
- Channels: 4-6 channel required.
1
sports flying redefined
INTRODUCTION

1. Main wing
2. Fuselage
3. Horizontal tail
4. Vertical tail
5. Landing gear
6. Wing spar tube
OrangeRX R620X
6Ch 2.4Ghz:
Part No. 9171000757-0
Turnigy Graphene 3000mAh
4S 65C Lipo:
Part No. 9067000140-0
Turnigy 4000mAh
4S 30C Lipo:
Part No. T4000.4S.30
OrangeRx T-SIX 2.4GHz 6CH
Programmable Tx:
Part No. 9403000001 Mode 1
9403000002 Mode 2
In its ‘Plug n Fly’ format the Zazzy will still require some additional electronic components to get it
‘flight ready’. Avios recommends the products below for optimum performance and great value.
Available at
hobbyking.com
10
34
1
7
611
5
2
8
9
CONTENT
REQUIRED TO COMPLETE MODEL:
2
7. 12x6 Carbon prop
8. Tail wheel assembly
9. Spinner
10. Control accessories/hardware
11. Instruction Manual

1. Begin assembly by locating the fuselage and wing tube joiner. Insert the wing tube into the hole
in the fuselage. It may be necessary to move the ESC or servo wires to stop any interference with
the wing tube. The wing tube simply slides in, it is not glued.
2. Insert the right wing panel to the fuselage. The built in PCB connector will automatically connect
the aileron servo to the fuselage. Next insert the left wing. Each should be tight against the
fuselage with no gaps.
3
C.
3. Secure the wing panels to the fuselage with 4 x M3x12mm coarse thread screws. Screws are
inserted on the under side of the wing/fuselage seam.
3x12mm 4pcs
3
sports flying redefined
ASSEMBLY

4. Insert vertical fin into horizontal stabilizer. Then carefully fit it to the fuselage. It is designed to
key together and align automactically. Secure tail to fuselage with two coarse thread screws.
Sizes listed in diagram below.
5. Install tail wheel unit. First attach plastic tail wheel arm to the rudder with two 2x13mm screws.
Next attach metal bracket to fuselage with two 3x17mm machine screws. Last, using a
3x10mm coarse thread screw to attach the rudder to the tail wheel bracket. This forms the
lower rudder hinge and should not be left off. Do not over tighten to prevent binding the rudder.
4
3x62mm 1pcs
3x47mm 1pcs
A.
2x13mm 2pcs 3x10mm 1pcs
3x17mm 2pcs
4

6. Attach landing gear to fuselage with four 4x12mm machine screws. Landing gear should look
swept back. This will give proper ground handling and correct fitment of wheel pants. After
securing the screws, attach foam cover piece with glue, or clear tape to make removal later
easier
7. Wheel pants are attached to the landing gear leg first with a 3x12mm machine screw. Then
insert wheel into wheel pant, and screw in 4x37mm axel screw that also helps secure the
fairing. Repeat for both legs.
4x12mm 4pcs
4x37mm 2pcs
3x12mm 2pcs
5
sports flying redefined

Note: It is recommended that you balance the prop and spinner before
installing for optimum performance and efficiency.
3x10mm 2pcs
8. Install spinner backplate to motor shaft, then propeller, washer and finally secure it with the
included 12mm nut. Lastly, attach the spinner cone to the back plate with two 3x10mm screws
6
Congratulations, basic assembly of your Zazzy is now complete. Please
perform a final check on all screws, bolts and components,
ensuring all are secure and firmly in place.

Roll Left
Roll Right
Pitch Up
Pitch Down
Yaw Left
Yaw Right
Aileron
(Roll)
Elevator
(Pitch)
Rudder
(Yaw)
Ailerons Elevator Rudder
1. With your receiver installed and all servos plugged into their corresponding channels, connect
the flight battery to the ESC to power up the electronics. With the model now armed, ensure all
servos are centered and all control surfaces are level. If not, adjust by turning the control clevis’s
by
hand accordingly until the control surfaces are level as shown.
Note: For safety reasons, it is advised that this is done with the prop removed from the
model.
2. Check all control surfaces are moving in the correct direction with the applicable
stick input (see below)
7
sports flying redefined
SETTING UP YOUR MODEL:

Elevator
10-20mm
10-20mm
15-30mm
15-30mm
95-100mm
10-20mm
10-20mm
Aileron
Rudder
3. The Zazzy handles very well in flight and that’s not down to good design alone, but a good
pre-flight set-up too. Before you fly your Zazzy please follow the recommended settings below for
optimum handling and performance..
*Elevator ‘low rates’ 10mm ‘high rates’ 20mm in either direction from neutral.
*Rudder ‘low rates’ 15mm ‘high rates’ 30mm in either direction from neutral.
*Aileron ‘low rates’ 10mm ‘high rates’ 20mm in either direction from neutral.
4. Linear power delivery is important to optimal flight performance, the instructions below outline
calibrating the ESC to your transmitter. Perform throttle calibration any time you switch to a new
transmitter.
Control throws:
A. Switch ON the transmitter and move throttle stick to 100%. (Full Throttle)
B. Connect flight battery pack and wait about 2 seconds.
C. The ESC will emit a ‘beep-beep’ tone meaning the high point of the throttle range has been set.
E. After the intialization tone from low throttle, the range is set and regular throttle control is
available.
D. After the tone is emitted, move the throttle stick back to low throttle. You will hear the regular
initialization beeps indicating the number of cells in the battery.
8

With assembly and set-up now complete, your Avios Zazzy
should now be ready for flight. However we recommend you read
and follow the advice given in the following pages of this
manual before flying your Zazzy.
5. The center gravity(CG) for the Zazzy is approximately 95-100mm from the leading edge of the
wing. Using the recommended Turnigy Graphene 3000mah 65C 4S lipo, the correct CG can be
attained quite easily due to the ample battery space. If using larger capacity batteries, you may
need to shift the battery backwards more to attain the correct CG.
95-100mm
CG 95-100mm when measured from the
leading edge of the wing at the root.
Measure with the model inverted.
9
sports flying redefined

MODEL FLYING PRECAUTIONS
1. Always range check your model before any flight (especially when flying a new model for the first
time). Follow your radio manufacturers guidelines for performing this check.
2. Check all screw/bolts and mounting points are firmly secured, including control horns and
clevises.
3. Only fly with fully charged batteries (both in your radio and model). Failure to do so could result
in loss of control, damage to the model and/or persons/property around you. Check your
batteries are fully charged.
4. With the model powered up (Transmitter on first, then receiver/model) check that all surface are
free from damage/obstructions, moving in the correct directions and freely with stick input.
5. Inspect the model and prop for any damage that may have occurred during transit and listen for
any unusual sounds from the electronics when powered up. If in doubt, do not fly.
6. With the model held securely and the prop free of obstructions, increase the throttle just slightly
to confirm the rotations of the prop is correct. The model should want to pull straight forward with
throttle.
7. If this is your first flight with the model double check the C/G is at the correct position. If not adjust
battery position inside model accordingly.
8. If you are an inexperienced model pilot seek the help and assistance of an experienced pilot to
perform these final checks and to test fly the model for you.
● Select your flight area carefully. Always choose an open space that is unobstructed from trees
and buildings and away from crowed areas. Avoid flying in area’s with roads, electric/telephone
poles/wires and water near by or within close proximity to full size air traffic.
● Do not fly this model in poor weather. High winds, low visibility, inclement temperatures, rain and
storms are to be avoided.
● Never attempt to catch this model whilst in flight. Even a slow moving model can cause harm to
yourself and/other and risks damage to the model.
● This model is recommended for children no younger than 14 year old. All children, no matter what
age, should always be supervised by a capable and responsible adult when operating this model.
● Always unplug your model battery when not in use. Never leave the battery installed in the model.
● Remember to keep clear of the propeller at all times when your flight battery is connected.
● Before flying, always turn on your transmitter first then plug your flight battery into the model.
● After flying, always unplug your flight battery first then turn off your radio transmitter.
● Exercise caution when charging your batteries and follow in full your battery manufactures safety
guideline when doing so.
10
PRE-FLIGHT CHECKS

Before flying make sure you have followed closely the set-up guidelines on pages 7 through 10.
Start by taxiing on the ground a little to get use to the handling. Be sure to always taxi with full up
elevator held in and gentle use of throttle. This will keep the model tracking steady and true. For take
off you'll want to hold in some right rudder to counter the rotational torque on the initial roll out.
Slowly advance the throttle whilst holding in just a little up to keep the tail down as you begin to build
up speed, correcting direction with rudder as needed. As speed builds, ease off the amount of up
elevator you have held in, then as soon as you reach 3/4 throttle you'll start to see the Zazzy lift of
the ground.
Once in the air you will find you can cruise around happily on 60% throttle. Of course opening up to
full throttle is very exciting, but generally only need as desired. Flight times vary according to set-up
and throttle use. An average flight of mixed throttle flying will give you approximately 8-10 minutes .
Your Zazzy may drop a wing if really pushed into a stall, that said once it does stall its quite benign
and easily recovered from at height by centering all sticks and application of power thereafter. The
Zazzy will perform a host of sport aerobatic manuevers including loops, rolls, knife edge, inverted
flight, snaps, and spins.
Landing the Zazzy is a pleasure and a real treat for as it has excellent low speed handling. If using
flaperon mixing, deploy flaps after turning to final and line up with the runway. Keep the power on to
maintain airspeed, flying the model to the ground. Cut power to zero upon touch down. As soon as
the Zazzy settles onto the ground hold in full up elevator to prevent the model from nosing over.
11
sports flying redefined
FLYING YOUR ZAZZY

● To further improve ground handling, espeically on rougher grass surface, unscrew and rotate
the landing gear 180 degrees and remove the wheel spats. This will not only give additional
prop clearance, but also reduce the chance of the model tipping over onto its nose when
landing.
● For optimum flight performance and model longevity, it is highly recommend that you always fly
with a balanced prop. The supplied prop should be balanced, but it is always good to check first.
● Keep all leads within the fuselage area as tidy as possible. Tidy wires look better, allow for
easier access to all internal components, better battery installation, increased airflow around
electronics and a reduction in potential electronic signal interference (noise).
● Inspect the propeller frequently, especially if you have suffered a hard landing or the prop has
been knocked. If the prop is in any way damaged it must be replaced and any loose fixings must
be tightened.
● It is very important that your flight battery be secured properly prevent the Zazzy from flying tail
heavy. Ensure you follow exactly the guidelines for CG set-up on page 9 before flying your
Zazzy.
● Set up the aileron servos on separate channels and enable flaperon mixing. This will slow your
Zazzy down even further for slow touch down landings. Depending on your CG, you may need
to mix in some elevator compensation when deploying flaperons.
● To further avoid any change of your Zazzy tipping over onto its nose on landing, switch to 'high'
rates on the elevator as soon as the model settles onto the ground after landing and hold full up
elevator.
● Do not leave your model in direct sunlight for prolonged periods of time. This will have an
adverse effect on the foam surface of the model.
Thank you again for purchasing the Avios Zazzy. We hope you’ll
have many happy days of flying and look forward to bringing you
more Avios models in the future.
Don’t forget, spare parts are available for this model,
please see the next page for details.
12
ZAZZY TIPS

Fuselage:
9306000220-0
Main Wing set:
9306000216-0
Horizontal tail:
9306000217-0
Canopy
9306000215-0
Spinner set:
9306000221-0
9306000219-0
Cowl:
9306000218-0
Vertical tail:
9499000077-0
12x6 Propeller
Wheel Pants
9306000226-0
Main landing gear:
9306000222-0 9306000223-0
Rear WheelSet:
9306000225-0
AeroStar 2820 900kv
13
sports flying redefined
SPARE PARTS LISTING
Accessories:
9306000224-0

1. The battery is not fully charged.
2. Elevator servo is reversed.
3. CG too far backwards.
1. Charge the battery.
2. Change servo direction via Tx.
3. Move battery forwards.
1. Transmitter/Receiver batteries
are flat.
Problem Cause Solution
Motor does
not turn
1. Battery is not fully charged.
2. Transmitter battery low.
3. Motors not connected.
4. The motor is damaged.
5. Receiver is not bound to Tx.
6. ESC in set-up mode.
Control surfaces
not moving with
stick input
Model does not
fly straight
Model does not
climb well
Limited Radio
Range 1. charge/replace batteries.
Motor turns in
reverse direction 1. Motor/esc connection error 1. Swap around any 2 of the 3
ESC/motor wire connections
1. Charge the batteries.
2. Install a full charged battery.
3. Check for connection
between the ESC and motor.
4. Replace motor.
5. Consult Radio manual and
go through bind procedure
again.
6. Hold model and move
throttle to full position then
back down to idle.
1. The servo lead is connected
to Rx incorrectly.
2. The servo is damaged.
1. Make sure the servo leads
are connect properly.
2. Replace servo.
1. Control surfaces not centered.
2.
CoG is not in the correct position.
1. Adjust the trims on the
transmitter.
2. Re-position lipo as
suggested.
TROUBLE SHOOTING:
14

15
sports flying redefined

16

hobbyking.com/avios
Table of contents
Other Avios Toy manuals

Avios
Avios Grand Tundra User manual

Avios
Avios Albatross User manual

Avios
Avios Albatross HU-16 User manual

Avios
Avios SPITFIRE Mkvb User manual

Avios
Avios KingTwin 1700 User manual

Avios
Avios BushMule V2 User manual

Avios
Avios MIG-17 FRESCO User manual

Avios
Avios C-130V2 User manual

Avios
Avios EXTRA 330 LX User manual

Avios
Avios Hawker Sea Fury FB11 EPO Warbird User manual