Aviosys 9310 User manual

IP SERVER 9310
User Manual

IP SERVER 9310 USER MANUAL
- 1 -
USER MANUAL
IP Server 9310
Version: 1.0
2007.3

IP SERVER 9310 USER MANUAL
- 2 -
Warning:any changes to this equipment without permission may cause
damages to your equipment! This equipment has been proved to can be prevented
from the influence of harmful electronic jamming in normal business use condition.
IMPORTANT NOTICE
1. IP SERVER 9310 is deigned on the fundamental principle of learning in kit.
2.IP SERVER 9310isdeigned to be used in-door, we have no responsibility for
the possible damage in out-door use especially in the rain.
3. Please use the power adaptor provided by the dealer, we have no responsibility
for the possible damage in using other adaptors.
4. Do not use IP SERVER9310 in strong shaking condition
5. Please contact the dealer If IP SERVER 9310 works improperly.
Copyright © 2007 . All rights reserved. No part of this publication may be
reproduced, stored in a retrieval system, or transmitted in any form or by any
means, electronic, mechanical, photocopying, recording or otherwise, without the
prior written consent of US
All trademarks and products mentioned in this document are the properties of
Aviosys.

IP SERVER 9310 USER MANUAL
- 3 -
Table of Content
1. INTRODUCTION..........................................................................................................4
FEATURES:.....................................................................................................................
2. BEFORE YOU START ............................................................................................5
9310 PACKAGE CONTENTS..............................................................................................
MINIMUM SYSTEM REQUIREMENTS....................................................................................
3. INTERFACE DESCRIPTION ......................................................................................6
4. HARDWARE & SOFTWARE INSTALLATION...................................................7
HARDWARE INSTALLATION.................................................................................................
SOFTWARE INSTALLATION ...............................................................................................
5. INITIAL SETTINGS......................................................................................................8
INITIAL SETTINGS THROUGH THE ETHERNET...................................................................
SEARCH 9310IN INTERNET ...........................................................................................
6. WEBPAGE FUNCTION INTRODUCE ..................................................................12
LOGIN SETTINGS ..............................................................................................................
LIVE VIEW SETTINGS.........................................................................................................
IMAGE SETTINGS..........................................................................................................
PTZCONTROL ..............................................................................................................
REAL TIME VIDEO PLAY,STOP AND STOP SNAP FUNCTION ............................................
PLAY THE RECORDED VIDEO.............................................................................................
PLAY THE RECORDED VIDEO .........................................................................................
VIDEO FORMAT TRANSFORM .........................................................................................
BASIC CONFIGURATION.....................................................................................................
STATUS REPORT ...........................................................................................................
USER MANAGEMENT......................................................................................................
CHANGE PASSWORD......................................................................................................
NETWORKING SETTING...................................................................................................
PPPOECONFIGURATION..............................................................................................
DATE &TIME SETTINGS.................................................................................................
VIDEO SETTINGS ...........................................................................................................
AUDIO SETTINGS ...........................................................................................................
LOG SETTINGS...............................................................................................................
ADVANCE CONFIGURATION................................................................................................
MAINTENANCE FUNCTION ..............................................................................................
DYNAMIC DNSSETTING................................................................................................
SMTPSETTING.............................................................................................................
FTPSETTING ................................................................................................................
GPIOSETTINGS............................................................................................................
IPSERVER SETTINGS .................................................................................................
SNAP SHOT SCHEDULE .................................................................................................
7. FAQ.............................................................................................................................35

IP SERVER 9310 USER MANUAL
- 4 -
1. Introduction
Depending on the built-in IP network server in 9310, you can transmit the input video
and audio to the network through an IP address. User can easily achieve security
protection, children or sickroom nursing, long-distance teaching, TV play, video game
through the standard network browser (such as IE). You can easily achieve the
INTERNET video broadcast through 9310 without need a PC in the monitoring
location.
Features:
zBuilt-in Web server, Simple to use!
zSupport Internet IP service finder, Easy to find!
zHigh Quality Full D1 MPEG-4 compliant Video with G.726 Audio lip-sync
streaming.
zDynamic Bandwidth Management for internet traffic
zVideo compression frame rate and bit rate adjustable for advance user.
zEmail picture or ftp storage if Motion Detection has been Detected
zMultiple PTZ camera support through the RS485 interface
zRemote control for both sensors and alarms with GPIO and RS232 interface.
zBuild in OSD (On Screen Display) function for customer’s application.
zFile management for Long time recording (over 1 months D1 /300G)
zUPNP, 802.11g / b wireless LAN (IP9320 only)
Product Specification:
Network:
* Embedded Web server – No need PC for Server.
* 10/100 Mbps Base-T Ethernet
*Network Protocols: TCP/IP, UDP, ICMP, HTTP, FTP, Telnet, SMTP, DHCP, NTP,
DDNS includes most of network protocol
* IEEE 802.11g wireless LAN (9320 only)
Video:
* NTSC / PAL Auto detection
* Record to Mpeg-4 format (AVI or mpeg raw file) with D1/1/2D1/SIF/QSIF at full frame
* Ideal Synchronization of Audio & Video
* Auto / Manual adjust network bandwidth.
* Resolution: 720x576/480/288/240, 352x240/288, 176x144/122 @ 30/25 fps
* Video Bitrate: 128K ~ 3M bits/sec (CBR/VBR configurable)
* Recording& Playback: Directly control from Web Browser
* Video Adjustment: Brightness, Contrast, Hue, Saturation, Frame rate, Bit rate, Bit
Rate, GOP, Frame rate
Audio:
*G.726 U-Law/A-Low
*Adjustable audio data rate, 384Kbps to 64Kbps, Sample rate: 48K
Control Interface
* RS485 output for controlling PTZ camera
* 6 Digital I/O interface for sensor and alarm
* RS232 Interface for serial communication

IP SERVER 9310 USER MANUAL
- 5 -
Others Features
Firmware Upgrade - Remote upgrade via network
O.S.D..
Maximum 20 concurrent viewers.
* Snapshot, Schedule recording, Motion Detect recording.
* Motion detection : Automatic remote image retrieval and storage via e-mail and FTP
with event triggering
*Sensitivity ratio adjustable
2. Before you start
9310 package contents
* One set of IP Server 9310
* One network wire with RJ45 port
* One 110~220V adaptor
* One composite video cable (yellow)
* One 3.5Φaudio terminal
* One Europe terminal ( RS232)
* One BNC to composite video
terminal
* One install disc
* One rapid install manual

IP SERVER 9310 USER MANUAL
- 6 -
Minimum System Requirements
Minimum Intel Pentium II 600MHz/compatible AMD processor
WINDOWS operating system (IE6.0+SP1)
Minimum 64MB RAM
VGA Card: with capability of displaying full-Colors and DirectDraw support
Network card with RJ45 port
Ethernet Hub / Router
Internet network (Ethernet, ADSL or other ways, depends on whether you need
far end control ability or not)
3. Interface Description
The front panel of 9310 :( from left to right)
1. RJ45 network port
2. RS-232 port
3. PTZ control(RS-485) port
4. video input interface
5. audio input interface
The rear panel of 9310 :( from left to right)
1. 6 way IO interface (4 way can use in current vision. you needs update the
firmware in the future for full function)
2. Power input interface
3. Reset button: reset to the default value.

IP SERVER 9310 USER MANUAL
- 7 -
4. Hardware & Software installation
Before you star to use IP SERVER 9310, please follow the steps below:
Check the package to make sure the contents is complete.
Prepare one Ethernet HUB, or Router
Check the voltage of the power supply to make sure it is AC 110-240 volt
Hardware installation
1 Connect the 9310 to HUB through network wire
2 Connect the video and audio source to 9310.
3 Connect the HUB to the Internet (May through ADSL/XDSL modem).
4. Connect the power adapter to the 9310.
Software Installation
Copy the IPEDIT from the install disc to the desktop, then the software installation is
done. You can begin to set the 9310 after finish installing the driver.

IP SERVER 9310 USER MANUAL
- 8 -
5. Initial Settings
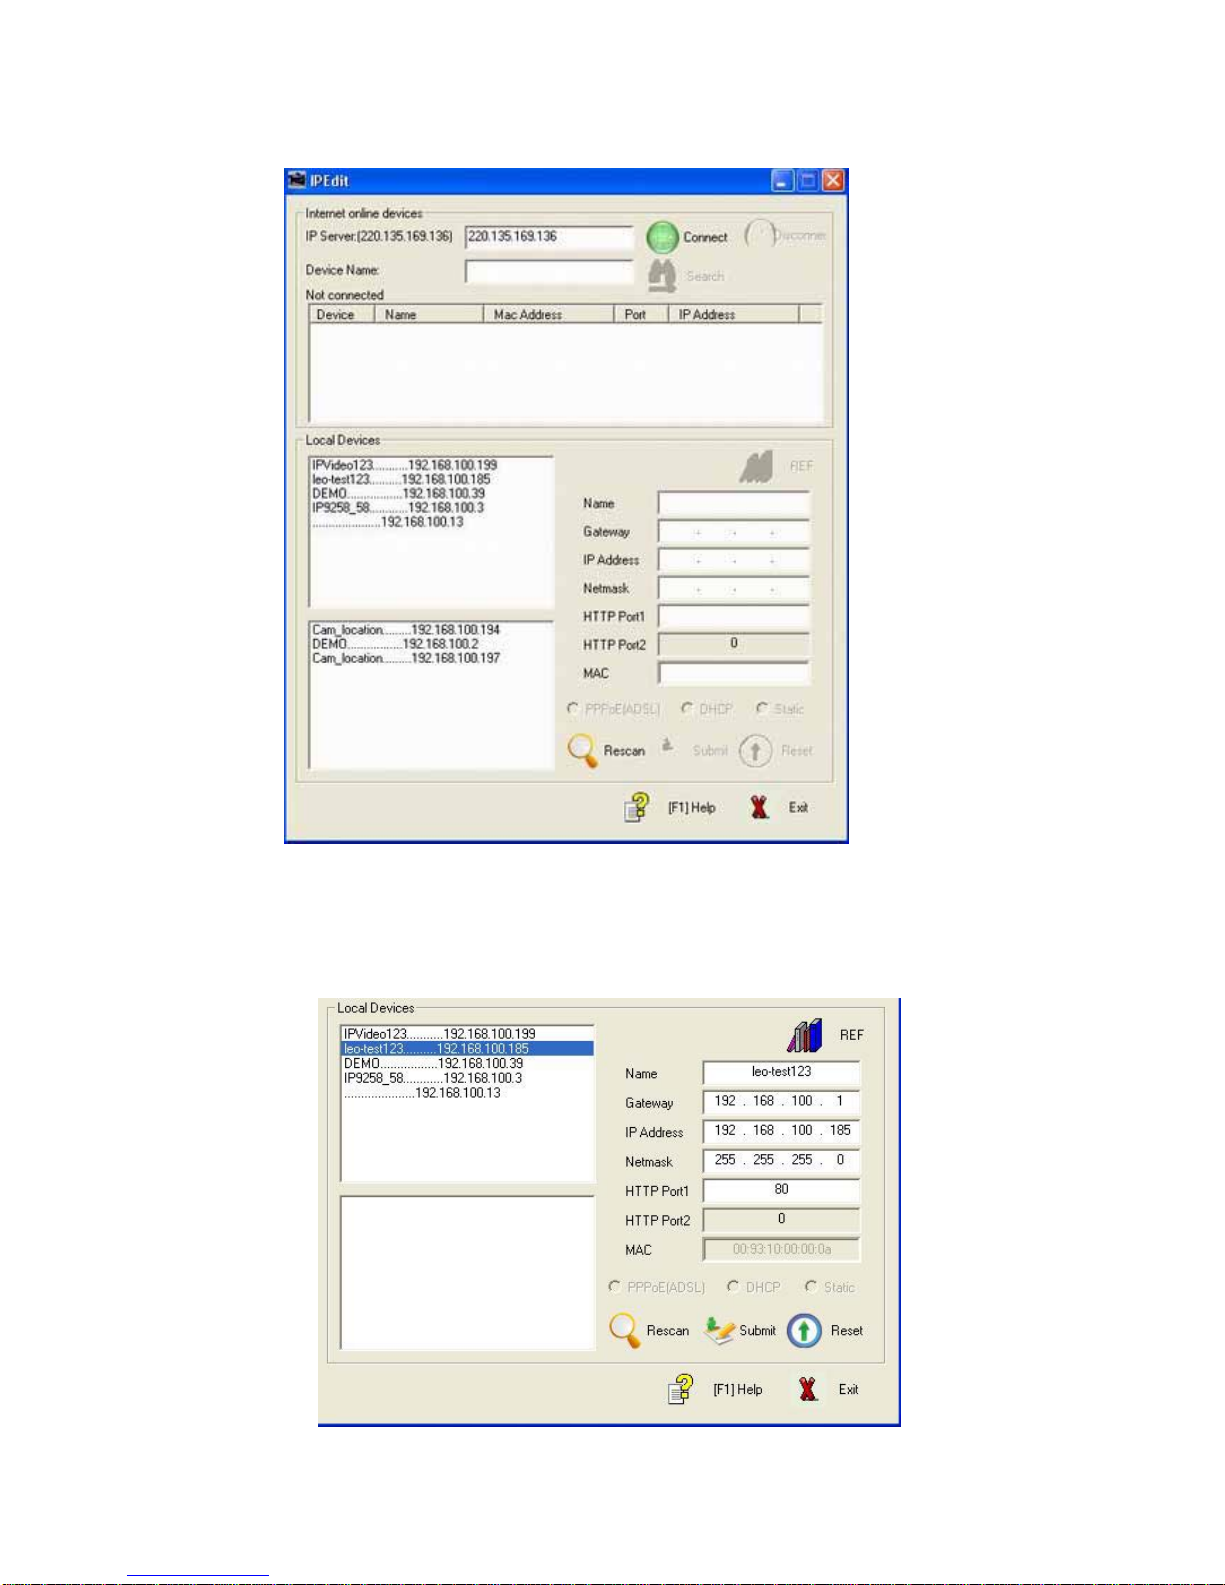
Initial settings through the Ethernet
Please make sure that the 9310 is power on and has been connected to the Ethernet,
and the PC installed ipEdit.exe is in the same network. Double click the ipEdit.exe in
the desktop.
2. The software will search the 9310 in the same Ethernet and display the search
results in the window.
IP SERVER 9310 USER MANUAL
- 9 -
.
3. Click the equipment you want to edit, its name will turn dark and its name and IP
address will display in the little window below. You can rename (please use numbers
and letters only), set the IP address and subnet mask (please set it in the same
network as the pc you want to connect to). Click submit button when finish setting, the
new setting will work in 20 seconds. Click the search button again and the software
will search the 9xxx equipments in the same network.
Table of contents
Other Aviosys Server manuals


