Avipas AV-1180 User manual

i
Model: AV-1180
HD Video Conferencing Camera
User Manual
V1.1
Please read this user manual
thoroughly before using.
www.avipas.com

Preface
Thanks for using this HD Video Conferencing Camera.
This manual introduces the functions, installation process and operation of the HD camera. Prior to installation and
usage, please read the manual thoroughly.
Precautions
This product can only be used in the specified conditions in order to avoid any damage to the camera:
1. Do not subject the camera to rain or moisture.
2. Do not remove the cover. Otherwise, you may risk receiving an electric shock. In case of unintended equipment
operation, contact an authorized engineer.
3. Never operate under unspecified temperature, humidity or power supply.
4. Please use soft dry cloth to clean the camera. If the camera is very dirty, clean it with diluted neuter detergent;
do not use any type of solvents, which may damage the surface.
Note
This is a class A production. Electromagnetic radiation at certain frequencies may affect the image quality of TV in home
environment.

iii
Electrical Safety:
Electric Safety
Installation and operation must accord with electric safety standard.
Use caution to transport
Avoid stress, vibration or soakage in transport, storage and installation.
Polarity of power supply
The power supply of this product is +12V, the max electrical current is 2A. Polarity of the power supply plug is
shown in the drawing below.
Installation precautions
Do not grasp the camera lens when carrying it. Do not touch camera lens by hand. Mechanical damage may
result from doing so.
Do not use in corrosive liquid, gas or solid environment to avoid any cover (plastic material) damage.
Make sure there is no obstacle within rotation range.
Do not power on before installation is completed.
Do not dismantle the camera
We are not responsible for any unauthorized modification or dismantling.
CAUTION!
Certain frequencies of electromagnetic field may affect the image of the camera.

iv
Content
Introduction .........................................................................................................................................................................................1
1.1 Product Schematic 1
1.2 Product Overview 2
1.3 Rear Panel Diagram 3
1.4 Bracket Installation 4
1.5 Accessory 4
1.6 Product Feature 5
1.7 Technical Specification 5
IR Remote Control................................................................................................................................................................................8
2.1 IR Remote Control Key 8
2.2 OSD Menu Setting 9
Network Connection ........................................................................................................................................................................133
3.1 Connection Method 13
3.2 Camera's Physical Address 13
3.3 Access Camera via IP 13
3.4 Web Interface 15
Serial Port Communication Control ...................................................................................................................................................23
4.1 Visca Protocol List 23
4.2 Pelco-D Protocol Command List 30
4.3 Pelco-P Protocol Command List 30
Maintenance and Troubleshooting ....................................................................................................................................................31
6.1 Camera Maintenance 31
6.2 Unqualified Application 31
6.3 Troubleshooting 31

1
Introduction
1.1 Product Schematic
Fig 1.1 Product Schematic
Description
:
1. Lens 5. ¼ -20 female thread Screw 9. DC12V Power Input Socket
2. Infrared Receiver 6. USB2.0 Type-A Port 10. RJ45 Network Connection Port
3. Indicator Light 7. RS485 Phoenix Connector
half-duplex
11. SDI Port
4. Installation Hole 8. 3.5 mm Audio Line-in Port

2
1.2 Product Overview

3
1.3 Rear Panel Diagram
The external interfaces of this product including: USB2.0, SDI, line-in, ethernet port, RS485, DC12V power supply, power
switch. The rear panel diagram is shown in below:

4
1.4 Bracket Installation
Steps of Wall Mount Installation
1.5 Accessory
When unpacked, check if all supplied accessories are included:
Table 1.5 Included Accessories
Power adapter
USB2.0 Cable

5
Included Accessory User manual
IR Remote Controller
Optional Wall Mount Bracket
1.6 Product Feature
Full HD Resolution: 1/2.8” 2.07M effective pixel SONY CMOS sensor, delivery the image resolution at
1080P with frame rate up to 60fps.
Optical Zoom Lens: 10x optical zoom, 5x digital zoom with 60.9° horizontal wide field of view.
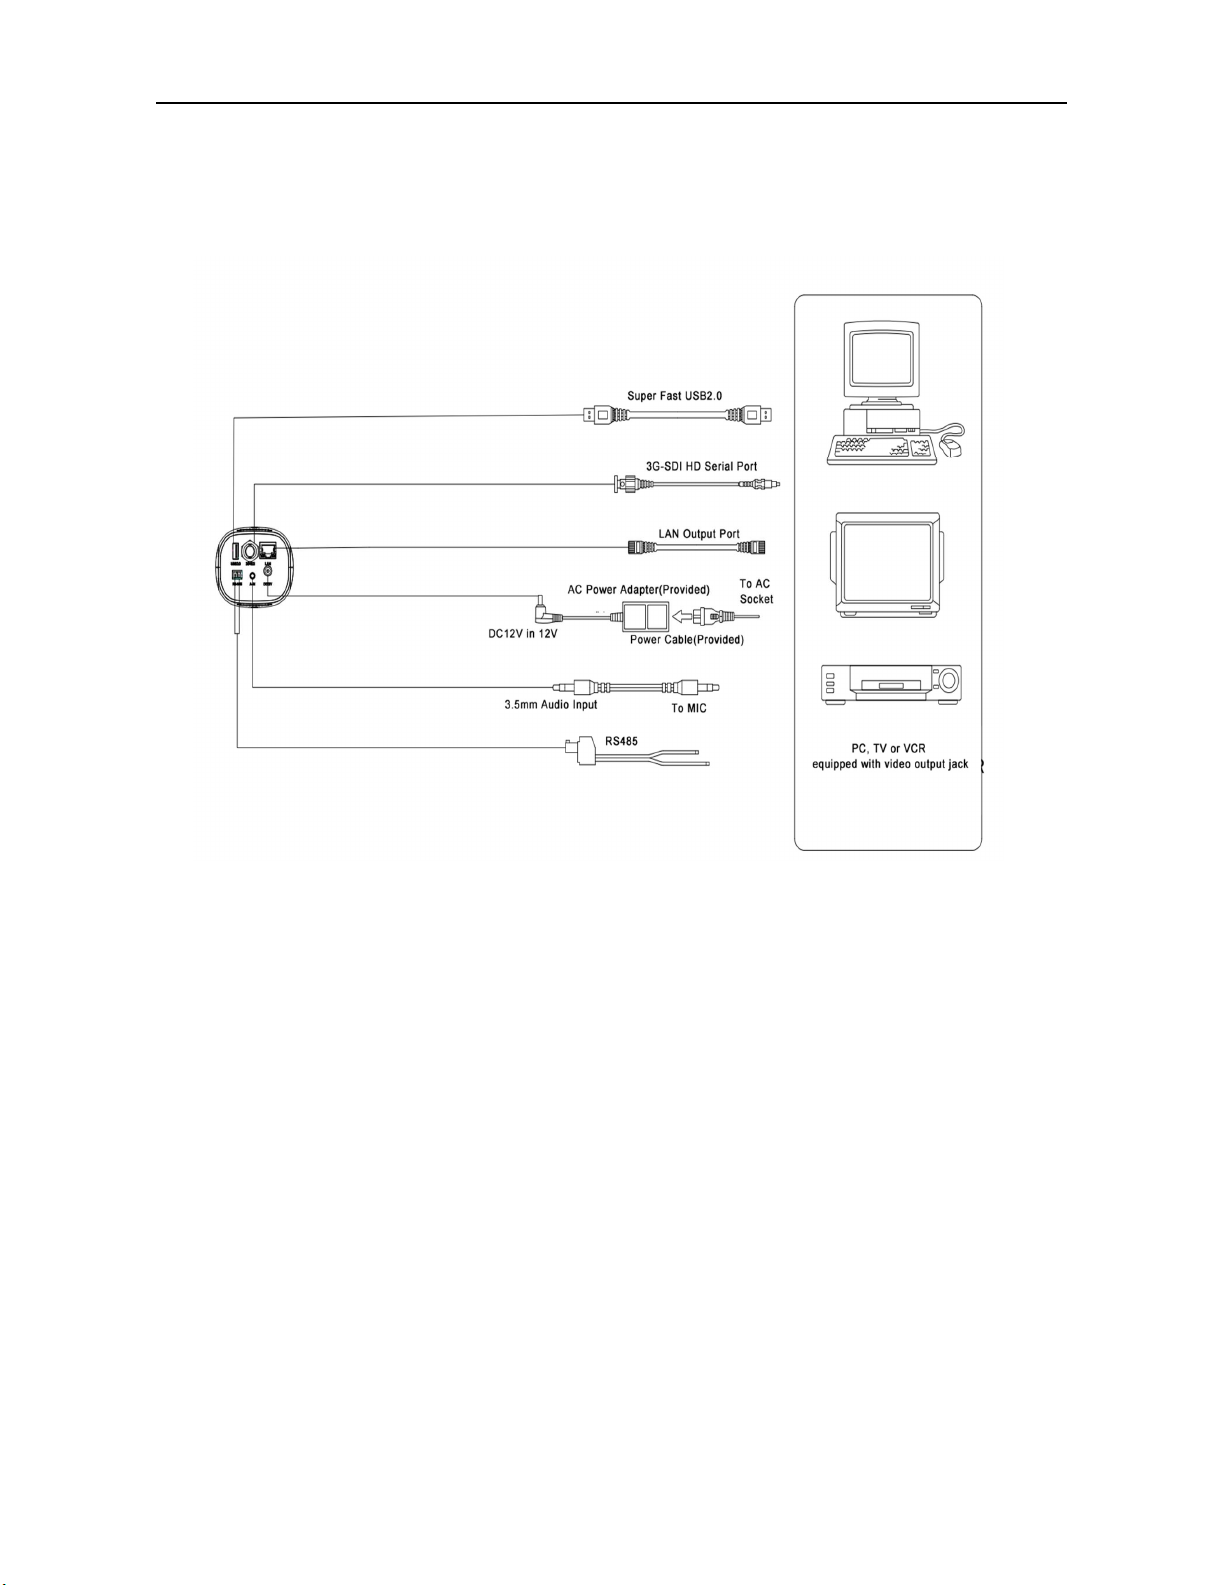
Video outputs: Supports simultaneously SDI, USB2.0 and IP streaming (LAN) outputs.
Dual Stream outputs: Supports simultaneously main stream and sub stream output.
Video Compression: Support H.264, H.265
Audio input and encoding: 3.5mmAudio Line-in, embedded with IP streaming out with AAC, MP3, G.711A
audio encoding
Network Protocol: Support RTSP, RTMP, RTP multicast, ONVIF, GB/T28181 protocols
Control Protocol: Supports VISCA, PELCO-D, PELCO-P, ONVIF, UVC1.1 & VISCA-over-IP protocols and
automatic identified the protocols
Communication interface: Half-Duplex RS485 Phoenix connector
PoE (Power Over Ethernet): Supports PoE, IEEE standard 802.af. Ethernet cable can transmit Power, IP
control signal and video streaming output
USB2.0 Type-A Port: Able to connect with PC, Mac, or Chromebox computer easily. Compatible with any
web conferencing or streaming software
1.7 Technical Specification
Table 1.7-1 Camera Lens Parameter
Camera Parameter
Zoom 10x Optical, 5x Digital
Lens F1.6 ~ F3.0, f=4.7 mm~ 47 mm
Viewing Angle
Horizontal:6.43˚(N)~ 60.9˚(W)
Vertical:4.1˚(N)~ 40.1˚(W)
Sensor 1/2.8-inch SONY CMOS sensor, Effective Pixel 2.07M
Video Format
SDI:
1080P60/50/30/25/59.94/29.97;1080I60/50/59.94;
720P60/50/30/25/59.94/29.97
USB2.0
MJPG:1920*1080/1280*720 /1024*768
/1024*576/960*540/800*600/720*576/720*480/704*576/640*480 /640*360
/352*288/320*240/320*180/176*144P30;
H.264:1920*1080/1280*720 /1024*768
/1024*576/960*540/800*600/720*576/720*480/704*576/640*480 /640*360
/352*288/320*240/320*180/176*144P30;

6
H.265:1920*1080/1280*720 /1024*768
/1024*576/960*540/800*600/720*576/720*480/704*576/640*480 /640*360
/352*288/320*240/320*180/176*144P30;
YUY2:800*448 P15; 640*480/640*360 /432*240/320*180/P30
Minimum Illumination 0.05Lux (F1.8, AGC ON)
Digital Noise Reduction 2D﹠3D Digital Noise Reduction
White Balance Auto / Manual/ One Push
Focus Auto/Manual/One Push
Exposure Mode Auto/Manual/Shutter Priority/Aperture Priority/Brightness Priority
Aperture Auto/Manual
Shutter Speed 1/25s~1/10000s
Backlight Compensation ON/OFF
WDR OFF/ Dynamic level adjustment
Video Adjustment Brightness, Color, Saturation, Contrast, Sharpness, B/W mode, Gamma Curve
SNR ≥55dB
Table 1.7-2 Interface Parameter
Interface Parameter
Video Out
1xSDI (3GSDI) BNC female,
1x RJ45 IP streaming 10M/100M/1000M adaptive Ethernet port
1x USB2.0 type-A
1x LAN (RJ45)
IP Video Compression
LAN:H.264, H.265
USB 2.0:MJPG、H.264、H.265、YUY2
Audio Input 1x Double track 3.5mm LINE-IN
Audio Output SDI, IP Streaming
Audio Compression AAC, MP3, G.711A
Network Interface 1x RJ45
Network Protocols RTSP/RTMP, ONVIF, GBT28181, SRT, multicast mode
Control Port RS485, USB (eCam), RJ45
Control Protocol
Communication Protocol
VISCA/ Pelco-D/ Pelco-P
Support Baudrate: 115200/38400/9600/4800/2400
USB Communication
Protocol
UVC1.1(Video Communication Protocol)
Power Supply HEC3800 Outlet (DC12V)/ PoE (IEEE standard 802.3af)
Power Adapter AC110V~AC220V to DC12V/ 2.5A

7
Input Voltage DC12V
Input <1A
Consumption <12W
Table 1.7-3 Other Parameter
Other Parameter
Storage Temperature -10℃~+60℃
Storage Humidity 20%~95%
Working Temperature -10℃~+50℃
Working Humidity 20%~80%
Dimension 149.7(L)mm×78.3mm(W)×65.9mm(D)
Environment Indoors

8
IR Remote Control
2.1 IR Remote Control Key
6. Zoom Control Key
[ZOOM
+
]: zoom in
[ZOOM
-
]: zoom out
7. Direction Control Keys
Directional arrow keys to control the OSD (on screen display) menu selections up,
down, left and right.
8. BLC Control Keys
Press [BLC] button to enable/disable backlight compensation. (Note: Backlight is
only effective under auto exposure mode)
9. Menu Setting
Press [MENU] to Open the OSD menu
Press [MENU] again to exit the OSD menu or return to the previous menu.
Press [HOME] to confirm the selection
10. Key Combination Functions
1. Standby Key
Press and hold the key for 3 seconds to enter standby mode. Press and hold the
key for 3 seconds to back to normal mode.
2. Camera Select Section
Select the camera address which wants to be controlled
(The camera will be set to address #1 in default.)
3. Number Key
Use for combination keys
4,*,# Key
Use for combination keys with [F1 – F4] to set camera IR controller address.
Example: [*] + [#] + [F1] : camera IR controller address No.1
5. Focus Control Key
Press [AUTO] to enter auto focus mode.

9
2.2 OSD Menu Setting
Main Menu
In normal working mode, press 【MENU】key to
display the menu, using direction arrow keys to
select different items.
Language: Language setting
Setup: System parameter setting
Exposure: Enter into Exposure setting
Color: Enter into color setting
Image: Enter into image setting
Focus: Enter into focus setting
Noise Reduction: Enter into noise reduction
Video Format: Enter into sub menu
Restore Default: Enter into reset setting,
select YES or NO to confirm
[↑ ↓] Select: For selecting menu
[← →] Change Value: For modifying
parameters
[MENU] Back: Press [Menu] to return
[Home] OK: Press [Home] to confirm
Set Up
Move the pointer to the [SETUP] in the Main Menu,
press [HOME] key and enter into setup page as
shown below:
【*】+【#】+ Manual:IP/user name/password restore
to default
【#】+【#】+【0】: Switch video format to 1080P60
【*】+【#】+【6】:Restore factory default 【#】+【#】+【1】: Switch video format to 1080P50
【*】+【#】+【9】:Vertically flip image 【#】+【#】+【2】: Switch video format to 1080I60
【#】+【#】+【3】: Switch video format to 1080I50
【#】+【#】+【4】: Switch video format to 720P60
【#】+【#】+【5】: Switch video format to 720P50
【#】+【#】+【6】: Switch video format to 1080P30
【#】+【#】+【7】: Switch video format to 1080P25
【#】+【#】+【8】: Switch video format to 720P30
【#】+【#】+【9】: Switch video format to 720P25
MENU
===============
Language English
(Setup)
(Exposure)
(Color)
(Image)
(Focus)
(Noise Reduction)
(Video Format)
(Version)
(Restore Default)
[↑↓] Select [← →]Change Value

10
Style: Default/Normal/Clear/Bright/Soft
Protocol: VISCA/Pelco-P/Pelco-D/Auto
Visca Address: VISCA=1~7/Pelco-P=1~255/ Pelco-
D=1~255
Baudrate: 2400/4800/9600/38400/115200
Zoom Speed: Set the zoom speed for the remote
control, 1~7
Exposure
Move the pointer to the [EXPOSURE] in the Main
Menu, press [HOME] and enter the exposure
setting page as below:
Mode: Auto, Manual, Shutter priority, Iris priority
and Brightness priority.
EV: On/Off (only available in auto mode)
BLC: ON/OFF for options (only available in auto
mode)
Anti-Flicker: OFF/ 50Hz/ 60Hz for options (only
available in Auto/ Iris priority/ Brightness priority
modes)
Gain limit: 0~15 (only available in Auto/ Iris priority
/Brightness priority mode)
DRC: 1~8, close
Color
Move the pointer to the [COLOR] in the Main
Menu, press [HOME] and enter the color setting
page as below:
WB Mode: Auto, Manual, One Push, 2400K,
3000K, 3500K, 4000K, 4500K, 5000K, 5500K,
6000K, 6500K, 7000K, 7100K
Saturation:
60%,70%,80%,90%,100%,110%,120%,130%,140
%,150%,160%,170%,180%,190%,200%
Red fine-tuning: -10~10 (only available in
automatic mode)
Blue fine-tunable: -10~10 (only available in
automatic mode)
RED GAIN: 0~255(only available in Manual mode)
BLUE GAIN: 0~255(only available in Manual
mode)
AWB Sensitivity: high/middle/low
SETUP
===============
Image Style Default
Protocol Auto
Visca Address 1
PELCO-P Address 1
PELCO-D Address 1
Baudrate 9600
Zoom speed 7
[↑↓]Select [← →]Change Value
[Menu]Back
EXPOSURE
================
(Mode) Auto
(EV) OFF
(BLC) OFF
(Flicker) 50Hz
(G.Limit) 3
(DRC) 2
[↑↓]Select [← →]Change Value
[Menu]Back [Home]OK
COLOR
==============
WB Mode Auto
RG Tuning 0
BG Tuning 0
Saturation 100%
Hue 7
AWB Sensitivity High
[↑↓]Select [← →]Change Value
[Menu]Back

11
Image
Move the pointer to the [IMAGE] in the Menu,
press the [HOME] and enter the image setting
page as below:
Brightness: 0~14
Contrast: 0~14
Sharpness: 0~15
Flip-H: On/Off
Flip-V: On/Off
B&W Mode: color, black/white
Gamma: Default/ 0.45/ 0.50/ 0.55/ 0.63
DCI: Dynamic Contrast: Off/ 1~8
Electronic zoom: On/ Off
Minimum Illumination: On/ Off
Focus
Move the pointer to the [FOCUS] in the Menu,
press [HOME] and enter the focus setting page as
below:
Focus Mode: Auto/ Manual/ OnePush
AF-Zone: Up/ Middle/ Down
AF-Sensitivity: High/ Middle/ Low
Noise Reduction
Move the pointer to the [NOISE REDUCTION] in
the Menu, press [HOME] and enter the noise
reduction setting page as below:
2D Noise Reduction: Auto, close, 1~7
3D Noise Reduction: Close, 1~8
Dynamic Hot Pixel: Close, 1~5
Video Format
Move the pointer to the [VIDEO FORMAT] in the
Menu, press [HOME] and enter the video format
setting page as below:
Note: After change the video format, please exit the
menu to save the changes.
Version
Move the pointer to the [VERSION] in the Main
Menu, press [HOME] and enter the version
information page as below:
IMAGE
===============
Brightness 7
Contrast 7
Sharpness 6
Flip-H OFF
Flip-V OFF
B&W-Mode
Color
Gamma Default
DCI Close
Electronic zoom Close
Low-Light Mode Close
[↑↓]Select [← →]Change Value
[Menu]Back
FOCUS
===============
Focus Mode Auto
AF-Zone ALL
AF-Sensitivity Low
[↑↓]Select [← →]Change Value
[Menu]Back
NOISE REDUCTION
================
NR-2D 3
NR-3D 3
Dynamic Hot Pixel OFF
[↑↓]Select [← →]Change Value
[Menu]Back
VIDEO FORMAT
===============
1080P60 1080P50
1080I60 1080I50
1080P30 1080P25
720P60 720P50
720P30 720P25
1080P59.94 1080I59.94
1080P29.97 720P59.94
720P29.97
[↑↓]Select
[Menu]Return [Home]OK

12
Camera Version: Display camera version
information
AF Version: Display AF version information
Restore Default
Move the pointer to the [RESTORE DEFAULT] in
the Main Menu, press [HOME] and enter the
setting page as below:
Restore default: Yes/ No
VERSION
================
Camera Version 1.0.0 2022-8-12
AF Version 1.0.2 2022-7-21
[Menu]Back
RESTORE DEFAULT
================
Restore Default? NO
[↑↓]Select [← →]Change Value
[Menu]Back [Home]OK

13
NETWORK CONNECTION
3.1 Connection Method
Direct Connection: Connect the camera with computer via Cat5/Cat6 Ethernet cable.
Connection to LAN
:
Connect camera and computer to the same local LAN (router or switcher) via Cat5/Cat6
Ethernet cables
3.2 Camera’s Physical Address (MAC address)
User can also use the Command Prompt or Terminal to verify network connection and the device’s physical
address.
1. Make sure the camera is in the same local network with laptop. Open Command Prompt or Terminal, type in:
ping 192.168.5.163; In order to check camera’s physical address, type in: arp -a.
If network connection is correct, the camera’s physical address will show up in screen as below
:
3.3
Access Camera via IP
Connect the camera to your computer directly via an Ethernet cable.
On the bottom-right corner of your desktop, right click on the Network icon, then click on the “Open Network and
Sharing Center”.
Click on “Ethernet2” -> “Properties” -> double click on “Internet Protocol Version 4(TCP/IPv4)” -> select “Use the
following IP address” and enter the IP address.

14

15
Note: In order to access camera via IP, make sure that your computer is in the same network segment range as
the camera IP address. The device will not be accessible if the segment is not consistent. For example: AV-1180
camera’s IP address (default) is 192.168.5.163, then your computer IP address should be in this range
192.168.5.XXX (the first three section must be same, and the last one should be different).
3.4 Web Interface
1
)
Web Login
Open a browser, type in 192.168.5.163 in the address bar, log in with user name: admin, password: admin.
2) Preview Page
In the preview page, user can control the camera’s zoom, focus, video capture, sound, focus, and set the preset
position.
Focus Mode: Auto(default), Manual, Onepush
Zoom +/- : Zoom in/out
Focus +/- : Adjust focus (please select the focus mode as manual)
3) Configuration Page
Click Configuration to enter into the setting page.

16
Audio Configure
Enable option
:
Choose to enable the audio or disable.
Encode Type
:
AAC (default), MP3, G.711A
Sampling Rate
:
16000, 32000, 44100(default), 48000
Sampling Bits: 16bits (default)
Bit Rate: 32K, 64K (default),48K, 96K,128K
Channel type: mono (default), stereo
Input Volume: Set the input volume (default 2, 1-10 optional)
Please click “Save” button after changes and reboot the camera to apply new settings
.
Video Configure
This manual suits for next models
2
Table of contents
Other Avipas Digital Camera manuals