Avipas AV-2020 User manual

How to connect PTZ camera with AV-3104IP
Please make sure that the camera and the keyboard are both powered, and they are connected with
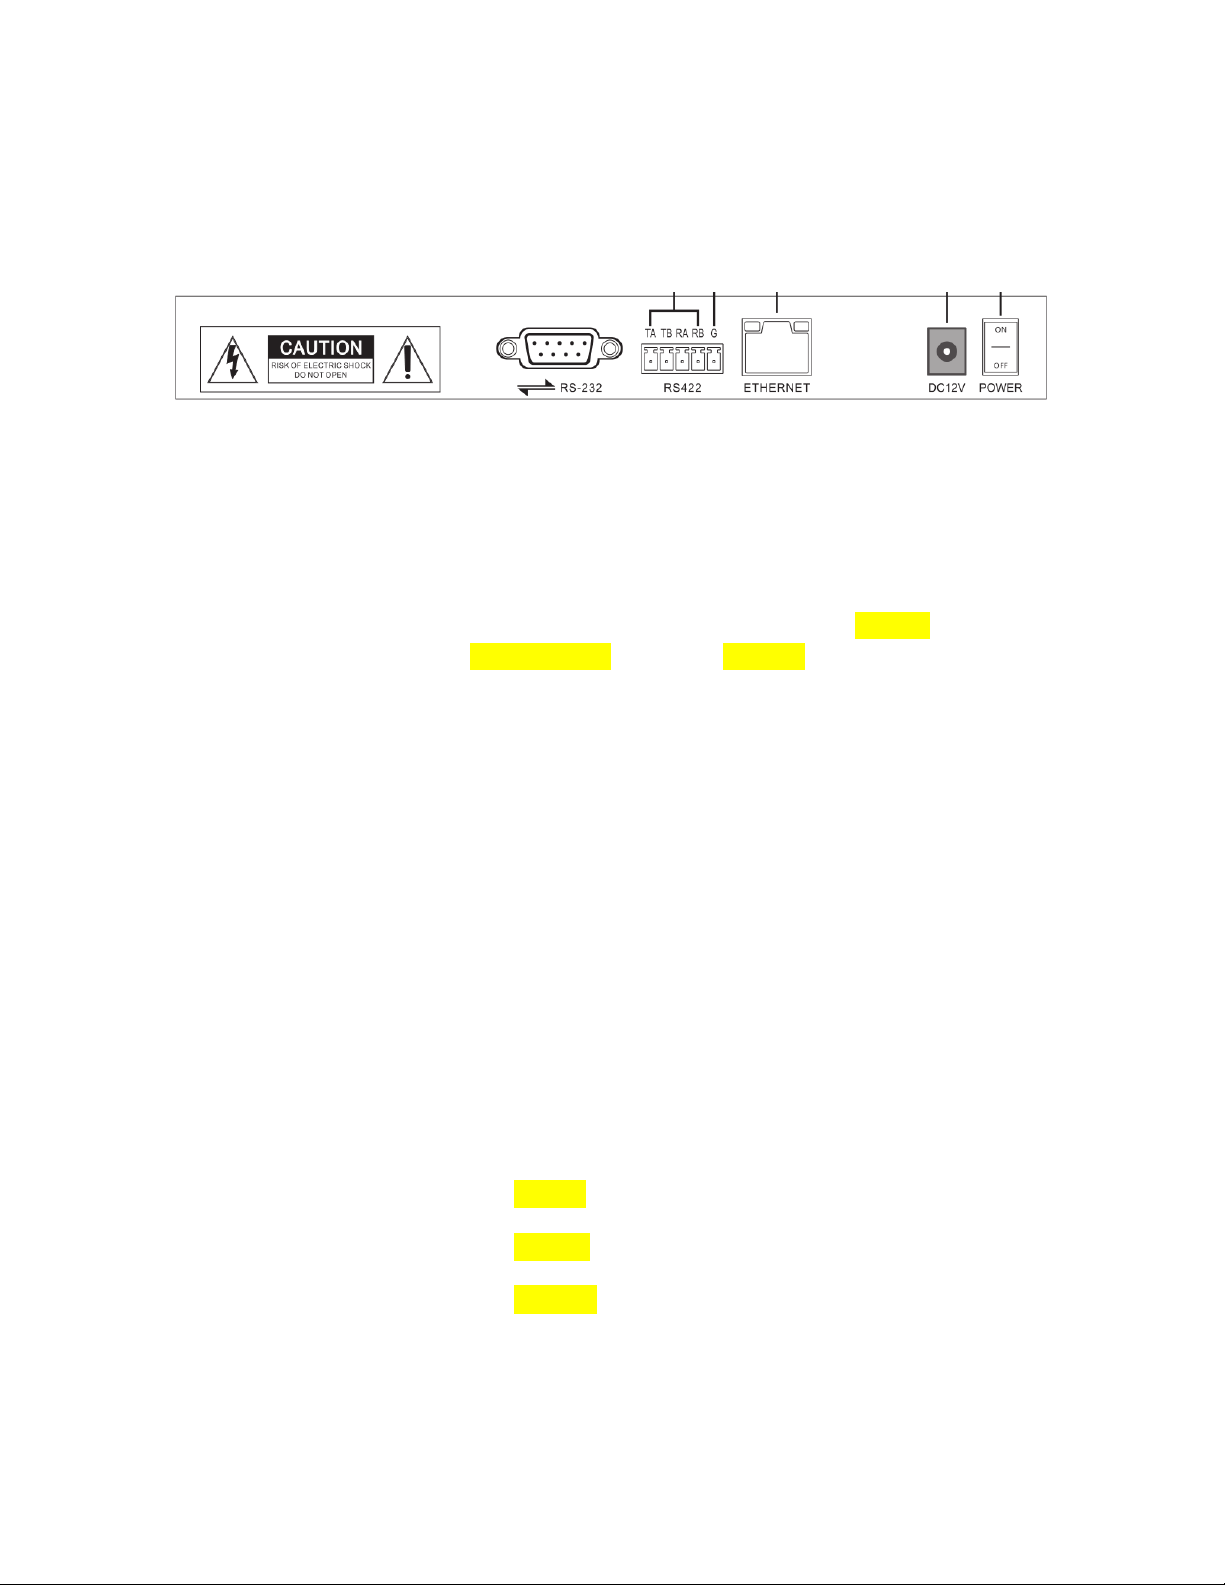
either a RS-232 (IN), RS422 or an Ethernet cable.
1. VISCA & PELCO-D/P (via RS232 or RS422 port)
To properly set up the connection, you need to make sure that the camera and the keyboard are using
the same protocol and baud rate. In order to do so:
•CAMERA:
Go to Camera menu (use IR remote): press “MENU” -> “SETUP” -> select 1) the protocol, i.e. “Pelco-D”;
2) Pelco-D (Pelco-P/VISCA) Address (camera address), i.e. “2”; 3) Baudrate, i.e. “9600” -> press “MENU”
to go back and exit the camera menu. All settings will be saved automatically.
•KEYBOARD:
Go to Keyboard menu:
Press【SETUP】-> push the joystick down to select the submenu, until “Setup 05/08” shows on the
screen for Mode selection;
Push the joystick rightward to choose the protocol: “PELCO”-> press the button on the joystick to enter,
or press【ENTER】;
On the screen, you’ll see default setting “Addr: 001, 2400 P-D” on the screen, where 001 is the current
controlling camera number, 2400 is the baudrate, P-D stands for Pelco-D protocol. Meanwhile,
【CAM1】button will light up.
In order to change the baudrate to be consistent with the one camera is using, press 【SETUP】again->
“Setup 01/06 Control Setup”-> press 【ENTER】
Push the joystick up/down to change the Address. In this case, 002, press【ENTER】
Push the joystick up/down to change the Protocol. In this case, PELCO-D, press【ENTER】
Push the joystick up/down to change the Baudrate. In this case, 9600, press【ENTER】
The screen will show “Ctrl Setup Address 003” automatically to set up the next camera. If you have
multiple cameras connected, please repeat the steps above. Otherwise, press【ESC】to exit the setup
page.

Press【CAM2】, “Addr: 002, 9600 P-D” will show on the screen, and 【CAM2】button will light up. You
now have control of the camera.
2. IP VISCA (via Ethernet port)
To properly set up the connection, you need to make sure that the camera supports IP VISCA and the
keyboard is within the same LAN as the camera.
•CAMERA:
Before setting up the connection on the keyboard, you’ll need to get some information of your camera:
Camera IP Address: take AV-1280 as an example, its IP address is 192.168.5.163.
Subnet mask: 255.255.255.0 (AV-1280)
Gateway: 192.168.5.1 (AV-1280)
UDP Port: 1259(AV-1280)
*Please refer the table on Page.5 for all AViPAS cameras port information.
•KEYBOARD:
a. Set up controller IP:
Press【SETUP】-> push the joystick down to select the submenu, until “Setup 05/08” shows on the
screen for Mode selection;
Push the joystick rightward to choose the protocol: “IP VISCA”-> press the button on the joystick to
enter, or press【ENTER】;
Press【SETUP】again -> push the joystick down to select the submenu, until “Setup 02/10” shows on
the screen for IP selection-> push the joystick to the right until it shows “IP: Static”-> press【ENTER】;
Use the keyboard to set the IP address of the controller: (Connected with AV-1280 series) 192.168.5.100
-> press【ENTER】to go to the next section;
* Keep the first 3 sections (192.168.5) the same as the connected camera, while the last section different. In this
case, camera: 192.168.5.163; controller: 192.168.5.100.
*If there’re less than 3 digits in the section, push the joystick to the right to go to the next section.
Subnet mask: keep the same as the connected camera. 255.255.255.0-> press【ENTER】to go to the
next section;
Gateway: keep the same as the connected camera. 192.168.5.1-> press【ENTER】

The controller will reboot. You should be able to see “192.168.5.100 Visca! ” on the screen when the
controller finishes rebooting. It's the controller’s IP information.
b. Set up camera connection
Press【IP】-> enter the IP address of the controlled camera: 192.168.5.163-> press【ENTER】to go to
the next section;
Port (UDP): 1259-> press【ENTER】to go to the next section;
Cam Num: choose any number from 1-255. This Cam Num will be assigned to the current camera.
2 -> press【ENTER】.
You’ll see “Succeed” shown on the screen. Press 【CAM2】, the button will light up, and
“192.168.5.163 Visca: ” will show on the screen. It's the IP information of the controlled camera.
You should be able to control the camera now.
3. ONVIF (via Ethernet port)
To properly set up the connection, you need to make sure that the camera supports ONVIF and the
keyboard is within the same LAN as the camera.
•CAMERA:
Before setting up the connection on the keyboard, you’ll need to get some information of your camera:
Camera IP Address: take AV-1280 as an example, its IP address is 192.168.5.163.
Subnet mask: 255.255.255.0 (AV-1280)
Gateway: 192.168.5.1 (AV-1280)
ONVIF Port: 2000 (AV-1280)
ONVIF Username & Password: admin
*Please refer the table on Page.5 for all AViPAS cameras port information.
•KEYBOARD:
c. Set up controller IP:
Press【SETUP】-> push the joystick down to select the submenu, until “Setup 05/08” shows on the
screen for Mode selection;
Push the joystick rightward to choose the protocol: “ONVIF”-> press the button on the joystick to enter,
or press【ENTER】;

Press【SETUP】again -> push the joystick down to select the submenu, until “Setup 02/10” shows on
the screen for IP selection-> push the joystick to the right until it shows “IP: Static”-> press【ENTER】;
Use the keyboard to set the IP address of the controller: (Connected with AV-1280 series) 192.168.5.100
-> press【ENTER】to go to the next section;
* Keep the first 3 sections (192.168.5) the same as the connected camera, while the last section different. In this
case, camera: 192.168.5.163; controller: 192.168.5.100.
*If there’re less than 3 digits in the section, push the joystick to the right to go to the next section.
Subnet mask: keep the same as the connected camera. 255.255.255.0-> press【ENTER】to go to the
next section;
Gateway: keep the same as the connected camera. 192.168.5.1-> press【ENTER】
The controller will reboot. You should be able to see “192.168.5.100 ONVIF ” on the screen when the
controller finishes rebooting. It's the controller’s IP information.
d. Set up camera connection
Press【IP】-> enter the IP address of the controlled camera: 192.168.5.163-> press【ENTER】to go to
the next section;
Port (ONVIF): 2000 -> press【ENTER】to go to the next section;
User Name: admin -> press【ENTER】to go to the next section;
Password: admin -> press【ENTER】to go to the next section;
Cam Num: choose any number from 1-255. This Cam Num will be assigned to the current camera.
3 -> press【ENTER】.
You’ll see “Succeed” shown on the screen. Press 【CAM3】, the button will light up, and
“192.168.5.163 ONVIF” will show on the screen. It's the IP information of the controlled camera.
You should be able to control the camera now.

*Port information for all AViPAS cameras:
Model Number
IP Address
Subnet mask
Gateway
UDP
port
ONVIF
port
Username/
Password
AV-2020
192.168.1.188
255.255.255.0
192.168.1.1
52381
8000
admin/admin
AV-1560
192.168.100.88
192.168.100.1
1259
81
AV-1071
AV-1080/1081/1082
192.168.5.163
192.168.5.1
2000
AV-1280/1281
AV-1250/1251
AV-1361/1362
AV-1563
AV-1161
45678
80
admin/123456
Other manuals for AV-2020
2
This manual suits for next models
13
Table of contents
Other Avipas Digital Camera manuals