AvMap EGT probe User manual

WARNING AND INSTALLATION MANUAL
MMEGTPX0AX010
ÑMMEGTPX0AX010@Ó
AvMap EGT probe
Thermocouple type K (Cr-Al) ungrounded

1. Disclaimer & Warning
AvMap disclaims any liability deriving from an improper use or installation of the thermocouple
sensor, in a way that may violate the ight and navigation rules, regulations and safety.
It is highly recommended that the installation of connection threads and thermocouple sensors on
the engine will be performed by a qualied aviation maintenance technician. Consult the engine
installation manual, your Rotax Maintenance Centre and/or aircraft manufacturer for a correct
installation of the thermocouple sensor on the engine.
2. Introduction
AvMap EGT probes are thermocouple sensors meant to measure the exhaust gas temperature of
the engine. AvMap EGT probes are compatible with AvMap EngiBOX, the engine monitoring system
for carbureted Rotax aircraft engines.
3. Package content
1x AvMap EGT probe - Thermocouple type K (Cr-Al) ungrounded
1x M8x1 weld boss
4. Technical specifications
4.1 AvMap EGT Probe - Thermocouple type K (Cr-Al) ungrounded
●Thermocouple type: K (Cr -Al) composed of alloys containing nickel
●Sheath: Inconel 600 Ø 3 mm x 30 mm (Ø 0.12” x 1.18”)
●Measuring junction type: Insulated hot junction in MgO
●Temperature range: -270°C / 1370°C (-454°F / 2498°F)
●Accuracy: According to DIN_IEC 584-2 class 2
●Connection thread: M8x1 screw-in type
●Cable length: 2,5 m insulated in silicon
4.2 M8x1 weld boss
●Connection thread: M8x1
●Diameter: Ø 15 mm (0.59”)
●Cut-out diameter: Ø 12 mm (0.47”)
●High: 11 mm (0.43”)
●Material: stainless steel (INOX)

5. Installation
IMPORTANT: For a correct installation and temperature readings, consult the EngiBOX User &
Installation manual, paragraph 2.2 Connections & Wiring, available at avionics.avmap.it.
IMPORTANT: First install the thermocouple sensor on the engine (STEP 1). After the thermocouple
sensor is installed on the engine, proceed to connect the thermocouple sensor bare wires to the
EngiBOX (STEP 2).
STEP 1: Installation on Rotax 2 stroke and 4 stroke carbureted engines
IMPORTANT: Grease the connection threads with Loctite ANTI-SEIZE type material to ensure
trouble free removal and protect against rust, corrosion, seizing and galling.
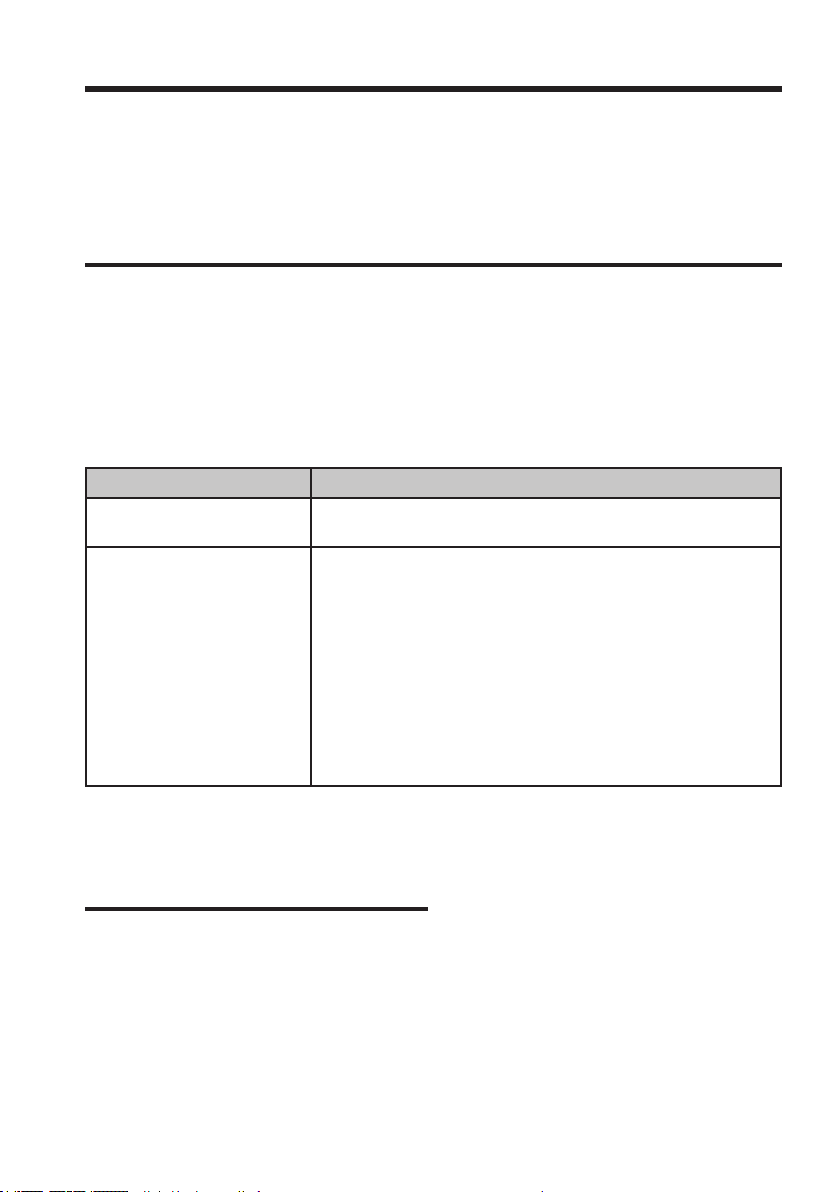
The engine exhaust gas temperature is monitored by means of thermocouple sensors on the
engines exhaust manifold.
Check if the connection thread M8x1 for attachment of the thermocouple sensor is already provided
in the exhaust bend.
Case Action
Connection thread M8x1 is
provided in the exhaust bends
Connect the thermocouple sensor to the connection thread M8x1
of the desired exhaust bend by screwing it in and fasten it tight.
Connection thread M8x1 is
NOT provided in the exhaust
bends
Install the M8x1 weld boss, that is delivered in this package
together with the thermocouple sensor, on the exhaust bend.
Consult the Rotax installation manual and the aircraft
manufacturer that installed the engine on the aircraft for
identifying the correct position on the exhaust bend for exhaust
gas temperature readings.
After identifying the correct position make a 12mm (0.47”)
diameter hole in the exhaust bend and insert the M8x1 weld boss
in the exhaust bend 12 mm (0.47”) diameter hole and attach the
M8x1 weld boss to the exhaust bend by welding it.
Connect the thermocouple sensor to the M8x1 weld boss by
screwing it in and fasten it tight.
NOTE: On Rotax 914 engine series the connection thread M8x1 for attachment of the thermocouple
sensor are already provided in the 4 exhaust bends. On the other Rotax engine series the presence
of exhaust manifold and connection threads may vary per engine and aircraft model.
STEP 2: Connection to the EngiBOX
The EngiBOX can connect to the thermocouple sensor in order to monitor the exhaust gas
temperature of the engine.
The AvMap EGT probe comes with 2 bare wires:
1. Red wire = +/+
2. Green wire = -/-
Connect the red wire to the respective EngiBOX terminal input +/+ TEMP
Connect the green wire to the respective EngiBOX terminal input -/- TEMP

6. Limited Warranty
The manufacturer warrants each AvMap EGT probe to be free from defects in material and
workmanship under normal use and service for a period of 12 months from original retail purchase.
During the warranty period, the manufacturer will repair or replace any component which fails in
normal use without charges for parts or labour.
To receive warranty service, contact your local authorized dealer for shipping instructions. This
limited warranty does not extent to any AvMap EGT probe which has been subjected to misuse,
neglect, accident, incorrect wiring or improper installation. The manufacturer reserves the right to
repair or replace the AvMap EGT probe at its sole discretion.
This is the only warranty. The manufacturer expressly disclaims any and all other warranties, either
expressed or implied, including warranties of suitability or tness for a particular purpose. In no
event will manufacturer be liable for consequential damages or loss of use. This warranty gives you
specic legal rights which may vary from state to state.
NOTE: We will not be liable for errors contained herein, or for incidental or consequential damages
in connection with the performance or use of this material.
For technical advice or assistance contact:
AvMap Srl
V.le Zaccagna 6,
54033 Carrara (MS), Italy
www.avmap.it
AvMap Satellite Navigation Inc.
25 Enterprise Zone Drive,
Riverhead, NY 11901, USA
www.avmap.us
AvMap do Brasil Ltda
Rua Professor Getùlio Nogueira de Sà, 51
CEP: 13208-180 Jundaì, São Paolo – SP, Brazil
www.avmap.com.br
K1EGTP00AM
avionics.avmap.it
Table of contents
Popular Accessories manuals by other brands

Eco Sensor
Eco Sensor ES701 user manual

Byron
Byron SX-245 Installation and operation instruction

PCB Piezotronics
PCB Piezotronics IMI SENSORS 640B61 Installation and operating manual

SIKA
SIKA VT 25 Series operating manual

PCB Piezotronics
PCB Piezotronics IMI SENSORS 641B12 Installation and operating manual

Vernier
Vernier Go Direct GDX-WRT manual