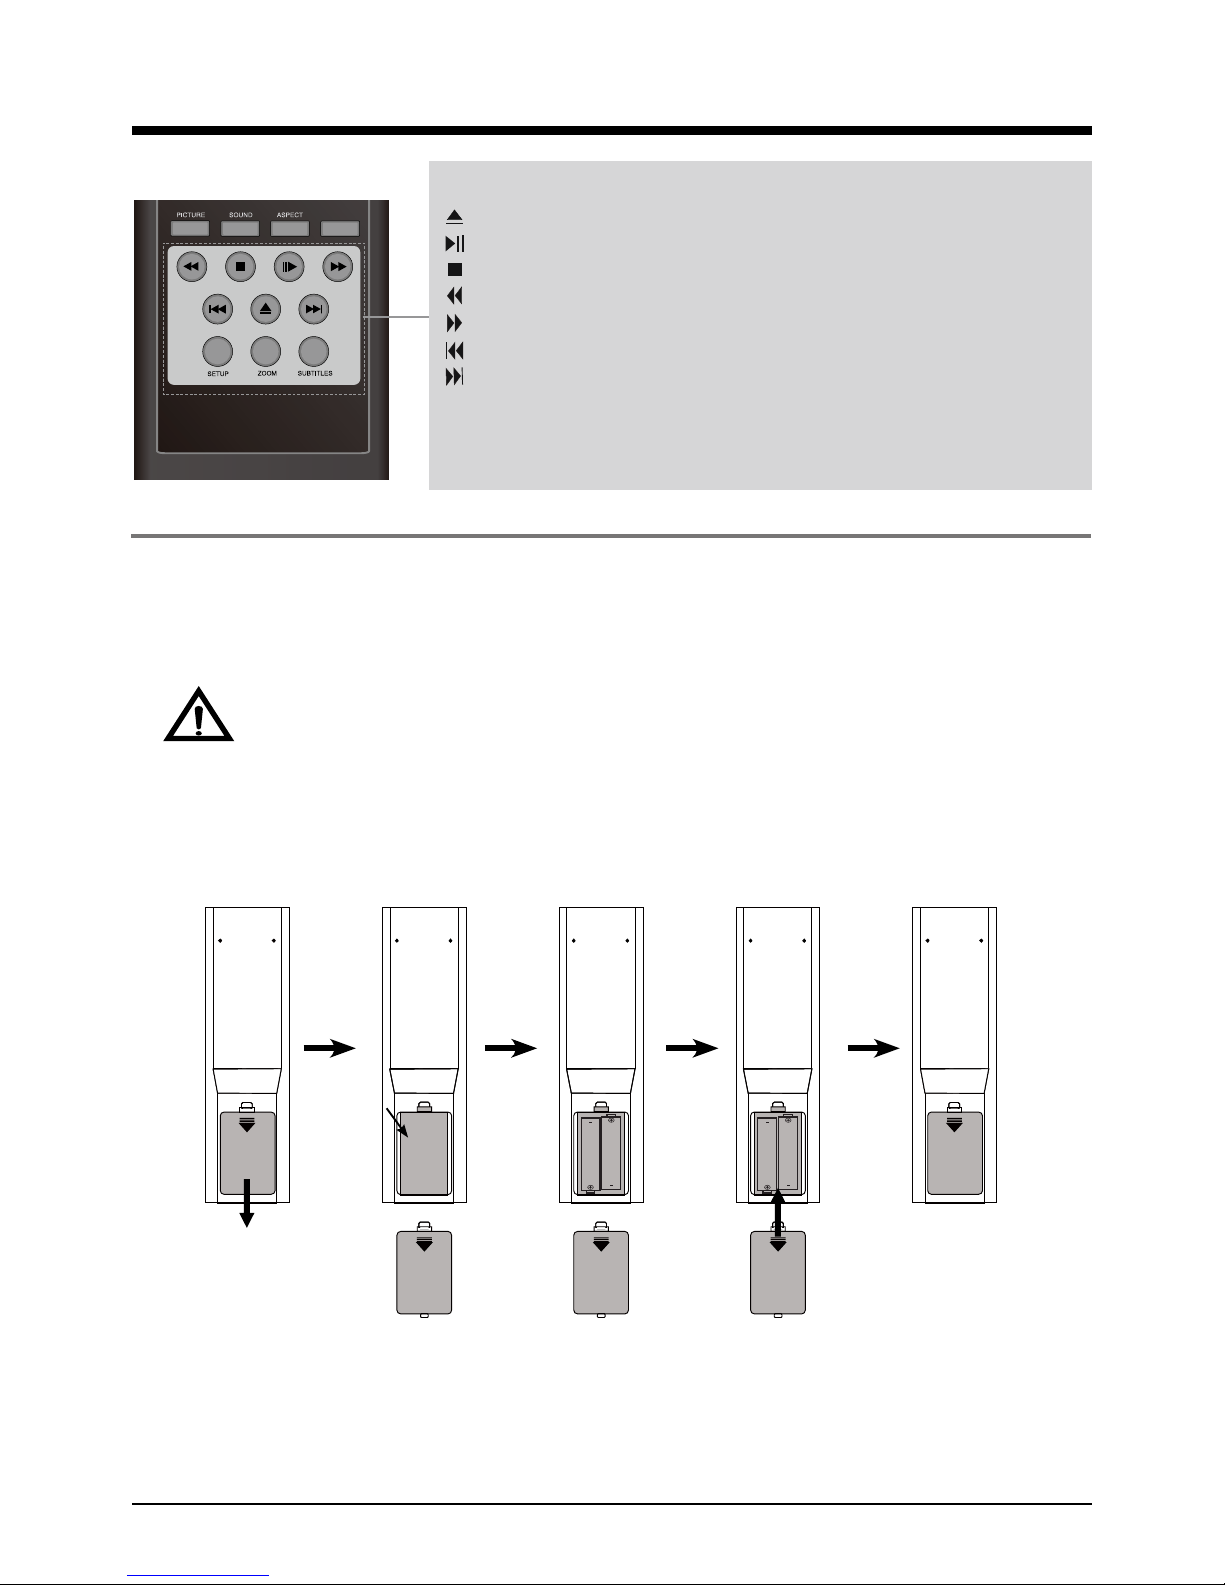
Avol ALTD2490AD User manual

Attention:
Please kindly refer to “TV Broadcasting system”(Page 20 of User’s manual) for the choosing suitable
TV broadcasting system as per your living area when you use this unit firstly. TV Color system is
automatically searched regardless of your living area.
Model No.: ALTD2490AD
24" Full HD ATSC/Multi System LCD TV & DVD Combo


1
Contents
Contents
Caution
Safety Information
Unit and Accessories
Product Feature
Introduction
1. Front View
2. Rear View
3. Remote Control
Connection
Basic Operation
OSD Menu
1. Picture menu
2. Audio menu
3. Time menu
4. Setup menu
5. Lock menu
6. Channel menu
2
3
4
4
5-8
5
6
7-8
9-12
13
14-20
14
15
16
17
18
19-20
DVD Operation
DVD Basic Operation
Disc Care
DVD System Setup
Simple Troubleshooting
21-24
21-22
22
23-24
25
26

2
Caution
Caution
7KHOLJKWHQLQJÀDVKZLWKDUURZKHDGV\PEROZLWKLQDQHTXLODWHUDOWULDQJOH
LVLQWHQGHGWRDOHUWWKHXVHUWRWKHSUHVHQFHRIXQLQVXODWHGGDQJHURXV
YROWDJHZLWKLQWKHSURGXFWVHQFORVXUHWKDWPD\EHRIVXI¿FLHQWPDJQLWXGH
WRFRQVWLWXWHDULVNRIHOHFWULFVKRFNWRWKHSHUVRQV
7KHH[FODPDWLRQSRLQWZLWKLQDQHTXLODWHUDOWULDQJOHLVLQWHQGWRDOHUWWKH
XVHUWRWKHSUHVHQFHRILPSRUWDQWRSHUDWLQJDQGPDLQWHQDQFHVHUYLFLQJ
LQVWUXFWLRQVLQWKHOLWHUDWXUHDFFRPSDQ\LQJWKHDSSOLDQFH
Correct disposal of this Product
:DVWH(OHFWULFDO(OHFWURQLF(TXLSPHQW:(((
<RXUSURGXFWLVGHVLJQHGDQGPDQXIDFWXUHGZLWKKLJKTXDOLW\PDWHULDOVDQG
FRPSRQHQWVZKLFKFDQEHUHF\FOHGDQGUHXVHG
7KLVV\PEROPHDQVWKDWHOHFWULFDODQGHOHFWURQLFHTXLSPHQWDWWKHLUHQG
RIOLIHVKRXOGEHGLVSRVHGRIVHSDUDWHO\IURP\RXUKRXVHKROGZDVWH
3OHDVHGLVSRVHRIWKLVHTXLSPHQWDW\RXUORFDOFRPPXQLW\ZDVWHFROOHFWLRQ
UHF\FOLQJFHQWUH
,QWKH86$WKHUHDUHVHSDUDWHFROOHFWLRQV\VWHPVIRUXVHGHOHFWULFDODQG
HOHFWURQLFSURGXFWV3OHDVHKHOSXVWRFRQVHUYHWKHHQYLURQPHQWZHOLYH
in!
7KLVXQLWFRPSOLHVZLWK$PHULFD6DIHW\GLUHFWLYHV
7KLVXQLWFRPSOLHVZLWK)&&GLUHFWLYHV

3
Safety Information
Safety Information
7RHQVXUHUHOLDEOHDQGVDIHRSHUDWLRQRIWKLVHTXLSPHQWSOHDVHUHDGFDUHIXOO\DOOWKH
LQVWUXFWLRQVLQWKLVXVHUJXLGHHVSHFLDOO\WKHVDIHW\LQIRUPDWLRQEHORZ
Electrical safety
7KH79VHWVKRXOGRQO\EHFRQQHFWHGWRDPDLQVVXSSO\ZKLFKPDWFKHVWKDWVWDWHGRQ
WKHODEHORQWKHPDLQVDGDSWRU
7RSUHYHQWRYHUORDGGRQWVKDUHWKHVDPHPDLQVVXSSO\VRFNHWZLWKWRRPDQ\RWKHU
LWHPVRIHTXLSPHQW
'RQRWSODFHDQ\FRQQHFWLQJZLUHVZKHUHWKH\PD\EHVWHSSHGRQRUWULSSHGRYHU
'RQRWSODFHKHDY\LWHPVRQWKHOHDGVZKLFKPD\GDPDJHWKHP
+ROGWKH0DLQVSOXJQRWWKHZLUHVZKHQUHPRYLQJIURPDVRFNHW
'XULQJDWKXQGHUVWRUPRUZKLOHOHDYLQJWKH79IRUORQJSHULRGVGLVFRQQHFWWKHDHULDOLI
RXWGRRUDQGPDLQVDGDSWRUIURPWKHVXSSO\
'RQRWDOORZZDWHURUPRLVWXUHWRHQWHUWKH79RUPDLQVDGDSWRU'R127XVHLQZHW
RUPRLVWDUHDVVXFKDV%DWKURRPVVWHDP\NLWFKHQVRUQHDUVZLPPLQJSRROV
3XOOWKHSOXJRXWLPPHGLDWHO\DQGVHHNSURIHVVLRQDOKHOSLI
WKHPDLQVSOXJRUFDEOHLVGDPDJHG
OLTXLGLVVSLOWRQWRWKHVHWRULILWLVDFFLGHQWDOO\H[SRVHGWRZDWHURUPRLVWXUH
DQ\WKLQJDFFLGHQWDOO\SHQHWUDWHVWKHYHQWLODWLRQVORWV
WKHVHWGRHVQRWZRUNQRUPDOO\
'R127UHPRYHWKHVDIHW\FRYHUV7KHUHDUHQRXVHUVHUYLFHDEOHSDUWVLQVLGH
<RXPD\LQYDOLGDWHWKHZDUUDQW\4XDOL¿HGSHUVRQQHORQO\DUHSHUPLWWHGWRVHUYLFHWKLV
DSSDUDWXV
7RDYRLGEDWWHU\OHDNDJHUHPRYHH[KDXVWHGEDWWHULHVIURPWKHUHPRWHFRQWURO
KDQGVHWRUZKHQQRWXVLQJIRUDORQJSHULRG
'R127EUHDNRSHQRUWKURZH[KDXVWHGEDWWHULHVRQD¿UH
Physical safety
'R127EORFNYHQWLODWLRQVORWVLQWKHEDFNFRYHU<RXPD\SODFHWKH79LQDFDELQHWEXW
HQVXUHDWOHDVWFPFOHDUDQFHDOODURXQGWKHXQLW
'R127WDSRUVKDNHWKH79VFUHHQ\RXPD\GDPDJHWKHLQWHUQDOFLUFXLWU\7DNHJRRG
FDUHRIWKHUHPRWHFRQWUROGRQRWGURSLWRUDOORZLWWRFRPHLQWRFRQWDFWZLWKOLTXLGV
7RFOHDQWKH79XVHDVRIWGU\FORWK'R127XVHVROYHQWVRUSHWUROEDVHGÀXLGV)RU
VWXEERUQVWDLQV\RXPD\XVHDGDPSVRIWFORWKZLWKGLOXWHGGHWHUJHQW

4
Unit and Accessories and Product Feature
Unit and Accessories
TV set
User's manual Remote control
Batteries: 2xAA
Mains Cable Mains adaptor
Product Feature
- Inputs: RF, VIDEO, VGA, YPbPr, HDMI, S-VIDEO
- Audio Input: AV Audio R/L, PC Audio
- Support TV mode: NTSC-M, ATSC, PAL, Secam - B/G, D/K, I.
- Search TV: Auto/Manual
- Auto-shutting down
- Program exchange and edit
220V Power Socket

5
Introduction
Introduction
1. Front View
1. (IR) Infrared Receiver: Receives IR signals from the remote control.
(Power on/Standby)LED Indicator: Press POWER to turn on and off.
Indicator on(Blue) Standby mode
Indicator on(Null) Power on mode
2. The functions of the buttons:
TV/AV: Press to display the input source menu.
MENU: Press to display the OSD menu,
press again to exit the menu.
CH+/-: Press to scan through channels.
VOL+/-: Press to adjust the volume.
POWER: Turn on/standby the TV set.
The effective receiving range for the signal is 5-8 metres from the front of the remote
control window, and 300to the left or right side and 200above or below the remote control
window.
Press TV/AV button on the TV set or on remote
control to display the input source menu, and use
CH+/- button on the TV set or ġ/Ģbutton on remote
control to select the input source, press OK button on the
remote control to enter.
Note: Before you select the input source, make sure the
connections are prepared.
TV
AV
S-Video
Component
HDMI
VGA
INPUT SOURCE
LED Indicator POWER Remote Control window
(Keep clear)
DVD
Please insert a 12cm disc
according to the silk
Play the next track or chapter
Play the previous track or chapter
Eject the disc
Play the disc playing
Pause the disc playing
Stop the disc playing

6
Introduction
2. Rear View
Wall Mounting
The TV is provided with mounting holes for a VESA approved wall mounting bracket(NOT SUPPLIED).
Remove the Two Posi screws holding the base to the base bracket and lift the base away (do not
remove the base mounting bracket). Mount the VESA bracket with 200x200 VESA Standard using
4 x M4 x10 Iso metric threaded screws (not supplied). Do not use screws longer than 10 mm,
damage will occur to the internal parts. Fit the wall bracket securely following the manufacturers
instructions.
1.
RF1(for USA): Connect antenna or cable 75 Ohm coaxial to receive TV signal.
2.
RF2(for Europe): Connect antenna or cable 75 Ohm coaxial to receive TV signal.
3. Headphone: Connect to a headphone.
4. VIDEO: Connect it to video output terminal of DVD.
L/R in: Connect them to the audio output terminal of DVD(shared with YPbPr and S-Video)
5. S-VIDEO: Connect it to S-video output terminal of DVD.
6. YPbPr: Connect them to the YPbPr video output terminal of DVD.
7. PC IN: Connect it to the audio output terminal of PC.
8. VGA: For PC display.Connect it to the D-Sub 15 pins analog output connector of the PC.
9. HDMI: Connect it to the HDMI of DVD or other equipment.
10.POWER: Connect to power adaptor.
RF1 R L VIDEO S-VIDEO Pr Pb Y PC-IN VGA HDMI POWER
Headphone out
Audio in
RF2
12 3 4 5 6 7 8 9 10

7
2.
Introduction
3. Remote Control
The remote control is using Infra-Red(IR). Point it towards the front of the LCD TV. The remote
control may not work correctly if it is operated out of range or out of angle.
POWER(red button): Turn the TV on/standby.
TV/AV: Press to display the input source menu.
CC: Press to display the closed caption.
MTS: Press to select the audio channels.
FAV: Press to add or remove favorite channel.
EPG: Press to enter the EPG menu directly.
MUTE: Press to mute the sound, press again or press VOL+ to
unmute.
DISPLAY: Display the information of current mode.
Thumbstick(! ġĢ ): Allows you to navigate the on-screen
menus and adjust the system settings to your preference.
OK: CONFIRM button.
MENU: Press to display the OSD menu.
EXIT: Press to exit the OSD menu.
VOL+/-: Press to adjust the volume.
CH+/-: Press to scan through channels.
RETURN: Return to the previous channel viewed.
TIMER: Shutdown timer.
Number Buttons: Choose channel directly.
Select channel 5, Press button "5";
Select channel 62, Press button "6", then press button "2" in 2
seconds;
Select channel 151, Press button "1", and press button "5" in 2
seconds, and press button "1" in 2 seconds;
Select channel 5-1, Press button "5", and press button "- / - -"
in 2 seconds, and press button "1" in 2 seconds;
PICTURE: Press repeatedly to cycle through the available
video picture modes.
SOUND: Press to cycle through the different sound settings.
ASPECT: Press to change the screen display mode.
Number buttons for DVD
Pressing“-/--”button to display “SELECT 10+”, and press a
number button to play the program.
Press to display the disc’s information in DVD mode.

8
Introduction
Installing Batteries
2SHQWKHEDWWHU\FRPSDUWPHQWFRYHURQWKHEDFNRIWKHUHPRWHFRQWURO
,QVHUWWZR9$$VL]HEDWWHULHVREVHUYLQJWKHSRODULW\PDUNLQJVLQVLGHWKHEDWWHU\
FRPSDUWPHQW'RQ¶WPL[GLIIHUHQWW\SHVRUXVHGEDWWHULHVZLWKQHZRQHV
3. Close the cover.
%DWWHULHVVKDOOQRWEHH[SRVHGWRH[FHVVLYHKHDWVXFKDVVXQVKLQHRU¿UH
7KHUHPRWHFRQWUROVKRXOGEHRSHUDWHGZLWKLQIHHWPDQG0to the left and right of the
IR receive at the front of the LCD TV.
8VHGEDWWHULHVVKRXOGEHGLVSRVHGSURSHUO\
/RDGHMHFW'9'GLVF
3OD\SDXVH'9'SURJUDP
6WRS'9'SURJUDP
'9'IDVWUHYHUVH
'9'IDVWIRUZDUG
'9'SUHYLRXVFKDSWHU
'9'QH[WFKDSWHU
Buttons for DVD functions
SETUP: DVD system setup.
ZOOM:$GMXVWSLFWXUHVL]HLQ'9'PRGH
SUBTITLES:7XUQRQRIIWKH'9'VXEWLWOHGLVSOD\

RF1 R L VIDEO S-VIDEO Pr Pb Y PC-IN VGA HDMI POWER
Headphone out
Audio in
RF2
9
Connection
Connection
Antenna(RF) Connection
Power Cord Connection
Coaxial (Round) Antenna Cable
Press SOURCE button on the remote control to display the input source menu, press ġĢ
button
to select TV, then press OK
Note: RF1(for USA): $QDORJ'LJLWDOȍATSC/NTSC Signal.
RF2(for Europe): $QDORJPAL/SECAM Signal.
- Connect to the power supply correctly as shown with the Mains cable and Mains adaptor.
- When you connect the power, the TV set comes into standby mode and the LED indicator (Page
5) lights Blue.
- You could bring the TV out of standby mode by press the POWER ro)5egap(tesVTnonottub
remote control(page 7), and the LED indicator lights off.
Wall jack with F-Connector
RF1: $QDORJ'LJLWDOȍATSC/NTSC Signal
RF2: Analog-PAL/SECAM Signal
External Antenna
RF
RF1 R L VIDEO S-VIDEO Pr Pb Y PC-IN VGA HDMI POWER
Headphone out
Audio in
RF2

10
Connection
AV Input Connection
S-VIDEO Connection
Note: All cables shown are not included with the TV.
- Connect the VIDEO and AUDIO output jacks on the DVD or VCR to the AV IN jacks on the TV
set with a RCA cable.
- Match the jacks colors: Video=yellow, Audio left=White, Audio right=red.
- Turn on the DVD/VCR, and select “AV” in the input source menu.
- Connect the S-VIDEO output jack on the DVD or VCR to the S-Video input jack on the TV set
with a S-Video cable. The picture quality is improved compared to a regular VCR to the video
input.
- Connect the audio output jacks on the DVD or VCR to the audio input jacks on the set with a
RCA cable.
- Turn on the DVD/VCR, and select “S-VIDEO” in the input source menu.
RCA Video Cable
S-Video Cable
RCA Audio Cable
Audio Cable
DVD or VCR
DVD or VCR
Headphone out
Do not connect both VIDEO and
S-VIDEO at the same time. They will
interfere with each other.
RF1 R L VIDEO S-VIDEO Pr Pb Y PC-IN VGA HDMI POWER
Headphone out
Audio in
RF2
RF1 R L VIDEO S-VIDEO Pr Pb Y PC-IN VGA HDMI POWER
Headphone out
Audio in
RF2

11
Connection
HDMI Connection
Note: All cables shown are not included with the TV.
DVD or VCR
- Connect the HDMI jack on the DVD to the HDMI jack on the TV set with a HDMI cable.
- Turn on the DVD, and select “HDMI” in the input source menu.
+'0,+LJK'H¿QLWLRQ0XOWLPHGLD,QWHUIDFHLVWKH¿UVWDOOGLJLWDOFRQVXPHUHOHFWURQLFVA/V
LQWHUIDFHWKDWVXSSRUWVXQFRPSUHVVHGVWDQGDUG2QHMDFNVXSSRUWVERWKYLGHRDQGDXGLR
LQIRUPDWLRQ
YPbPr Connection
Note: All cables shown are not included with the TV.
- Connect the YPbPr output jacks on the DVD or VCR to the YPbPr input jacks on the TV set
with a YPbPr cable. 7KHSLFWXUHTXDOLW\LVLPSURYHGFRPSDUHGWRDUHJXODU9&5WRWKHYLGHR
input.
- Match the jacks colors: Y=Green, Pb=Blue, Pr=red.
- Connect the audio output jacks on the DVD or VCR to the audio input jacks on the set with an
audio cable.
- Turn on the DVD/VCR, and select “YPbPr” in the input source menu.
DVD or VCR
YPbPr Cable
Y Pb Pr
RF1 R L9,'(269,'(23U3E Y PC-IN VGA+'0,32:(5
Headphone out
Audio in
RF2
RF1 R L9,'(269,'(23U3E Y PC-IN VGA+'0,32:(5
Headphone out
Audio in
RF2

RF1 R L VIDEO S-VIDEO Pr Pb Y PC-IN VGA HDMI POWER
Headphone out
Audio in
RF2
RF1 R L VIDEO S-VIDEO Pr Pb Y PC-IN VGA HDMI POWER
Headphone out
Audio in
RF2
12
Connection
PC Connection
Headphone Connection
Note: All cables shown are not included with the TV.
- Connect the RGB jack on the PC to the VGA jack on the TV set with a VGA cable.
- Connect the audio output jack on the PC to the PC IN jack on the TV set with a stereo audio
cable.
- Turn on the PC, and select “VGA” in the input source menu.
- If using a sound card, adjust the
PC sound as required.
- Set the video resolution of your
PC to 1024x768,60Hz on its
original monitor.
Make the connections between
the TV monitor and your PC,
switch on the monitor before
booting the PC.
You can now set your preferred
resolution from the choice
supported.
See the table of supported
resolutions on the right.
- You can connect a headphone to your TV if you wish to watch program without disturbing
people around you.
- Insert some standard headphones with a 3.5mm jack plug into the 3.5mm jack on the back of
the TV(see diagram).
Note: 1.HEADPHONE VOLUME WARNING.
Connect headphones with the volume set low and increase it if required.
Prolonged listening through some headphones at high volume settings can result in
hearing damage.
2. You will not receive the sound from the TV when you connect headphones to the
system.

13
Basic Operation
Basic OSD Menu operation
Main menu
Picture, Audio, Time, Setup, Lock, Channel
Submenu
(Picture menu for example)
Hint
you should operate the OSD menu
according to the hint.
Press MENU button to display the OSD menu as below:
Use /!button to select the main menu, and press Ģbutton to enter the submenu.
In the submenu, use ġ/Ģbutton to select the function item, and you could:
adjust ("Contrast" item in Picture menu for example) with /!button;
select ("Picture Mode" item in Picture menu for example) with /!button;
enter the submenu ("Close Caption" item in Setup menu for example) with !button.
* (Press MENU button to return to the upper menu.)
* (Press EXIT button to exit the menu display.)
Note1: Only when you input the suitable signal, the relevant items can be activated
Note2: Please operating the OSD menu according to hint on the bottom of the banner.
Basic Operation
Power on/off
1. Connect to the power supply with a power code and an adaptor(page 9).
2.-To turn on the TV
Press POWER button on the TV or remote control.
-To turn off the TV
Press POWER button on the TV or remote control.
Input Source select
Press TV/AV button on the TV set or remote control
to display the input source menu, and use CH+/- button on the TV set
or ġ/Ģbutton on remote control to select the input source, press OK
button on the remote control to enter.
Note: Before you select the input source, make sure the
connections are prepared.
TV
AV
S-Video
Component
HDMI
VGA
INPUT SOURCE
DVD

14
OSD Menu
OSD Menu
1. Picture menu
Picture mode: Select between Standard, Dynamic, Mild, Sports and User.
You may select the picture mode directly by pressing the PMODE button on the remote
control.
Contrast: Control the difference between the bright and dark regions of the screen picture.
Brightness: Adjust brightness of the picture.
Color: Adjust color of the picture.
Tint: Control the fresh tones to make them appear natural.
Sharpness:6HWWKHDPRXQWRI¿QHGHWDLOLQWKHSLFWXUH
Color Temp.: select between Normal, Cool and Warm.
Description

15
2. Audio menu
Description
OSD Menu
Sound Mode: Select your desired picture mode as follow: Flat, Music, Movie, Sports and User
You may select the sound mode directly by pressing the SMODE button on the remote
control.
Bass: Low frequencies intensity.
Treble: High frequencies intensity.
Balance: Left and right stereo audio channels balance.
Surround: Activate or deactivate the Surround function.
Audio Language: Select audio language.
Flat

16
OSD Menu
3. Time menu
Description
Sleep timer: You may set the automatic shutdown timer choosing from 5 to 240 minutes, or
deactivate this function.
Time zone: 6HOHFWEHWZHHQ3DFL¿F Alaska, Hawaii, Eastern, Central and Mountain.
Daylight Saving Time: Select between On and Off.
Clock: User can not change time manually during DTV mode, for time is from signal source
directly.

17
OSD Menu
4. Setup menu
Menu Language:6HOHFW26'PHQXODQJXDJH
Transparency:7XUQRQRURIIWKHWUDQVSDUHQF\PHQXIXQFWLRQ
Zoom Mode:6HOHFWWKH]RRPPRGHEHWZHHQ]RRP
]RRP
Noise reduction:6HOHFWWKHQRLVHUHGXFWLRQPRGHEHWZHHQ
6WURQJ2II:HDNDQG0LGGOH
PC SETUP:,IWKHYLGHRLQSXWVLJQDOFRPHVIURP\RXU3&\RXPD\
DGMXVWWKH93RVLWLRQ+3RVLWLRQ)UHTXHQF\3KDVHRUHYHQ
SHUIRUPDQ$XWRDGMXVWPHQW
Closed Caption:
&&0RGH$OORZ\RXWRVHOHFWWKH&&0RGHDPRQJ2Q2IIDQG
CC on Mute.
Basic Selection:$OORZ\RXWRVHOHFWWKHEDVLFVHOHFWLRQDPRQJ
&&&&&&&&7H[W7H[W7H[WDQG7H[W
Advanced Selection:$OORZ\RXWRVHOHFWWKHDGYDQFHGVHOHFWLRQ
DPRQJ6HUYLFH6HUYLFH6HUYLFH6HUYLFH6HUYLFHDQG
Service 6.
Option:8VHWKXPEVWLFNEXWWRQVWR
RSHUDWLQJLQRSWLRQPHQXDV\RXU
GHVLUH
XVS:$FWLYDWHGHDFWLYDWHWKHDXWRPDWLFG\QDPLFEULJKWQHVVIXQFWLRQ
Restore Default:5HVWRUHDOOVHWWLQJVLQ6(783PHQXWRIDFWRU\VHWWLQJV
Description
Closed Caption
PC SETUP

18
5. Lock menu
OSD Menu
<RXPXVWHQWHUWKHSDVVZRUGWRJDLQDFFHVVWRWKH/RFNPHQX7KHGHIDXOWSDVVZRUGLV
<RXPD\PRGLI\WKHIROORZLQJRSWLRQV
Change password:&KDQJHWKHSDVVZRUG\RXPXVWHQWHUWKHQHZSDVVZRUGWZLFHWRFRQ¿UP
LW1RWH'RQRWIRUJHWWKHSDVVZRUG
Lock: $OORZ\RXWRWXUQRQRURIIWKHV\VWHPORFN,IGHDFWLYDWHGWKHIXQFWLRQVGHVFULEHGEHORZ
don’t work.
7KLVRSWLRQPHQXDOORZV\RXWRORFNDQ\79FKDQQHORUDGMXVWWKH0RYLHUDWLQJ¿OWHU
US:!
TV: 8VHĤ0ĥEXWWRQVWRVHOHFWWKHGHVLUHGUDWLQJDQGSUHVV
?EXWWRQWREORFNRUXQEORFNUDWLQJ
03$$7KH0RYLHUDWLQJ03$$LVXVHG
IRURULJLQDOPRYLHVUDWHGE\WKH0RWLRQ
3LFWXUH$VVRFLDWLRQRI$PHULFD03$$
DVEURDGFDVWHGRQFDEOH79DQGQRW
HGLWHGIRUWHOHYLVLRQ
8VHĤ0ĥEXWWRQWRVHOHFW1$*
3*3*51&RU;
Canada:!
&DQDGD(QJOLVK6HOHFWDPRQJ(&&*3*DQG
&DQDGD)UHQFK6HOHFWDPRQJ(*DQVDQVDQVDQG
DQV
Reset RRT:$OORZ\RXWRUHVHWWKH557VHWWLQJ
Description
Table of contents
Other Avol LCD TV manuals