AVS RXPRO User manual
Page 1
AVS RXPRO 4-Channel Controller
Installation Manual
INTRODUCTION
The AVS RXPRO is a multi-purpose 4-channel narrow-band UHF receiver/transmitter set with fully programmable relay
outputs (1 amp relays).
All outputs are individually programmable to suit almost any application (momentary, latched,
timed or pulsed)
Up to 5 remote controls can be programmed and used
Compatible with wireless sensors (up to four can be programmed in)
Up to 200 metres radio frequency range (line of sight)
Programming via remote
Power supply requirement: 12VDC @ 500mA
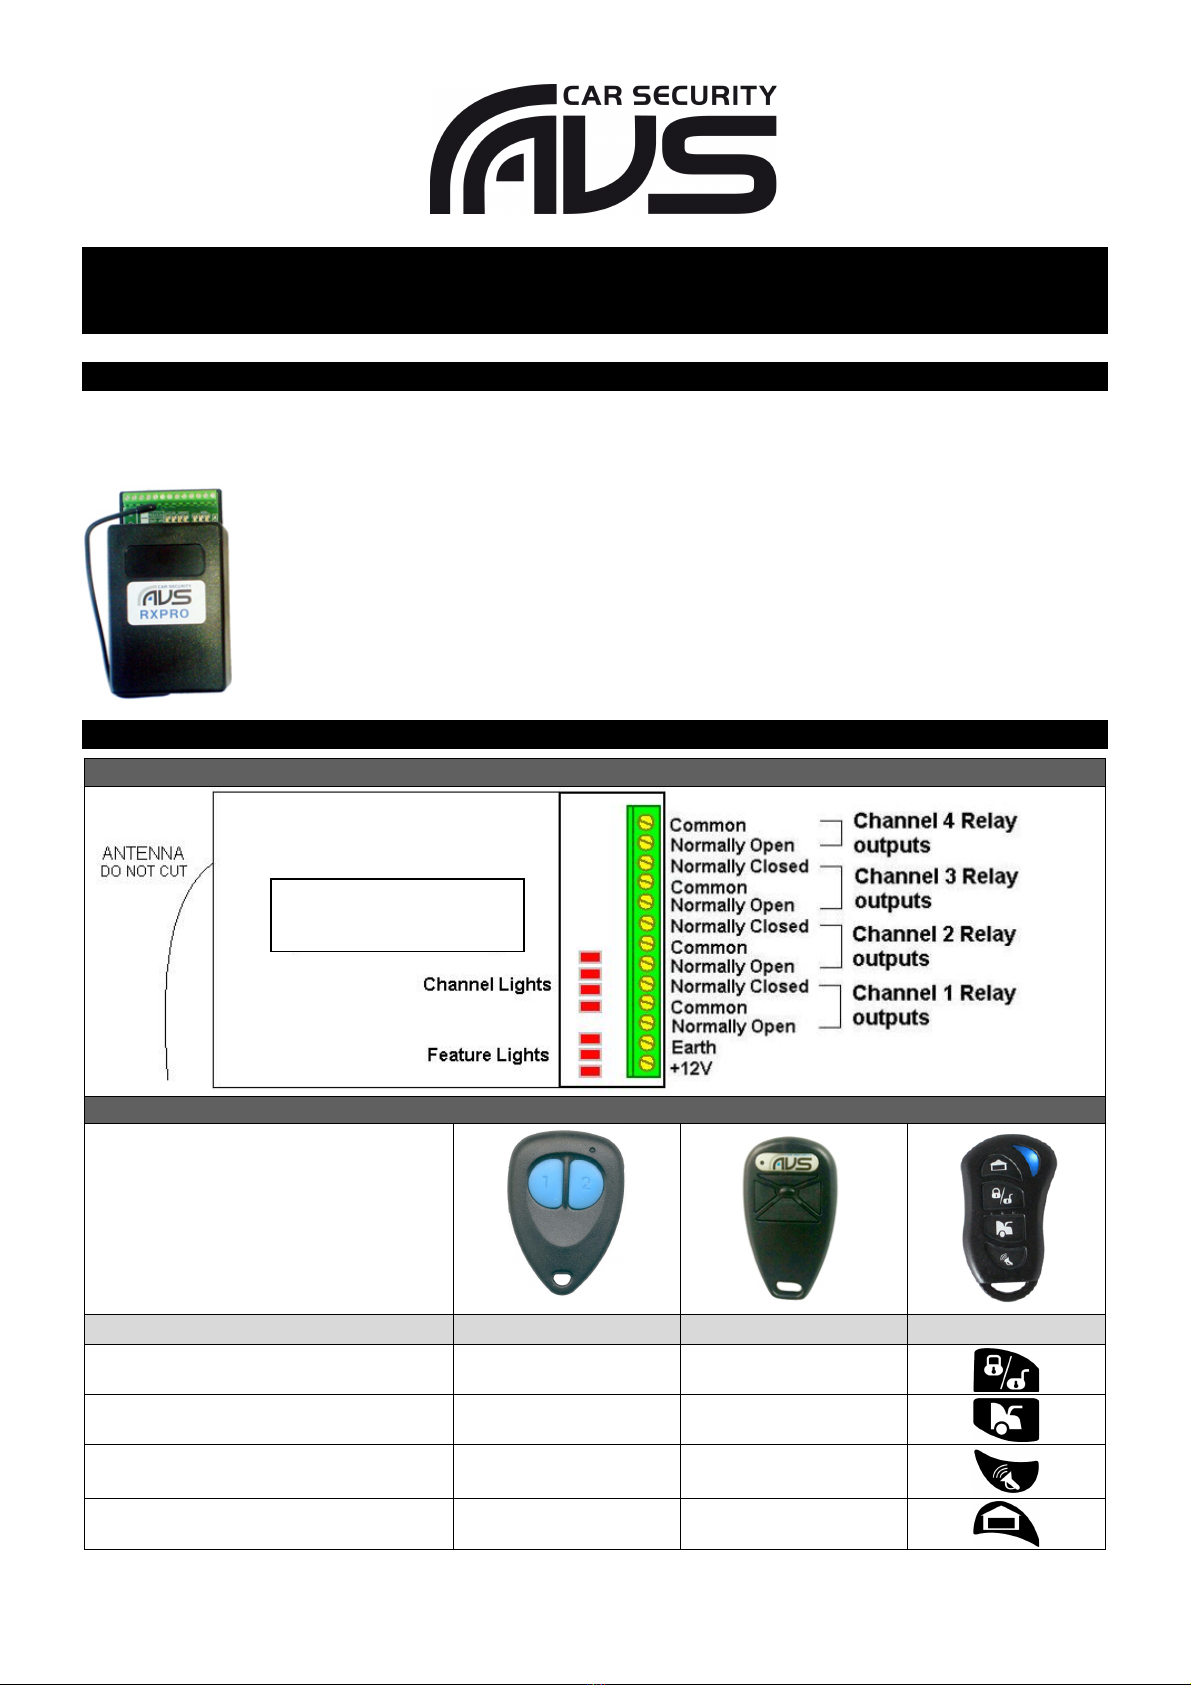
SCHEMATIC DIAGRAM
4 CHANNEL RECEIVER
REMOTE BUTTON CONVERSION
NOTE: By default all channels are 1-
second pulsed outputs (i.e. pressing the
button will turn the output on for 1
second and then turn off). See
Programming for modifying to suit your
application.
Output Channels
TX2-01 433M
TX4-03 433M
TX4-04 433M
1
1
Bottom
2
2
Left
3
NA
Right
4
1+2
Bottom + Left
AVS RXPRO

Page 2
ANTENNA MOUNTING
For maximum operational range the antenna must be made vertical and straight.
PROGRAMMING
The RX-Pro will need to be reset and a remote coded in to program and use the unit.
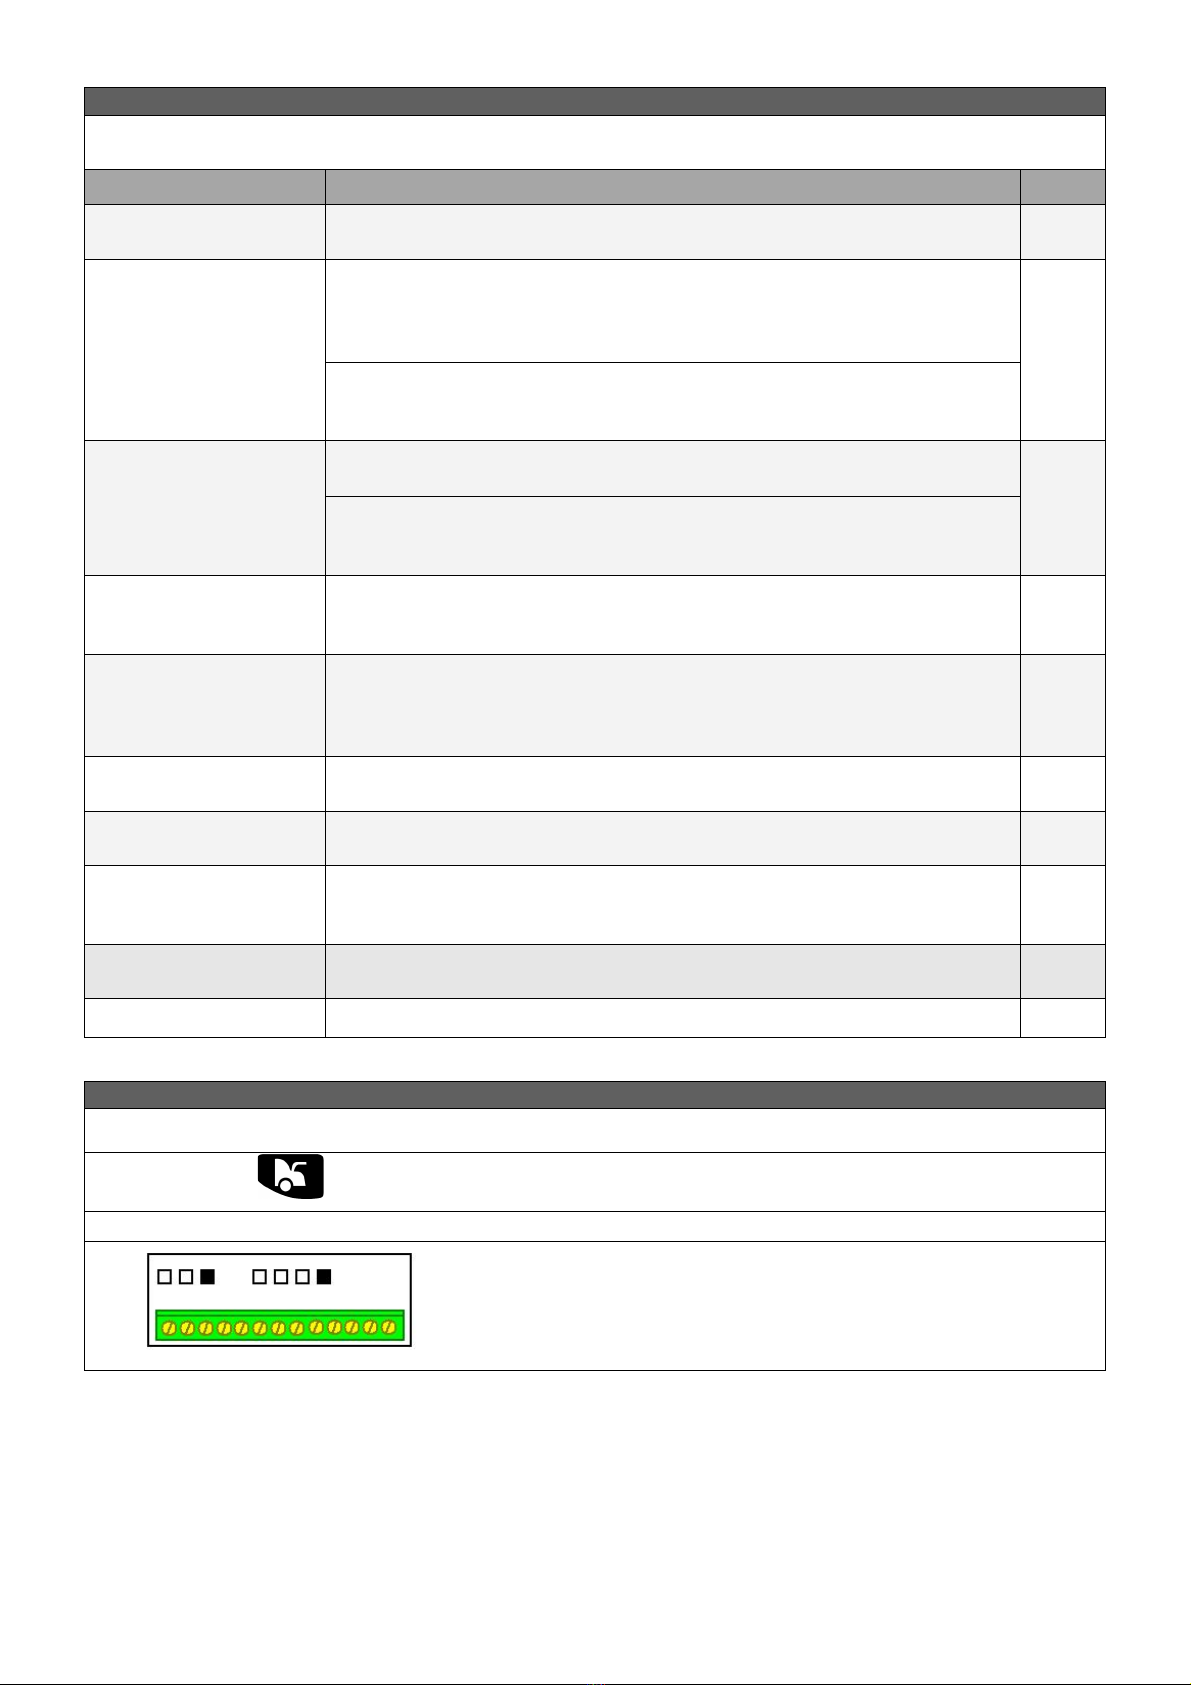
RE-SETTING THE AVS RXPRO
Re-setting erases all remotes and detectors and returns the programming settings to the factory defaults .i.e. 1 second
pulse outputs for all channels.
1.
Disconnect power from the unit.
2.
Using a piece of wire or metal tweezers, short (link) the top
solder pad on the far right channel LED to the square bottom
solder pad on the bottom right hand corner of the circuit
board as shown. Keep the short on.
3.
Press and hold button 1 on the remote control.
4.
Power up the unit and then remove the short.
5.
When the channel lights go solid release the button on the
remote control. The device has now been reset, and the first
remote control is learnt in. You may now learn additional
remotes as per the standard procedure.
MANUAL SYMBOLOGY
Light is OFF
Light is ON and not flashing
Light is FLASHING
Lights are SCROLLING
When looking at the receiver with the terminal strip at the bottom:
The group of 3 LEDs on the left are the FEATURE lights
The group of 4 LEDs on the right are the CHANNEL lights
NOTE: During normal operation the display lights on the unit are scrolling from right to left. When the display lights are
not scrolling, this indicates the unit is in programming mode.
FEATURE CHANNEL
Page 3
FEATURES OVERVIEW
The following features are programmable for each individual channel. For instructions on how to program each feature
refer to the page number reference.
Feature
Description
Page
Adding new remotes &
deleting remotes
Up to 5 remote controls can be programmed in.
3
Latched: activating the channel activates the output, activating the channel
again deactivates the output eg. if a light was connected to the output, pressing
the button once would turn the light on, pressing the button again would turn
the light off.
Latched or pulsed output
(factory setting is a 1-
second pulsed output)
Pulsed: activating the channel will activate the output for only 1 second eg. if a
light was connected to the output, pressing the button would turn the light on
for 1-second, the light will then turn off.
4
Normally open: output switches to closed when the channel is activated.
Normally open or
normally closed outputs
Normally closed: output switches to open when the channel is activated eg. use
on channel 4 when a normally closed circuit is required. Channels 1, 2, and 3
have connections for both normally open and normally closed outputs.
4
Timed output
Output will activate only for a programmed time when the channel is activated
eg. if a light was connected to the output, pressing the button would turn the
light on for the programmed time, the light will then turn off.
5
Momentary output
enable
Output is activated while button on remote control is held down and deactivates
when button is released. eg. if a light was connected to the output, while
pressing the button the light would be on, releasing the button will turn the
light off.
6
Adding wireless devices
Allows wireless detectors to be learnt into the system to trigger one of the
output channels eg. use this for learning in wireless detectors
7
Reed mode enable
Output is activated on open and deactivated on close of wireless reed switch.
Use when using wireless reed switches,
8
Low Battery output from
wireless devices
Output is activated when a wireless detector learnt into any channel transmits a
low battery signal. i.e. When the battery in the wireless detector goes low, the
output will activate.
8
Re-setting the AVS RXPRO
Re-setting erases all remotes and detectors and returns programming settings to
the factory default.
9
AVS remote conversion
Using other AVS remotes with the AVS RXPRO
9
ENTERING PROGRAMMING MODE
1.
Disconnect 12VDC power from the unit.
2.
Press and hold button 2 on the remote control.
3.
Reconnect 12VDC Power to the unit.
4.
Release button 2 once the display lights stop scrolling. You are now in
programming mode.
Page 4
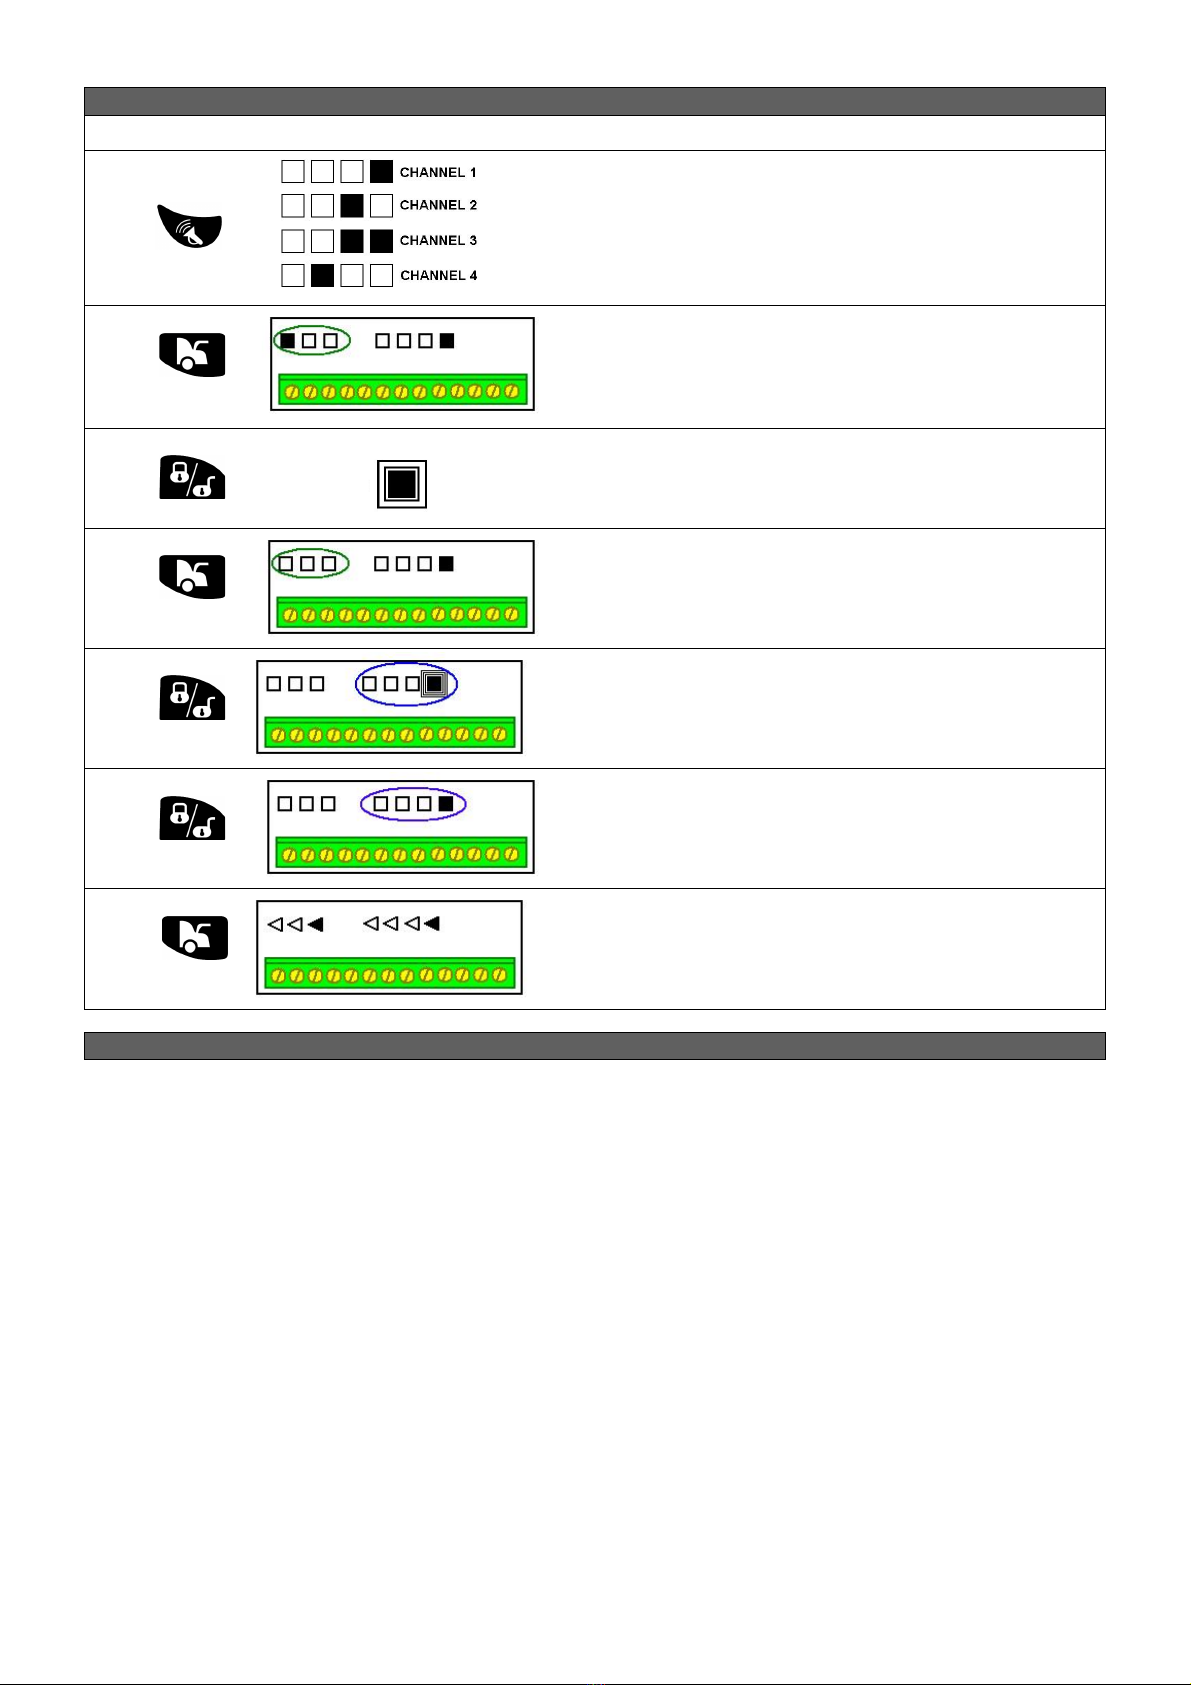
ADDING NEW REMOTES (Up to a maximum of 5 remotes)
1.
Enter programming mode (see above).
2.
Press button 3 repeatedly until the channel lights indicate one of
the output channels you wish to program. Select a channel that
you wish to operate with a remote control i.e. not a channel that
you wish to operate with a wireless detector.
3.
Press button 2 until the feature lights are on as shown.
4.
Press button 1 to set the feature light(s) to flashing.
NOTE: By default the feature light(s) will be flashing, if not press
button 1 to set to flashing.
5.
Press button 2 repeatedly until the feature lights are off as
shown.
6.
Press and hold button 1 until the channel lights(s) begin to flash.
7.
Immediately press button 1 repeatedly on the new remote
control you wish to learn in until the channel light(s) stop
flashing.
8.
Press and hold button 2 on the new remote control until the
lights start scrolling.
The new remote control has now been learnt in.
DELETING REMOTE CONTROLS
If a remote is lost or stolen, you can simply erase the lost/stolen remotes by repeating the procedure above 6 times. This
will fill the system memory with remotes that only you have in your possession.
Note: For latched output you must turn off TIMED OUTPUT first (see page 5)

Page 5
LATCHED OR PULSED OUTPUT
1.
Enter programming mode (see page 3)
2.
Press button 3 repeatedly until the channel lights indicate one of
the output channels you wish to program.
3.
Press button 2 until the feature lights are on as shown.
Press button 1 to swap the feature light(s) between flashing
and not flashing.
Flashing
Not Flashing
4.
Latched Output.
Pulsed Output. If Timed Output is
turned on then the output will pulse
for the programmed time. See Timed
Output.
5.
Press and hold button 2 on the remote control until the lights
start scrolling.
The output has now been programmed.
NORMALLY OPEN OR NORMALLY CLOSED OUTPUTS
1.
Enter programming mode (see page 3)
2.
Press button 3 repeatedly until the channel lights indicate one of
the output channels you wish to program.
3.
Press button 2 until the feature lights are on as shown.
Press button 1 to swap the feature light(s) between flashing
and not flashing.
Flashing
Not Flashing
4.
Normally Open
Output.
Normally Closed Output
5.
Press and hold button 2 on the remote control until the lights
start scrolling.
The output has now been programmed.
OR
OR

Page 6
TIMED OUTPUT
1.
Enter programming mode (see page 3)
2.
Press button 3 repeatedly until the channel lights indicate one
of the output channels you wish to program.
3.
Press button 2 repeatedly until the feature lights are on as
shown.
Press button 1 to swap the feature light(s) between flashing
and not flashing.
Flashing
Not Flashing
4.
Timed Output off.
Timed Output on. Default 0.5
seconds, see below to change the
time.
5.
Press and hold button 2 on the remote control until the lights
start scrolling.
The output has now been programmed.
TIMED OUTPUT TIMER PROGRAMMING
1.
Enter programming mode (see page 3)
2.
Press button 3 repeatedly until the channel lights indicate one
of the output channels you wish to program.
3.
Press button 2 repeatedly until the feature lights are on as
shown.
4.
Press button 1 repeatedly (either once or twice) to set the
feature light(s) to flashing.
5.
To begin recording the desired output time press button 1. The
feature light(s) will stop flashing to indicate recording.
Note: the maximum time is 75 seconds.
6.
Once the desired output time has elapsed press button 2 to
stop recording. The feature lights will appear as shown to
indicate the recording has been confirmed.
OR
Page 7
Note: For momentary output you must turn off TIMED OUTPUT first (see page 5) and also turn on PULSED OUTPUT
(see page 4)
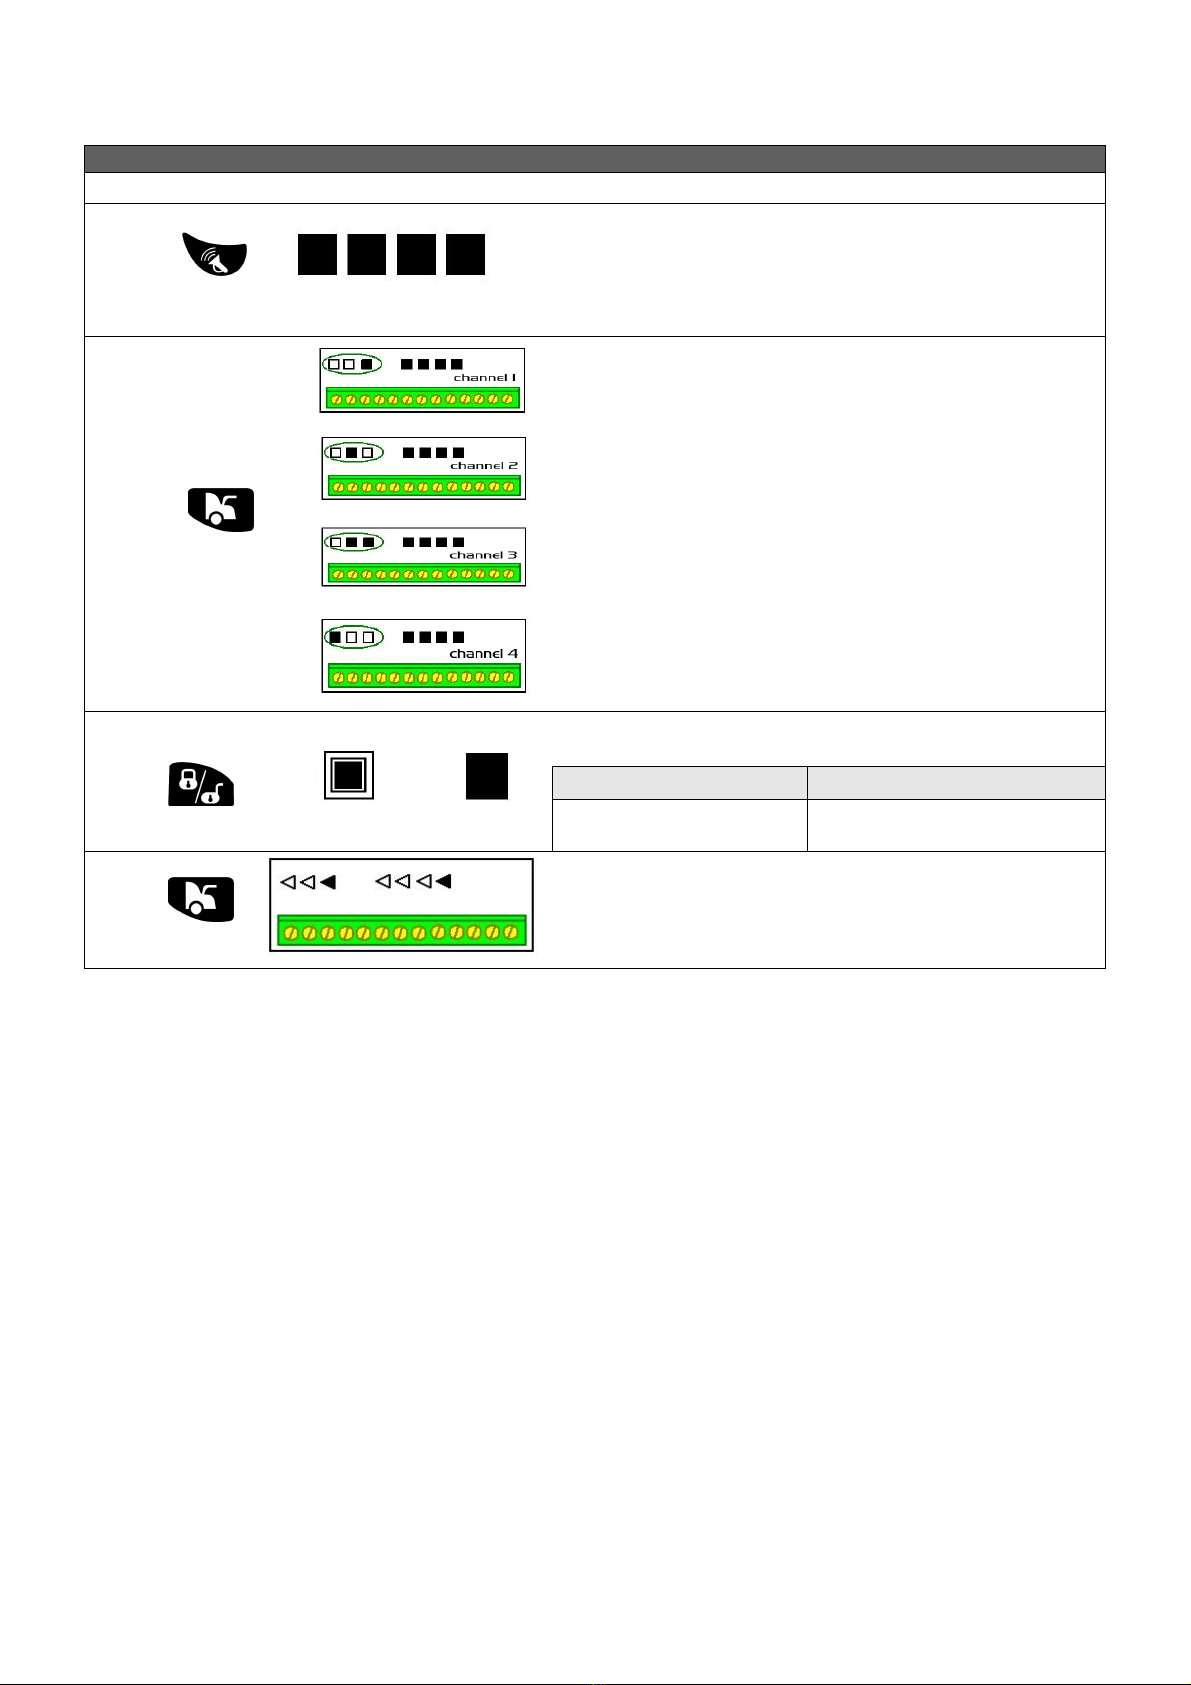
MOMENTARY OUTPUT
1.
Enter programming mode (see page 3)
2.
Press button 3 repeatedly until the channels lights are all on as
shown.
3.
Press button 2 repeatedly until the feature lights indicate the
desired channel for momentary operation.
Press button 1 to swap the feature light(s) between flashing
and not flashing.
Flashing
Not Flashing
4.
Momentary Output off.
Momentary Output on.
5.
Press and hold button 2 on the remote control until the lights
start scrolling.
The output has now been programmed.
OR

Page 8
ADDING WIRELESS DEVICES
(wireless PIR, reed switch, smoke detector, emergency pendant)
1.
Enter programming mode (see page 3)
2.
Press button 3 repeatedly until the channels lights indicate the
output channel you wish to program.
Select the channel that you wish to be activated by the
detector.
3.
Press button 2 repeatedly until the feature lights are on as
shown.
4.
Press button 1 to set the feature light(s) to not flashing.
Note: By default the feature light(s) will be flashing, if not do
not press button 1.
5.
Press button 2 repeatedly until the feature lights are off as
shown.
6.
Press and hold button 1 until the channel light(s) begin to flash.
7.
Now trigger the new detector; the channel light(s) should stop
flashing.
Note: detectors are high-powered and should be triggered at
least 5 metres away from the unit.
8.
Press and hold button 2 on the remote control until the lights
start scrolling - The detector has now been learnt in.
Note: if using a wireless reed switch also follow Reed Mode
Enable on the next page.

Page 9
REED SWITCH MODE ENABLE
If using wireless reed switches enable this mode. When the wireless reed switch sends “open” i.e. when your door or
window is opened, then the channel output will be latched on. When the door is closed the output turns off.
1.
Enter programming mode (see page 3)
2.
Press button 3 repeatedly until the channels lights are on as
shown.
3.
Press button 2 repeatedly until the feature lights indicate the
desired channel for reed operation.
Press button 1 to swap the feature light(s) between flashing
and not flashing.
Flashing
Not Flashing
4.
Reed Switch Mode disabled.
Reed Switch Mode enabled.
5.
Press and hold button 2 on the remote control until the lights
start scrolling.
Reed mode has now been programmed.
LOW BATTERY OUTPUT FROM WIRELESS DEVICES
If this mode is enabled, if any wireless device programmed in to any channel sends a low battery signal then the
selected channel output will be activated.
1.
Enter programming mode (see page 3)
2.
Press button 3 repeatedly until the channels lights indicate the
output channel you wish to program.
The channel you select will activate whenever a low battery
signal is transmitted by any of the learnt in detectors.
3.
Press button 2 repeatedly until the feature lights are on as
shown.
Press button 1 to swap the feature light(s) between flashing
and not flashing.
Flashing
Not Flashing
4.
No output on low battery.
Output on low battery.
5.
Press and hold button 2 on the remote control until the lights
start scrolling
OR
OR

Page 10
OPTIONAL EXTRAS
Wireless PIRs: for detecting the movement of humans inside your building
Wireless reed switches: for detecting the opening of doors or windows
Wireless smoke detectors: for detecting a fire
Wireless emergency pendants: worn around the neck, this special remote device needs to be pressed on both sides to
activate the alarm system. Particularly suited for the elderly, ill, or incapacitated user.
Additional remotes: up to 5 remote controls can be used
Your AVS RXPRO remote can be used to control AVS car alarms and immobilisers as well as many other common
remote control devices including garage doors. Talk to your AVS dealer for more information.
3-YEAR WARRANTY
Manta Electronics Ltd warrants the original consumer purchaser that the product described above is free from defects in
material and workmanship. Should this product be proven to be defective in materials or workmanship during the term of
the warranty, Manta Electronics Ltd shall replace or repair any product or part of the product which Manta Electronics Ltd
agrees is defective, without charge.
Warranty on installation labour, removal and reinstallation charges are not the responsibility of Manta Electronics Ltd.
If you require a mobile technician to call there will be a call out charge regardless of the cause of the fault.
Any damage to the products as a result of misuse, abuse, neglect, accident, incorrect wiring, improper installation, repair or
alteration or installation outside Manta Electronics Ltd approved dealers will void warranty.
Remote control transmitters and batteries are not covered under warranty.
This warranty shall not apply to any product which is found to have been modified, repaired or altered in any way without
the express written consent of Manta Electronics Ltd. This warranty shall not apply to any equipment or product connected
to the Manta Electronics Ltd product.
This warranty does not constitute a guarantee or insurance against the theft of the vehicle or contents thereof.
This warranty does not affect your rights under the Consumer Guarantees Act.
Table of contents
Other AVS Car Alarm manuals


Popular Car Alarm manuals by other brands


Directed Electronics
Directed Electronics 429 Series owner's guide

Audiovox
Audiovox Pursuit PRO9644i owner's guide

Clarion
Clarion UNGO MS2005 owner's manual

Audiovox
Audiovox Prestige APS-2K4MS Programming guide

Excalibur
Excalibur RS-255-EDP+ Operation guide

CrimeStopper
CrimeStopper HP-9235MX Wiring diagram

Directed
Directed DIRECTECHS CHRYSLER10 installation guide

OK-Computers
OK-Computers OBD-Saver VAG Mounting instruction

Code Alarm
Code Alarm 2000 owner's manual

Scytek electronic
Scytek electronic VISIONGUARD 6000 product manual

Viper
Viper Directed 4706V owner's guide

Leisure Technologies
Leisure Technologies WITI Operations & installation guide