AVYCON AVK-NK500-A1 User manual

NK500-A1
AVK
NETWORK KEYBOARD
MANUAL

Safety Instruction
These instructions are intended to ensure that users can use the product correctly to avoid
danger or property loss. The precaution measures are divided into “Warnings” and “Cautions”
Warnings: Serious injury or death may be caused if any of these warnings is neglected.
Cautions: Injury or equipment damage may be caused if any of these cautions are neglected.
Warnings
This installation must be conducted by a qualified service person and should strictly
comply with the electrical safety regulations of the local region.
To avoid the risk of fire and electric shock, do keep the product away from rain and
moisture before installation.
Do not touch components such as heat sinks, power regulators, and processors, which
may be hot.
Source with DC 12V.
Please make sure the plug is firmly inserted into the power socket.
If the product does not work properly, please contact your dealer. Never attempt to
disassemble the device by yourself.
Cautions
Make sure that the power supply voltage is correct before using the keyboard.
Do not store or install the device in extremely hot or cold temperatures, dusty or damp
locations, and do not expose it to high electromagnetic radiation.
Only use the components and parts recommended by the manufacturer.
Do not drop the keyboard or subject it to physical shock.
To prevent heat accumulation, do not block air circulation around the device.
Save the package to ensure the availability of shipping containers for future
transportation.
Warnings: Please follow these safeguards to prevent
serious injury or death.
Cautions: Please follow these safeguards to prevent
potential injury or equipment damage.

EU Conformity Statement
2012/19/EU (WEEE directive): Products marked with this symbol cannot be
disposed of as unsorted municipal waste in the European Union. For proper
recycling, return this product to your local supplier upon the purchase of
equivalent new equipment, or dispose of it at designated collection points. For
more information see: www.recyclethis.info.
2006/66/EC (battery directive): This product contains a battery that cannot be
disposed of as unsorted municipal waste in the European Union. See the product
documentation for specific battery information. The battery is marked with this
symbol, which may include lettering to indicate cadmium (Cd), lead (Pb), or
mercury(Hg). For proper recycling, return the battery to your supplier or a
designated collection point. For more information see: www.recyclethis.info.

Table of Contents
Chapter 1 Product Introduction ................................................................................................... 1
1.1 Introduction ...................................................................................................................................... 1
1.2 Product Key Functions ................................................................................................................. 1
1.3 Appearance .................................................................................................................................... 2
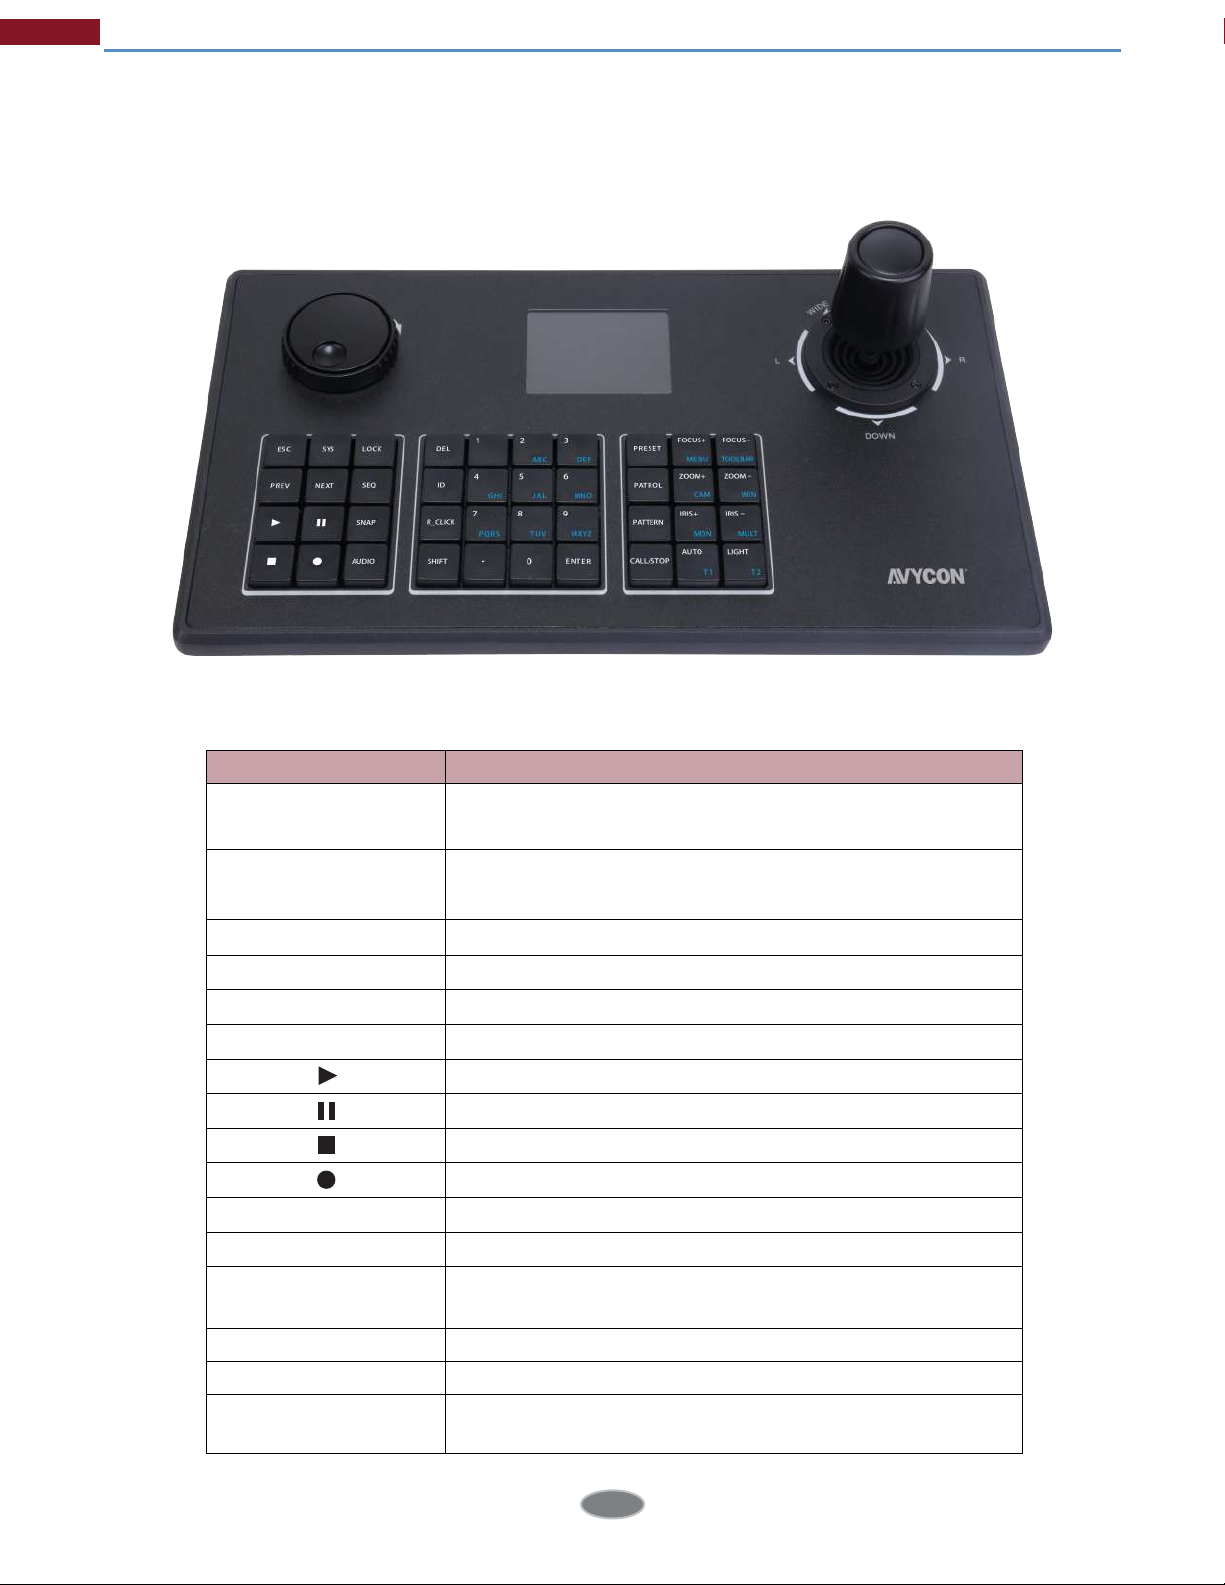
1.4 Operation Panel............................................................................................................................. 3
1.5 Keyboard Joystick ........................................................................................................................ 4
1.6 Keyboard Shuttle .......................................................................................................................... 5
Chapter 2 Operation Guide ......................................................................................................... 6
2.1 User Account .................................................................................................................................. 6
2.2 Boot and Shut down of Network Keyboard ........................................................................ 6
2.2.1 Boot ................................................................................................................................. 6
2.2.2 Shut Down ..................................................................................................................... 7
2.3 Local Keyboard Configuration by Admin ............................................................................ 7
2.3.1 Login ................................................................................................................................ 7
2.3.2 Keyboard Management .......................................................................................... 7
2.4 Keyboard Operation ................................................................................................................. 10
2.4.1 Device Connection ................................................................................................... 10
2.4.2 PTZ Control .................................................................................................................. 11
Chapter 3 Keyboard Configuration by WEB Server ................................................................ 13
3.1 Login ................................................................................................................................................ 13
3.2 Device Management ................................................................................................................ 13
3.3 Keyboard Management .......................................................................................................... 16
Chapter 4 Services ..................................................................................................................... 19

Chapter 1 Product Introduction
1
1.1 Introduction
AVYCON Network Keyboard AVK-NK500-A1 is positioned to control PTZ Cameras. It adopts
a network connection for easy connection and control, eliminating unwanted complexity
and simplifying the overall installation process. Built-in Web Servers can support the use
of a browser to manage and maintain the keyboard easily. Designed for operation via the LCD
screen from the operation panel, it is easy to display operations. All of the designs oer a better
user-friendly experience.
1.2 Product Key Functions
Hardware
Support an LCD screen to display operation.
The keyboard joystick supports 4D operation(up and down, left and right, rotation,
confirmation).
Shortcut keys for PTZ control, such as preset, patrol, and so on.
Shortcut keys for recording and playback control, such as record, play, stop, pause,
speed up, and speed down.
Shortcut keys for light control operation.
Easy to operate, stable performance.
General
Support Administrator and Operator user management.
Support IE/ Firefox/ Chrome/ Safari browser to manage the keyboard.
Support auto-searching connected devices in the same network segment on the
web page.
Support to control up to 110 devices.
Support to import and export keyboard configuration files on the web page.

2
1.3 Appearance
Product Introduction
Figure 1.3-1 AVYCON Network Keyboard Operation Panel
Figure 1.3-2 AVYCON Network Keyboard Interfaces

3
Product Introduction
1.4 Operation Panel
DescriptionButton
ESC 1) Return to previous menu.
2) Long press 10s to reset all settings to factory deault.
DEL 1) Clear error input when inputting the password of the device.
2) In PTZ mode, delete the defined presets (DEL+Num).
SHIFT 1) Switch between number and letter.
2) Switch the mode between PTZ and NVR.
SYS Long press 2s to enter keyboard settings interface.
Note: Only admin user has the permission.
LOCK Lock/Unlock the keyboard.
PREV Previous channel.
NEXT Next channel.
SEQ Play/Stop Sequence.
SNAP One button screenshot.
AUDIO One button to turn the Audio on/o.
ID The identifier of the device.
R_Click Right click the mouse.
Instant Playback or Play the video file.
Pause.
Stop.
Emergency Record.
Description of Functional Buttons

DescriptionOperation
Description of Joystick
Left 1) In PTZ mode, control the PTZ to move left.
2) In NVR playback interface, video fast forward 30s.
Up In PTZ mode, control the PTZ to move up.
Down In PTZ mode, control the PTZ to move down.
4
Product Introduction
CALL/STOP Call the defined Preset, Patrol and Pattern in PTZ mode.
Stop the Patrol and Pattern operation in PTZ mode.
FOCUS+: In PTZ mode, adjust the focus.
MENU: Enter the main Menu of NVR.
FOCUS+
MENU
FOCUS-: In PTZ mode, adjust the focus.
TOOLBAR: Enter the Live View toolbar of NVR or channel.
FOCUS-
TOOLBAR
ZOOM+: In PTZ mode, adjust the zoom value.
CAM: Select a specific camera to make it full screen (CAM+Num).
ZOOM+
CAM
ZOOM-: In PTZ mode, adjust the zoom value.
WIN: Select the window (WIN+Num).
ZOOM-
WIN
IRIS+: InPTZ mode, adjust the Iris.
MON: Select the channel (MON+Num) (Unfulfilment).
IRIS+
MON
IRIS-: In PTZ mode, adjust the Iris.
MULT: Switch dierent multi-screen layouts.
IRIS-
MULT
AUTO: In PTZ mode, start/stop auto scan.
T1: Switch the page tab.
Auto
T1
LIGHT: In PTZ mode, turn on/o the white light.
T2: Switch the focus in the page tab.
LIGHT
T2
0-9/A-Z Number input or letter input.
ENTER Confirm operation.
PRESET In PTZ mode, select or set the preset.
PATROL In PTZ mode, select the patrol.
PATTERN In PTZ mode, select the pattern.
.Dot.
1.5 Keyboard Joystick
2
1

Left up/Left down/
Right up/Right down
Right 1) In PTZ mode, control the PTZ to move right.
2) In PTZ playback interface, video rewind 30s.
In PTZ mode, control the PTZ to move Left up/Left down/Right
up/Right down.
Clockwise rotation In PTZ mode, Zoom in.
Counter clockwise In PTZ mode, Zoom out.
5
Product Introduction
Note:
1. For the keyboard joystick, the greater the amplitude of the sway is, the greater the speed of
the PTZ camera is.
2. Keyboard joystick is a precision part, whose rotation angle is about ±45 °. Do not over-rotation
to avoid doing damage to the joystick.
3. As the picture shows, ‘1’ is used to control the zoom (Clockwise rotation is for zoom in while
counterclockwise rotation is for zoom out). ‘2’ is the central button that can be used as the Enter
button.
1.6 Keyboard Shuttle
2
1
DescriptionOperation
Description of Shuttle
2
1) Adjust NVR playback speed. Rotate clockwise to speed up and
anti-clockwise for speed down.
2) Quickly switch the page tab (The same as the T1 button).
11) Rotate the shuttle to select video files in the NVR playback interface.
2) Switch the focus in the page tab (The same as the T2 button).

Chapter 2 Operation Guide
6
2.1 User Account
There are two types of keyboard user account: admin and operator. The admin user is
authorized with the following operation permissions:
Add a maximum of 9 operator accounts.
Configure the keyboard parameters.
Add, edit and delete devices.
Add, edit and delete operator users.
Control the Network Keyboard.
The operator user can only control the Network Keyboard.
Note:
1) Both admin user and operator user can control the Network Keyboard.
2) Only admin users can access the keyboard through the web page.
3) Only admin users can modify the parameters of the keyboard.
2.2 Boot and Shut down of Network Keyboard
2.2.1 Boot
Step 1. Connecting the power supply and cable, several seconds later, the keyboard will
start to initialize; After initializing, the login interface will be shown on the LCD screen.
Step 2. Refer to the prompts to log in to the keyboard, if you want to configure the
parameters of the keyboard, please input the password of the admin user to log in.
Figure 2.2.1-1 Locked Interface

7
Operation Guide
Note:
1. The default user name and password of the Network Keyboard is admin and 1234.
2. Inputting the user name is not compulsory for the keyboard. Just input the password of the
user, the Network Keyboard will automatically distinguish the password belongs to which user.
3. If you log in to the keyboard as an operator user, except the [SET] function, other functions are
the same as an admin user.
4. When inputting the password of the keyboard, moving the joystick to the left could execute
the Delete action.
2.2.2 Shut Down
Unplug the power supply, then the keyboard will power o and shut down.
2.3 Local Keyboard Configuration by Admin
2.3.1 Login
Input the password of admin user to log in the keyboard.
2.3.2 Keyboard Management
Step 1. Step1. Long press 2s on the [SYS] button to enter the setting interface like the
Figure 2.3.2-1;
Step 2. Select dierent configuration items through controlling the joystick, then press the
[Enter] button to confirm the settings.
There are three options (NETWORK/DEVICE/SYSTEM) in the setting interface.
Figure 2.3.2-1 Setting Interface
Local

8
Operation Guide
Network
There are two options (NET MODE/CURRENT IP) in Network Interface:
NET MODE: STATIC or DHCP is available for you to set up a local IP address for the keyboard.
After configuring, the keyboard will prompt “REBOOT NOW?”. Then confirm the reboot operation,
the setting will take eect;
CURRENT IP: Enter the CURRENT IP interface, you can check the current IP address of this
keyboard.
There are three options (INQUIRE/ADD/DELETE) in the DEVICE interface:
INQUIRE: Inquire the devices which have been added.
ADD: Select [ADD] option, press [ENTER] to enter the ADD DEVICE interface, the keyboard will
assign an ID to the device, you can vacillate joystick to the left and right to select the device
type which contains NVR and PTZ camera, then press the [Enter] button to input the IP address
of the device, press [ENTER] button to confirm and save the setting.
DELETE: If you want to delete a device, just input the ID of the device and press the [ENTER]
button to delete it.
Device
Figure 2.3.2-2 Network Interface
Figure 2.3.2-3 Device Interface

9
Operation Guide
System
Figure 2.3.2-4 System Interface
There are five options (SOUND/BACK LIGHT/LANGUAGE/PASSWORD/DEFAULT) in SYSTEM
interface:
SOUND: Sway joystick to the left and right to turn on or turn o the keypad tones, then press
[ENTER] button to confirm and save the setting.
BACK LIGHT: Sway joystick to the left and right to select the retention time of screen back light,
then press [ENTER] button to confirm and save the setting.
LANGUAGE: English and Chinese are supported, sway joystick to select and press [ENTER] button
to confirm.
PASSWORD: Set the keyboard login password.
DEFAULT: Press [ENTER] button to restore the keyboard factory default settings.
Note:
1. Please make sure the Network Keyboard is connected to the Internet.
2. The default IP address of the Network Keyboard is 192.168.5.180.
3. When inputting the IP address on the keyboard, moving the joystick to the left could execute
the Delete action.
4. If you want to abandon the settings, please keep pressing [ESC] to exit configuration.

10
Operation Guide
2.4 Keyboard Operation
After adding the devices, you can use the keyboard to control all devices you added.
2.4.1 Device Connection
ID: Device number.
Step 1. Press the [ID] button, then input the ID number of the device you want to connect.
Step 2. Input the password of the user of the device in the Device Login interface.
After the device authentication, the LCD screen will show the connection state.
Figure 2.4.1-1
Figure 2.4.1-2 Device Authentication

11
Operation Guide
Figure 2.4.1-3 NVR Mode
Figure 2.4.2-2 PTZ Mode
Figure 2.4.2-1 PTZ Control
2.4.2 PTZ Control
The keyboard can operate the PTZ via the joystick and PTZ function buttons.
Press the [SHIFT] button to select the PTZ mode:
NVR
Network Keyboard
PTZ Cameras
PTZ Cameras

12
Operation Guide
PRESET
Setting : PRESET+Num+ENTER
Delete : DEL+PRESET+Num+ENTER
Call : CALL+PRESET+Num+ENTER
PATROL
Call : CALL+PATROL+Num+ENTER
Pause : STOP
PATTERN
Call : CALL+PATTERN+NUM+ENTER
Pause : STOP
Through the [ZOOM+], [ZOOM-], [FOCUS+], [FOCUS-], [IRIS+], [IRIS-] buttons, you can adjust the
lens of the PTZ camera.
Note:
1. It is not able to control the PTZ if the user doesn’t enter the PTZ Mode.
2. The steering and the rotation speed of the PTZ camera are controlled by the joystick; The
amplitude of joystick movement controls rotation speed; The rotation of the joystick is for the
zoom operation of the PTZ camera.
3. Press [ESC] or [SHIFT], exit the PTZ Mode.

13
Chapter 3 Keyboard Configuration
by WEB Server
3.1 Login
Step 1. Input the IP address of keyboard in browser.
Step 2. Input the password of admin user to login.
3.2 Device Management
Figure 3.1-1 WEB Login Page
Figure 3.2-1 WEB Device Management

14
Keyboard Configuration by WEB Server
Add Devices
Method 1. Add devices via searching function
1. Click [Search] button to quickly search the devices in LAN.
2. Click to select one device, then click [Add] button to add the selected device.
Figure 3.2-2 Search Device
Figure 3.2-3 Add One Device

15
Keyboard Configuration by WEB Server
Click [Add All] button to add all the devices which have been searched out.
Figure 3.2-4 Add All Devices
Figure 3.2-5 Add Manually
3. Click [Save] button to confirm the operations you have done.
Method 2. Add devices manually
1. Select the device type.
2. Input the IP address of the device, then click [Add Manually] to add a device manually.
3. Click the [Save] button to confirm the operation.

16
Keyboard Configuration by WEB Server
Configure Added Devices
Click the [Delete] button to delete an added device.
Click the [Del All] button to delete all devices which have been added.
Click the [Sort] button to sort the devices which have been added by ID number, Device
type, and IP address.
Note:
After doing any operation, please click the [Save] button to make sure the operation takes
eect.
3.3 Keyboard Management
Click to enter the Setting page.
Network
The basic configuration includes Network Type, IP address, Subnet Mask, Gateway, DNS server,
etc.
Note:
If there has a DHCP server running in networks, you can choose the DHCP Network Type for the
keyboard.
Figure 3.3-1 Keyboard Management
Table of contents
Other AVYCON Keyboard manuals