1
3
2
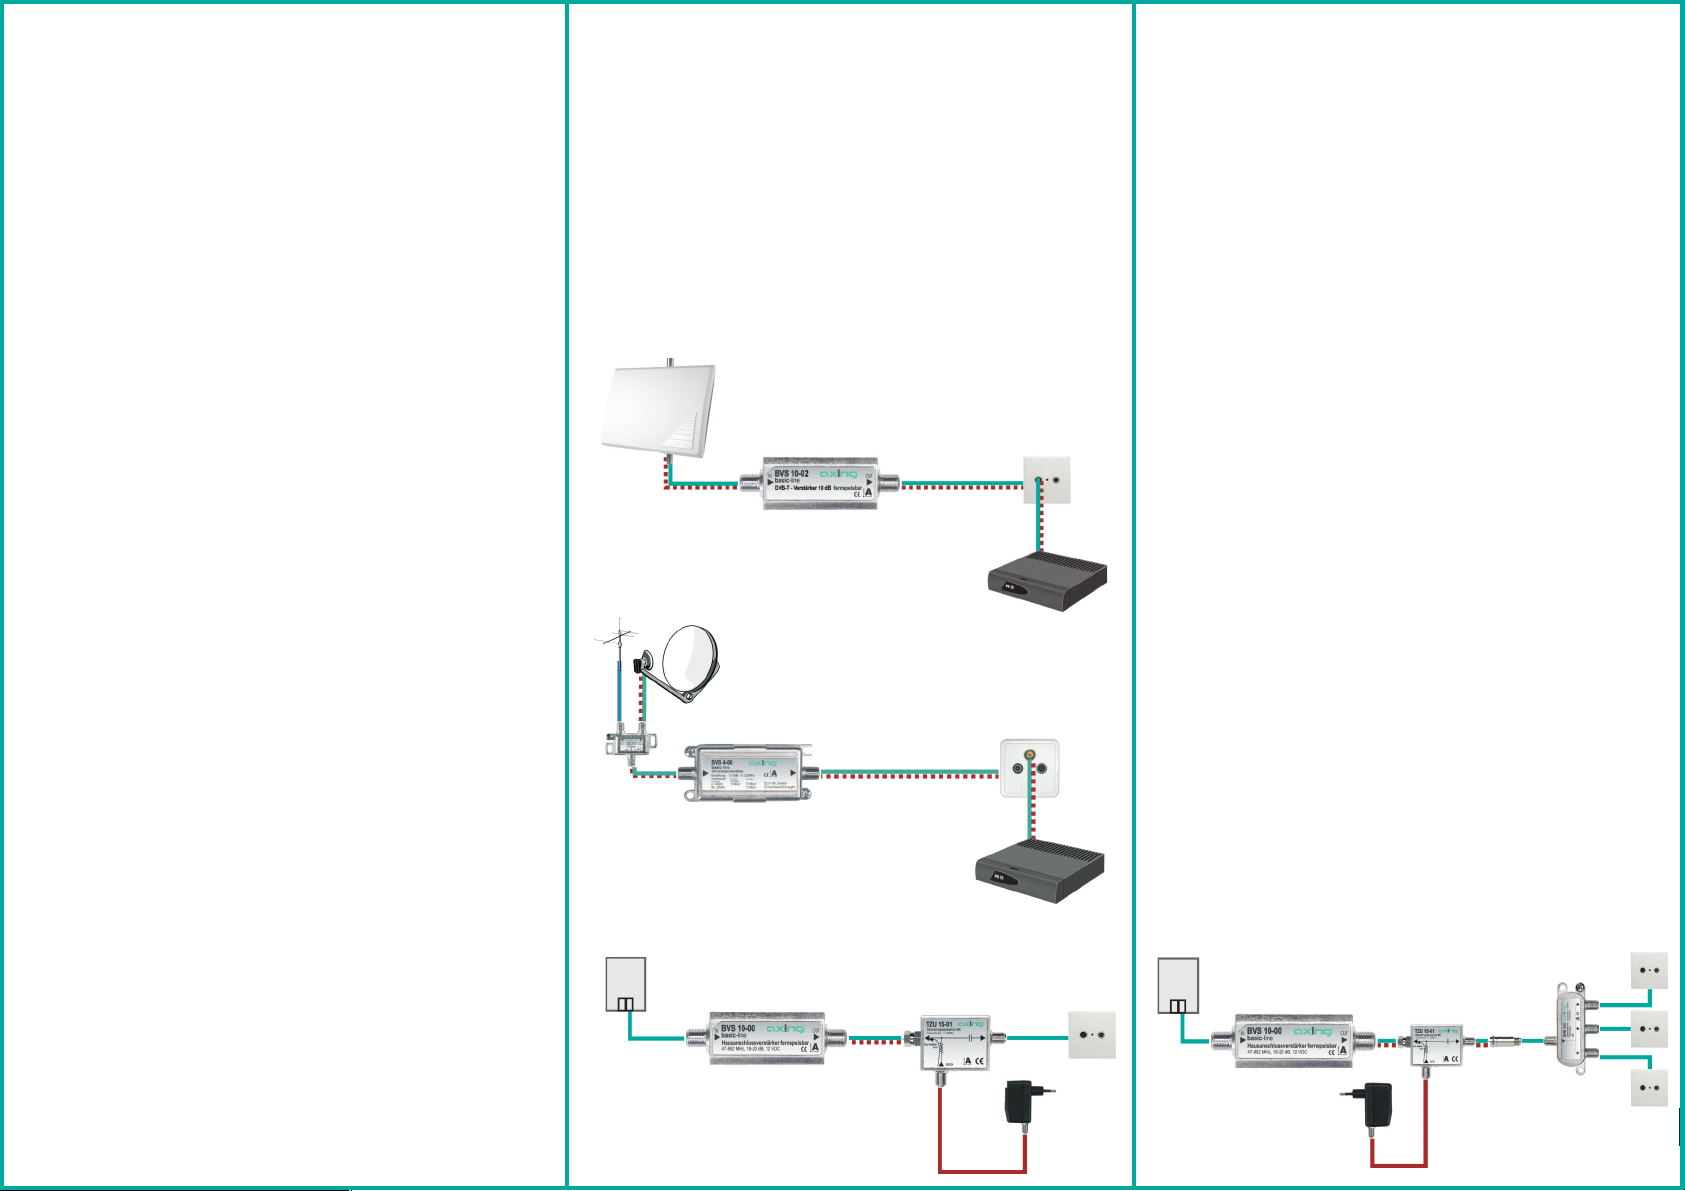
HF-Anschluss:
!Schließen Sie den Inline-Verstärker zwischen dem Hausübergabepunkt, der
DVB-T-Antenne bzw. der SAT-Antenne und der jeweiligen
Antennensteckdose an.
!Verwenden Sie hierfür ein hochgeschirmtes Koaxialkabel mit F-
Anschlusssteckern. Passende Kabel und Stecker finden Sie im aktuellen
AXING-Katalog oder unter www.axing.com.
RF Installation:
!Connect the inline amplifier between the video interconnection point, the
DVB-T antenna or the SAT antenna and the antenna wall outlet.
Use a highly shielded coaxial cable with F connectors (for TVS 10-00 also
IEC connectors possible). Suited cables and plugs can be found in the
current AXING catalogue or at www.axing.com.
!
Verwendungsbereich:
Die Geräte sind ausschließlich für den Einsatz zum Verstärken sowie Verteilen
von Radio- und Fernsehsignalen im Haus geeignet! Wird das Gerät für andere
Einsätze verwendet, wird keine Garantie übernommen!
Field of application:
The devices are suited only for distributing radio and television signals in the
house! If the device is used for other purposes, no warranty is given!
ÉSicherheitshinweise:
Die Installation des Geräts und Reparaturen am Gerät sind ausschließlich vom
Fachmann unter Beachtung der geltenden VDE-Richtlinien durchzuführen. Bei nicht
fachgerechter Installation und Inbetriebnahme wird keine Haftung übernommen.
Vor Öffnen des Gerätes Netzstecker ziehen bzw. Stromzuführung entfernen, andernfalls
besteht Lebensgefahr. Dies gilt auch, wenn Sie das Gerät reinigen oder an den
Anschlüssen arbeiten.
Sofern eine austauschbare Sicherung vorhanden ist, ist vor dem Wechsel der Sicherung
der Netzstecker zu ziehen. Defekte Sicherungen nur durch normgerechte Sicherungen
des gleichen Nennwertes ersetzen.
Wählen Sie den Montage- bzw. Aufstellort so, dass Kinder nicht unbeaufsichtigt am
Gerät und dessen Anschlüssen spielen können. Der Montage- bzw. Aufstellort muss eine
sichere Verlegung aller angeschlossenen Kabel ermöglichen. Stromversorgungskabel
sowie Zuführungskabel dürfen nicht durch irgendwelche Gegenstände beschädigt oder
gequetscht werden.
Setzen Sie das Gerät niemals direkter Sonneneinstrahlung aus und vermeiden Sie die
direkte Nähe von Wärrmequellen (z. B. Heizkörper, andere Elektrogeräte, Kamin etc.)
Bei Geräten, die Kühlkörper oder Lüftungsschlitze haben, muss daher unbedingt darauf
geachtet werden, dass diese keinesfalls abgedeckt oder verbaut werden. Sorgen Sie
außerdem für eine großzügig bemessene Luftzirkulation um das Gerät. Damit verhindern
Sie mögliche Schäden am Gerät sowie Brandgefahr durch Überhitzung. Achten Sie
unbedingt darauf, dass Kabel nicht in die Nähe von Wärmequellen (z.B. Heizkörper,
andere Elektrogeräte, Kamin etc.) kommen.
ÉSafety advice:
Installation and repairs to the equipment may only be carried out by technicians
observing the current VDE guidelines. No liability will be assumed in the case of faulty
installation and commissioning.
Before opening the equipment pull out the power plug or remove the power supply,
otherwise there is danger of electrocution. This is also valid for cleaning the equipment or
working on the connections.
Providing that a serviceable fuse exists, the power cord must be pulled out before
changing the fuse. Defective fuses may only be replaced with standard compliant fuses
that have the same nominal value.
Choose the location of installation or mounting such that children may not play
unsupervised near the equipment and its connections. The location of installation or
mounting must allow a safe installation of all cables connected. Power feeding cables as
well as feeder lines may not be damaged or clamped by objects of any kind. To prevent
damage to your equipment and to avoid possible peripheral damages, the devices
foreseen for wall mounting may only be installed on a flat surface.
Avoid exposure of the equipment to direct sunlight and to other heat sources (e. g.
radiators. other electrical devices, chimney, etc.). Devices that are equipped with heat
sinks or ventilation slots must under no circum-stances be covered or blocked. Also
ensure for a generous air circulation around the equipment. In this way you avoid
possible damage to the equipment as well as a risk of fire caused by overheating.
Absolutely avoid that cables come near any source of heat (e.g. radioators, other
electrical devices, chimney, etc.).
4
Spannungsversorgung
Die Inline-Verstärker müssen über die Koaxialleitung ferngespeist werden, um
sie mit Betriebsspannung zu versorgen. Sie können am Ein-oder am Ausgang
ferngespeist werden.
Die Fernspeisespannung wird durch den Verstärker durchgeschleift, weitere
aktive Komponenten (DVB-T-Antennen, LNB etc.) können mit der jeweils
angegebenen Spannung ebenfalls versorgt werden.
Für den Fall, dass passive Bauteile (wie Verteiler/Abzweiger/Antennen
Steckdosen oder passive Antennen am Verstärker angeschlossen werden, ist zur
Vermeidung von Schäden durch Kurzschlüsse darauf zu achten,dass der Ein-
bzw. Ausgang mit einem DC-Blocker (Bsp. AXING SZU 14-00) versehen wird
().
!
!
Prüfen Sie, ob der DVB-T- oder SAT-Receiver dafür geeignet ist ( oder ),
den Verstärker zu versorgen. Gegebenenfalls muss der Verstärker durch ein
externes Netzteil über eine Einspeiseweiche versorgt werden ( ).
Geeignete Netzteile und Einspeiseweichen finden Sie im aktuellen AXING-
Katalog oder unter www.axing.com (im Set BVS 10-01 sind diese
Komponenten enthalten).
Prüfen Sie, ob die Spannungsquelle den notwendigen Ausgangstrom für alle
aktiven Komponenten liefern kann.
12
3
Hinweis:
4
Power supply:
The inline amplifiers have to be remote feed over the coaxil cable. They are
remote feedable at input or output.
Active components, such as antennas or amplifiers , which are
installed after the inline amplfier can be remote power fed with the indicated
voltage of the relevant inline amplifier.
In case that passive components (like splitters/taps/antenna-sockets or passive
terrestrial antennas) are connected to it, make sure, that a DC block is used at
the input or output (for example AXING's SZU 14) in order to prevent any
damage by causing a short-circuit ( ).
!
!
Check wether the DVB-T or SAT receiver has an integrated power supply,
which can be used ( or ), to support the amplifier. If not, use an external
power supply with DC-power coupler ( ).
Suited power supplys and DC-power couplers can be found in the current
AXING catalogue or at www.axing.com(both are included with the amplifier
set BVS 10-01).
(or)
Check wether the power supply can supply all active components. Check the
maximum nominal current of the power supply..
12
3
12
4
The SAT amplifiers SVS 2-02 and SVS 4-00 also can
amplify terrestrial signals (e.g. FM radio). Therefor
the SAT signal and the terrsrtrial signal have to be
combined with a SAT combiner.
Die SAT-Verstärker SVS 2-02 und SVS 4-00 können
auch terrestrische Signale (z.B. UKW) verstärken.
SAT- und terrestrische Signale müssen vorher mit
einer SAT-Weiche zusammengeschaltet werden.


