Verwendungsbereich:
HF-Anschluss:
Die Geräte sind ausschließlich für den Einsatz zum Verteilen von Radio- und
Fernsehsignalen im Haus geeignet! Wird das Gerät für andere Einsätze
verwendet, wird keine Garantie übernommen!
Mit den 8 SAT-ZF-Polarisationsebenen inklusive
terrestrischer Signale (z.B. UKW-Radio) auf mehrere SAT-Receiver verteilt
werden.
Kaskadebausteinen können
SPU 996-09 = 6 Receiver, SPU 998-09 = 8 Receiver, SPU 9912-09 = 12
Receiver und SPU 9918-09 = 18 Receiver.
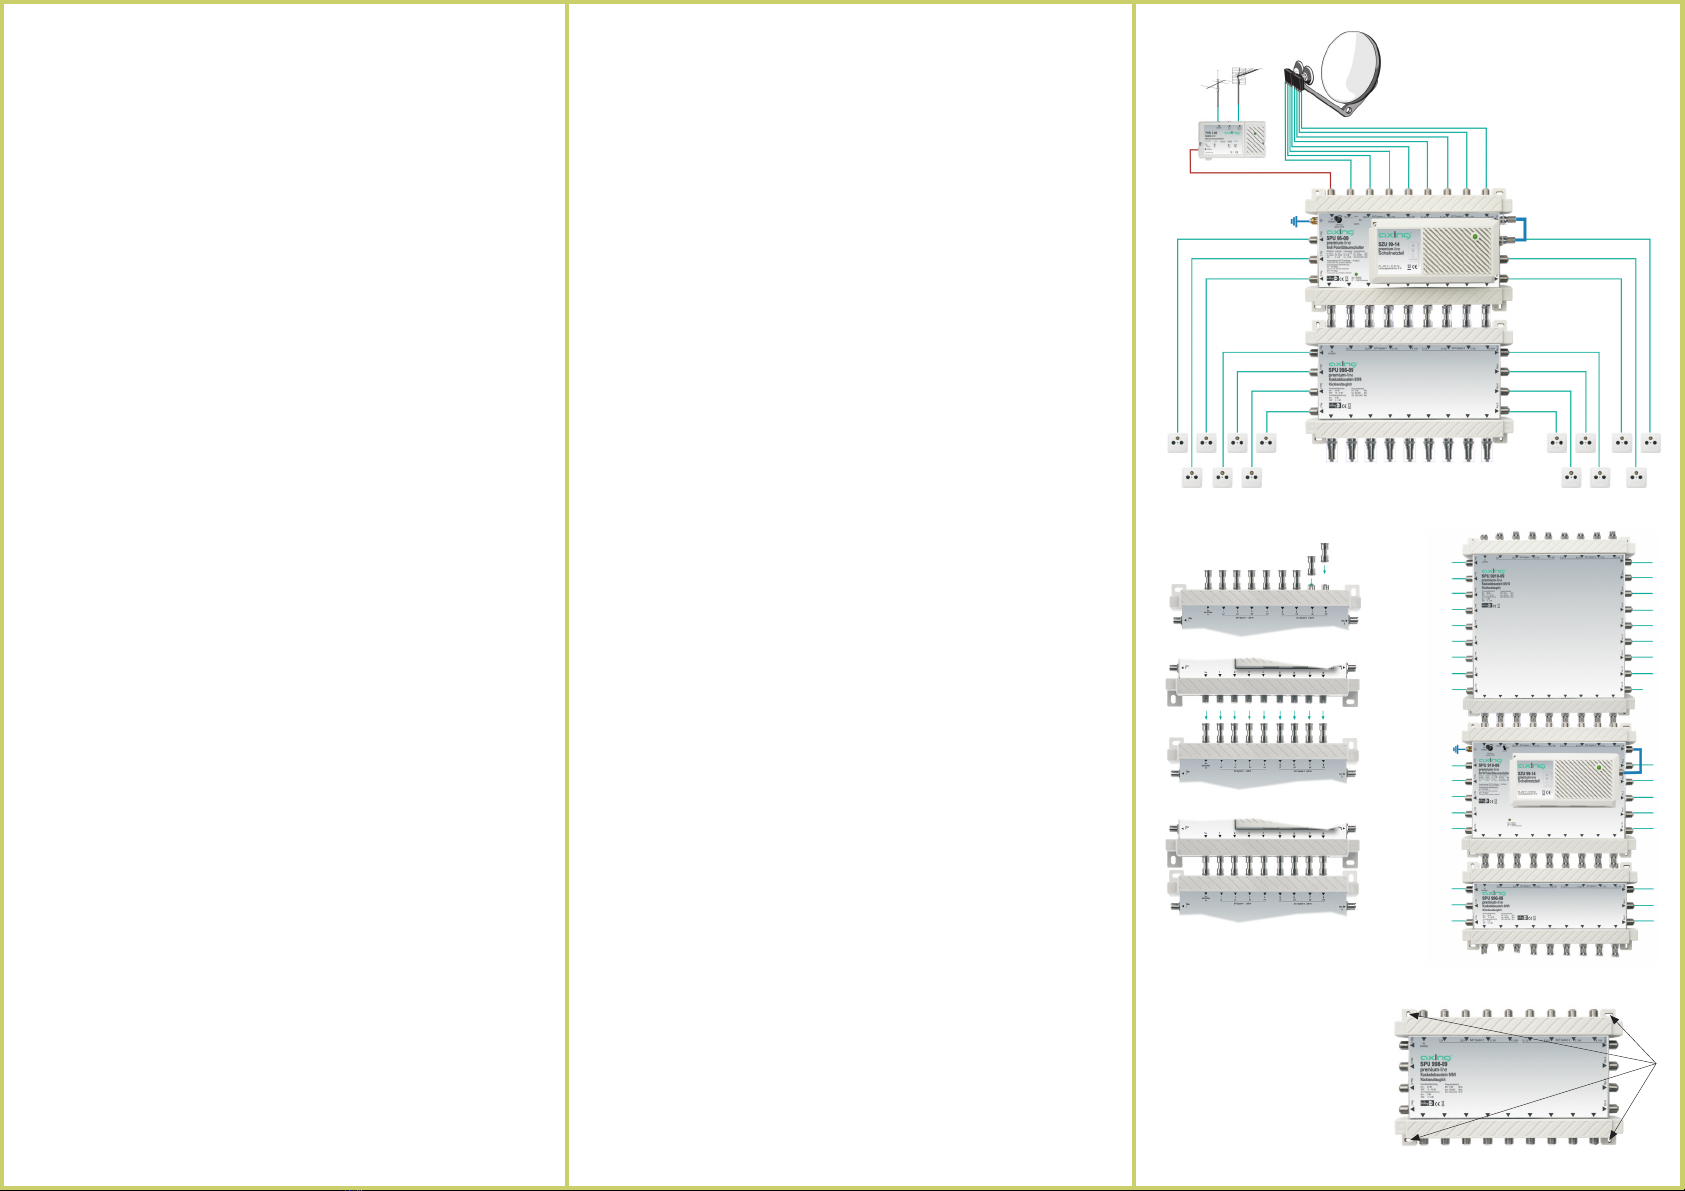
Für ein Kaskadesystem mit den Kaskadebausteinen SPU 996-09,
SPU 998-09, SPU 9912-09 oder SPU 9918-09 benötigen Sie einen der
Polaritätsumschalter SPU 96-09, 910-09 oder 916-09. Beachten Sie bei der
Inbetriebnahme des Polaritätsumschalters dessen Betriebsanleitung.
Verbinden Sie die Ausgänge der Polaritätsumschalter mit den Eingängen der
Kaskadebausteine. Verwenden Sie F/F-Quickfix-Adapter CFA 4-01 (nicht im
Lieferumfang enthalten), damit können Sie die Geräte einfach aufeinander
stecken 1 bis 3 .
Wenn Sie mehrere Kaskadebausteine verwenden, schließen Sie die Ausgänge
des Kaskadebausteins an den Eingängen eines weiteren Kaskadebausteins an
usw. Hinweis: Abhängig vom Anlagenaufbau (Pegelverlusten), sind beim
Einsatz mehrerer Kaskadebausteine weitere Polaritätsumschalter zur
Verstärkung der Durchgangssignale nötig 4.
Schließen Sie die Ausgänge des letzten Kaskadebausteins mit den beim
Polaritätsumschalter beiliegenden Abschlusswiderständen CFA 11-00 ab .
Verbinden Sie die seitlichen Teilnehmerausgänge mit den Antennensteck-
dosen. Verwenden Sie für alle HF-Verbindungen hochgeschirmte Koaxialkabel
mit F-Anschlusssteckern. Passende Kabel und Stecker finden Sie im aktuellen
AXING-Katalog oder unter www.axing.com.
Hinweis:
!
!
!
!
5
Field of application:
The devices are only suitable for in-house distribution of RF signals! If the device
is used for other purposes, no warranty is given!
With the cascading units 8 SAT IF polarization levels including terrestrial signals
(e.g. FM radio) can be distributed to several SAT receivers. SPU 996-09 = 6
receivers, SPU 998-09 = 8 receivers, SPU 9912-09 = 12 receivers und SPU
9918-09 = 18 receivers.
For a cascading system with the cascade units SPU 996-09, SPU 998-09,
SPU 9912-09 or SPU 9918-09 you need a polarization switch SPU 96-09, 910-09
oder 916-09. Please note when installing these polarization switch the appropriate
operation instructions.
Note:
RF-Installation:
!
!
!
!
Connect the outputs of the polarization switch to the inputs of the cascade unit.
Use F/F Quickfix adapters CFA 4-01 (not included in delivery). Using adapters
you can easily plug the devices on each other (see figure 1 to 3).
If you use several cascade units, connect the outputs of the first cascade unit
to the inputs of the next cascade unit and so on. Note: According to the
dimensions of your SAT system, you may have to use after some cascade
units a further polarization switch to amplify the trunk signals 4.
Terminate the outputs of the last cascade unit with the resistors CFA 11-00 you
find in the carton box of the polarization switch 5.
Connect the receiver outputs on the left and right sides to the antenna sockets.
Use highly shielded coaxial cables with F connectors. Suitable cables and
connectors can be found in the current AXING catalogue or under
www.axing.com.
ÉSicherheitshinweise:
·
·
·
·
·
Die Installation des Geräts und Reparaturen am Gerät sind ausschließlich vom
Fachmann unter Beachtung der geltenden VDE-Richtlinien durchzuführen. Bei nicht
fachgerechter Installation und Inbetriebnahme wird keine Haftung übernommen.
Das Gerät darf nur in trockenen Räumen betrieben werden. In feuchten Räumen oder im
Freien besteht die Gefahr von Kurzschlüssen (Achtung: Brandgefahr) oder elektrischem
Schlägen (Achtung: Lebensgefahr).
Wählen Sie den Montage- bzw. Aufstellort so, dass Kinder nicht unbeaufsichtigt am
Gerät und dessen Anschlüssen spielen können. Der Montage- bzw. Aufstellort muss eine
sichere Verlegung aller angeschlossenen Kabel ermöglichen. Kabel dürfen nicht durch
irgendwelche Gegenstände beschädigt oder gequetscht werden.
Wählen Sie einen Montage- bzw. Aufstellungsort, an dem unter keinen Umständen
Flüssigkeiten oder Gegenstände in das Gerät gelangen können (z. B. Kondenswasser,
Dachundichtigkeiten, Gießwasser etc.)
Setzen Sie das Gerät niemals direkter Sonneneinstrahlung aus und vermeiden Sie die
direkte Nähe von Wärrmequellen (z. B. Heizkörper, andere Elektrogeräte, Kamin etc.)
Bei Geräten, die Kühlkörper oder Lüftungsschlitze haben, muss daher unbedingt darauf
geachtet werden, dass diese keinesfalls abgedeckt oder verbaut werden. Sorgen Sie
außerdem für eine großzügig bemessene Luftzirkulation um das Gerät. Damit verhindern
Sie mögliche Schäden am Gerät sowie Brandgefahr durch Überhitzung. Achten Sie
unbedingt darauf, dass Kabel nicht in die Nähe von Wärmequellen (z.B. Heizkörper,
andere Elektrogeräte, Kamin etc.) kommen.
ÉSafety advice:
·
·
·
·
·
Installation and repairs to the equipment may only be carried out by technicians
observing the current VDE guidelines. No liability will be assumed in the case of faulty
installation and commissioning.
The equipment may only be operated in dry rooms. In humid rooms or outdoors there is
danger of short-circuit (caution: risk of fire) or electrocution.
Choose the location of installation or mounting such that children may not play
unsupervised near the equipment and its connections. The location of installation or
mounting must allow a safe installation of all cables connected. Cables may not be
damaged or clamped by objects of any kind. To prevent damage to your equipment and
to avoid possible peripheral damages, the devices foreseen for wall mounting may only
be installed on a flat surface.
Choose the location of installation or mounting so that under no circumstances liquids or
objects can get into the equipment (e.g. condensation, water coming from leaking roofs
or flowing water, etc.).
Avoid exposure of the equipment to direct sunlight and to other heat sources (e. g.
radiators. other electrical devices, chimney, etc.). Devices that are equipped with heat
sinks or ventilation slots must under no circum-stances be covered or blocked. Also
ensure for a generous air circulation around the equipment. In this way you avoid
possible damage to the equipment as well as a risk of fire caused by overheating.
Absolutely avoid that cables come near any source of heat (e.g. radioators, other
electrical devices, chimney, etc.).
1
2
3
6
Montage:
Verwenden Sie die dem Gerät
beiliegenden Montageschrauben
und die Montagelöcher an den
Geräten .6
Mounting:
Use the included mounting screws
and the mounting holes of the
devices .6
4
5


