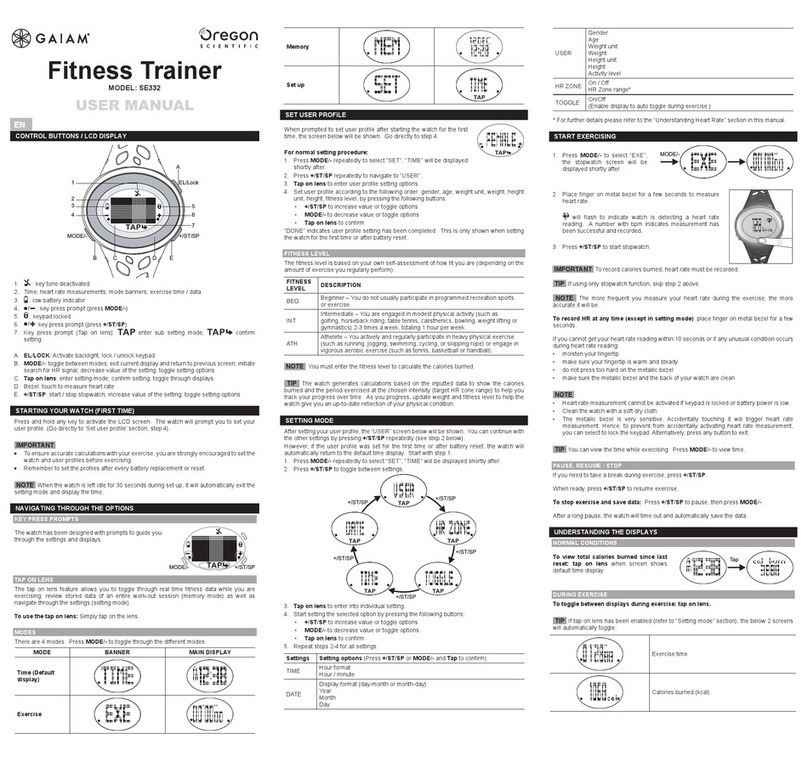
Axiom HR200 User manual

?O2@e@@@?fW2@@e@@@?f?O2@@@6Kf?W2@@?fW2@@?@@@@@@@
?O2@@@e@@@Lf7@@5?J@@@?e?O2@@@@@@@6Xe?7@@@Le?W&@@@?3@@@@@@
?O2@@@@@e@@@1e?J@@@H?7@@5??W2@@@@@@@@@@1e?@@@@1e?7@@@@e@@@@@@
?W2@@@@@@@e3@@@eW&@@5??@@@H?W&@@@(M?I4@@@@L??@@@@@eJ@@@@@?@@@@@@@
O&@@@@@@@5eN@@@?O&@@(Y??@@@e7@@@(Yf?@@@1??@@@@@?O&@@@@5g?I
W2@@@@0Y@@@He?@@@@@@@@He?@@@?J@@@(Y?f?3@@@?J@@@@@@@@@@@@Hh
7@@@(Me@@@?e?3@@@@@@5?eJ@@@?7@@(Yg?N@@@?7@@@@@@@@@@@@?h
?J@@@(Y?e@@@?e?N@@@@@(Y?e7@@@?@@@H?h@@@?@@@@@@@@@@@@@?h
W&@@(Ye?J@@@?f@@@@@Hf@@@@@@@@he@@@?@@@V'@@@@@@@@?h
7@@@H?e?7@@@?f@@@@5?f@@@?@@@5h?J@@@?@@@?V4@0Y@@@5?h
@@@5f?@@@5?e?J@@@@g@@@?@@@Hh?7@@@?@@@?f?@@@H?h
?J@@@Yf?@@@H?e?7@@@@1?e?J@@@?@@@?h?@@@@@@@@?f?@@@he
?7@@@@@@@@@@@@fJ@@@@@@?e?7@@@?@@@?hJ@@@?@@@5?f?@@@he
?@@@@@@@@@@@@@e?W&@@@@@@?e?@@@5?@@@Lg?W&@@5?@@@H?fJ@@@he
?@@@@@@@@@@@@@eW&@@(Y@@@Le?@@@H?@@@1gW&@@@H?@@@g7@@5he
?@@@g@@@5e7@@@H?3@@1e?@@@e3@@@f?W&@@@5??@@@g@@@Hhe
J@@@g@@@H?J@@@5eN@@@eJ@@@eN@@@@6K?O&@@@(Y?J@@@g@@@?he
7@@@g@@@?W&@@(Ye?@@@L?7@@@e?3@@@@@@@@@@(Ye7@@5g@@@?he
@@@5g@@@?7@@@H?e?3@@1?@@@5e?V4@@@@@@@@0Y?e@@@Hf?J@@@?he
@@0Yg@@@?@@@@f?V4@@?@@0Yf?I4@@@0Mg@@@?f?@@@@?he
HR200
Heart Rate Monitor
Owner’s Manual
HRM200 3/30/99 9:37 AM Page 1

Table of Contents
Introduction . . . . . . . . . . . . . . . . . . . . . . . . . . . . . . . .1
Functions and Features . . . . . . . . . . . . . . . . . . . . . . . . .1
Button Commands and
Important Tips . . . . . . . . . . . . . . . . . . . . . . . . . . . . . .2
Positioning the Chest Band/Transmitter . . . . . . . . . . . . . .4
Mounting the Receiver on Your Bike . . . . . . . . . . . . . . . . .4
Setting Up Your HR200 for Use . . . . . . . . . . . . . . . . . . . .5
Displaying your Heart Rate . . . . . . . . . . . . . . . . . . .5
Time of Day and Date/Heart Rate Mode . . . . . . . . . . .5
Setting the Time of Day and Date . . . . . . . . . . . . . . .5
Setting the Daily Alarm . . . . . . . . . . . . . . . . . . . . .9
Setting Your Heart Rate Target Zone . . . . . . . . . . . .10
Using Your HR200 . . . . . . . . . . . . . . . . . . . . . . . . . . .12
Activating and Deactivating Alarms . . . . . . . . . . . . .12
Stopwatch Mode . . . . . . . . . . . . . . . . . . . . . . . . .12
Time in Zone . . . . . . . . . . . . . . . . . . . . . . . . . . .13
Back-Lighting . . . . . . . . . . . . . . . . . . . . . . . . . . . . . .13
Replacing Batteries . . . . . . . . . . . . . . . . . . . . . . . . . .14
Troubleshooting . . . . . . . . . . . . . . . . . . . . . . . . . . . . .14
Axiom HR200 Specifications . . . . . . . . . . . . . . . . . . . . .15
©1998 Performance Inc. All rights reserved
Performance Inc.
One Performance Way
Chapel Hill, NC 27514
1-800-727-2453
www.performancebike.com
HRM200 3/30/99 9:37 AM Page 2

Introduction
The wireless Axiom HR200 heart rate monitor calculates and
displays heart rate information via radio frequency transmis-
sion from the chest transmitter to the watch receiver.
The Axiom HR200 provides the feedback you need in order
to monitor your training, with functions that help you
increase your fitness and performance.
Combined with an appropriate exercise program, the Axiom
HR200 will help you:
• Control your training
• Reduce your heart rate recovery time
• Increase your aerobic capacity
• Improve your overall fitness
• Improve your exercise performance
The easy-to-read display and simple operation make the
Axiom HR200 very user-friendly!
Caution: Before you start any exercise program you should
consult a physician. If you have a pacemaker or other
implanted electronic device, consult your physician prior
to using a heart rate monitor.
Functions and Features
1. Current heart rate
2. Heart rate upper limit alarm (visible and audible)
3. Heart rate lower limit alarm (visible and audible)
4. Time of day (12 or 24 hr.)
5. Daily alarm
6. Month and day calendar
7. Stopwatch
8. Recall time spent in target heart rate zone
9. Electroluminescent back-light
1
HRM200 3/30/99 9:37 AM Page 4

Important Tips
1. You must press and hold the Mode button (in any main
screen except the Daily Alarm) before you can display your
heart rate.
2. If you get into a set up screen by mistake, a long press of
the Light button will always get you back to a main screen.
Successive presses of the Mode button will then scroll you
through all main screens.
3. For proper heart rate readings, it is critical that there be
sufficient moisture (water or saliva) between the electrodes
on the transmitter (chest strap) and your skin. Insufficient
moisture can cause no reading, or frozen or erratic readings.
4. When using a wireless heart monitor near computers,
motorized gym equipment, electric motors, power lines,
inside of automobiles, televisions and even fluorescent
bulbs, erratic readings may occur.
5. You can wear the Axiom heart monitor when swimming,
but do not push any of the buttons while the receiver
(watch) is underwater.
3
Button Commands and Important Tips
Button Commands
Not only does the Axiom HR200 have a variety of functions,
it’s also easy to use. You only need remember a few basic
button commands in order to set and reset values, and to
toggle between the main screens (please refer to the logic
diagram on pages xx to see the complete range of screens).
To go from any of the four main screens to another press the
Mode key. The Mode key will cycle the HR200 from Time of
Day, to Daily Alarm, to Stopwatch, to Time in Zone, and
back to Time of Day. Please note that all button presses are
short presses unless otherwise noted.
To enter Set Up mode: In any main screen (except
Stopwatch), press and release the Select button. To contin-
ue through each of the set up screens, continue to press
and release the Select button. To change a number in a set
up screen, press the Adjust button.
To back up to a previous screen from any set-up screen press
the Light button.
To move from a set-up screen to the corresponding main
screen press and hold the Light button.
Note: the Light cannot be activated in any of the set-up
screens.
The following set-up instructions will take you through the
entire set-up procedure from beginning to end. If you’d like
to program a single function, go to the main screen for that
function and press and release the Select button. Once in
the set-up screen for the specific function, use the Adjust
button to modify the value. To return to the main screen,
press and hold the Light button.
If you accidentally find yourself in a set-up screen and don’t
want to modify the value, remember that all you have to do
is press and hold the Light button to go back out to the
main screen!
2
Figure 1. HR200 Display, all possible LCD segments on. Buttons
are as marked on display surround.
Audible Target
Zone Alarm icon
Heart
Rate icon
Stopwatch icon
Time in Zone icon
Above, In
or Below
Limits icon
PM icon
(12-hr time)
Alarm
(Time) icon
HRM200 3/30/99 9:37 AM Page 2

Setting Up Your HR200 for Use
Displaying Your Heart Rate
When in any main screen (except time-of-day alarm),
press and hold the Mode button to activate the heart rate
function. The heart symbol and a “zero” heart rate will
appear.
After a few seconds, provided that you are wearing the
transmitter chest belt, the upper display row will show your
heart rate and a flashing heart symbol. The lower display
row will continue to show main screen information. On the
left side of the screen is a bar with arrows on each end. If
all three segments are displayed, this indicates that your
heart rate is within the target zone. If the bar and the “up”
arrow are displayed, you are operating above the target
zone, and if the bar and the “down” arrow are displayed,
you are operating below your target zone. Target zone set-
up is discussed on page 10.
Press and hold the Mode button again to deactivate the
heart rate function. A long period of inactivity (with no
heart rate signals and no button presses for two minutes)
will cause the receiver to switch off automatically. At that
point, the display will automatically return to the Date and
Time of Day main screen.
Note: Even when the receiver is deactivated, the transmitter
will continue to send a signal when it is worn. To conserve
transmitter battery power, the transmitter belt should be
removed when not in use.
Time of Day and Date/Heart Rate Mode
Press the Mode button until the Time of Day is displayed in
the lower row of the screen (see Fig. 4).
When heart rate signals are not being received, date infor-
mation will be automatically displayed on the upper portion
of the screen. If the heart rate function has been activated
(see Displaying Your heart rate above), the date will be
replaced by a heart icon and a heart rate value.
Setting the Time of Day and Date
Note: At any time while in the set-up screens, a press of
the Light button sends you back to the previous screen. At
any stage of the set-up procedure, press and hold the
Light button to return to the main screen.
1. First, choose between the 12 or 24 hour mode. When in
the Time of Day main screen, a press of the Adjust button
shows if the unit is in 12 or 24 hour mode.(see Fig. 4)
5
Positioning the Chest Band/Transmitter
1. Adjust the strap length to achieve a snug, comfortable fit
on your chest as shown in Fig 2.
2. The transmitter should face outward as shown, with the
band fitting comfortably on the bare chest just below the
breast.
3. Center the transmitter on the chest (with the Axiom logo
right-side up).
4. Moisten the rubber electrodes on the inside of the trans-
mitter band with water or saliva.
5. Attach the receiver to your wrist or mount it on your
bicycle (see the following sub-section for mounting the
receiver to your bike).
6. When placed on the body, the transmitter is automatical-
ly activated (and deactivated when removed). To conserve
transmitter battery power, the transmitter should be
removed when not in use.
If you have difficulty obtaining a regular heart rate reading,
try readjusting the chest band. The rubber electrodes must
be flat against the skin, and the band must be in the correct
position–not too low. Make sure there is sufficient moisture
between the electrodes and your skin. Check that the band
is clean, with no accumulated sweat or dirt.
Mounting the Receiver on Your Bike
Your HR200 comes with a Handlebar Adapter for your bike.
Slide the split foam ring over your handlebar in a conve-
nient location and wrap the Velcro® Strap snugly around the
foam ring. Your HR200 receiver may now be installed over
the Strap as you would attach it to your wrist.
4
Figure 2. Correct Transmitter
location on chest, detail of
moistening electrodes.
HRM200 3/30/99 9:37 AM Page 4

76
Figure 3. Full HR200 logic diagram.
HRM200 3/30/99 9:37 AM Page 6

2. A long press of the Adjust button (i.e., press and hold)
will change the mode (from 12 to 24 hour or 24 to 12 hour
mode). When in the 12 hour mode, a “PM” icon will appear
on the screen for all times between noon and midnight.
8
3. To set the desired time of day, press the Select button to
enter the Time set-up screen. The seconds will flash. A press
of the Adjust button will zero the seconds.
4. Press the Select button again to set the hours. The hours
will flash. Press the Adjust button to advance the hours.
Holding the Adjust button causes the hours to increase
rapidly.
5. Press the Select button again to set the minutes. The
minutes will flash. Press the Adjust button to advance the
minutes. Holding the Adjust button causes the minutes to
increase rapidly.
6. Press the Select button again to set the month, and set
the correct month using the Adjust button.
7. Press the Select button again to set the day, and set the
day of the month using the Adjust button.
8. From the Day set-up screen, one more press of the Select
button advances to the daily alarm set-up screen.
Setting the Daily Alarm
You can set the daily alarm either at the end of the month-
day set-up, or directly from the Daily Alarm main screen.
From either, press the Select button (see Fig. 5).
1. When in the Daily Alarm set-up screen, the hours will
flash. Use the Adjust button to set the desired hour. Press
and hold the Adjust button to increase the hours rapidly.
9
Figure 4. Time of Day/Date Main Screen and Set-up screens.
Figure 5. Daily Alarm Main Screen and Set-up screens.
HRM200 3/30/99 9:37 AM Page 8

When the high limit has been set, press the Select button to
advance to the low limit. The “down” arrow will be dis-
played and the lower row of digits will flash.
Press the Adjust button to decrease the low limit in single
beat increments. Press and hold the Adjust button to rapidly
decrease the low limit.
Note: There must be a minimum of a five beat-per-minute
difference between the high limit and low limit. Whenever a
new high limit setting is entered, you may have to reset the
lower limit as well.
Another press of the Select button will return you to the
Time of Day main screen, and the set up sequence is
complete. Note: See page 12 for activating the Target Zone
Limit Alarm.
11
2. Press the Select button again, and the minutes will flash.
Use the Adjust button to set the desired minutes. Press and
hold the Adjust button to increase the minutes rapidly.
Refer to page 12 for instructions on how to turn the alarm
on or off.
Press the Select button again to enter the Time in Zone set-
up screen, where you will enter the upper and lower limits
of your target zone.
Setting Your Heart Rate Target Zone
From the Daily Alarm (set minutes) set-up screen or the
main Time in Zone screen, press the Select button to enter
the Target Zone set-up screen (see Fig. 6). In the Target
Zone set-up screen, the high heart rate limit will be flashing
and displayed in the upper row, and the low heart rate limit
will be displayed in the lower row. The “up” arrow will be
showing, indicating that a press of the Adjust button will
modify the high limit.
Press the Adjust button to increase the high limit in single
beat increments. Press and hold the Adjust button to rapidly
increase the high limit.
10
Figure 6. Time in Zone Main Screen and Set-up screens.
HRM200 3/30/99 9:37 AM Page 10

the Adjust button (when you hold the Adjust button, the
stopwatch will initially start running, but will reset in two
seconds). The stopwatch can be started, stopped, and reset
only from the the Stopwatch main screen.
When the stopwatch is running, the “STW” icon will flash in
all main screens (except the Stopwatch main screen) to
show that it is operating in the background.
Time In Zone
Please note: Information accumulation of time spent in
the target zone will only occur when the Stopwatch is
activated. However, when the Stopwatch is cleared, accu-
mulated heart rate data is not reset. To reset accumulat-
ed Time in Zone data, press and hold the Adjust button.
To view your accumulated time in your target zone, press
the Mode button from any main screen until you reach the
Time in Zone main screen. The “TiZ” icon will be displayed
on the screen. The time spent in the target zone will show
on the screen, accumulating automatically when the user’s
heart rate falls within the programmed target zone. This
information is accessible at any time during your workout.
Back-Lighting
In all of the main screens, press the Light button to activate
the electroluminescent back-light for four seconds. The
back-light does not operate in any set-up screen.
13
Using Your HR200
Activating and Deactivating Alarms
Daily Alarm - To activate the Daily Alarm, go to the Daily
Alarm main screen, the “AL” icon will be displayed on the
lower row. Press and hold the Adjust button to activate (or
deactivate) the alarm. The alarm icon will appear on the
screen while the alarm is activated, see Fig. 7.
The alarm will sound for one minute, until silenced by press-
ing any button. When you press a button to silence the
alarm, the normal function of the button will not be per-
formed.
Target Zone Limit Alarm - To activate the Target Zone Limit
Alarm, press and hold the Select button while in any main
screen except Daily Alarm (see Fig. 8). The Target Zone
Alarm can only be activated while the heart icon is dis-
played on the top row. The alarm icon will be displayed
above the heart icon. A tone will sound in rhythm with your
heart beat when you are above or below your Target Zone.
To deactivate the alarm, press and hold the Select button
until the alarm icon disappears from the screen.
Stopwatch Mode
To operate the stopwatch: From any main screen, press the
Mode button until you reach the Stopwatch main screen
(see Fig. 9). The “STW” icon will be displayed. If the heart
rate function has been activated, current heart rate will also
be shown.
To start the stopwatch, press the Adjust button. To stop the
stopwatch, press the Adjust button again. Once the stop-
watch is stopped, it can be reset by pressing and holding
12
Figure 7. Daily
Alarm activated.
Figure 8. Target
Zone Limit Alarm
activated.
Figure 9. Stopwatch Main Screen.
Alarm Bell icon
appears above
AL icon
Alarm icon
appears above
the Heart icon
HRM200 3/30/99 9:38 AM Page 12

c. Be sure you have made a long press (i.e., press and hold)
of the Mode button from the appropriate screen.
d. Check the battery in your transmitter.
What if the heart rate reading becomes extremely high
(above 200)?
When exercising with your Axiom HR200 heart rate monitor
you may come within range of electromagnetic signals,
causing the heart rate reading to elevate to abnormal levels.
Common sources of electromagnetic signals are high voltage
power lines and motor driven equipment. Signals from other
users transmitter belts (within 80 cm) can also cause incor-
rect readings. Check your surroundings and move away from
the source.
Axiom HR200 Specifications
Watch/Receiver
Stopwatch resolution: 0.1 sec
Maximum stopwatch time: 9 hr 59 min 59.9 sec
Heart rate range: 30 to 240 beats per minute (bpm)
High heart rate limit range: 80 to 240 bpm in steps of 1 bpm
Low heart rate limit range: 30 to 235 bpm in steps of 1 bpm
(or 5 bpm lower than the high
limit setting)
Heart rate accuracy: ± 1 bpm
Maximum time in zone: 9 hr 59 min 59 sec
Back-light duration: 4 seconds per press of Light button
Battery: 3 volt Lithium 2025 cell
Battery life: approximately 1 year with 60 min/day heart
rate monitoring
Transmitter
Emitted frequency: 5 kHz ±10%
Battery: 3 volt Lithium 2032 cell
Battery life: 2 years when used 60 min/day
Range: 95 cm (37 inches) maximum to watch/receiver
15
Replacing Batteries
Transmitter
Unscrew the battery compartment counterclockwise, using a
coin (see Fig. 10). Before you remove the old battery, note
its orientation. Please be sure that the new battery is
inserted with the same orientation (with the positive pole
upwards and the negative pole against the battery compart-
ment spring). To maintain water resistance, make sure the
rubber O-ring is in place.
Watch Receiver
The watch receiver has a replaceable battery. However, to
maintain the water resistance of the watch case we recom-
mend taking the watch receiver to a jeweler or watch repair
shop for battery replacement.
Troubleshooting
What if the heart rate reading is erratic or totally absent?
a. Check to see that the chest band is tight enough. The
band should be adjusted so that the electrodes are flat
against your skin. You may have to move the band one way
or another to find the best position for the transmitter.
b. Check to make sure that the electrode strips are thor-
oughly moistened. The transmitter will not function properly
without enough moisture (water or saliva) to make good
electrical contact.
If you are wearing the transmitter over a shirt, make sure
there is enough moisture to make the needed contact with
the electrodes.
Accumulated sweat and dirt may interfere with clear recep-
tion of the signal from the skin to the transmitter. Check to
see if your transmitter needs cleaning.
14
Figure 10. Changing
the Transmitter
Battery, remember to
replace O-ring correctly.
HRM200 3/30/99 9:38 AM Page 14

?O2@@@@@@@@6K?
?O2@@@@@@@@@@@@@@@@@@@6K
O2@@@@@@@@@@@@@@@@@@@@@@@@@@6K
?O2@@@@@@@@@@@@@@@@@@@@@@@@@@@@@@@@6K?
?O2@@@@@@@@@@@@@@@@@@@@@@@@@@@@@@@@@@@@6K?
?O2@@@@@@@@@@@@@@@@@@@@@@@@@@@@@@@@@@@@@@@@6K?
?W2@@@@@@@@@@@@@@@@@@@@@@@@@@@@@@@@@@@@@@@@@@@@6X?hg
O&@@@@@@@@@@@@@@@@@@@@@@@@@@@@@@@@@@@@@@@@@@@@@@)Khg
W2@@@@@@@@@@@@@@@@@@@@@@@@@@@@@@@@@@@@@@@@@@@@@@@@@@6Xhf
?W&@@@@@@@@@@@@@@@@@@@@@@@@@@@@@@@@@@@@@@@@@@@@@@@@@@@@)X?he
W&@@@@@@@@@@@@@@@@@@@@@@@@@@@@@@@@@@@@@@@@@@@@@@@@@@@@@@)Xhe
?W&@@@@@@@@@@@@@@@@@@@@@@@@@@@@@@@@@@@@@@@@@@@@@@@@@@@@@@@@)X?h
W&@@@@@@@@@@@@@@@@@@@@@@@@@@@@@@@@@@@@@@@@@@@@@@@@@@@@@@@@@@)Xh
?W&@@@@@@@@@@@@@@@@@@@@@@@@@@@@@@@@@@@@@@@@@@@@@@@@@@@@@@@@@@@@)X?g
W&@@@@@@@@@@@@@@@@@@@@@@@@@@@@@@@@@@@@@@@@@@@@@@@@@@@@@@@@@@@@@@)Xg
?W&@@@@@@@@@@@@@@@@@@@@@@@@@@@@@@@@@@@@@@@@@@@@@@@@@@@@@@@@@@@@@@@@1g
?7@@@@@@@@@@@@@@@@@@@@@@@@@@@@@@@@@@@@@@@@@@@@@@@@@@@@@@@@@@@@@@@@@@L?f
J@@@@@@@@@@@@@@@@@@@@@@@@@@@@@@@@@@@@@@@@@@@@@@@@@@@@@@@@@@@@@@@@@@@)Xf
7@@@@@@@@@@@@@@@@@@@@@@@@@@@@@@@@@@@@@@@@@@@@@@@@@@@@@@@@@@@@@@@@@@@@1f
@@@@@@@@@@@@@@@@@@@@@@@@@@@@@@@@@@@@@@@@@@@@@@@@@@@@@@@@@@@@@@@@@@@@@@f
?@@@@@@@@@@@@@@@@@@@@@@@@@@@@@@@@@@@@@@@@@@@@@@@@@@@@@@@@@@@@@@@@@@@@@@@@@@@@@@@@@@@@@@@@@@@@@@@@@@?
J@@@@@@@@@@@@@@@@@@@@@@@@@@@@@@@@@@@@@@@@@@@@@@@@@@@@@@@@@@@@@@@@@@@@@@@@@@@@@@@@@@@@@@@@@@@@@@@@@@?
7@@@@@@@@@@@@@@@@@@@@@@@@@@@@@@@@@@@@@@@@@@@@@@@@@@@@@@@@@@@@@@@@@@@@@@@@@@@@@@@@@@@@@@@@@@@@@@@@@@?
?J@@@@@@@@@@@@@@@@@@@@@@@@@@@@@@@@@@@@@@@@@@@@@@@@@@@@@@@@@@@@@@@@@@@@@@@@@@@@@@@@@@@@@@@@@@@@@@@@@@@?
?7@@@@@@@@@@@@@@@@@@@@@@@@@@@@@@@@@@@@@@@@@@@@@@@@@@@@@@@@@@@@@@@@@@@@@@@@@@@@@@@@@@@@@@@@@@@@@@@@@@@@
?@@@@@@@@@@@@@@@@@@@@@@@@@@@@@@@@@@@@@@@@@@@@@@@@@@@@@@@@@@@@@@@@@@@@@@@@@@@@@@@@@@@@@@@@@@@@@@@@@@@@0
?@@@@@@@@@@@@@@@@@@@@@@@@@@@@@@@@@@@@@@@@@@@@@@@@@@@@@@@@@@@@@@@@@@@@@@@@@@@@@@@@@@@@@@@@@@@@@@@@@@@@@@@@@
J@@@@@@@@@@@@@@@@@@@@@@@@@@@@@@@@@@@@@@@@@@@@@@@@@@@@@@@@@@@@@@@@@@@@@@@@@@@@@@@@@@@@@@@@@@@@@@@@@@@@@@@@@
?W&@@@@@@@@@@@@@@@@@@@@@@@@@@@@@@@@@@@@@@@@@@@@@@@@@@@@@@@@@@@@@@@@@@@@@@@@@@@@@@@@@@@@@@@@@@@@@@@@@@@@@@@@@
?7@@@@@@@@@@@@@@@@@@@@@@@@@@@@@@@@@@@@@@@@@@@@@@@@@@@@@@@@@@@@@@@@@@@@@@@@@@@@@@@@@@@@@@@@@@@@@@@@@@@@@@@@@V
J@@@@@@@@@@@@@@@@@@@@@@@@@@@@@@@@@@@@@@@@@@@@@@@@@@@@@@@@@@@@@@@@@@@@@@@@@@@@@@@@@@@@@@@@@@@@@@@@@@@@@@@@@@?
7@@@@@@@@@@@@@@@@@@@@@@@@@@@@@@@@@@@@@@@@@@@@@@@@@@@@@@@@@@@@@@@@@@@@@@@@@@@@@@@@@@@@@@@@@@@@@@@@@@@@@@@@@@?
@@@@@@@@@@@@@@@@@@@@@@@@@@@@@@@@@@@@@@@@@@@@@@@@@@@@@@@@@@@@@@@@@@@@@@@@@@@@@@@@@@@@@@@@@@@@@@@@@@@@@@@@@@@?
W2@@@@@@@@@@@@@@@@@@@@@@@@@@@@@@@@@@@@@@@@@@@@@@@@@@@@@@@@@@@@@@@@@@@@@@@@@@@@@@@@@@@@@@f
7@@@@@@@@@@@@@@@@@@@@@@@@@@@@@@@@@@@@@@@@@@@@@@@@@@@@@@@@@@@@@@@@@@@@@@@@@@@@@@@@@@@@@@5f
?J@@@@@@@@@@@@@@@@@@@@@@@@@@@@@@@@@@@@@@@@@@@@@@@@@@@@@@@@@@@@@@@@@@@@@@@@@@@@@@@@@@@@@@(Yf
?7@@@@@@@@@@@@@@@@@@@@@@@@@@@@@@@@@@@@@@@@@@@@@@@@@@@@@@@@@@@@@@@@@@@@@@@@@@@@@@@@@@@@@@H?f
J@@@@@@@@@@@@@@@@@@@@@@@@@@@@@@@@@@@@@@@@@@@@@@@@@@@@@@@@@@@@@@@@@@@@@@@@@@@@@@@@@@@@@@5g
?W&@@@@@@@@@@@@@@@@@@@@@@@@@@@@@@@@@@@@@@@@@@@@@@@@@@@@@@@@@@@@@@@@@@@@@@@@@@@@@@@@@@@@@(Yg
?7@@@@@@@@@@@@@@@@@@@@@@@@@@@@@@@@@@@@@@@@@@@@@@@@@@@@@@@@@@@@@@@@@@@@@@@@@@@@@@@@@@@@@(Y?g
J@@@@@@@@@@@@@@@@@@@@@@@@@@@@@@@@@@@@@@@@@@@@@@@@@@@@@@@@@@@@@@@@@@@@@@@@@@@@@@@@@@@@@(Yh
7@@@@@@@@@@@@@@@@@@@@@@@@@@@@@@@@@@@@@@@@@@@@@@@@@@@@@@@@@@@@@@@@@@@@@@@@@@@@@@@@@@@@(Y?h
?J@@@@@@@@@@@@@@@@@@@@@@@@@@@@@@@@@@@@@@@@@@@@@@@@@@@@@@@@@@@@@@@@@@@@@@@@@@@@@@@@@@@@(Yhe
?7@@@@@@@@@@@@@@@@@@@@@@@@@@@@@@@@@@@@@@@@@@@@@@@@@@@@@@@@@@@@@@@@@@@@@@@@@@@@@@@@@@@(Y?he
J@@@@@@@@@@@@@@@@@@@@@@@@@@@@@@@@@@@@@@@@@@@@@@@@@@@@@@@@@@@@@@@@@@@@@@@@@@@@@@@@@@@0Yhf
?W&@@@@@@@@@@@@@@@@@@@@@@@@@@@@@@@@@@@@@@@@@@@@@@@@@@@@@@@@@@@@@@@@@@@@@@@@@@@@@@@@@(Mhg
?7@@@@@@@@@@@@@@@@@@@@@@@@@@@@@@@@@@@@@@@@@@@@@@@@@@@@@@@@@@@@@@@@@@@@@@@@@@@@@@@@@0Y?hg
J@@@@@@@@@@@@@@@@@@@@@@@@@@@@@@@@@@@@@@@@@@@@@@@@@@@@@@@@@@@@@@@@@@@@@@@@@@@@@@@@0M?
7@@@@@@@@@@@@@@@@@@@@@@@@@@@@@@@@@@@@@@@@@@@@@@@@@@@@@@@@@@@@@@@@@@@@@@@@@@@@@@0M?
?J@@@@@@@@@@@@@@@@@@@@@@@@@@@@@@@@@@@@@@@@@@@@@@@@@@@@@@@@@@@@@@@@@@@@@@@@@@@@@0M?
?7@@@@@@@@@@@@@@@@@@@@@@@@@@@@@@@@@@@@@@@@@@@@@@@@@@@@@@@@@@@@@@@@@@@@@@@@@@0M
J@@@@@@@@@@@@@@@@@@@@@@@@@@@@@@@@@@@@@@@@@@@@@@@@@@@@@@@@@@@@@@@@@@@@@@@@0M?
?W&@@@@@@@@@@@@@@@@@@@@@@@@@@@@@@@@@@@@@@@@@@@@@@@@@@@@@@@@@@@@@@@@@@0M?
?7@@@@@@@@@@@@@@@@@@@@@@@@@@@@@@@@@@@@@@@@@@@@@@@@@@@@@@@@
J@@@@@@@@@@@@@@@@@@@@@@@@@@@@@@@@@@@@@@@@@@@@@@@@@@@@@@@@5
7@@@@@@@@@@@@@@@@@@@@@@@@@@@@@@@@@@@@@@@@@@@@@@@@@@@@@@@@H
?J@@@@@@@@@@@@@@@@@@@@@@@@@@@@@@@@@@@@@@@@@@@@@@@@@@@@@@@@5?
W&@@@@@@@@@@@@@@@@@@@@@@@@@@@@@@@@@@@@@@@@@@@@@@@@@@@@@@@@H?
7@@@@@@@@@@@@@@@@@@@@@@@@@@@@@@@@@@@@@@@@@@@@@@@@@@@@@@@@5
?J@@@@@@@@@@@@@@@@@@@@@@@@@@@@@@@@@@@@@@@@@@@@@@@@@@@@@@@@(Y
?7@@@@@@@@@@@@@@@@@@@@@@@@@@@@@@@@@@@@@@@@@@@@@@@@@@@@@@@@H?
J@@@@@@@@@@@@@@@@@@@@@@@@@@@@@@@@@@@@@@@@@@@@@@@@@@@@@@@@5
7@@@@@@@@@@@@@@@@@@@@@@@@@@@@@@@@@@@@@@@@@@@@@@@@@@@@@@@@H ?W2@6X
@@@@@@@@@@@@@@@@@@@@@@@@@@@@@@@@@@@@@@@@@@@@@@@@@@@@@@@@@? W&U?I/X?
7R@@?N1?
@?@@L?@?
3T(R/T5?
V'U?S(Y?
?V4@0Y
Performance Inc.
One Performance Way
Chapel Hill, NC 27514
1-800-727-2453
www.performancebike.com
Made in Taiwan
For Technical Assistance Please Call:
Tech Support Line 1-800-553-8324
HRM200 3/30/99 9:38 AM Page 16
Table of contents
Other Axiom Fitness Electronic manuals