Axiom QS8 v4 User manual

QS8 v4 Surround

Every member of our Axiom team, myself included, is pleased that you have decided on one
of our products. We have all worked hard to bring the highest level of satisfaction to your
audio experiences, and will continue to work hard to make every Axiom purchase a wise audio
investment for you.
Axiom is deeply commied to ongoing audio research that continues to enhance the performance
of our products. We design and engineer all of our loudspeakers based on the world-class psycho-
acoustical research that was conducted at the National Research Council and that I have been an
integral part of since its early years. is research changed the way that sound is measured, and
allows Axiom to provide the world’s most realistic-sounding loudspeakers at amazing value to the
consumer. By emphasizing the practical side of our ongoing research, Axiom continues to extend
people’s expectations of performance.
It is our central goal at Axiom to turn this research into a truly exciting experience for you in your
environment. Our commitment to the delivery of the most accurate sound reproduction is a
commitment to heighten the level of enjoyment you receive from music and movies.
We at Axiom see our customers as family members and as such we stand at the ready to deliver
personal, expert advice and to follow up on any of your audio needs.
Sincerely,
Sincerely,
Ian Colquhoun
President and Founder
Axiom Audio

Placement
Quadpolar surround speakers in a 5.1 system will sound their best and produce the greatest sense of envelopment in the surround
soundeld if they are to each side of the listening area (see diagram) rather than on the rear walls, and from 1 to 5 feet above the level
of seated listener’s ears. However if your room doesn’t permit side-wall placement of the surrounds, the QS models will work very
eectively on the rear wall behind the listening area.
Dolby Labs specify that with side-wall placement, the surrounds may be located up to 20 degrees to the rear of your couch or chair
relative to an imaginary line across the listening area. Keep the surrounds at least 5-6” inches from the ceiling, so the top-mounted
woofer’s output is not compromised.
In a 7.1-channel setup, the back surrounds are intended for rear-wall placement at angles of from 135 to 150 degrees (see diagram)
relative to the 0-degree line facing the center channel and TV display. e QS surrounds don’t need to be “aimed” towards the
listening area.
An ideal 7.1-channel surround system setup has the main surrounds (Ls, Rs) to each side and the back surrounds (Lb, Rb) at the
rear of the listening area.
HOWEVER, these are not hard and fast rules. e Quadrants are very forgiving of asymmetrical placement and dicult rooms.
ey will indeed work ne at ear level on stands to the sides of the listening area or even on the rear walls if side-wall placement is
impossible. ey do NOT have to be mounted at equal heights or equal distances from each surround speaker to the listeners. You
can adjust for dierent distances and levels with your Dolby Digital/dts A/V surround sound receiver’s set-up menu. Experiment
with placement locations using a couple of helpers to temporarily support the Quadrants while you listen for a seamless enveloping
sense of immersion in the surround eld. e Quadrants will preserve directional cues “hardmixed” to the le or right, but you
should not locate specic sounds directly at the Quadrants themselves when properly set up.
900
220
300
R
Rs
1100
1500
1350
C
L
Lb
00
Sub
Ls
Rb

Accessories
Full Metal Stand
is sturdy audiophile-quality die-cast aluminum 16-inch / 24-inch Full Metal
Stand is custom-engineered to exactly t your Axiom Speaker. Its top plate has two
screw holes at the rear that match up with the two bolts on the boom rear of your
Axiom speakers.
Full Metal Bracket
For versatile wall mounting, use the Axiom Full Metal Bracket. Designed for
accommodating even the most dicult installations, the Full Metal Bracket swivels
le, right, up, and down, with lock-nuts for securing your ultimate position. Your
Axiom bookshelf speaker has a bolt in the center rear of the cabinet designed for
mounting to your Full Metal Bracket.
Full Metal Ceiling Bracket
Strength, Flexibility, Durability - Axiom’s Full Metal Ceiling Bracket is a great new
solution for ceiling mounting your loudspeakers. It’s perfect for hanging surround
speakers in your open-concept theater room or simply in rooms where rear or side
wall mounting isn’t possible.

Power Bracket Installation
e Axiom Power Bracket provides easy wall mounting and electrical connections in one
innovative design. Simply connect your speaker wires, mount the bracket to the wall, and
hang you speaker. e negative is on the le side of the bracket and the positive is on the
right. Optionally you can use the standard binding posts. Each gold binding post has a
colored ring around it-- RED is POSITIVE, BLACK is NEGATIVE. Most receiver and
amplier manufacturers use this color code and you should use it as well--it makes things a
lot easier to hook up your speaker cables.
Step 1
Using a pencil and a level, draw intersecting horizontal and vertical lines on wall at
desired speaker location. Note: It is extremely important to place the center of the
Power Bracket up against a stud on the wall for security. Loosen clamps and insert
wires. Ensure positive (+) wire from amp is in (+) side of power bracket. Tighten
clamps.
Step 2
Place bracket on the wall and align with pencil lines. Install screws. Do not completely
tighten yet. Place a level on top of power bracket and make any necessary adjustments.
Tighten screws. Wash o pencil marks.
Step 3
Place the Wall Bumpers on the back boom corner of the speaker.
Step 4
Li your speaker over the Power Bracket and slide it down until the tabs on the back of
your speaker rest securely on the Power Bracket.
WARNING: Do not loosen bolts on
power tabs. Doing so will cause the
speaker to lose electrical connection
and render the speaker inoperable.

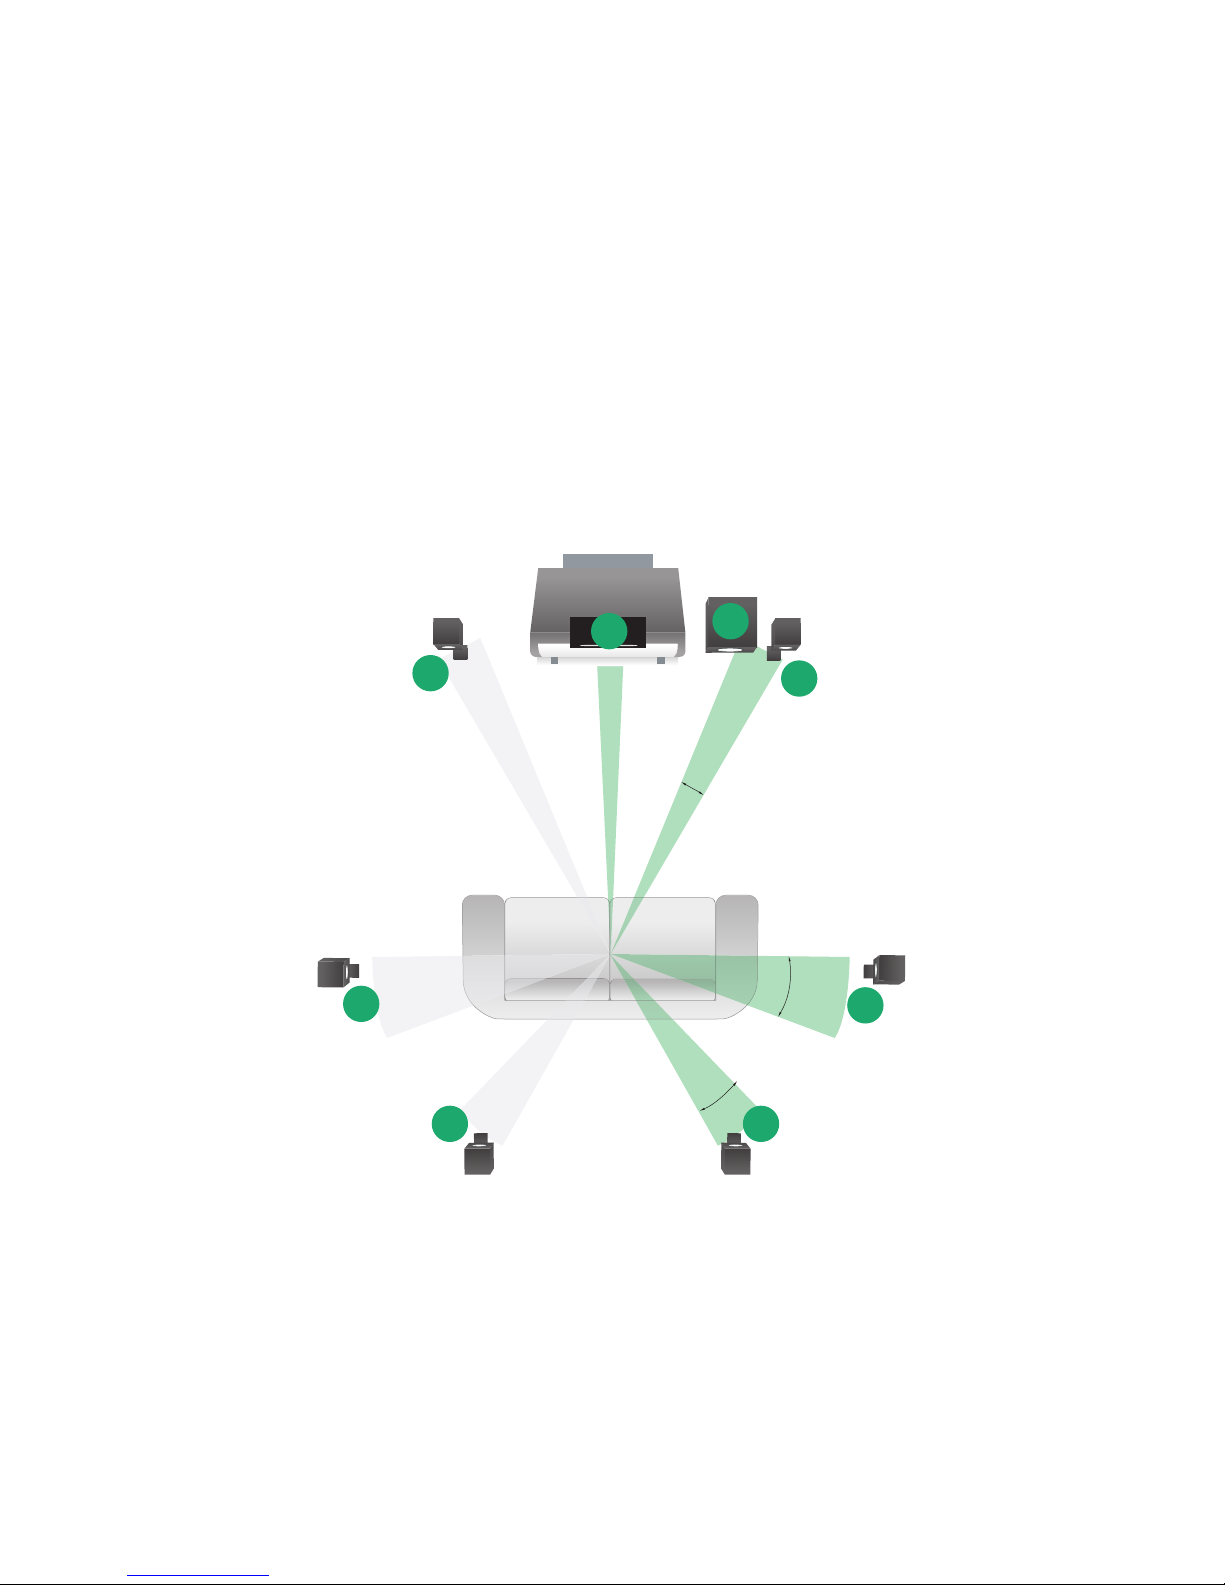
Front Left Speaker: White
Subwoofer: Purple
(line-level RCA output only)
Front Right: Red
Center: Green
Left Surround (side): Blue
Right Surround (side): Gray
Left Back Surround: Brown
Right Back Surround: Tan
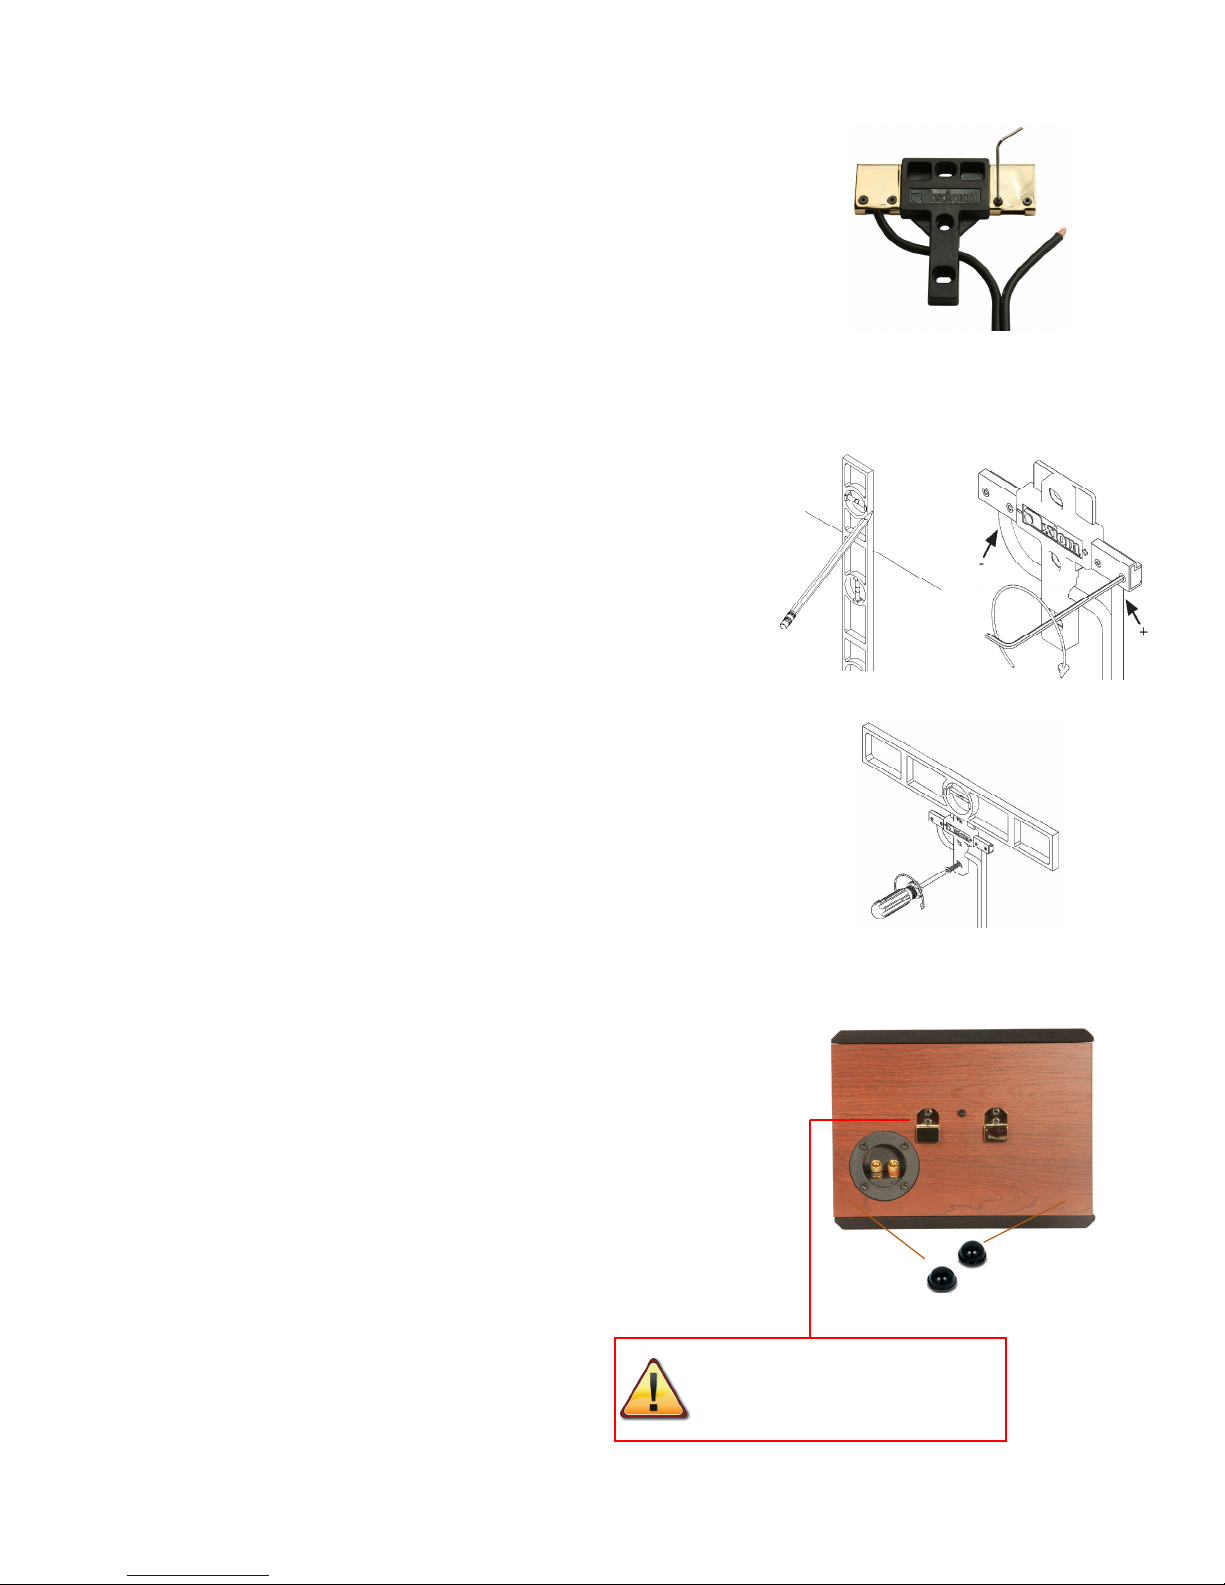
Hookup
Turn the speakers around and look at the back
panel. You’ll see gold-plated 5-way binding posts,
to which you are going to connect the speaker
cables from your receiver or amplier. Each gold
binding post is colour coded. RED is POSITIVE,
BLACK is NEGATIVE. You will also see a
positive (+) sign engraved in the plastic beneath
the RED binding post, and a negative (-) sign
beneath the BLACK post. Your amplier will
likely have these same colours and/or symbols.
Note: for surround and center channels the
positiveislikelyadierentcolouronyourreceiver
or amplier. However, black is universally used
for the negative (-).
Examine your speaker cables. ere will be
something to dierentiate each wire in the pair
of wires; the insulation may have color coding,
or one wire may be copper-colored while the
other is silver-coloured, or there may be printing
on one of the wires, or a ribbed paern on the
plastic insulation of one of the wires. IT IS
EXTREMELY IMPORTANT TO CHOOSE
ONE WIRE TYPE TO BE THE NEGATIVE
AND FOLLOW THAT THROUGH YOUR
ENTIRE HOOKUP.
e Axiom binding post is very versatile to suit
the type of wire end you may be desirous to use
(see wiring diagram). If you are using spade
connectors the ¼” type is best as the Axiom
binding post will lock in a ¼” spade to stop it
from spinning when tightened by liing the ring
on the post under the nut. BE SURE TO USE
THE SUPPLIED PLASTIC WRENCH TO
TIGHTEN YOUR BINDING POSTS AND
CHECK THEM EVERY YEAR TO ENSURE
THEY ARE STILL TIGHT.
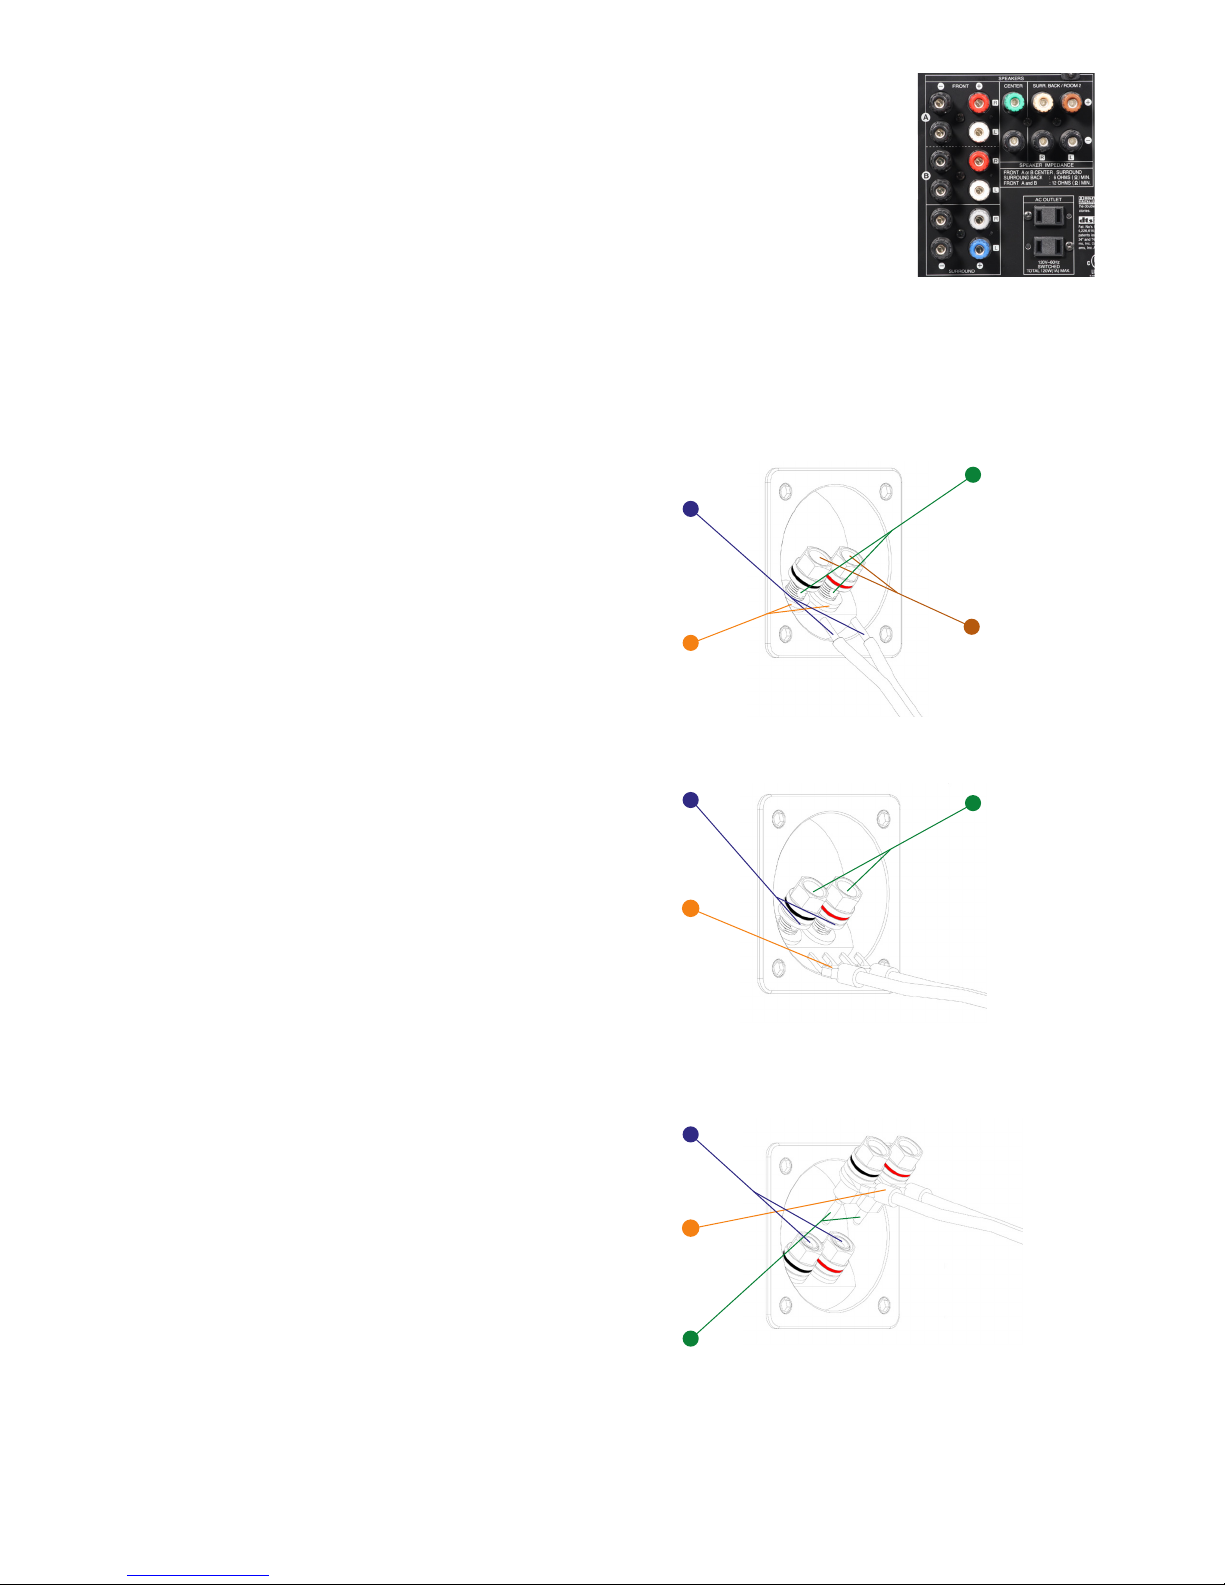
Step 2
Leave washer down.
Step 1
Bare ends of speaker wire.
Step 3
Insert bare end of
wire through exposed
hole on binding post.
Ensure positive wire
from Amp is in red
connector.
Step 4
Tighten nuts with sup-
plied plastic wrench.
Step 1
Lift washer.
Step 2
Ensure positive wire
from Amp is in red
connector.
Step 1
Tighten nuts with
supplied
plastic wrench
Step 3
Insert banana plug.
Step 3
Tighten nuts with sup-
plied plastic wrench.
Spade Lug (1/4-inch spade)
Bare Wire
Banana Plug (3/4-inch spacing)
Step 2
Insert spade into slots
in binding post.
Ensure positive wire
from Amp is in red
connector.


Axiom Audio Head Office: 2885 Highway 60
Dwight, ON Canada
P0A 1H0
Toll Free (North America): 1-888-352-9466
Worldwide: 1-705-635-2222
Email: info@axiomaudio.com
www.axiomaudio.com