Azurite D35C User manual

1

Introduction
2
Introduction
Dear customer:
Thank you for purchasing a Azurite D35c telephone; we appreciate your trust in us.
This product was manufactured with the upmost care, should you encounter any difficulties during its
use, we recommend that you refer to this user guide. You can also find information on the following
site: http://www.phones4telkom.co.za
For your comfort and safety, we ask that you read the following paragraph carefully:
Recommendations and safety instructions
•Your DECT telephone must not be installed in a humid room (wash room,
bathroom, laundry room, kitchen, etc.) unless it is 1.50 m away from a water point,
or outside. Your telephone must be operated at temperatures ranging from 5°C to
45°C.
•Only use the supplied power adapter, connect it to the base socket according to
the installation instructions provided in this booklet and the indications on the
identification label affixed to it (voltage, current, electric network frequency). As a
safety measure, you can use the power adaptors to cut off the 230V current in
case of danger. They must be located near to the device, and must be easily
accessible.
•This telephone was designed for use on the public switched telephone network
(PSTN). In case of a problem you must first contact your reseller. Only use the
supplied telephone cord.
•For your personal safety, never place your handset on the base without the
batteries, or without the battery cover, you could get an electric shock.
•To avoid damaging your handset, only use certified rechargeable AAA batteries
NiMH 1.2 V 600 mAH, never use non rechargeable batteries. Insert the batteries
in the hand- set battery compartment respecting polarity.
At the end of their useful life, batteries must be disposed of responsibly, e.g. at
appropriate collection points provided by your local authority.
•Your DECT telephone has an inside radio range of about 50 metres and up to 300
metres in open space. The immediate presence of metal parts (of a television for
example), or of any electric appliance may result in range reduction.
•Some sensitive medical equipment and safety equipment may be affected by the
radio-frequency transmissions of your telephone. In all cases, we ask that you
respect the safety recommendations.
•In areas where storms are frequent, we recommend that you protect your
telephone line using a surge protection device.
This equipment does not function in the case of an electric network shutdown: For
the emergency calls, use a self-contained cord telephone.
•The CE marking certifies that the product meets the essential requirements of
Directive 1999/5/CE of the European Parliament and of the Council pertaining to
microwave radio equipment and telecommunication terminal equipment, for the
safety and health of users, for electromagnetic interference. Furthermore, it
efficiently uses the frequency spectrum attributed to ground and spatial
communication to prevent damaging interference.

Introduction
3
Recommendations and safety instructions2
Your telephone ......................................5
Unpacking................................................5
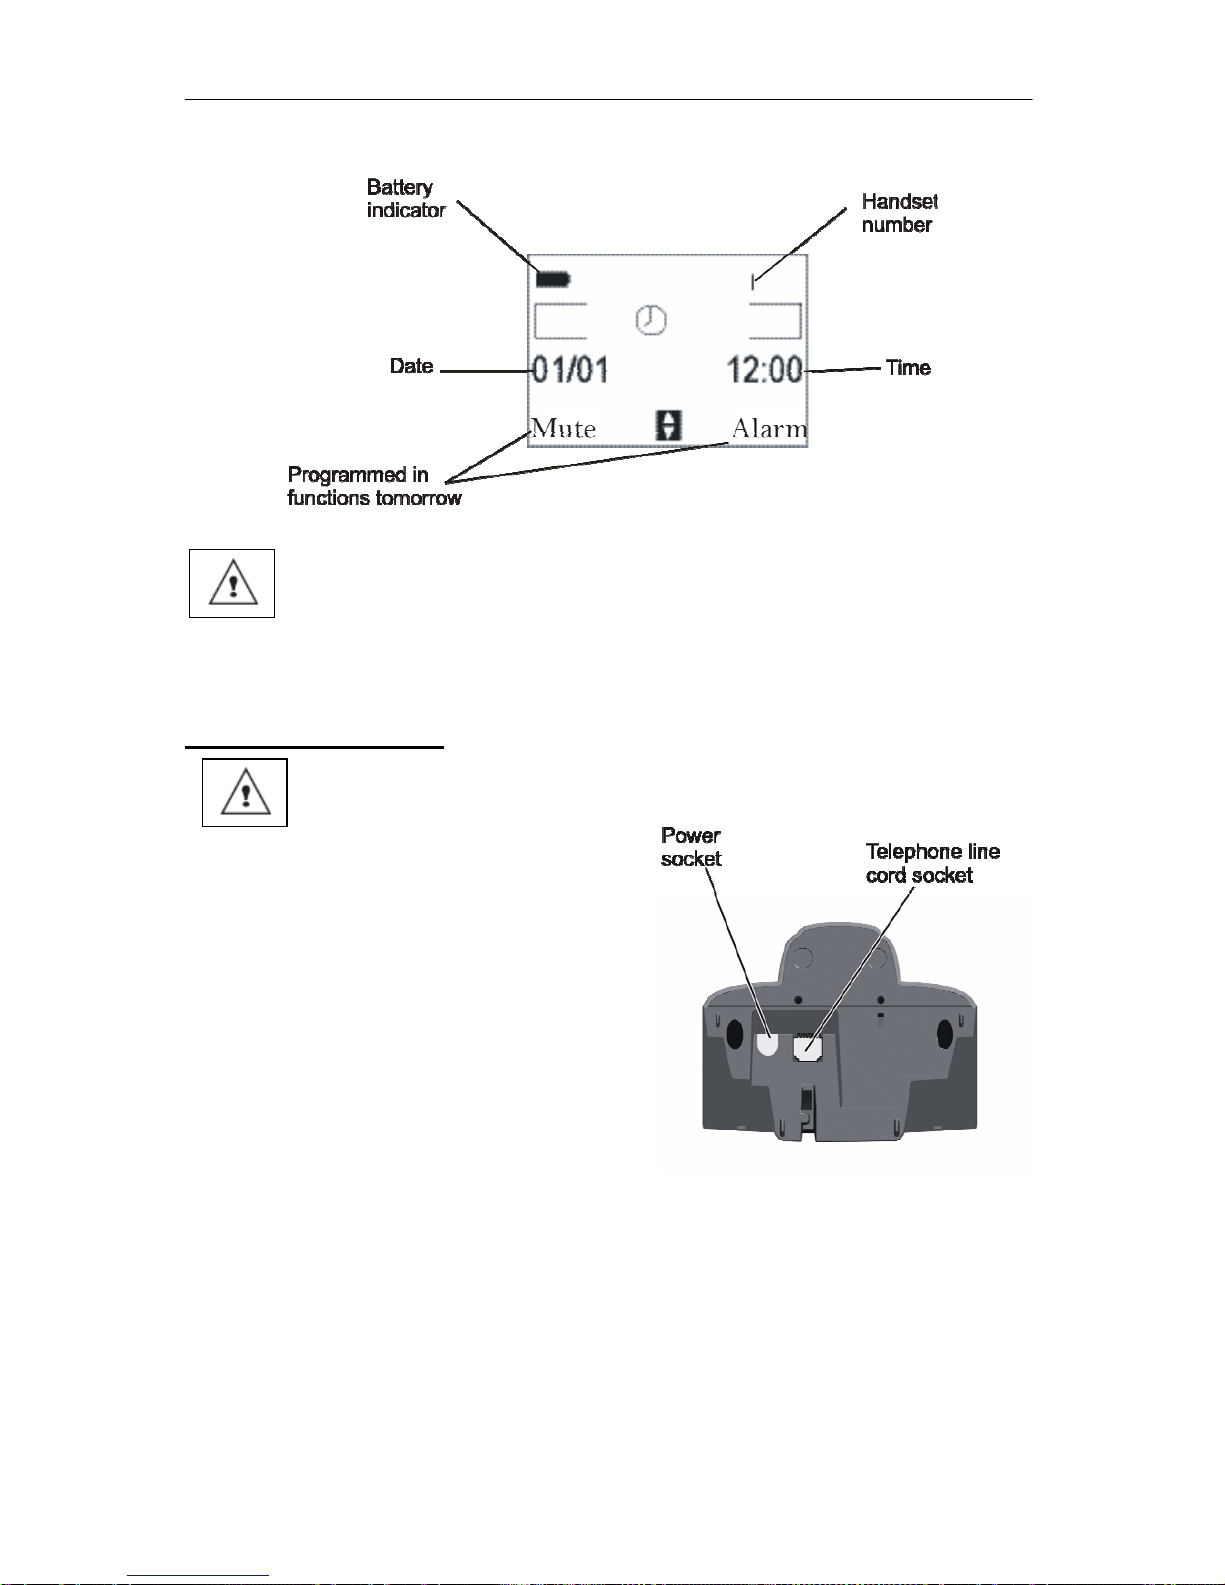
Your base ................................................5
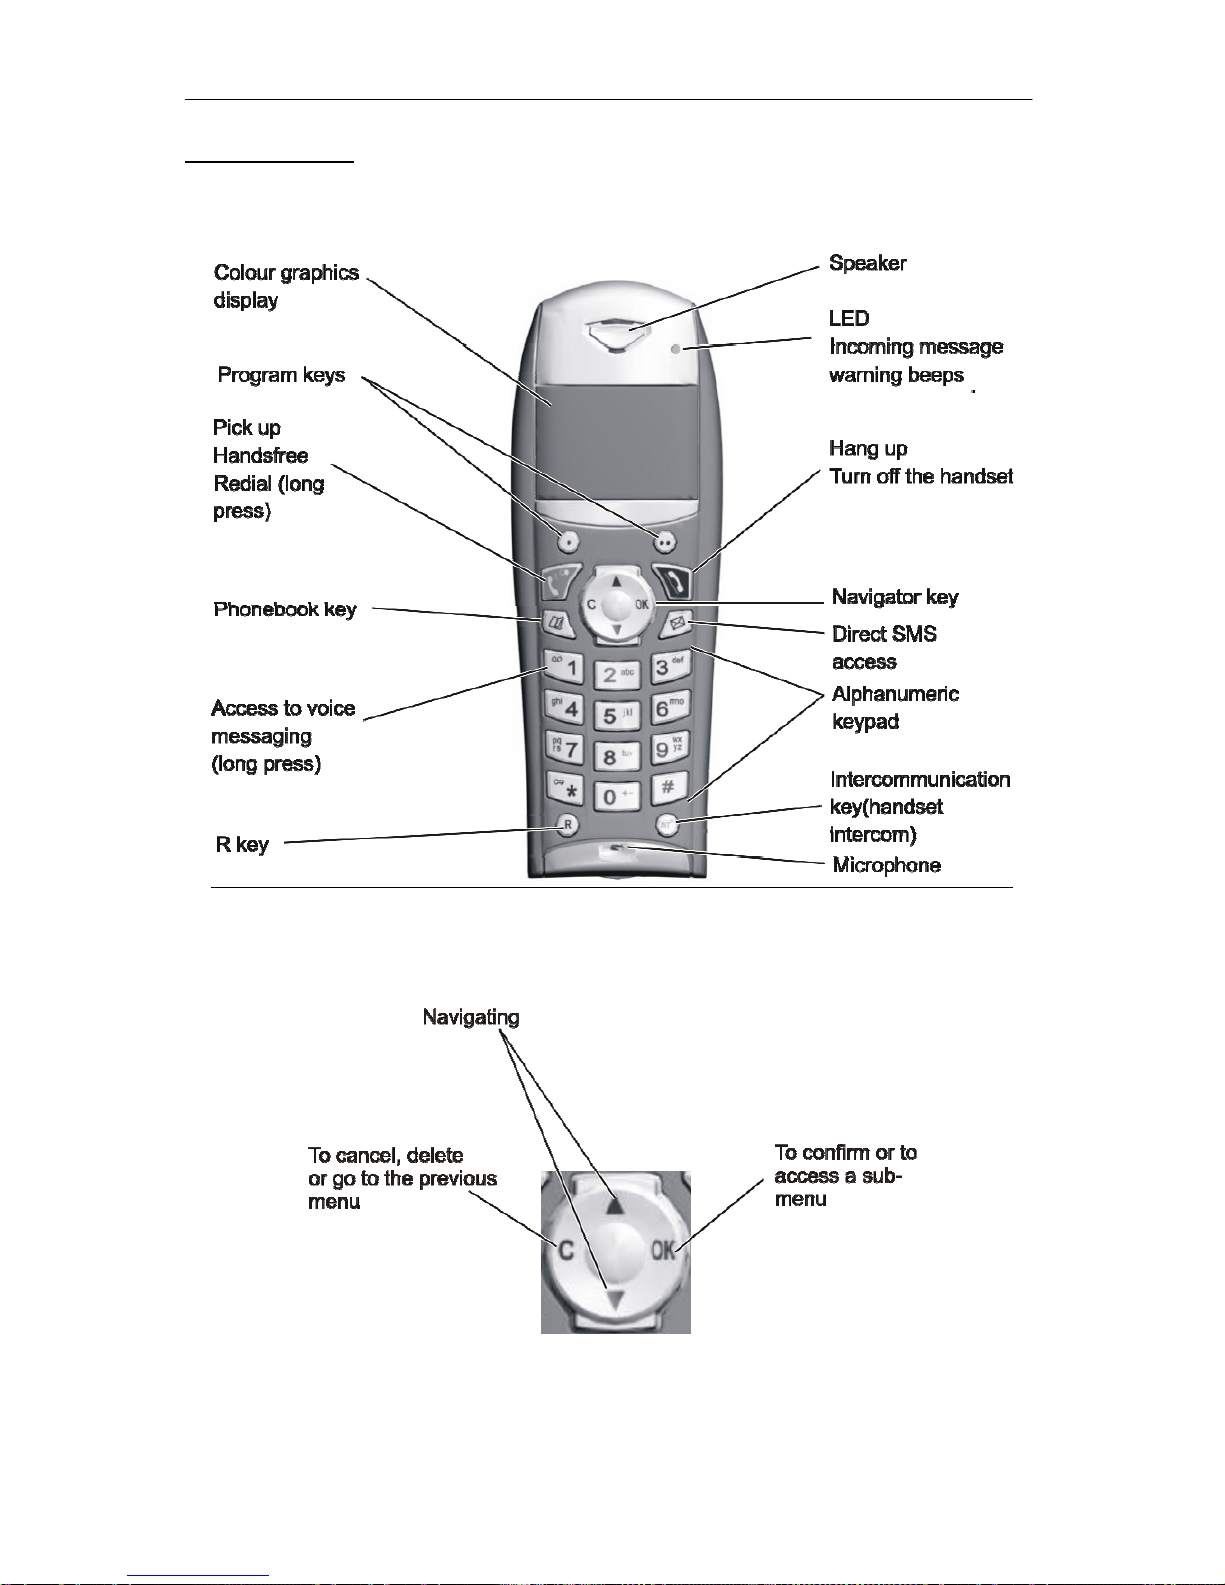
Your handset ...........................................6
Connecting the base................................7
Handset set-up ........................................8
Handset turning on and off ......................8
Replacing the batteries............................8
Making a call............................................9
Receiving a call .......................................9
During a call.............................................9
Hands free ...............................................9
Call transfer .............................................9
During a call...........................................10
Accessing the phonebook or call log .....10
Secret mode ..........................................10
Ending a call ..........................................11
Communication between two handsets .11
Menu structure.....................................12
Your phonebook..................................14
Viewing the phonebook .........................14
Creating an entry ...................................14
Using a phonebook entry to place a call 15
Searching for a contact..........................15
Performing a quick search.....................15
Performing a refined search ..................15
Editing an entry......................................15
Deleting an entry ...................................16
Sending a SMS from phonebook...........16
SMS service .........................................17
SMS service ..........................................17
Sending a text message ........................17
Writing a text message__ ......................17
Making a correction ...............................17
Capital letters/Small letters....................18
Special characters .................................18
Sending an SMS....................................18
To transmit message .............................18
In the event of a delivery failure.............18
Reading a message...............................19
Managing read messages .....................19
Modify the SMS mode ...........................19
Viewing the memory status....................20
Emptying an SMS folder........................20
SMS settings........................................21
Modifying the SMS centre numbers.......21
Choose the SMS transmission centre ...21
Modifying the terminal number ..............21
SMS boxes ............................................22
Sub-Addressing .....................................22
Creating a personal box.........................22
Viewing a message from a personal box23
Modifying or removing a personal box...23
Call log..................................................24
Viewing the received and dialled call log24
Calling the last number dialled (Redial) .24
Calling a number listed in the dialled and
received call log.....................................24
Viewing the events log...........................24
Activate/deactivate the new events
information screen .................................25
Accessories .........................................26
Alarm clock ............................................26
Setting the alarm clock ..........................26
Activating or deactivating the alarm
clock ......................................................26
Modifying the alarm clock time ..............26
Changing the alarm clock ring tone .......26
Timer .....................................................26
Changing the programmed time of the
timer.......................................................27
Changing the timer ring tone .................27
Displaying or hiding the programmed
time of the timer.....................................27
Birthday alarms......................................27
Adding a new birthday alarm ................27
Viewing a birthday alarm .......................27
Modifying or deleting a birthday alarm...28
Monitoring a room..................................28
Ring tones............................................29
Changing the ring tones.........................29
Activating or deactivating the beeps ......29
Activating/deactivating the silent mode..29
Settings ................................................30
Modifying the date and time...................30
Using the auto hang up and pick up
features..................................................30
Modifying the Voice box number ...........31
Modifying the language..........................31
Security..................................................32
Locking/unlocking the keypad................32
Programming an emergency number ....32
Defining the call time limit ......................32
Defining forbidden prefixes - Call barring33
Modifying the base code........................34
Authorising listening in...........................34
Handset settings....................................35

Contents
4
Registering a new handset to a base ....35
Modifying the base preference ..............35
Resetting the handset............................36
Personal registering...............................36
Base settings .........................................37
Using a handset to put the base in
registration mode...................................37
Resetting the base.................................37
De-registering a handset .......................38
Renaming the base ...............................38
Line settings ..........................................39
Modifying the network type....................39
Modifying the dialling mode ...................39
Modifying the flash duration (R key) ......39
Setting a PABX prefix ............................40
Appendix..............................................41
Care and Maintenance ..........................41
Problems ...............................................41
Features................................................42
Environment.........................................43
Packaging..............................................43
Batteries ................................................43
The product ...........................................43
Warranty...............................................44

Your telephone
5
Your telephone
Unpacking
Place the box in front of you, open it and make sure it contains the following items:
•one base,
•one handset,
•one battery compartment cover,
•one power supply,
•one telephone line cord,
•three rechargeable batteries,
•this user guide.
In the case of purchasing a pack duo or trio, you will find in addition for each additional handset:
•a handset,
•a base,
•a power supply,
•a battery compartment cover,
•three rechargeable batteries.
Your base
The simple but functional base design fits well into the home environment.

Your telephone
6
Your handset
With its user-friendly design, you will appreciate how easy it is to hold and its quality during
conversations.
The navigator key, a rapid feature selection tool.

Your telephone
7
The visual display of your handset
When the battery charge icon is at minimum, your screen will not be lit and the
volume level of the hands-free function will be decreased until the battery is
recharged.
Connecting the base
Before making any connections, please refer to the safety instructions presented at the beginning
of this user guide.
On the bottom part of the base, click in the
telephone jack in its socket (as shown on the
drawing) and connect the other end of the lead to
the wall telephone socket.
Connect the end of the mains power unit lead to
the bottom of the base and the mains power unit
to the mains socket. The mains on indicator
located on the base comes on green.
Route the wires in the guides and put the base in
the required position.

Your telephone
8
Handset set-up
Refer to the illustration and insert the three
batteries ensuring that the battery polarity is
as shown on the label in the handset.
Replace the battery compartment cover and
make sure it is completely closed.
Remove the protective film on the screen,
place the handset on the base to fully charge
the batteries.
The charging icon appears on the screen, it
indicates the charging status. Once the icon is
full, your batteries are charged.
Only use certified rechargeable batteries. For optimal battery charge, leave
the handset on the base for at least 12 hours during initial use. During
charging, the batteries may heat up, this is quite normal and without risk.
Handset turning on and off
To turn off the handset, hold down the red key , The "POWER OFF" message is displayed on
the screen. Your handset is now switched off.
To turn on your handset, hold down the green key . The name TELKOM is displayed on the screen
.
Information is displayed on the screen, including the battery charging indicator icon, the handset number (for
example 1), the date, the time and the programmed function of the two keys (default Mute and Alarm).
Replacing the batteries
Hold down the red key , to turn off the handset. Place it face down so that the battery
compartment is accessible.
Press on the indent on the compartment battery cover and slide the cover downwards.
Remove the old batteries and insert the new batteries one by one ensuring that the polarity of the
batteries is as shown on the label inside the battery compartment.
Place the cover back on the battery compartment and push upwards until it is completely closed.
At the end of their useful life, batteries must be disposed of in a responsible manner.
To avoid damaging your handset, only use certified rechargeable AAA batteries NiMH 1.2
V 600 mAH, never use non rechargeable batteries.

Getting started
9
Getting started
A language selection screen is displayed. The
default language is English. If another language
is required, press or until the required
language is displayed. Press Valid.
Contact your service provider to find out
which services are available (caller
display service, SMS, etc.) and the
charges involved. Dial 10219 for further
information.
Making a call
Enter the number of your contact using the
keypad keys.
If you enter an invalid digit, press Con the
navigator key , to erase the incorrect digit.
Press the green key on your handset to
make the call.
You can also make a call by:
- Pressing the green key to access
the line.
- Dialling your contact's number.
During communication, you can increase
or decrease the audio volume of your
handset by pressing the or key on
the navigator.
Receiving a call
When you receive a call your telephone rings. If
you have subscribed to Telkom’s "Caller display"
service, the caller's information appears on the
screen (unless your caller has enabled the
anonymous mode), otherwise the "UNKNOWN"
screen is displayed. Note that IdentiCall is
Telkom’s Caller display service, ring 10219 for
further information.
Pick up by pressing the green key .
At the end of the conversation, press the red
key .
During a call
During a call, numerous options are accessible
by pressing Menu
Select the desired option in the following list:
- HANDSFREE: to activate the handset speaker.
- CALL TRANSFER: to transfer the call to
another handset.
- SECOND CALL: to make a second call.
- PHONEBOOK: to access the phonebook.
- CALLS: to access the call log.
-SECRET: to mute the handset microphone.
Hands free
While having a conversation with your contact,
you can enable the handset loudspeaker. Press
Menu .
Select HANDSFREE. Press Activ. .
When pressing the green key while
engaged in a conversation you
automatically activate the handsfree mode
of the handset, by pressing it again you
deactivate the handsfree mode.
When the battery charge icon is at
minimum the hands-free function is turned
off until the battery is recharged.
The message HANDSFREE ACTIVATED
appears on the screen. Increase or decrease the
audio volume using or .
Call transfer
This function is only accessible when two
handsets or more are registered to the same
base. You can now transfer the call in progress
to another hand set.
During communication, press Menu
Select CALL TRANSFER using or . Press
Valid.
Select the handset you want to call using or
. Press Call The handset called rings,
once someone picks up transfer the call by
pressing the red key .

Getting started
10
To retake the call before it is picked up by the
handset called, press Menu
Select HANGING UP using or . Press
Valid.
During a call
During a call, you can receive a second
incoming call or place a call to a second contact.
You can then switch from one contact to the
other, or have a conference (depending on your
service provider and subscription).
Receiving a second call whilst on line
During the call, a beep is transmitted to your
telephone by your service provider to let you
know that you have a second call waiting.
Press + to take this new call.
Your other caller is then put on hold and you can
talk with your second caller.
Making a second call whilst on line.
During a call, you can put your contact on hold
and call a second one by pressing Menu .
Select SECOND CALL using or . Press
Valid .
Select your contact's telephone number in the
phonebook by pressing and press Valid.
or dial the number using the keypad and
press Call .
The second call is then launched, with the first
call still on hold.
To alternate from one call to the other
Press Menu
Select SWITCH using or . Press Valid .
The call in progress is put on hold, and you can
then take the second call.
To end one of the calls and continue the
other one
Press Menu
Select SWITCH using or . Press
Valid .
The call in progress is definitely terminated, and
you can then take the second call.
To set up a 3 way-call (the two parties and yourself)
Press Menu
Select 3-PARTY CONF using or . Press
Valid .
You can then talk to both parties simultaneously.
To end the 3 way-call, press the red key .
Dual incoming call management can also be
done via the R key :
- Accepting a second incoming call:
.
Making a second call during communication :
+ recipient number.
- Alternating from one call to the other
.
- Ending a call and switching to the call on hold:
.
- Setting up a 3 way-call :
Accessing the phonebook or
call log
During a call, you can access your phonebook to
look up a telephone number, a name contained
in an entry or information on calls stored in your
call log.
During a call, press Menu .
Select PHONEBOOK or CALLS using or .
Press Valid .
Return to the communication menu using .
Secret mode
You can switch to secret mode at any time
during your conversation. Your handset
microphone will be switched off and the other
person will not be able to hear you.
To activate secret mode:

Getting started
11
During a call, press Menu
Select SECRET using or . Press
Activ. .
The SECRET MODE message will appear on
the screen.
To deactivate secret mode:
Press Exit .
Your correspondent will be able to hear you
again.
You can also choose to deactivate the
secret mode by the C key on the
navigator panel.
Ending a call
At the end of the conversation, press the red
key
Communication between two
handsets
To communicate between handsets,
both handsets must be matched to a
single base, and must be within range
of the base.
To call another handset, press the key.
Select with the desired handset with the or
keys. Press Call
The handset rings. Pick up on the second
handset using the green key .
To end the call, press the red key

Menu structure
12
Menu structure
You can navigate through the menus using the navigator key .
PHONEBOOK VIEW
Option
CALL
EDIT
SEARCH
RING TONE
SEND SMS
ADD NUMBER
NEW ENTRY
DELETE
INCOMING CALLS
CALLS
OUTGOING CALLS
EVENTS
SMS CENTERS
EDIT SMS
SMS
READ SMS
MEMORY
EMPTY BOX
SETTINGS
ALARMACCESSORIES
TIMER
BIRTHDAY
ROOM MONITOR.
EXTERNALCALL
RING TONE
INTERNALCALL
BEEPS
SILENT MODE
SUB-ADDRESS
PRIVATE BOX

Menu structure
13
PROGRAM KEYSSETTINGS
DATE/TIME
AUTOHANGUP
AUTOPICKUP
VOICE BOX No
LANGUAGE
ADVANCED SET.
NETWORK TYPE
DIAL
FLASHING
PABX PREFIX
SET LINE
BASE PRIORITY
RESET HANDSET
PERSON. REGISTR
REGISTR. MODE
DELETE HANDSET
RESET BASE
SET BASE
RENAMEBASE
SET HANDSET
TIME LIMIT
RESTRICTION
CHANGE CODE
INTRUSION
SECURITY
EMERGENCY
KEYPAD LOCK
REGISTRATION
SET SMS

Your phonebook
14
Your phonebook
You can store 100 phonebook entries in your
phonebook.
Each phonebook entry can contain the name
of your contact which can be a maximum of 12
characters long (spaces included), your
contact's telephone number up to 24 digits and
an icon identifying the type of number (work,
home, mobile...).
You can associate a unique ring tone to each
entry and thus create your own call groups. (To
use this service, the caller id service must be
activate on your line.).
Viewing the phonebook
On the navigator key , press or until
the PHONEBOOK screen is displayed, press
OK to confirm (you can access the phonebook
directly using the key ).
The list of phonebook entries organised in
alphabetical order appears.
The first time you access your
phonebook, only the New element
appears in the list.
Select the entry you want to view using
or . Once you have selected it, press OK to
confirm.
You can call the number that is associated to
the entry directly by pressing the green key
.
Once the entry appears on the screen,
press ., to display all of the available
actions that can be executed via the
phonebook entry :
- CALL: to call the number associated to the
entry.
-EDIT: to edit the entry (name, number, icon).
-SEARCH: to search for another entry.
- RING TONE: to assign a unique ring tone to
your handset that will be used each time this
number calls you (caller display service
mandatory).
-SEND SMS: to send an SMS to a number
associated to the entry.
- ADD NUMBER: to enter a new number for
the same name.
- NEW ENTRY: to create a new entry in the
phonebook.
- DELETE: to delete the entry from your
phonebook.
- VIEW: to view the entry data.
Select the action you wish to perform using
or . Press Valid. .
To exit the phonebook, press the red key .
Creating an entry
Alphanumeric keypad key correspondence.
1
A, B, C, a, b, c, 2
D, E, F, d, e, f, 3
G, H, I, g, h, i, 4
J, K, L, j, k, l, 5
M, N, O, m, n, o, 6
P, Q, R, S, p, q, r, s, 7
T, U, V, t, u, v, 8
W, X, Y, Z, w, x, y, z, 9
специальные символы (см. Таблицу на
стр.19)
пробел, +, @, -, $, &, %, 0, /
#, ''. : ; ! ? ' ( ) _
To enter text press successively on the desired
key until the letter is displayed on the screen.
On the navigator key , press or until
the PHONEBOOK screen is displayed, press
OK to confirm.
Select New. Press Valid .
The name input screen appears.
Using the keypad keys, enter the name of your
contact by pressing successively on the
corresponding keys. In case of a mistake,
press Cto erase one character at a time.
Once you are done making your changes,
press Valid .
The number input screen appears.
Now, enter the number of your contact using
the keypad keys. In case of a mistake, press C
to delete one digit at a time.

Your phonebook
15
Once you are done making your changes,
press Valid .
Select an icon for this number, usingor to
specify the type of number:
: HOME : MOBILE
: WORK : FAX
Once the icon is selected, press Valid.
A new entry is created. It appears in the
phonebook list. The name of this entry
corresponds to the beginning of your contact's
name which is preceded by a type icon.
Using a phonebook entry to
place a call
On the navigator key , press or until
the PHONEBOOK screen is displayed, press
OK to confirm.
The list of alphabetical phonebook entries
appears.
Select your contact using or .
Press the green key to make the call.
Your handset displays the number of your
contact and dials this number automatically.
Searching for a contact
When referring to your phonebook, you can
search for a contact by:
•navigating through the list using , ,
•using quick search,
•using refined search.
Performing a quick search
Access your phonebook list, press and release
the keypad key which corresponds to the first
letter of the name you are searching for until
the letter appears in the bottom right of the
display. Once the first letter of the name is
displayed, wait a moment.
The phonebook selects the first name in the list that
starts with the selected letter.
Press or to select the specific entry that
you wish to view or call, press OK to confirm.
Performing a refined search
In the phonebook menu, press Option .
Select SEARCH using or . Press
Valid. .
Using the keypad, enter the first three letters of
the contact you are searching for.
The phonebook positions itself to the entry
which comes closest to those two characters.
Press or to select the specific entry that
you wish to view or call, press OK to confirm.
Editing an entry
To edit a phonebook entry (change the name,
the number and/or the number type icon),
enter the phonebook, select the entry you want
to edit and confirm using OK to display it on
the screen.
Once the entry is displayed on the screen,
press Option .
Select EDIT using or . Press Valid. .
You enter the name input screen. The cursor is
at the end of the name.
•The information is accurate. Press Valid.
.
•To correct the name, press Con the
navigator key to delete characters.
Make your corrections using the keypad
keys by pressing successively on the
corresponding keys. Once you are
finished, press Valid. .
You enter the number input screen. The cursor
is at the end of the number.
•The information is accurate. Press Valid.
.

Your phonebook
16
•To correct the name, press C on the
navigator key to delete the numbers.
Enter the new number and press Valid. .
Select the icon according to the type of number
entered using or . Press Valid. .
To exit the menu, press the red key .
Deleting an entry
To delete an entry, enter the phonebook,
select the entry, press Option .
Select DELETE using Press Valid. .
A confirmation screen asks you if you wish to
delete the entry.
•If you do not wish to delete the entry,
press No .
•To delete the entry, press Yes . The
entry is deleted from the phonebook.
To exit the menu, press the red key .
Sending a SMS from
phonebook
On the navigator key , press or until
the PHONEBOOK screen is displayed, press
OK to confirm.
Select the contact using , keys or keypad,
enter the first three letters of the contact. Press
or to select the specific entry then press
Option .
Select SEND SMS using or . Press
Valid. .
A text input screen appears. refer to paragraph
Sending a text message17.

SMS service
17
SMS service
SMS service
You can use your DECT telephone to send,
receive and track SMS messages. You can
send SMS messages either another fixed
SMS-capable telephone or a mobile telephone.
You must subscribe to your Network
Providor’s Caller Display and SMS
Messaging services so that you can
use the SMS Service and you must not
withhold your telephone number.
The Telkom Caller Services required
are IdentiCall and Home SMS. Call
10219 for further details.
If you register for SMS Messaging,
messages to your number will be
delivered in text. If you are not
registered for text messaging,
messages to your number will be
converted to voice and delivered to
your number as voice calls.
Sending a text message
On the navigator key , press or until
the SMS screen is displayed, press OK to
confirm ( can also be used to directly
access the SMS menu).
Writing a text message__
Once in the SMS menu, press or until
the EDIT SMS appears. Press Valid. .
Use the , keys to select either
COMMON BOX or a personal box if one has
been created. Press Valid. .
The SMS will be sent to the box selected.
If no personal box has been
created, only the shared box
(Common Box) is displayed on the
screen.
To create a personal box, select
PersoBox Menu and press Valid. .
Follow the instructions displayed on
the screen. For further details, refer to
the paragraph Creating a personal
box.
Enter the code of the box, if you have selected
a personal box. Press Valid .
A text input screen appears.
Using the keypad keys, enter the text
message by pressing successively on the
corresponding keys. The default setting for
characters is lower case. Press for 20
seconds to switch between lower (abc) and
upper (ABC) case. For an alternative
method see Capital letters/Small letters on
page 18.
The sequence for each key is shown below.
Whether it is upper or lower case depends
case selected as described above. See also
Special characters on page 18.
', 1, #, ,, ., :, ?, _, *
a, b, c, 2
d, e, f, 3
g, h, i, 4
j, k, l, 5
m, n, o, 6
p, q, r, s, 7
t, u, v, 8
w, x, y, z, 9
special characters
space, 0, /, +, @, -, $, &, %
#
To enter text press successively on the desired
key until the letter is displayed on the screen.
Making a correction
If you enter the wrong letter, press Con the
navigator key to delete one character at a
time.
You can also move through the text to delete
characters or insert new ones as follows:
Use or to move through the text. Once
you have reached the location where you want

SMS service
18
to insert or delete a character. Press
Select .
Select INSERT CHAR. or DELETE CHAR.
using or , depending on the operation you
want to carry out. Press Valid. .
Capital letters/Small letters
When writing your message, you can enter
capital letters or small letters.
During the SMS input, press Select .
Select CAPITAL LETTER or SMALL LETTER.
Press Valid. .
Special characters
During the writing process, certain special
characters are accessible by doing the
following.
Press the button, the first line of the special
characters list is displayed. Using or and
the keypad numbers, select the desired
character, use to confirm.
List of special characters:
Sending an SMS
Once you are done writing your text message,
press Select to select the type of delivery.
You can choose between the following options:
- SEND: to send a message.
- STORE: to save your text as a draft. It can be
sent at a later time. The draft message is
archived in the "DRAFT" box.
- CANCEL: to permanently delete the text
message that you just entered.
To transmit message
Select SEND using or . Press Valid. .
Enter or search for the receiver's number.
Enter the number using the keypad. Press
Valid. .
or
If the receiver is listed in the phonebook as one
of your contacts, press the Phonebook key and
navigate to the required contact. Press
Valid. .
A confirmation screen appears. It indicates the
type of transmission and the number to which
your message will be sent.
•If the information is accurate. Press
Confirm . A message appears on the
screen indicating that the transmission of
your SMS is in progress.
•To change the phone number, edit or
modify your text message, press
Modify . Press Edit .
At the end of the transmission, you can save a
copy of your message. It will be stored in the
Sent SMS folder.
To save the message, press Yes .
If you do not want to save the message, press
No .
In the event of a delivery
failure
An information screen appears indicating that
your service provider was unable to deliver
your message.
Press CONT. .
Different options come up on the screen:
- SAVE: to save your text in draft form. Once it
is saved, you will be able to resolve the
potential problems and send your message at
a later time without having to enter it again.
-TRY AGAIN: to attempt a new delivery.
- DELETE SMS: to permanently delete your
SMS.

SMS service
19
- SEE RECEIVER: to check the phone number
or send the SMS again.
- EDIT: to change the delivery type and
number or your text.
Choose an action using or . Press
Valid. .
Reading a message
Your telephone has 4 different folders in which
your SMS messages are stored.
- NEW: contains the unread messages.
- INBOX: contains the read messages that you
have chosen to keep.
- SENT: contains the copies of sent messages
that you saved.
- DRAFT: contains the messages that you
wrote and that have not been sent out.
On the navigator key , press or until
the SMS screen is displayed, press OK to
confirm.
Select READ SMS using or . Press
Valid. .
Select a send box, press Valid. .
If no personal box has been created,
only the shared box is displayed on
the screen.
To create a personal box, select
PersoBox Menu and press
Valid. . Follow the instructions
displayed on the screen. For further
details, refer to the paragraph
Creating a personal box.
Enter the code of the box, if you have selected
a personal box. Press Valid. .
A list of the different folders appears. The
number of messages contained in each folder
is displayed in brackets.
Using or , select the folder containing the
message you would like to view. Press
Valid. .
The list of messages contained in the folder is
then displayed, starting with the most recent
message to the oldest one.
•The first 4 numbers indicate:
•the arrival time (in 12:00 format) for the
messages received during the current day,
•the arrival date (in 30/01format) for
messages received previously or prior to
the current day.
The following characters indicate the sender of
the message if he/she is known.
Select the message you would like to view
using or , press OK to confirm.
The written message is displayed on the
screen.
According to the SMS mode selected, using
and or and to scroll the text on the
screen.
To return to the beginning of the message
press .
To return to the list of messages, move to the
beginning of the message and press .
Managing read messages
Once the message has been read, press
Select and select:
- REPLY: to write an SMS in response to the
message received (the receiver number of the
new SMS will automatically be entered).
- ARCHIVE: to keep this message. It will be
stored in the "Inbox" message folder.
- TRANSMIT: to forward this message to a
new recipient. You will be able to modify the
original message.
- CALL: to call the SMS sender number.
- STORE NUMBER: to save the SMS sender
number in your phonebook.
- SMS MODE: Allows to display the message
on one or two lines manually or automatic.
- DELETE: to permanently delete this SMS.
Select the desired option usingor . Press
Valid. .
Modify the SMS mode
You can also read your message with different
read modes. Three modes are available :
- AUTO SCROLL: automatic scrolling,

SMS service
20
- MANUAL SCROLL: manual scrolling,
- 2 LINES: the text is displayed in 2 lines.
To activate one SMS mode, press Select .
Select SMS MODE using or . Press
Valid. .
Viewing the memory status
You can store 30 different SMS messages.
These can be indiscriminately distributed
between the various folders.
Once the maximum storage capacity
is reached, you cannot receive new
SMS. To receive new message,
please delete some of the stored
messages.
On the navigator key , press or until
the SMS screen is displayed, press OK to
confirm.
Select MEMORY using or . Press
Valid. .
A screen informs you as to the number of
messages contained in each folder (new,
inbox, sent and draft). It also indicates the total
number of messages stored and the amount of
space available.
To exit the memory information screen, press
Return .
Emptying an SMS folder
This function is used to delete all the
messages contained in a folder. To delete the
messages one by one refer to paragaph
Managing read messages.
When you empty an SMS folder,
all messages linked to a personal
box will not be erased
On the navigator key , press or until
the SMS screen is displayed, press OK to
confirm.
Select EMPTY BOX using or . Press
Valid. .
Select the folder you want to empty by
pressing or . Press Valid. to delete all
messages in the selected folder.
A delete confirmation screen appears.
•Press No if you do not want to empty
the folder.
•Press Yes to empty the folder.
To exit the menu, press the red key .
Table of contents