Congratulations and thank you for
purchasing a professional tube ampli-
er from Bad Cat. As with all Bad Cat
products, your amplier is designed from
the ground up to provide the very best
tones possible in a rugged, reliable pack-
age. Each one of our pro quality models is
constructed with Bad Cat’s commitment
to making the highest quality, hand-built,
American-made ampliers.
CAUTION
With a little care and caution, your Bad
Cat amplier should provide you with
years of trouble-free operation and
enjoyment. Please avoid damp areas and
moisture during operation of the amp
and in storage. This includes placement
of beverages near or on the amp that
could spill into the amp’s chassis. Liquids
can easily damage tubes, switches and
other parts. Immediately disconnect the
amp from power source should a spill
occur and dry the amp thoroughly prior
to switching on the amp again. Drying
may require the complete removal of the
chassis from the cabinet and the removal
of the tubes for cleaning. Avoid tipping the
amp, using it in unbalanced positions, or
lifting it unassisted to awkward heights. A
little common sense will go a long way in
making sure the amp does what it’s sup-
posed to do: provide you with dependable
operation and great tone on a consistent
basis.
GROUNDING
Please check thoroughly that the ground
tip on the power cord plug is connected to
true ground prior to operation of your Bad
Cat amp. Using unfamiliar junction boxes
can cause potentially dangerous oating
grounds. Please do not cut or defeat the
ground tip.
FOR YOUR RECORDS, YOU MAY WISH TO RECORD THE FOLLOWING INFORMATION.
SERIAL NO._____________________ INVOICE DATE______________________
Last updated: March 12, 2014 - Rev. 08
LIMITED LIFETIME WARRANTY
Bad Cat Ampliers has a limited lifetime warranty on select amps and cabs agains work-
manship or defect. The warranty excludes pedals, The Unleash and accessories.The war-
ranty does not cover tubes, speakers or cosmetic damage, wear and tear, or abuse. This
warranty is transferable. Modifying or altering the amp in any way voids the warranty.
Shipping to and from the warranty repair center is the responsibility of the customer.
We have a new Lifetime Warranty on all new amps leaving the factory. We are extending
the Limited Lifetime Warranty to all of our pre-acquisition amps for $349. Simply send
the unit back to us with an approved RMA number, and we will have one our technicians
go through it from the ground up. Shipping to and from the warranty repair center is
the responsibility of the customer. For more information please contact us at sales@
badcatamps.com or directly at 1-800-730-0966.
When returning merchandise to the factory, you must call for a return authorization num-
ber (RMA). Any items arriving without a proper RMA number will be rejected at customer’s
expense. Bad Cat Amps may update its warranty from time to time. When we change
the warranty in a material way a notice will be posted on our website along with the
updated warranty.
IMPORTANT!
FOR YOUR PROTECTION, PLEASE READ
THE FOLLOWING:
WATER AND MOISTURE: Appliance should
not be used near water (near a bathtub,
washbowl, kitchen sink, laundry tub, in a
wet basement, or near a swimming pool,
etc). Care should be taken so that objects
do not fall and liquids are not spilled into
the enclosure through openings.
POWER SOURCES: The appliance should
be connected to a power supply only of
the type described in the operating in-
structions or as marked on the unit.
GROUNDING OR POLARIZATION: Precau-
tions should be taken so that the ground-
ing or polarization means of an appliance
is not defeated.
POWER CORD PROTECTION: Power sup-
ply cords should be routed so that they
are not likely to be walked on or pinched
by items placed upon or against them,
paying particular attention to cords at
plugs, convenience receptacles, and the
point where they exit from the appliance.
SERVICING: The user should not attempt
to service the unit beyond that described
in the operating instructions. All other
servicing should be referred to qualied
service personnel.
FUSING: If your unit is equipped with a
fuse receptacle, replace only with the
same type fuse. Refer to replacement
text on the unit for correct fuse type.
This symbol is intended to alert
the user to the presence of
uninsulated “dangerous
voltage” within the product’s enclosure that
may be of sufcient magnitude to constitute
a risk of electric shock to persons.
This symbol is intended to
alert the user to the presence
of important operating and
maintenance (servicing) instructions in the
literature accompanying the appliance.
CAUTION
RISK OF ELECTRIC SHOCK
DO NOT OPEN
REFER SERVICING TO QUALIFIED SERVICE PERSONNEL!
THIS UNIT CONTAINS HIGH VOLTAGE INSIDE!
PHONE 800.730.0966
FAX 714.630.0106
INFO@BADCATAMPS.COM
WWW.BADCATAMPS.COM
140 Technology Drive Suite 500, Irvine CA 92618
BAD CAT HOLDINGS LLC. USA
Operating Manual
Hot Cat series
Copyright ©2014 Bad Cat Holdings LLC.USA. All rights reserved.
Tube Chart
hot CAt 15R
12AX712AX7 12AX7
EL84
12AX7
EL84
12AX712AX7 12AX7
GZ34
Outside View (Tubes Up)
Input Jack
Back Panel
Choke
Reverb
Transformer
POWER
TRANSFORMER
OUTPUT
TRANSFORMER
xx
Copyright ©2014 Bad Cat Holdings LLC.USA. All rights reserved.
Tube Chart
hot CAt 30R
12AX712AX7 12AX7
12AX7
12AX712AX7 12AX7
Outside View (Tubes Up)
Input Jack
Back Panel
Choke
Reverb
Transformer
POWER
TRANSFORMER
OUTPUT
TRANSFORMER
EL34 EL34 GZ34
xx
Copyright ©2014 Bad Cat Holdings LLC.USA. All rights reserved.
Tube Chart
hot CAt 50R
12AX712AX7 12AX7
12AX7
12AX712AX7 12AX7
SS RECT.
Outside View (Tubes Up)
Input Jack
Back Panel
Choke
Reverb
Transformer
POWER
TRANSFORMER
OUTPUT
TRANSFORMER
EL34 EL34
xx
TROUBLESHOOTING
Your new Bad Cat amplier is designed for many years of
professional trouble free operation. Common sense will tell
you that if you notice any severe abnormalities in operation
like burning smell, smoke, etc.; you need to shut down the
amp immediately.Always consult your Bad Cat dealer if you
are unsure of the problems that you are dealing with; i.e.,
take your amp to where you purchased it.
HELP SECTION
Amp Will Not Turn On
Check the power to the amp. Check for tripped circuit break-
ers, unplugged extension cords or power-strip switches that
may be turned off. Check the fuse. If a dark brownish color
or no wire can be seen within the glass tube, then replace.
The amp may be perfectly ne but occasionally a fuse may
blow because of high AC voltage surges. After the fuse has
been replaced with the proper Slow Blow value and if the
fuse fails again, the amp will require servicing.
Weak or No Output Level
Verify the signal output from your instrument rst. Check
guitar’s controls and that the cables are working properly.
Also, check any effects pedals that may be connected in
between the guitar and the amplier.
No Output with Power light On
Tubes damaged in shipping will be the primary reason for
your amp to not function properly. Please give us a call to
help guide you through this simple repair.
Keep Your Amp Looking New
Use a damp cloth to wipe the controls on the front & rear
chassis panels. Wipe the black vinyl covering with a damp
cloth.
Adverse Sounds-Hum, Whistle, Loss of Dynamics,
Feedback, Howling
Check loudspeaker cones, frayed guitar cables, controls on
your instrument, the guitar’s pickups and any other devices
that many be connected to your amplier such as effects
pedals or rack processors. Some of these devices are “am-
pliers” in their own right with gain and boosted volume
levels and they may cause hissing and unwanted feedback
if set too high in front of the amp. Shut down the amp and
check the tubes. Wait for the amp to cool down. Remove
the back panel of the amplier. Avoid handling hot tubes
as they can cause severe burns. Check the larger output
power tubes rst by carefully removing the tube shields
or loosening the clamps, and then unseat the tubes from
their sockets but note from which sockets you removed the
tubes. Inspect the integrity of the laments in the tubes. If
one or more of these tubes are bad, you will need to replace
the entire set of the power tubes. If all the tubes are OK, you
can eliminate the adverse sounds by swapping the location
of these tubes. If this fails to x the problem, you may need
to replace the entire set of power tubes with a new matched
set. Use of inferior quality (unrated) tubes may cause dam-
age to your amplier. You should also check the preamp
tubes, especially the rst input stage tube (far right if you’re
looking at the amp from the back). Microphonics (feedback
noise that cannot be controlled by turning down the volume
pot on you guitar) indicates a bad preamp tube(s). You may
want to swap the position of preamp tubes to see if this will
x the microphonics problem. Preamp tubes can go bad
without warning but can also last many years without any
problem whatsoever.
As you can see when handling tubes, they are sensitive, fragile and somewhat
prone to inconsistencies. Please handle your amp with care when transporting
it. Although your Bad Cat amp is sturdily built and designed to take years of
rugged use, the tubes are not. It’s always a good idea to keep extra tubes (both
preamp and output power tubes) handy, especially for performance situations.
An overwhelming majority of minor problems on tube amps are tube-related
and it’s just a matter of swapping one or more out to have your amp performing
like brand new again.
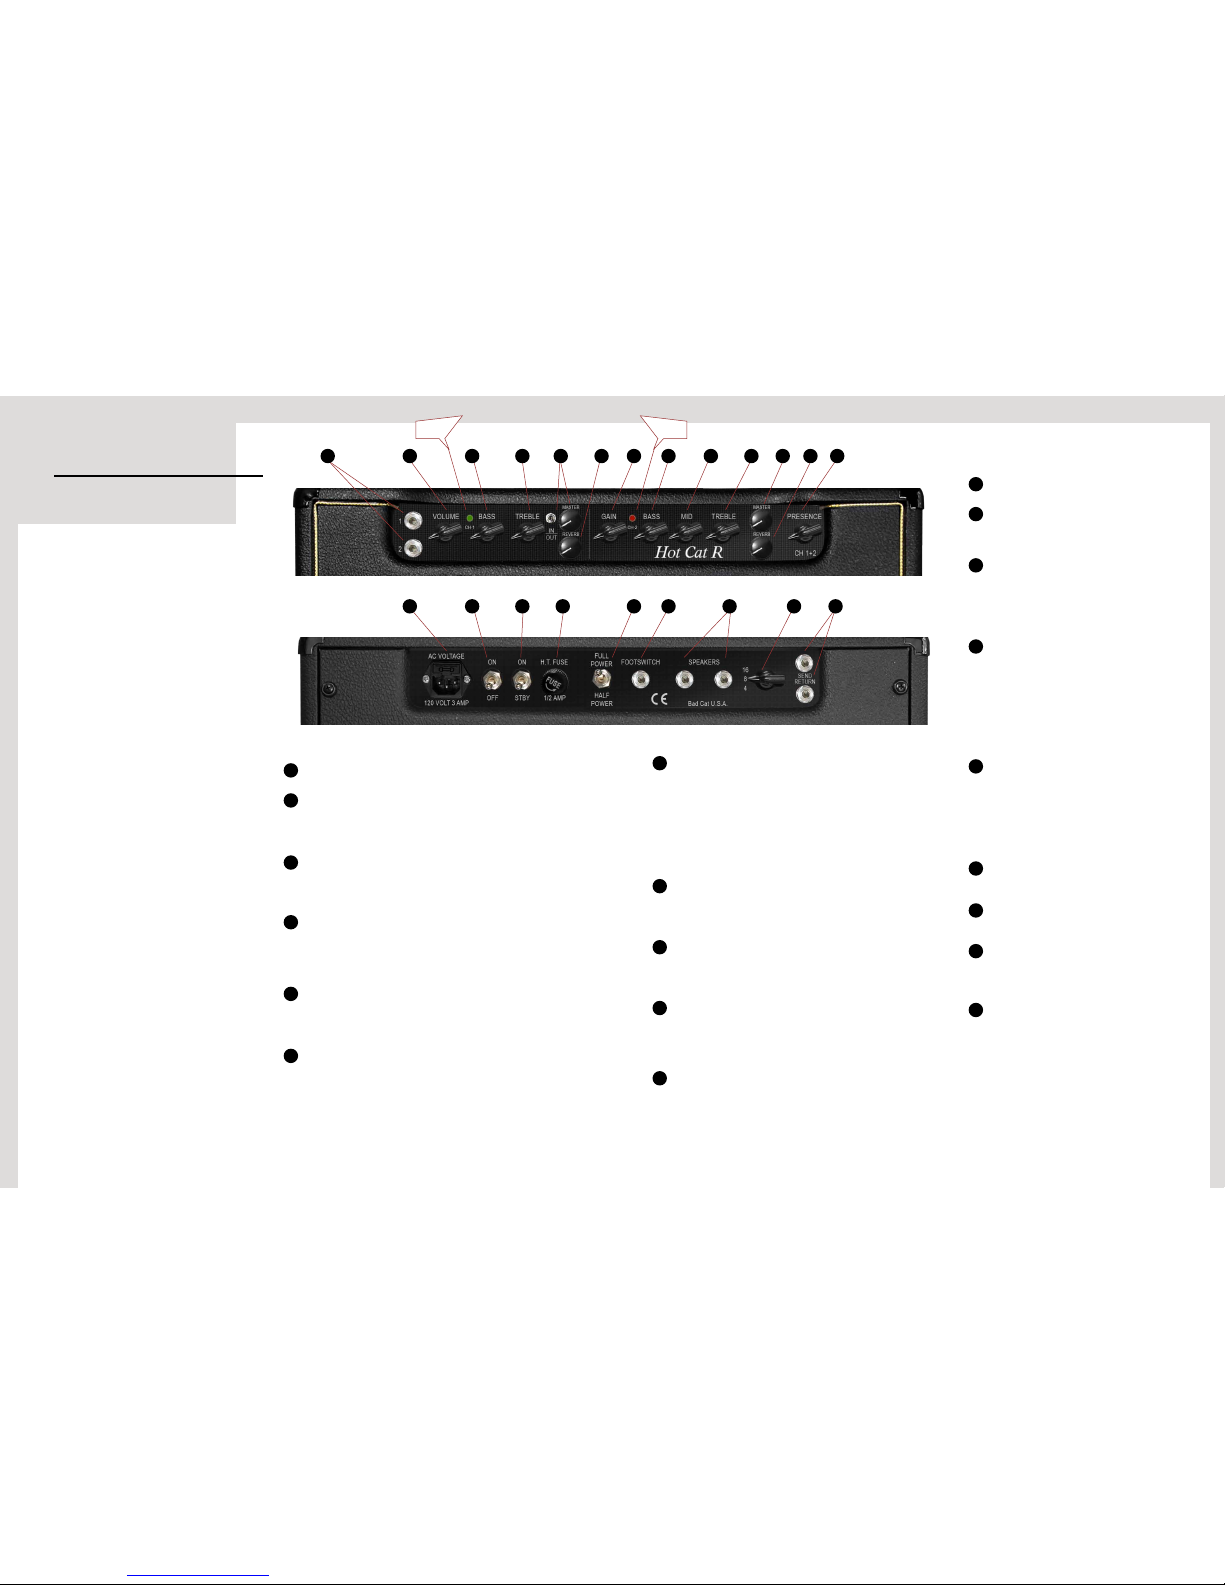
LED CHANNEL INDICATOR
BASS AND TREBLE CONTROLS ON THE NEW HOT CAT SERIES GIVE YOU FLEXIBLE CLEAN CHANNEL
SIMPLIFIED GAIN CHANNEL: BASS, MID, TREBLE TONE STACKS
SEPARATE REVERB CONTROLS FOR EACH CHANNEL
15-WATT
2-EL84
CATHODE BIASED
2-CHANNEL FOOT SWITCHABLE
HALF POWER SWITCH
A little over ten years ago Bad Cat created the worlds rst Class A high gain amplier. One decade,
multiple editors pick awards and in 2004, Guitar Player Magazine recognized the amp with a 2nd
place in the top ten best combo amps ever made! The honor was presented at the Summer NAMM
Nashville show.
Bad Cat has once again dened and rened the best. We have taken the best clean channel in the
business and expanded its capability. We have added a bass and treble control for added versatility.
Along with the defeat-able master volume the clean channel can cover everything from sparkling
pristine clean to the type of crunch found on 70’s vinyl.
The Hot channel has been simplied in its controls and expanded in its capabilities. The controls
have been simplied to gain, bass, mid, treble , master and now for the rst time reverb. The gain
structure has been recongured to begin with a bluesy smooth breakup and gradually roll into thick
syrupy high gain.
This amp covers everything from clean sparkle to harmonically rich saturation.
Available with or without reverb.
ELECTRONICS
Power: 15 Watt Class A, 30 Watt Class A, 50 Watt Class A
Channels: Two
Controls: CH. 1 - Volume, Bass, Treble, In/Out, Master, Reverb, Presence
CH. 2 - Gain, Bass, Mid, Treble, Master, Reverb, Presence
HARDWARE
Available Conguration: Head Shell, 1x12 Combo
Cabinet Material: Head - Italian Poplar, Combos - 13 Ply Baltic Birch
Speaker Description: Head Shell: N/A Combo: 12” Bad Cat Proprietary Celestion Speaker
Impedance: Selectable 4, 8, 16 ohms
Power Tubes: 15 Watt - 2 EL84, 30 Watt - 2 EL34, 50 Watt - 2 EL34
Pre-Amp Channel 1: 12AX7
Pre-Amp Channel 2: 12AX7
Rectier Tube: 15 Watt - GZ34/SS, 30 Watt - GZ34/SS, 50 Watt - Solid State
30-WATT
2-EL34
CATHODE BIASED
2-CHANNEL FOOT SWITCHABLE
HALF POWER SWITCH
50-WATT
2-EL34
GRID BIASED
2-CHANNEL FOOT SWITCHABLE
HALF POWER SWITCH
MODELED & IMPROVED FROM
THE LYNX