Badger Basket 200 User manual

MODEL 200™
INSTRUCTION
BOOK
BOTTOM FEED, SINGLE ACTION
INTERNAL MIX
Photo may not represent actual airbrush.

1
TO OPERATE
1) Attach hose to air supply (CO
2
tank, compres-
sor or aerosol propellant can) then holding air
hose in hand, attach airbrush to air hose by
gently turning in clockwise motion on to fit-
ting. Tighten air hose snugly into place with
wrench provided in set.
2) When air is regulated, pressure should be
between 15 to 50 p.s.i. Normal operating
pressure is 30 p.s.i. We recommend a pres-
sure gauge (No. 50-054) and/or water trap
(No. 50-051) in conjunction with compressor
where humidity is a problem. A compressor
or CO
2
tank is more practical for larger jobs
and prolonged spraying.
3) To attach jar or color cup, insert stem from jar
into hold located in bottom of airbrush near
head. Insert the stem into the airbrush and give
a 1/4 counter clockwise turn. This will lock your
jar (bottle) or color cup assembly in place. To
remove, pull down and rotate jar (or cup)
assembly counterclockwise again.
READ INSTRUCTIONS CAREFULLY BEFORE OPERATING
At BADGER AIR-BRUSH CO. we are extremely proud of our people and our products. Our continued
growth and success is based upon high quality and conscientious craftsmanship in the manufacture of
each and every BADGER product. At BADGER AIR-BRUSH CO. there is a feeling of accomplished pride and
dedication to you, the BADGER airbrush user, that bonds the entire BADGER family, and goes into the
design, development, and manufacture of every airbrush we make.
Each air brush and all of its components are carefully machined, inspected, assembled by hand, and
tested in actual use to be certain it meets BADGER’S and your high standards of quality. Then, and only
then, the BADGER name is put on it.
This dedication to excellence and commitment to your satisfaction prompts us to stand behind all of our
products and offer the following warranty.
WARRANTY
Your BADGER airbrush is warranted against all manufacturing defects of material and/or factory work-
manship origin for a period of one year. Any part or material that becomes defective or is worn so as to not
be usable within one year of purchase will be repaired or replaced at our discretion and expense. Your
BADGER airbrush has a lifetime warranty for any necessary factory labor (After the first year, the only
cost of factory repair will be the cost of shipping to the factory and repair related parts). These warranties
do not cover damage caused by negligence, accidents, misuse, or units that have been abused or altered
in any way. The PTFE needle bearing has a lifetime warranty and if ever necessary will be replaced at the
factory without cost, except for to the factory shipment cost, to the air brush owner.
SPECIAL NOTE: Read instructions for proper care in handling and operation. Use in
well ventilated area. Always read and follow instructions, cautions, and warnings on
materials being sprayed. See back page for further information.
CONGRATULATIONS on your purchase of the Model 200, a superior quality-precision crafted airbrush
designed, engineered, and manufactured by BADGER-AIR-BRUSH CO. The Model 200™ has a single-size
paint tip, spray regulator, and needle that work with any properly reduced medium, including acrylics,
gouache, inks & dyes, enamels, lacquers, stains, etc. The Model 200™ works especially well with BADGER
Air-Opaque™, Air-Tex™, and MODELflex™ paints.
The Model 200™ bottom feed is an ideal tool for artists, high school students, hobbyists, van painters,
taxidermists, etc.

2
REPLACEMENT PARTS LIST
50-046 PTFE Needle Bearing
50-0482 1/4 oz. Color Cup
50-0052 3/4 oz. Paint Jar w/Cover
50-0053 2 oz. Paint Jar w/Cover
50-111 Coupling Nut
50-112 Coupling Nipple
50-200 Propel Regulator Valve
50-208 33mm Fast Blast Jar
Adaptor
50-4011 10 Ft. Re-Coil Air Hose for
Badger/Thayer Chandler
50-4012 10 Ft. Re-Coil Air-Hose for
Paache/Binks
51-067 Trigger Pad
50-015 Valve Screw
51-048 Needle
51-061MT Needle (Mobile Tech)
50-019 Trigger
50-020 Plunger Spring
51-073 Protective Cap
50-023 1/4˝ Pipe Thread Fitting
50-029 Tire Adaptor
50-036 Valve Assembly
Complete (50-013-014-0141-015-020)
51-071 Head
41-004 Tip
41-043 Guarded Spray Regulator
Part No.
50-001 Five Foot Air Hose
50-0011 Eight Foot Air Hose
(Includes 50-023)
†50-2011 10 Ft. Braided Air Hose
†50-2025 10 Ft. Braided Air Hose
w/ Moisture Filter
50-2014 Moisture Filter (only)
51-0107 Shell
(w/Needle Bearing)
50-011 Handle
51-060MT Handle (Mobile Tech)
50-010 Needle Chuck
50-013 Valve Casing
50-014 Plunger and “O”Ring
50-0141 “O” Ring
*The PTFE Needle Bearing Carries a Lifetime Warranty and Free Replacement at the Factory only
†Hose can be used with compressor fitting or propel valve.
TO ATTACH
1. Attach air-regulator to
air-hose.
2. Attach air-regulator to
propel can.
3. Attach other end of
air-hose to airbrush by
turning in a clockwise
motion on to fitting.
TO TURN ON AIR
1. Turn adjusting screw
clockwise to desired
pressure.
2. For less pressure or to
turn off, turn adjusting
screw in counter-
clockwise direction.
The air-regulator valve is designed for propellant cans. It
will adjust pressure from 15 to 50 PSI. For larger jobs and
prolonged spraying a compressor or CO
2
tank is recom-
mended.
When air is regulated, pressure should be between 15 to
50 PSI. Normal operating pressure is 30 PSI.
SPARE TIRE VALVE ADAPTER
A spare tire from the family car can be used as a
power source in place of a can of propellant. Simply
inflate tire (must be on a rim) to 40 lbs. of air.
Adapter screws are sold through dealers.
TO ADJUST PAINT FLOW
Paint flow controlled by moving needle adjusting
screw forward for fine spray, back for wider spray.
NOTE: NEEDLE IS PRE-SET.
READ INSTRUCTIONS CAREFULLY

SURFACE
START PRESS PULL KEEP STEADY MOVE RELEASE FOLLOW
MOTION TRIGGER TRIGGER MOTION TRIGGER TRIGGER THRU
HERE DOWN BACK AND SPRAY FORWARD MOTION
DON’T ARC
If airbrush motion in uneven,
paint finish will be uneven.
SURFACE
BUILD-UP
ARCING MOTION
THE MOST
COMMON
PROBLEM
Runs and sags
are caused by
one or more of
the following
errors.
1. “Freezing” or forgetting to release trigger at the
end of the stroke.
2. Holding airbrush still or moving too slowly.
3. Holding airbrush too close to surface.
LEARN TO TRIGGER
Best results are achieved by a good constant motion. Start motion before pressing trigger, follow through
motion after releasing trigger. Do not hesitate while spraying or you will create what is called the Barbell
Effect. See Figure 3 pg. 9.
Careful maintenance of your airbrush is essential if
it is to continue to work effectively. One of the most
important factors that affect the performance of the
airbrush is cleanliness. The small passages inside
the airbrush can become blocked easily by dried
paint if the airbrush is not cleaned after each use. if
there is still a useable amount of color in the color
cup or reservoir when you have finished spraying,
pour the remainder back into the original paint
bottle. Operate the airbrush, spraying on a scrap
piece of paper until the color is gone and only air is
sprayed. Spray with clean water first, then Air-
Opaque™ Cleaner or an appropriate solvent recom-
mended by paint supplier until the spray is color-
less. Always clean the airbrush every time you
finish spraying. Some types of paints can dry
remarkably fast. If the paint is allowed to dry inside
the airbrush you may be able to dissolve it with
clean water. Cleaning with solvent is the next step. If
cleaning with solvent does not dissolve the block-
age, you will have to disassemble the airbrush.
REMOVING AND REPLACING THE TIP
When replacing the paint tip (41-004), it is impor-
tant to loosen the needle chuck )50-010) and par-
tially retract the needle (51-048). This will ensure
that no damage will occur to the tip or needle as the
head assembly is tightened.
Unscrew the Spray Regulator (41-043) and the
head (51-071). The tip can now be removed from
its tapered seat in the airbrush body. Make sure
there is no dried paint on any part of the airbrush
MAINTENANCE AND CLEANING OF YOUR AIRBRUSH
head or body that would interfere with proper tip
seating. Even a small amount of dried paint can
cause tip misalignment, which could lead to uneven
or pulsating spray pattern. Dried paint can be
removed using a moist cotton squab.
Place the new tip into its seat in the airbrush body
(see photograph 1), and then screw the head and
spray regulator onto the airbrush body. The head
assembly on the
Model 200 is
designed to be
tightened firmly by
hand - use of pliers
or other tools
should not be
necessary!
Before spraying,
reseat the needle
into the new tip by
pushing the needle forward until it stops. Do not
push forcefully or the tip could split at the end. The
Needle Chuck should then be retightened.
MANUFACTURER’S NOTE: Although the nozzle and
needle assemblies of this airbrush are manufactured
to easier maintenance “finger tight” tolerances, the
initial removal of some components may require the
use of a small pliers. If a pliers is necessary for
initial component disassembly, just finger tighten it
when reassembling and the pliers should not be
required for assembly/disassembly thereafter.
3

4
CLEANING OF YOUR AIRBRUSH
To clean the airbrush, take a clean color cup or jar
full of cleaner. Insert it into the airbrush, spray
some cleaner through the airbrush at broad and
small patterns. After removing color cup or jar, turn
brush upside down and press trigger. This will
remove any material still in the brush.
Another method of cleaning the airbrush is back
flushing. Take a soft cloth and cover the spray regu-
lator–depress and pull back on the trigger. This will
cause a bubbling in the color cup or jar. Take away
the cloth and spray and repeat this procedure sever-
al times. After this is done you should remove the
needle for cleaning.
Spray regulator should be cleaned using a soft
bristle brush. Insert into the cavity of the spray
regulator and rotate until the paint is removed.
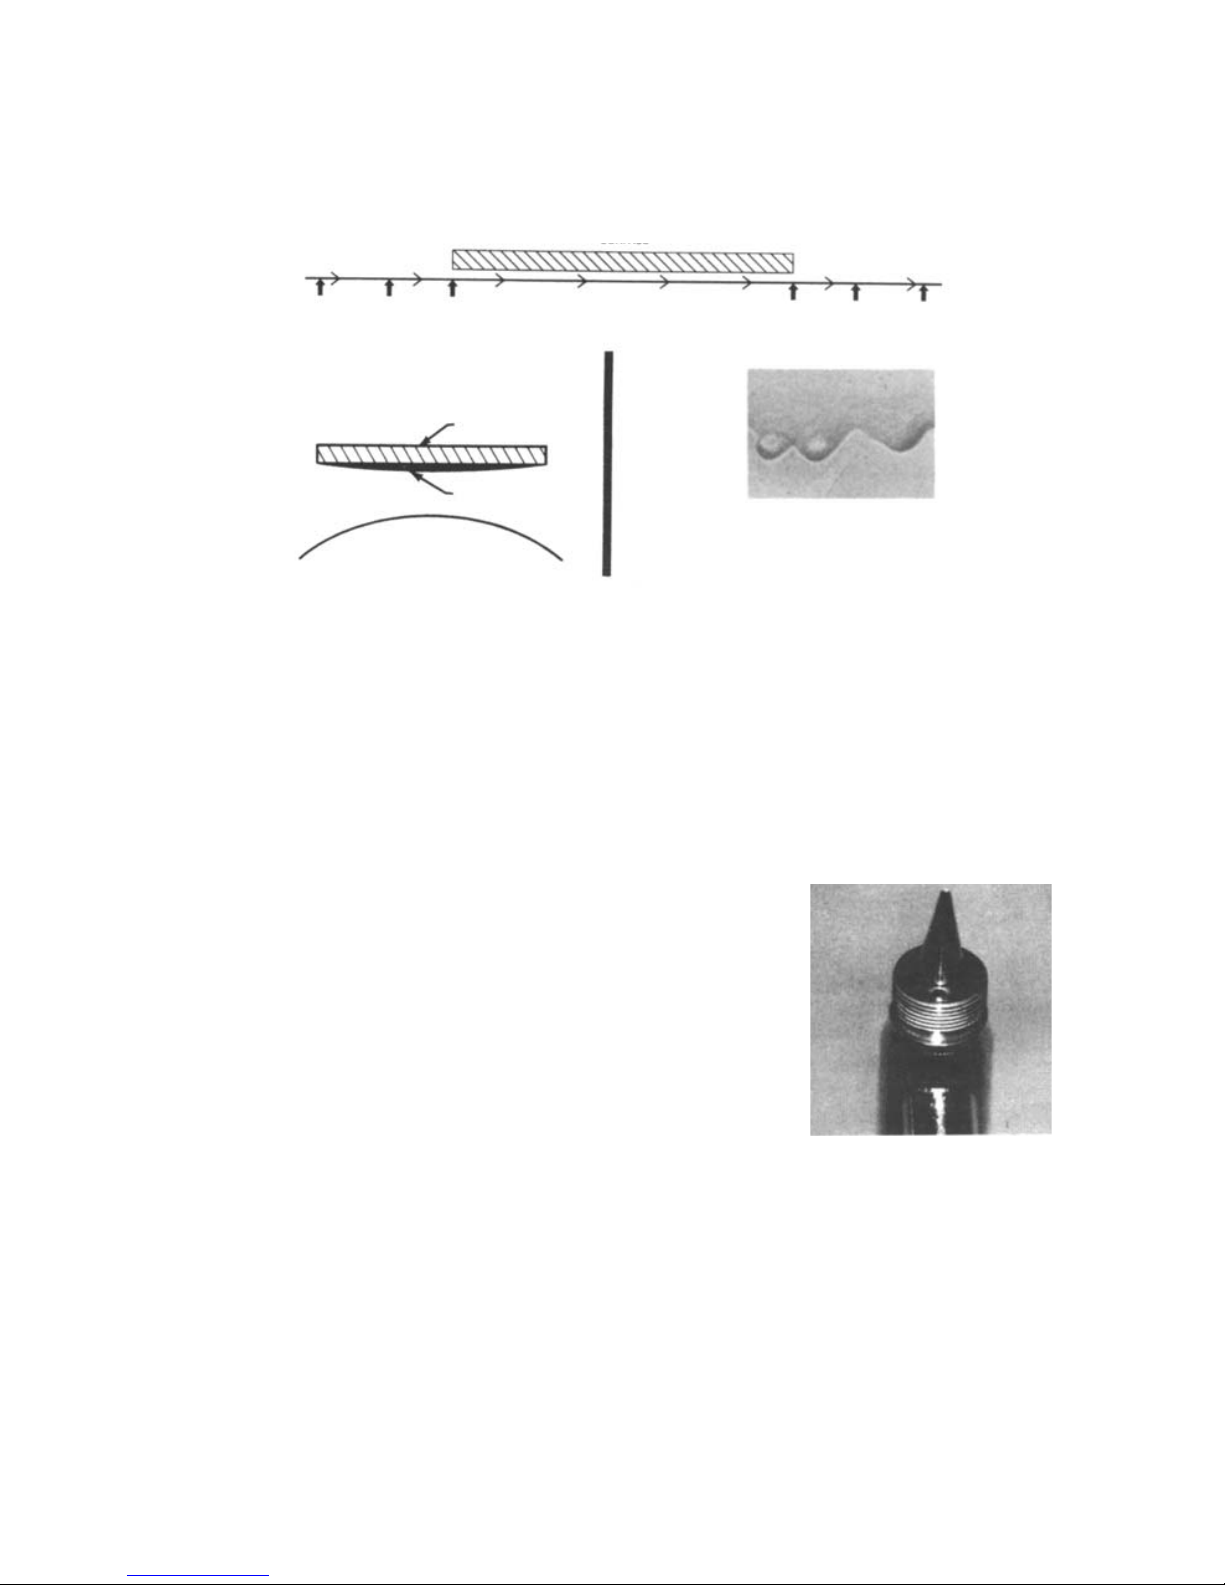
If the needle is stuck in the airbrush, carefully
loosen the needle chuck, then grasp the end of the
needle with a pair of pliers and twist in a counter-
clockwise direction to release the needle. Inspect for
hardened paint, which causes the needle to bind. If
there is a residual stain on the needle, it can be
polished off using a pink eraser. Hold the needle flat
on a worktable. Rund the pink eraser the full length
of the needle, turn the needle slowly by rolling it
towards yourself and repeat the process. Be careful
not to bend the tip. Remove all eraser particles by
running the needle between your thumb and fore-
finger.
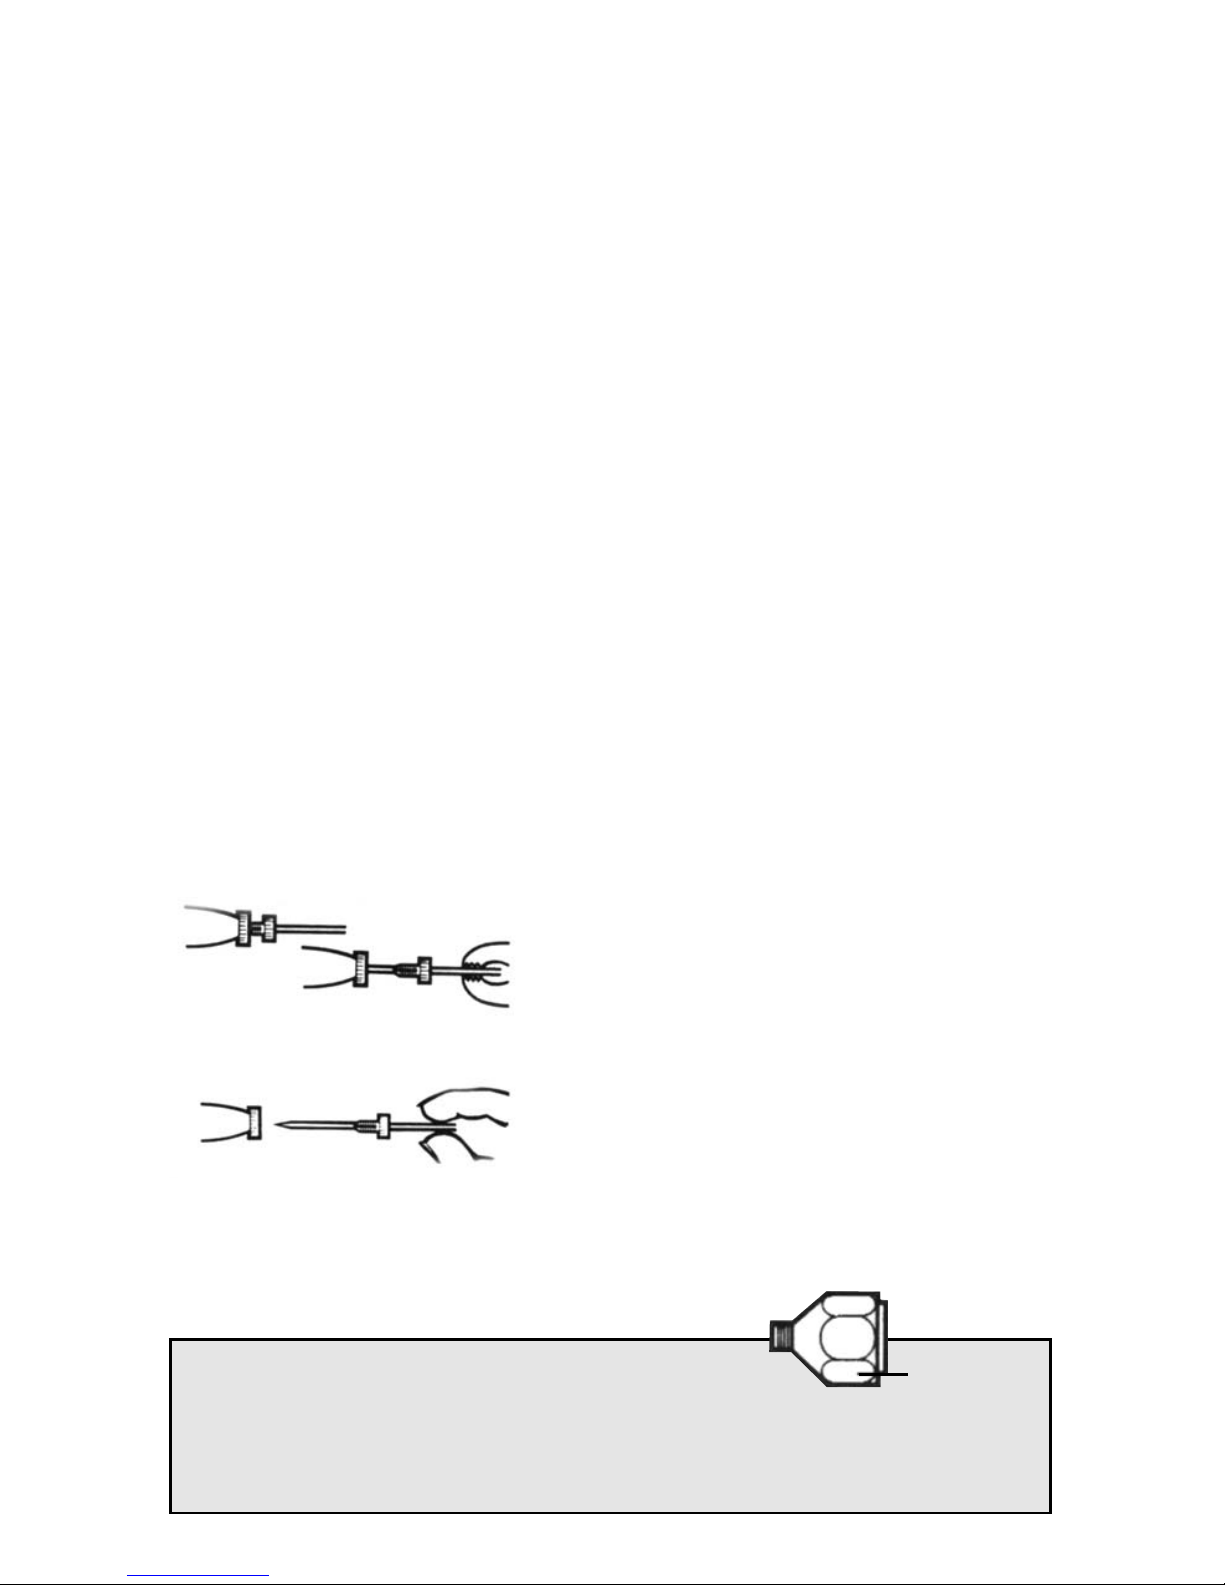
To replace a bent needle, set needle adjusting screw
all the way forward.
Loosen needle chuck and slide out needle.
Insert new needle. Slide it forward with slight
pressure from index finger until the needle stops.
Do not push forward with great pressure, as the
needle may split the delicate paint tip and also dam-
age the needle point. To lock the needle in place
tighten needle chuck into needle adjusting screw.
Turn needle adjusting screw to desired spray pat-
tern.
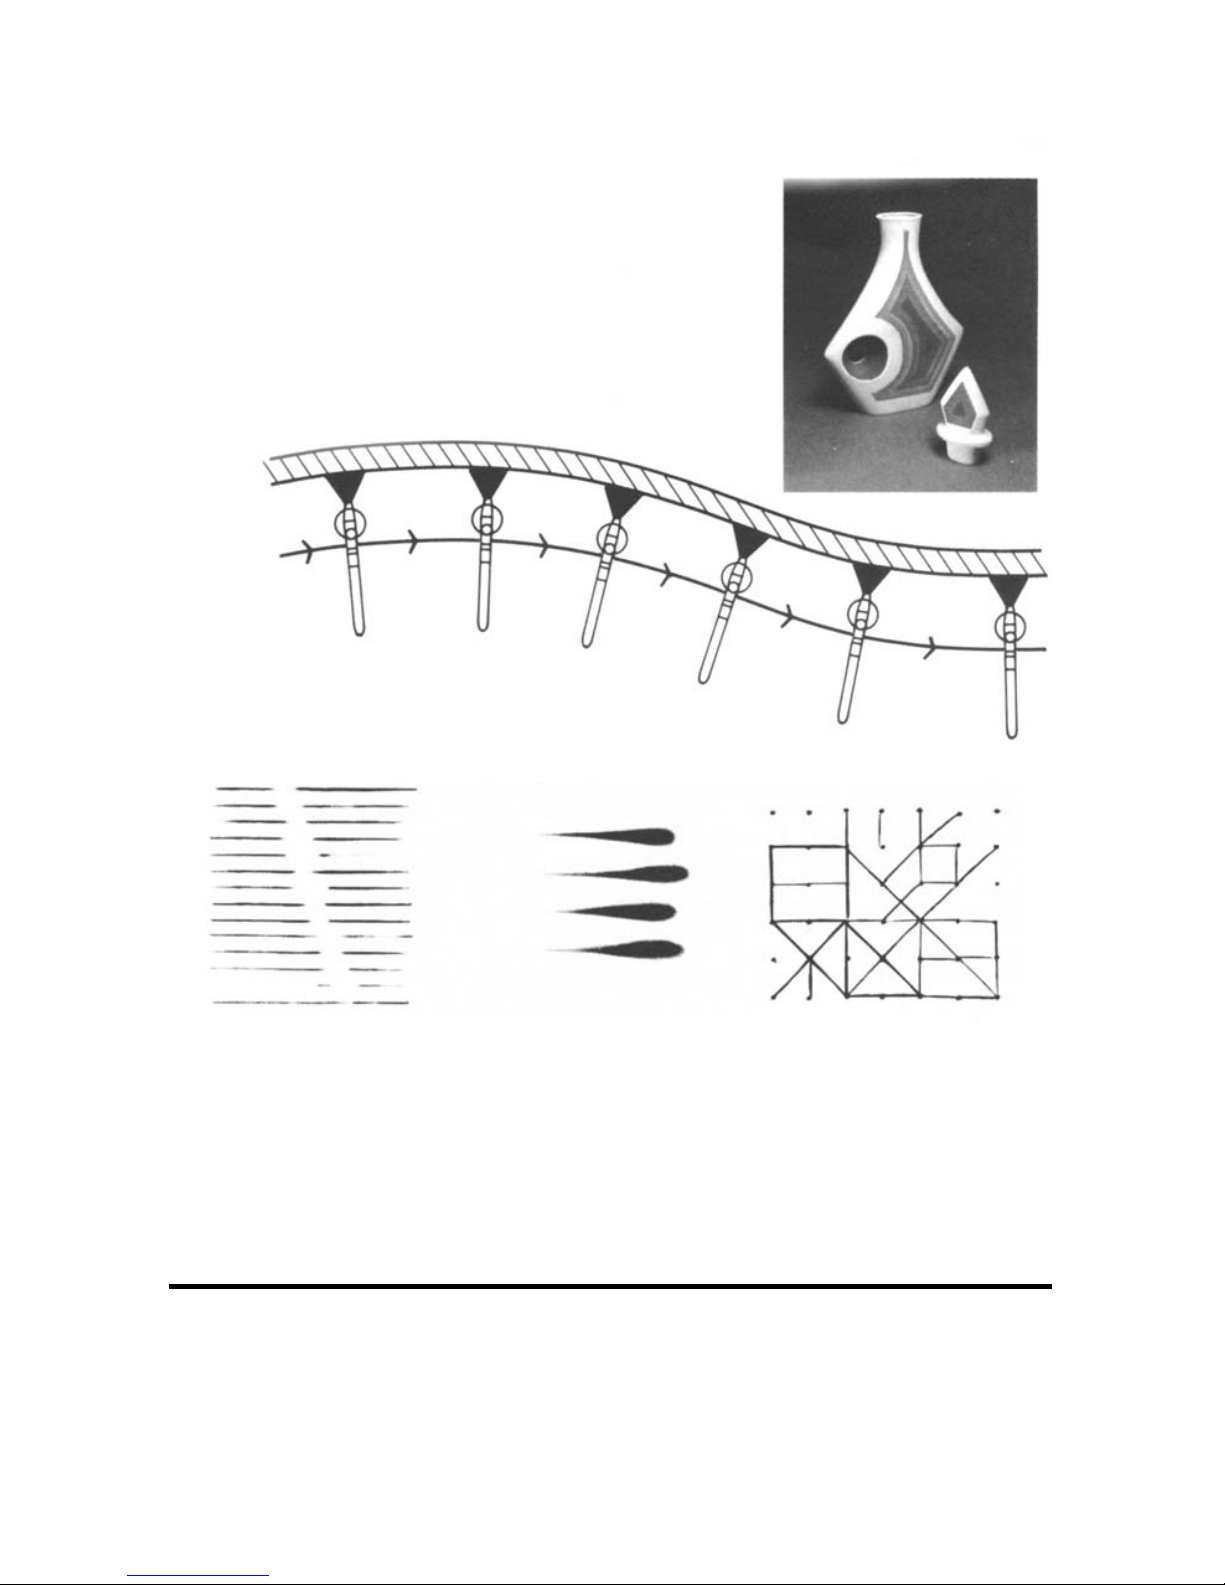
A bent needle will prevent you from airbrushing a
fine line and will cause an erratic direction of spray.
A bent tip does not always have to be discarded.
Place the needle on a firm surface at the angle of
the tip. Straighten the bent tip by running your fin-
gernail across it on the tabletop while you turn the
needle slowly. Run your fingernail from the body of
the needle outward towards the tip.
You can custom mix any color combination you
wish. REMEMBER: Paints must by compatible...that
is, mix enamels with enamels, lacquers, etc. Mix
thoroughly. Make sure paint is free of lumps...strain
if necessary. To help prevent your airbrush from
clogging, Badger offers a Fluid Filter (50-2018 sold
separately). The filter slides on and off the siphon
tube for quick and easy cleaning.
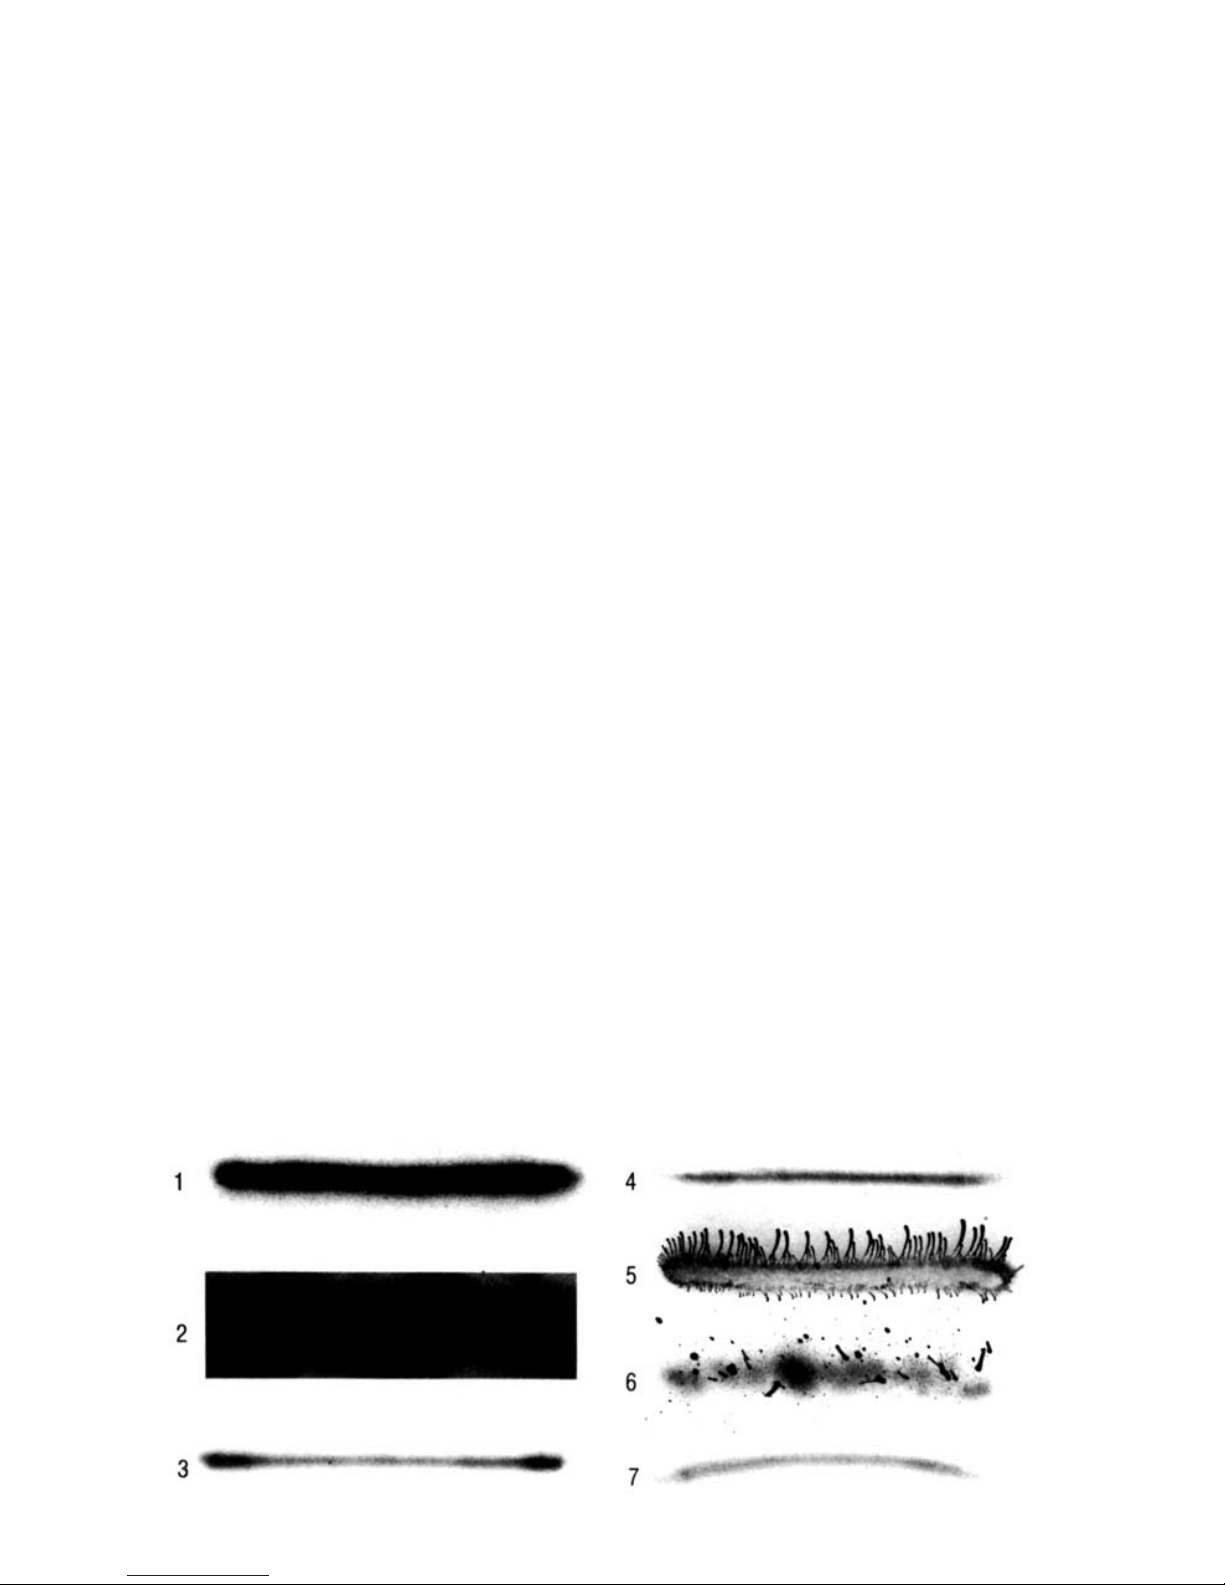
THINNING
Most jar paints are too heavy to spray. Enamels
should be thinned approximately 1 part paint to 1
pat thinner, and lacquers approximately 1 part paint
to 1 part thinner. TO thin automotive lacquers, con-
sult the spraying directions on the side of the paint
container.
WHEN USING LACQUER
Lacquer dries very quickly. For best results the
operation should be continuous, that is, air airbrush
should not be set down for more than a few
moments before resuming spray. Keep an extra
paint jar of thinner handy...remove lacquer jar,
attach jar of thinner and spray to clean out any lac-
quer that may dry in airbrush. Also refer to cleaning
instructions for additional information.
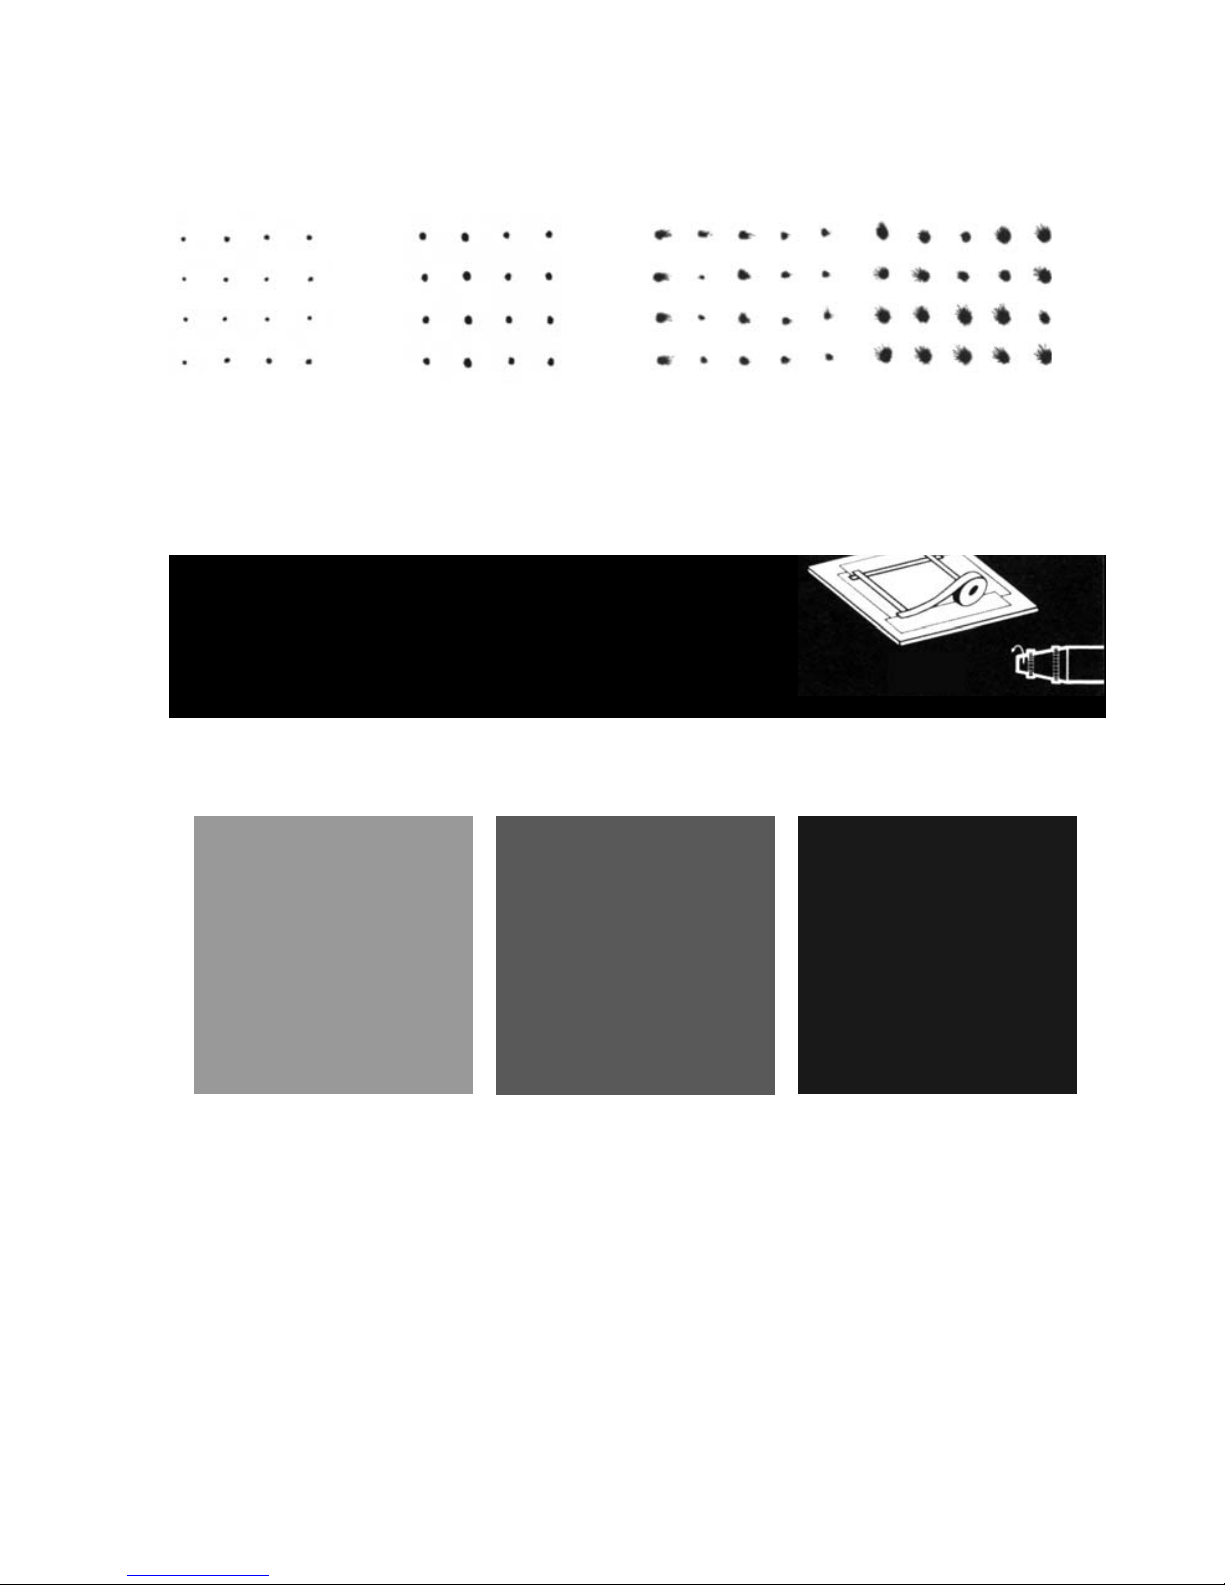
TO SPRAY
After mixing and thinning paint, fill paint jar about
2/3 full (or less). Attach jar of paint to airbrush, turn
air on and press trigger. Test your spray on old
newspaper or other material, make any necessary
spray adjustments, and get the “feel” of your air-
brush. (Be sure that paint or fumes cannot reach
any flame. Also make sure that there is adequate
ventilation).
MANUFACTURERS NOTE
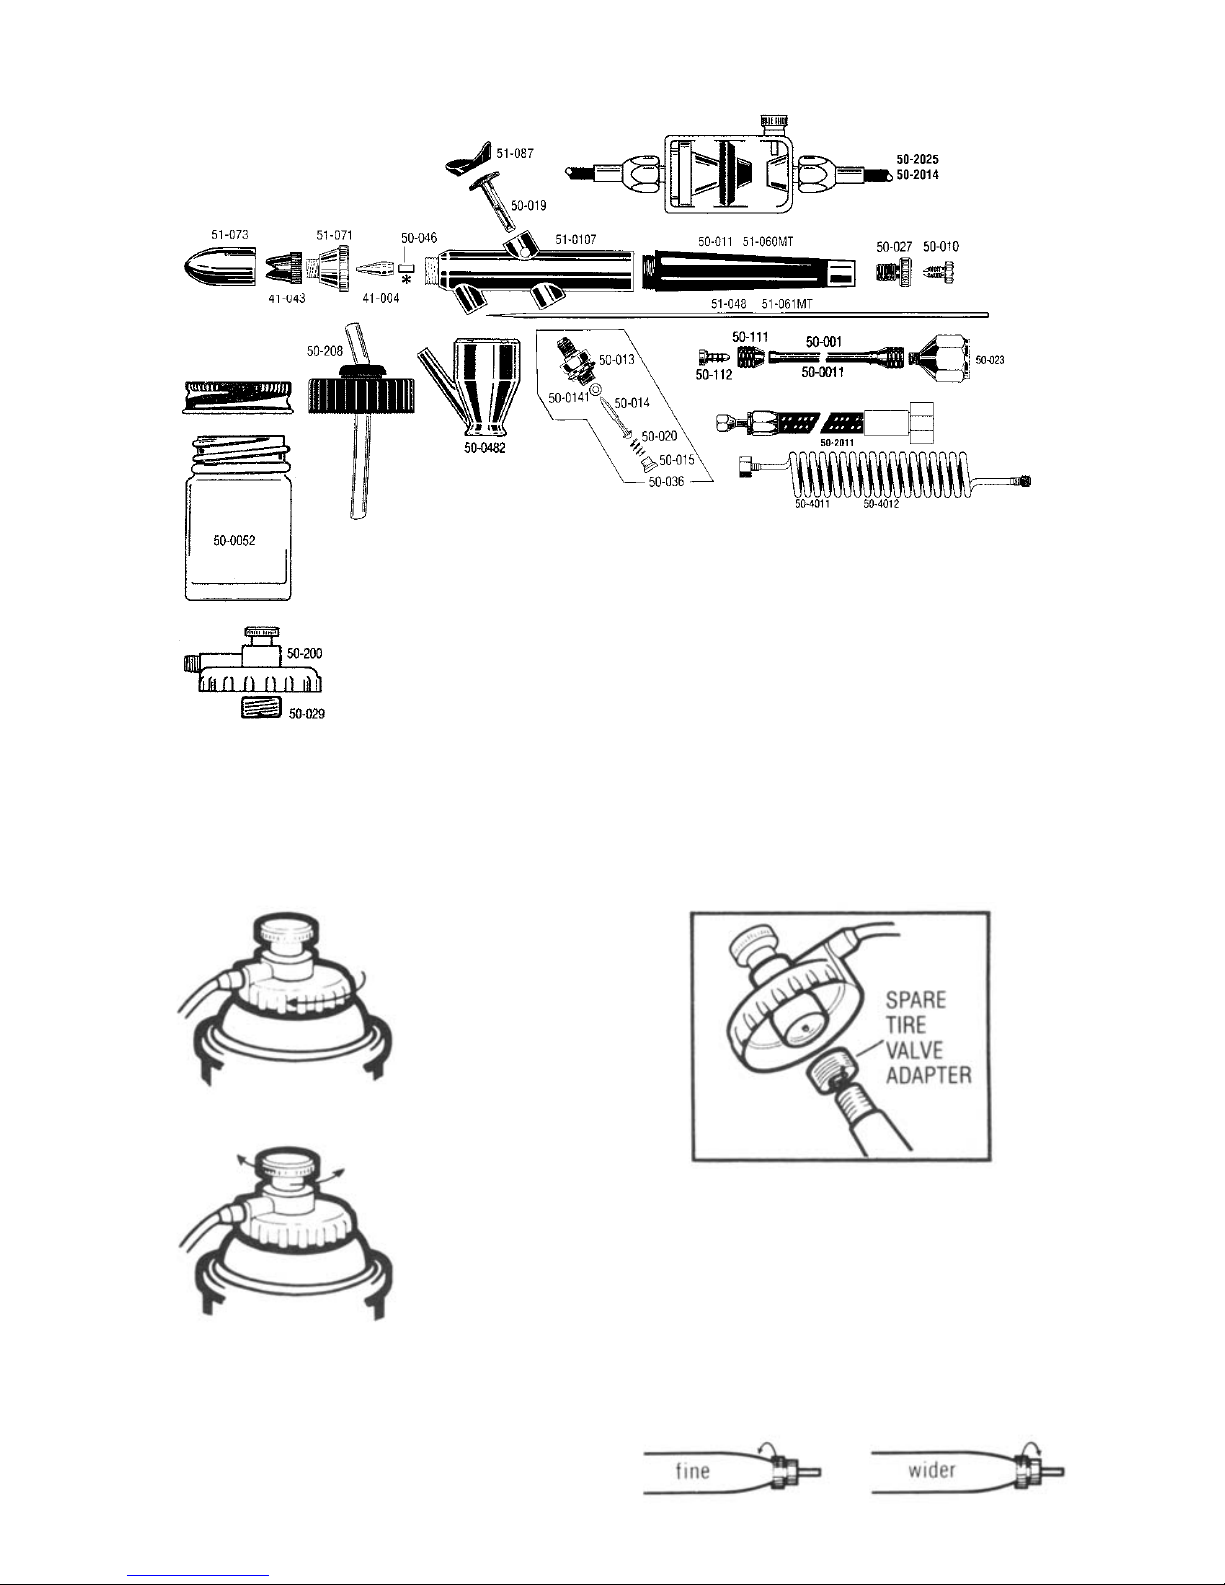
For larger jobs and prolonged spraying, a compressor or CO2tank is recommended. A 1/4˝ pipe thread fit-
ting (50-023 sold separately) is needed to adapt air-hose to air-supply. When using a “Bleeder Type” com-
pressor, a pipe thread fitting (50-0231 sold separately) must be used to prevent compressor from stalling
out or overheating when airbrush is not in use.
1.4˝ PIPE
ADAPTOR NO. 72 OR
1/32˝ DRILL

5
Prepare the object to be painted, masking off any
area that should not be painted (be sure object is
clean and free of dust, grease, etc.). Small objects
such as models, etc. should be hung or placed on a
pedestal so all areas to be sprayed can be easily
reached (a stand may be fashioned from an ordi-
nary wire coat hanger or bottle etc.). Hold the tip of
the airbrush about 6 inches from the surface. Use
short strokes, moving the airbrush constantly at a
steady rate parallel to the surface. Don’t spray too
PAINTING PROCEDURE FOR THREE DIMENSIONAL OBJECTS
KEEP AIRBRUSH PARALLEL TO SURFACE
This exercise shown in fig. 1, will enable you to
draw straight lines without forming dots or pud-
dles at the beginning and end of each line. This is
triggering again, see page 3. Fig. 2 is parallel line
graduating from narrow to broad. These are made
by releasing more color and at the same time, lift-
ing the airbrush away from the surface. Practice
daily to develop trigger action control. Fig. 3, lay-
out in pencil 1/2 inch squares. Airbrush the dots
as small as possible and connect dots with
straight lines of even tone. Practice every lesson
carefully before proceeding to the next one.
EXERCISE TWO
On a board or paper, lightly pencil in a number of
1/2 inch squares. Hold the airbrush about 1/2 inch
from the surface and spray paint small dots on
the intersecting lines, as shown in fig. 4. Use liq-
uid food coloring. When you are able to place the
dots accurately, begin enlarging the size of the
dots (fig. 5) by allowing more color to flow
through the airbrush. At the same time increase
heavily. Apply a light coat, let dry, then apply
another coat and continue until the desired cover-
age is achieved.
EXERCISE ONE/FREE HAND CONTROLLED EFFECT
FIG. 1 FIG. 2 FIG. 3

6
the distance between the airbrush and the paper or
board. If the airbrush is held too closely to the
paper with the trigger pulled all the way back and
down, “puddles” will form and spread (as in figs. 6
and 7). Aim for accuracy not speed and continue
practicing until you can spray paint any size dot
exactly where you want it. This simple lesson will
give you control of position and density of dots
or shapes you require, which are important for
touch-ups and fill-in work.
MASKING OFF
In the next several exercises you will need to mask off a square area.
Make a mask from 4 pieces of scrap paper (fig. 8). These masks are
held in place by masking tape, keeping the atomized material from
creeping into the margins around the area. When using masks spray
over the edge.
FIG. 9 FIG. 10 FIG. 11
EXERCISE THREE/EVEN TONES
FIG. 8
To accomplish a flat tone, we will airbrush a fine
consistency of paint from left to right at the top of
the taped area. Hold the airbrush about four inches
from the surface of the sheet. Be sure to spray a
portion of the tape so that no light line shows when
the masking tape is removed. Use the trigger tech-
nique on page 3 throughout this lesson. Now air-
brush from right to left, overlapping the previously
airbrushed strokes. Continue down the entire sheet,
trying not to create a line pattern with the airbrush.
Overspray the tape, both right and left and top and
bottom. Begin at the top again and do the entire
page. Repeat the exercise until you reach the
desired smooth coverage of the entire area. Do not
attempt to cover the entire sheet with a heavy tone
at one time. Build the tone gradually (figs. 9-11).
Make sure the work and tape are dry before remov-
ing the masking tape. This should be done carefully
to avoid tearing the surface of the paper it is
adhered to. If your first results are not satisfactory,
repeat the lesson until you are satisfied.
FIG. 4 FIG. 6 FIG. 7
FIG. 5

EXERCISE FOUR/VARYING SHADES
This lesson is similar to the previous one.
This time you will start at the top and gradu-
ally fade into white (fig. 12). Do not fade
abruptly and do not carry the tone further
than 2/3 or 3/4 of the page. Remember, you
must stop your tone shorter each time, since
the overspray will build up. Fig. 13 is a com-
bination of masking and varying shades. The
important thing in this exercise is to train
your eye so that all the small squares have
the same tone value.
FIG. 12 FIG. 13
POSITIVE REVERSE (negative)
TECHNIQUES TO USE
Masking or frisket is used mostly when more
than one color is applied. A new frisket is
cut for each color and covers any area that
should not be sprayed. Badger’s
Foto/Frisket™ Film is specially formulated
for use on all surfaces commonly used for
airbrushing.
For contour masking (models, ceramics,
etc.) use masking tape, scotch tape or
Foto/Frisket™ Film and cut to desired
shape. Make sure the edges are pressed
firmly against surface to prevent underspray.
STENCILS
Stencils are used when a design needs to be
duplicated, as in posters and decorating.
Cut from stiff paper, Foto/Frisket™ FILM or
NO-TACK Stencil Film, hold the stencil
firmly in position and spray starting with the
edges and work inward. A reverse stencil
can also be used, spray along the stencil
edge.
A flat surface mask can be cut from
Foto/Frisket™ Film. For a sharp edge, hold
the mask flat in position. For a softer edge,
elevate the mask slightly by resting on a
ruler or other flat object.
7

8
EXERCISE FIVE/THREE EFFECTS USING MASKS OR FRISKETS
Rendering these basic forms will provide instruc-
tion and sequence in shading these shapes, which
comprise all of the shapes you will encounter.
Combinations of these forms make up all of the
various products, etc. In airbrushing these
shapes, it is a general rule to have the light source
coming from the upper left hand corner at about a
45 degree angle.
CUBE Make a line drawing lightly about twice the
size of the above illustration. Cut a frisket for the
outline and dividing lines of the separate sides. At
this time remove the frisket from the side farthest
from the light source. Gradually airbrush a tone
from the upper left corner to the lower right hand
corner. Repeat the gradual dark tone as neces-
sary, then remask the finished side and start the
other sides until the desired effect is achieved.
CYLINDER Note how the light varies on the cylin-
der and makes the top flat surface different from
the curved area. The frisket is cut along the
curved line and while the top is masked, the side
is sprayed. Then the side is masked and the top is
sprayed.
Only practice will enable you to know how dark to
paint one side of the subject while the other is
masked.
CONE Again cut a frisket of a cone shape. Remove
the cone shape from the frisket. Start airbrush
action from the top. Paint and flair slightly
towards the curved base. Repeat the action on the
right side until you achieve the tapered appear-
ance as illustrated above.
SPHERE Place a frisket on the board making sure
the remaining portion of the board is not exposed
to airbrushing overspray. Use a compass knife
and cut your circle and remove. Gradually air-
brush lightly around the entire edge of the circle
in a curved, rocking, back and forth motion. Next,
start from the bottom right hand portion of the
circle and airbrush upwards towards the center
not quite reaching the center. Allow a high lighted
circular portion of the sphere near the upper left
hand portion. Continue until the sphere takes on a
three dimensional appearance.

9
1) GRAINY SPRAY. Caused by paint being too
thick. Add water or thinner sparingly to the
mixture and check the needle and regulator tip
for dried paint. Also check the air supply to
make sure airbrush is being operated.
2) BUCKLING PAPER. Paint may be too thin or you
may be applying paint in too heavy a coat.
3) PAINT BLOBS AT THE ENDS OF THE STROKE.
You are spraying paint before moving your hand
and stopping the movements before shutting off
the paint flow.
4) FLARED ENDS. Caused by spraying too much
paint too close to the paper. If a fine line is
desired, lightly pull back on the front trigger.
5) CENTIPEDES. Caused by spraying too much
paint too close to the paper. If a fine line is
desired, lightly pull back on the front trigger.
6) SPLATTERING. Caused by permitting the needle
to snap back into the tip. Always release the
trigger gently. Check for dried paint on needle or
tip. Also may be caused by triggering. See page
3 for proper triggering.
TROUBLESHOOTING YOUR AIRBRUSH
7) CURVED STROKE. Caused by arcing arm too
close to the paper. Arm should always be
parallel to the work, unless this effect is desired.
8) BUBBLES THROUGH THE COLOR CUP. The
spray regulator might be turned out too far, or
the head may be loose. Check both and tighten if
necessary.
9) COLOR SPRAY CANNOT BE SHUT OFF. Tip may
be clogged. This is recognized by a “spongy”
feel when needle is set into tip. Remove the
head from the airbrush and clean the tip – see
Maintenance and Cleaning, page 3.
10) PULSATING. This is caused by the head being
loose or the tip not seated properly. See page 3,
Replacing the tip.
The only other reason that the brush may begin to
pulsate is if the needle bearing wears down or falls
out. There is a lifetime warranty on this part because
the owner cannot replace this part. If this occurs
send back to factory for no-charge service
(see warranty, page 2).

Air-Opaque™the ready to use airbrush colors.
Offers you a choice of 35 colors plus 8 pearlescent
colors. All 43 are pre-reduced for instant use, color-
fast, waterproof, vibrant, quick drying, non-bleed
paints. They are formulated for use with airbrushes,
technical pens or artist brushes. All Air-Opaque™ colors
are non-toxic and completely intermixable.
Foto/Frisket™Film
Foto/Frisket™Film is a transparent self-adhering mask-
ing and stenciling material which is cut directly on
your work. It is available in both matte and gloss fin-
ish. Both matte and gloss are available in 8-1/2˝ x 11˝
10-sheet pack., 12˝ x 15’roll, 24˝ x 15’ roll.
Brite-White™Airbrush Paper
Designed for airbrushing techniques, it is a super,
strong surfaced 50% rag, 145 pound sulfite paper.
Brite-White™holds up extremely well to frisketing
material, drafting tape and adhesive. This paper has an
extremely bright white surface which adds vividness
and life to airbrushed colors. Brite-White™will not
buckle when sprayed on. Both sides can be used.
Brite-White™will accept all airbrush media and is avail-
able in 10-sheet, 18˝ x 24˝ packages.
VOLUME II AIRBRUSHING TECHNIQUES FOR
CUSTOM PAINTING
By Carl Caiati - 48 full color pages.
HOBBY AND CRAFT GUIDE TO AIRBRUSHING
By Carl Caiati - 32 page book.
STEP-BY-STEP MODELER’S GUIDE TO AIRBRUSHING
By Susan Harris and Evan Roark
32 full color pages. Subjects include: Military
Modeling, Figures, Diagrams and Scale Modeling of
‘69 Camaro.
VIDEOTAPES
30 minute tapes, perfect for classroom teaching
BV-001 Introduction to Airbrushes, Accessories, and
Airbrushing Mediums by Robert Paschal
BV-002 Vol. I The Fundamentals of Airbrush
Technique: Basic Exercises by Robert Paschal
BV-003 Vol. II Intermediate Airbrush Technique:
Working in Color by Robert Paschal
BV-004 Vol. I The Art of Airbrushing Fingernails: A
Basic Course by Elizabeth Anthony
BV-005 Vol. II The Art of Airbrushing Fingernails:
Advanced Design Techniques by Elizabeth Anthony
BV-006 Vol. I T-Shirt and Fabric Airbrushing:
Techniques for Getting Started by Tim Mitchell
BV-007 Vol. II T-Shirt and Fabric Airbrushing for the
Intermediate Artist by Tim Mitchell
BV-008 Cake Decorating with the Airbrush by Jerry
Manderfield
BV-011 Aging & Weathering (& Stuff) with an
Airbrush by Mac McCalla
BV-020 The Art of Airbrushing Wildfowl Carvings by
George Krath
22-425 Tanning Application Instruction Video
BV-009 Basic Model Painting with the Airbrush by
John lee & Dan Osborn Available Soon
BV-010 Tips, Tricks, and airbrush techniques for
superdetailing models by Joe Porter Available Soon
BRITE WHITE™
Foto/Frisket™
AIR-OPAQUE™ AND AIR-TEX™ COLORS
AIRBRUSH HOLDER
COMPRESSOR
10

PLEASE READ CAREFULLY BEFORE USING YOUR BADGER AIRBRUSH
Your new BADGER airbrush should provide you with many hours of enjoyment. However, because of the nature of airbrushing and of
the composition of materials which you may use in your airbrush, we are providing you with information about potential hazards.
Many materials commonly used in arts and crafts projects (such as lacquers, varnishes, adhesives, fixatives, powders, acrylics and
solvents) can be extremely hazardous. Not all of these materials will be used in your airbrush, but may be used in some other phase
of your project. We recommend that you always find out what is in the material you use. We suggest that when using any chemical
substance that you request a copy of the manufacturer’s Material Safety Data Sheet from your art supply dealer. This will give you
some indication of the dangers posed and some of the precautions you need to take.
ALWAYS READ AND FOLLOW LABEL DIRECTIONS CAREFULLY.
CHILDREN Hazardous materials pose an even greater risk to children due to their lesser body weight and frequent lack of care in fol-
lowing directions. CHILDREN SHOULD ALWAYS BE SUPERVISED WHEN USING AN AIRBRUSH OR ART MATERIALS (unless the
materials have been certified by the Crayon, Watercolor and Craft Institute). An airbrush is not a toy. It should not be pointed at any-
one or at oneself.
GOOD HYGIENE IS IMPORTANT ANYTIME YOU ARE WORKING WITH ART MATERIALS.
•Do not smoke, eat or drink while airbrushing.
•Avoid putting your fingers in your mouth while working on art projects.
•Be sure to clean your fingernails and wash your hands when you are finished.
•Be especially careful of the materials you use if you have cuts or open sores.
•STOP WORK AT THE FIRST SIGN OF DIZZINESS, NAUSEA, HEADACHE, BLURRED VISION, OR SKIN IRRITATION. Seek fresh air
immediately, and call a doctor if the symptoms persist or are severe.
VENTILATION An open window does not provide adequate ventilation when working with hazardous art materials. When working with
these materials, you should have an exhaust ventilation system (one which removes vapors, dusts, etc., from the area in which you
are working and vents to the outside). A general ventilating system dilutes toxic vapors with fresh air to lower their concentration to a
safer level.
Many factors have to be considered to determine the kind of ventilating system you should have. We suggest that you contact the
National Institute for Occupational Safety & Health, (NIOSH), Robert A. Taft Laboratories, 4676 Columbia Parkway, Cincinnati, Ohio
45226 for publications which they have dealing with ventilating systems.
RESPIRATORS A respirator may pose more of a hazard than a help unless:
•you get one designed to filter out the specific hazardous substance you are working with
•one that fits properly
•you keep it properly cleaned and maintained.
We suggest you buy only a NIOSH* approved respirator and read and follow carefully the instructions which come with it.
A respirator may not be suitable for some people with heart or breathing problems. Information on respirators is also available from
NIOSH at the address above.
RESOURCES In addition to NIOSH, you might want to read Health Hazards Manual for Artists by Michael McCann, PhD (published by
the Foundation for the Community of Artists, 280 Broadway, Suite 412, New York, New York 10007) or contact the Consumer
Products Safety Commission, Washington, D.C. 20207.
BA327 Made and Printed in U.S.A. 10/05 © BACo.2005
9128 W. BELMONT AVE • FRANKLIN PARK, IL 60131
www.badgerairbrush.com
iHOBBY EXPO
This manual suits for next models
1
Table of contents
Other Badger Basket Paint Sprayer manuals