Baicells Neutrino-224 User manual

Neutrino-224 Indoor 2x125mW
FDD/TDD eNodeB
Installation Guide
December 2018
Version 1.7

2
About This Document
This document is intended for anyone who will be installing the Baicells Neutrino-224 Indoor
2x125mW eNodeB (eNB). The 3GPP standards-based Neutrino eNB provides broadband
wireless access to Long-Term Evolution (LTE) Frequency Division Duplexing (FDD) and Time
Division Duplexing (TDD) backhaul networks. The information includes planning
considerations, installation procedures, and configuration guidance.
The eNB GUI may vary based on software version and based on FDD or TDD operation. This
document includes both FDD and TDD configuration fields based on:
•FDD software version BaiBS_QATA_1.3.3
•TDD software version BaiBS_QATA_2.2.2
Copyright Notice
Baicells Technologies, Inc., copyrights the information in this document. No part of this
document may be reproduced in any form or means without the prior written consent of
Baicells Technologies, Inc.
Disclaimer
The information in this document is subject to change at any time without notice. For more
information, please consult with a Baicells technical engineer or the support team. Refer to
the “Contact Us” section below.
Disposal of Electronic and Electrical Waste
Pursuant to the WEEE EU Directive, electronic and electrical waste must not be
disposed of with unsorted waste. Please contact your local recycling authority for
disposal of this product.

3
Revision Record
Date
Version
Description
SMEs/Contributors
Author/Editor
13-Dec-2018
V1.6
Added TDD info
Yang Yanan
Ronald Mao
Sharon Redfoot
12-Nov-2018
V1.5
SME feedback
Wang Zhiyang
Ronald Mao
Sharon Redfoot
2-Nov-2018
30-Oct-2018
V1.4
V1.3
Updated per China doc
v02 sent Oct 2018
Yang Yanan
Wang Zhiyang
Ronald Mao
Sharon Redfoot
21-May-2018
V1.2
Updated per China doc
v02 sent May 2018
Yang Yanan
Sharon Redfoot
19-Jan-2018
V1.1
English draft from China
version June 2017
Yang Yanan
Cameron Kilton
Sharon Redfoot
Contact Us
Baicells Technologies Co., Ltd.
Baicells Technologies North America, Inc.
China North America
Address
3F, Bldg. A, No. 1 Kai Tuo Rd, Haidian
Dist, Beijing, China
555 Republic Dr., #200, Plano, TX 75074,
USA
Phone
+86-10-62607100
+1-888-502-5585
Email
contact@Baicells.com
Website
www.Baicells.com
https://na.Baicells.com
Related Documents
Other Baicells technical documents may be found at Baicells Support > Downloads.
User Equipment:
Atom 5dBi Indoor CPE User Manual
Atom 11dBi Outdoor CPE User Manual
Atom 19.5dBi Outdoor CPE User Manual
Atom ID0406-6.5 User Manual
Atom OD0406-14/19.5 User Manual
EPC, OMC/BOSS, System:
Configuration & Network Administration Guide
Handoff Configuration Guidelines (Beta trial)
HaloB User Guide
BOSS API Manual
Operation, Maintenance, & Troubleshooting Guide

4
Safety Information
For the safety of installation personnel and for the protection of the equipment from damage,
please read all safety warnings. If you have any questions concerning the warnings, before
installing or powering on the base station contact the Baicells support team.
Warning IMPORTANT SAFETY INSTRUCTIONS
This warning symbol means danger. You are in a situation that could cause bodily injury. Before
you work on any equipment, be aware of the hazards involved with electrical circuitry and be
familiar with standard practices for preventing accidents.
Warning Read the installation instructions before you connect the system to its power
source.
Warning Installation of the equipment must comply with local and national electrical
codes.
Warning This product relies on the existing building or structure for short-circuit
(overcurrent) protection. Ensure that the protective device is rated no greater than 20A.
Warning Do not operate this wireless network device near unshielded blasting caps or
in an explosive environment unless the device has been modified and qualified for such use.
Warning In order to comply with the United States Federal Communications
Commission (FCC) radio frequency (RF) exposure limits, antennas should be located at a
minimum of 20 centimeters (7.9 inches) or more from the body of all persons.

5
Table of Contents
1Overview ...................................................................................................................... 9
1.1 Introduction................................................................................................................. 9
1.2 Features ..................................................................................................................... 10
2Planning...................................................................................................................... 11
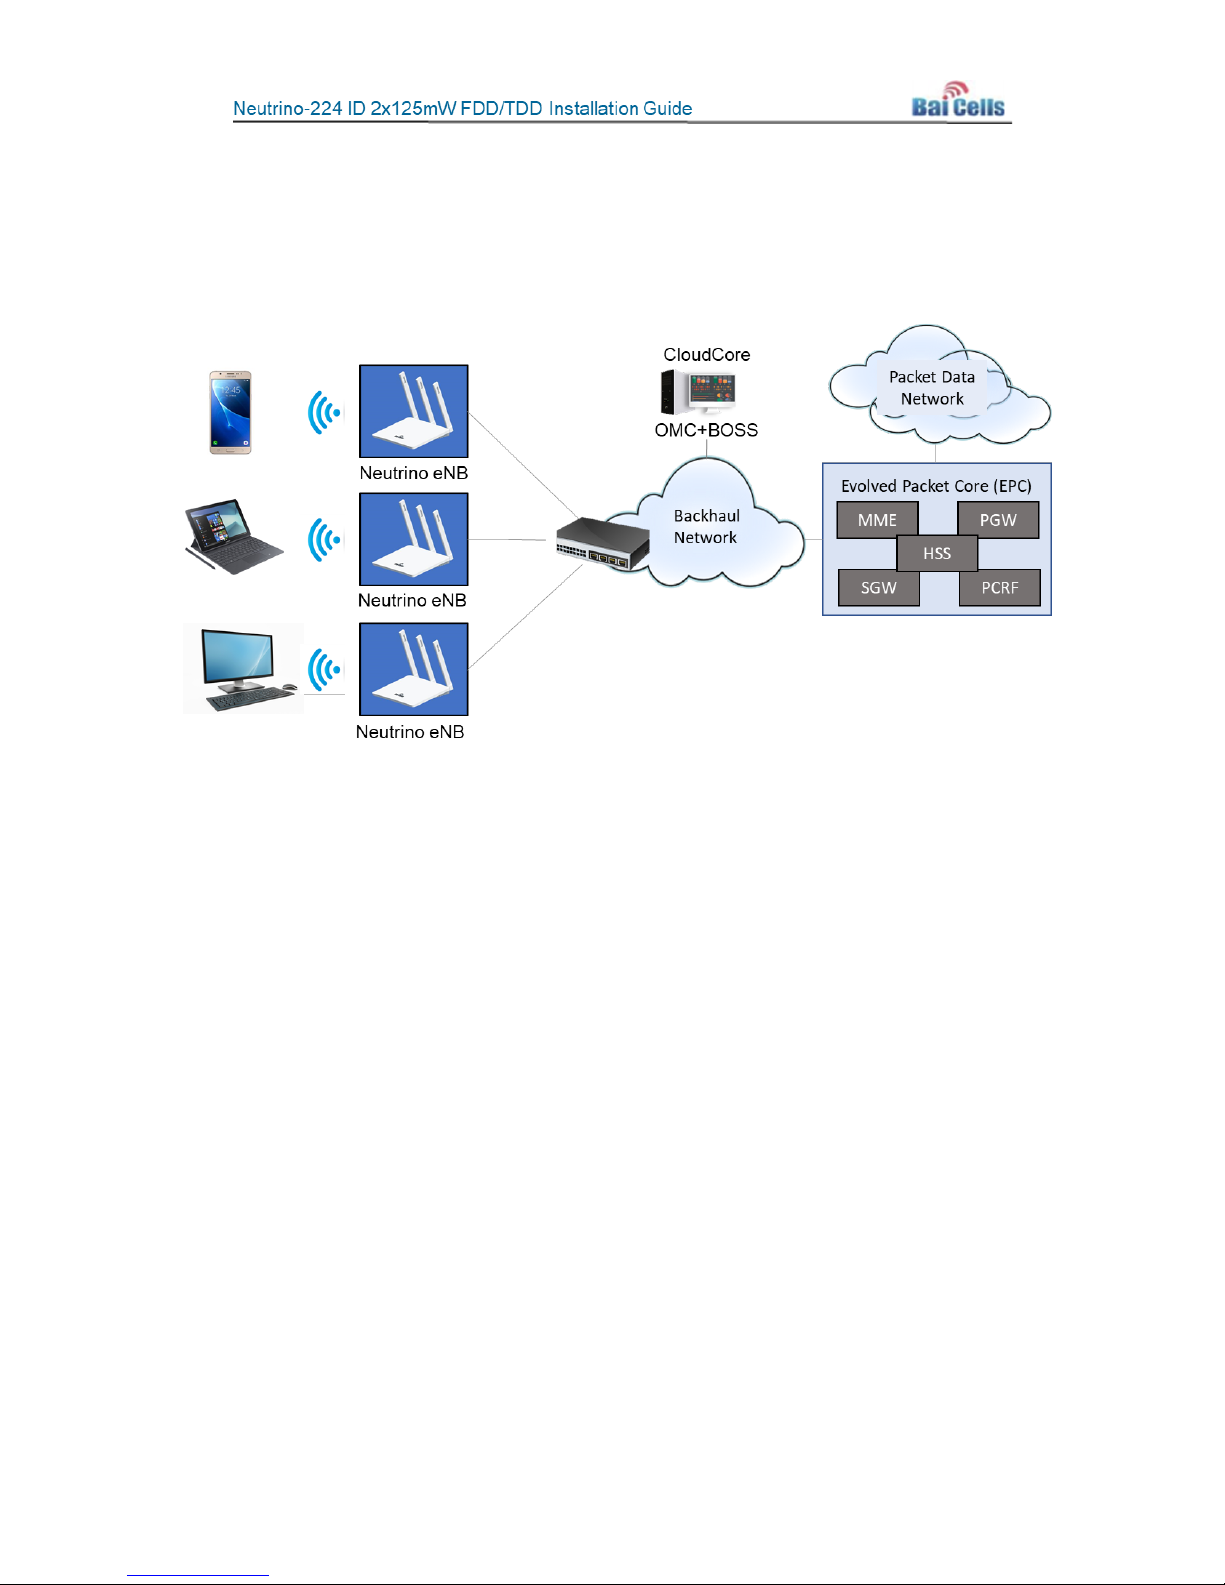
2.1 Network & Site Planning............................................................................................ 11
2.2 Mounting Options...................................................................................................... 11
2.3 Client Computer Requirements................................................................................. 11
2.4 Form Factor................................................................................................................ 12
3Verify Basic Operation ................................................................................................. 14
3.1 Connect Power Cable................................................................................................. 14
3.2 Power On ................................................................................................................... 14
4Mounting the Unit....................................................................................................... 15
4.1 Preparation ................................................................................................................ 15
4.2 Ceiling Installation ..................................................................................................... 15
4.3 Wall Installation ......................................................................................................... 17
4.4 Connect Cables .......................................................................................................... 17
4.5 Power on.................................................................................................................... 17
4.6 Check eNB Status in Software ................................................................................... 17
4.6.1 Computer Requirements .................................................................................17
4.6.2 Prepare the Client Computer...........................................................................18
4.6.3 eNB GUI ...........................................................................................................19
5Configuration .............................................................................................................. 21
5.1 Quick Setting.............................................................................................................. 21
5.2 Network ..................................................................................................................... 23
5.2.1 WAN.................................................................................................................23
5.2.2 LAN ..................................................................................................................25
5.2.3 Route ...............................................................................................................27
5.2.4 Host..................................................................................................................28
5.2.5 IPSec ................................................................................................................29
5.2.6 BACKHAUL .......................................................................................................35
5.3 BTS Setting................................................................................................................. 36
5.3.1 Security Setting................................................................................................36
5.3.2 Management Server........................................................................................36
5.3.3 Sync Setting .....................................................................................................37
5.3.4 License Management ......................................................................................39
5.4 System ....................................................................................................................... 39
5.4.1 NTP ..................................................................................................................39
5.4.2 Upgrade ...........................................................................................................40
5.4.3 Backup .............................................................................................................42
5.4.4 Password..........................................................................................................43
5.4.5 CertStore..........................................................................................................44

6
5.5 LTE Setting.................................................................................................................. 44
5.5.1 Neighbor Cells & Mobility................................................................................45
5.5.2 Other LTE Settings............................................................................................71
5.6 Reboot ....................................................................................................................... 79
Appendix A: Technical Specifications .............................................................................. 80
Hardware Specifications .................................................................................................. 80
Software Specifications ................................................................................................... 81
Environmental Specifications .......................................................................................... 82
Global Part Numbers ....................................................................................................... 82
Appendix B: FAQs........................................................................................................... 83
Appendix C: Abbreviations & Acronyms.......................................................................... 84
List of Figures
Figure 1-1: Neutrino-224 eNB ................................................................................................... 9
Figure 1-2: Baicells Broadband Wireless Access Solution with Neutrino-224 eNB................. 10
Figure 2-1: Form Factor ........................................................................................................... 12
Figure 2-2: LEDs & Interfaces................................................................................................... 12
Figure 3-1: LEDs & Interfaces................................................................................................... 14
Figure 4-1: Attach Bracket ....................................................................................................... 15
Figure 4-2: Mark Drilling Holes................................................................................................ 16
Figure 4-3: Fix Bracket to Ceiling Panel.................................................................................... 16
Figure 4-4: Attach Unit to Bracket ........................................................................................... 16
Figure 4-5: Internet Protocol Version (TCP/IPV4) .................................................................... 18
Figure 4-6: eNB GUI Login ....................................................................................................... 19
Figure 4-7: FDD eNB GUI Home Page ...................................................................................... 20
Figure 4-8: TDD eNB GUI Home Page ...................................................................................... 20
Figure 5-1: FDD Quick Setting.................................................................................................. 21
Figure 5-2: TDD Quick Setting.................................................................................................. 22
Figure 5-3: WAN....................................................................................................................... 24
Figure 5-4: Multi link mode configuration............................................................................... 25
Figure 5-5: LAN ........................................................................................................................ 26
Figure 5-6: LAN Internet Config ............................................................................................... 26
Figure 5-7: Route ..................................................................................................................... 27
Figure 5-8: Host ....................................................................................................................... 29
Figure 5-9: IPSec ...................................................................................................................... 30
Figure 5-10: IPSec Tunnel – Basic Setting ................................................................................ 31
Figure 5-11: IPSec Tunnel – Advance Setting........................................................................... 33
Figure 5-12: Backhaul .............................................................................................................. 35
Figure 5-13: Security Setting.................................................................................................... 36
Figure 5-14: Management Server............................................................................................ 37
Figure 5-15: FDD Sync Setting.................................................................................................. 37
Figure 5-16: TDD Sync Setting ................................................................................................. 38

7
Figure 5-17: License Management .......................................................................................... 39
Figure 5-18: NTP ...................................................................................................................... 40
Figure 5-19: Upgrade ............................................................................................................... 41
Figure 5-20: Backup ................................................................................................................. 42
Figure 5-21: CertStore ............................................................................................................. 44
Figure 5-22: LTE Setting ........................................................................................................... 45
Figure 5-23: LTE Freq/Cell........................................................................................................ 46
Figure 5-24: LTE Neigh Freq Settings (1 of 2)........................................................................... 47
Figure 5-25: LTE Neigh Freq Settings (2 of 2)........................................................................... 47
Figure 5-26: LTE Neigh Cell Settings......................................................................................... 50
Figure 5-27: 3G Freq/Cell......................................................................................................... 52
Figure 5-28: 3G Neigh Cell Settings ......................................................................................... 53
Figure 5-29: GSM Freq/Cell ..................................................................................................... 55
Figure 5-30: Handoff................................................................................................................ 57
Figure 5-31: Mobility Parameter ............................................................................................. 58
Figure 5-32: A3 Event Threshold ............................................................................................. 62
Figure 5-33: A4 Event Threshold ............................................................................................. 63
Figure 5-34: A5 Event Threshold ............................................................................................. 63
Figure 5-35: Measurement Control Parameter ....................................................................... 63
Figure 5-36: B2 Event Threshold.............................................................................................. 63
Figure 5-37: Cell Selection Parameter ..................................................................................... 63
Figure 5-38: Cell ReSelection Parameter ................................................................................. 64
Figure 5-39: Additional Measurement Parameter .................................................................. 64
Figure 5-40: Advanced............................................................................................................. 65
Figure 5-41: SON Functional.................................................................................................... 68
Figure 5-42: Scheduling Algorithm .......................................................................................... 69
Figure 5-43: MOCN Parameters (1 of 2) .................................................................................. 72
Figure 5-44: MOCN Parameters (2 of 2) .................................................................................. 72
Figure 5-45: RRC Parameter (1 of 2) ........................................................................................ 73
Figure 5-46: RRC Parameter (2 of 2) ........................................................................................ 73
Figure 5-47: Capacity Parameter ............................................................................................. 74
Figure 5-48: Random Access & Capacity Parameters.............................................................. 75
Figure 5-49: Log Config............................................................................................................ 76
Figure 5-50: LTE log level & phyTraceSubsystemConfig........................................................... 78
Figure 5-51: phyTraceConfig.................................................................................................... 78
Figure 5-52: phyTraceNetworkCaptureConfig ......................................................................... 79
Figure 5-53: boardConf............................................................................................................ 79

8
List of Tables
Table 2-1: Client Computer Requirements .............................................................................. 11
Table 2-2: LEDs & Interfaces .................................................................................................... 12
Table 2-3: LED Color States...................................................................................................... 13
Table 4-1: Computer Requirements ........................................................................................ 17
Table 5-1: Quick Setting........................................................................................................... 22
Table 5-2: WAN Interface......................................................................................................... 24
Table 5-3: Multi link mode configuration ................................................................................ 25
Table 5-4: LAN Internet............................................................................................................ 26
Table 5-5: Static Route............................................................................................................. 27
Table 5-6: Host......................................................................................................................... 29
Table 5-7: IPSec Tunnel – Basic Setting.................................................................................... 31
Table 5-8: IPSec Tunnel – Advance Setting .............................................................................. 33
Table 5-9: BACKHAUL............................................................................................................... 35
Table 5-10: Security Setting..................................................................................................... 36
Table 5-11: Sync Setting........................................................................................................... 38
Table 5-12: NTP........................................................................................................................ 40
Table 5-13: Neighbor LTE eNB Frequencies ............................................................................. 48
Table 5-14: Neigh Cell List........................................................................................................ 50
Table 5-15: Neigh Freq List ...................................................................................................... 52
Table 5-16: Neigh Cell List........................................................................................................ 54
Table 5-17: Neigh Freq List ...................................................................................................... 55
Table 5-18: Neigh Cell List........................................................................................................ 56
Table 5-19: Mobility Parameter............................................................................................... 58
Table 5-20: Power Control Parameters.................................................................................... 66
Table 5-21: eNodeB Settings.................................................................................................... 67
Table 5-22: GAP Setting ........................................................................................................... 67
Table 5-23: SON Setting ........................................................................................................... 68
Table 5-24: Scheduling Algorithm............................................................................................ 69
Table 5-25: eNodeB Range ...................................................................................................... 70
Table 5-26: Cfsb Select............................................................................................................. 71
Table 5-27: RAT Handover Priority........................................................................................... 71
Table 5-28: MOCN Parameters ................................................................................................ 72
Table 5-29: RRC Parameter...................................................................................................... 73
Table 5-30: Capacity Parameter............................................................................................... 75
Table 5-31: Log Config ............................................................................................................. 77

9
1 Overview
1.1 Introduction
The Baicells Neutrino-224 product is an indoor 2x125mW small cell eNodeB (eNB) (Figure 1-
1). The eNB provides broadband wireless access to 3GPP standard Frequency Division
Duplexing (FDD) and Time Division Duplexing (TDD) Long-Term Evolution (LTE) backhaul
networks. The Neutrino eNB is the equivalent of a Wi-Fi access point, except that it runs on
LTE technology. Using LTE technology ensures an extremely fast, reliable, and secure
connection to the network.
The Neutrino eNB makes use of the current LTE transmission resources to enable low-cost
coverage and increased capacity for up to 48 (FDD) or 32 (TDD) concurrent users. The small-
sized eNB is easy to deploy. Each eNB comes pre-configured so that installation is simplified
and connection to the core network can be plug-and-play.
Figure 1-1: Neutrino-224 eNB
Baicells provides a local and Web-based Graphical User Interface (GUI) application to configure
and manage the eNB. Baicells also provides a cloud-based solution called CloudCore, which
enables service providers with an account to access network management applications
through the Internet. The Baicells CloudCore provides an Operations Management Console
(OMC) for element management across multiple sites and a Business and Operations Support
System (BOSS) for subscriber management.
NOTE: All GUI applications (UE GUI, eNB GUI, OMC, BOSS) are documented in the
Baicells Configuration & Network Administration Guide. However, the Neutrino eNB
is a newer product based on the latest development software; the eNB GUI and
OMC menus and fields may differ from other Baicells products.

10
The cloud-based Evolved Packet Core (EPC) functions may be managed by Baicells to provide
high-speed packet processing and high-quality mobile broadband services end-to-end.
The system architecture, including Neutrino-224 eNBs, is illustrated in Figure 1-2.
Figure 1-2: Baicells Broadband Wireless Access Solution with Neutrino-224 eNB
1.2 Features
The Neutrino-224 eNB is based on LTE Standard 3GPP Release 9. Following is a list of the key
features of this product:
• Standard LTE network modes:
- FDD bands 1, 2, 3, 4, 5, 7, and customized
- TDD bands 40, 41, 42, 43, 48, and customized
• Peak rate with 20 MHz spectrum:
- FDD: 150 Mbps DL, 50 Mbps UL
- TDD: 110 Mbps DL, 20 Mbps UL
• Maximum 48 (FDD) and 32 (TDD) concurrent users per cell
• Supports 5/10/15/20 MHz operation bandwidth
• Plug-and-play with SON capabilities
• Built-in DHCP server, DNS client, and NAT functionality
• Integrated high-gain antenna
• Local and Web GUI, network management through BaiOMC

11
2 Planning
2.1 Network & Site Planning
When installing multiple Neutrino eNodeBs (eNBs) in the same general location, for example
to cover an entire floor of a building, you will need to perform network and site planning to
ensure that all target areas are properly covered for wireless service. Radio Frequency (RF)
performance can be diminished by numerous factors, including interference from other eNBs
and other radiating devices, and the existence of walls or other obstructions.
You need to consider the density of users and the required capacity to meet their needs. The
selected frequency, power, and other settings also affect RF performance. For these reasons,
you should perform a site survey and plan the distance between eNBs. A site survey may be
ad hoc, or you may wish to use a third-party site survey and RF planning application, or you
can hire professionals to complete the planning.
Other types of network planning involve IP addressing; the selection of unique network and
cell site identifiers that are used when configuring LTE networks; and for each installation site,
the availability of a power source as well as proximity to the local gateway equipment.
2.2 Mounting Options
The Baicells Neutrino-224 eNB was designed for easy deployment. The unit can sit on a
desktop or be installed on a ceiling or a wall.
Before placing or installing the eNB at its final location, Baicells recommends that you connect
power to the unit in order to verify the status of the PWR LED indicator. How to do this is
explained in section 3.
2.3 Client Computer Requirements
Table 2-1 describes the client computer requirements for accessing the Neutrino eNB GUI app.
As part of the initial installation of the eNB, typically you will need to use an Ethernet cable to
connect the local computer to the eNB LAN port.
Table 2-1: Client Computer Requirements
Item
Description
CPU
Intel Core 1 GHz or higher
Memory
2G or higher RAM
Hard Disk
No less than 100 MB space available
Operating System
Microsoft:Windows XP, Windows Vista, or Windows 7
or later
Mac
:
MacOSX10.5 or later
Screen Resolution
Above 1024 x 768
Browser
Chrome 6 or later

12
2.4 Form Factor
The Neutrino eNB has a sleek form factor (Figure 2-1):
•Height with antennas – 7 inches / 175 mm
•Height of base – 1 inch / 30 mm
•Width – 5 inches / 130 mm
The unit only weighs approximately one pound (500 g).
Figure 2-1: Form Factor
Figure 2-2 shows the LED indicators and interfaces on the back of the unit. The LEDs and
interfaces are described in Tables 2-2 and 2-3.
Figure 2-2: LEDs & Interfaces
Table 2-2: LEDs & Interfaces
LED/Interface
Description
RST
Reset button
GPS
Optional*: External Global Positioning System (GPS) antenna
connector, SMA male connector type
LAN
Gigabit Ethernet Local Area Network (LAN) interface
WAN
Gigabit Ethernet Wide Area Network (WAN) interface for
backhaul
PWR
Power interface: 220V AC to 12V DC power adaptor

13
*NOTE: Some users may want to add a GPS antenna to better ensure accurate
physical location information used by the eNB during transmissions. Follow the GPS
vendor’s installation requirements to install a GPS antenna with the Neutrino eNB.
Table 2-3: LED Color States
Color
Status
Description
White
Steady on
The device is powered on.
Slow flash The device is ready to transmit/receive data.
Fast flash
The device is transmitting data.
Red
Steady on
Alarm indicating strong interference may be
affecting network performance
Slow flash Other types of alarms are occurring
Fast flash
S1 alarm – the device cannot reach the backhaul
network (Internet)
Please refer to Appendix A for all of the Neutrino technical specifications.

14
3 Verify Basic Operation
Before installing the Neutrino eNodeB (eNB), especially if placing it on a ceiling or wall, you
should check that:
•You have all of the parts on the packing list;
•You have the standard tools at hand to perform the installation; and
•The eNB unit will power on successfully.
This section walks you through the steps of verifying that the Neutrino eNB is operational
and ready for installation.
3.1 Connect Power Cable
Refer to Figure 3-1 to connect power to the eNB. Connect the power adaptor to the power
(PWR) port on the unit, and plug the other end into an AC power outlet.
Figure 3-1: LEDs & Interfaces
3.2 Power On
Power on the Neutrino eNB. The PWR LED should light up with a steady white light, as
described in Table 2-3 above. The other LEDs will not activate or may display alarm status pre-
installation. You will be checking those LEDs later in the process once the installation and basic
configuration steps are completed.
If the eNB does not power on or the PWR LED is not lit up, please verify that the connection
setup is correct. Otherwise, contact your supplier immediately for a replacement.

15
4 Mounting the Unit
This section covers how to install the Neutrino eNodeB (eNB) on a ceiling or wall. If you
completed the steps in section 3 Verify Basic Operation, as recommended, uninstall the power
connections from the eNB before installing the unit on a ceiling or wall.
4.1 Preparation
If you plan to install the Neutrino eNodeB (eNB) on a ceiling or wall, you will need a marker
pencil and a percussion drill to install the bracket that holds the eNB. Go to section 4.2 for a
ceiling installation, or to section 4.3 for a wall installation.
Some operators may want to add a GPS antenna to ensure accurate physical location
information used by the eNB during transmissions. To connect the antenna you will use the
GPS interface on the eNB. Follow the GPS vendor’s installation requirements to install a GPS
antenna with the Baicells Neutrino-224 eNB.
4.2 Ceiling Installation
Review the following guidelines for installing the Neutrino-224 eNB unit on a ceiling. The
installation steps follow.
The thickness of the ceiling should be no less than ½ inch/18 mm, and should be able to
bear more than 11 lbs/5 kg weight.
If the ceiling is made of weak materials, such as a gypsum, this installation method is not
recommended. Because of the environment restrictions, to continue with a ceiling mount
in this situation add one layer of stronger panel under the screws to make sure the device
is secure.
1. Attach the bracket under the Neutrino eNB unit using the M3*10 cross round head screws
(Figure 4-1).
Figure 4-1: Attach Bracket
2. Remove the selected ceiling panel.

16
3. Place the bracket on the center of the ceiling panel, and mark the drilling hole
locations with a marker pen (Figure 4-2).
Figure 4-2: Mark Drilling Holes
4. Drill the 3 holes that you marked, deep enough to receive the expansion bolts.
5. Use the expansion bolts to fix the installation bracket on the ceiling panel, and tighten the
screws (Figure 4-3).
Figure 4-3: Fix Bracket to Ceiling Panel
6. Slide the Neutrino unit onto the bracket according to the arrow indicator (Figure 4-4).
Proceed to section 4.4.
Figure 4-4: Attach Unit to Bracket

17
4.3 Wall Installation
The steps for installing a Neutrino eNB on a wall are the same as when installing it on a ceiling,
as covered in section 4.2 Ceiling Installation, with the exception that you will need to adjust
the direction of the arrow on the bracket according to the wall placement. Be sure the 3 holes
for the bolts are in the correct position.
Proceed to section 4.4, next.
4.4 Connect Cables
Connect the power adaptor to the unit and outlet, as explained in section 3 Verify Basic
Operation. Do not power on the unit yet.
Connect an Ethernet cable to the WAN port on the unit; the other end connects to the
backhaul device.
4.5 Power on
Power on the Neutrino eNB. It may take a minute or two for the LEDs to provide status
information. Refer to Table 2-3 LED Status to ensure the PWR LED is showing a steady white
light. The other LED will be more accurate after you complete the basic configuration, which
is discussed in section 5 Configuration.
4.6 Check eNB Status in Software
The Baicells eNBs are designed to be plug-and-play and, therefore, arrive with many
parameters pre-configured using default values. You will need to connect a computer to the
LAN port using an Ethernet cable to ensure the eNB status is reported as active before you
continue with the installation.
4.6.1 Computer Requirements
The client computer you use to interface with the LAN port on the eNB must meet the
following minimum requirements shown in Table 4-1.
Table 4-1: Computer Requirements
Item
Description
CPU
Intel Core 1GHz or higher
Memory
> 2G RAM
Hard Disk
> 100 MB space available
Operating system
Microsoft: Windows XP, Windows Vista, or Windows7
Mac: MacOSX10.5 or later
Screen resolution
> 1024 x 768
Browser
Chrome 6 or higher

18
4.6.2 Prepare the Client Computer
4.6.2.1 Connect Ethernet Cable
Connect one end of an Ethernet cable to the LAN port on the eNB and the other end to
your computer. Initially, you will use this local connection to access the eNB GUI
application to verify the eNB’s status and to configure a few basic settings. Make sure
the client computer and the LAN interface are configured and attached to the same local
area network.
4.6.2.2 Client Setup
To establish the connection between the client computer and the eNB, please ensure the IP
addressing is set up correctly. Following is an example for a Windows 7 PC.
1. Select Start > Control Panel, and in the pop-up window click on Network and Internet.
2. Click on View network status and tasks, and then click on Local Connectivity.
3. In the window labeled Status of Local Connectivity, click on Properties. This will open
the Properties of Local Connectivity window.
4. Select Internet Protocol Version (TCP/IPV4), and click on Properties to see the pop-
up window shown in Figure 4-5.
Figure 4-5: Internet Protocol Version (TCP/IPV4)
5. Select either Obtain an IP address automatically and proceed to step 7, or select Use
the following IP address and follow steps 6 and 7. In general, if the option for
obtaining the IP address automatically fails, you will need to set up the IP address
manually.
6. Select Use the following IP address. Input the IP address, subnet mask, and default
gateway, where:

19
a. IP address is 192.168.150.xxx (where xxx is a number from 100 to 254).
b. Subnet mask is 255.255.255.0.
c. Default gateway is 192.168.150.1.
7. In the command window, execute a ping to 192.168.150.1, and check whether the
connection between the client computer and the eNB is working.
4.6.3 eNB GUI
NOTE: The eNB GUI menus vary according to software version and based on FDD or
TDD operation. Both FDD and TDD GUIs are covered in this document.
Once you have connected a computer to the LAN port, open a Web browser and go to
http://192.168.150.1. Log in using username admin, password admin (Figure 4-6).
Figure 4-6: eNB GUI Login
This will open the eNB GUI home page (FDD shown in Figure 4-7, TDD shown in Figure 4-8).
Go to BTS Info > Basic Info > Cell Status to check the cell (eNB) status (the field highlighted in
red in the figures. The Cell Status field should indicate Activation (for Active). You are ready to
go to the next step – section 5Configuration.
If the status is reported as inactive, check the SCTP/S1AP link or contact Baicells support.

20
Figure 4-7: FDD eNB GUI Home Page
Figure 4-8: TDD eNB GUI Home Page
Table of contents
Other Baicells Wireless Access Point manuals

Baicells
Baicells Nova430 User manual

Baicells
Baicells EG7035E-M1 User manual

Baicells
Baicells CW0100 User manual

Baicells
Baicells ATOM OD06 User manual

Baicells
Baicells EG7010A-M11 User manual

Baicells
Baicells Atom ID0406-6.5 User manual

Baicells
Baicells EG2030C-M2 User manual

Baicells
Baicells EG7035E User manual

Baicells
Baicells Nova442i User manual
Popular Wireless Access Point manuals by other brands

Grandstream Networks
Grandstream Networks GWN7610 Deployment guide

M2M
M2M MCF-LW12TERPM operating manual

Cisco
Cisco AIR-AP352E2R - Aironet 350 - Wireless Access... datasheet

Cisco
Cisco WUMC710 Quick installation guide

Metrologic
Metrologic FocusBT MS9535 Brochure & specs

Ubiquiti
Ubiquiti Power AP N 802.11n quick start guide