Baiyun Cleaning A201 User manual

Environmental tips
Please dispose of the package,
used components (battery) and
hazardous fluid (antifreeze and
machine oil) properly according
to local waste disposal regulations
to ensure environmental safety.
Please remember to recycle them
for further use if possible.
ISO9001:2008 International
Quality System Certified
ISO9001:2008 International
Quality System Certified
This manual contains important safety precautions and instructions on the correct
operation of product. Please read this carefully before using the product.
Version: A/0-2014
Applicable model
A201 Q
:
、201 K201 Y201 T201.、、、
Product Manual
PUSH-BEHIND FLOOR SCRUBBER
201 SERIES
Guangdong Baiyun Cleaning Group Co.,Ltd.

Guangdong Baiyun Cleaning Group Co.,Ltd.

Rear squeegee
Front squeegee
Remark:
Pad driver:14" floor scrubber
pad driver
201 Series Push-behind
Floor Scrubber Optional Spares
Description:1.201 series:A201 Q201 K201 Y201 T201.、、、、
2.The following pictures are only for reference, so products
are subjects to what you get.
Front squeegee: standard squeegee with 6 holes
Front squeegee: customized hole position
Front squeegee: oil-resistant squeegee
Rear squeegee: standard squeegee
Rear squeegee: oil-resistant squeegee
Pad driver
Pad driver
buckle
Brush:14" brush with 0.7mm bristles
Description of symbols in this manual
Description of symbols on the machine
Guangdong Baiyun Cleaning Group Co.,Ltd.

17
CONTENTS
3
5
6
7
7
8
9
9
10
13
14
15
6
7
6
WARRANTY INFORMATION
Disclaimer
Guangdong Baiyun Cleaning Group Co.,Ltd.

4
5
16
AFTER-SALES SERVICE
After-sales service
Limited warranty statement
PACKING LIST
Standard configuration
No. Name Unit Quantity
1
2
3
1
1
1
1
1
Main Unit
Squeegee assembly
Power cable
Product manual
Conformity certificate
Set
Piece
Copy
Piece
Piece
Unpacking check
Check the product on receiving immediately. If there will be obvious damages on the
product, please keep the packing materials and contact the local distributor.
Guangdong Baiyun Cleaning Group Co.,Ltd.

15
X2capacitor
432
1
2
8
2
3
4
5
6
7
18
20
19
21
14
12
21
20
11
17
16
15
18
10 19
9
9
1
2
3
4
5
7
8
13
OPERATION INSTRUCTIONS
Key components
Serial number
Brush motor switch
Control panel
Handle adjustment switch
Handle lever assembly
Squeegee adjustment lever
Vacuum hose
Recovery tank lid
Recovery tank
Solution tank frame
Wheel
Squeegee assembly
Suction hose
Solution tank
Solution tank lid
Circuit board assembly
Brush motor
Vacuum motor
Solenoid valve
Protect cover
Brush assembly
TECHNICAL DETAILS
Wiring diagram
Power cable
Vacuum
motor
Black White
Red
Green
Red
Red
Black
Black
Yellow
green
Brown
Blue
Green
Red
White
Black
Blue
Brown
Brown
Brown
Yellow green
Yellow
green
Blue
Brown
Brown
Brush motor
White(Blue)
Blue
Yellow
White
Black
Brown
Brown
Brown(Black)
Blue
(Red) Running
capacitor
Starting
capacitor
Guangdong Baiyun Cleaning Group Co.,Ltd.

3
①Control panel
②Brush motor switch
③Handle adjustment switch
②
③
①
①
③
② ③①
14
IPX
V
mmH O
2
W
W
rpm
L
L
dB
cm
kg
300
cm
m /h
2
inch
kg.f
deg
cm
cm
m
1300
200
3
12
140
≤70
11.8
13.4
43
1500
14
35
025
-
12
60
25
42x41x86
34.7
TECHNICAL DETAILS
Technical specifications
Description Unit Data
Protection level
Operating tension
Vacuum motor
Suction vacuum
Brush motor
Brush speed
Noise level
Solution tank capacity
Recovery tank capacity
Squeegee width
Theoretical cleaning efficiency
Brush diameter
Cleaning width
Brush pressure
Maximum gradient
Minimum turning radius
Power cable length
Machine dimensions(Without squeegee)
Package weight(Without battery)
OPERATION INSTRUCTIONS
Description of control components
(See on the instruction of the control panel.)
Hold on the switch to make the brush
motor work. Release it, the brush stops
working.
Operate the switch to regulate the angle
of the handle lever.
Description of control panel
Vacuum switch
Sprinkling switch
Press this switch, the vacuum motor begins to work. Press it again to turn off the vacuum
motor.
②ON/OFF switch
Press this switch to turn on or off the power.
Press this switch the sprinkling motor starts to working. Then, press this again, the
sprinkling motor comes to a complete stop.
,
Assembling parts
1.Squeegee assembling
Put the end hole on the revolving shaft of the squeegee assembly as axile and assemble
the revolving shaft assembly, spring, shaft. Then, insert and unfasten the opening bolt
with the holes of the revolving shaft. After that, use the locking nut to connect the revolving
shaft assembly with the shaft on the solution tank frame. At last, connect the suction hose
Guangdong Baiyun Cleaning Group Co.,Ltd.

4
●Squeegee ascending and descending●
13
Opening bolt
Suction
inlet
Locking nut
Revolving
shaft
Squeegee assembly
Spring
Shaft
Revolving shaft assembly
fig.1 fig.2
Squeegee
assembly
OPERATION INSTRUCTIONS
Assembling parts
into the suction mouth on the squeegee frame to complete the assembling of the squeegee
assembly.(fig.2)
After the cleaning work, lift up the squeegee assembly and remove the brush in case that
the squeegee and the brush deform. Pull the squeegee lever upward to ascend the squeegee
assembly, and pull it downward to descend the squeegee assembly. The specific steps to
remove the brush is seen on the page 6 as the instructions of brush assembling(fig.2)
2 Brush assembling.
Attention
Do not operate any function button while hands are touching the brush, in case of injuries.
●
●Make sure the scrub pad is placed with the center of the pad driver and screw the pad
driver buckle. Afterwards, you can work as follows.
Rotate it 30
to the left
Three-blade
plate
fig.3 fig.4
Rotate it 30
to the right
1.Make the operation handle vertical and put the machine downward on the floor. Then,
align the brush with the three-blade plate and rotate the brush 30 to the left. After that,
the brush assembling will be finished and place the machine well.(fig.3)
2.If the brush is needed to change, hold on and rotate it 30 to the right to remove the
brush.(fig.4)
MAINTENANCE GUIDE
Trouble shooting
1 The machine socket has not been
connected well with the battery
socket.
2.The related motor switch has not
been switched on.
3.The voltage of the machine is not
normal or stable.
4.The related indicated lights blinks
abnormal.
.
1.The seal ring of the soiled water
recovery tank lid gets loose.
2.The hose hoop gets loose.
3.The water suction motor gets
loose or tilts.
4.The water suction hose is
obstructed.
5.The vacuum hose is broken.
1.Attach the seal strip properly without
space.
2.Check the hose hoop and install it
properly.
3.Open the silencer lid to make sure
the motor is installed correctly and
properly.
4.Clear out the air inlet and outlet.
5.Repair the vacuum hose.
Guangdong Baiyun Cleaning Group Co.,Ltd.

①Open the solution tank lid, then fill the water
or dilute neutral detergent into the solution
tank from the inlet mouth.
4
5
●Brush assembly exploded diagram●Brush assembly exploded diagram
12 5
Attention
MAINTENANCE GUIDE
Daily maintenance
fig.13 fig.14 fig.15
4.Maintain the brush
Rotate it 30
to the right
Brush
Rinse
Hold on the brush and rotate it 30 to the right to remove the brush(fig.13&fig.14), and then
clean them. If the machine will lay idle for long time, the brush should be removed, cleaned
and air-dried, otherwise, the load of the brush motors may be too strong when it is being
used again and even worse, can’t operate normally.(fig.15)
1Brush motor
3Brush holder
2Brush motor plate
Pulley
Protect cover
6Brush
OPERATION INSTRUCTIONS
Working before preparation
Solution
tank lid
Brush
Turn off ON/OFF switch Connect the power
1.Fill the solution tank
The temperature of water or detergent should
be lower than 50℃.
②
To avoid shortening the service life of the
machine, detergents added into the solution
tank should be less foamy and less volatile
neutral detergents with a PH of 5-9.
2 Check whether the
brush is assembled
well. If not, assemble
them according to the
instruction of “Brush
assembling” on Page 7.
.3.Check whether the
squeegee assembly
is assembled well.
If not, assemble the
squeegee assembly
according to the
instruction of
“squeegee assembling”
on Page 4.
4.Insert the plug into the power socket to connect the power, and then press the function
buttons on the control panel to make sure the brushes, the squeegee assembly, the
suction pump and the sprinkling pump are ready for work.
Guangdong Baiyun Cleaning Group Co.,Ltd.

6
5
11
OPERATION INSTRUCTIONS
Operation steps
After the preparation work, operator can use the machine to begin the cleaning work.
c. Hold on the brush
motor switch a. Press the function
buttons
b. Put the squeegee
lever down
squeegee
lever
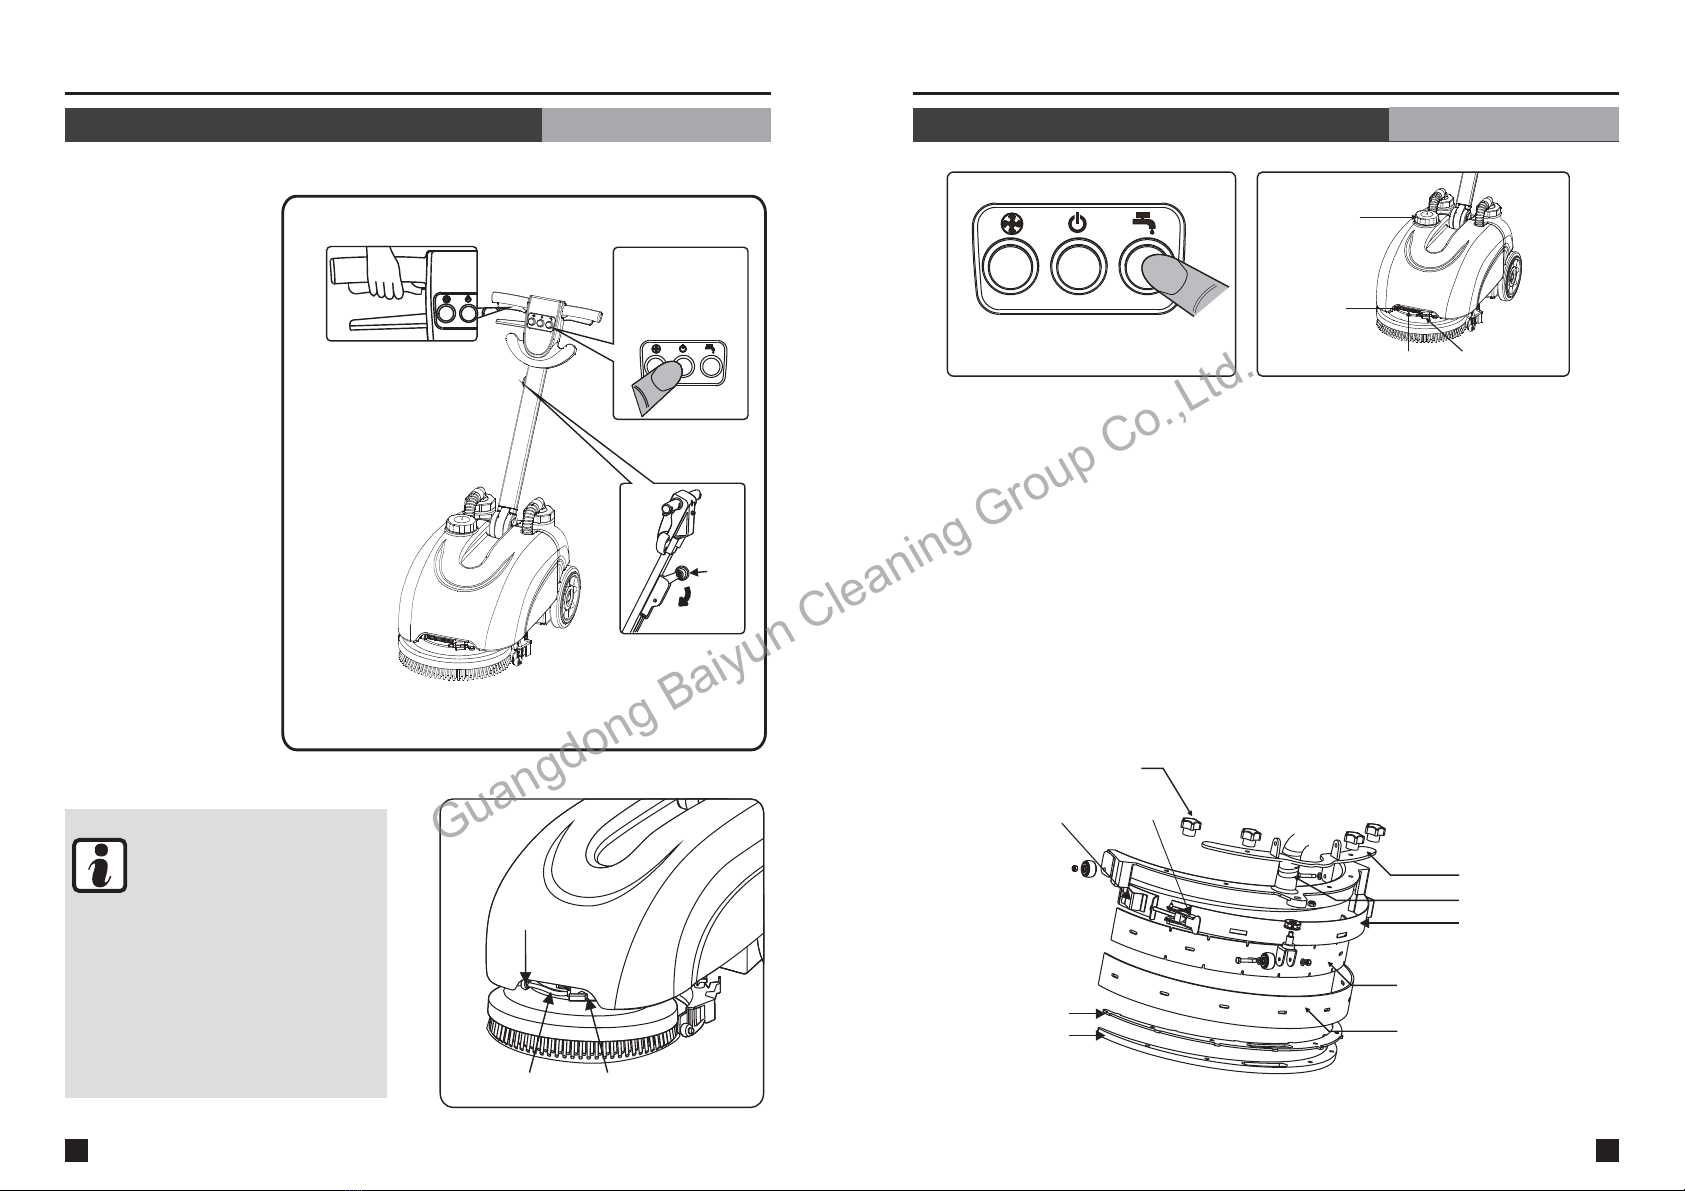
1 Check whether the sprinkling
button and the vacuum button
are turn off. Then switch on the
ON/OFF switch on the control
panel(fig.5-a), the machine will
in manual state.
.
2.Press the sprinkling button
on the control panel(fig.5-a),
the solenoid valve begins to
work, the machine starts
sprinkling water.
3.Put down the squeegee lever
to ensure that the squeegee
is totally touched with the floor
to work.
4.Hold on the brush motor
switches on both sides
(fig.5-c), the brush can
clean the floor.
5.After cleaning the work,
lift up the squeegee lever
and release the brush
motor switches. Then,
press the sprinkling button,
vacuum button, ON/OFF
switch to stop all cleaning
work.
Note
During the cleaning work, change the
water flow according to the condition
of the floor. The ball valve above the
brush cover can be used to adjust the
water flow. After the cleaning work,
pull the water pipe from quick connector
can discharge water in the solution tank
(fig.6).
Quick connector
Water pipe Ball valve
fig.6
MAINTENANCE GUIDE
Daily maintenance
Turn off the ON/OFF switch
fig.11
Solution
tank lid
Quick
connector
Water pipe Ball valve
fig.12
3.Maintain the squeegee
Remove, clean and air-dry the squeegee regularly to prolong the service life. The whole
squeegee assembly can be removed, to be cleaned and air-dry.
The procedure to remove the squeegee:
Star nuts
Triangle
clasp
Squeegee
clasp
Squeegee holder
Suction hose
Front squeegee
Rear squeegee
Upper inner pad
Lower inner pad
Retaining metal
strip assembly
①
②
③
④
Release the squeegee clasp to loosen the retaining metal strip assembly. Then pull the
two triangle clasps downwards to take out the retaining metal strip assembly.
After taking out the retaining metal strip assembly, the rear squeegee can be
removed.
Loosen the upper and lower inner pads and then the front and rear squeegee
can be removed. Check to confirm the wearing condition of the squeegee and
turn to an untouched side for use. Each squeegee has 4 sides for switching use.
Turn the two star nuts anticlockwise to remove the squeegee assembly.
Sprinkling switch
ON/OFF switch
Vacuum switch
Guangdong Baiyun Cleaning Group Co.,Ltd.

7
●
10
●Clean the strainer periodically.(fig.10)
MAINTENANCE GUIDE
Daily maintenance
Attention
When the cleaning work is over:
1.Disconnect the machine socket from the battery socket.
2.Drain the soiled water from the recovery tank and wash it with clean water.
3.Check to make sure the water suction hose is clear.
4.Wash the brushes and squeegees, and air-dry them.
1.Maintain the recovery tank
●Clean the recovery tank every time the cleaning work is finished.
fig.10
Strainer
fig.9
Vacuum
hose
Solution
tank lid
Solution
tank
Recovery tank lid
Drain hose
Recovery
tank
①
②
③
④
Take out the vacuum hose and the drain hose from the recovery tank lid. Then, pull out
the whole recover tank to separate it from the machine.
Loose the two recovery tank lids and turn over the recovery tank to discharge all the
soiled water.
Use the clean water to wash the recovery tank and air-dry it. Take care of preventing
sludge or foreign objects from blocking the water.
After cleaning the recovery tank, fasten the two recovery tank lids. After that, push the
recovery tank into the machine. Finally, connect the vacuum hose and the drain hose
with the mouth of the recovery tank.
2.Maintain the solution tank
If the machine stay idle for long time, open the solution tank lid and quick connector to
discharge all the solution water in the solution tank in case of solution in the tank
deteriorates(fig.12).
If the machine will be transported or stored when the environment temperature is less than
4 fter this, twist down the ball valve.
Then press the sprinkling button to sprinkle all the water stayed in the sprinkling system
(fig.11). Otherwise, water may freeze and damage the sprinkling motor, solenoid valve, and
hoses because of lower water temperature.
℃, discharge all the solution water in the solution tank. A
●
Notes before using
Don’ts
Guangdong Baiyun Cleaning Group Co.,Ltd.

9
47cm
8
2. Sensibility to strong acid and strong alkali
Do not put strong acid or strong alkali liquids into the water tank to deal with stubborn
dirt, in case those liquids damage the components of the water channel. If those liquids
are needed, sprinkle them on the floor directly.
The detergents put into the water tank should be neutral detergents with a PH of 5-9.
3. Cleaning areas
If there are too much dirt and big rubbish on the floor, such as wastepaper, plastic bags,
fruit peel, fruit seeds and so on, it is recommended to sweep the floor first, and then use
the machine to clean the floor, in case big objects block the water suction hose.
Notes on moving
1.While driving, keep the machine from colliding with other objects. Before entering a narrow
space, check whether the machine can get in.
2.Avoid driving the machine over rough places in case of mechanic damage, which will
shorten the servicing life of the machine
3.The width of the aisle should be at least 47cm for the machine with the squeegee assembly
to get through. If the width of the aisle is less than 47cm,remove the squeegee assembly,
and then let the machine get through. Do not force the machine to get through, which may
result in mechanical problems.
.
IMPORTANT PRECAUTIONS
Working conditions
1.Working environment temperature
The machine can only work in the 10 - environment.℃35℃
Turn off the ON/OFF
switch
fig.7
SAFETY PRECAUTIONS
Warning
Safety precautions
Forbidden
fig.8
13.If the user use the non-original batteries or chargers, please contact the manufacturers
in advance in order to avoid accidents.
Guangdong Baiyun Cleaning Group Co.,Ltd.
This manual suits for next models
4
Table of contents
Popular Scrubber manuals by other brands

Pacific
Pacific Z210 parts manual

Nilfisk-Advance
Nilfisk-Advance SC4000 Instructions for use

HAKO
HAKO Scrubmaster B120 instruction manual

Dustbane
Dustbane Hurricane Mini Operation manual

U.S. Products
U.S. Products Solus 500 Operating instruction

Saber Compact
Saber Compact Glide SG28 operating instructions