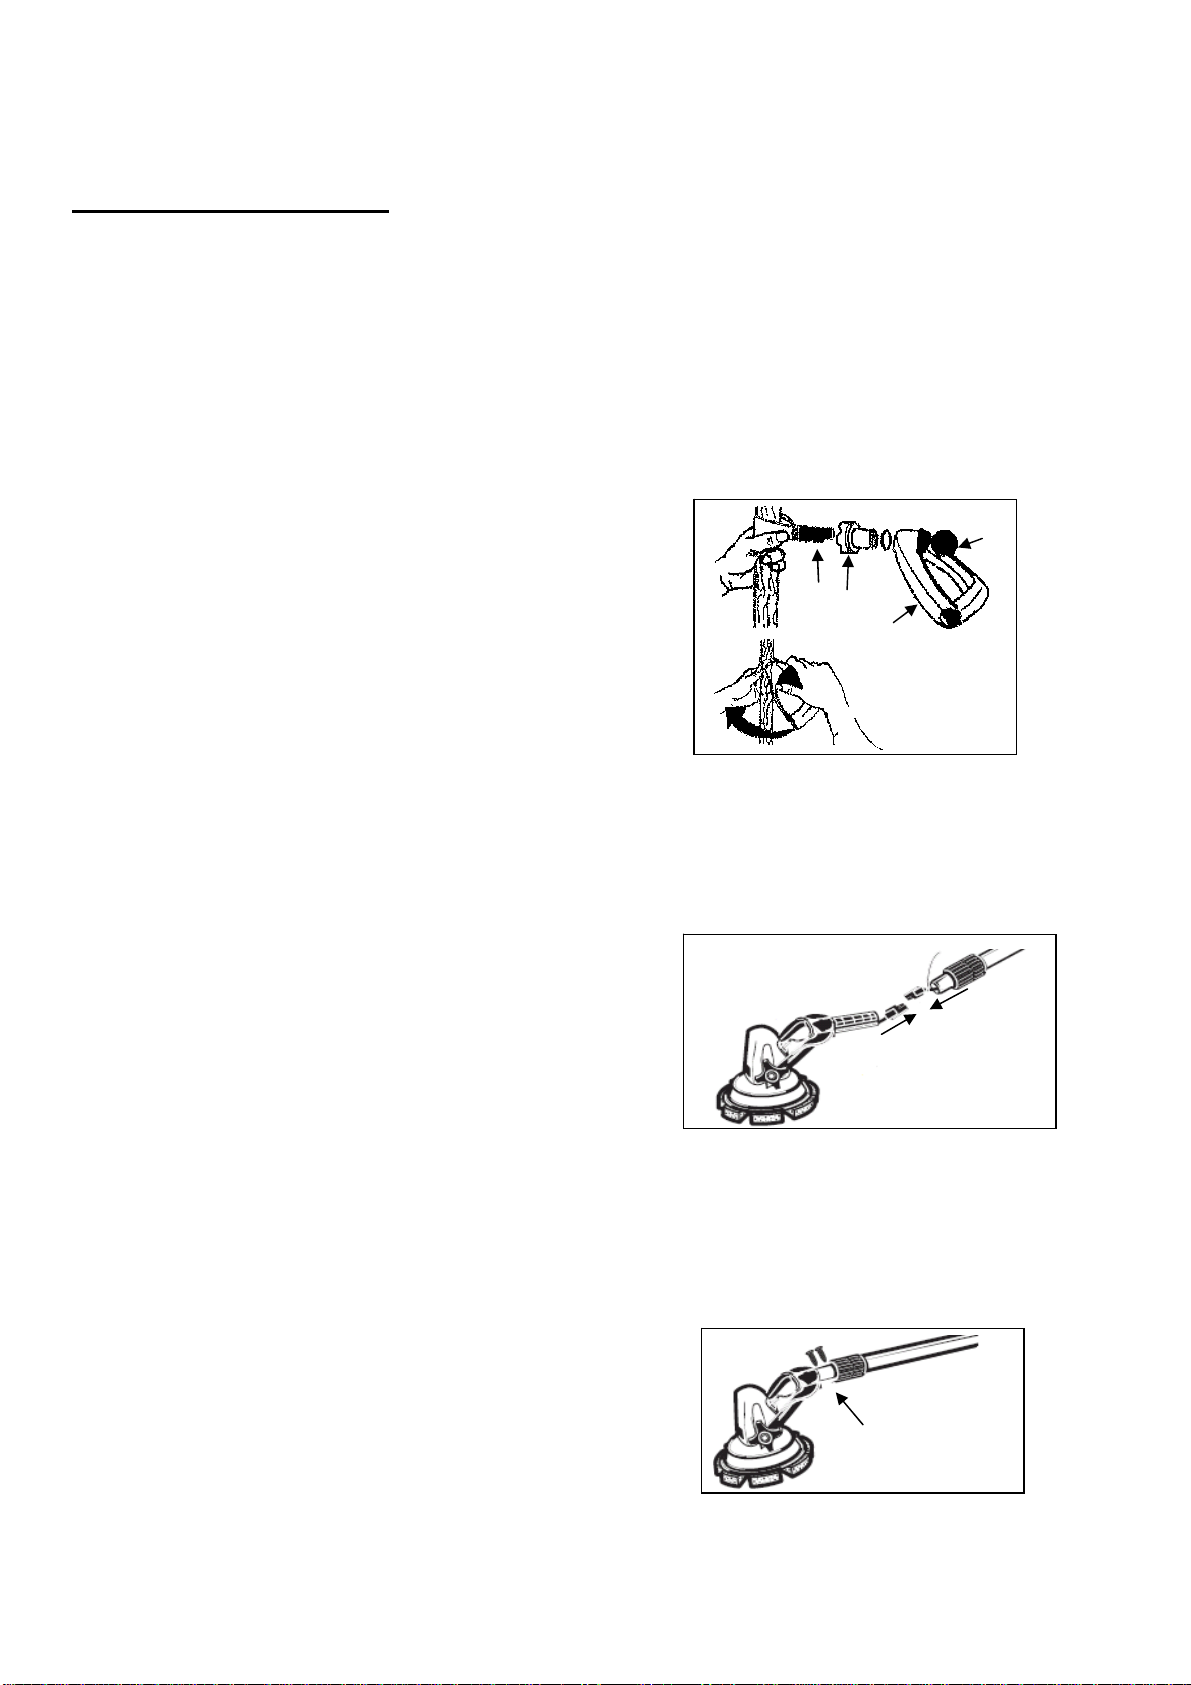
Truvox Orbis MotorScrubber 20 User manual

ORBIS MOTORSCRUBBER 20
includes Parts List & Electrical Wiring Diagram
USER MANUAL
EN
2
03-828 -0000 04/13 V.1
www.truvox.com


2
1
2
3
5
6
4


3
ORBIS MOTOSCRUBBER 20
The following manual contains important
information about the machine and safety advice
for the operator.
WARNING
Earth Ground Symbol
Waste Electrical & Electronic
Equipment (WEEE)
Do not dispose of this device with
unsorted waste. Improper disposal may
be harmful to the environment and
human health. Please refer to your
local waste authority for information on
return and collection systems in your
area.
EC DECLARATION OF CONFORMITY
Machine Type: Rotary/Scrubber
Type: Orbis MotorScrubber 20 Model: OMS20320…
This machine is in conformity with the following EU
directives:
2006/42/EC
2004/108/EC
Applied
harmonised
standards
Machinery Directive
The EMC Directive
EN60335-1, EN60335-2-67,
EN55014-1, EN55014-2,
EN610003-2, EN610003-3,
EN62233
Truvox International Malcolm Eneas
Third Avenue, Millbrook Operations Manager
SO15 0LE, Southampton
Hampshire, England Southampton, 05-04-2013
TECHNICAL SPECIFICATIONS
Model Orbis
MotorScrubber 20
Product Code OMS20320
Charging voltage AC (~)/
Frequency V/ Hz 100 – 240 ~ 50 –
60
Charging voltage DC V 12
Battery details 1x 12V 7.0 Ah
Pad/brush speed rpm 320
Pad/brush diameter cm 20
Run time h 4
Charge time hrs 12
Dimensions with handle
(L x W x H) cm 20x20x135
Weight of battery & harness kg 3
Weight of machine kg 2
Warranty 1 Year
•Class II construction. Enclosure to IPX4.
•Noise levels measured at a distance of 0.25 metre from machine and
1,5 metres above floor, when scrubbing a hard floor. Measurements
recorded using a hand held meter.
•Handle vibration does not exceed 2,5 m/s², when operating on any
surface with brush or pads. Measurements recorded by an
independent test laboratory.
If you have any queries or questions, please contact
the supplier who you purchased the machine from or
Truvox International.
Truvox International Limited
Third Avenue, Millbrook, Southampton, Hampshire,
SO15 0LE, United Kingdom; Tel.: +44 (0) 23 8070 6600;
Web: www.truvox.com
ORIGINAL INSTRUCTIONS
WARNING - READ THESE INSTRUCTIONS BEFORE USING THE MACHINE & RETAIN FOR FUTURE REFERENCE

4
Please refer to machine pictures on page 1
1
2
3
4
5
6
Handle
On/off switch
D-Grip
Yoke
Motor Housing
Hub – Disc mount
1. Product information
These commercial floor treatment machines are designed
for the scrubbing of hard floors in indoor areas. Only the
battery type supplied with this machine must be used
which can provide up to 4 hours running time. The
machine is intended for commercial use, for example in
hotels, schools, hospitals, factories, shops, offices, rental
businesses and other than normal housekeeping
purposes.
The following instructions contain important information
about the machines and safety advice for the operator.
These instructions are valid for the following models:
Orbis MotorScrubber 20 – OMS20320…
Equipment must be operated, serviced and maintained in
accordance with the manufacturer’s instructions. If in doubt
contact the supplier of your machine.
1.1 Important safety advice
When using this machine, basic safety
precautions should be followed, including the following:
•This machine must only be used for the manufacturer’s
approved application as described in this manual.
•Please note that the safety information described in the
manual supplements and does not replace standards in
force in the country in which the machine is used.
•WARNING - Only use accessories and spare parts
provided with the machine or those approved by the
manufacturer. The use of other spare parts or
accessories may impair the safety of the machine.
•CAUTION - This machine is for dry indoor use, some
wet applications and should not be used or stored
outdoors in wet conditions.
•All parts are to be positioned as indicated in the
instructions before using the machine.
•The machine must be unpacked and assembled in
accordance with these instructions before connecting to
the electrical supply.
•DO NOT use where hazardous dust is present.
•DO NOT use in an explosive atmosphere.
•DO NOT pick up or use near flammable fluids, dusts or
vapours.
•DO NOT use to clean up any burning or lighted materials
such as cigarettes, matches, ashes or other combustible
objects.
•Take care when using a machine near the top of stairs
to avoid overbalancing.
•Only use the machine on firm level surfaces. DO NOT
use on a gradient or more than 2% slopes.
•DO NOT operate this machine on rough uneven
surfaces e.g. industrial concrete floors.
•DO NOT use on coarse concrete surfaces.
•DO NOT on patios, decks or rough surfaces.
•DO NOT sweep over wet surfaces.
•.
•DO NOT use diesel/petrol or corrosive detergents to
wash floors.
•DO NOT wash and vacuum corrosive, flammable and/
or explosive liquids, even if diluted.
•DO NOT put any object into openings. DO NOT use
with any opening blocked; keep free of dust, debris
and anything that may reduce airflow.
•DO NOT cover machine when in use.
•DO NOT operate the machine when connected to the
mains electrical supply.
•DO NOT leave the machine connected to the
electricity supply when not in use, unless you are
charging the machine; always remove the plug from
the socket outlet.
•DO NOT leave machine running unattended.
•The machine shall be disconnected from its power
source during its cleaning or maintenance and when
replacing parts or accessories, by removing the plug
from the socket-outlet.
•DO NOT use if it has been damaged or left outdoors.
•DO NOT operate buttons or touch the mains plug with
wet hands as this may cause electric shock.
•WARNING - Keep the power supply cord clear of
moving parts (and/or rotating brushes). During
operation hazard may occur when running the
machine over the power supply cord.
•DO NOT operate the machine with a damaged supply
cord or plug, or after the machine malfunctions or is
damaged in any way. Contact an authorised Service
Agent for repair or adjustment.
•DO NOT pull or carry by the supply cord. DO NOT use
cord as a handle, close door on cord or pull cord
around sharp edges or corners.
•DO NOT kink or twist the power cord and keep cord
away from heated surfaces.
•When unplugging, pull the plug, not the supply cord.
•Only use the supplied charger when charging.
•DO NOT use a damaged charger.
•When not in use the charger should be removed from
the mains supply socket.
•The plug of the charger cable must be removed from
the socket-outlet before commencing cleaning of the
machine or undertaking maintenance operations.
•DO NOT charge the machine with a damaged battery
charging lead or plug, or after the machine
malfunctions or is damaged in any way. Contact an
authorised Service Agent for repair or adjustment.
•The battery charging lead is to be regularly inspected
for signs of damage. If the lead is damaged the
charger is to be replaced.
•When recharging ensure area is sufficiently ventilated.

5
•DO NOT run the machine dry, as this could damage the
floor surface or the machine itself.
•Never use excessive foaming or highly corrosive
cleaning solutions.
General warnings about batteries
•WARNING - Use appropriate personal protection
equipment to avoid contact with the skin (see standards
in force in the country in which the machine is used).
•DO NOT inhale the vapour, it is dangerous.
•It is forbidden to smoke and/ or use naked flames within
2 metres of the battery during charging, in the charging
area and while the battery is cooling after charging.
•Report any liquid leaking from the battery. Leaks are
dangerous and highly polluting.
•WARNING - In the event of a fire, use approved powder
extinguishers only; DO NOT use water to put out the fire.
1.2 Guidelines for the operator
•This machine is not intended for use by persons
(including children) with reduced physical, sensory
or mental capabilities, or lack of experience and
knowledge, unless they have been given
supervision or instruction concerning use of the
machine by a person responsible for their safety.
•Operators must be fully trained in the use of the
machine in accordance with these instructions, able
to perform user maintenance and the correct
selection of accessories.
•Operators should be physically capable to
manoeuvre, transport and operate the machines.
•Operators should be able to recognise unusual
operation of the machine and report any problems.
•Keep children and unauthorised persons away from
the machine when in use.
•Keep cleaning solutions away from children and
pets at all times.
•CAUTION - This machine is for dry indoor use and
some wet applications. It should not be used or
stored outdoors in wet conditions.
•DO NOT clean the machine using water sprays or
jets.
•Keep hair, loose clothing, hands, feet and all other
parts of the body away from openings and moving
parts.
•Keep machine clean and in good operating
condition.
•Let the machine do the work. Grip the handle as
lightly as possible.
•Stand with feet slightly apart to maintain good
balance. Avoid twisting the body more than 45
degrees.
•Wear suitable footwear to avoid slipping.
•Wear suitable clothing to keep dry and warm.
•Where possible implement job rotation and
adequate rest periods to avoid continuous use of
the same muscles.
•DO NOT smoke when using the machine.
2. Preparing for use
2.1 Electrical connection
Before connecting the machine to the power supply,
check that your supply voltage corresponds with that
marked on the rating label on the machine.
2.2 Assembling the D Grip (Fig 1)
•Wrap the split screw strap (1) around the shaft of the
handle.
•Slide the saddle (2) onto the split screw strap with
indentations matching the shaft of the handle.
•Slide the D Grip (3) with the rubber ring onto the strap
assembly.
•Turn the nut (4) as far as possible ensuring threads of
split screw are correctly aligned.
•To tighten turn the D Grip until secured into position.
Fig. 1
2.3 Assembling the handle
•Remove the motor housing and yoke from the box.
•Connect the electrical plug from the yoke (1) to the
electrical plug from the end of the handle (2). Push
together firmly (Fig.2).
Fig.2
•Coil the tie wrap (3 in Fig. 2) around the wire and insert
it along with the electrical plug connection onto the
handle. Ensure both electrical plugs are fully locked
together.
•Insert the yoke into the handle aligning the screw holes
in the yoke with the two holes in the handle (Fig.3)
insert screws and tighten.
Fig. 3
1
2
3
1 2 3
4

6
2.4 Assembling the hub-disc mount
•Attached the hub-disc mount to the motor housing using
the flat washer, lock washer and bolt provided.
Assemble in the order shown in Fig. 4.
Fig. 4
2.5 Connecting the batteries
NOTE - 8 hours are required for complete battery charge.
IMPORTANT - Opportunity / top up charging will damage
the batteries. This will cause run time to fall and overall
battery life will be affected. AVOID TOP UP CHARGING.
WARNING – Only charge batteries in a well-ventilated
area.
•It is necessary to charge the battery before using your
Orbis MotorScrubber 20 and after each use
•Place the battery pack into the battery bag.
•Feed the wire connections through the appropriate hole
depending if you are left or right handed.
•Connect the battery wires into the battery pack. Red
wire to red terminal, black wire to black terminal (Fig.5).
•The battery pack contains a fuse for protection against a
short circuit. If your Orbis MotorScrubber 20 will not run,
open the fuse holder in the battery pack and check the
fuse. Replace if necessary with: 30Amp-32 Volt, ABC
Glass fuse (Fig.5)
Fig. 5
•Connect the wire from the battery to the charger. Ensure
both electrical plugs are fully locked together (Fig. 6).
Fig. 6
•Plug the charger directly into a 230V electrical outlet.
•After charging, disconnect the charger from the electrical
outlet
•Ensure to disconnect the charger from the battery
2.6 Fitting discs & brushes
WARNING – This appliance has been designed for use
with quality brushes and pads only. The fitting of
inappropriate brushes and pads may affect its
performance and safety. WARNING - Ensure the
machine is switched off before adding or changing
accessories.
•Line up the tabs on the disc/brush with the hub on the
bottom of the Orbis MotorScrubber 20 (Fig. 7).
•Press down while turning the disc/brush clockwise until
it locks into position. Hold hub to prevent rotation (Fig.
8).
•To remove, press down on the disc and turn it counter-
clockwise holding the hub until the tabs are free (Fig.
9).
•Lift off the disc/brush
Fig. 7 Fig. 8 Fig. 9
IMPORTANT - Never allow the cleaning head to rest on
the brush or drive disc and pad when not in use.
2.7 Battery harness
•The harness s equipped with quick release buckles.
Adjust the shoulder and waist straps by sliding the
adjustable buckles to fit comfortably (Fig. 10).
Fig.10
3. Operation
3.1 Using the machine
•Wash off the surface to be cleaned to remove loose
dirt.
•Apply soap/cleaning solution to the surface or directly
to the scrub disc/brush.
•It is possible to mix soap concentrate in a bucket and
dip the scrub disc/brush into the bucket.
•Switch on the Orbis MotorScrubber 20 using the on/off
switch on the handle.

7
•Scrub with straight light strokes. You do not have to
exert pressure the Orbis MotorScrubber 20 will do the
work.
WARNING – The Orbis MotorScrubber 20 is not designed
for prolonged use under water
WARNING – Automatic Shut-Off. the Orbis
MotorScrubber 20 is equipped with a self-resetting circuit
breaker to prevent damage to the motor. If the unit is
stalled, the circuit breaker will interrupt the electrical power
from your 12-volt battery. Remove the Orbis
MotorScrubber 20 from the work surface. the circuit
breaker will re-set in 6-10 seconds. Resume using the
Orbis MotorScrubber 20.
IMPORTANT - Only chemicals recommended by the
appliance manufacturer should be used, i.e. non-foaming,
and follow the chemical manufacturers’ directions
regarding use, handling, disposal and health and safety
provisions. WARNING - If the detergent comes in contact
with the eyes and/or skin or if swallowed, refer to the use
and safety information booklet provided by the
manufacturer of the detergent.
4.5 When cleaning is finished
•When cleaning is finished switch off the Orbis
MotorScrubber 20 using the on/off switch button on the
handle.
•Remove brush or pad from machine and wash in warm
soapy water.
5. Storage
•Always switch off, wipe down and dry the machine after
use.
•When storing the machine, ensure the pad/brush is
removed
•Store the machine in a dry indoor area only.
6. Maintenance
WARNING - Before undertaking maintenance operations
or adjustments switch off machine, unplug from the
electricity supply and disconnect the battery.
IMPORTANT – All other servicing and repairs should only
be performed by a Truvox engineer or Authorised Service
Agent. IMPORTANT – Should the machine fail to operate
please refer to the fault diagnosis section in the back of
this instruction manual. If the problem / remedy is not listed
please contact Truvox Customer Service Department for
rapid attention.
The machine requires minimum maintenance apart from
the following checks by the operator prior to use:
•DO NOT rest tools and metal objects on the batteries;
danger of short circuits.
•DO NOT use aggressive detergents, acid, lye etc. during
cleaning and washing and take particular care with
electrical parts.
•Charging cord and plug - Regularly inspect sheath, plug
and cord anchorage for damage or loose connection.
7. After sales service
Truvox machines are high quality machines that have
been tested for safety by authorised technicians. It is
always apparent that after longer working periods,
electrical and mechanical components will show signs of
wear and tear or ageing. To maintain operational safety
and reliability the following service interval has been
defined: Every year or after 250 hours. Under extreme or
specialised conditions and/or insufficient maintenance,
shorter maintenance intervals are necessary. Use only
original Truvox spare parts. Use of other spare parts will
invalidate all warranty and liability claims. Should you
require after sales service please contact the supplier
from whom you purchased the machine, who will
arrange service. Repairs and servicing of Truvox
products should only be performed by trained staff.
Improper repairs can cause considerable danger to the
user.
8. Guarantee
Your product is guaranteed for one year from the date of
original purchase, or hire purchase, against defects in
materials or workmanship during manufacture. Within
the guarantee period we undertake at our discretion, to
repair or replace free of charge to the purchaser, any
part found to be defective, subject to the following
conditions:
CONDITIONS
1. Claims made under the terms of the guarantee must
be supported by the original invoice/bill of sale issued
at the time of sale, or the machine Serial No.
2. For claims under this guarantee contact the supplier
from whom you purchased the product who will
arrange the appropriate action. Do not initially return
the product as this could result in transit damage.
3. Neither Truvox nor its distributor shall be liable for
any incidental or consequential loss.
4. This guarantee is governed by the laws of England.
5. This guarantee does not cover any of the following:
•Periodic maintenance, and repair or
replacement of parts due to normal wear and
tear.
•Damage caused by accident, misuse or neglect,
or the fitting of other than genuine Truvox parts.
•Defects in other than genuine Truvox parts, or
repairs, modifications or adjustments performed
by other than a Truvox service engineer or
authorised service agent.
•Costs and risks of transport relating directly or
indirectly to the guarantee of this product.
•Consumable items such as, brushes, drive
discs, filters and vacuum skirts.
•This guarantee does not affect your statutory rights, or
your rights against the supplier arising from their sales
or purchase contract. Truvox International Limited
policy is one of continual product development and we
reserve the right to alter specifications without prior
notice.

8
Accessories
Item Part Number
Handle 125cm Telescopic 98-0157-0000
Handle 75cm Telescopic 98-0158-0000
Handle 38cm Hand Held Solid 98-0159-0000
Black Motorscrubber Carry bag 98-0160-0000
Red Motorscrubber Accessory bag 98-0161-0000
Sponge Disc for cleaning vehicles 98-0162-0000
Delicate cleaning Brush black bristles 98-0163-0000
Aggressive strength scrubbing Brush orange bristles 98-0164-0000
Aggressive strength scrubbing Brush With Splash Ring 98-0165-0000
Tile and Grout cleaning Brush 98-0166-0000
Disc for applying Wax 98-0167-0000
Medium strength cleaning Brush Red Bristles 98-0168-0000
long bristle Soft Brush with grey bristles 98-0169-0000
Pad Holder Drive plate 98-0170-0000
Corridor edges and stair cleaning brush 98-0171-0000
Mity-Lok ( Aluminium Disc for Stair brush ) 98-0172-0000
20cm Black fibre Stripping pad 98-0173-0000
20cm Green fibre Scrubbing pad 98-0174-0000
20cm Red fibre Spray cleaning pad 98-0175-0000
20cm White fibre Dry buffing pad 98-0176-0000
22cm Microfibre multipurpose cleaning pad 98-0177-0000
20cm Twister white pad ( refurbishing ) each 98-0178-0000
20cm Twister Yellow pad ( Shine Creating ) each 98-0179-0000
20cm Twister Green pad ( Shine & Maintenance ) each 98-0180-0000
Protection against water spray splashguard 98-0181-0000

9
10. Fault diagnosis
The following simple checks may be performed by the operator:
Trouble Reason Remedy
Motor
Scrubber is
not turning on
or is turning
slowly.
•The battery may
need charging
or replacing.
How to establish if this fault is the battery
Using a voltmeter, simply open the battery pack, disconnect the two leads at
the battery and touch the voltmeter probes to the terminals accordingly. A
satisfactory reading would be approximately 11.5 volts to 13 volts. Anything
less would indicate the need to charge the battery, failure to retain a charge
indicates the need to replace the battery.
•The charger is
faulty How to establish if this fault is the battery charger
Use a spare battery which is knowingly working. Check the battery voltage as
mentioned above. Put the battery on charge for 10minutes. Then check the
voltage again. If the voltage has risen then the charger is working.
•The motor is
faulty How to establish this fault is the motor Disconnect the plug between the
handle and the motor. After the motor is disconnected, connect the battery
pack coil cord directly to the motor. If the motor now turns properly then the off
/on switch, wiring harness within the handle is not functioning properly. If the
motor still does not turn, the motor may be experiencing failure ( or gear
failure) and the distributor will need to be contacted for instructions on returning
the unit to the manufacturer for repair or replacement under the terms of the 12
month warranty.
•The wiring is
faulty Wiring harness within the handle may need to be replaced if the above tests
have proven the battery and motor to be functioning properly. Again the
distributor will need to be contacted for instructions on returning the unit to the
manufacturer for repair or replacement under the terms of the 12 month
warranty.
•The fuse has
blown Check that the glass 30A fuse has not blown. Replace if required.
* If the fuse blows several times, the machine should be checked by an authorised Service Agent.

Authorised dealer:
Table of contents
Other Truvox Scrubber manuals
Popular Scrubber manuals by other brands

Crescent
Crescent SC530 53 B GO Service manual

Kränzle
Kränzle SSM 430 Use and maintenance

Manrose
Manrose LP 100 installation instructions

FIORENTINI
FIORENTINI TERMINATOR-1000 user manual

Tennant
Tennant 5500 Complete Operator and parts manual

Xvent
Xvent MiracleAir 300-A1 Instructions for use and installation