B&O Play Beoplay M5 User manual

NOTICE
MARQUE :
REFERENCE :
CODIC :
B&O
PLAY M5
4291603

Beoplay M5
User Guide
Betjeningsvejledning
Bedienungsanleitung
Guía del usuario
Mode d’emploi
Guida utente
ユーザーガイド
사용 설명서
Gebruikershandleiding
Guia do utilizador
Руководство пользователя
Användarhandbok
用户指南
使用者指南

2 3
Setting up and configuring your M5
EN The box contains Beoplay M5 and up to three power cables.
M5 can be set up as an individual speaker or in a speaker
network. Use the BEOPLAY app to configure and connect
your Beoplay M5.
DA Kassen indeholder Beoplay M5 og op til tre strømledninger.
M5 kan konfigureres til at arbejde som en enkelt højttaler eller
i et højttalernetværk. Brug appen BEOPLAY til at konfigurere
og forbinde din Beoplay M5.
DE Die Verpackung enthält den Beoplay M5 und bis zu drei
Stromkabel. Der M5 lässt sich als einzelner Lautsprecher oder
in einem Lautsprecher-Verbund einrichten. Verwenden Sie
die BEOPLAY-App um den Beoplay M5 zu konfigurieren und
zu verbinden.
ES La caja contiene el Beoplay M5 y hasta tres cables de
alimentación. El M5 se puede configurar como altavoz
individual o dentro de una red de altavoces. Utilice la
BEOPLAY App para configurar y conectar su Beoplay M5.
FR La boîte contient votre Beoplay M5 et jusqu’à trois câbles
d’alimentation. Le M5 peut être configuré comme un haut-
parleur individuel ou dans un réseau de haut-parleur. Utilisez
l’application BEOPLAY pour configurer et connecter votre
Beoplay M5.
IT La scatola contiene il Beoplay M5 e fino a tre cavi di
alimentazione. È possibile impostare l'M5 come diffusore
singolo o in una rete di diffusori. Per configurare il Beoplay
M5, usare la app BEOPLAY.
Beoplay beoplay.com/APP

4 5
EN Connect Beoplay M5 to the mains supply. Wait for 1 minute
while both the connectivity indicator and the product
indicator are flashing white. After the connectivity indicator
changes to orange and a sound prompt is heard, the product
is booted up and ready to be set up with the BEOPLAY app.
DA Slut Beoplay M5 til forsyningsnettet. Vent 1 minut på, at
både forbindelsesindikatoren og produktindikatoren blinker
hvid. Når forbindelsesindikatoren skifter til at lyse orange,
og der afspilles en lyd, er produktet startet op og klart til
konfiguration sammen med appen BEOPLAY.
DE Schließen Sie den Beoplay M5 an eine Netzstromsteckdose an.
Warten Sie 1 Minute, während die Konnektivitätsanzeige und die
Geräteanzeige weiß blinken. Wenn die Konnektivitätsanzeige
zu Orange wechselt und ein Signalton erklingt, wurde das
Gerät hochgefahren und ist für die Einrichtung mithilfe der
BEOPLAY-App bereit.
ES Conecte el Beoplay M5 a la corriente. Espere 1 minuto
hasta que el indicador de conectividad y el indicador del
producto parpadeen en color blanco. Cuando el indicador
de conectividad cambie al color naranja y se escuche una
indicación sonora, el producto habrá arrancado y estará listo
para configurarse con la BEOPLAY App.
Connecting your M5
01:00 m

6 7
FR Connectez Beoplay M5 à l’alimentation secteur. Attendez
1 minute jusqu’a ce que les témoins de connectivité et du
produit clignotent en blanc. Une fois que le témoin de
connectivité devient orange et que l’on entend une invite
sonore , le produit démarre et prêt pour être installé avec
l’application BEOPLAY.
IT Connettere il Beoplay M5 all’alimentazione di rete. Attendere
1 minuto mentre la spia di connettività e la spia del prodotto
lampeggiano in bianco. Quando la spia di connettività diventa
arancione e si ode un suono di avviso, il prodotto viene
avviato ed è pronto a essere impostato con la app BEOPLAY.
JA Beoplay M5 を電源に接続します。接続インジケータと製
品インジケータの両方が白色に点滅している間(1 分間)
はお待ちください。接続インジケータがオレンジ色に変
化し、音声による指示があった後、本体の起動が完了し、
BEOPLAY アプリを使用して設定することができます。
KO
Beoplay M5 를주전원콘센트에연결합니다 .연결
표시기와제품표시기모두가흰색으로깜박일때까지
1분동안기다립니다 .연결표시기가주황색으로바뀌고
신호음이울린후에제품이부팅되고BEOPLAY 앱을
사용해설정할준비가됩니다 .
NL Sluit de BeoPlay M5 aan op het lichtnet. Wacht 1 minuut
terwijl de aansluitingsindicator en de productindicator wit
knipperen. Nadat de aansluitingsindicator oranje is geworden
en een geluidstoon is afgegaan, wordt het apparaat
ingeschakeld en is het klaar om te worden geïnstalleerd met
de BEOPLAY-app.
PT Ligue o Beoplay M5 à corrente elétrica. Espere um minuto
enquanto o indicador de conectividade e o indicador do
produto estiverem a piscar com uma cor branca. Após o
indicador de conectividade mudar para laranja e depois de
ouvir um sinal sonoro, o produto é iniciado e está pronto para
ser configurado com a aplicação BEOPLAY.
RU
Подключите устройство Beoplay M5 к сетевому
источнику электропитания. Подождите 1 минуту до
тех пор, пока индикатор подключения и индикатор
изделия не начнут мигать белым. После того, как
индикатор подключения изменит цвет на оранжевый и
раздастся звуковой сигнал, изделие загружено и готово к
настройке с использованием приложения BEOPLAY.

8 9
Streaming music
EN Beoplay M5 is a connected speaker, using Google Cast
Multi-room and Apple AirPlay. As a point-to-point source,
Bluetooth is always open for pairing. Turn on Bluetooth on
your device and select Beoplay M5.
DA Beoplay M5 er en forbundet højttaler, som anvender Google
Cast Multi-room og Apple AirPlay. Som en kilde er Bluetooth
altid tilgængelig til pardannelse. Aktivér Bluetooth på din
enhed, og vælg Beoplay M5.
DE Der Beoplay M5 ist ein vernetzter Lautsprecher, der mit
Google Cast Multi-room und Apple AirPlay kompatibel ist. Als
Punkt-zu-Punkt-Quelle ist Bluetooth immer für die Kopplung
aktiv. Schalten Sie auf Ihrem Gerät Bluetooth ein und wählen
Sie den Beoplay M5.
ES Beoplay M5 es un altavoz conectado que utiliza Google Cast
Multi-room y Apple AirPlay. Como fuente punto a punto,
Bluetooth siempre está activado para emparejar. Encienda
Bluetooth en su dispositivo y seleccione Beoplay M5.
FR Le Beoplay M5 est un haut-parleur connecté, en utilisant
Google Cast Multi-room et Apple AirPlay. En tant que
source de point à point, Bluetooth est toujours ouvert
pour l’appariement. Activez Bluetooth sur votre appareil et
sélectionnez Beoplay M5.
IT Il Beoplay M5 è un diffusore collegato, usando Google Cast
Multi-room e Apple AirPlay. In quanto sorgente point-to-point,
il Bluethoot è sempre aperto per l’accoppiamento. Accendere il
Bluetooth sul dispositivo e selezionare Beoplay M5.
Bluetooth
Bluetooth
Settings
11:11
Bluetooth
Bluetooth
Settings
11:11
Beoplay M5 Not Paired
DEVICES
Bluetooth
Bluetooth
Settings
11:11
Beoplay M5 Connected
DEVICES

10 11
Basic operation
EN A Volume knob Turn and hold the volume knob clockwise
to increase volume continuously. Turn and hold the knob
counterclockwise to decrease. B Press During standby, short
press to join existing multi-room groups. If no groups are
available, the last connected source will initiate (Bluetooth).
During audio playback, short press to pause / play. Double-
press to switch source.
DA A drejeknap til lydstyrke Drej drejeknappen til lydstyrke
med uret for at forøge lydstyrken løbende. Drej og hold
drejeknappen til lydstyrke mod uret for at reducere lydstyrken.
B tryk Mens i standby-tilstand, tryk kort for at tilslutte dig
eksisterende flere-rumsgrupper. Hvis der ikke er nogen grupper
tilgængelige, startes den sidst forbundne gruppe (Bluetooth).
Under afspilning, tryk kortvarigt for at sætte på pause eller
genoptage lydafspilningen. Tryk to gange for at skifte kilde.
DE A Lautstärkeregler Drehen Sie den Lautstärkeregler im
Uhrzeigersinn, um die Lautstärke zu erhöhen. Drehen Sie den
Regler im Gegenuhrzeigersinn, um die Lautstärke zu senken.
B drücken Im Standby-Modus kurz drücken, um vorhandenen
Multi-Room-Gruppen beizutreten. Falls keine Gruppen
vorhanden sind, wird die letzte verbundene Quelle gestartet
(Bluetooth). Während der Audio-Wiedergabe zum Anhalten/
Wiedergeben kurz drücken. Zweimal drücken, um die Quelle
zu wechseln.

10 11
ES A Perilla de volumen Mantenga girada la perilla de volumen
hacia la derecha para aumentar el volumen de forma continua.
Mantenga girada la perilla hacia la izquierda para disminuirlo.
B Presione En modo de espera, presione brevemente para
unirse a grupos de salas existentes. Si no hay ningún grupo
disponible, se iniciará la última fuente conectada (Bluetooth).
Durante la reproducción de audio, presione brevemente para
pausar o reproducir. Pulse dos veces para cambiar de fuente.
FR A Bouton de volume Tournez et maintenez le bouton de
volume enfoncé dans le sens horaire pour augmenter le volume
continuellement. Tournez et maintenez le bouton enfoncé
dans le sens antihoraire pour le diminuer. B Appuyez sur En
veille, appuyez brièvement pour se joindre à des groupes
de plusieurs chambres existantes. Si aucun groupe n’est
disponible, la dernière source connectée lancera (Bluetooth).
Pendant la lecture audio, appuyez brièvement pour pause /
lecture. Appuyez 2 fois pour basculer la source.
IT A Manopola del volume Girare e tenere girata la manopola
del volume in senso orario per aumentare il volume in modo
continuo. Girare e tenere girata la manopola in senso antiorario
per diminuirlo. B Premere Durante lo standby, premere
brevemente per unirsi a gruppi multisala esistenti. Nel caso
in cui non vi fossero gruppi disponibili, si avvierà la sorgente
collegata l’ultima volta (Bluethoot). Durante la riproduzione
audio, premere brevemente per mettere in pausa/riprodurre.
Per commutare la sorgente, premere due volte.
JA A 音量つまみ 音量つまみを時計回りに回すと、連続し
て音量を上げることができます。音量を下げるには、反
時計回りに回します。B 押しボタン スタンバイ時に短く
押すと、既存のマルチルームグループに加わります。加
入可能なグループがない場合は、最後に接続された音源
(Bluetooth)に接続されます。音楽の再生中に短く押すと、
一時停止 / 再生を切り替えることができます。音源を切り
替えるには、素早く 2 度押しします。
KO A 볼륨 손잡이볼륨을연속해서높이려면볼륨손잡이를
시계방향으로돌립니다 .손잡이를시계반대방향으로
돌리면볼륨을줄어듭니다 .B 누르기대기중기존
멀티룸그룹에연결하려면짧게누릅니다 .사용
가능한그룹이없을경우 ,마지막으로연결된소스가
시작됩니다 (Bluetooth).오디오재생중짧게누르면
일시중지 / 재생이수행됩니다 .두번누르면소스가
전환됩니다 .
12 13
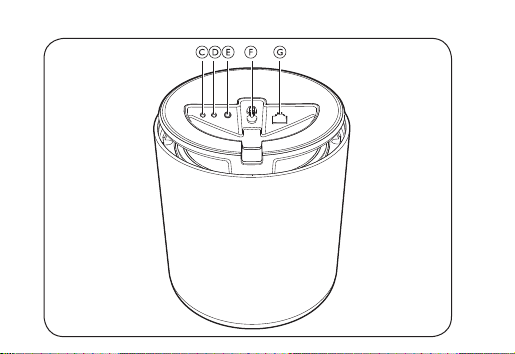
Buttons and connections
EN C Standby button Short press to put M5 in standby. Long
press to turn M5 off. D Configuration button Short press to
enter setup mode. When in setup mode, short press to cancel.
E Line in Optical/Analogue mini-jack for connecting external
audio sources. F Power Connect M5 to mains supply using
only the enclosed mains cable. G Ethernet Ethernet socket for
a wired network connection.
DA C Standby-knap Tryk kortvarigt for at sætte M5 i standby-
tilstand. Tryk på knappen, og hold den nede for at slukke
for M5. D Konfigurationsknap Tryk kortvarigt for at åbne
konfigurationstilstand. Tryk kortvarigt for at annullere.
E Linjeindgang Optisk/analog minijackindgang til tilslutning af
eksterne lydkilder. F Strøm Slut kun M5 til forsyningnettet ved
brug af det medfølgende strømkabel. G Ethernet Ethernet-stik
til kablet netværkstilslutning.
DE C Standby-Taste Kurz drücken, um den M5 in den Standby-
Modus zu schalten. Lang drücken, um den M5 auszuschalten.
D Konfigurationstaste Kurz drücken, um den Einrichtungsmodus
aufzurufen. Im Einrichtungsmodus kurz drücken, um diesen
zu beenden. E Eingang Optische/analoge Mini-Buchse für
den Anschluss externer Audioquellen. F Strom Schließen Sie
den M5 nur mit dem beiliegenden Netzstromkabel an die
Stromversorgung an. G Ethernet Ethernet-Buchse für eine
LAN-Verbindung.

14 15
ES C Botón Standby Presiónelo brevemente para poner el M5
en estado de espera. Presiónelo más tiempo para apagar
el M5. D Botón de configuración Presiónelo brevemente
para acceder al modo de configuración. En modo de
configuración, presiónelo brevemente para cancelar.
E Entrada de línea Conector minijack óptico/analógico
para conectar fuentes de audio externas. F Alimentación
Conecte el M5 a la corriente utilizando solo el cable de
alimentación suministrado. G Ethernet Conector Ethernet
para conexión cableada a la red.
FR C Bouton de veille Appuyez brièvement pour mettre M5
en veille. Appuyez longuement pour éteindre M5. D Bouton
Configuration Appuyez brièvement pour accéder au mode de
configuration. En mode de configuration, appuyez brièvement
pour annuler. E Line in Le mini-jack optique/analogique
pour connecter des sources audio externes. F Alimentation
Connectez M5 à l’alimentation secteur en utilisant uniquement
le câble d’alimentation fourni. G Ethernet Prise Ethernet pour
une connexion à un réseau filaire.
IT C Pulsante di standby Premere brevemente per mettere l’M5
in standby. Premere a lungo per spegnere l’M5. D Pulsante di
configurazione Premere brevemente per entrare in modalità
configurazione. Quando ci si trova in modalità configurazione,
premere brevemente per annullare. E Ingresso di linea
Mini-jack ottico/analogico per la connessione di sorgenti audio
esterne. F Alimentazione Connettere l’M5 all’alimentazione
di rete usando esclusivamente il cavo di rete in dotazione.
G Ethernet Presa Ethernet per la connessione a una rete
cablata.
JA C スタンバイボタン 本体をスタンドバイに切り替えるに
は、短く押します。電源を切るには長押しします。D 設定
ボタン セットアップモードを開くには、短く押します。
セットアップモードを閉じるには、短く押します E 外部
入力 外部音源を接続できる光 / アナログミニジャックで
す。F 電源 M5 を電源に接続します。同梱の電源ケーブル
以外は使用しないでください。G イーサネット有線ネット
ワーク接続に使用します。
16 17
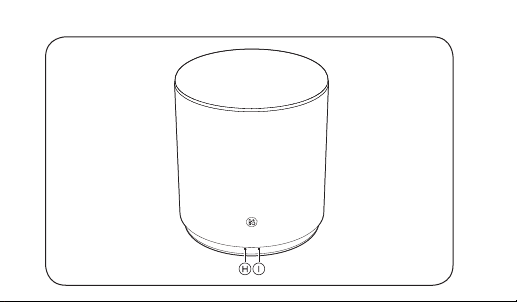
Indicators
H Connectivity indicator
– White (dim): Product is in standby mode.
– White (flashing): Product is booting up.
– White (solid): Connected to the network. The wireless
signal strength is high.
– Orange (solid): Connected to the network. The wireless
signal strength is medium.
– Red (solid): Connected to the network. The wireless signal
strength is low.
– Red (flashing): Network connection error.
– Blue (flashing): Product is in Bluetooth pairing mode.
– Blue (solid): Indicator turns solid blue shortly after
Bluetooth pairing is successful.
– Red (solid): Indicator turns solid red shortly when Bluetooth
pairing is unsuccessful.
I Product indicator
– Off: Product is in standby mode or switched off.
– White (flashing): Product is booting up.
– Red (solid): Both Indicators turn solid red shortly before
during factory reset.
– Red (flashing): Both Indicators flash red at the same time to
indicate that software update is in progress. Do not operate
the product or switch it off.
– Red (flashing): Firmware error. Disconnect the product
from the mains supply and reconnect it.
– Orange (flashing): Indicator is flashing orange when the
product is overheating and needs time to cool down.
EN

20 21
FR H Témoin de connectivité
- Blanc (faible): Le produit est en mode veille.
- Blanc (clignotant): Le produit est en cours de démarrage.
- Blanc (permanent) : Connecté au réseau. La puissance du
signal sans fil est élevée.
- Orange (permanent) : Connecté au réseau. La puissance du
signal sans fil est moyenne.
- Rouge (permanent) : Connecté au réseau. La puissance du
signal sans fil est faible.
- Rouge (clignotant) : Erreur de connexion au réseau.
- Bleu (clignotant) : Le produit est en mode d'appairage
Bluetooth.
- Bleu (continu): Le témoin devient bleu continu peu après la
réussite de l'appariement Bluetooth.
- Rouge (continu): Le témoin devient rouge continu peu
après l'échec de l'appariement Bluetooth.
I Témoin du produit
- Off : Le produit est en mode veille ou éteint.
- Blanc (clignotant): Le produit est en cours de démarrage.
- Rouge (continu): Les deux témoins clignotent en rouge
continu peu avant la réinitialisation.
- Rouge (clignotant) : Les deux témoins clignotent en rouge
dans le même temps pour indiquer que la mise à jour du
logiciel est en cours. Ne pas utiliser le produit ou l'éteindre.
- Rouge (clignotant) : Erreur de micrologiciel. Débranchez le
produit de l'alimentation secteur et rebranchez-le.
- Orange (clignotant) : Le témoin clignote en orange lorsque
le produit surchauffe et a besoin de temps pour se refroidir.

30 31
The Wi-Fi CERTIFIED™ Logo
is a certification mark of
Wi-Fi Alliance®.
Important information AirPlay,
iPad, iPhone, iPod, iPod classic,
iPod nano, iPod touch, and Retina
are trademarks of Apple Inc.,
registered in the U.S. and other
countries. iPad Air, iPad mini,
and Lightning are trademarks
of Apple Inc.
Google Cast and the Google Cast
badge are trademarks of Google
inc.
The Bluetooth® word mark and
logos are registered trade-marks
owned by Bluetooth SIG, Inc. and
any use of such marks by Bang
& Olufsen group is under license.
Other trade-marks and trade
names are those of their respective
owners.
The Spotify software is subject to
third party licenses found here:
www.spotify.com/connect/third
-party-licenses
The Deezer name and logo are
trademarks of Deezer. All other
trademarks are the property of
their respective owners.

34 35
EN DA DE ES FR IT JA KO NL PT
Register online at www.beoplay.com/register to receive important
information about product and software updates – and to get exciting
news and offers from B&O PLAY. If you have purchased your product
at a BANG & OLUFSEN store or at www.beoplay.com, you have
automatically been registered
Tilmeld dig online på www.beoplay.com/register for at modtage vigtige
oplysninger om produkt- og softwareopdateringer – og modtage
spændende nyheder og tilbud fra B&O PLAY. Hvis du har købt dit
produkt i en BANG & OLUFSEN-butik eller på www.beoplay.com, er du
automatisk blevet tilmeldt.
Registrieren Sie sich online auf www.beoplay.com/register
und erhalten Sie wichtige Informationen über Ihr Produkt und
Softwareaktualisierungen sowie spannende Neuigkeiten und Angebote
von B&O PLAY. Wenn Sie ein Produkt in einem BANG & OLUFSEN
Fachgeschäft oder auf www.beoplay.com gekauft haben, sind Sie
bereits registriert.
Regístrese en www.beoplay.com/register y reciba información
importante acerca del equipo y las actualizaciones de software
disponibles para el mismo, así como apasionantes noticias y ofertas de
B&O PLAY. Si ha adquirido el equipo en una tienda BANG & OLUFSEN o
en www.beoplay.com, se habrá registrado automáticamente.
Inscrivez-vous à l'adresse www.beoplay.com/register pour recevoir
d'importantes informations sur les produits B&O PLAY et leurs mises
à jour logicielles, ainsi que les actualités de la marque et des offres
exceptionnelles. Si vous avez acheté votre produit dans un magasin
BANG & OLUFSEN ou sur www.beoplay.com, vous avez été inscrit
automatiquement.
Effettua la registrazione on-line su www.beoplay.com/register per
ricevere informazioni relative agli aggiornamenti del software e dei
prodotti - e per conoscere le novità e le offerte di B&O PLAY. Se hai
acquistato il tuo prodotto in un punto vendita BANG & OLUFSEN o su
www.beoplay.com, la registrazione è automatica.
www.beoplay.com/register からご登録いただくと、製品やソフトウェアの更新
に関する重要なお知らせのほか、
B&O PLAY の最新ニュース、特別割引情報をお
届けします。
BANG & OLUFSEN ストアまたは www.beoplay.com にて商品を
ご購入されたお客様はすでに登録済です。
www.beoplay.com/register에서온라인등록을하면제품및소프트웨어업데
이트에대한자세한정보는물론 B&O PLAY에서제공하는흥미로운뉴스와혜
택을받으실수있습니다.BANG & OLUFSEN 대리점또는 www.beoplay.com
에서제품을구입하신고객은자동으로등록됩니다.
Registreer online op www.beoplay.com/register om belangrijke
informatie over producten en software-updates te ontvangen – en
voor interessante nieuwtjes en aanbiedingen van B&O PLAY. Als u uw
product in een BANG & OLUFSEN-winkel of op www.beoplay.com hebt
gekocht, bent u automatisch geregistreerd.
Registe-se online em www.beoplay.com/register para receber
informação importante sobre atualizações de produtos e software e
para receber notícias emocionantes e ofertas da B&O PLAY. e adquiriu
o seu produto numa loja BANG & OLUFSEN ou em www.beoplay.com,
foi automaticamente registado.
Other manuals for Beoplay M5
1
Other B&O Play Speakers manuals


