Barbeques Galore Dakota Extension Table DAKEXTT250L User manual


DAKEXTT250L
2
PRE-ASSEMBLY PREPARATION
Before you start:
1. Choose a clean, level, spacious assembly area. Avoid hard surfaces that
may damage the product.
2. Take care when lifting. Assembly should be done as near as possible to
3. the final position.
4. Ensure that you have all required parts for complete assembly.
5. Read the assembly instructions fully and carefully before beginning assembly.
6. Keep unassembled hardware parts and packaging out of reach of small children.
7. Do not over tighten the screws and bolts as this may damage the threads.
Around 30 minutes required Min 2 people required for assembly
30 MIN 2
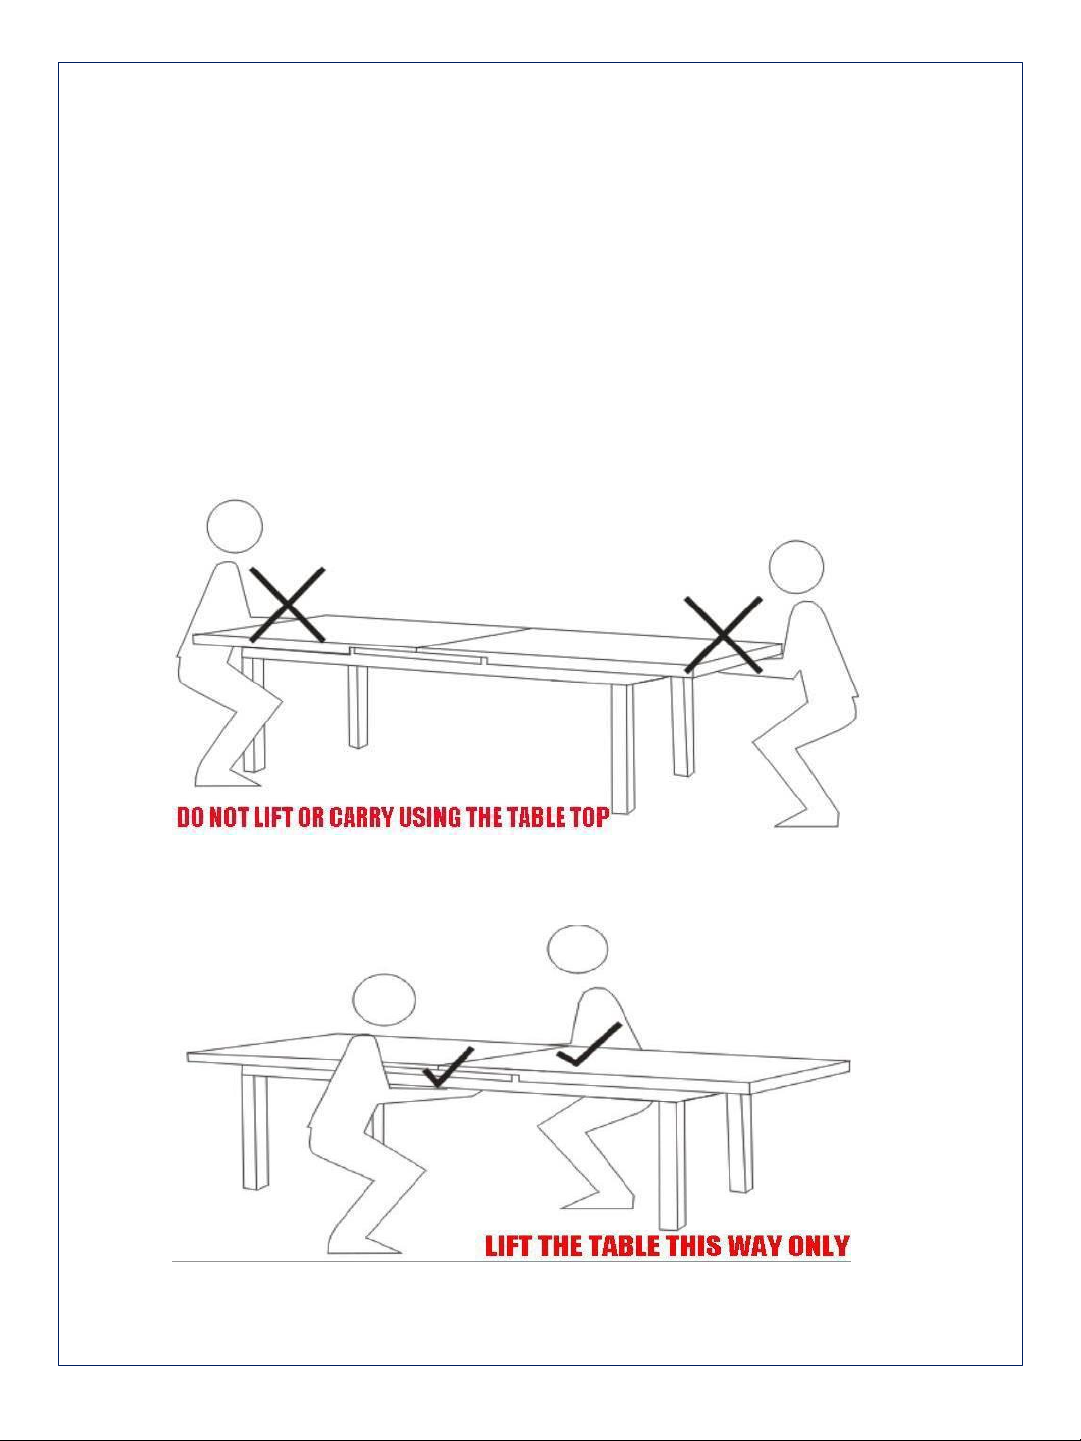
Do not lift the table by the glass ends!
Lift only by the support frame.
DAKEXTT250L
3
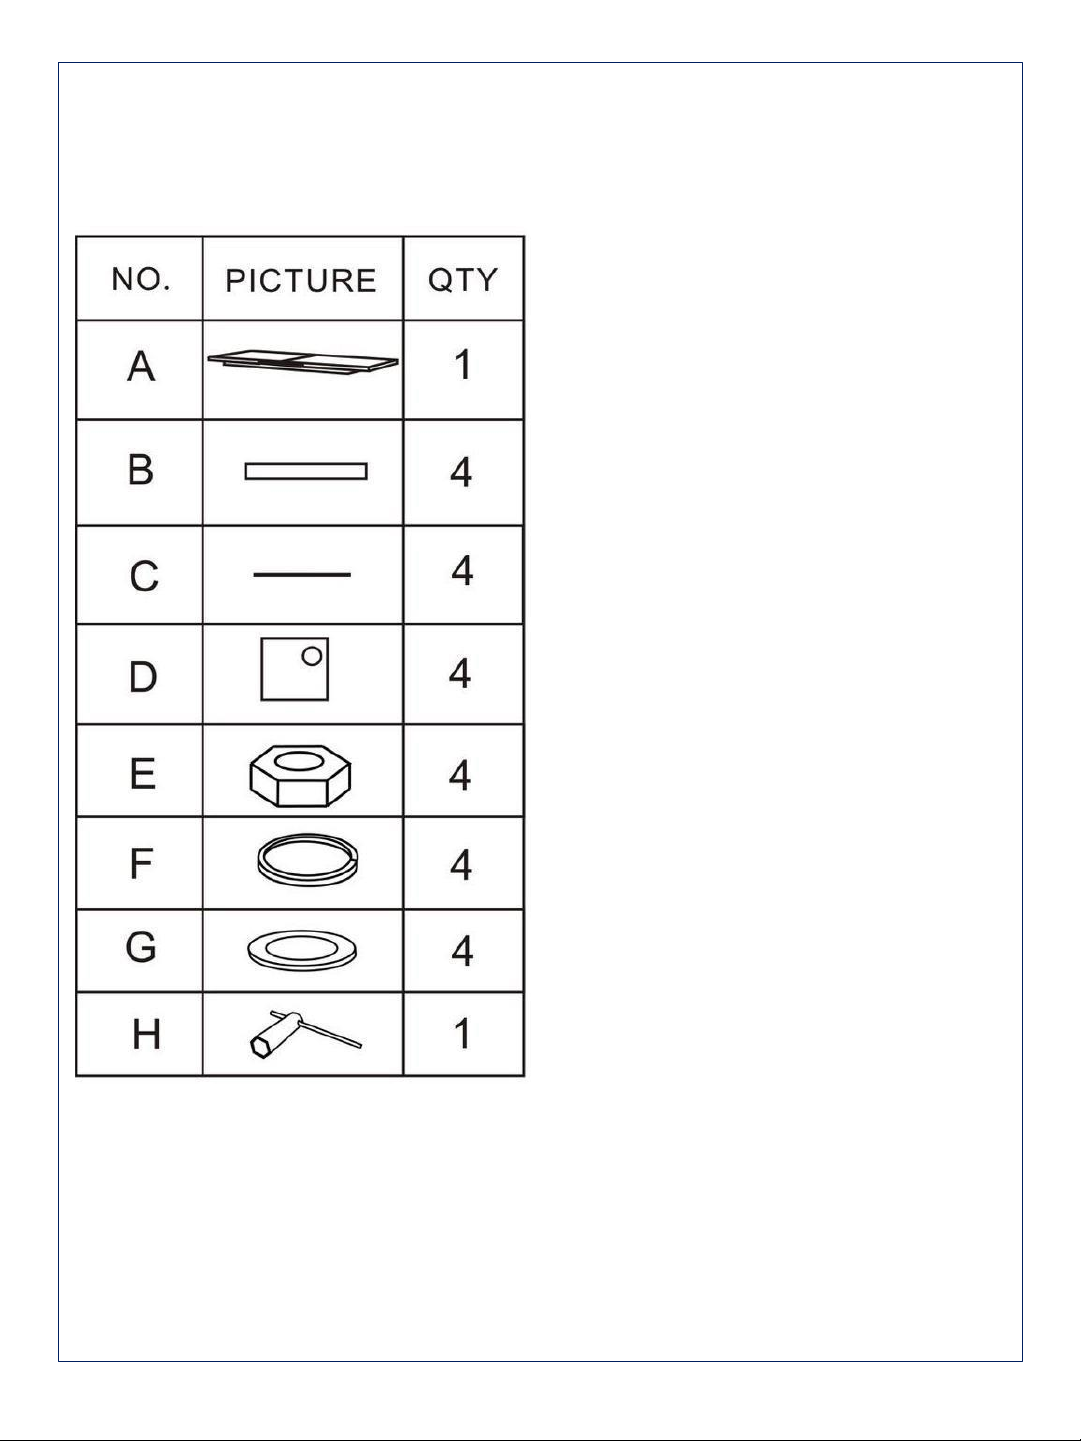
PARTS LIST
TABLETOP
TABLELEG
LONG SCREW
LEG CAP
M10 NUT
SPRING WASHER
FLAT WASHER
TOOL

DAKEXTT250L
4
ASSEMBLY INSTRUCTIONS
STEP 1: Fit the LONG SCREWS (C)
Important: When moving the table and/or table top, lift and carry by the support frame
only, as lifting by the glass pieces may damage the table and/or the mechanism.
With the help of another person carefully place the TABLE TOP [A] upside down on a
soft clean surface e.g. a blanket.
Then as shown below take one LONG SCREW [C] and align the end thread into the
threaded hole in one corner of the underside of the TABLE TOP [A], turn the long screw
clockwise by hand 2 to 3 full turns to ensure the thread has engaged properly.
Check the thread has properly engaged by gently pulling upwards on the screw. Once
the screw is properly engaged, turn the long screw clockwise into the frame another 3 to
4 full turns. Note this screw does not have to touch the bottom of thread hole. Fit the
remaining 3 long screws in the same way.

DAKEXTT250L
5
ASSEMBLY INSTRUCTIONS (continued)
STEP 2: Fit the Legs (B)
Each leg has one open end and the other end has a flat plate. The open end joins to the
table frame.
Take one TABLE LEG [B] slide it over a long screw. Align the long screw to come through
the hole in the flat plate at the end of the leg.
Once the long screw is through, push the leg over the mounting in the corner of the table
frame. Ensure the mounting is square and flat against table frame. Then fit in order: one
FLAT WASHER [G] then one SPRING WASHER [F] and fix with one M10 NUT [E] onto the
end thread of long screw. Ensure to seat the nut correctly. Tighten the nut by hand
clockwise 2 to 3 full turns. Check the thread is properly engaged by winding the nut up and
down by hand, it should turn quite easily.
With the nut correctly fitted, use the TOOL [H] and tighten the nut until it feels firm. Do not
Over Tighten. Once the nut is tightened, fit the LEG CAP [D] by aligning all the edges of the
cap all into the edges of the leg tube and with the full palm of your hand, push the leg cap
down into place.
Repeat for the other three legs.
DAKEXTT250L
6
ASSEMBLY INSTRUCTIONS (continued)
STEP 3: Turn the table upright (NEEDS TWO PEOPLE):
Once all legs are fitted, with the help of another person, carefully roll the table onto its long
side. Make sure the edge is resting on something soft like a blanket or some cushions. With
each person anchoring a lower table leg with their foot, carefully roll the table over to its
upright position.
Stabilise the table if necessary by adjusting the level screws at the bottom of each leg.
Please read the following operating instruction before use.
Do not lift the table by the glass ends!
Lift only by the support frame.
7
OPERATING INSTRUCTIONS
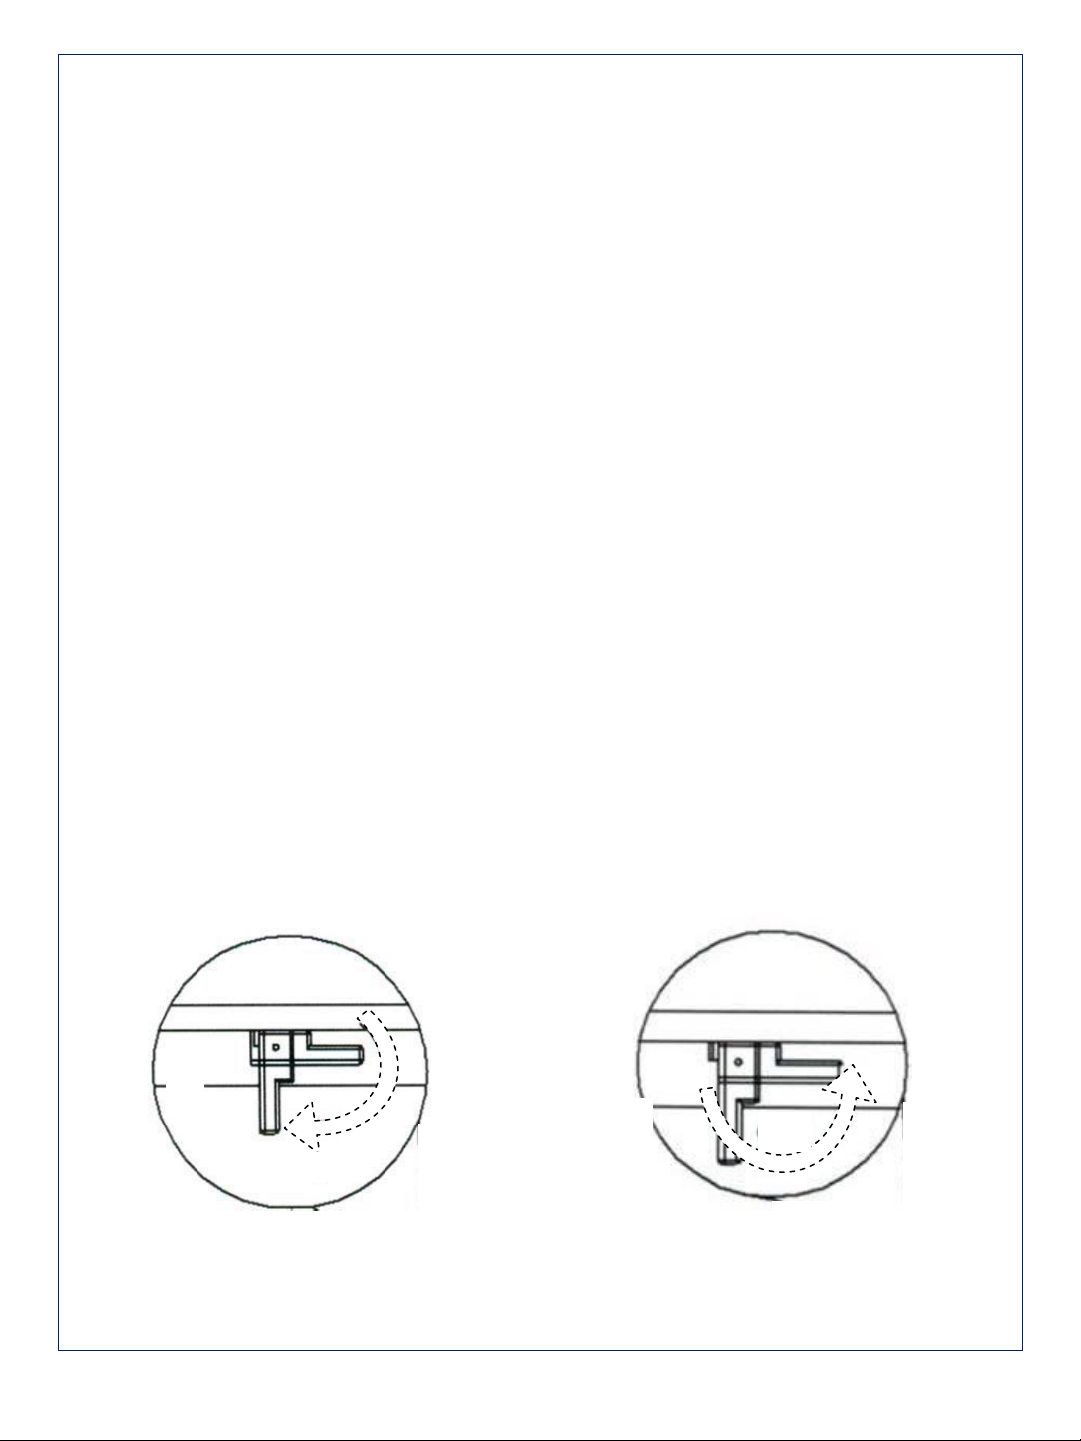
Note that to open the extension, there are two toggles that are factory set to the locked
position.
They are located under the table, past the slide action, one on each side of the table. The first
time you will probably need to look under table to locate them. After the first time, you will
know where they are.
Each toggle is shaped as shown below, and black in colour.
To UNLOCK: pull the toggle away from To LOCK: Lever the toggle towards the
the frame. You will feel it loosen. Frame. You will feel it tighten.
DAKEXTT250L
8
OPERATING INSTRUCTIONS (continued)
Once both toggles are in the unlocked (down) down position you can now open and close the
extension as desired.
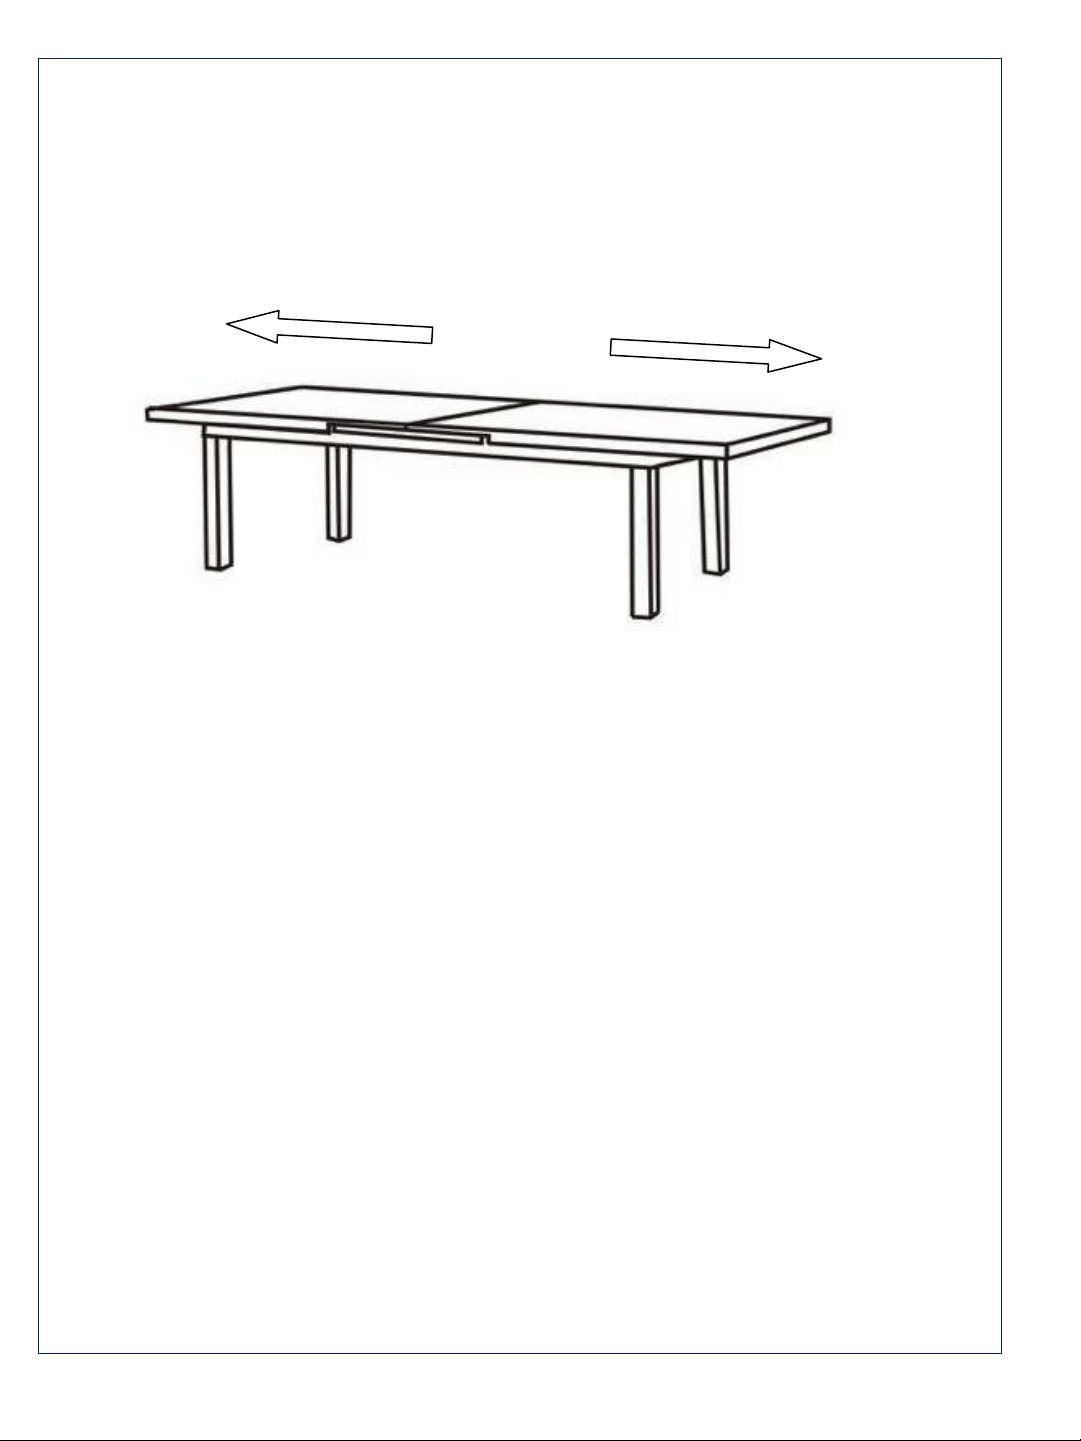
To open the extension: Stand at one short end of the table. With two hands, one on each long
side of the table, pull the table top back towards you and step slowly backwards.
Both sections of the table top are joined by a pulley system, so both ends open together and one
person alone can do this if required. It is a bit easier with two people working together, one at
each end.
The auto-riser function will raise the extension. Keep opening the table until all sections of the
table are level. Once all of the table is extended and level, simply push the table top back
towards the middle to align all the sections together. Lock the toggles to prevent unwanted
movement of the tops.

9
OPERATING INSTRUCTIONS (continued)
To close the extension, first unlock both toggles then stand at one short end of the table.
With two hands, one on each long side of the table, gently pull the table top back towards you
a little.
The extension will start to lower. Continue opening the gap until the extension has lowered
enough to slide table top back over the extension.
Note that if you continue to pull back too far, then the extension piece will rise again.
When satisfied that the extension piece is in correct position, slowly push the table top
forward to slowly slide the two table tops together. Continue until the gap is closed, then lock
the toggles.
It’s a good idea to practice this few times to get to know how it works.
Keep these instructions handy for anyone new to understand how to use the extension.

DAKEXTT250L
10
CARE AND MAINTENANCE
A little care and maintenance will help extend the life and maintain the appearance of your table.
When it is not in use, protection from direct exposure to the elements, falling tree sap and
pollen, bird droppings etc. will make a significant difference to the appearance of your table.
DAKOTA
Construction
Frame: Powder coated aluminium
Top: Tempered Glass
Powder Coated Aluminium
Powder coating is similar to a painted finish, the metal is coated with a paint powder then is
baked in a kiln to bond and harden the coating onto the metal.
To clean, use a bucket of warm water with a soft clean cloth or sponge, gently clean the
surface in one direction, avoid excessive rubbing as this will wear down the finish. Ensure to
pat dry with a soft absorbent cloth as water droplets will leave a mark on the finish.
Glass table top
•If the glass is chipped or broken, stop using the product and consult your place of purchase.
•Do not drop, drag or strike the glass.
•Do not sit or stand upon the glass surfaces.
•Do not place very hot or cold items on the glass unless adequately thick table mats are
used to prevent such items coming in contact with the glass.
•Do not place very heavy objects on glass.
•Avoid scratching the glass or using it as a chopping surface.
•Do not strike the glass with hard or pointed items.
•When cleaning the glass panels, use a damp cloth with washing up liquid or soft soap if
necessary. Do not use washing powders or any other substances containing abrasives that
may potentially scratch the glass.
Table of contents
Other Barbeques Galore Indoor Furnishing manuals

Popular Indoor Furnishing manuals by other brands


WOHNconcept
WOHNconcept SCALA 4013WW 01 manual

adapt-r
adapt-r 2.0 Basic Installation and user guide

Hooker Furniture
Hooker Furniture 5960-75206B-BLK Assembly instruction

Shanty 2 CHIC
Shanty 2 CHIC Easy DIY Cooler manual

Spectrum Industries
Spectrum Industries 22860 Assembly instructions

Vinsetto
Vinsetto 924-009 manual