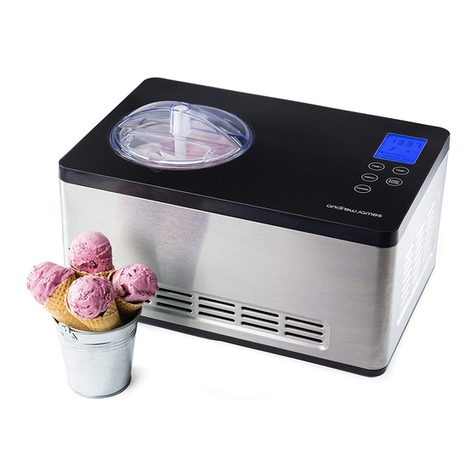
baridi DH50 User manual

Baridi 1.5L Ice Cream Maker
with Fast Freeze Compressor Cooling Stainless Steel
Model No. DH50
Thank you for purchasing a Dellonda product. Manufactured to a high standard, this product will, if used according to these instructions, and properly
maintained, give you years of trouble free performance.
LINE
DRAWING
www.dellonda.co.uk DH50 Issue:2 01/03/2021

2
Important Information
Please read these instructions carefully and note any safe operational requirements, warnings & cautions. Use the product correctly and with
care for the purpose for which it is intended. Failure to do so may cause damage and/or personal injury and will invalidate the warranty. Keep
these instructions safe for future use.
Contents
About the Product
Make up to 1.5L of ice cream, gelato, sorbet, sherbet or frozen yoghurt in less than 60 minutes! Easy-to-use with only two buttons to set up
preparation time. LCD display indicates time remaining and inside temperature. Digital timer can be adjusted in increments of 10 minutes up to a
total time of 60 minutes. Rell inlet allows ingredients to be added without needing to stop the making process. Compressor cooling technology
gives a cooling range of between -18° to -35°C. Non-stick removable bowl for easy cleaning. Stainless steel design.
Refer to
instruction
manual
Warning:
Flammable
Capacity: 1.5L
Refrigerant (weight): R600a (26g)
Vesicant: Cyclopentane (C5H10)
Power consumption 150W
Standby energy consumption 0.59W
Supply 230V-50Hz
Cooling range -18° to -35°C
Product dimension (W x D x H): 320 x 385 x 330mm
Specication Table

3
Safety Instructions
ELECTRICAL SAFETY
WARNING! It is the responsibility of the owner and the operator to read, understand and comply with the following:
You must check all electrical products, before use, to ensure that they are safe. You must inspect power cables, plugs, sockets
And any other connectors for wear or damage. You must ensure that the risk of electric shock is minimised by the installation of
Appropriate safety devices. A Residual Current Circuit Breaker (RCCB) should be incorporated in the main distribution board. You
Must also read and understand the following instructions concerning electrical safety.
9Ensure that cables are always protected against short circuit and overload.
9Regularly inspect power supply cables and plugs for wear or damage and check all connections
To ensure that none are loose.
9Ensure that the voltage marked on the appliance matches the power supply to be
Used and that the plug is tted with the correct fuse - see fuse rating at right.
8DO NOT use worn or damaged cables, plugs or connectors. Have any faulty item repaired or
Replaced immediately by a competent electrician.
9It is recommended that this appliance is wired directly to a fused isolator switch. If, however, a plug
Is tted, the following applies:
9Fit a new plug according to the following instructions (UK only).
A) Connect the GREEN/YELLOW earth wire to the earth terminal ‘E’.
B) Connect the BROWN live wire to the live terminal ‘L’.
C) Connect the BLUE neutral wire to the neutral terminal ‘N’.
D) After wiring, check that there are no bare wires, that all wires have been correctly connected,
That the cable restraint is tight.
GENERAL SAFETY
IMPORTANT NOTICES
9When using an electrical appliance, basic safety precautions should always be followed to reduce the risk of re, electric shock, and/or
injury, including the following:
9Read instructions before use.
9Ensure the voltage is compliant with the voltage range stated on the rating label, and ensure the earthing of the socket is in good
condition.
9If the power supply cord is damaged, it must be replaced by the manufacturer or its service agent or a similarly qualied person in order
to avoid a hazard.
8DO NOT upend this product or incline it over a 45° angle.
9To protect against risk of electric shock, DO NOT pour water on cord, plug, ventilation, or immerse the appliance in water or any other
liquid.
9Keep the appliance 8cm from other objects to ensure good ventilation.
8DO NOT use accessories that are not recommended by the Manufacturer.
8DO NOT use the appliance close by ames, hot plates or stoves.
8DO NOT switch the power button on and off frequently (ensure a 5min interval at least) to avoid the damage to the compressor.
8DO NOT insert metal implements or other objects into the appliance this can cause re, electric shock and damage to the unit.
9When taking out the ice cream, DO NOT knock the barrel or edge of barrel to protect the barrel from damage.
8DO NOT switch on the power before installing the barrel or blender blade.
9The initial temperature of the ingredients is 25±5℃. DO NOT put the ingredients into freezer for pre-freezing, as this will block the blender
blade before the ice cream has formed.
8DO NOT remove the blender blade when the appliance is plugged in or working.
8DO NOT use outdoors.
WARNING! Unplug the appliance after using and before cleaning.
9Never clean with scouring powders or hard implements.
9Please keep the instruction manual.
9This appliance can be used by children aged from 8 years and above and persons with reduced physical, sensory or mental capabilities
or lack of experience and knowledge if they have been given supervision or instruction concerning use of the appliance in a safe way and
understand the hazards involved. Children shall not play with the appliance. Cleaning and user maintenance shall not be made by children
without supervision.
9Children should be supervised to ensure that they DO NOT play with the appliance.
9This appliance is intended to be used in household and similar applications such as
– staff kitchen areas in shops, ofces and other working environments;
– farm houses and by clients in hotels, motels and other residential type environments;
– bed and breakfast type environments;
– catering and similar non-retail applications
WARNING: DO NOT store explosive substances such as aerosol cans with a ammable propellant in this appliance.
WARNING: Keep ventilation openings, in the appliance enclosure or in the built-in structure, clear of obstruction.
WARNING: DO NOT use mechanical devices or other means to accelerate the defrosting process, other than those recommended by the
manufacturer.
WARNING: DO NOT damage the refrigerant circuit.
WARNING: DO NOT use electrical appliances inside the food storage compartments of the appliance, unless they are of the type
recommended by the manufacturer.
WARNING: When disposing of the appliance, do so only at an authorized waste disposal centre. DO NOT expose to ame.
9The refrigerant isobutene (R600a) is contained within the refrigerant circuit of the appliance, a natural gas with a high level of
environmental compatibility, which is nevertheless ammable. During transportation and installation of the appliance, ensure that none of
the components of the refrigerant circuit becomes damaged.
9The refrigerant (R600a) is ammable.
9Professional repair only.
WARNING! risk of re
9If the refrigerant circuit should be damaged:
9Avoid opening ames and sources of ignition.
9Thoroughly ventilate the room in which the appliance is situated.
Recommended fuse rating
13 Amp

4
BEFORE MAKING ICE CREAM
• Cleanliness:
• Before use, thoroughly wash all parts that will come into contact with the ice cream (including the xed bowl, removable bowl, mixing blade,
transparent lid, rell lid, measuring cup and spoon).
• Prepare recipe ingredients:
• Prepare recipe ingredients from your own recipe or from the recipe booklet here, and pour the ingredients into the removable bowl.
• Note: You do not need to freeze the bowl for hours in a freezer in advance, this machine has a BUILT-IN COMPRESSOR that freezes the
ingredients whilst in operation to make the ice cream.
ASSEMBLY
Warning: Please ensure the ice cream maker is unplugged.
• Important: Always place the Ice Cream Maker upright on a at surface in order that the build-in COMPRESSOR can provide best
performance.
• 1) Put the removable bowl into the xed bowl in the machine body.
• 2) Place the mixing blade into the removable bowl.
• 3) Install the transparent lid on top of the bowls and keep the mixing blade tted in the centre of the transparent lid.
• 4) Place the rell lid onto the transparent lid.
• 5) Mount the blender motor onto the transparent lid and be sure the motor axis tted into the hole in top of mixing blade.
START MAKING ICE CREAM
• Plug in the ice cream maker.
• Operation of function buttons
• [POWER]Button: After connecting with the electricity, press the [POWER]
button to turn on the machine and the LCD will display “60:00” which means
the default operating time is 60 minutes.
• [TIMER]Button: 10, 20, 30, 40, 50 and 60 minutes of operation time is optional
and can be preset by repeatedly pressing [TIMER] Button. You can choose
different operating times for your specic needs. (Default operating time is 60
minutes).
• [START/STOP]Button: After setting the time, press the “Start/Stop” button,
the ice cream maker will start its ice cream making cycle, and the countdown
starts. The LCD back light is always on during the entire working process.
The screen shows cycling between the countdown time and the real-time
temperature. While the ice cream maker is working, press and hold the “Start/
Stop” button to exit the current ice cream making cycle.
• NOTE: During the ice cream making cycle, press and hold the “Start/Stop” button for 3 seconds, the machine will return to the initial standby
state. After the countdown has nished, the buzzer will make 10 “drip” sounds, the LCD back light will be off, and the display will ash “00:00”.
• If the ice cream is not served or the machine is not turned off in 10 minutes, it automatically enters into an “Extended Cooling Function” to keep
the ice cream frozen.
• Extended Cooling Function
• The machine runs the COOLING function (no mixing) for 10 minutes, every other 10 minutes, for a total of 1 hour, then returns to the initial default
status of “standby” (plugged in but not turned on).
WARNING! Always remember to unplug from the socket when you serve the nished ice cream to avoid an electric shock.
• Adjusting Operation:
• Stopping The Ice Cream Making Cycle: You can stop the machine by pressing the [START/STOP] Button for 3 seconds, or pressing the [Power]
button for one time whenever the machine is running.
• Adjusting The Time While In Operation: Whenever the machine is running, you can add the operating time by repeatedly pressing the [TIMER]
Button, + 5 minutes each time you press the button until it reaches the maximum 60 minutes displayed on the LCD. The time can only be
increased but can not be reduced.
• Extending The Ice Cream Making Cycle (After Operating Cycle Finished)
• When the preset ice cream making cycle time (60 minutes etc.) nishes and the machine stops, it will go back to its initial default status, if you
like a harder consistency, you can run an additional ice cream making cycle of (10/20/30/40/50/60 minutes) by pressing the [TIMER] button,
then pressing the [START/STOP] button again in turn, the machine will continue to run down the time you selected it will then stop and enter the
“Extended Cooling Function” to keep the ice cream frozen.
• Control the Amount of Ingredients
• To avoid overow and waste, please make sure that the ingredients DO NOT exceed 60% of capacity of the removable bowl (Ice cream expands
when being formed).
STORAGE OF ICE CREAM
• Remove nished ice cream into another container using a plastic scoop or a wooden spoon, DO NOT use a metal scoop avoiding scratch on the
inside removable bowl.
ICE CREAM RECIPE MANUAL
• Use measuring cup provided
• VANILLA ICE CREAM
• Makes eight 1/2-cup servings.
• 1 cup whole milk
• 1/2 cup granulated sugar
• 2/3 cups double cream, well chilled
• 1 – 2 teaspoons pure vanilla extract, to taste
• In a medium bowl, use a hand mixer or a whisk to combine the milk and granulated sugar until the sugar is dissolved, about 1 – 2 minutes on low
speed. Stir in the double cream and vanilla to taste. Turn machine on, pour mixture into freezer bowl through ingredient spout and let mix until

5
thickened, about 30 – 40 minutes.
• Nutritional analysis per serving:
• Calories 239 (68% from fat) . carbs. 17g . pro 2g . fat 18g . sat. fat 11g . cholesterol. 69mg .
• VARIATIONS:
• Mint Chip: Omit the vanilla and replace with 1 to 1-1/2 teaspoons pure peppermint extract (to taste). Chop your favourite 4-ounce Dark (at
least 70% cocoa solids) or Plain Chocolate (around 50% cocoa solids) bar into tiny uneven pieces. Add the chopped chocolate during the last 5
minutes of mixing.
• Butter Pecan: Melt 1 stick unsalted butter in a 10-inch skillet. Add 1 cup roughly chopped pecans and 1 teaspoon kosher salt. Cook over medium-
low heat, stirring frequently until the pecans are lightly browned. Remove from the heat, strain (the butter will have a pecan avour and may be
reserved for another use). Allow the pecans to cool completely. Add the toasted buttered pecans during the last 5 minutes of mixing.
• Cookies & Cream: Add 3/4 cup coarsely chopped cookies or your favourite candy (chocolate chip, miniature biscuits., etc.) during the last 5
minutes of mixing.
• BASIC CHOCOLATE ICE CREAM
• Makes eight 1/2-cup servings.
• 1 cup whole milk
• 1/2 cup granulated sugar
• 240g or 8 ounces Dark (at least 70% cocoa solids) or Plain Chocolate (around 50% cocoa solids) (your favourite), broken into 1/2-inch pieces
• 1 cup double cream, well chilled
• 1 teaspoon pure vanilla extract
• Heat the whole milk until it is just bubbling around the edges (this may be done on the stove top or in a microwave). In a blender or food
processor tted with the metal blade, pulse to process the sugar with the chocolate until the chocolate is very nely chopped. Add the hot milk,
process until well blended and smooth. Transfer to a medium bowl and let the chocolate mixture cool completely. Stir in the heavy cream and
vanilla to taste.
• Turn the machine on, pour mixture into freezer bowl through ingredient spout and let mix until thickened, about 30 – 40 minutes.
• Nutritional analysis per serving:
• Calories 370 (60% from fat) . carbs. 34g . pro 3g . fat 25g . cholesterol. 65mg .
• VARIATIONS:
• Chocolate Almond: Add 1/2 teaspoon pure almond extract along with the vanilla. Add 1/2 - 3/4 cup chopped toasted almonds or chopped
chocolate-coated almonds during the last 5 – 10 minutes of freezing.
• Chocolate Cookie: Add 1/2 - 1 cup chopped cookies during the last 5 minutes of freezing.
• Chocolate Fudge Brownie: Add 1/2 - 1 cup chopped day old brownies during the last 5 minutes of freezing.
• Chocolate Marshmallow Swirl: When removing the ice cream to a container for freezing, layer it with dollops of your favourite chocolate sauce
and scoops of marshmallow crème.
• FRESH STRAWBERRY ICE CREAM
• Makes eight 1/2-cup servings.
• 250g or 1 pint fresh ripe strawberries, stemmed and sliced
• 2/3 tablespoons freshly squeezed lemon juice
• 1/2 cup sugar, divided
• 1 cup whole milk
• 1 cups double cream
• 1 teaspoon pure vanilla extract
• In a small bowl, combine the strawberries with the lemon juice and 1/2 cup of the sugar; stir gently and allow to the strawberries to macerate in
the juices for 2 hours.
• In a medium bowl, use a hand mixer or a whisk to combine the milk ,and granulated sugar until the sugar is dissolved, about 1 – 2 minutes on low
speed. Stir in the heavy cream plus any accumulated juices from the strawberries and vanilla. Turn the machine on, pour mixture into freezer bowl
through ingredient spout and let mix until thickened, about 30 – 40 minutes. Add the sliced strawberries during the last 5 minutes of freezing.
• Note: this ice cream will have a “natural” appearance of very pale pink; if a deeper pink is desired, sparingly add drops of red food colouring until
desired colour is achieved.
• Nutritional analysis per serving:
• Calories 222 (61% from fat) . carbs. 17g . pro 3g . fat 15g . cholesterol.57mg .
• FRESH LEMON SORBET
• Makes eight 1/2-cup servings.
• 2/3 cups sugar
• 2/3 cups water
• 1 cup freshly squeezed lemon juice
• 1 tablespoon nely chopped lemon zest *
• Combine the sugar and water in a medium saucepan and bring to a boil over medium-high heat. Reduce heat to low and simmer without stirring
until the sugar dissolves, about 3 – 5 minutes. Cool completely. This is called a simple syrup, and may be made ahead in larger quantities to have
on hand for making fresh lemon sorbet. Keep refrigerated until ready to use.
• When cool, add the lemon juice and zest; stir to combine. Turn the machine on, pour the lemon mixture into freezer bowl through ingredient spout
and mix until thickened, about 30 – 40 minutes.
• *When zesting a lemon or lime use a vegetable peeler to remove the coloured part of the citrus rind.
• Nutritional analysis per serving:
• Calories 204 (0% from fat) . carbs. 52g . pro .19g . fat 0g . cholesterol. 0mg .
• VARIATION:
• Fresh Pink Grapefruit Sorbet: Substitute 1-1/2 cups freshly squeezed pink grapefruit juice for the lemon juice, and 1 tablespoon nely chopped
grapefruit zest for the lemon zest. Add 1/4 cup almond syrup to the mixture ( Almond Syrup is used for cocktails such as a Mai Tai or Scorpion
and can be found with the drink mixers in most grocery stores).

• CHOCOLATE FROZEN YOGURT
• Makes eight 1/2-cup servings.
• 1 cup whole milk
• 180g or 6 ounces Dark (at least 70% cocoa solids) or Plain Chocolate (around 50% cocoa solids), chopped
• 2 cups low-fat vanilla yogurt
• 1/4 cup sugar
• Combine the milk and chocolate in a blender or food processor tted with the metal blade and process until well blended and smooth, 20 – 30
seconds. Add the yogurt and sugar; process until smooth, about 15 seconds. Turn the machine ON, pour mixture into freezer bowl through
ingredient spout and let mix until thickened, about 50 – 60 minutes.
• Nutritional analysis per serving:
• Calories 222 (31% from fat) . carbs. 36g . pro 3g . fat 8g . cholesterol. 4mg
Dellonda Limited, Sole UK Distributor of Baridi
Kempson Way, Suffolk Business Park, Bury St Edmunds, Suffolk. IP32 7AR
Environment Protection, Waste Electrical and Waste Electronic Equipment Regulations
(WEEE)
Recycle unwanted packaging materials. When this product is no longer required, or has reached the end of its useful life, please dispose
of in an environmentally friendly way. Drain any uids (if applicable) into approved containers, in accordance with local waste regulations.
Please note that this product contains one or more batteries. It is our policy to continually improve products and we reserve the right to
alter data, specications and parts without prior notice. No liability is accepted for incorrect use of this product. Guarantee is 12 months
from purchase date, proof of which is required for any claim.
Table of contents
Other baridi Ice Cream Maker manuals

