Kitchen Living FDM-1301 User manual

ID: #05007
m
y
h
a
n
s
e
c
o
n
t
r
o
l
.
c
o
m
M
A
N
U
A
L
D
E
V
E
L
O
P
E
D
I
N
G
E
R
M
A
N
Y
User-friendly
Manual
User Guide
Manual
del usuario
Frozen Treat Maker
Máquina de Helados
English ..... Page 06
Español.. Página 21

QR codes take you where you want to go
quickly and easily
Whether you require product information, spare parts or accessories, de-
tails on warranties or aftersales services, or if you want to watch a product
demonstration video, our QR codes will take you there in no time at all.
What is a QR code?
A QR code (QR = Quick Response) is a type of matrix that can be read with a
smartphone camera and that contains a link to a website or contact details,
for example.
Advantage:You do not need to manually enter a website address or contact
details.
How it works
To scan the QR code, all you need is a smartphone with QR code reader soft-
ware and an internet connection*. This type of software can be downloaded
for free from your smartphone’s app store.
Try it out now
Just scan the QR code with your smartphone and find out
more about the Aldi product you have purchased.*
Your Aldi Service Portal
All details mentioned above can also be found in the
Aldi Service Portal at www.aldi.us.
* Depending on your tariff plan you may be charged for the connection.

Contents
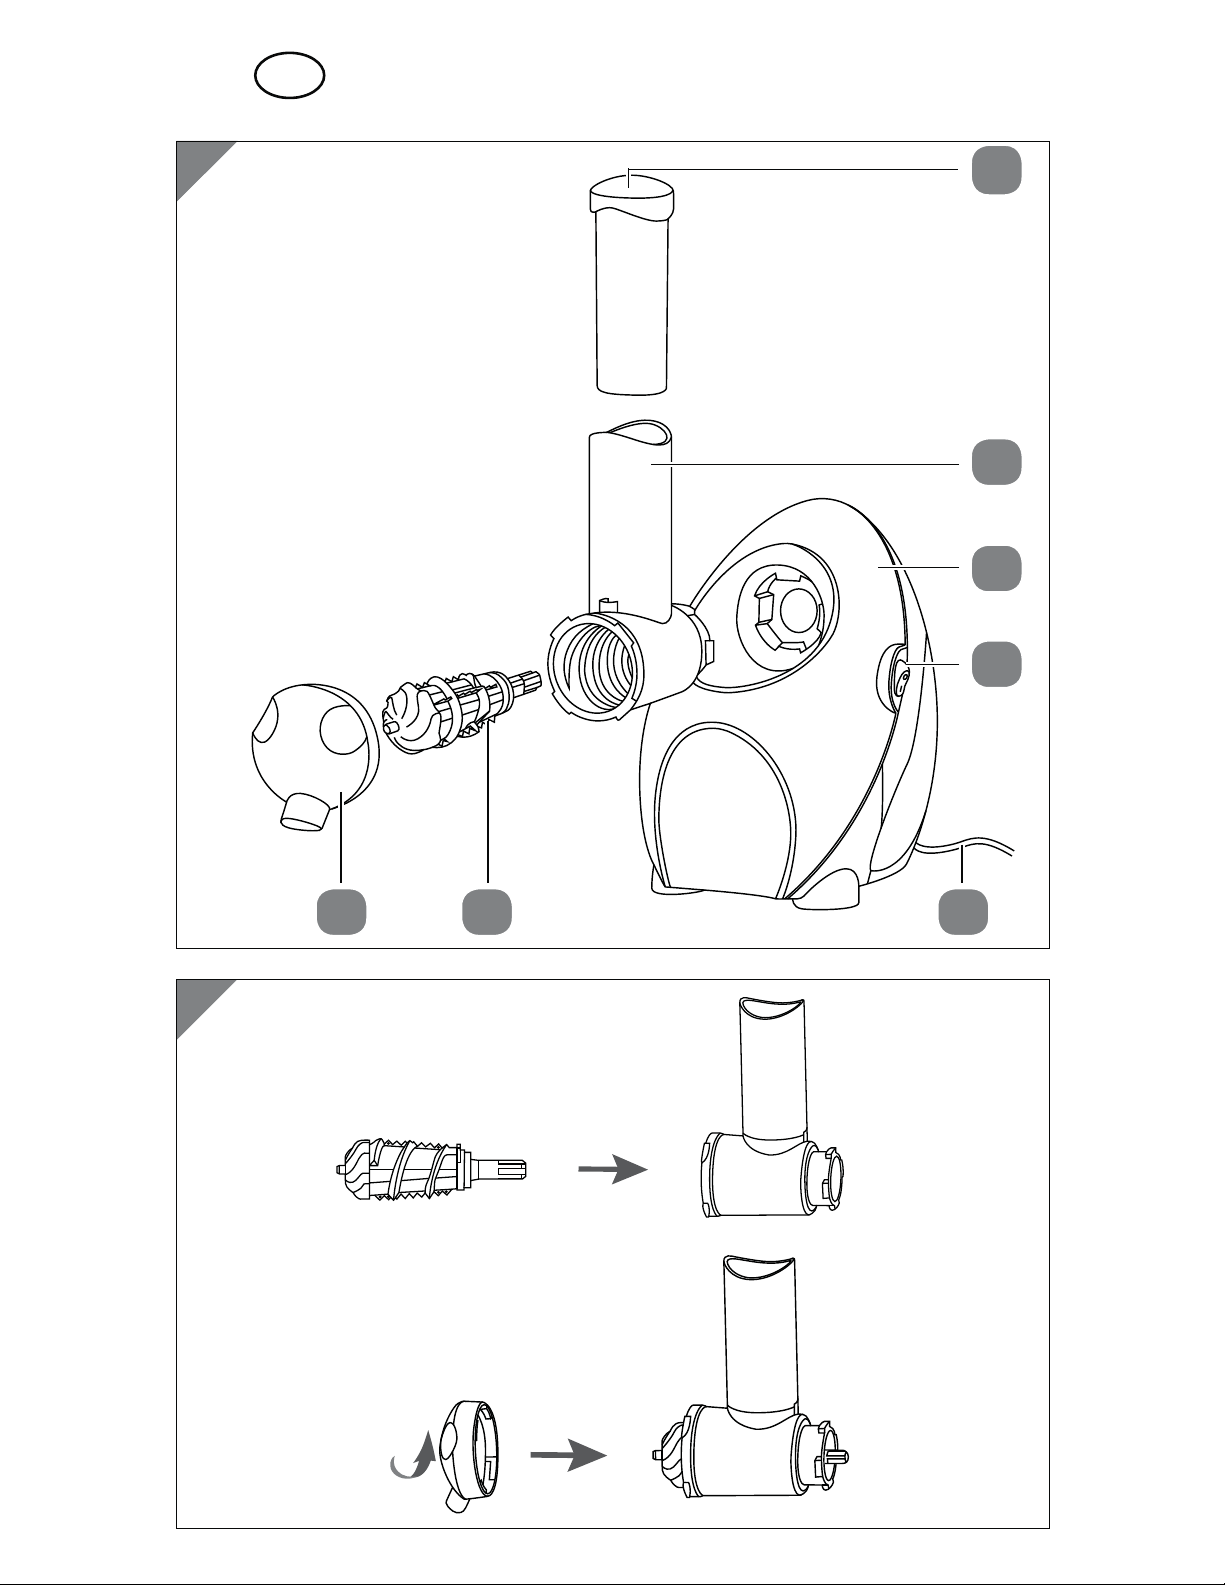
Overview ..................................................................................................... 4
Use................................................................................................................ 5
Pack contents/device parts ....................................................................... 6
General information ...................................................................................7
Reading and storing the user manual .......................................................... 7
Explanation of symbols....................................................................................7
Safety...........................................................................................................8
Proper use...........................................................................................................8
Safety notes........................................................................................................8
First use ..................................................................................................... 13
Checking the treat maker and product contents...................................... 13
Basic cleaning .................................................................................................. 13
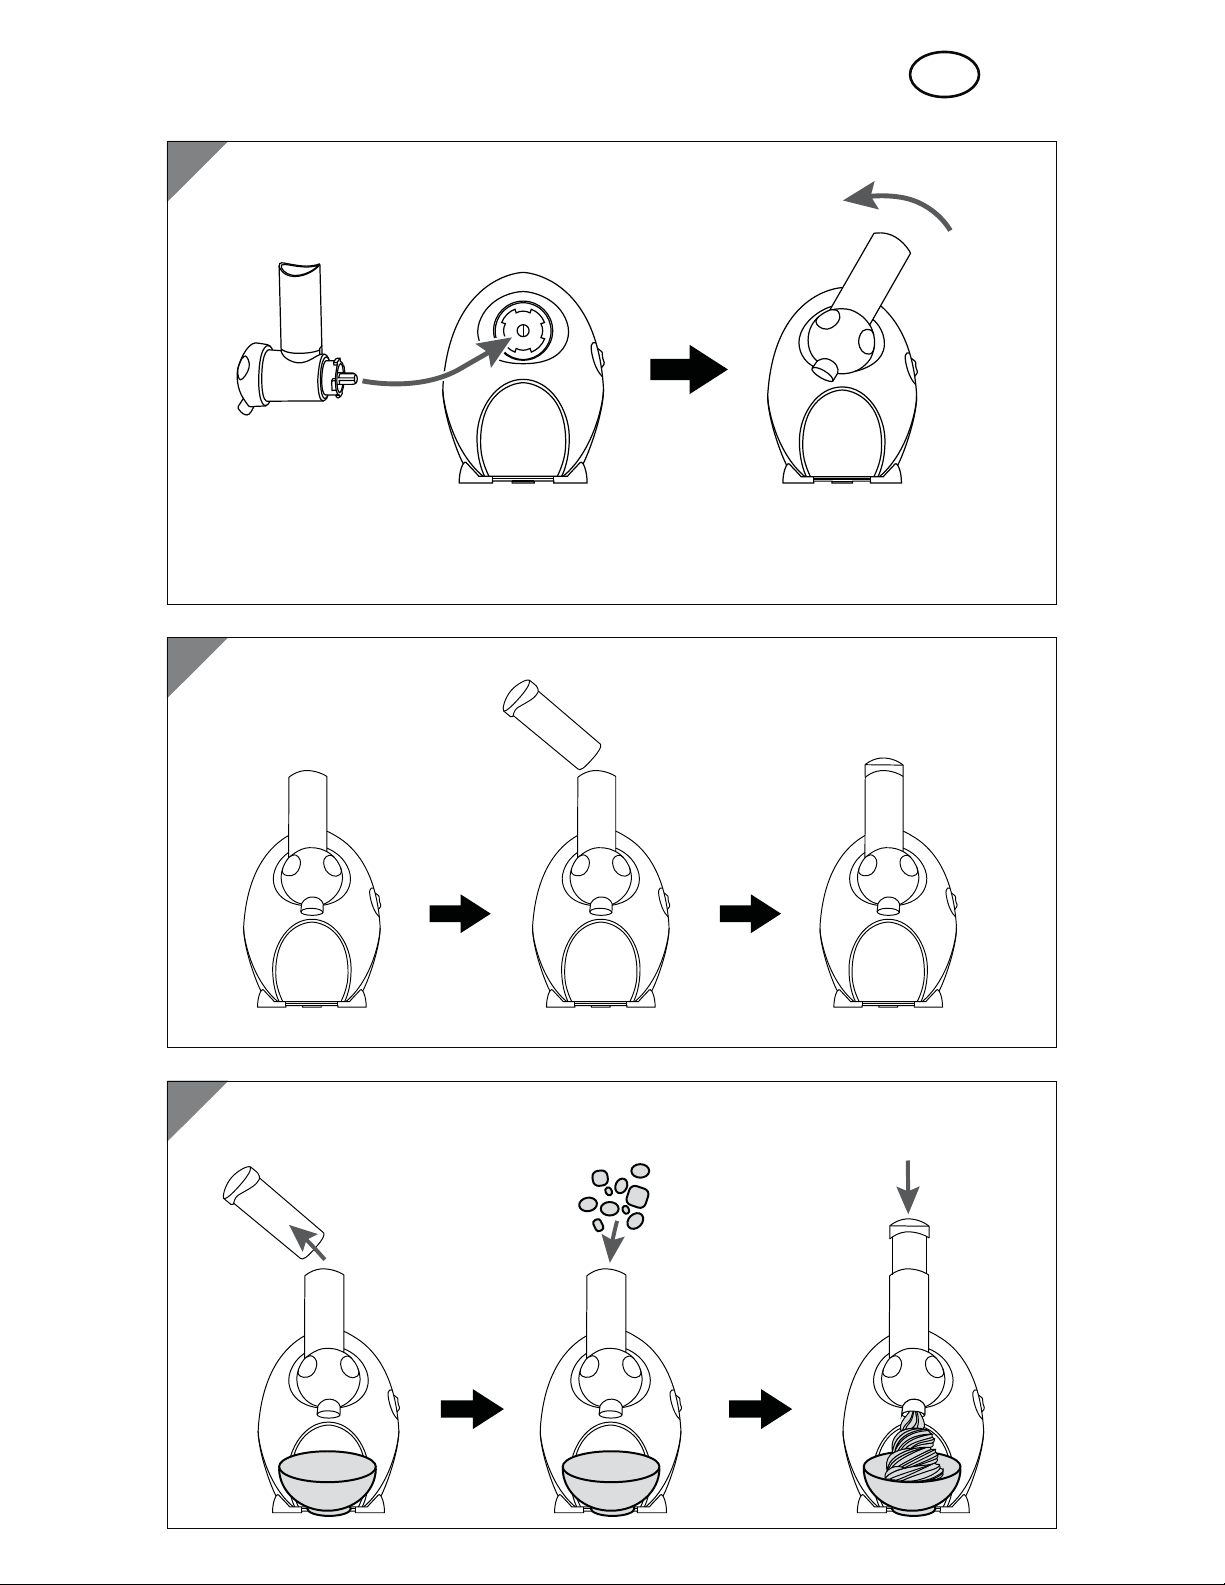
Assembly ................................................................................................... 13
Preparation............................................................................................... 14
Tips and tricks .................................................................................................. 14
Using the treat maker..................................................................................... 15
Recipes....................................................................................................... 16
Cleaning.....................................................................................................18
Cleaning the main unit................................................................................... 18
Cleaning the parts........................................................................................... 18
Storage ...................................................................................................... 19
Troubleshooting ....................................................................................... 19
Technical data ...........................................................................................20
Disposal .....................................................................................................20
Disposing of the packaging...........................................................................20
Disposing of the treat maker.........................................................................20
Warranty....................................................................................................39
Warranty card...................................................................................................39
Warranty conditions....................................................................................... 40

A
4
USA
B1.
2.
1
2
3
4
6 57

5
USA
C
D
E2.1. 3.

6
USA
Pack contents⁄device parts
1Presser
2Filling tube
3Main unit
4On/Off switch
5Power cord and plug
6Grinder
7Dispenser

AFTER SALES SUPPORT
USA
G
eneral
i
nformat
i
o
n
USA
866 235 5029 serviceusa@tempo.org
7
General information
Reading and storing the user manual
This user manual accompanies the frozen treat maker.
It contains important information on handling and care. For
improved readability, the frozen treat maker will be referred to
only as the “treat maker” below.
Before using the treat maker, read the user manual carefully. This
particularly applies to the safety notes. Failure to follow the instructions in this
user manual may result in severe injury or damage to the treat maker.
When abroad, you must also observe country-specific guidelines and laws!
Store the user manual for future use. If you pass the treat maker on to a third
party, please be absolutely sure to include this user manual.
Explanation of symbols
The following symbols and signal words are used in this instruction manual, on
the treat maker or on the packaging.
DANGER! This key word/symbol indicates a hazardous
situation which, if not avoided, could result in death
or serious injury.
WARNING! This signal word/symbol designates a hazard with
moderate degree of risk, which may lead to death or
severe injury if not avoided.
CAUTION! This signal word/symbol designates a hazard with
low risk which may result in minor or moderate
injury if not avoided.
NOTE! This signal word/symbol warns of possible damage
to property.
This signal word/symbol provides you useful
additional information regarding assembly or
operation.

Sa
f
et
y
USA
AFTER SALES SUPPORT
8
USA
866 235 5029 serviceusa@tempo.org
Safety
Proper use
The treat maker is exclusively designed for making a fruit mixture from
frozen fruit. It is exclusively intended for private use and is not suitable for
commercial or medical applications.
Only use the treat maker as described in this user manual. Any other use is
deemed improper and may result in damage to property or even personal
injury. The treat maker is not a children‘s toy.
The manufacturer or vendor accepts no liability for damage caused by improp-
er or incorrect use.
Safety notes
IMPORTANT SAFEGUARDS
When using electrical appliances, basic safety
precautions should always be followed including the
following. Read all instructions.
WARNING!
Risk from poor hygiene!
Frozen treat is an ideal breeding ground for bacteria
(e.g. salmonella). Pay attention to the hygiene during the
preparation.
− Always check that all work equipment is absolutely clean.
− Wash your hands regularly before and during food
preparation.
− Once made, frozen treat should be eaten without delay.
Frozen treat with fresh ingredients can only be stored in
the freezer at -0.4 °F (- 18 °C) for maximum 1 week.
− Frozen treat that has thawed out even slightly must not be
refrozen under any circumstances.
− Before and after each use, the main unit and all parts of
the treat maker must be cleaned thoroughly as
described in the chapter “Cleaning”.

AFTER SALES SUPPORT
USA
S
a
f
et
y
USA
866 235 5029 serviceusa@tempo.org
9
DANGER!
Risk of electric shock!
Defective electrical installation or excessive line voltage could
lead to electric shock.
− Connect the treat maker only to an alternating current (AC)
power supply. Make sure that the voltage corresponds
with the voltage details on the device. The treat maker
must be operated using (120 V / 60 Hz)
alternating current (AC).
− Only connect the treat maker to an easily accessible socket
so that you can quickly pull the plug in an emergency.
− Do not use the treat maker if the housing or cord is
defective or has other visible damages. In the event of
damage, only have the treat maker serviced by the
manufacturer, its customer service team or a similarly
qualified person to avoid risks.
− Plug the cord into a socket only when the treat maker is
properly assembled.
− Never open the housing of the treat maker.
− Never try to repair the treat maker yourself. All repairs
must be carried out solely by a qualified electrician.
− Keep the main unit, cord and plug away from water and
other fluids.
− Do not touch the plug of the treat maker with wet hands.
− Always pull the plug and not the cord to disconnect the
treat maker from the mains.
− Never use the cord of the treat maker as a carrying strap.
− Lay the cord of the treat maker so that it does not pose a
tripping hazard.
− Ensure that the cord of the treat maker is not damaged,
tightly stretched or kinked and is not laying over sharp
edges.
− Do not let cord of the treat maker hang over edge of table
or counter.

Sa
f
et
y
USA
AFTER SALES SUPPORT
10
USA
866 235 5029 serviceusa@tempo.org
− Never store the treat maker so that there is a risk of falling
into a bathtub or sink.
− Never reach to retrieve the treat maker if it has fallen in
water. In such case, immediately pull the plug. Have the
treat maker checked before using it again.
− Always turn the treat maker off and pull the plug out of
the socket:
• if you are not using the treat maker,
• before you clean the treat maker,
• before you assemble the accessories,
• if a fault occurs,
• in the event of a storm.
− Do not use extension cords or sockets that do not have
sufficient capacity.
− Do not modify the plug in any way. This treat maker has a
polarized plug (one blade is wider than the other).
To reduce the risk of electric shock, this plug will fit in a
polarized outlet only one way. If the plug does not fit fully
in the outlet, reverse the plug. If it still does not fit, contact
a qualified electrician.
WARNING!
Danger for children and persons with impaired physical,
sensory or mental capacities (e.g. partially disabled
persons, older persons with reduced physical and mental
capacities) or lack of experience and knowledge
(e.g. older children).
− As long as they are supervised or have been instructed on
how to safely use the treat maker and have understood
the risks associated with operating it, this treat maker may
be used by children ages eight and over as well as per-
sons with impaired physical, sensory or mental capacities
or those lacking experience and knowledge. Cleaning and
user maintenance must not be performed by unsuper-
vised children.

AFTER SALES SUPPORT
USA
S
a
f
et
y
USA
866 235 5029 serviceusa@tempo.org
11
− Keep children under eight years of age away from the
treat maker and power cord.
− Do not leave the treat maker unattended while in operation.
− Do not allow children to play with the packaging wrapper.
They may get caught in it and suffocate.
− Make sure that children do not play with the treat maker.
The treat maker should be kept out of the reach of
children.
− Make sure that children cannot pull the treat maker off the
work surface by means of the power cord.
WARNING!
Risk of injury!
Handling the treat maker improperly may result in injury.
− Keep your fingers clear of all moving parts when the treat
maker is in operation.
− Keep hair, clothes and other objects away from the treat
maker when it is in operation.
− The grinder contains sharp edges. Be very careful when
assembling the treat maker.
NOTE!
Risk of damage!
Improper handling of the treat maker may damage it.
− Do not use this treat maker in continuous operation. The
maximum recommended operating time is 5 minutes.
Allow a 5-minute pause after each use for cooling down.
Let the treat maker cool down completely after using it for
3 cycles. There is a risk of overheating if the treat maker is
operated for longer periods.
− Do not use the treat maker outdoors.
− Make sure the parts are securely locked in place before
operating the treat maker.

Sa
f
et
y
USA
AFTER SALES SUPPORT
12
USA
866 235 5029 serviceusa@tempo.org
− Do not attempt to defeat the interlock mechanism of the
treat maker.
− Place the treat maker on an easily accessible, flat, dry and
stable working surface.
− Do not place the treat maker at the edge of the working
surface.
− Keep the treat maker away from open flames, hot surfaces
and extreme temperatures.
− Do not insert any objects in the housing of the treat maker.
− Do not immerse the main unit of the treat maker in water
for cleaning.
− Never wash the treat maker in the dishwasher. This will
damage the treat maker.
− Do not use the treat maker and its accessories when de-
formations, cracks or fissures are found.
− Do not make any modifications to the treat maker.
− Use only the original and provided accessories of the
treat maker. The use of attachments not recommended or
sold by the manufacturer may cause fire, electric shock or
injury.
− Always lift the treat maker with both hands and by hold-
ing on to the main unit. Never hold on to the dispenser or
filling tube.
− If necessary, place a non-slip mat underneath the treat
maker. As furniture is coated with various varnishes and
plastics and may be treated with different cleaning
products, it cannot be completely ruled out that some of
these substances contain components which may attack
and soften the rubber feet.
SAVE THESE INSTRUCTIONS
Keep the user manual for future reference.

AFTER SALES SUPPORT
USA
F
i
rst us
e
USA
866 235 5029 serviceusa@tempo.org
13
First use
Checking the treat maker and product contents
1. Take the treat maker out of the packaging and check whether the treat
maker or the individual parts have any damages. If this is the case, do not
use the treat maker. Contact the manufacturer using the service address
specified on the guarantee card.
2. Check to make sure that all contents have been received (see Fig. A).
Basic cleaning
− Clean all parts of the treat maker before first use as described in the chapter
“Cleaning”.
Assembly
CAUTION!
Risk of injury and damage!
Improper handling of the treat maker may damage it and cause
injury.
− Make sure the treat maker is placed on a stable, flat surface.
− Do not connect the treat maker to a socket during
assembly.
− The grinder contains sharp edges. Be very careful when
assembling the treat maker.
1. Place the grinder 6in the filling tube 2(see step 1 in Fig. B).
2. Place the dispenser 7at the front of the filling tube and secure it by
turning to the left (see step 2 in Fig. B).
3. Place the axis of the grinder into the opening of the main unit 3(with the
mouth of the dispenser facing downwards). Secure it by turning to the left
(see Fig C).
4. Place the presser 1into the filling tube (see Fig D).
The treat maker is now ready for use.

Pre
p
arat
i
on
USA
AFTER SALES SUPPORT
14
USA
866 235 5029 serviceusa@tempo.org
Preparation
Tips and tricks
• This treat maker is particularly suitable for people who are lactose-intoler-
ant. Tasty frozen treats can be made without adding cream, milk or other
lactose-containing products.
• You can buy frozen fruit in a supermarket to make the frozen treat.
Alternatively, fresh fruit can also be used. In that case, cut the fresh fruit into
small pieces so that they can fit through the filling tube of the treat maker.
Place the fresh fruit pieces in the freezer for at least 12 hours before use.
• Bananas are extremely suitable for use as the base ingredient. It is
recommended to use bananas in all your recipes.
• Overripe fruit that may not look appetizing anymore is particularly good for
making frozen treat.
• Experiment with all kinds of fruit combinations to get your favorite recipes.
Pieces of chocolate, frozen milk or cream cubes, cookies or sugar can also be
added to enhance flavors.
• When different kinds of fruit are used in your recipe, fill them alternately into
the filling tube of the treat maker to get a good mixture of flavors.
• The following kinds of fruit are especially good for making frozen fruit treat:
Berry: Strawberries, blueberries, blackberries, raspberries and cranberries
Banana: Use ripe bananas and peel them before freezing
Melon: Honeydew melons, cantaloupe melons and watermelons
Pineapple: Remove the shell and stalk and cut into long and thin pieces
Peach, pear, apple,mango: Peel, remove the core and cut into small pieces
• A simple frozen yogurt treat can be made by using frozen yogurt cubes
instead of bananas in your recipe. To prepare the frozen yogurt cubes, fill an
ice cube tray with any yogurt product and place it in the freezer for at least
24 hours.

AFTER SALES SUPPORT
USA
P
re
p
arat
i
o
n
USA
866 235 5029 serviceusa@tempo.org
15
Using the treat maker
NOTE!
Risk of damage!
Improper handling of the treat maker may damage it.
− Do not use this treat maker in continuous operation. The
maximum recommended operating time is 5 minutes.
Allow a 5-minute pause after each use for cooling down.
Let the treat maker cool down completely after using it for
3 cycles. There is a risk of overheating if the treat maker is
operated for longer periods.
− Do not grind hard food such as bones, ginger roots, etc.
− Only use the presser provided to push ingredients down
the filling tube of the treat maker. Do not use hands.
− To avoid jamming, do not use excessive force when push-
ing ingredients down the filling tube. Push the presser
gently and steadily down the filling tube.
− Do not overfill ingredients in the filling tube.
1. Plug the treat maker in for power.
2. Place a bowl or container under the dispenser 7.
3. Remove the presser 1from the filling tube 2(see step 1 in Fig. E).
4. Fill the filling tube with ingredients (see step 2 in Fig. E).
5. Turn the On/Off switch 4to the “I” position to start the operation.
6. Use the presser to push the ingredients down the filling tube
(see step 3 in Fig. E).
If necessary, remove the presser from the filling tube and fill the filling tube
with new ingredients.
7. When all ingredients are pushed through the filling tube, turn the
On/Off switch to the “O” position to stop the operation.
The frozen fruit mixture comes out from the dispenser and rests in the bowl
or container placed underneath. If necessary, stir the mixture to get the
flavors well mixed.
If a firmer texture is desired, place the mixture in the freezer for at least
1 hour before eating.

Rec
ip
e
s
USA
AFTER SALES SUPPORT
16
USA
866 235 5029 serviceusa@tempo.org
Recipes
See chapter “Tips and tricks” for the preparation of the ingredients and chapter
“Using the treat maker” for the operations of the treat maker.
Mint Chocolate Chips
Ingredients: 2 ripe bananas, 1 ounce peppermint chocolate
Preparation method:
1. Put the first frozen banana into the filling tube, followed by the peppermint
chocolate.
2. Put the second frozen banana into the filling tube and then stir the frozen
mixture to get the flavors well mixed.
Perfect Peach
Ingredients: ½ cup peaches, ¼ cup cantaloupe melons, ¼ cup cream
Preparation method:
1. Put the frozen cantaloupe melons into the filling tube, followed by half of
the frozen cream.
2. Put the frozen peaches into the filling tube, followed by the remaining
frozen cream.
3. Stir the frozen mixture in the bowl to get the flavors well mixed.
Vanilla Blackberry
Ingredients: 2 vanilla pods, ¾ cup blackberries, ¼ cup Pistachio nuts
(chopped), ¼ cup cream
Preparation method:
1. Split the vanilla pods lengthwise. Scrape the vanilla seeds out with a knife
and mix with the blackberries.
2. Freeze the mixture of blackberries and vanilla seeds.
3. Put half of the blackberries and vanilla seeds mixture into the filling tube,
followed by the frozen cream.
4. Put the remaining blackberries and vanilla seeds mixture into the filling
tube, followed by the Pistachio nuts.
5. Stir the frozen mixture in the bowl to get the flavors well mixed.

AFTER SALES SUPPORT
USA
Rec
ip
e
s
USA
866 235 5029 serviceusa@tempo.org
17
Lemon Raspberry
Ingredients: 2 ripe bananas, 1 tablespoon grated lemon zest,
½ cup raspberries
Preparation method:
1. Put the first frozen banana into the filling tube, followed by the frozen
lemon zest.
2. Put the frozen raspberries into the filling tube, followed by the second
frozen banana.
3. Stir the frozen mixture in the bowl to get the flavors well mixed.
Perfect Strawberry
Ingredients: 2 cups strawberries, ½ cup cream, ½ cup frozen milk cubes
Preparation method:
1. Put half of the frozen strawberries into the filling tube, followed by the
frozen cream.
2. Put the remaining frozen strawberries into the filling tube, followed by the
frozen milk cubes.
3. Stir the frozen mixture in the bowl to get the flavors well mixed.
Tropical fruits
Ingredients: ½ cup pineapple chunks, ½ cup mango chunks,
¼ cup grated coconut, ¼ cup cream
Preparation method:
1. Put the frozen pineapple chunks into the filling tube, followed by half of the
frozen cream.
2. Put the frozen mango chunks into the filling tube, followed by the
remaining frozen cream.
3. Stir the frozen mixture in the bowl to get the flavors well mixed.
4. Sprinkle the grated coconut on the frozen mixture.

Clean
i
n
g
USA
AFTER SALES SUPPORT
18
USA
866 235 5029 serviceusa@tempo.org
Cleaning
DANGER!
Risk of electric shock!
− Always switch off the treat maker and unplug the mains
cord before cleaning.
− Never immerse the main unit of the treat maker in water
or other fluids.
NOTE!
Risk of damage!
Improper handling of the treat maker may result in damage.
− Do not use any aggressive cleaners, brushes with metal or
nylon bristles, sharp or metallic cleaning utensils such as
knives, hard scrapers and the like. They could damage the
surfaces.
− Do not wash any parts of the treat maker in the
dishwasher.
Cleaning the main unit
1. Use a damp cloth to wipe off the main unit.
2. Dry the main unit thoroughly with a clean, dry cloth.
Cleaning the parts
Disassembling the parts
1. Remove the presser 1from the filling tube 2.
2. Turn the filling tube to the right and detach it from the main unit 3.
3. Turn the dispenser 7to the right and detach it from the front of the filling
tube.
4. Remove the grinder 6from the filling tube.
Washing the parts
1. Wash the parts with a dishcloth or sponge in hot soapy water.
2. Dry the parts afterwards with a clean, dry cloth.

AFTER SALES SUPPORT
USA
S
tora
g
e
USA
866 235 5029 serviceusa@tempo.org
19
Storage
− Store the treat maker in a clean and dry place. We recommend putting the
treat maker back in its original packaging.
− Keep the treat maker out of reach of children.
Troubleshooting
Risk of damage!
Do not open the housing of the treat maker; instead,
have qualified professionals perform any repairs.
Contact a qualified workshop for this. Liability and
warranty claims are waived in the event of repairs
performed by the user or incorrect operation.
− Some problems may be caused by minor faults that you can fix yourself. To
do so, follow the instructions in the following table. If it is still not possible to
resolve the problem, contact customer service. Do not repair the treat maker
yourself.
Problem Possible cause Solution
The treat maker does
not start.
The plug is not
connected to a
socket.
Properly connect the plug to
a socket.
Frozen mixture does
not come out from the
dispenser.
The filling tube is
blocked.
Turn off the treat maker and
unplug the cord at once.
Disassemble and then clean
the filling tube, dispenser
and grinder before using
them again (see chapter
“Cleaning”).
The frozen mixture is
too soft.
The ingredients are
not frozen enough.
Place the ingredients in the
freezer for some hours.

T
echn
i
cal data
USA
AFTER SALES SUPPORT
20
USA
866 235 5029 serviceusa@tempo.org
Technical data
Product description: Frozen Treat Maker
Product code: 92411
Supply voltage: 120 V / 60 Hz
Power: 150 W
Disposal
Disposing of the packaging
Sort the packaging before you dispose of it. Dispose of cardboard
and carton as waste paper and wrapping via the recyclable
material collection service.
Disposing of the treat maker
Old appliances may not be disposed of in the household garbage!
− Should the treat maker no longer be capable of being used at some point in
time, dispose of it in accordance with the regulations in force in your state or
country.
− Please ensure your recycling information comforms with the local
regulations and EPA recommendations (www.epa.gov).
Other manuals for FDM-1301
1
This manual suits for next models
1
Table of contents
Languages: