Barn Owl RangeCam Mini User manual

RangeCam Mini
Instruction Manual
Barn Owl Tech, Inc 1

Contents
1) Quick Start - 3 -
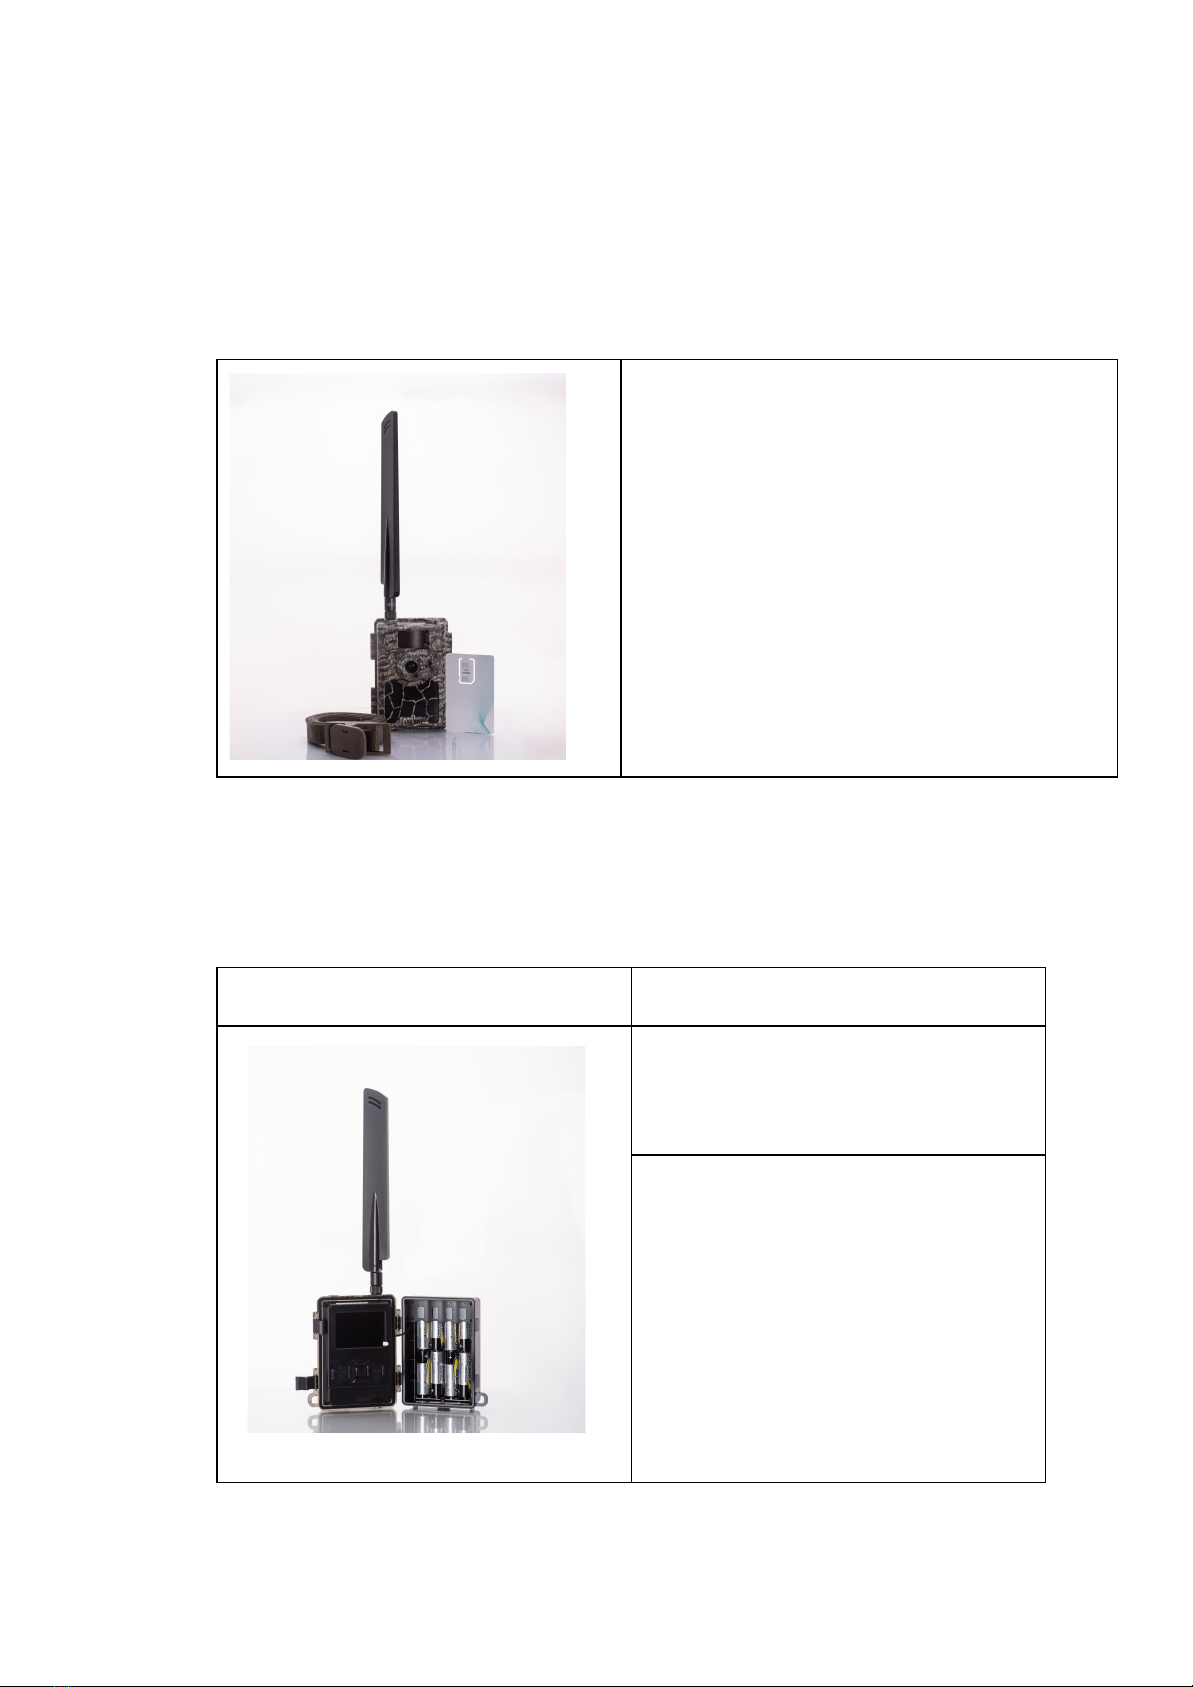
1.1 What’s in the Box - 3 -
1.2 How to Get the Camera Ready - 3 -
1.3 How to Setup the Camera - 5 -
1.4 Camera Default Settings in Red Letter - 6 -
2) Camera Components - 7 -
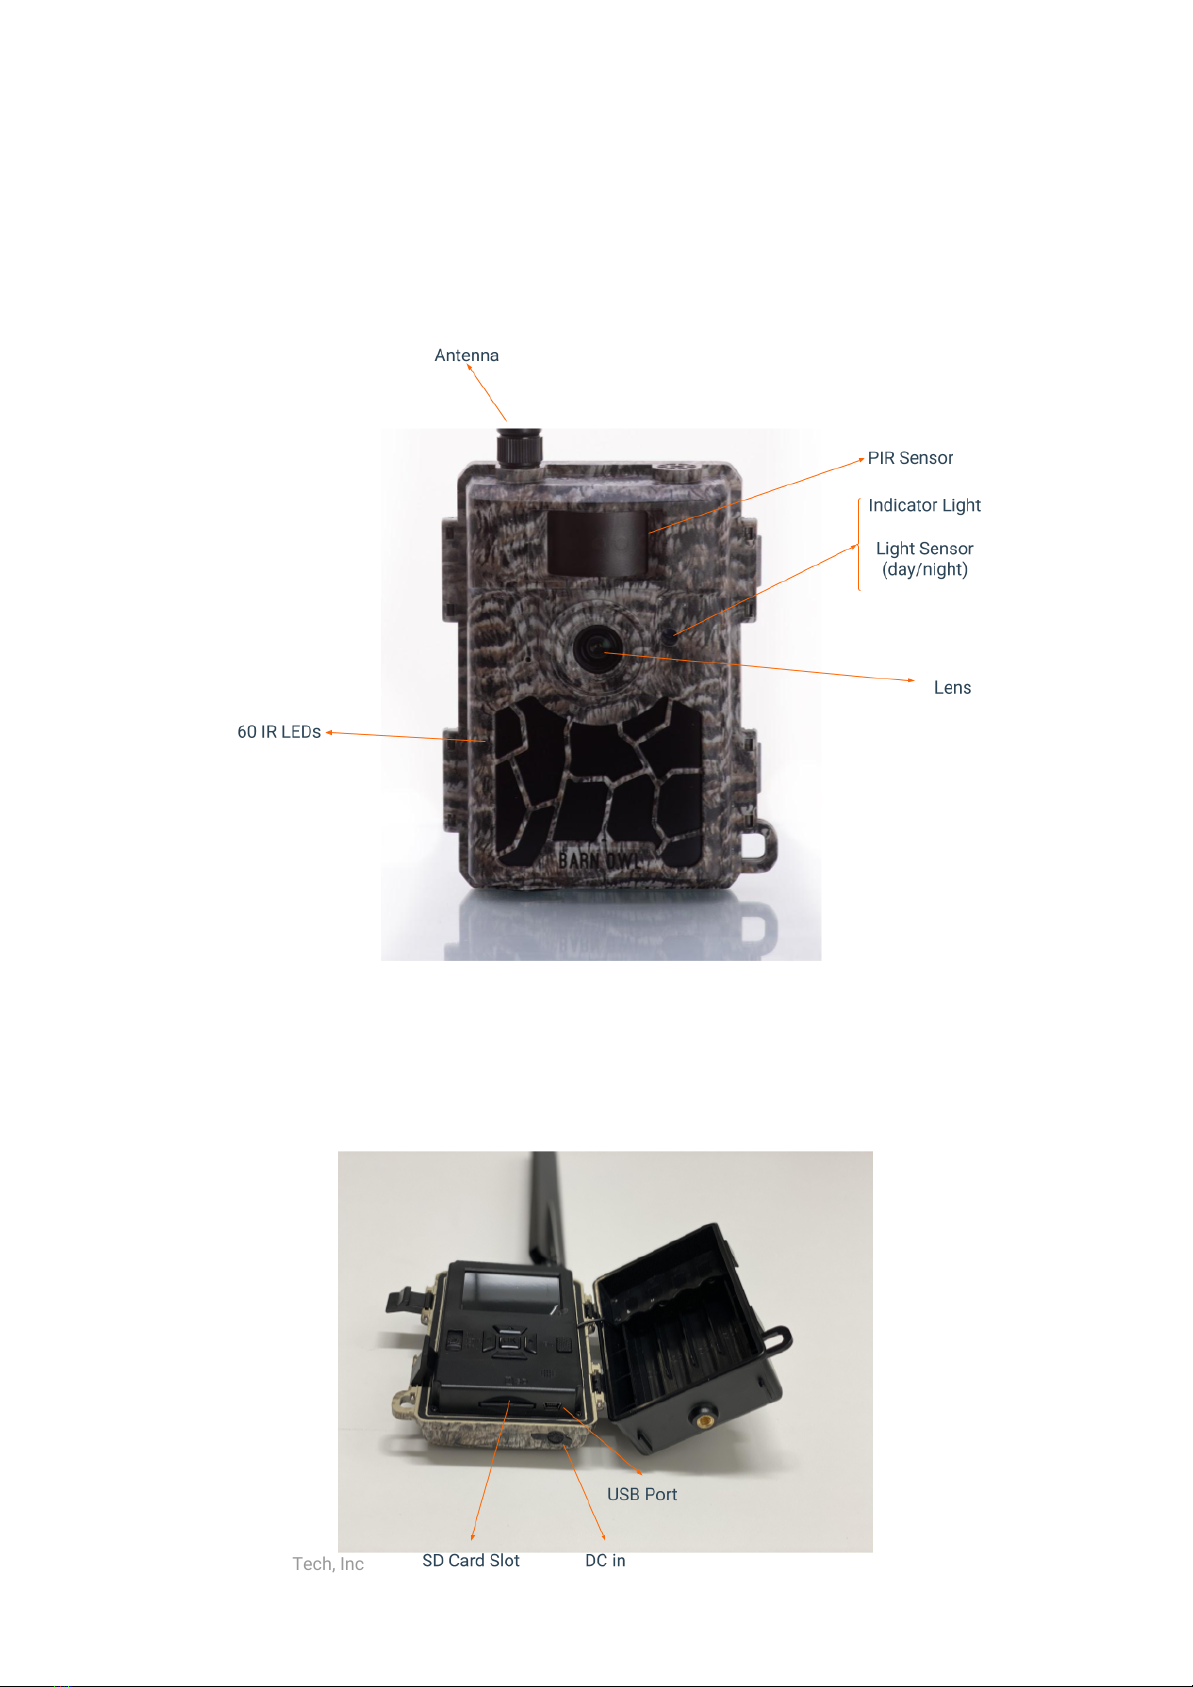
2.1 Figure 1: Front View of Camera - 7 -
2.2 Figure 2: Bottom View of Camera - 7 -
2.3 Figure 3: Internal, Side, and Back View of Camera - 8 -
3) Camera Details - 9 -
3.1 Full Functionality Introduction - 9 -
3.2 Power Supply - 9 -
3.3 SD Card Selection - 10 -
3.4 USB Connection - 10 -
3.5 Attention - 11 -
3.6 Key Features - 11 -
4) Operation List - 12 -
4.1 Video/Photo Playback - 12 -
4.2 Delete - 12 -
4.3 Format of SD Card - 12 -
4.4 Auto Power Off - 12 -
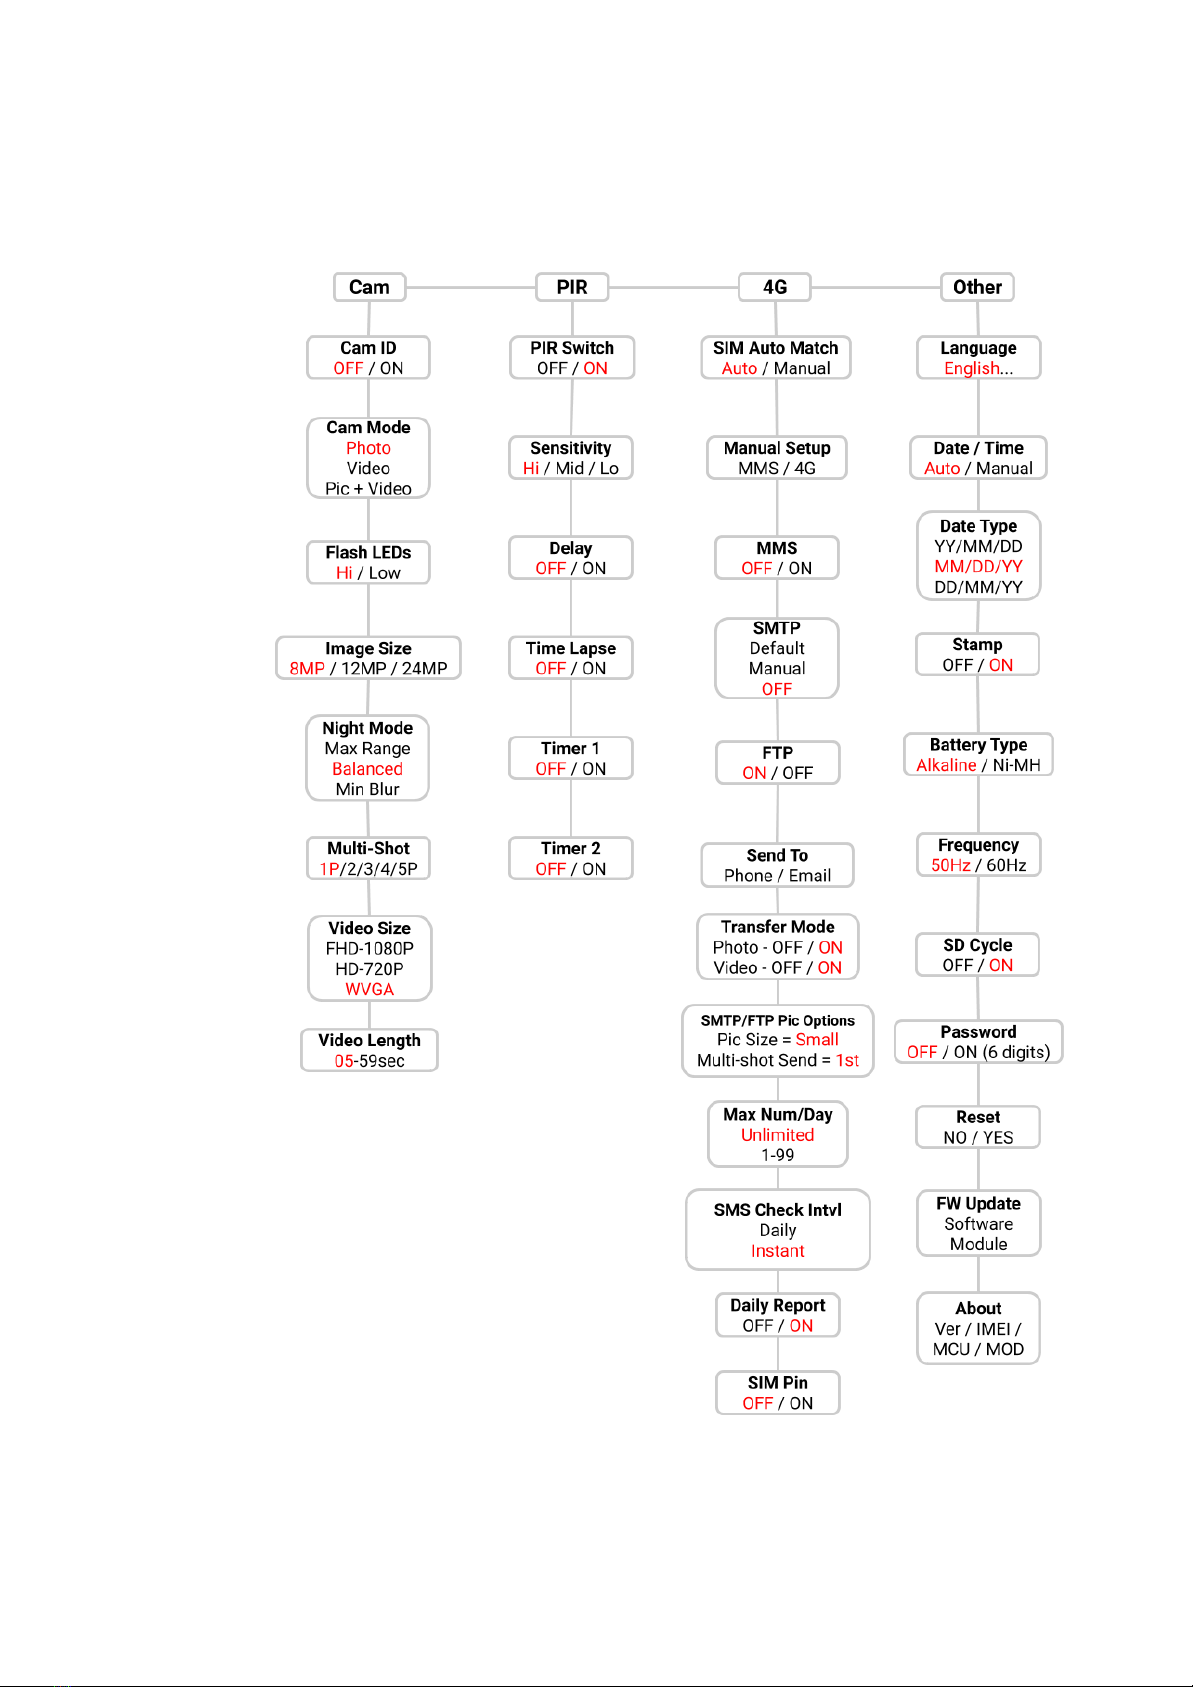
4.5 Operation Menu - 13 -
5) Specifications - 18 -
6) Troubleshooting - 20 -
6.1 Photos Do Not Capture Subject of Interest - 20 -
6.2 Night Vision Flash Range Doesn’t Meet Expectation - 20 -
Barn Owl Tech, Inc 2

1) Quick Start
1.1 What’s in the Box
1.2 How to Get the Camera Ready
Insert the (a) batteries, (b) SD card, and (c) SIM card BEFORE turning on the
camera.
Barn Owl Tech, Inc 3
Trail Camera
x1
Mounting Strap
x1
Antenna
x1
(a) Insert the batteries
Open the camera house and insert
the batteries with polarity as
marked in the battery case.
Note:
8AA Alkaline, Ni-MH, or Lithium
batteries. For better
performance, choose the correct
battery type in the camera’s
menu. For Alkaline or Lithium,
choose “Alkaline”. For Ni-MH,
choose “Ni-MH”.

(c) Mount the Antenna & Insert SIM card
Barn Owl Tech, Inc 4
(b) Insert the SD card
Note:
a 4-32GB SD card is required.
Insert the SD card as depicted
(gold contacts facing front of
camera)

1.3 How to Setup the Camera
Barn Owl Tech, Inc 5
1.
Power on the camera AFTER you’ve installed the batteries, SIM card, & SD card
The camera is pre-configured for motion triggered photos. To use basic
motion triggered photos, move the power switch Switch to ON. The screen
will not come on, but you will see the red LED in the front of the camera
flash. The camera can now be mounted if motion-activated photos are
desired. Refer to page 6 below for default settings in red letters.
2.
Configure Camera Settings
When you switch the camera to SETUP mode the screen will light up. Press
the Menu key to view & change settings. Press the arrow keys for navigation
and the OK key to confirm settings.
Note: Switch to ON to enable the camera to work after settings are
configured.
3.
How to Connect the Camera to Network
The camera will begin a network “Searching” process when you select
SETUP and will display network strength in bars when a network is detected.
If it comes with a pop-up “SIM Auto Match failed…”, please go to “SIM Auto
Match” under “4G”, select “Manual”, and fill in local operator APN details in
“Manual Setup”
Note:
By default, the camera transmits photos to the Barn Owl app via FTP. You
can email photos directly from the camera, but it will use more data than
just using FTP. The camera will not send MMS with the SIM card provided
by Barn Owl. If you desire emails or texts, we recommend setting those up
in the Barn Owl app. The Barn Owl software will forward incoming images
to the selected emails or phone numbers.

1.4 Camera Default Settings in Red Letters
Barn Owl Tech, Inc 6

2) Camera Components
2.1 Figure 1: Front View of Camera
2.2 Figure 2: Bottom View of Camera
Barn Owl Tech, Inc 7

2.3 Figure 3: Internal, Side and Back View of Camera
Barn Owl Tech, Inc 8

3) Camera Details
3.1 Full Functionality Introduction
The RangeCam Mini is designed with the following features:
SIM setup is automatic (auto match), remote control via the Barn Owl app, 65
ft IR invisible flash range, 0.4 seconds trigger time, video transmission, and 1
photo/sec (up to 5 photos per trigger) during multi-shot sequence.
3.2 Power Supply
Barn Owl Tech, Inc 9
A.
Batteries
The camera runs on 8 AA batteries, can work with alkaline, lithium, and
NiMH rechargeable batteries. We recommend lithium batteries, especially in
cold temperatures. NiMH are also a good option if you recharge batteries.
Be sure to choose the battery type you’re using in the menu option “Battery
Type” to improve battery life.
There is a battery icon in the photo stamp to indicate battery charge level.
The battery indicator for lithium batteries is deceptive--it will show full right
up until the lithium batteries die. This is because lithium batteries maintain
their voltage right up until they are almost out of energy, while alkaline and
NiMH batteries lose voltage slowly.
Note: Do not mix battery types! Using different battery types may damage
the camera and void the warranty.
B.
Solar Panel
The solar panel should power the camera indefinitely with 3-4 hours of
direct sunlight per day. When the solar panel is connected, the camera runs
on the solar panel’s lithium battery until it dies. The camera’s AA batteries
serve as backup power to the solar panel. The solar panel does not charge
the AA batteries in the camera.

3.3 SD Card
A memory card (SD card) is required to operate the camera.
When the camera is "ON" and no memory card is used, the screen displays
"No card". The SD slot of the camera has a 32 GB memory capacity. Before
inserting or removing the memory card, the camera must be turned "OFF".
Failing to do so may cause loss of or damage to the pictures/videos already
recorded on the memory card. When the SD card is full, the viewing screen
shows "Memory Full". You can select SD Cycle “ON” to overwrite the oldest
photos. SD Cycle “ON” will keep your camera operating when the SD card is
full.
Chart below will show you the approximate capacity of different size SD
cards.
3.4 USB Connection
When the camera is connected via USB cable, the screen will display “MSDC”.
Press “Menu” once, “MSDC” turns to “PC Cam”, and the camera now can be
Barn Owl Tech, Inc 10
C.
Power Adaptor
This camera can also be powered by an external 12V, 2A DC adapter.

used as a PC camera. Press “Menu” again, camera exits PC camera mode.
3.5 Attention
1. Ensure the camera is off when removing or inserting the SD card.
2. Use high-quality AA batteries in order to prevent battery cells from corrosion
from leaking acid.
3. Ensure the AC Adapter is 12V/2A. Do not invert the polarity of AA batteries.
4. In SETUP mode, the camera will automatically power off in 3 mins if there are
no keypad buttons pressed.
5. Don’t interrupt the power supply during firmware upgrade.
6. Turn the camera off when inserting or removing the power cable from the
solar panel or AC adapter.
7. Avoid moving objects, such as leaves, branches, tall grass, ropes, etc., motion
detection zone of cameras to avoid undesired motion triggers.
8. Do not place the camera next to hot objects, such as exhaust vents, lights,
generators, etc., to avoid undesired IR triggers.
9. To ensure the 60 IR LED’s fire properly, ensure high-quality batteries are used,
or use an external power supply.
10.Programmed Date/Time can be saved in the camera for 12 hours, but the
camera should automatically retrieve the current date/time from the nearest
cell tower.
3.6 Key Features
●0.4secondstriggerspeed
●58° FOV lens; 52° PIR angle
●Programmable 8/12/24 Megapixel resolution
●720P or 1080P video @30FPS
●60pcsinvisibleIRLEDs for 65feetnightvisiondistance
●1photo per second burst shot mode
●Adjustable PIR sensitivity
●Programmable delay between motions
●Time Lapse, Timer
●Photo stamp (camera ID, trigger type, date/time, temperature, moon phase)
●Operating temperature: -13℉ to 140℉
●Built-in 2.4" TFT color screen
●4G connectivity with MMS/SMTP/FTP function, camera can transmit photos
to 1-4 preset mobile phones, 1-4 email, and FTP account per trigger
●SMS control can be set to instant or a selectable interval
●SMS “Instant” enables near-real time commands
●Optional small size (640*480), medium (1280x960), large size (1920*1440),
and 8/12/24MP Email/FTP photos
●Use Barn Owl app for full control and data plan management
Barn Owl Tech, Inc 11

4) Operation List
4.1 Video/Photo Playback
Turn “Power Switch” to SETUP position to enter test mode. Press the “↑”
arrow button to view files on SD card, press the “←” and “→” buttons to
navigate, and press “OK” to play a selected video.
.
4.2 Delete
4.3 Format of SD Card
Formatting your SD card will delete all files from the SD card. Perform this
operation if your SD card is not working correctly.
4.4 Auto Power Off
In the Setup position, the camera will automatically power off in 3 mins if no
keypad buttons are pressed.
Barn Owl Tech, Inc 12
1.
The camera is pre-configured for motion triggered photos. To use
basic motion triggered photos, move the power switch Switch to
ON. The screen will not come on, but you will see the red LED in
the front of the camera flash. The camera can now be mounted if
motion-activated photos are desired. Refer to page 6 below for
default settings in red letters.
2.
Press the “↑” button again to exit the SD card navigation menu.
“Delete One”
deletes selected photo/video. Press “OK” to choose,
press“↑” and “↓”for selection, “Yes” to confirm, “No” to
exit to the previous page
“Delete All”
deletes selected photo/video. Press “OK” to choose,
press“↑” and “↓”for selection, “Yes” to confirm, “No” to
exit to the previous page

Note: Camera screen will stay on if camera is in Menu configuration pages.
4.5 Operation Menu
Test mode, Press “Menu” once to enter the camera setting menu. Navigate
the settings menu with the “←”, “↑”, “→”, or “↓” buttons, press “OK” to select,
press “Menu” to exit to previous page or switch character sets on the
keyboard screen.
Note: For some settings, you’ll need to press “OK” to save your entry (Cam
ID, Delay, Time Lapse, Timer, Password)
Barn Owl Tech, Inc 13
Cam
Settings
Programmable Options
Cam ID
Select “ON”, press “OK”, to set 12 digits/letters for each camera.
Use this to easily differentiate cameras.
Cam Mode
Photo, Video, PIC+VIDEO
1) Photo: camera shoots photos only based on configured
Burst Shot & Image Size;
2) Video: camera shoots videos only based on configured
Video Length/Size;
3) “PIC+VIDEO”, camera shoots photo(s) first, then video upon
the same trigger event based on configured Video
Length/Size and Burst Shot/ Image Size.
Flash LED
All/Part
All: 60 IR LEDs will work in dark environment;
Part: Bottom 30 IR LEDs will be turned off.

Barn Owl Tech, Inc 14
Image Size
8MP (3264*2448), 12MP (4032*3024), 24MP (5632*4224)
Night Mode
a) Min. Blur: Short exposure time to minimize motion blur for
better image quality; shortened IR flash range;
b) Max. Range: Longer exposure time to extend IR flash range
for better night vision; lower image quality;
c) Balanced: combination of above 2 options;
Multi-shot
Takes 1~5 photos per trigger, 2sec delay between each photo.
Video On
Video Size
FHL-1080P (1920*1080), HD-720P (1280*720), WVGA
(848x480)
Video length
05~59 Secs
PIR
Settings
Programmable Options
PIR Switch
OFF/ON
Note:
a) with PIR switch off, the camera will not trigger on
motion detection
b) with PIR switch on, the camera will trigger on
motion even when Time Lapse is ON.
Sensitivity
High, Middle, Low
Higher sensitivity is 1) more sensitive to
movements by smaller subjects; 2) longer
detection distance; 3) easier for sensor to detect
difference between body heat and outdoor
temperature. In a high temperature environment,
body heat of subjects and environment
temperature is harder to measure, so we suggest
setting to High.
Delay
Select “ON”, press “OK”, to set a time interval
between motion triggers. This option can prevent
the camera from taking too many photos or
videos.
Example: Camera will wait 1 minute between
motion triggers if Delay is set to 00:01:00
Configurable delay time: 00:00:05~23:59:59.
Time Lapse
Select “ON”, press “OK”, to set the interval where
the camera will trigger automatically upon the

Barn Owl Tech, Inc 15
interval set. Motion will still trigger the camera if
PIR Switch is ON.
Configurable interval: 00:00:05~23:59:59.
Timer1
Select “ON”, press “OK”, to set start and end times
(hour/minute); the camera will only work during
the time period set.
i.e.: 15:00 – 18:00; camera only works during
15:00 – 18:00
Timer2
Select “ON”, press “OK”, to set start and end times
(hour/minute); the camera will only work during
the time period set.
i.e.: 15:00 – 18:00; camera only works during
15:00 – 18:00
4G
SIM Auto Match
1) While set to “Auto”, the camera automatically programs itself based on the
SIM card provided by Barn Owl.
2) While set to “Manual”, the “Manual Setup” option below will become
available, allowing you to manually configure SIM info to work with your
personal SIM card.
Manual Setup (Not Recommended)
MMS
Here you can enter the MMSC/APN/Proxy/Port
(Username & Password if required) manually to use
your own MMS-enabled SIM card.
1. With MMS enabled, the camera will send all photos
and videos via SMS to each phone number entered in
the “Send To” menu.
4G
Enter your local operator’s 4G APN, and corresponding
Username and Password.
Note: Only with 4G setups added, can SMTP and FTP
functions work.
Note: it’s not a must to enter Username and Password

Barn Owl Tech, Inc 16
of APN. But some operators may require this password
access to enable 4G function. For details, pls contact
your local operator.
MMS
MMS
ON/OFF
Turning the option ON will send small sized photos via
MMS to each phone number entered in the “Send To”
menu, assuming you’ve correctly configured your SIM
settings under “Manual Setup” - “MMS”.
SMTP (Not Recommended)
“Default” uses our SMTP server, or you can set your own under
“Manual”.
1) Enter your SMTP server IP;
Example:
Hotmail IP: smtp.live.com;
Gmail IP: smtp.gmail.com;
2) Enter your mailbox port;
Port of most mail servers is 25; enter your corresponding server
port here.
3) Enter your mail server username/password credentials.
Note: SMTP will send photos and videos to each email address
provided under the “Send To” menu.
FTP
1) Enter your FTP server IP;
Example:
FTP Server IP: ftp://dianwan2008.gicp.net/
Enter: dianwan2008.gicp.net
2) Enter your FTP server port;
Port of most FTP server is 21; please enter your FTP server port
here.
3) Enter your FTP server username/password credentials.
Send To
Phone
Enter recipients’ phone numbers (1~4)
Email
Enter recipients’ email addresses(1~4)
Transfer mode: this function allows camera to send photos or videos, or both
Photo
ON/ OFF
Video
ON/ OFF
SMTP/ FTP Pic Options
Pic Size: Small/Medium/Large/Original; Pictures sent via SMTP and
FTP are in optional size as Small (640*480), Medium (1280x960), Large
(1920*1440), or Original (8M/ 12M/ 24M based on the Image Size you
set in the CAM menu)
Multishot Send: 1st/2nd/3rd/4th/5th Pic;
Here you can choose which photos of the Multi Shot burst are
transmitted.
Max Num/Day

Barn Owl Tech, Inc 17
Default: unlimited;
Optional: 1~99
i.e.: user chooses 50, then camera will only transmit 50 times each day.
Each time. The rest of the photos/videos will only be stored on the SD
card.
SMS Ctrl
1) Daily: (Recommended if using AA batteries only)
Camera will check for new commands (settings updates,
command trigger, etc) once per day, not immediately.
2) Instant: (Recommended if using external power: Solar panel, 12V,
120V, etc)
Camera will receive commands immediately, but drains the battery
more quickly.
Other
Language
English...
Stamp
Imprints of programmed camera ID, moon phase,
temperature, date, and time on photo
Battery Type
Alkaline/ NI-MH
Choose the correct type of AA batteries being used.
Frequency
50HZ, 60HZ; improper setting may cause camera screen
flicker
SD Cycle
Select “ON”, press “OK”, camera will continue to record
photos/videos by deleting the oldest files on the SD card.
Password
Select “ON”, press “OK”, to enable password protection for
your camera; supports up to 6 letters/numbers.
Reset
Select “Yes” to reset camera back to factory default
settings.
FW Update
With update firmware on the SD card, you can enter this
menu to update camera firmware by confirming “Yes” in the
options.
About
Firmware version in camera (Version: / IMEI: / MCU:/MOD:)

5) Specifications
Barn Owl Tech, Inc 18
Image Sensor
5 Mega Pixels Color CMOS
Effective Pixels
2560x1920
Day/Night Mode
Yes
IR range
20m
IR Setting
60 LEDs
Memory
SD Card (4GB – 32GB)
Operating keys
7
Lens
F=3.0; FOV=58°; Auto IR-Cut-Remove (at night)
PIR Angle
52°
LCD Screen
2.4” TFT, RGB, 262k
PIR distance
20m (65feet)
Picture size
8MP/12MP/24MP =
3264x2448/4032x3024/5632X4224
Picture Format
JPEG
Video resolution
FHD (1920x1080), HD (1280x720),
WVGA(848x480)
Video Format
MOV
Video Length
05-10 sec. programmable for wireless
transmission; 05-59 sec. programmable for no
wireless transmission;
Picture size for wireless
transmission
640x480/2560x1921/8MP/12MP/24MP
(according to Image Size setting)
Shooting Numbers
1-5
Trigger Time
0.4s
Trigger Interval
4s-7s
Camera + Video
Yes
Device Serial No.
Yes
Time Lapse
Yes
SD Card cycle
ON/OFF
Operation Power
Battery: 9V; DC: 12V(optional AC power supply is
available)
Battery Type
8AA
External DC
12V
Stand-by Current
0.165mA
Stand-by Time
5~8 months (8×AA)
Auto Power Off
In Test mode, camera will automatically power off
in 3 mins if no buttons are pressed.
Wireless Module
LTE Cat.4 module; 2G & 3G networks are also
supported in some countries.
Interface
USB/SD Card/DC Port
Mounting
Strap (included) Mounts available as accessories
Operating Temperature
-13°F to 140°F
Storage temperature
-22°F to 158°F

Specifications are subject to change without prior notice.
Barn Owl Tech, Inc 19
Operation Humidity
5%-90%
Waterproof spec
IP66
Dimensions
128*96*76 mm
Weight
260 g
Certification
CE FCC RoHs

6) Troubleshooting
6.1 Photos Do Not Capture Subject of Interest
1. Check the PIR sensitivity setting. For warm weather, set the Sensor
Level to “High” and for cold weather use, set the sensor for “Low”.
2. Try to set your camera up in an area where no heat resources are in the
camera’s field of view.
3. In some cases, setting the camera near water will trigger the camera
unnecessarily.
4. Set the camera on stable objects, any slight movement will cause a PIR
trigger.
5. At night, the motion sensor may detect motion beyond the range
of the IR flash. Reduce detection distance by adjusting PIR
sensitivity setting.
6. Rising sun or sunset can also trigger the sensor, we recommend
repositioning.
7. If a person/animal moves quickly, it may move out of the camera’s
field of view before the photo is taken. Move camera further back
or reorient camera.
6.2 Night Vision Flash Range Doesn’t Meet Expectation
1. “Max Range” Night Mode setting offers better IR flash range at the
cost of reduced image quality.
2. Mount the camera in a dark environment without any obvious light
sources.
3. Certain surroundings (trees, walls, ground, etc.) within flash range will
result in better nighttime images; do not point the camera into a total
open field where there is nothing within IR flash range to reflect the
flash back to the camera lens.
Barn Owl Tech, Inc 20
Table of contents