Bask Mistmaster M3N1.0 User manual


Bask Mistmaster ® 3-in-1 Compact Misting System User’s Guide
v.210119 Page 2of 20
Table of Contents
Key Features of Your Mistmaster ...........................................................................................................................3
Contents List............................................................................................................................................................3
Additional Features and Specifications...................................................................................................................4
Mistmaster Status Indicators Guide .......................................................................................................................4
Congratulations On Your Purchase.........................................................................................................................6
About Your Mistmaster...........................................................................................................................................6
Instructions..............................................................................................................................................................7
Set Up Your Device..................................................................................................................................................7
Operate Your Device.............................................................................................................................................12
Draining The Tank..................................................................................................................................................15
Flushing The Tank..................................................................................................................................................15
Use of Accessories.................................................................................................................................................16
Cleaning the Exterior of Your Mistmaster ............................................................................................................16
Repairs and Replacement Parts............................................................................................................................16
Storing Your Device...............................................................................................................................................17
Return Policies.......................................................................................................................................................17
One-Year Limited Warranty..................................................................................................................................17
Limited Warranty Exclusions.................................................................................................................................18
Extended Limited Warranty..................................................................................................................................18
Use of Treatments.................................................................................................................................................18
Managing Spray/Mist Drift and Preventing Runoff..............................................................................................18
Resources For Information About Pesticides .......................................................................................................20

Bask Mistmaster ® 3-in-1 Compact Misting System User’s Guide
v.210119 Page 3of 20
Key Features of Your Mistmaster
1. Fill Cap
2. Vent
3. Handle
4. Mist Button
5. Status Indicators
6. Strap Loops (2)
7. Mist Nozzles (4)
8. Flapper
9. Selector
10. Control Panel
11. Auxiliary Output
12. Fuse Holder Cap
13. Fuse (Not Shown)
14. Charge Port
15. Power Button
16. Mix Button
17. Air Intake Holes
18. Battery Charger
19. Shoulder Strap
Contents List
−Bask Mistmaster ® 3-in-1 Compact Misting System
−Universal AC-Battery Charger
−Shoulder Strap
−User’s Guide
−Reusable Watertight Plastic Shipping Bag*
−Slow Blow Fuse
−Fuse Holder Cap
*Your Mistmaster arrives packed in a reusable watertight plastic shipping bag. Retain this bag and the original shipping
carton and packing materials for later use. In the event that return shipping is required for warranty service or repair,
contact Bask for a return authorization. Use the original shipping materials and follow the Instructions for Return
Shipping on our website https://bask-solutions.com/return-policy. If you do not have the original shipping materials,
contact Bask at 1-888-814-BASK or returns@bask-solutions.com for a ship kit.
Mistmaster ®
3-in-1 Compact Misting System

Bask Mistmaster ® 3-in-1 Compact Misting System User’s Guide
v.210119 Page 4of 20
Additional Features and Specifications
−One gallon (useable) capacity tank with a mixing feature
−Removable strainer
−High-pressure pump
−High-efficiency blower
−Powerful, rechargeable battery
−Rugged, high-impact, UV-resistant enclosure
−Comfort-grip rubber handle and rubber feet
−~17.25 lbs. (~8.2 kg) empty tank weight; up to 28 lbs. (~12.7 kg) filled tank weight
−~14.6 inches long (~37.1 cm) x 6 inches wide (~15.2 cm) x ~16.2 inches high (~41.1 cm)
−Accessories sold separately. Visit www.bask-solutions.com for more information
−Operating temperature range: 34° F –104° F
Mistmaster Status Indicators Guide
The three Status Indicators (5) on the top of your Mistmaster indicate the approximate level of fluid in the tank as well
as other feedback.
Tank Level Upper Half: When the two outer indicators are lit and steady, your tank fluid level is
between medium and high.
Tank Level Lower Half: When the middle indicator is lit and steady, your tank fluid level is between
low and medium.
Low Fluid: When all three indicators begin to flash, your Mistmaster is shut down due to low
fluid. You will need to add fluid to the device to continue using it.
Low Battery: When the two outer indicators begin to flash, your Mistmaster is shut down due
to low battery. You will need to charge the device to continue using it.
Low Temp: When the middle indicator begins to flash, your Mistmaster is shut down due to
freezing temperatures. You will need to bring device into an environment that is above freezing
temperature immediately to prevent damage.
If you own a Mistmaster Long-Range Remote-Control, the Status Indicators (5) will also display the following condition
during a successful pairing. Refer to the Mistmaster Long-Range Remote-Control Instructions for complete pairing
procedures.
Successful Pairing: outer indicators and the middle indicator begin to flash in an alternating
sequence when pairing is successful. (If indication is not present after pairing attempt, repeat
the pairing procedure)
Bask Mistmaster ® 3-in-1 Compact Misting System User’s Guide
v.210119 Page 5of 20
GENERAL SAFETY INSTRUCTIONS
For your safety and the safety of others, read, understand, and follow all safety instructions, warnings,
and precautions provided in this User’s Guide during set up, routine use, charging, filling, cleaning,
shipping, and storage of your Mistmaster, accessories, and treatments selected for use in the
Mistmaster 3-in-1. For information on accessories and treatments, visit www.bask-solutions.com.
WARNINGS
Use this device only for its intended use as described in this User’s Guide. Other use may cause
fire, electrical shock, damage to the device, or injury to persons, and will void any warranty by the
manufacturer.
To protect against electric shock, do not immerse the device or its charger in water.
Do not allow children to operate the device; close supervision is necessary when operating the
device near children.
Do not insert flammable substances into the device or operate the device in the presence of
explosive and/or flammable fumes.
Do not charge the device with a damaged charging cord; follow battery charging instructions
carefully.
To disconnect the battery charger cord, grip plug and pull gently from the wall outlet. Do not pull
on the cord.
Disconnect the charging cord from power and from the device before cleaning. Do not clean the
device with strong detergents, abrasive cleaners, or flammable liquids.
Do not attempt to operate the device if it has been damaged in any manner.
May cause serious physical injury if dropped on hands, feet, or other body parts.
Use only treatments selected by Bask for use in the Mistmaster®3-in-1. When using chemical
treatments, follow manufacturer’s instructions for use of gloves, eye protection, mask, or other
Personal Protective Equipment (PPE) to protect your skin, eyes, mouth, and lungs.
CAUTIONS
Use only with treatments selected by Bask for use in the Mistmaster®3-in-1 Compact Misting
System. Dilute treatments in potable water in accordance with manufacturer’s instructions.
Do not insert any object or allow any object to enter the Mistmaster’s built-in tank, as this may
damage the device or cause it to malfunction.

Bask Mistmaster ® 3-in-1 Compact Misting System User’s Guide
v.210119 Page 6of 20
Congratulations On Your Purchase
With the Bask Mistmaster®3-in-1 Compact Misting System we are putting professional-grade misting performance right
in your hands, reimagined for you to use with ease. Carefully read and follow this User’s Guide to get the greatest
benefit from your Bask Mistmaster®3-in-1 Compact Misting System.
About Your Mistmaster
Misting is a commonly used method of dispersing liquid treatments for a variety of purposes, such as fungicide
treatments, lawn and garden plant care, sanitization and deodorizing indoor or outdoor spaces, or distributing natural
or chemical treatments to control mosquitoes, spiders, fleas, ticks, and other pests. Your Bask Mistmaster®3-in-1
Compact Misting System is designed to provide you with three methods of misting in one compact device: (1) Blower,
(2) Wand, and (3) Stationary. Each method allows efficient distribution of mist to your desired treatment area. Your
Mistmaster device comes equipped with everything you need to operate the Mist Blower. The Misting Wand and Mist
Station Riser and Overhead Kits and other accessories are available for purchase at www.bask-solutions.com.
Your Mistmaster features a rugged enclosure that is uniquely designed to withstand high impact and extended
exposure to the sun. Air intake holes on the sides of the device allow air to flow freely into its internal high-efficiency
blower. The blower and pump work together to create and disperse mist as fine as 10 to 100 microns.
With a variety of treatments selected for use in your Bask Mistmaster®3-in-1 Compact Misting System, you now have
do-it-yourself control over germs or pesky insects and other challenges in your indoor or outdoor spaces. Be sure to
follow the treatment manufacturers' recommendations regarding proper use, ventilation requirements, and other
health and safety guidelines.
Bask Mistmaster ® 3-in-1 Compact Misting System User’s Guide
v.210119 Page 7of 20
Getting Started
For maximum benefit from your Mistmaster, and to avoid injury or malfunction, read, understand, and follow this
User’s Guide in its entirety. If you have any questions after reading this User’s Guide, visit us online at www.bask-
solutions.com for answers to Frequently Asked Questions (FAQ). If you need additional assistance, simply complete our
online contact form and we will respond with detailed instructions to help you get the most out of your Mistmaster.
Remove your Mistmaster from the shipping carton and check to ensure all items in the Contents List of this User’s
Guide are included and have not been damaged during shipping. Contact Bask immediately if damage has occurred
during shipping. Save the shipping carton, original packing materials, and watertight plastic shipping bag for use should
you ever require return shipping for service under the terms of your Limited Warranty (see Instructions for Return
Shipping in this User’s Guide for additional shipping instructions). If you do not have the original shipping materials,
contact Bask at 1-888-814-BASK or email returns@bask-soltutions.com for a ship kit.
Set Up Your Device
To set up your Mistmaster, follow the instructions provided below.
STEP 1. Install the Fuse
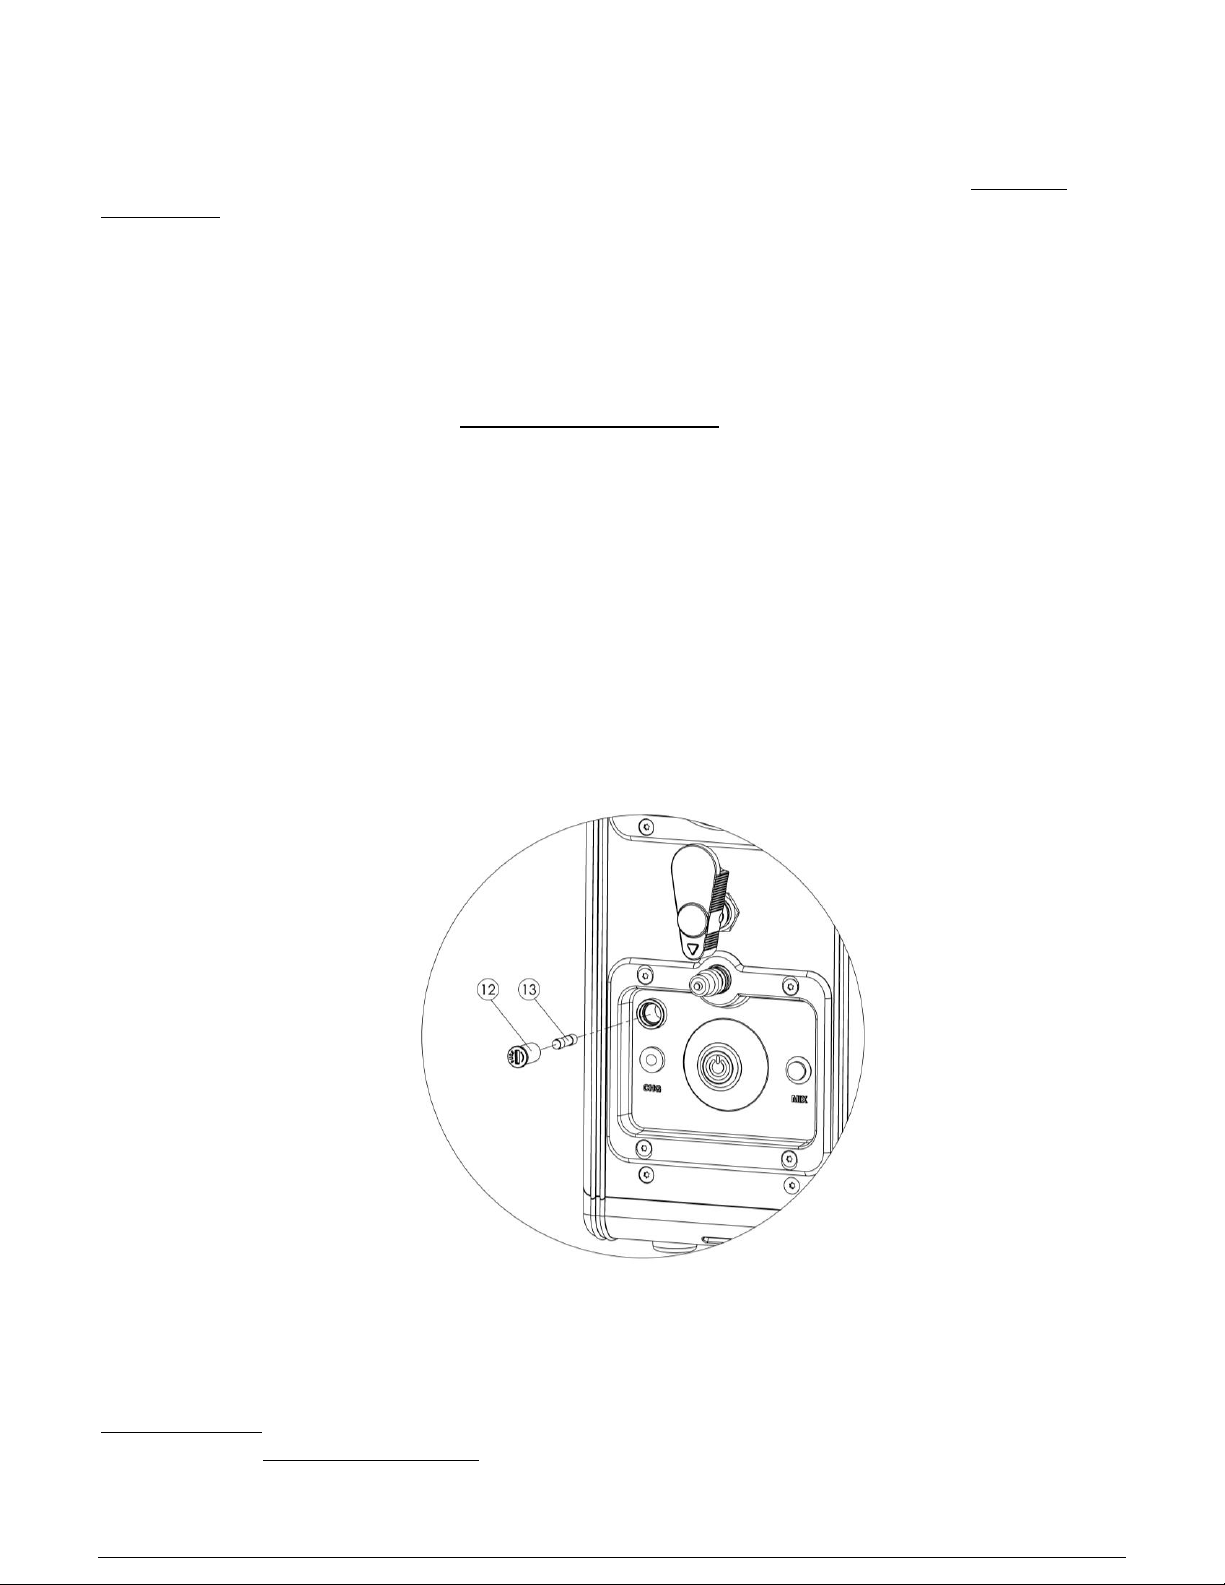
1. A Fuse Holder Cap (12) and glass slow blow fuse (13) are included with your Mistmaster. Fuse (13) and Fuse
Holder Cap (12) are shipped disassembled and must be installed prior to charging for use. Carefully orient both
parts and assemble as shown below.
2. Using a dime or flat head screwdriver, gently apply inward pressure to the slot of the Fuse Holder Cap (12)
while rotating clockwise until it drops in and stops (approximately ¼ turn).
3. Test that the fuse has been successfully installed by powering ON your Mistmaster. Press the Power Button
(15) and observe that the power icon turns on.
4. Power OFF your Mistmaster by pressing the Power Button (15) again and observe the power icon turn off.
STEP 2. Charge the Battery
Use only the Battery Charger (18) provided by Bask. This multistage battery charger is specifically designed with a
charging algorithm that works with your Mistmaster’s factory-installed rechargeable 12V SLA battery. Use of any other
charger may be dangerous (see WARNINGS –BATTERY CHARGER section below). The Battery Charger (18) is rated for
INDOOR USE ONLY. Bask can provide charger extenders that allow the charger base to be moved to a protective
environment. Visit www.bask-solutions.com to view all available accessories.

Bask Mistmaster ® 3-in-1 Compact Misting System User’s Guide
v.210119 Page 8of 20
To charge your Mistmaster battery:
1. Insert the Battery Charger (18) cord into the Charge Port (14) located on the left side of the Control Panel (10).
2. Plug the power cord into an AC electrical outlet.
3. For optimal battery life, allow your device to charge for at least 24 hours prior to first use. WARNING: Do not
purge or fill your Mistmaster tank while the device is connected to the Battery Charger (18).
When the Battery Charger (18) is connected to your Mistmaster and plugged into an AC electrical outlet, the small
indicator light on the Battery Charger (18) indicates the following:
•Red: Charging (not sufficiently charged to operate your device). This stage requires a constant current of 800
mA ±100 mA (to start charging, battery voltage must be above 4V).
•Green: Charge Finishing or Float Charging. This stage indicates the battery is approaching full charge or fully
charged and is in the maintenance stage of the charging algorithm. Note that a green light also may indicate
that the battery charger is connected to a power source but is not connected to a battery. Ensure that the
Battery Charger (18) cord is connected to the Charge Port (14).
•No light: If the light on the Battery Charger (18) is not illuminated, first check to ensure the cord is plugged in
properly and the AC power outlet is working. If the cord is properly plugged in and the outlet is working and no
light appears on the Battery Charger (18), contact Bask for information and/or service.
A slow blow fuse controls the flow of energy from the battery to power the electrical functions of your Mistmaster and
protects the charge port.
To optimize battery life:
Battery life will vary due to many factors, such as ambient temperature, age, usage, cycling, and the amount of time the
battery is maintained on its charger. For optimal battery life:
•Charge battery for 24 hours prior to first use.
•Always maintain your Mistmaster on the charger when not in use. Your Mistmaster battery has a built-in
battery management system that will not allow it to overcharge.
•Use only the charger and charger extender provided by Bask.
•If you must store your Mistmaster without leaving it plugged in to the Battery Charger and an AC power
source, plug it in periodically (at least every 4 to 6 months) to refresh the battery’s charge. When storing,
always power OFF your Mistmaster.
Sleep Mode:
The Mistmaster is designed with a sleep mode feature to optimize battery life and performance. Your device is
designed to be plugged into a charger at all times when not in use. If the device is left off of its charger for 24
hours, it will go into sleep mode to preserve its battery life and performance. When in sleep mode, the Mist
Button (4) and Power Button (15) will not be illuminated even though the Power Button (15) is pressed. To
wake the device for use simply cycle the Power Button (15) by pressing the Power Button (15) twice. It is
important to return the device to its charger after use and while not in use.
If the two outer indicators on your Mistmaster are flashing, recharge the battery. If the battery cannot be recharged
and the fuse is good (the metal wire in the middle of the glass is not broken and there is no burnt on the glass itself),
the battery has reached the end of its charging life and must be replaced. Contact Bask at 1-888-814-BASK or
info@bask-solutions.com to replace the battery under the terms of your Limited Warranty or to order a replacement
battery.

Bask Mistmaster ® 3-in-1 Compact Misting System User’s Guide
v.210119 Page 9of 20
WARNINGS –BATTERY CHARGER
The charger is designed for indoor use only; do not submerge in water or expose to rain, snow,
or inclement weather.
The charger should rest horizontally, operating in a dry, well-ventilated area.
Do not operate the charger when the ambient temperature is higher than 40℃(104°F).
Do not touch the metal parts of the plug of the battery charger.
Do not operate the battery charger near flammable liquids or in gaseous or explosive
atmospheres.
Do not operate the battery charger if it has been damaged in any way. If damaged, replace
immediately.
To avoid electrical shock, do not try to disassemble the charger; high voltage inside.
Use only the battery charger provided by Bask. Bask-approved charger extenders are available
in our store at www.bask-solutions.com.
Disconnect battery charger from your Bask device before purging, filling, or draining the tank,
before cleaning the exterior of the device, and before operating the device using the blower or
wand misting functions.
Do not use the battery charger for any other purpose than to charge your Mistmaster®3-in-1
Compact Misting System.
WARNINGS AND SAFETY INSTRUCTIONS –BATTERY
Read, understand, and follow the warnings and safety instructions concerning use of battery. Under normal
conditions of battery use, internal battery components will not present a health hazard. The following
information is provided for battery acid and lead exposure that may occur during battery production or
container breakage or under extreme heat conditions such as fire.
Potential Health Effects of Battery Acid and Lead Exposure:
May cause acute toxicity. Corrosive to the eyes and may cause severe damage including blindness.
Causes burns.
Harmful by inhalation. Contact with moist mucous membranes of the respiratory system can cause
caustic condition resulting in burns.
Harmful if swallowed. Can burn the mouth, throat, and stomach.
Lead compounds may be absorbed by ingestion, by inhalation, and through the skin. Lead may
damage kidney function, the blood-forming system, and the reproductive system. Avoid repeated
exposure. Severe exposures can lead to shock, circulatory collapse, and death. Lead poisoning is
characterized by a metallic taste in the mouth, loss of appetite indigestion, nausea, vomiting,
constipation, sleep disturbances, and overall weakness.
Do not use the battery for any other purpose or any other device
Bask Mistmaster ® 3-in-1 Compact Misting System User’s Guide
v.210119 Page 10 of 20
STEP 3. Purge the Pump
Your Mistmaster contains an internal high-pressure pump that enables it to disperse a fine mist of any treatment
selected specifically for use in the Bask Mistmaster 3-in-1. When using your Mistmaster for the first time, you will need
to purge air from the pump. Properly purging air from the pump allows your Mistmaster to function at the maximum
pressure necessary for optimal performance.
WARNING –DO NOT MODIFY
Do not modify the internal pump (or any other component of your Mistmaster) in any manner.
To purge the pump:
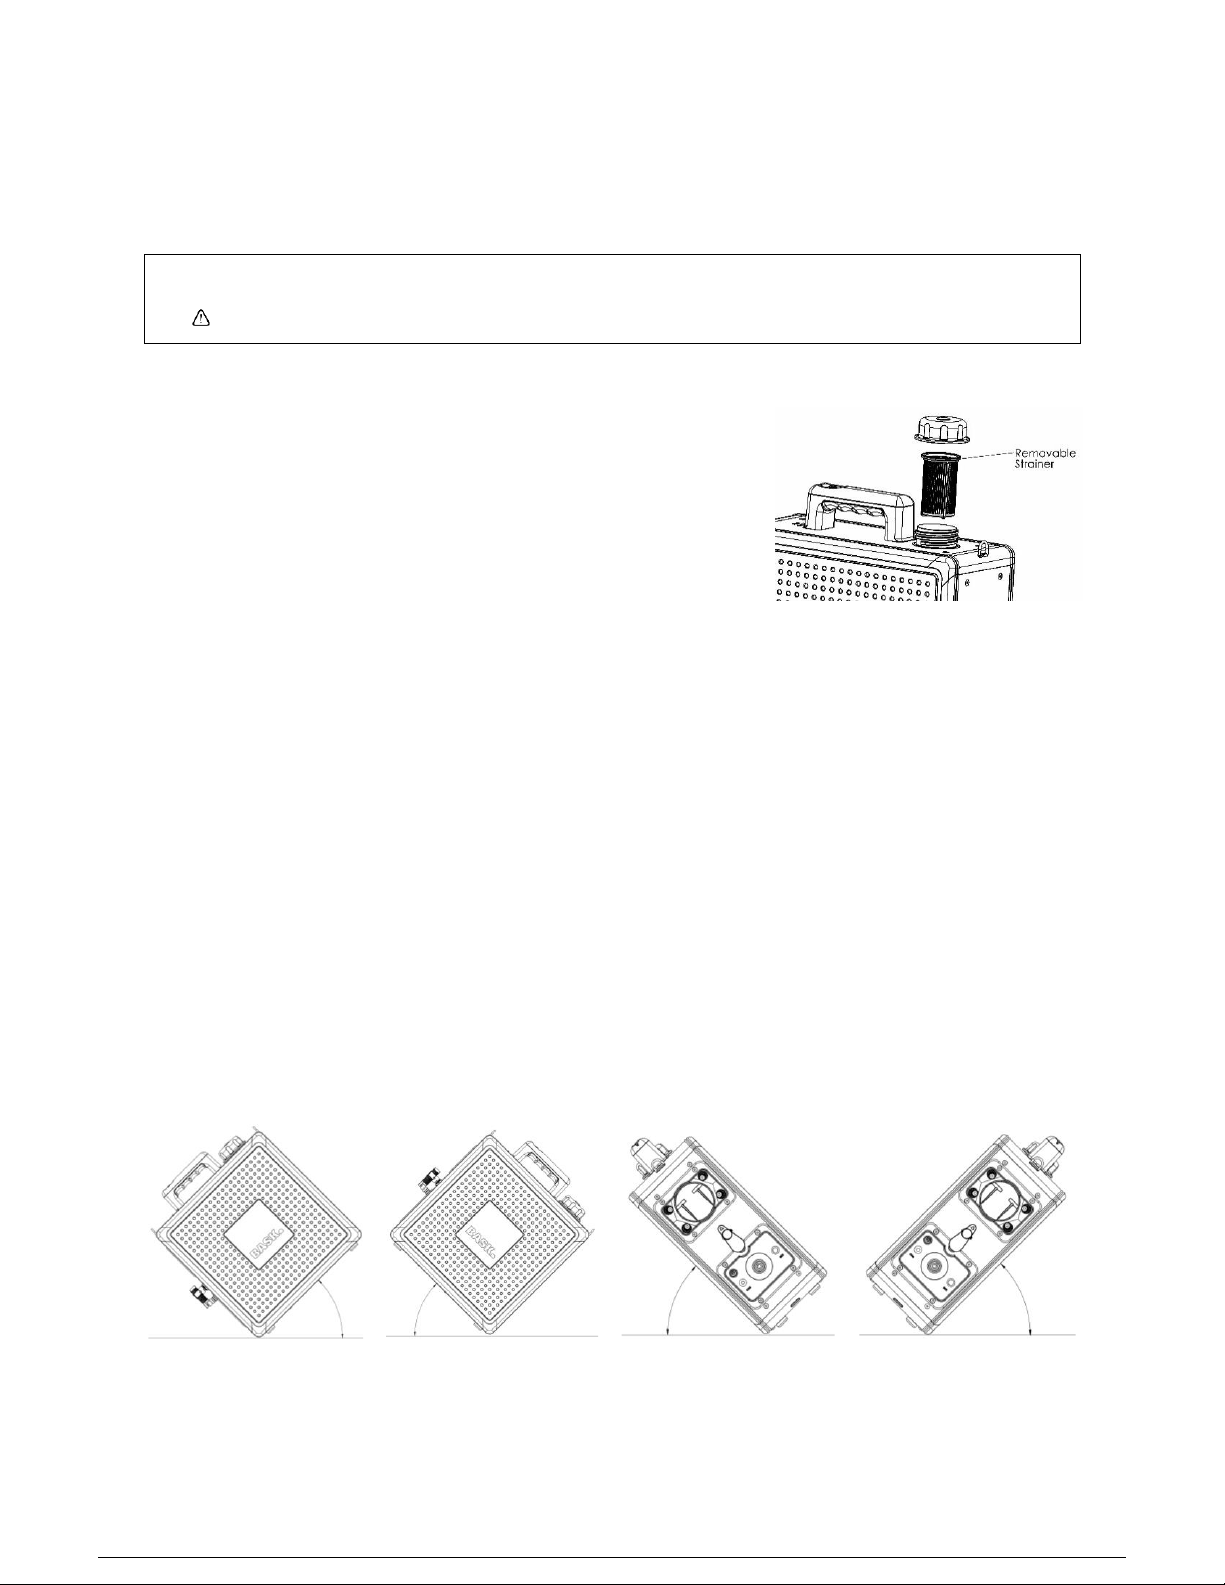
1. Remove the Fill Cap (1) by turning it counterclockwise. Under the
Fill Cap (1), you will find a removable strainer designed to prevent
debris (e.g., leaves, twigs, insects, and other foreign objects) from
falling into the tank. Leave the strainer in place. (Note: Remove the
strainer only when necessary to remove debris; always replace it
before pouring water or treatments offered by Bask into the tank.)
2. Pour approximately 3 quarts of clean, potable water through the strainer into the tank. When purging the
pump for the first time, DO NOT add any chemical treatments. It is not necessary to fill the tank all the way to
the top.
3. Replace the tank Fill Cap (1) by turning clockwise until the cap is firmly in place. The Fill Cap (1) and Vent (2)
reduce spillage in the event that your device tips over or is tilted at extreme angles during use.
4. Power ON your Mistmaster.
5. Rotate the Selector (9) to the Blower position with the arrow pointing up and the bottom of the Selector (9)
covering the Auxiliary Output (11) located in the top center of the Control Panel (10).
6. In a safe to mist location, locate the Mix Button (16) next to the Power Button (15) on the Control Panel (10).
Press and hold the Mix Button (16) for approximately one minute or until you hear a change in the pump
motor effort. This change signals that fluid has reached the pump.
7. In a safe to mist location, place the device on a stable surface and again press and hold the Mix Button (16).
Gently tilt and hold the device at approximately 45 degrees angles in each direction for approximately 15
seconds for each direction (forward, backward, left, right as illustrated below) while continuing to press the
Mix Button (16). This motion allows air to escape from the pump, maximizing the performance of your
Mistmaster.
Tilt Forward
Tilt Backward
Tilt Left
Tilt Right
8. Press and hold the Mist Button (4) until you observe the mist emerging from all four Mist Nozzles (7) and air
from the internal blower exits the device through the Flapper (8).

Bask Mistmaster ® 3-in-1 Compact Misting System User’s Guide
v.210119 Page 11 of 20
9. Release the Mist Button (4) and observe that both the mist and the blower stop.
10. Power OFF your Mistmaster.
11. Continue with the Fill the Tank process described below.
12. Bask recommends that you use, transport, and store your Mistmaster in an upright position.
NOTE: The Purge the Pump process is required to remove air from the pump prior to first use. It is not necessary to
purge the pump each time you use your Mistmaster. However, when air has been reintroduced to the pump, purging
the pump again will help increase pump pressure and make your device operate more efficiently. Air can be introduced
to the pump in a variety of ways, including:
•Tipping the device on its side or upside down
•Draining the tank
•Vigorously shaking the device or tilting it at extreme angles
•Storing the device for a period of time long enough for treatment in the tank to evaporate
USAGE TIP: If at any time your device is not properly misting (i.e., has insufficient pump pressure or the mist appears to
pulse), simply repeat the Purge the Pump steps listed above to remove the air and restore pump pressure. When
purging the pump after a chemical treatment has been added to the tank, be sure to contain the mist or conduct the
purge process in an area safe for the treatment. Always purge the pump with more than half a tank of fluid, as
indicated by two lights of the Status Indicators (5).
STEP 4. Fill the Tank
After purging the pump (described in Step 3, above), the next step in setting up your device is to fill the tank with a
treatment designed specifically for your intended use. Bask offers a variety of natural and chemical treatments that are
selected for use in the Bask Mistmaster 3-in-1. For information about specific products and uses, visit us online at
www.bask-solutions.com. See the USE OF TREATMENTS section of this User’s Guide for more information about user
responsibilities.
To fill the tank:
1. Select a treatment offered by Bask that is labeled for your intended use. Use only treatments selected for use
in the Bask Mistmaster®3-in-1 Compact Misting System.
2. Remove the Fill Cap (1), without removing the strainer.
a. If you use a Treatment which is a concentrate (shake or mix well first)
i. Pour the required dose of the treatment through the strainer into the tank (As per treatment
directions). Do not mix multiple treatments or exceed the recommended volume of
treatment. Each time you refill the tank, pour the treatment into the tank first, before filling
the rest of the tank with clean, potable water.
ii. Fill the remainder of the tank to top with clean, potable water. Do not overfill. Overfilling
wastes treatment and the overflow could potentially contaminate areas not intended for
exposure to the treatment.
b. If you use a Treatment which is a ready-mix (shake or mix well first)
i. Pour the treatment through the strainer into the tank. Do not mix multiple treatments.
ii. Do not overfill. Overfilling wastes treatments and the overflow could potentially contaminate
areas not intended for exposure to the treatment.
3. Replace the tank Fill Cap (1), tightening firmly.
4. Power ON your Mistmaster.

Bask Mistmaster ® 3-in-1 Compact Misting System User’s Guide
v.210119 Page 12 of 20
5. Press and hold the Mix Button (16) for approximately one minute to ensure the treatment is evenly mixed in
the tank.
6. Power OFF your Mistmaster and connect the charger unless you are ready to start misting.
Note: When operating a Mist Station remotely, DO NOT power OFF your Mistmaster; the power must remain
on and connected to the charger so you can activate the device via Long-Range Remote Control.
7. Continue with the Attach the Shoulder Strap instructions below to complete the setup of your Mistmaster.
WARNINGS –FILLING THE TANK
Do not overfill the tank; overfilling wastes treatment and the overflow could potentially
contaminate areas not intended for exposure to the treatment and cause unnecessary contact
with treatments.
Use the strainer to prevent leaves, twigs, insects, and other foreign objects from falling into the
tank and potentially interfering with the operation of your Mistmaster or permanently damaging
the device. Pour treatment and eventually potable water through the strainer into the tank. The
strainer also creates a seal between the tank and the Fill Cap (1). Always keep the strainer in place
to prevent fluid from leaking from around the bottom of the Fill Cap (1).
Do not insert a water hose into the tank, as this can result in siphoning of treatment back into the
water supply. Instead, fill a gallon jug or other container with clean, potable water so you can
easily pour the desired amount into the Mistmaster tank.
To avoid injury, contamination, and/or damage to property and equipment, always read,
understand, and follow the precautionary statements on the product label and insert prior to
handling any treatment. Instructions may include the use of gloves, eye protection, mask, or other
Personal Protective Equipment (PPE) to protect your skin, eyes, mouth, and lungs.
STEP 5. Attach the Shoulder Strap
The adjustable Shoulder Strap (19) is padded for your comfort when you carry the device. If you wish to carry your
Mistmaster using the adjustable Shoulder Strap (19):
1. Attach the clips on each end of the Shoulder Strap (19) securely to the Strap Attachment Loops (6) at the top
front and rear of your Mistmaster.
2. Adjust the length of the strap so that the device hangs at a level that allows you to comfortably operate the
Mist Button (4) on the Handle (3) of the device.
WARNING –PROTECT STRAP
Prolonged exposure to the elements (sun, rain) can weaken shoulder strap fibers and create a
potential hazard when using the shoulder strap to carry the device. Store indoors. Never use a
shoulder strap showing signs of wear!
Operate Your Device
After you have completed the SET UP YOUR DEVICE instructions above, your Bask Mistmaster®3-in-1 Compact Misting
System is ready for use with the built-in blower function or with accessories sold separately by Bask for wand or
stationary misting. See the MANAGING SPRAY/MIST DRIFT AND PREVENTING RUNOFF section of this User’s Guide for
information about user responsibilities for managing spray/mist drift and preventing runoff, and for important chemical
safety instructions and warnings.

Bask Mistmaster ® 3-in-1 Compact Misting System User’s Guide
v.210119 Page 13 of 20
Keep in mind that no matter what treatment you use in your Mistmaster, the misting agent may also come in contact
with your landscape, garden, furniture, decking, and any other items in the area. Not all treatments are safe for use on
plants or man-made surfaces; they may cause discoloration, peeling, bubbling, or corrosion. Read product labels and
inserts carefully to understand the risks associated with each treatment. Bask recommends that you test a small area
first before widespread application of any treatment. Bask shall not be responsible for damages to personal property
items caused by treatments used in your Mistmaster.
METHOD 1: Mist Blower
The Mist Blower is the ideal method for quickly distributing a fine mist over a large area such as your backyard, pool
deck, ball field, playground, or campsite.
To use the Mist Blower method:
1. Rotate the Selector (9) to the Blower position with the arrow pointing up and the bottom of the Selector (9)
covering the auxiliary Output (11) located at the top of the Control Panel (10).
2. Power ON your Mistmaster.
3. Place the padded Shoulder Strap (19) on your shoulder, carefully lifting the device so that it rests comfortably
at a level at which you can safely carry the device. Adjust the length of the strap as needed for your comfort,
safety and control.
WARNING –SAFETY FIRST
When filled to capacity, your Mistmaster weighs approximately 28 lbs. (12.7 kg). Bend knees when
lifting; use caution to avoid injury; do not drop. May cause serious physical injury if dropped on
hands, feet, or other body parts.
When using chemical treatments, protect your skin, eyes, mouth, and lungs by wearing appropriate
gloves, eye protection, mask, or other Personal Protective Equipment (PPE) as specified by the
treatments’ manufacturers label and/or insert.
4. Aim (point) the front of the Mistmaster device in the direction of your desired coverage area while observing
all safety instructions, warnings, and recommendations. Press and hold the Mist Button (4). Mist will emit from
the four Mist Nozzles (7) and moving air from the internal blower will cause the Flapper (8) to open; this air
helps propel the mist to cover the maximum distance. Air Intake Holes (17) located on the sides of your
Mistmaster allow air to flow freely into the blower.
5. When using the Mist Blower method, continue pressing the Mist Button (4) as you walk, aiming the front of the
Mistmaster to your left or to your right; do not walk into or through the mist. When using chemical treatments,
always use proper protection for protecting your skin, eyes, mouth, and lungs by wearing appropriate gloves,
eye protection, mask, or other Personal Protective Equipment (PPE) as specified by the treatments’
manufacturers label and/or insert.
6. To discontinue misting, simply release the Mist Button (4).
7. When your Mistmaster is filled to capacity and fully charged, you can expect to operate the blower function for
up to 20 minutes before refilling and up to 60 minutes (approximately 3 tanks) before recharging. Battery life
will vary due to many factors. For optimal battery life, maintain your Mistmaster on the charger when not in
use. See the To optimize battery life section of this User’s Guide for additional recommendations for
optimizing and maintaining your Mistmaster battery.
8. When you are finished using the Mist Blower, power OFF your Mistmaster.
9. Insert the Battery Charger (18) cord into the Charge Port (14) and plug the cord into an AC electrical outlet to
recharge the battery. For optimal battery life, maintain your Mistmaster on the charger when not in use. See
the To optimize battery life section of this User’s Guide for additional recommendations for optimizing and
maintaining your Mistmaster battery.

Bask Mistmaster ® 3-in-1 Compact Misting System User’s Guide
v.210119 Page 14 of 20
USAGE TIP: Using the Mist Blower method of misting, your Mistmaster can propel mist up to 30 feet (9 meters).
Measure or estimate your desired coverage area and plan the most efficient path to follow while misting, taking wind
patterns into consideration. Do not operate your Mistmaster during high winds, rain, or other inclement weather, or
when such conditions are expected.
USAGE TIP: If you run out of treatment before you have treated the entire targeted area, the three lights of the Status
Indicator (5) will begin to flash. Also, if your battery runs out of charge, the two outer lights of the Status Indicators (5)
will begin to flash. In either case, the Mistmaster will stop for the indicated servicing. At this time be sure to note the
location at which you will continue misting after you refill and/or recharge your device.
For more usage tips, visit www.bask-solutions.com.
METHOD 2: Misting Wand (sold separately at www.bask-solutions.com)
The Misting Wand provides the ideal method of misting when targeting smaller areas, such as baseboards, soffits and
eaves or specific areas outdoors or indoors. The Misting Wand is made of marine-grade 316 stainless steel with an
impact-resistant comfort-grip handle for ease of use. A single nozzle at the tip of the Misting Wand disperses mist in a
cone shape, allowing you to control the application of mist to your desired treatment area without impacting
surrounding areas. Other nozzle configurations are also available.
METHOD 3: Mist Station (sold separately at www.bask-solutions.com)
A Mist Station provides the ideal method for misting an outdoor area you intend to treat repeatedly, such as your yard
or patio. A simple and highly customizable installation of one or more Mist Stations allows you to treat specific areas of
your home or business—even areas that are difficult to reach—with just the push of a button on your Bask Long-Range
Remote Control.
Bask currently offers two types of Mist Station Kits to meet your specific needs:
Overhead Kit. Bask overhead mist nozzles are designed to be mounted high up on existing structures like
fences, porch railings, trees, pergolas, or walls, allowing you to remotely mist outward to treat a fixed area as
often as needed. Each overhead mist nozzle tees into nylon tubing that connects the mist nozzles to one
another and to your Mistmaster device. Each kit includes four overhead mist nozzles with mounting hardware,
50 feet of nylon tubing, an end plug, and Quick Disconnect.
Riser Kit. Bask risers are designed for ground installation along the perimeter of your desired coverage area,
such as a patio, along hedges, tree lines, or on landscape islands at 8- to 10-foot spacing. Two styles of risers
are available: Slim Risers (½-inch copper construction) and Ultra Slim Risers (¼-inch 316 stainless steel
construction). The risers are designed to elevate the mist nozzle to 24 inches above the ground, allowing you to
remotely treat a fixed area as often as you choose. Each riser tees into nylon tubing that connects the risers to
one another and to your Mistmaster device. Each kit includes four risers with mounting hardware, 50 feet of
nylon tubing, an end plug, and a Quick Disconnect.
Each Mist Station Kit comes with everything you need to install a semi-permanent customized configuration of mist
nozzles to easily treat any area of your property or business, including step-by-step instructions and tips for customizing
your installation. Slim Riser Kits, Ultra Slim Riser Kits, and Overhead Kits each provide four mist nozzles that can be
configured to work together. Purchase multiple kits to create larger or more than one Mist Station with the ideal
combination of overhead nozzles and risers to treat your outdoor and indoor spaces. Individual risers and overhead
nozzles may be purchased separately to expand your Mist Station to treat a larger area if needed. Compliment your
Riser Kit or Overhead Kit with a Bask Long-Range Remote Control (sold separately) that allows you to easily select mist
times of 15, 30, or 45 seconds as often as you choose with just the push of a button.

Bask Mistmaster ® 3-in-1 Compact Misting System User’s Guide
v.210119 Page 15 of 20
Draining The Tank
It is not necessary to drain your Mistmaster tank after every use. Read the manufacturer’s instructions on the product
label or product insert to determine how long the treatment you are using will remain effective.
Always flush and drain your Mistmaster tank prior to packaging the device for shipping. (See Instructions for Return
Shipping on our website https://bask-solutions.com/return-policy) You are responsible for complying with all laws
and regulations applicable to disposal of chemical products.
If you need to dispose of treatment in your Mistmaster tank, you can manually drain the tank by following the process
described below. Note that some fluid will remain in the lower part of the tank. To remove chemical or natural
treatments from the tank, follow the Flushing the Tank instructions in this User’s Guide using clean, potable water to
flush previously used fluids from the nozzles.
WARNING –DRAINING
Draining your Mistmaster tank increases your risk of accidental exposure. It is important that you
read and follow all safety instructions and warnings provided on product label and insert for the
treatment you are using.
You are responsible for complying with all laws and regulations applicable to disposal of chemical
products.
SEE WARNINGS –DISPOSAL OF CHEMICALS IN THIS USER’S GUIDE.
To drain the tank:
1. See WARNINGS –DISPOSAL OF CHEMICALS section of this User’s Guide.
2. Remove the Fill Cap (1) and the strainer. Tip your Mistmaster and pour the remaining treatment from the tank
into a receptacle with a watertight childproof cap. Label the receptacle to identify the treatment inside and
note any warnings from the manufacturer. To avoid accidental poisoning, store the recovered treatment in a
location that is inaccessible to children. Do not reuse food or beverage containers to store and/or discard
potentially harmful treatments. Place the removable strainer back into your Mistmaster and add the next
treatment
3. Replace the strainer and Fill Cap (1).
Flushing The Tank
It is not necessary to flush the tank prior to every use; however, flushing the tank is recommended when switching
between different treatments. Flushing the tank helps to ensure that no residual chemicals remain in the tank that
could contaminate the next treatment you use and potentially cause harm to your treatment area.
Always flush the tank to remove any residual treatment prior to shipping your Mistmaster. (See Instructions for Return
Shipping on our website https://bask-solutions.com/return-policy)
WARNING –FLUSHING
Flushing your Mistmaster tank increases your risk of accidental exposure. It is important that
you read and follow all safety instructions and warnings provided on product label and insert
for the treatment you are using.
To flush the tank:
1. Follow steps 1-2 of the To drain the tank section and replace the strainer.
2. Pour tank approximately 1/2 full with clean, potable water through the strainer.

Bask Mistmaster ® 3-in-1 Compact Misting System User’s Guide
v.210119 Page 16 of 20
3. Replace the Fill Cap (1), tightening firmly.
4. Press and hold the Mist Button (4) and allow the water to flush the selected nozzles (approximately one
minute)
5. Press the Mix Button (16) for 15 seconds.
6. Dispose of remaining tank content safely. Now the device is ready for storage or a new treatment.
WARNINGS –DISPOSAL OF CHEMICALS
Read, understand, and follow all manufacturer’s warnings and safety instructions when handling
treatments, including use of the appropriate personal protective equipment.
Do not store diluted chemical treatments for later use.
Dispose of pesticides and other hazardous chemicals in accordance with the disposal instructions
on the product label and insert, following all local, state, and federal laws.
Dispose of unused chemicals in a receptacle with a watertight childproof cap. Label the receptacle
to identify its contents and include all warnings from the manufacturer.
To avoid accidental poisoning due to the consumption of harmful treatments, do not store or
dispose of chemical treatments in juice, soda, or water bottles, milk jugs, or any other or food or
beverage containers.
Do not dispose of chemical treatments by pouring down a drain, sink, toilet, storm sewer, or
anywhere that leads to a water source. Do not discard hazardous treatments in household trash.
Dispose of hazardous treatments at a facility approved for disposal of household hazardous waste.
Use of Accessories
Bask accessories are designed to optimize the versatility and effectiveness of your device. Visit us online at www.bask-
solutions.com for information about accessories available for you Mistmaster.
Use only accessories provided by Bask for use with your Mistmaster®3-in-1 Compact Misting System. Use of non-Bask
accessories will void all warranties and can cause serious harm. Bask is not responsible for injury or damage caused by
the use of accessories not sold by Bask.
Cleaning the Exterior of Your Mistmaster
Before cleaning, disconnect the Battery Charger (16) cord from the power source and from your Mistmaster device.
Wipe the exterior of the device with a clean, damp cloth, using mild soap when needed.
WARNINGS –CLEANING
Device contains a battery and electrical components. DO NOT SUBMERGE THE DEVICE IN WATER
OR OTHER LIQUIDS. DO NOT USE A WATER HOSE OR PRESSURE DEVICE TO CLEAN.
Disconnect the Battery Charger (16) cord from power source and from your Mistmaster device
before cleaning.
Do not use strong detergents, abrasive cleaners, or flammable liquids.
Repairs and Replacement Parts
If your device malfunctions or is damaged in any way, contact Bask. An authorized Bask service technician will be able
to help you troubleshoot the issue and guide you through the steps necessary to get your device in working order. If
necessary, a return authorization will be issued (see Instructions for Return Shipping in this User’s Guide). See the
terms and conditions listed in the LIMITED WARRANTY section of this User’s Guide.

Bask Mistmaster ® 3-in-1 Compact Misting System User’s Guide
v.210119 Page 17 of 20
Storing Your Device
Short-Term Storage Between Uses: Although your Mistmaster is both rugged and weather-resistant, we recommend it
be stored in a dry, temperature-controlled environment; maintained in a standing upright position; and powered off
and plugged into its Battery Charger (18) when not in use. Care should be taken to assure the Battery Charger (18) is
plugged into a steady AC source avoiding switched circuits that might be unintentionally turned off via a wall switch or
timer. See the To optimize battery life section of this User’s Guide for additional recommendations for maintaining
your Mistmaster battery.
Long-Term Storage (Seasonal): Whenever possible, store your Mistmaster as described above for short-term storage
between uses. If it is necessary to store your Mistmaster for an extended period of time (longer than 60 days) without it
being maintained on its Battery Charger (18), we recommend the following:
•Fully charge your device; then remove the Battery Charger (18) cord and Fuse (13).
•Bask recommends draining and flushing the device prior to long-term storage to prevent damage due to
evaporation.
•Store the device in a standing upright position in a dry temperature-controlled location away from heat
sources and freezing temperatures.
•When the battery is fully charged, your Mistmaster may be stored for up to 4 to 6 months; then a freshening
charge is recommended. When stored at temperatures higher than 25°C (77°F), more frequent charging may
be required.
•If the battery fails to hold a charge and cannot be recharged, it has reached the end of its charging life and
must be replaced. Contact Bask at 1-888-814-BASK or info@bask-solutions.com for information about
replacing the battery.
WARNING –STORAGE
Do not store your Mistmaster in extreme heat or freezing temperatures (avoid temperatures
above 40°C/104°F and below 1°C/34°F).
Return Policies
Please visit https://bask-solutions.com/return-policy information about our return policies.
One-Year Limited Warranty
Bask warrants that your product will be free from factory defects in material or workmanship for one (1) year from the
date of purchase provided that you have complied with conditions specified in this User’s Guide. Within the warranty
period (one year from date of purchase) Bask will repair or replace a defective device at no charge to you. All warranty
requests are reviewed on a case-by-case basis. Repair or replacement is at Bask’s sole discretion. The Limited Warranty
covers normal use only as described herein.
Product Registration. Your Limited Warranty is automatically activated at the time Bask ships your Mistmaster. This
registration identifies your ownership of the Bask Mistmaster model number and unique serial number assigned to
your product. If you transfer ownership of your product, please contact Bask at 1-888-814-BASK or info@bask-
solutions.com so we can update our records and provide service and support to the new owner.
Your Limited Warranty remains in effect only if:
•Product is used in accordance with instructions published in the User’s Guide.
•No evidence exists of tampering, mishandling, neglect, accidental damage, modification and/or repair to your
product, including its internal components, including change of battery or fuses, by anyone other than
authorized service personnel.
•No evidence exists of the use of treatments or accessories NOT offered by Bask.

Bask Mistmaster ® 3-in-1 Compact Misting System User’s Guide
v.210119 Page 18 of 20
•No evidence exists of submersion in water or other liquid, fire, or other wear and tear beyond the normal aging
of the product.
•The serial number has not been removed or defaced from the product.
There are no express warrantees except as listed above. All warranty requests are reviewed on a case-by-case basis.
The warrantor shall not be liable for incidental or consequential damages resulting from the use of this product or
arising out of any breach of this warranty unless excluded by your state laws. All express and implied warranties,
including the warranties of merchantability and fitness for a particular purpose, are limited to the applicable warranty
period set forth above.
This warranty gives you specific legal rights and you may also have other rights which vary from state to state.
Limited Warranty Exclusions
•Accessories. Accessories, treatments and parts are not under warranty, including but not limited to shoulder
straps, battery chargers, Misting Wands, Mist Station Kits, Long-Range Remote Controls, and treatments.
•Battery During the warranty period, Bask will replace your Mistmaster battery at no cost to you. Contact Bask
for shipping authorization and instructions. If you choose to replace the battery yourself, your warranty will no
longer apply. After the warranty period has expired, Bask will replace your Mistmaster battery for a nominal
fee. Contact Bask for information and shipping authorization. Replacement batteries and fuses are available for
purchase: for more information contact Bask at 1-888-814-BASK or info@bask-solutions.com.
Extended Limited Warranty
An Extended Limited Warranty was offered at the time of purchase. If you purchased the Extended Limited Warranty
the terms of your Limited Warranty extend for an additional year (a total of two years from the date of purchase). No
Extended Warranty is offered or implied after the initial purchase.
Use of Treatments
Use only the treatments selected for use in the Bask Mistmaster 3-in-1. Read and follow all instructions on the product
labels and inserts to ensure the safe use of treatments and safe use, cleaning, and disposal of containers. For more
information about specific treatments and their intended uses, contact the manufacturer.
Visit the United States Environmental Protection Agency website (www.epa.gov/pesticide-worker-safety/pesticide-
containers#regulations) for information about pesticide containers. Users are responsible for following the product
label and insert instructions for safe cleaning and handling of pesticide containers and disposal of unused chemical
treatments.
Managing Spray/Mist Drift and Preventing Runoff
Spray drift is defined by the United States Environmental Protection Agency (EPA) as the movement of droplets of
chemical treatments (e.g., pesticides, herbicides) through the air at the time of application or soon after, to any site
other than the area intended. Your Mistmaster nozzles are designed to create fine mists for various treatments offered
by Bask for indoor and/or outdoor uses that include insect control, sanitization, plant health and odor elimination. It is
your responsibility to take proper precautions to ensure spray/mist drift does not adversely affect people and the
environment surrounding your intended treatment area using the Mistmaster in the proper mode given its use and
location.
Runoff occurs when water and any contaminants such as pesticides flow across the soil surface into existing bodies of
water, such as streams, canals, rivers, and lakes. Runoff also can enter water systems through storm drains. It is your
responsibility to take proper precautions to ensure runoff does not adversely affect people and the environment
surrounding your intended treatment area.

Bask Mistmaster ® 3-in-1 Compact Misting System User’s Guide
v.210119 Page 19 of 20
For additional information and best practices recommended by the EPA to reduce spray/mist drift and runoff, and your
responsibilities when using a misting system to control mosquitoes, spiders, fleas, ticks, and other pests around your
home or other property, visit the EPA website at www.epa.gov/reducing-pesticide-drift/introduction-pesticide-drift and
www.epa.gov/mosquitocontrol/mosquito-misting-systems
CAUTIONS CONCERNING LEGAL RESPONSIBILITIES
When using pesticides or other chemicals in your Mistmaster, you are legally responsible for any harm
or damage caused by misuse. Your responsibility extends to effects caused by spray/mist drift, runoff,
or improper handling, storage, and disposal. Take proper precautions to protect people’s health, pets,
the environment, and nearby lawns, gardens or crops, including the following:
No matter if you use the mist blower or allow the wind to carry mist, you are responsible for
keeping your treatments off of your neighbors, their lawns and property.
To avoid spray/mist drift and runoff, apply chemical treatments during calm weather
conditions. Do not apply chemicals during high winds, rain, or when other inclement weather
is expected. Apply chemicals in a manner that does not allow them to enter storm drains,
gutters, drainage ditches, or surface waters.
Always follow local, state and federal laws as well as precautions and instructions on
treatment labels.
CHEMICAL SAFETY INSTRUCTIONS AND WARNINGS
Use only treatments selected for use in the Bask Mistmaster®3-in-1 Compact Misting System.
Read, understand, and follow instructions provided with treatments selected for use in the Bask
Mistmaster®3-in-1 Compact Misting System. Each chemical treatment has specifications for the
use of appropriate personal protective equipment you must use to protect your skin, eyes, mouth,
and lungs. When in doubt, heed all warnings and exercise all precautions.
Users are responsible for the safety of themselves, others, and the environment. Dispose of
unused chemicals and chemical containers properly to avoid harming others or contaminating the
environment.
To avoid overtreating an area, follow manufacturer’s instructions on the label of the treatment
you are misting to determine the coverage area for the volume of treatment in your Mistmaster.
Plan your misting path and walking speed in advance to apply the right amount of treatment for
the size of the area you are misting.
To avoid unnecessary contact with mist treatments, avoid walking into, under, or through the mist
or recently misted areas; read product labels and inserts to determine when it is safe to enter the
treated area.
Read and follow the chemical manufacturer’s instructions for washing skin, hair, and clothing after
contact or exposure.
Always read and observe all re-entry times for humans and pet (if any) listed on the chemical’s
label.

Bask Mistmaster ® 3-in-1 Compact Misting System User’s Guide
v.210119 Page 20 of 20
Resources For Information About Pesticides
Each treatment offered by Bask is selected for use in the Bask Mistmaster®3-in-1 Compact Misting System and is
packaged with the manufacturer’s instructions for use. Bask is not responsible for the use or misuse of treatments used
in your Mistmaster. User is responsible for complying with all safety instructions, warnings, and regulations for disposal
of containers and unused treatments. See product labels and inserts for websites that provide additional safety
information. The following resources provide information and education on how to use pesticides and your
responsibilities for protecting the health and safety of people, animals, and the environment.
•National Pesticide Information Center (NPIC) is a cooperative agreement between Oregon State University
and the U.S. Environmental Protection Agency. The NPIC provides evidence-based information about the use of
pesticides and their potential impact on health and safety when used for pest control. Visit NPIC at
www.npic.orst.edu.
•National Institute of Environmental Health Sciences (NIEHS) provides scientific information relevant to human
health and the environment. For the latest information from the NIEHS, visit
www.niehs.nih.gov/health/topics/agents/pesticides.
•United States Environmental Protection Agency (EPA) is a government agency whose mission is to protect
human health and the environment by working with businesses, non-profit organizations, and state and local
governments. For information about Pest Control and Pesticide Safety for Consumers, visit the EPA at
www.epa.gov/safepestcontrol.
FCC DISCLAIMER
This equipment has been tested and found to comply with the limits for a Class B digital device,
pursuant to part 15 of the FCC Rules. These limits are designed to provide reasonable protection
against harmful interference in a residential installation. This equipment generates, uses and can
radiate radio frequency energy, and if not installed and used in accordance with the instructions, may
cause harmful interference to radio communications. However, there is not guarantee that interference
will not occur in a particular installation. If this equipment does cause harmful interference to radio or
television reception, which can be determined by turning the equipment off and on, the user is
encouraged to try to correct the interference by one or more of the following measures:
•Reorient or relocate the receiving antenna.
•Increase the separation between the equipment and receiver.
•Connect the equipment into an outlet on a circuit different from that to which the receiver is
connected.
•Consult the dealer or an experienced radio/TV technician for help.
Table of contents
Popular Lawn And Garden Equipment manuals by other brands


Troy-Bilt
Troy-Bilt TB225 Operator's manual

Johnny's Selected Seeds
Johnny's Selected Seeds BiO Plus 1000' user guide

Redpath
Redpath CLOC6 Assembly & Installation Guidelines

JELÍNEK
JELÍNEK BioComp S-650 quick start guide

Troy-Bilt
Troy-Bilt Horse Tiller Operation manual

hillvert
hillvert HT-GK-100 user manual


