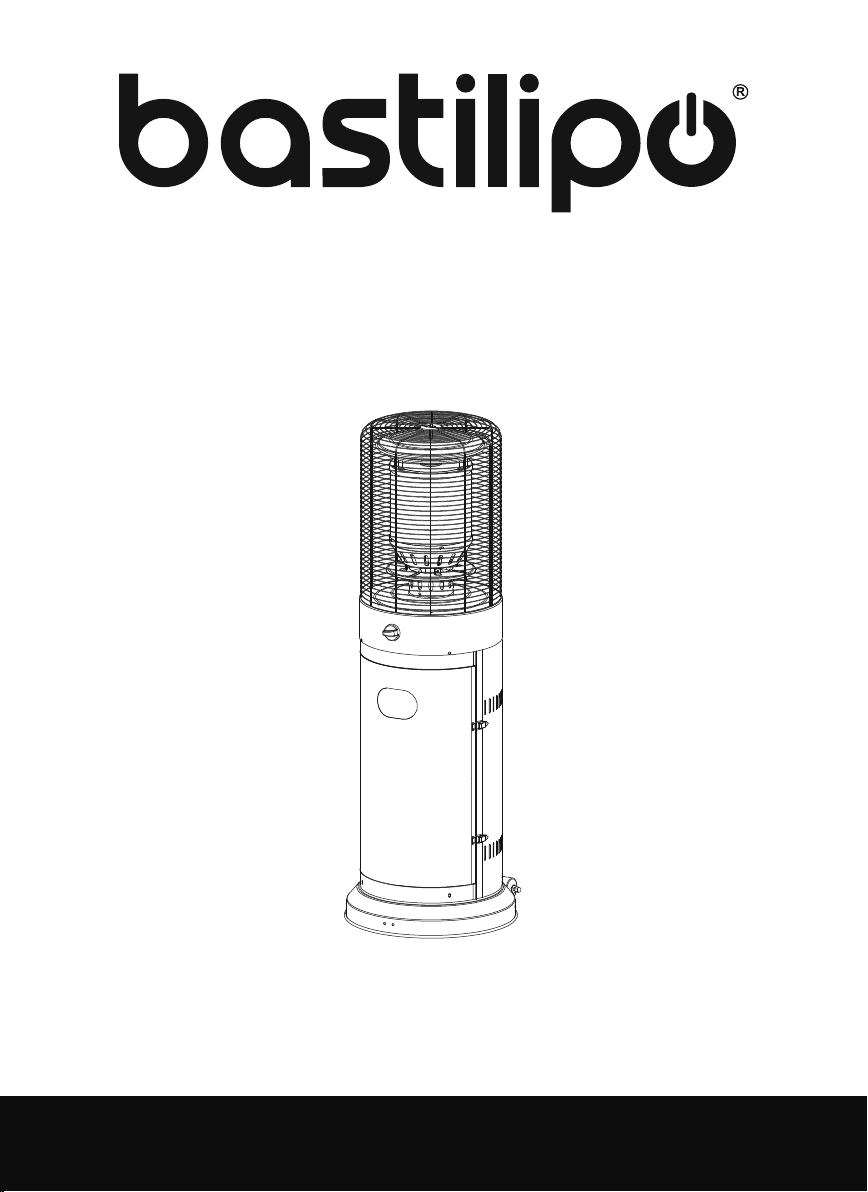
Bastilipo PROMETEO BLACK 11K User manual
MANUAL DE INSTRUCCIONES
ESTUFA DE GAS EXTERIOR
OUTDOOR PATIO HEATER
Model/Model:
PROMETEO BLACK 11K
www.bastilipo.com

Advertencias Español
1
Estimado cliente, muchas gracias por
haber comprado uno de nuestros
productos. Le rogamos que lea con
atención y guarde este manual de
instrucciones.
ADVERTENCIA REGLAS DE
SEGURIDAD
POR TU SEGURIDAD
Si huele a gas:
1 Apague el gas del aparato.
2 Extinguir cualquier llama encendida.
3 Si el olor continúa, llame inmediatamente a su
proveedor de gas o al 112.
POR TU SEGURIDAD
1.No almacene ni use gasolina u otros gases o
líquidos inflamables cerca de este o cualquier
otro aparato.
2. Un cilindro de gas LP no conectado para su
uso no debe almacenarse cerca de este o
cualquier otro aparato.
ADVERTENCIA
1) Para uso al aire libre o en áreas bien ventiladas.
2) Un área ampliamente ventilada debe tener un
mínimo de 25% del área de superficie abierta.
3) El área de superficie es la suma de la superficie de
las paredes.
ADVERTENCIA
Una instalación incorrecta o el mal uso o
mantenimiento incorrecto puede causar lesiones o
daños a la propiedad. Lea detenidamente las instru-
cciones de instalación, operación y mantenimiento
antes de instalar o usar este producto.
ADVERTENCIA
Lea las instrucciones antes de la instalación y
el uso
ŸEste aparato debe instalarse y el cilindro de
gas debe almacenarse de acuerdo con las
normas vigentes;
ŸNo obstruya los orificios de ventilación de la
carcasa del cilindro;
ŸNo mueva el aparato cuando esté en
funcionamiento;
ŸCierre la válvula en la bombona de gas o el
regulador antes de mover el aparato;
ŸLa tubería o la manguera flexible deben
cambiarse dentro de los intervalos prescritos;
ŸUse solo el tipo de gas y la bombona
especificada por el fabricante;
ŸLa bombona utilizada en su estufa de gas
debe cumplir con los siguientes requisitos:
ŸCompre bombonas sólo con estas medidas
requeridas: (31.8cm) (diámetro) x 58cm)
(altura) con capacidad máxima de 15 kg.
ŸEn caso de viento fuerte, se debe prestar
especial atención a la inclinación del aparato;
Mantenga el aparato al menos a 1 m del
cilindro de gas.
ŸEl inyector en este aparato no es removible y
el inyector solo se ensambla por fabricación.
Este aparato está prohibido convertir de una
presión de gas a otra presión.
ŸNo conecte la bombonas directamente al
aparato sin el regulador. Use solo el tipo de
gas y el tipo de bombona especificada en las
instrucciones.
Un regulador (que cumple con EN16129: 2013 y
la normativa nacional) de la presión correcta
correspondiente a la categoría del aparato.
Utilice un regulador de 30 mbar para butano /
propano en la categoría I3B / P (30). Utilice un
regulador de 30 mbar para butano en la categoría
I3 + (28-30 / 37). Use un regulador de 37 mbar
para propano en la categoría I3 + (28-30 / 37).
Use el regulador de 50 mbar para butano /
propano en la categoría I3B / P (50). Se
recomienda usar una manguera flexible que esté
aprobada por EN16436: 2014.

2
ESP
PRECAUCIÓN
LEA DETENIDAMENTE LAS SIGUIENTES
DIRECTRICES DE SEGURIDAD ANTES DE
UTILIZAR LA ESTUFA DE GAS
ŸNo use la estufa de gas para interiores, ya que puede causar
lesiones personales o daños a la propiedad.
ŸEsta estufa de exterior no está diseñada para ser instalada en
vehículos recreativos y / o barcos.
ŸLa instalación y reparación deben ser realizadas por un técnico de
servicio cualificado.
ŸLa instalación, ajuste o alteración inadecuados pueden causar
lesiones personales o daños a la propiedad.
ŸNo intente alterar la estufa de gas de ninguna manera.
ŸNunca reemplace ni sustituya el regulador por ningún otro
regulador que no sea el sugerido por el fabricante.
ŸNo almacene ni use gasolina u otros vapores o líquidos
inflamables en la estufa de gas.
ŸSe debe inspeccionar todo el sistema de gas, la manguera, el
regulador, el piloto o el quemador antes de detectar fugas o daños
al menos anualmente por una persona de servicio calificada.
ŸTodas las pruebas de fugas deben hacerse con una solución de
jabón. Nunca use una llama abierta para verificar si hay fugas.
ŸNo use el calentador hasta que todas las conexiones hayan sido
probadas contra fugas.
ŸNo transporte el calefactor mientras esté funcionando.
ŸNo mueva el calentador después de haberlo apagado hasta que la
temperatura se haya enfriado.
ŸMantenga la abertura de ventilación de la caja del cilindro libre de
residuos.
ŸNo pinte la pantalla radiante, el panel de control o el reflector
superior del dosel.
ŸEl compartimiento de control, el quemador y los conductos de aire
de circulación del calentador deben mantenerse limpios.
ŸLimpieza frecuente puede ser necesario según sea necesario.
ŸEl tanque de gas LP debe estar apagado cuando el calentador no
esté en uso.
ŸRevise el calentador inmediatamente si ocurre algo de lo siguiente:
- El calentador no alcanza la temperatura.
- El quemador hace un ruido de estallido durante el uso (un ligero
el ruido es normal cuando el quemador se apaga).
- Olor a gas en conjunto con extremidades amarillas extremas de
las llamas del quemador.
ŸEl conjunto de manguera / regulador de LP debe ubicarse fuera de
las vías donde las personas puedan tropezar con él o en un área
donde la manguera no esté expuesta a daños accidentales.
ŸCualquier protector u otro dispositivo de protección retirado para
reparar el calefactor debe reemplazarse antes de operar el
calefactor.
ŸSe debe mantener una distancia de seguridad suficiente cuando la
estufa de gas esté encendida para evitar quemaduras.
ŸLos niños deben ser supervisados cuidadosamente cuando estén
en el área de la estufa de gas.
ŸDebe cambiar la bombona de gas en un área bien ventilada, lejos
de cualquier fuente de ignición (velas, cigarrillos, otros aparatos
que producen llamas).
ŸPara verificar que el sello del regulador esté correctamente instalado
y pueda cumplir su función, se muestra en la foto anterior;
ŸPara no obstruir los orificios de ventilación de la carcasa del cilindro;
ŸPara cerrar el suministro de gas en la válvula de la bombona de gas
o el regulador después de su uso;
ŸEn caso de fuga de gas, el aparato no debe utilizarse o, si está
encendido, el suministro de gas debe cerrarse y el aparato debe
reparase antes de volver a utilizarlo;
ŸDebe revisar la manguera al menos una vez al mes, cada vez que se
cambie la bombona, o cada vez que no se use por un tiempo
prolongado. Si muestra signos de agrietamiento, hendidura u otro
deterioro, deberá cambiarse por una manguera nueva de la misma
longitud y calidad equivalente;
ŸEl uso de este aparato en áreas cerradas puede ser peligroso y está
PROHIBIDO;
ŸLea las instrucciones antes de usar este aparato. El aparato debe
instalarse de acuerdo con las instrucciones y las normativas locales.
ŸPara la conexión de la manguera y el regulador, y la conexión del
regulador y la manguera, consulte la foto que se muestra arriba
SOPORTE DE ESTUFA Y
UBICACIÓN
ŸLa estufa es principalmente para uso en
exteriores solamente. Asegúrese siempre de que
se proporciona ventilación adecuada de aire
fresco.
ŸMantenga siempre un espacio adecuado para los
materiales combustibles no protegidos, es decir, la
parte superior de 100 cm y los lados de 100 cm
como mínimo.
ŸLa estufa debe colocarse en un suelo firme y
nivelado.
ŸNunca utilice la estufa en una atmósfera explosiva
como en áreas donde se almacena gasolina u
otros líquidos o vapores inflamables.
ŸPara proteger la estufa del fuerte viento, fije
firmemente la base al suelo con tornillos.
REQUISITOS DE GAS
ŸUse gas propano, butano o sus mezclas
solamente.
ŸEl regulador de presión y el conjunto de manguera
a utilizar deben cumplir con los códigos estándar
locales.
Manguera
Sello
Regulador
Bombona
sello manguera
regulador
cilindro
TECHO
PARED

ŸLa instalación debe cumplir con los códigos
locales, o en ausencia de códigos locales, con la
norma para el almacenamiento y manejo de
gases líquidos.
ŸUna bombona abollada, oxidada o dañada
puede ser peligrosa y debe ser revisada por su
proveedor de bombonas. Nunca use una
bombona con una conexión de válvula dañada.
ŸLa bombona debe tener correctamente instalada
la extracción de vapor del cilindro operativo.
ŸNunca conecte una bombona no regulada a la
estufa de gas.
TESTEO ANTI FUGAS
Las conexiones de gas en la estufa son testeadas
contra fugas en la fábrica antes del envío. Se debe
realizar un control de gas completo en el sitio de
instalación debido a un posible mal manejo en el
envío o la excesiva presión que se aplica al
calentador.
ŸPrepare una solución jabonosa con una parte
de jabón líquido y una parte de agua. La
solución de jabón se puede aplicar con una
botella de spray, un cepillo o un trapo. Las
burbujas de jabón aparecerán en caso de fuga.
ŸLa estufa debe comprobarse con una
bombona llena.
ŸAsegúrese de que la válvula de control de
seguridad esté en la posición de APAGADO.
ŸEncienda el suministro de gas.
ŸEn caso de una fuga, apague el suministro de
gas. Apriete los accesorios con fugas, luego
encienda el suministro de gas y vuelva a
verificar.
ŸNunca realice pruebas de fugas mientras
fuma..
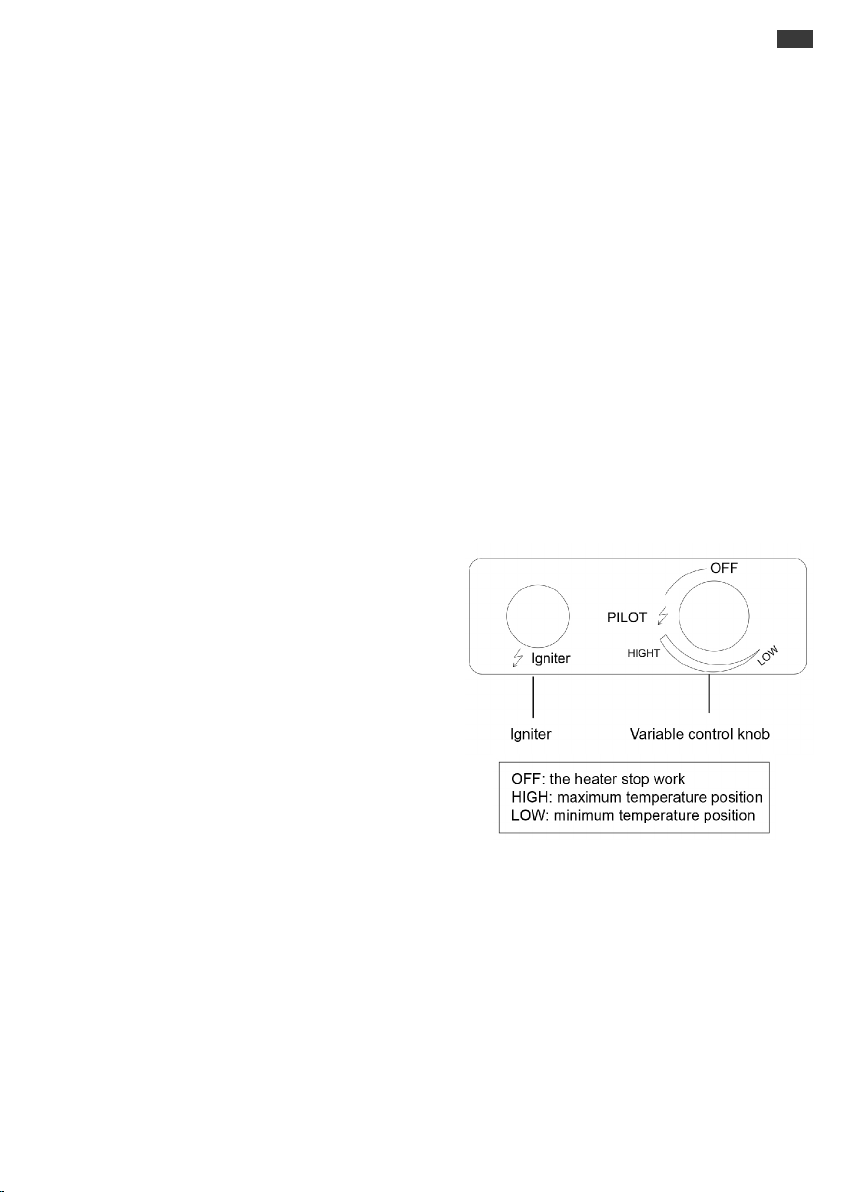
OPERACIÓN Y ALMACENAMIENTO
1. Abra completamente la válvula del cilindro de
suministro de gas.
2. Pulsar y girar la perilla de control variable a la
posición PILOTO (90º en sentido antihorario)
3. Presione la perilla de control variable y
manténgala presionada durante 60 segundos.
Mientras mantiene presionada la perilla de
control variable, presione el botón de
encendido varias veces hasta que se encienda
la llama piloto. Suelte la perilla de control
variable después de que se encienda la llama
piloto.
Nota:
- Si se acaba de conectar un tanque nuevo, espere
al menos un minuto para que el aire de la
tubería de gas se purgue a través del orificio
piloto.
- Al encender la llama piloto, asegúrese de que la
perilla de control variable esté presionada
constantemente mientras presiona el botón de
encendido. La perilla de control variable se
puede soltar después de que se enciende la
llama piloto.
- Si la llama del piloto no se enciende o se apaga,
repita el paso 3.
4. Después de que se encienda la llama del piloto,
gire la perilla de control variable a la posición
máxima y déjela y déjela allí durante 5 minutos o
más antes de girar la perilla a la posición de
temperatura deseada.
APAGAR EL CALENTADOR
1. Cierre completamente la válvula de gas.
2. Gire la manilla de control hacia la derecha hasta
la posición de OFF.
Almacenamiento:
1. Cierre siempre la válvula de la bombona de gas
después de su uso o en caso de emergencia.
2. Retire el regulador de presión y la manguera.
3. Compruebe la estabilidad de la válvula de gas y si hay
daños. Si sospecha de un daño, póngase en contacto
con su distribuidor de gas.
4. Nunca almacene la bombona de gas en un terreno
subterráneo o lugares sin ventilación adecuada.
LIMPIEZA Y MANTENIMIENTO
ŸLimpie las superficies recubiertas con polvo con un
trapo suave y húmedo. No limpie la estufa con
productos de limpieza que sean combustibles o
corrosivos.
ŸRetire los residuos del quemador para mantenerlos
limpios y seguros para su uso.
ŸCubra la unidad del quemador con la cubierta
protectora opcional cuando la estufa no esté en uso.
3
ESP
OFF: Parar el calentador
HIGH: Posición de máxima temperatura
LOW: Posición temperatura mínima

ŸUsar el regulador adecuado de acuerdo
con la presión de salida del regulador como
se muestra en las tablas anteriores.
Tabla de inyector
ŸEl conjunto de manguera y regulador debe
cumplir con los códigos estándar locales.
ŸLa presión de salida del regulador debe cumplir
con la categoría de aparato correspondiente en
B. Especificación.
ŸEl aparato requiere una manguera homologada
de 0,6 m de longitud.
4
ESP
A. Construcción y características.
ŸEstufa transportable de terraza con
bombona.
ŸCarcasa en acero con recubrimiento en
negro o en acero inoxidable.
ŸConexiones de manguera de gas con
abrazadera metálica (tapones de rosca
para Alemania).
ŸEmisión de calor del reflector.
B. Especificaciones
ŸUse gas propano, butano o sus mezclas
solamente.
ŸMax. potencia: 11000 vatios
ŸMin. potencia: 5000 vatios
ŸConsumo:
CATEGORÍA:
TIPO DE GAS:
GAS PRESIÓN:
PRESIÓN DE GAS
DEL REGULADOR:
I +(28-30/37)
3
Butane Propane
28-30 mbar 37 mbar
28-30 mbar 37 mbar
I3B/P(30)
Butane, propane or
their mixtures
30 mbar 50 mbar
30 mbar 50 mbar
I3B/P(50)
Butane, propane or
their mixtures
I3B/P(37)
Butane, propane or their mixtures
37 mbar
37 mbar
ENTRADA TOTAL CALOR:
(Hs): (Qn)
I +(28-30/37)
3
Butane Propane
28-30 mbar 37 mbar
11 kW (G30:800 g/h; G31:786 g/h)
TAMAÑO DEL INYECTOR: 1.75 mm for main burner
0.22 mm for pilot burner
11 kW (G30:800 g/h; G31:786 g/h)
1.75 mm for main burner
0.22 mm for pilot burner
I3B/P(30) I3B/P(50) I3B/P(37)
Butane, propane or their mixtures Butane, propane or their mixtures Butane, propane or their mixtures
30 mbar 50 mbar 37 mbar
1.55 mm for main burner
0.22 mm for pilot burner
1.60 mm for main burner
0.22 mm for pilot burner
Cubierta protectora
Quemador
Manilla de control
Carcasa del tanque
CATEGORÍA:
TIPO DE GAS:
GAS PRESIÓN:
PRESIÓN DE GAS
DEL REGULADOR:
CATEGORÍA:
TIPO DE GAS:
GAS PRESIÓN:
PRESIÓN DE GAS
DEL REGULADOR:
CATEGORÍA:
TIPO DE GAS:
GAS PRESIÓN:

5
ESP
MONTAJE DE PIEZAS
Partes:
1. Cubierta protectora
2. Quemador
3. Manilla de control
4. Base
5. Ruedas
ENSAMBLAJE DE PARTES
1. Utilice 2 tornillos M8x16mm y tuercas M8 para
unir el soporte con la rueda a la base.
1
Tornillo M8 x 16Tuerca M8
Tuerca circular M6Tornillo M5 x 8
Destornillador Llave inglesa
Tuerca M8
Tornillo M8
Llave inglesa
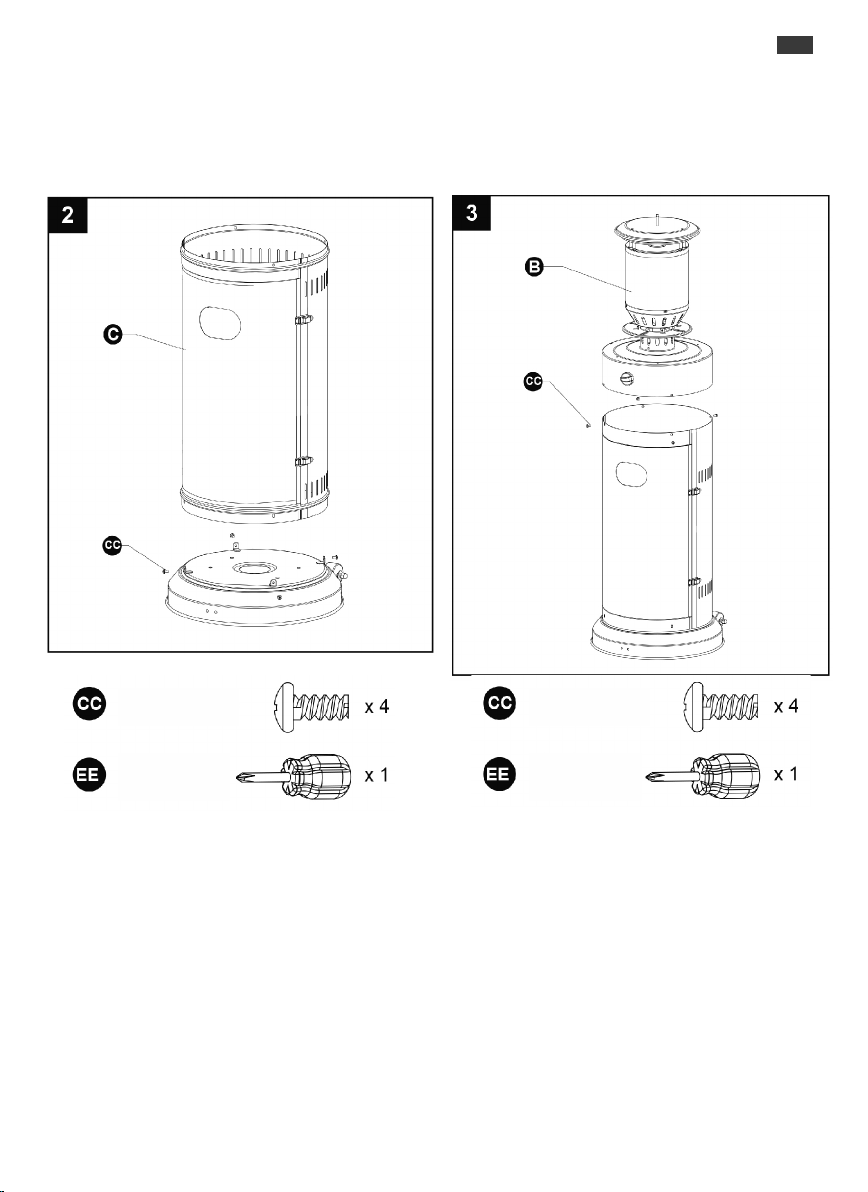
6
ESP
ASSEMBLY PROCEDURES
2. Utilice 4 tornillos M5x8mm para unir la base del
soporte del tanque y el cilindro.
3. Use la tuerca circular para conectar las dos
medias protecciones de seguridad al cabezal del
quemador.
Tornillo M5
Destornillador
Tornillo M5
Destornillador
7
ESP
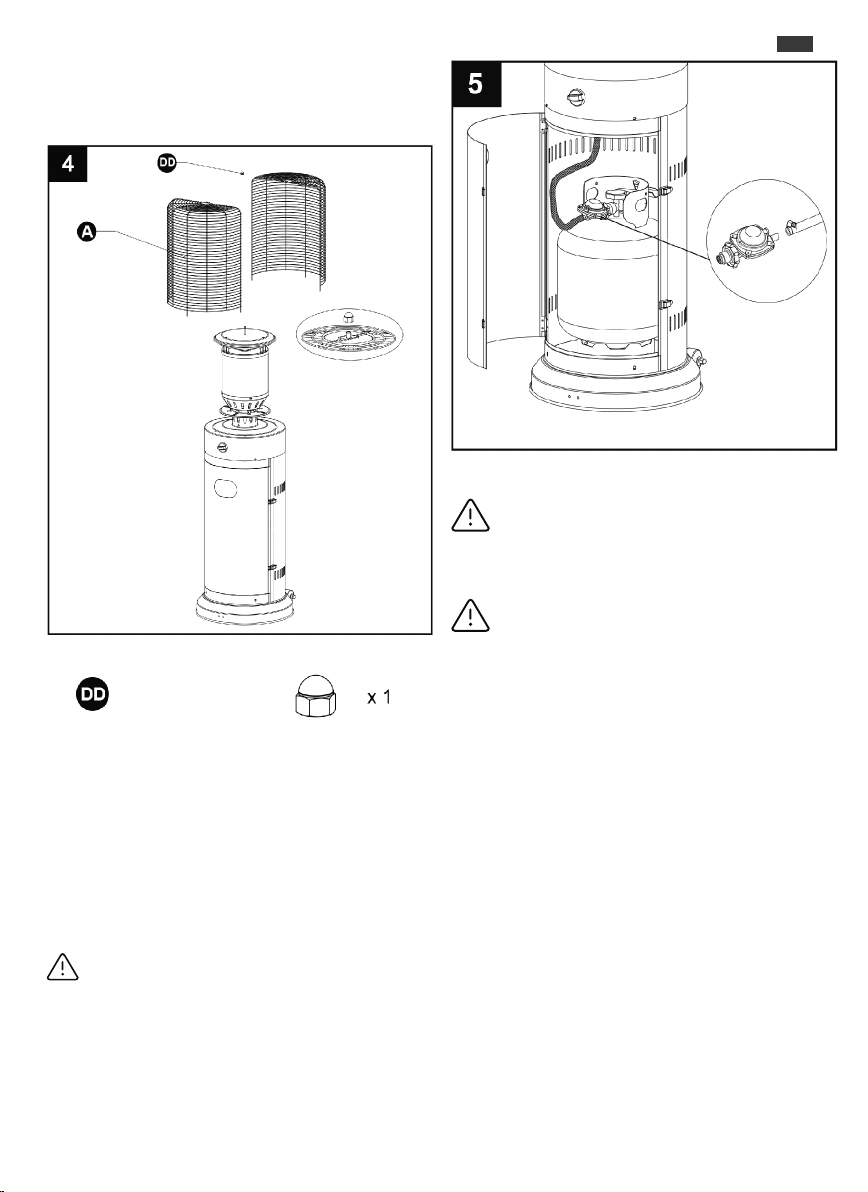
1. Use la tuerca circular M6 para conectar las dos
medias protecciones de seguridad al cabezal del
quemador.
5-1. Abra la puerta de la carcasa del tanque.
5-2. Conecte el conjunto de manguera y regulador
al accesorio de entrada de gas ubicado
dentro de la caja de la bombona, y apriétela a
mano, luego use una llave para girar la tuerca
una media vuelta más.
5-3. Conecte el regulador a la bombona de gas y
apriete con una llave.
5-4. Coloque el cilindro de gas en la bombona,
luego cierre la puerta.
WARNING! Asegúrese de que la manguera
no toque ninguna superficie a alta temperatura, o
podría derretirse y gotear provocando un incendio.
Después de colocar la bombona dentro de la
estufa, asegure la bombona con la correa del
bloque firmemente.
La estufa debe fijarse en una mesa estable y
resistente con una altura mínima de 40 cm desde
el nivel del suelo.
6. Control de fugas.
¡ADVERTENCIA! Se debe realizar una
inspección de seguridad anual y cada vez
que se conecta una bombona o si se
reemplaza una parte del sistema de gas.
¡ADVERTENCIA! Nunca use una llama
encendida para verificar si hay fugas de
gas. Asegúrese de que no haya chispas o
llamas encendidas cerca mientras revisa
si hay fugas. Las chispas o llamas
encendidas pueden provocar incendios,
explosiones, daños a propiedad, lesiones
corporales graves, o hasta la muerte.
Inspección de seguridad: deben realizarse
antes del uso inicial, anualmente, y siempre
que se reemplacen o revisen los
componentes de gas. No fume mientras
realiza esta prueba, y elimine todas las
fuentes de ignición. Gire todos los controles
del quemador a la posición de apagado.
Encienda la válvula de suministro de gas.
Aplique una solución con agua y jabón en
todas las uniones y conexiones del
regulador, la manguera, los colectores y las
válvulas. (Como paso 6 donde se muestran
las flechas en la siguiente página)
Las burbujas indicarán una fuga de gas.
Reemplace la pieza con una recomendada
por el departamento de Atención al Cliente
y haga que un instalador de gas certificado
inspeccione la estufa de gas
Tuerca circular M6

8
ESP
Si no puede detener la fuga, cierre el suministro de
gas inmediatamente, desconéctelo y llame a un
instalador o distribuidor de gas certificado para que
inspeccione la estufa de gas. No use la estufa de
gas hasta que se haya detenido la fuga.
LIMPIEZA Y MANTENIMIENTO
• Con un paño suave y húmedo, con o sin una
s o l u c i ó n d e j a b ó n s u a v e , l i m p i e
cuidadosamente la superficie exterior del
producto.
• PRECAUCIÓN: deje que el producto se
enfríe completamente antes de manipularlo
o limpiarlo.
• También recomendamos la limpieza
periódica de este aparato colocando
ligeramente la boquilla de la aspiradora
sobre las guardas para eliminar el polvo o la
suciedad que pueda haberse acumulado en
el interior o en la unidad.
PRECAUCIÓN: No use detergentes
fuertes, limpiadores químicos o disolventes,
ya que pueden dañar el acabado de la
superficie de los componentes.
Cuando acabe la vida útil del producto,
asegúrese de depositar el producto en un
sitio de reciclaje donde corresponde.
Póngase en contacto con sus entidades
locales para obtener información sobre la
normativa de la utilización de aparatos que
requieran el uso de bombonas de gas.
Si la estufa de gas se desecha en
vertederos, las sustancias peligrosas
pueden filtrarse en el agua subterránea y
entrar en la cadena alimentaria, dañando su
salud y bienestar.
Regulador de gas
Manuguera con regulador

9
ESP
PROBLEMAS, CAUSAS Y SOLUCIONES
PROBLEMA
La llama no se enciende
CAUSA PROBABLE
La válvula de gas puede estar
apagada
Bombona de combustible vacia
Apertura bloqueada
Aire en el suministro
Conexiones sueltas
SOLUCIÓN
Encienda la válvula de gas
Recarga de tanque de GLP
Limpie o reemplace la abertura
Purgar el aire de las líneas.
Revise todos los accesorios
La llama no se queda
encendida
Residudos que obstruyen la
llama
Conexiones sueltas
Termopar mal
Fuga de gas en linea
Falta de presión en la bombona
Limpie el área sucia
Apretar las conexiones
Reemplace el termopar
Comprobar conexiones
Tanque casi vacío.
Cambiar la bombona
No se enciende la llama La presion es baja
Apertura bloqueada
Control no encendido
Termopar mal
Ensamblaje de la luz piloto
doblado
No está en la ubicación correcta
Sustituir la bombona
Quitar y limpiar
Gire la válvula a ON
Reemplace el termopar
Coloca el piloto correctamente
Posicionar adecuadamente y volver a
intentar
En caso de que haya algún defecto o problema de montaje o uso, no intente modificarlo por su
cuenta, póngase en contacto con su proveedor o distribuidor para resolverlo.

Warning English
• Dear customer,
We thank you very much for having
purchased one product of ours. We
kindly ask you to read and save this
instruction manual.
WARNlNG SAFETY RULES
FOR YOUR SAFETY
If you smell gas:
1 Shut off gas to the appliance.
2 Extinguish any open flame.
3 If odor continues, immediately call your gas
supplier or your fire
Department.
FOR YOUR SAFETY
1.Do not store or use gasoline or other flammable
vapors and liquids in the vicinity of this or any
other appliance.
2.An LP cylinder not connected for use shall not
be stored in the vicinity of this or any other
appliance.
WARNlNG
1) For use outdoors or in amply ventilated areas.
2) An amply ventilated area must have a minimum of
25 % of the surface area open.
3) The surface area is the sum of the walls surface.
WARNlNG
Improper installation, adjustment, alteration, service
or maintenance Can cause injury or property damage.
Read the installation, operating and maintenance
instructions thoroughly before installing or servicing
this equipment.
WARNlNG
Read the instructions before installation and
use.
ŸThis appliance must be installed and the gas
cylinder stored in accordance with the
regulations in force;
ŸDo not obstruct the ventilation holes of the
cylinder housing;
ŸDo not move the appliance when in operation;
ŸShut off the valve at the gas cylinder or the
regulator before moving the appliance;
ŸThe tubing or the flexible hose must be
changed within the prescribed intervals;
ŸUse only the type of gas and the type of
cylinder specified by the manufacturer;
ŸThe LP tank used with your patio heater must
meet the following requirements:
ŸPurchase LP tanks only with these required
measurements: (31.8cm) (diameter) x 58cm)
(tall) with 15kg capacity maximum.
ŸIn case of violent wind particular attention
must be taken against tilting of the appliance;
Keep the appliance at least 1m from the gas
cylinder.
ŸThe injector in this appliance is not removable
and the injector is only assembled by
manufacture. This appliance is forbidden to
convert from one gas pressure to another
pressure.
Ÿ-Do not connect the gas cylinder directly to the
appliance without regulator. Use only the type
of gas and the type of cylinder specified in the
instructions.
A regulator(compliees with EN16129:2013 and
the national regulation) of the correct pressure
corresponding to the appliance category. Use
30mbar regulator for butane/propane under the
category I3B/P(30). Use 30mbar regulator for
butane under the category I3+(28-30/37). Use
37mbar regulator for propane under the category
I3+(28-30/37). Use 50mbar regulator for
butane/propane under the category I3B/P(50).It's
recommended to use flexible hose that approved
by EN16436: 2014.
10

ENG
CAUTION
PLEASE READ CAREFULLY THE
FOLLOWING SAFETY GUIDELINES
BEFORE OPERATION
ŸDo not use the patio heater for indoors, as it may cause personal
injury or property damage.
ŸThis outdoor heater is not intended to be installed on recreational
vehicles and/or boats.
ŸInstallation and repair should be done by a qualified service
person.
ŸImproper installation, adjustment, alteration can cause personal
injury or property damage.
ŸDo not attempt to alter the unit in any manner.
ŸNever replace or substitute the regulator with any regulator other
than the factory-suggested replacement.
ŸDo not store or use gasoline or other flammable vapors or liquids in
the heater unit.
ŸThe whole gas system, hose, regulator, pilot or burner should be
inspected for leaks or damage before
Ÿuse, and at least annually by a qualified service person.
ŸAll leak tests should be done with a soap solution. Never use an
open flame to check for leaks.
ŸDo not use the heater until all connections have been leak tested.
ŸDo not transport heater while it’s operating.
ŸDo not move the heater after it has been turned off until the
temperature has cooled down.
ŸKeep the ventilation opening of the cylinder enclosure free and
clear of debris.
ŸDo not paint the radiant screen, control panel or top canopy
reflector.
ŸControl compartment, burner and circulation air passageways of
the heater must be kept clean.
ŸFrequent cleaning may be required as necessary.
ŸThe LP tank should be turned off when the heater is not in use.
ŸCheck the heater immediately if any of the following occurs:
- The heater does not reach temperature.
- The burner makes popping noise during use (a slight
noise is normal when the burner is extinguished).
- Smell of gas in conjunction with extreme yellow tipping of
the burner flames.
ŸThe LP regulator/hose assembly must be located out of pathways
where people may trip over it or in area where the hose will not be
subject to accidental damage.
ŸAny guard or other protective device removed for servicing the
heater must be replaced before operating the heater.
ŸAdults and children should stay away from high temperature
surface to avoid burns or clothing ignition.
ŸChildren should be carefully supervised when they are in the area
of the heater.
ŸTo change the gas cylinder in a amply ventilated area, away from
any ignition source (candle, cigarettes, other flame producing
appliances, ...);
ŸTo check that the regulator seal is correctly fitted and able to fulfill
its function showed as photo right;
ŸTo not obstruct the ventilation holes of the cylinder housing;
ŸTo close the gas supply at the valve of the gas cylinder or the
regulator after use;
ŸIn the event of gas leakage, the appliance shall not be used or if
alight, the gas supply shall be shut off and the appliance shall be
investigated and rectified before it is used again;
ŸTo check the hose at least once per month, each time the cylinder
is changed,or each time before long time no use. If it shows signs
of cracking, splitting or other deterioration it shall be exchanged for
new hose of the same length and of the equivalent quality;
ŸThe use of this appliance in enclosed areas can be dangerous and
is PROHIBITED;
ŸRead the instructions before using this appliance. The appliance
must be installed in accordance with the instructions and local
regulations.
ŸFor connection of hose and regulator,and connection of regulator
and hose, please refer to photo showed above.
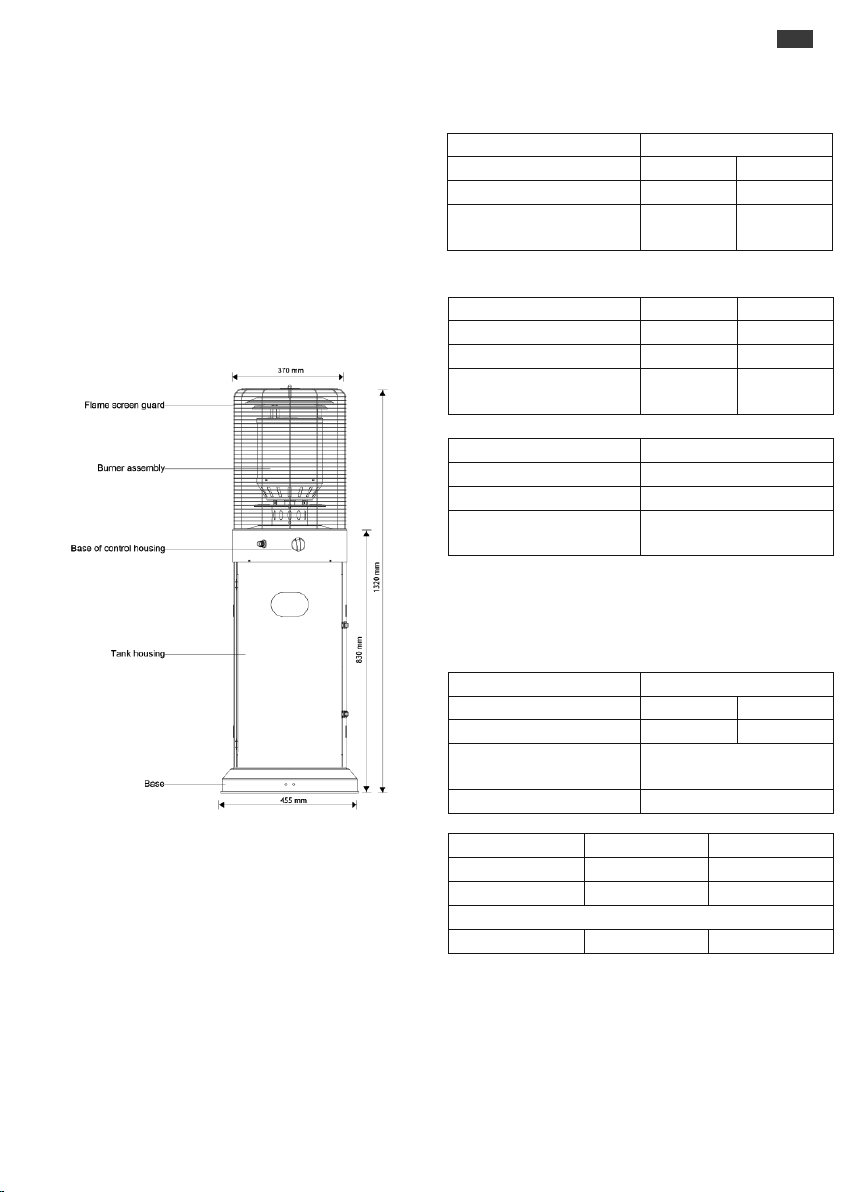
HEATER STAND AND LOCATION
The heater is primarily for outdoor use only.
Always ensure that adequate fresh air ventilation
is provided.
ŸAlways maintain proper clearance to non
protected combustible materials i.e. top 100
cm and sides 100 cm minimum.
ŸHeater must be placed on level firm ground.
ŸNever operate heater in an explosive
atmosphere like in areas where gasoline or
other flammable liquids or vapors are stored.
ŸTo protect heater from strong wind, anchor
the base securely to the ground with screws.
GAS REQUIREMENTS
ŸUse propane, butane or their mixtures gas
only.
ŸThe pressure regulator and hose assembly to
be used must conform to local standard
codes.
Hose/ Regulator connection and
Regulator / Cylinder connection 11
ŸThe installation must conform to local codes, or
in the absence of local codes, with the standard
for the storage and handling of liquid petroleum
gases.
ŸA dented, rusted or damaged tank may be
hazardous and should be checked by your tank
supplier. Never use a tank with a damaged
valve connection.
ŸThe tank must be arranged to provide for vapor
withdrawal from the operating cylinder.
ŸNever connect an unregulated tank to the
heater.
LEAKAGE TEST
Gas connections on the heater are leak tested at
the factory prior to shipment. A complete gas
tightnes scheck must be performed at the
installation site due to possible mishandling in
shipment or excessive pressure being applied to
the heater.
ŸMake a soap solution of one part liquid
detergent and one part water. The soap
solution can be applied with a spray bottle,
brush or rag. Soap bubbles will appear in case
of a leak.
ŸThe heater must be checked with a full cylinder.
ŸMake sure the safety control valve is in the OFF
position.
ŸTurn the gas supply ON.
ŸIn case of a leak, turn off the gas supply. Tighten
any leaking fittings, then turn the gas supply on
and recheck.
ŸNever leak test while smoking.
OPERATION AND STORAGE
1.Turn on the valve on the gas supply cylinder
completely.
2. Press and turn the variable control knob to
PILOT position (counter-clockwise 90 º)
3. Press down the variable control knob and hold
for 60 seconds. While holding down the variable
control knob, press the igniter button several
times until the pilot flame lights. Release the
variable control knob after the pilot flame lights.
Note:
- If a new tank has just been connected, please
allow at least one minute for the air in the gas
pipeline to purge out through the pilot hole.
- When lighting the pilot flame make sure that the
variable control knob is consinuously pressed
down while pressing the igniter button. Variable
control knob can be released after the pilot flame
lights.
- If the pilot flame does not light or it goes out,
repeat step 3.
4. After the pilot flame lights, turn the variable
control knob to maximum position and leave and
leave it there for 5 minutes or more before turning
the knob to desired temperature position.
TO TURN OFF THE HEATER
1. Turn the variable control knob to PILOT position.
2. Press and turn the variable control knob to OFF
position.
3. Turn off the valve on the gas supply cylinder
completely.
Storage:
1. Always close the gas valve of the gas cylinder
after use or in case of a disturbance.
2. Remove the pressure regulator and the hose.
3. Check the tightness of the gas valve and for
damage. If you suspect a damage, have it
changed by your gas dealer.
4. Never store liquid gas cylinder in a sub-terrain, or
at places without adequate ventilation.
12
ENG
A. Construction and characteristics
ŸTransportable terrace/garden heater with
tank housing.
ŸCasing in steel with powder-coating or in
stainless steel.
ŸGas hose connections with metal clamp
(screw caps for Germany).
ŸHeat emission from reflector.
B. Specifications
ŸUse propane,butane or their mixtures gas
only.
ŸMax. wattage: 11000 watts
ŸMin. wattage: 5000 watts
APPLIANCE CATEGORY:
TYPES OF GAS:
GAS PRESSURE:
GAS PRESSURE
OF REGULATOR:
I +(28-30/37)
3
Butane Propane
28-30 mbar 37 mbar
28-30 mbar 37 mbar
APPLIANCE CATEGORY:
TYPES OF GAS:
GAS PRESSURE:
GAS PRESSURE
OF REGULATOR:
I3B/P(30)
Butane, propane or
their mixtures
30 mbar 50 mbar
30 mbar 50 mbar
I3B/P(50)
Butane, propane or
their mixtures
APPLIANCE CATEGORY:
TYPES OF GAS:
GAS PRESSURE:
GAS PRESSURE
OF REGULATOR:
I3B/P(37)
Butane, propane or their mixtures
37 mbar
37 mbar
ŸUsing the proper regulator according to
outlet pressure of regulator as showed as
showed in the table above
Table of injector
ŸThe hose and regulator assembly must
conform to local standard codes.
ŸRegulator outlet pressure should meet the
corresponding appliance category in B.
Specification.
ŸThe appliance requires approved hose in 0.6m
length.
APPLIANCE CATEGORY:
TYPES OF GAS:
GAS PRESSURE:
TOTAL HEAT INPUT:
(Hs): (Qn)
I +(28-30/37)
3
Butane Propane
28-30 mbar 37 mbar
10 kW (G30:728 g/h; G31:715 g/h)
INJECTOR SIZE: 1.75 mm for main burner
0.22 mm for pilot burner
10 kW (G30:800 g/h; G31:786 g/h)
1.75 mm for main burner
0.22 mm for pilot burner
I3B/P(30) I3B/P(50) I3B/P(37)
Butane, propane or their mixtures Butane, propane or their mixtures Butane, propane or their mixtures
30 mbar 50 mbar 37 mbar
1.55 mm for main burner
0.22 mm for pilot burner
1.60 mm for main burner
0.22 mm for pilot burner
ENG
13
CLEANING AND CARE
ŸWipe off powder coated surfaces with soft,
moist rag. Do not clean heater with cleaners
that are combustible or corrosive.
ŸRemove debris from the burner to keep it clean
and safe for use.
ŸCover the burner unit with the optional
protective cover when the heater is not in use.
ŸConsumption:
PARTS AND SPECIFICATIONS

ENG
ASSEMBLY PARTS
Tools needed:
ŸPhilips screwdriver w/ medium blade
ŸSpray bottle of soap solution for leakage test
Parts list:
1. Flame screen guard
2. Burner assembly
3. Cylinder Housing
4. Base
5. Wheel
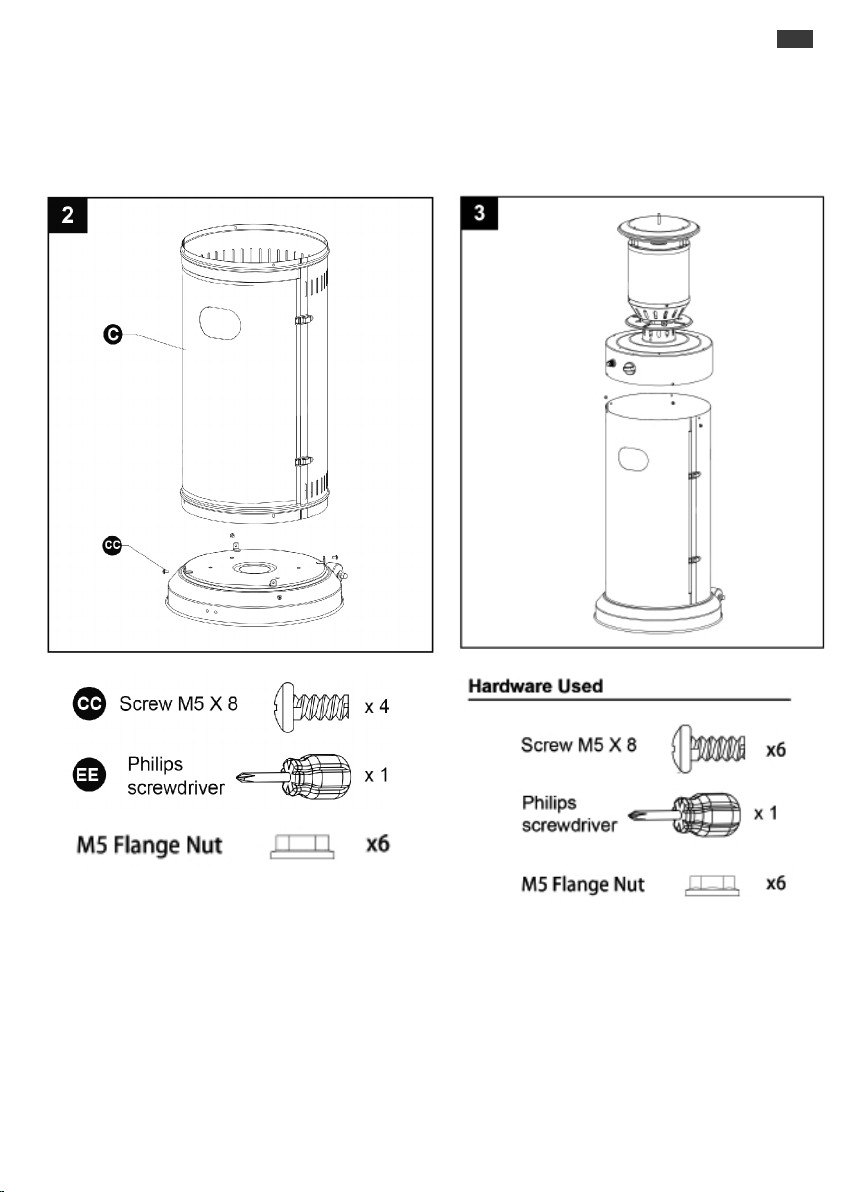
ASSEMBLY PROCEDURES
1. Use 2 pcs M8x16mm bolts and M8 nuts to
connect bracket with wheel to the base.
14
ENG
ASSEMBLY PROCEDURES
2. Use 4 pcs M5x8mm screw to join the tank
housing base and stand.
3. Use the M6 Dome Nut connect the two half
safety guards to burner head.
15

ENG
1. Use the M6 Dome Nut connect the two half
safety guards to burner head.
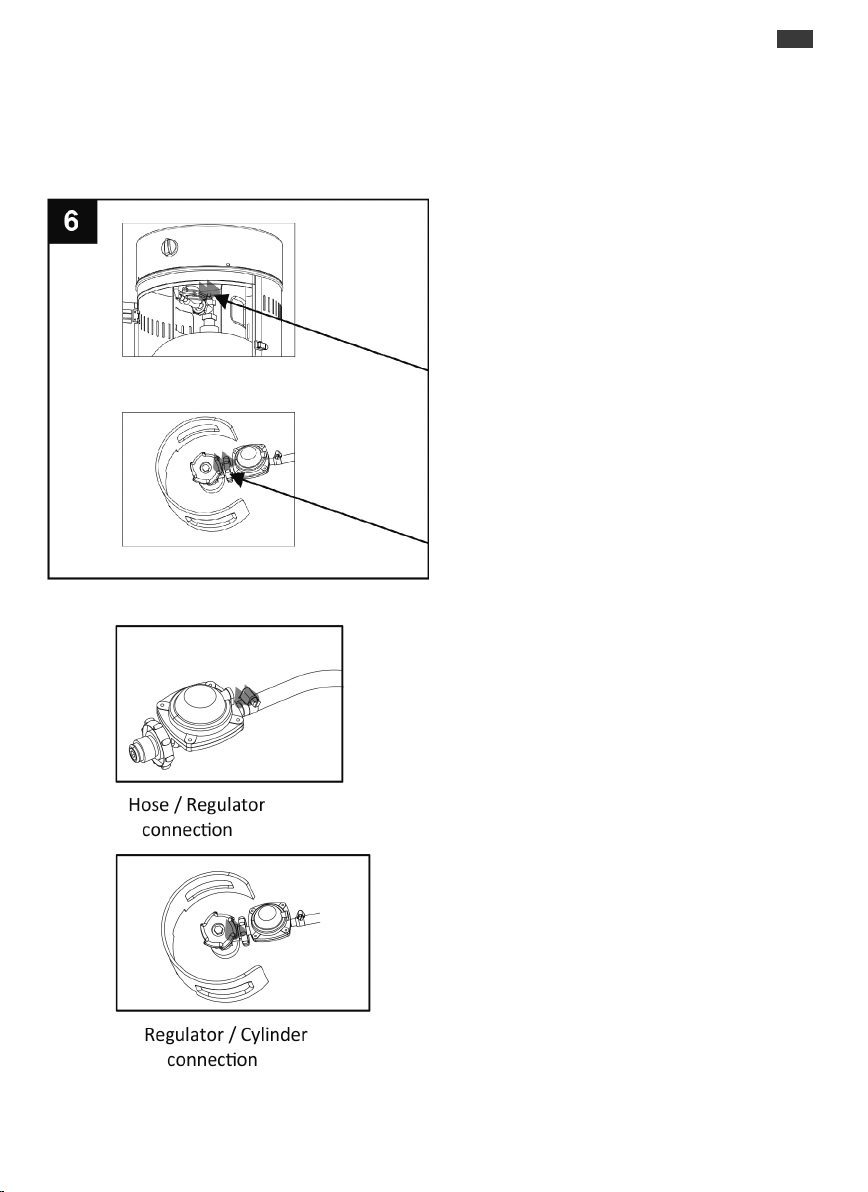
5-1. Open the door of tank housing.
5-2. Attach the hose and regulator assembly to the
gas inlet fitting located inside the tank housing, and
hand tighten, then use a wrench to turn the nut a
further half turn.
5-3. Attach the regulator to the gas cylinder and
tighten with wrench.
5-4. Put the gas cylinder into the tank housing, then
close the door.
WARNING! Ensure the hose does not contact
any high temperature surfaces, or it may melt and
leak causing a fire. After the cylinder is placed
inside the heater, secure the cylinder with block belt
tightly.
The heater must be fixed on a stable and strong
table with a minimum height of 40cm from the floor
level.
6. Leak Check.
WARNING! A leak test must be performed
annually and each time a cylinder is
hooked up or if a part of the gas system is
replaced.
WARNING! Never use an open flame to
check for gas leaks. Be certain no sparks
or open flames are in the area while you
check for leaks. Sparks or open flames
will result in a fire or explosion, damage to
property, serious bodily injury, or death.
Leak testing: must be done before initial use,
annually,and whenever any gas Components
are replaced or serviced. Do not smoke while
performing this test, and remove all sources
of ignition. See Leak Testing Diagram for
areas to check. Turn all burner controls to the
off position. Turn gas supply valve on.
Brush a half-and-half solution of liquid soap
and water onto all joints and connections
of the regulator, hose, manifolds and valves.
(As step 6 where arrows show )
Bubbles will indicate a gas leak. Either tighten
the loose joint or have the part replaced with
one recommended by the Customer Care
department and have the patio heater
inspected by a certified gas installer.
16
ENG
If the leak cannot be stopped, immediately shut off
the gas supply, disconnect it,and have the patio
heater inspected by a certified gas installer or
dealer. Do not use the patio heater until the leak
has been corrected.
Cleaning and maintenance
• Switch off and unplug from the power
supply before cleaning.
• Using a soft, moist cloth, with or without a
mild soap solution, carefully clean the
exterior surface of the product.
• CAUTION: Allow the product to
completely cool before handling or cleaning
it.
• Do not allow water or other liquids to run
into the interior of the product, as this could
create a fire and/or electrical hazard.
• We also recommend the periodic cleaning
of this appliance by lightly running a
vacuum cleaner nozzle over the guards to
remove any dust or dirt that may have
accumulated inside or on the unit.
CAUTION: Do not use harsh detergents,
chemical cleaners or solvents as they may
damage the surface finish of the plastic
components.
Indoor use only
Environment
Meaning of crossed –out wheeled dustbin:
Do not dispose of electrical appliances as
unsorted municipal waste, use separate
collection facilities.
Contact your local government for
information regarding the collection
systems available.
If electrical appliances are disposed of in
landfills or dumps, hazardous substances
can leak into the groundwater and get into
the food chain, damaging your health and
well-being.d seriously compromise the
appliance's safety and render the warranty
invalid.
17

PROBLEMS CHECK LIST
PROBLEM
Pilot will not light
PROBABLE CAUSE
Gas valve may be OFF
Tank fuel empty
Opening blocked
Air in supply system
Loose connections
SOLUTION
Turn the gas valve ON
Refill LPG tank
Clean or replace opening
Purge air from lines
Check all fittings
18
Pilot will not stay on Debris around pilot
Loose connections
Thermocouple bad
Gas leak in line
Lack of fuel pressure
Clean dirty area
Tighten connections
Replace thermocouple
Check connections
Tank near empty. Refill LPG
tank.
Burner will not light Pressure is low
Opening blocked
Control not ON
Thermocouple bad
Pilot light assembly bent
Not in correct location
Tank near empty. Refill LPG tank.
Remove and clean
Turn valve to ON
Replace thermocouple
Place pilot properly
Position properly and retry
If the appliance is in case of any defaults or problems of assembly or use,please don’t try to modify
it by yourself,contact your supplier or distributor to solve it.
ENG

6
www.bastilipo.com
Compañía Pineda Álvarez S.L.
P.I. Sta Isabel c/Alicatadores, 23
Población: El Viso del Alcor
Provincia: Sevilla
Código Postal: 41520
Tel. +34 955 741 038
Fax. +34 955 741 254
Móvil +34 615 264 338
Table of contents
Languages:


