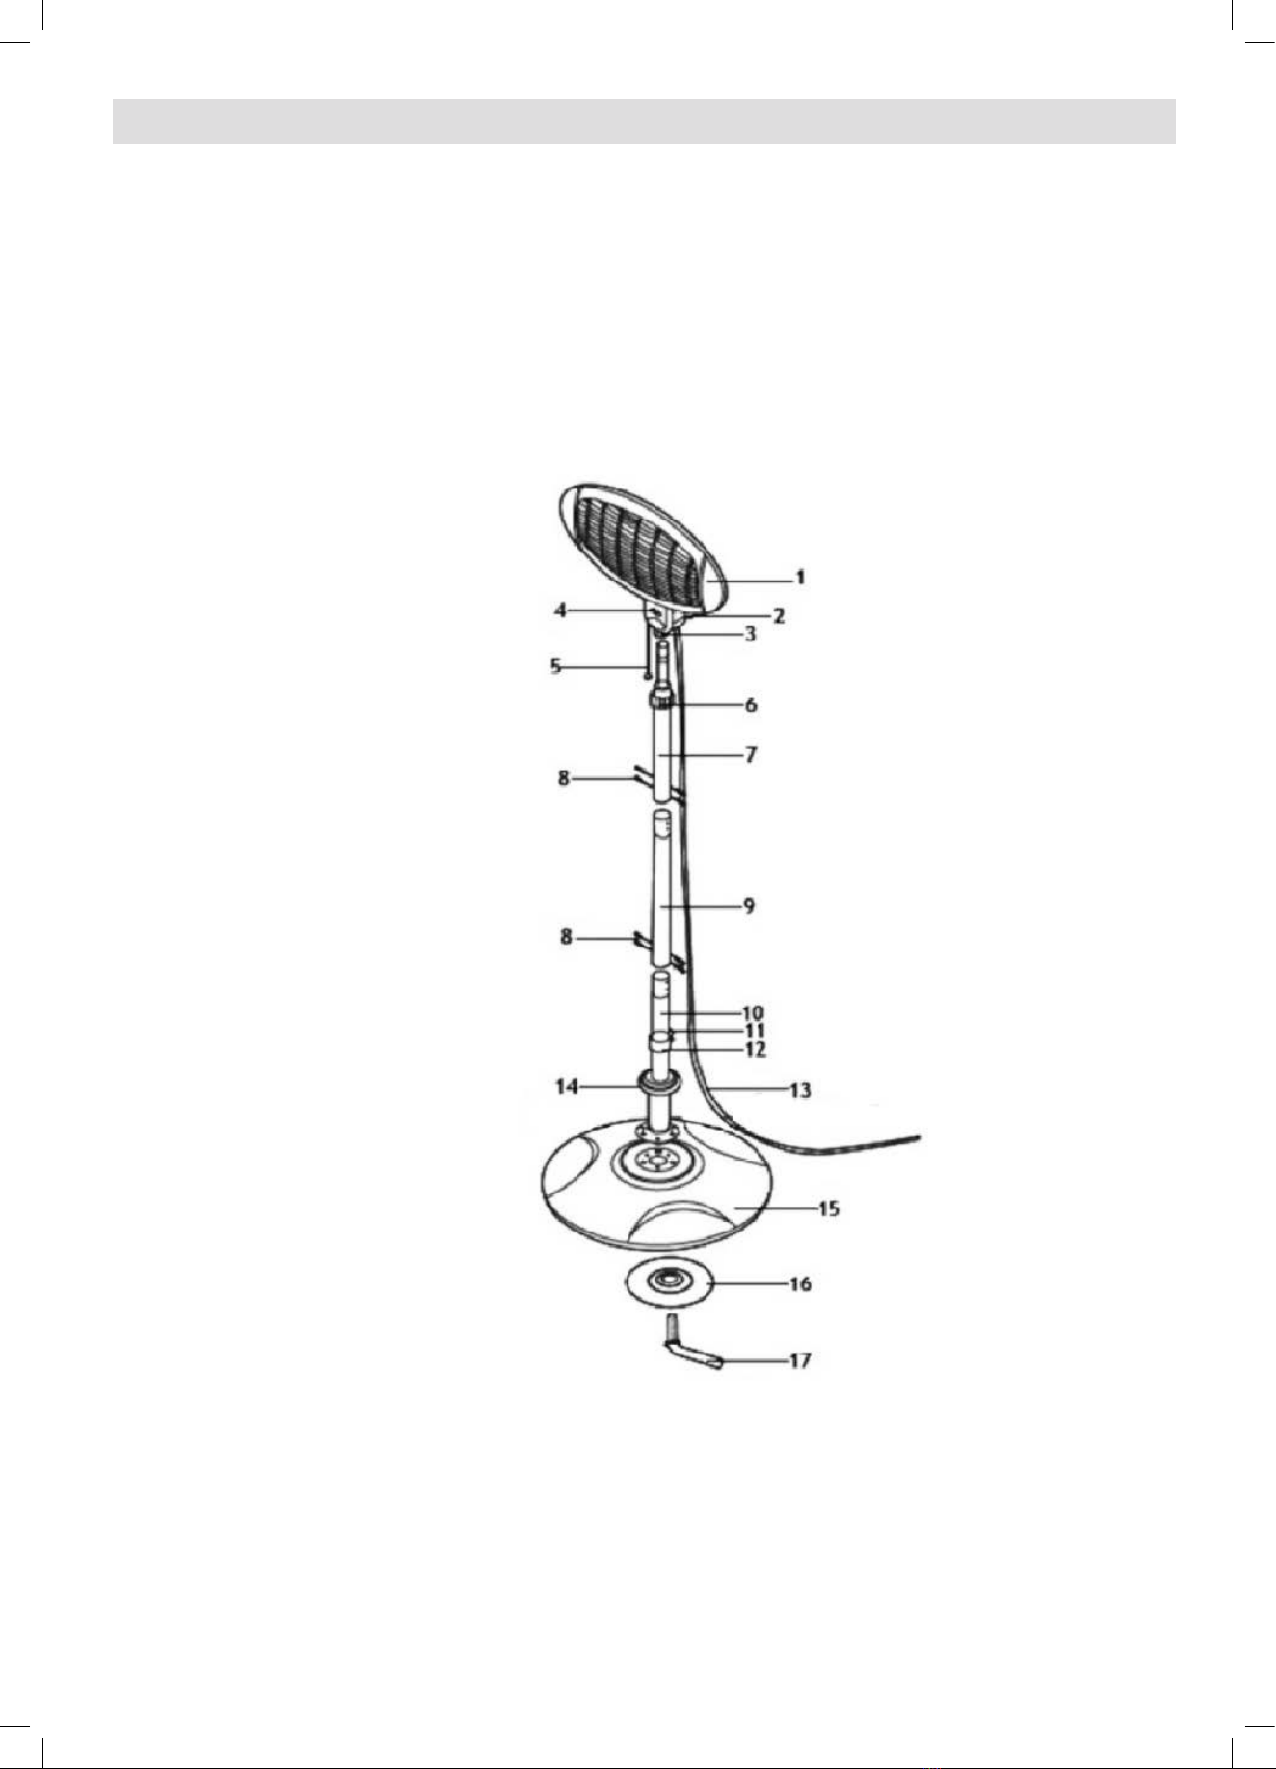
tepro 2140UK User manual

Bitte aufklappen
01.04.2010 13:38:13 Uhr
User Manual
PATIO HEATER
WITH QUARTZ HEATING ELEMENT
Version 2022
Item no. 2140UK
P21110_TEPRO_2140UK_Standheizer_GB_210909.indd 1 13/9/2021 3:49 PM

2
P21110_TEPRO_2140UK_Standheizer_GB_210909.indd 2 13/9/2021 3:49 PM

Contents
Before using the device ....................................................................................................................... 4
Delivery contents.................................................................................................................................. 4
Intended use.......................................................................................................................................... 4
For your safety ................................................................................................................................. 4 - 6
Signal symbols .................................................................................................................................. 4
General safety instructions................................................................................................................ 4
Safety instructions........................................................................................................................ 4 - 5
Before first use...................................................................................................................................... 6
Assembly .......................................................................................................................................... 6 - 7
Preparation ........................................................................................................................................ 6
Required tools ................................................................................................................................... 6
Assembling the patio heater......................................................................................................... 6 - 7
Setting up the patio heater .................................................................................................................. 8
Selecting the heat level .........................................................................................................................8
Cleaning and maintenance .................................................................................................................. 8
Technical data ....................................................................................................................................... 8
Disposal ..................................................................................................................................................8
Declaration of conformity.................................................................................................................... 8
Service .................................................................................................................................................. 8
Distributor.............................................................................................................................................. 8
P21110_TEPRO_2140UK_Standheizer_GB_210909.indd 3 13/9/2021 3:49 PM

4
Before using the product
After unpacking and before use, check the product for damages.
Should the product be damaged, do not use it and contact your
retailer.
This user manual is based on the norms and regulations valid
in the European Union. Should you be located outside of the
EU, please follow all guidelines and legislation in your country
of residence!
Read the safety instructions and instructions for use
thoroughly before using the product. Doing so will
allow you to use all the product‘s functions safely and
reliably.
Keep the operating instructions and give them to any third party
who might own the patio heater after you.
Delivery contents
1 Heater housing
2 Adjustment knob
3 Casing
4 Heat level indicator
5 ON/OFF switch
6 Height adjustment knob
7 Upper tube (with extension part)
8 Screw 8pcs (M5x8)
9 Middle tube
10 Lower tube
11 Power cable fastener
12 Screw 1pc (M5x15)
13 Power cable
14 Footstand screw cover
15 Footstand
16 Washer
17 Screw
Please check whether the scope of delivery is complete and
undamaged. Contact your retailer if a piece is missing or damaged.
Complaints regarding damaged or missing pieces made after
assembly is completed or begun will not be recognized.
Intended use
This product can be used both indoors and outdoors.
Only use the item as described in this operating manual. All
other uses are considered improper and can lead to material
damage or even to personal injuries.
The manufacturer accepts no liability for damages caused by
improper use.
This device is designed exclusively for private (i.e. non-commer-
cial) use.
For your safety
Signal symbols
Danger High risk!
Disregarding this warning can lead to danger to life
and limb.
Attention Medium risk!
Disregarding this warning can lead to property dam-
age.
Caution Low risk!
Facts you should know when using the product.
GENERAL
SAFETY INSTRUCTIONS
-
to be observed in each use
–Read the instructions before operation.
–The instructions are to be kept for future use.
–CAUTION! Accessible parts can be very hot. Keep chil-
dren away.
–Do not move the device when it is in operation.
–Do not use the device in:
–Tents, recreational vehicles such as caravans / mobiles
and boats etc.
Safety instructions
Danger Risk of electric shock !
This device is an electrical appliance for domestic
use and is not designed for industrial or professional
use.
– Before using the device for the first time, please check that
the type of current and the mains voltage match the informa-
tion on the rating plate.
– This device can be used both indoors and outdoors. How-
ever, the socket must be located indoors. The device must
not be permanently attached to the ground outdoors.
– Before inserting the plug into the mains socket, make sure
that the device is switched off.
– Do not use the device if the device or the power cord is dam-
aged or if it has been dropped.
–Only connect the electric patio heater to a socket with
alternating current and an earth contact, with a voltage of
230V/50Hz. The minimum protection on the socket should be 10
amperes.
–Additional protection is afforded by the installation in your
home of a residual current device with a nominal release cur-
rent of no more than 30 mA. Seek advice from your electri-
cian.
– If the device appears to be damaged or malfunctioning, the
mains plug must be pulled out of the socket immediately.
– Improper handling when electric current is involved can have
lethal consequences.
– Do not pull the mains plug out of the socket by the cable.
– Regularly check the mains plug and mains cable for damage.
– Do not transport the device while it is in use.
– Place the device on a flat, heat-resistant surface. The device
is equipped with a protective function that switches it off if it is
not in an upright position.
P21110_TEPRO_2140UK_Standheizer_GB_210909.indd 4 13/9/2021 3:49 PM

5
– To ensure a stable installation, always place the device on a
firm and level surface that can reliably support the weight of
the device.
– Keep flammable materials such as textiles away.
– Operate the device in a secure area, sufficiently distant from
playing children or wandering pets.
– The device is splash-proof (IPX4), but should not be placed
near water or other liquids, or in locations where water and
other liquids could collect.
– If it starts raining, immediately unplug the mains plug and
handling the device carefully, place it in a dry place.
– Never attempt to repair the device yourself. In case of mal-
function, have the device repaired by qualified experts only.
Do not open the housing yourself under any circumstances.
There is a risk of electric shock!
– If the mains cable of this device is damaged, it must be re-
placed by the manufacturer or its service department in order
to avoid dangers.
– Avoid damage to the mains plug through squeezing, bending,
or rubbing on sharp corners, and keep it away from hot sur-
faces.
– When using an extension cord, it must be suitable for the cor-
responding power requirements.
– Lay the cable, as well as any extension cable that may be
needed, in such a way that unintentional pulling or tripping over
it is not possible.
– To avoid electric shock, never allow the device, cable or plug
to come into contact with water or other liquids.
– Never touch the device after it has fallen into water. Switch
off the power supply and pull out the power plug. Do not use
the device again until it has been checked and approved by a
qualified electrician.
– Never touch the thermostat or power plug with wet or damp
hands.
– Do not insert any objects into the inside of the housing.
– If the device is not in use, is being cleaned, is overturned or
does not work properly, switch the device off and unplug the
power cord.
– Do not use this device in the vicinity of a bathtub, shower, or a
swimming pool.
– Use the device only in moderate latitudes. Tropics and par-
ticularly humid climates should be avoided.
– The device must not be installed directly below a wall socket.
– Do not use this device with a timer switch or a separate remote
control system.
Danger Fire hazard!
Parts of the device become very hot during operation
and can ignite fires.
– Always have a fire extinguisher and a first aid kit ready and be
prepared in the event of an accident or fire.
– Place the device on a flat, horizontal, safe, heat-resistant and
clean surface.
– Set up the device so that it is at least 1 m from walls, ceilings
and easily flammable materials such as garden furniture.
– Do not transport the device during operation.
– Only transport the device when it has cooled down.
– Before each change of location, the device must be switched
off and the power plug pulled out.
– Do not leave the device unattended during operation.
– Do not use sprays near the device.
Danger Risk of burning!
Do not cover the ventilation openings.
Under no circumstances may the device be covered
with clothing, blankets, insulating or similar material.
Danger Risk of burning and accidents!
This device is not intended for use by persons (incl.
children) with limited physical, sensory, or mental
capacities or lacking experience and/or lacking
knowledge.
– Such persons must be informed about the dangers of the de-
vice and supervised by a person responsible for their safety.
– All modifications to the product present a great safety risk and
are prohibited. Do not tamper with the device yourself. In case
of damages, repairs or other problems with the grill, contact
our service point or a professional in your area.
– Keep children and pets away from the device.
The device becomes very hot during operation, so that any con-
tact with it can lead to extremely severe burns.
– Keep away from hot parts as any contact can cause severe
burns.
– Note that various components can store heat and so can still
lead to burns even after the device has been used.
Danger Hazards for children!
Children may become entangled in packaging foil
and suffocate.
– Never let children play with packaging material.
Danger Risk of injury!
Do not set up the device near entryways or heavily
trafficked zones.
– Always be attentive and aware of what you are doing. Do not
use the product when you are lacking in concentration or are
tired and/or under the influence of drugs, alcohol or medica-
tion. One moment of inattention while using the product is
enough to lead to severe injury.
– In strong winds, precautions must be taken to prevent the
device from tipping over.
Attention Risk of damage!
Do not use any strong or abrasive solvents or scour-
ing pads as such products attack the grill‘s surfaces
and leave permanent markings.
– Do not expose the device to adverse weather conditions such
as rain, wind or snow. The device should be kept indoors
overnight.
Danger Risk of burning and accidents!
Do not make any changes to the device. Use only
original accessories.
– Any change to the device leads to the immediate expiry of the
guarantee and can also be dangerous!
Danger Risk of explosion!
Do not use the device in an explosive environment in
which there are substances such as flammable liq-
uids, gases and, in particular, paint and dust mist.
These substances can ignite from hot surfaces on the
device.
P21110_TEPRO_2140UK_Standheizer_GB_210909.indd 5 13/9/2021 3:49 PM

6
Before first use
Check whether the scope of delivery is complete and in perfect
condition.
Contact your seller immediately if the scope of delivery is incom-
plete or defective.
Do not operate the device if it is defective.
Assembley
Preparation
Danger Risk of injury!
Failure to follow these instructions can lead to prob-
lems and risks while using the grill.
– Follow each assembly step described here.
Required tools
1 x Phillips screwdriver
Raise the footstand screw cover (14).
Connect the lower tube (10) to the footstand, by installing the
washer (16) on the footstand and then tightening the screw
(17).
Replace the screw cover (14) to conceal the screws.
Step 1
Assembling the patio heater
P21110_TEPRO_2140UK_Standheizer_GB_210909.indd 6 13/9/2021 3:49 PM

7
Set the heater housing (1) to the desired angle between 0° and
45°.
Warning! Never adjust the angle while the heater is in opera-
tion.
The patio heater is now fully assembled and can, if necessary,
be dismantled in the reverse order.
Important: All screws must be tightened securely
Step 2
Attach the power cable fastener (11) to the lower tube (10), and
use the screw (12) to fasten it in the desired position.
Loosen the screws (8) on the middle tube (9).
Use the 4 screws (8) to firmly screw the middle tube (9) to the
lower tube (10).
Step 3
Loosen the screws (8) on the upper tube (7).
Use the 4 screws (8) to firmly screw the upper tube (7) to the
middle tube (9) .
Step 4
Pull the extension out from the upper tube (7) and use the
height adjustment knob (6) to fix it to your desired height.
Insert the upper tube (7) into the casing (3) of the heater hou-
sing (1).
Tighten the adjustment knob (2) to secure the heater housing
(1) on the tube.
Now place the power cable (13) in the power cable fastener (11) .
Step 5
P21110_TEPRO_2140UK_Standheizer_GB_210909.indd 7 13/9/2021 3:49 PM

8
Setting up the patio heater
Attention Risk of damage!
During use, the screws can loosen slowly and impair
the grill‘s stability.
– Check that all screws are tightened before use. If necessary,
tighten all screws to guarantee stability.
– Place the device on a flat, heat-resistant surface. The device
is equipped with a protective function that switches it off if it is
not in an upright position.
– To ensure a stable installation, always place the device on a
firm and level surface that can reliably support the weight of
the device.
Selecting the heat level
Please note: A slight vibration when switching the appliance on
and off is normal and only takes a few seconds. Before con-
necting the appliance to the mains supply, check that the mains
voltage matches the voltage specified on the appliance rating
plate. An incorrect connection may cause permanent damage
and injuries.
The appliance is turned on by means of a cord-operated switch,
which is pulled in sequence to obtain the required heat level.
The wattage output is displayed on the heat level indicator (4):
0 = Off
1 = 650 W
2 = 1350 W
3 = 2000 W
Danger Risk of injury
The heater housing remains hot for some time even af-
ter the device has been switched off. Always allow the
device to cool down before adjusting or relocating it.
Cleaning and Maintenance
Danger Risk of burning!
Let the patio heater cool down completely before
cleaning.
Attention Risk of damage!
Do not use any strong or grinding solvents or abra-
sive pads, since these can attack the surfaces and
leave behind scrape marks.
– Do not use abrasive cleaners, scouring solutions or cleaning
agents such as kerosene, thinner, gasoline or the like.
•Carefully clean the device with a damp, soft cloth, with or
without soapy water.
•Use a soft, clean cloth for drying.
•If you are not going to use the device for a long period of time,
store it in a dry, dust-free place.
•You can store the device partially dismantled or in an
assembled state. It is only important that you store the
device in a dry and safe place. If you store the device in a
disassembled state, it is recommended that you use the
original packaging.
Technical Data
Product: Item. No. 2140UK
Patio heater with
quartz heating element
Weight: approx. 8.5 kg
Dimensions: approx. 47 x 47 x 205 cm
Hight: Adjustable from
120 cm to 205 cm
Operating voltage: 220V~240V 50Hz
Heating capacity: max. 2 kW
Max. power consumption: 2000 W
Protection type: IPX4
Heat levels: 0 – Off
1 – Low (650 W)
2 – Medium (1350 W)
3 – High (2000 W)
Cable lenght: approx. 1.6 m
Disposal
The packaging is made from environmentally friendly
materials, which you can dispose of at your local recy-
cling points.
Do not under any circumstances dispose of the device
in normal household waste! Dispose of it at an approved
disposal business or at your community disposal facility.
Respect the currently valid regulations. If in doubt, get in
touch with your disposal facility.
Declaration of conformity
This product fulfills the valid European and national directives.
This is confirmed by the CE (corresponding declarations are
lodged with the manufacturer) and the UKCA mark.
Service
For inquiries about spare parts or technical questions, please
contact your contract partner.
Subject to technical modifications and typographical errors.
Distributer
TEST RITE (UK) Ltd, Unit E,The Foundry, London Road,
Kings Worthy, Winchester, Hampshire, SO23 7QN,
United Kingdom
Web: www.tepro-uk.com
P21110_TEPRO_2140UK_Standheizer_GB_210909.indd 8 13/9/2021 3:49 PM

9
P21110_TEPRO_2140UK_Standheizer_GB_210909.indd 9 13/9/2021 3:49 PM

Bitte aufklappen
01.04.2010 13:38:13 Uhr
P21110_TEPRO_2140UK_Standheizer_GB_210909.indd 10 13/9/2021 3:49 PM
Table of contents
Other tepro Patio Heater manuals