Bath Royale MasterSuite BR283 Round User manual

INSTALLATION INSTRUCTIONS
Visit us at: BathRoyale.com
Model: BR283 Round / BR237 Elongated
MasterSuite® Toilet Seat with
Slow Close & Quick Release

Care & Cleaning
Clean your seat using a soft cloth and mild dishwashing liquid diluted with water. Diluted
multi-surface cleaners (Mr. Clean®, Pine-Sol®, etc.) or chlorine-free disinfecting wipes
(Lysol®, Clorox®, etc.) can be used. Rinse your seat with a damp cloth and dry with a soft towel.
2
-
WARRANTY
®
bathroyale.com
8
8
IMPORTANT
• Do Not use brushes or abrasive cleaners
(Comet®, Soft Scrub®, etc.) which can scratch or
dull the surface.
• Do Not use aerosols, acid, rubbing alcohol,
harsh chemicals or cleaners containing chlorine.
Do not mix cleaning chemicals.
• Do Not submerge the seat in water.
• Do Not spray or saturate the mounting bases or
hinges. Doing so may cause the mounting bases
to slip and your seat to slide out of position. If
using a pump spray, spray the cloth, then wipe.
MasterSuite®/ Eurocast®Seats
MasterSuite seats are made of Eurocast, a high-
tech polymer that is extremely durable and
scratch resistant. Eurocast is cooler to touch,
more porous and breathes better against the skin
than other toilet seat materials. To prevent water
spots or staining, immediately wipe off colored
liquids (urine, blood, diarrhea, etc.) including the
underside of the seat where maintenance is often
neglected.

Questions? Visit BathRoyale.com or call (704) 589-1009 3
Model: BR283 Round / BR237 Elongated
MasterSuite® Toilet Seat with
Slow Close & Quick Release
Tools Required:
Phillips Head Screwdriver
Tape Measure or Ruler
Installation Instructions
Installation is not difcult, but it is VERY DIFFERENT from other seats. Please follow these
instructions step-by-step. (Video available at BathRoyale.com).
MISSING PARTS? Please do not return your seat. Call (704) 589-1009 or email
info@BathRoyale.com for replacement parts.
Parts List
NOTE: Toilet bowls without access to nuts under seat require top mount anchors sold
separately at BathRoyale.com
Toilet seat with lid (1)
Note: Seat must be installed for Slow Close
to work.
Mounting base covers (2)
Note: Stainless steel covers are available
at BathRoyale.com
Stainless steel screws (2)
Stainless steel washers (2)
Mounting bases with stainless steel post
and silicone rubber seal on bottom (2)
Clear plastic ribbed inserts (2)
Black rubber washers (2)
White plastic washers (2)
White wing nuts (2)

Questions? Visit BathRoyale.com or call (704) 589-1009
Installation Instructions
4
Important: Mounting surface of toilet must be at, clean and dry with no chemical residue. To prepare
mounting surface, we recommend using Windex® (or any glass cleaner) around the mounting holes of
the toilet to get the mounting surface squeaky clean.
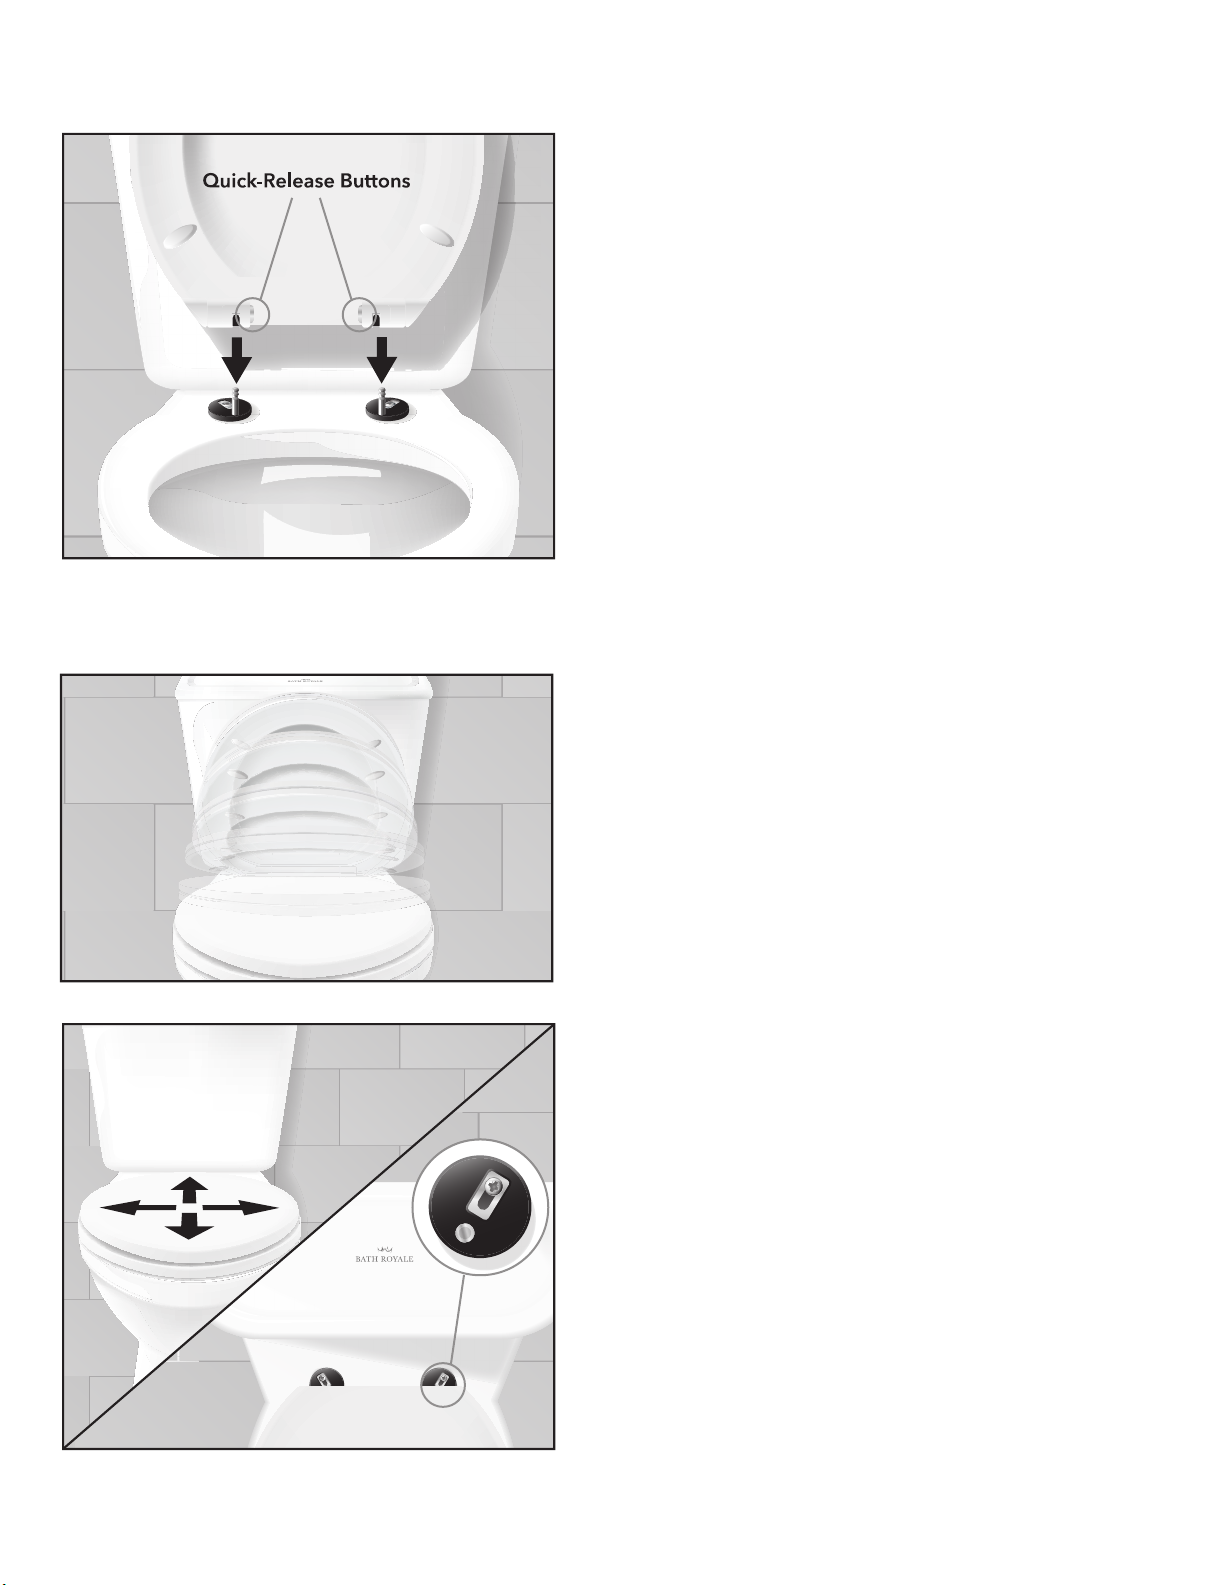
1. Install mounting bases on toilet bowl.
a. Push clear plastic ribbed inserts into the holes in the
toilet and place mounting bases over holes with
posts facing front of bowl.
b. Place stainless steel washers in mounting base slots
and insert screws through the washers, mounting
bases and clear ribbed inserts.
c. Stack washers on wing nuts and thread on to
screws. Note: The black rubber washer goes on
rst, then the white washer and nally, the wing nut.
Tip: Mounting bases rotate 360 degrees allowing
seat to be adjusted and t non-standard hole
spacings (4 ½ to 6 ½ inches).
2. Thread wing nuts all the way up the screw.
Tip: Place thumb or nger on the screw head to
keep it from turning.
Do not completely tighten the wing nuts. The
mounting bases must be able to move so the seat
can be attached (Step 4) and adjusted (Step 6).
1.
2.
3. 3. Adjust mounting bases.
a. Rotate mounting bases so the posts face forward
(closest to the front of the bowl, not tank).
b. Using a tape measure or ruler, adjust the
mounting bases so the posts are 4 ¾ inches apart
(this is the distance between the mounting holes
in the seat).
Do not completely tighten the wing nuts.
Questions? Visit BathRoyale.com or call (704) 589-1009
Installation Instructions
5
5. Close seat and cover.
Tap forward and let the seat and lid close by
themselves.
Tip: It is OK to push the seat and lid closed. Unlike
other Slow-Close seats, Bath Royale® seats can
be force-closed repeatedly, without damaging
the Slow-Close mechanism.
Closing too slow? Push it closed.
6. Adjust seat.
If mounting bases are tilting forward, push them
down so they sit at on bowl. With the lid closed,
align seat with bowl by moving the seat and
mounting bases together.
Tip: Lift back of seat to unstick mounting bases
from bowl (loosen screws if necessary). We
recommend installing the seat overhanging
the front of the bowl by ¼ inch, so the seat
can be lifted more easily without touching the
toilet bowl.
Tip: In most cases, screw heads will be towards
back of screw slot (see drawing). Don’t worry
if screw positions don’t match on both sides.
Hole positions can vary slightly on all toilets.
5.
6.
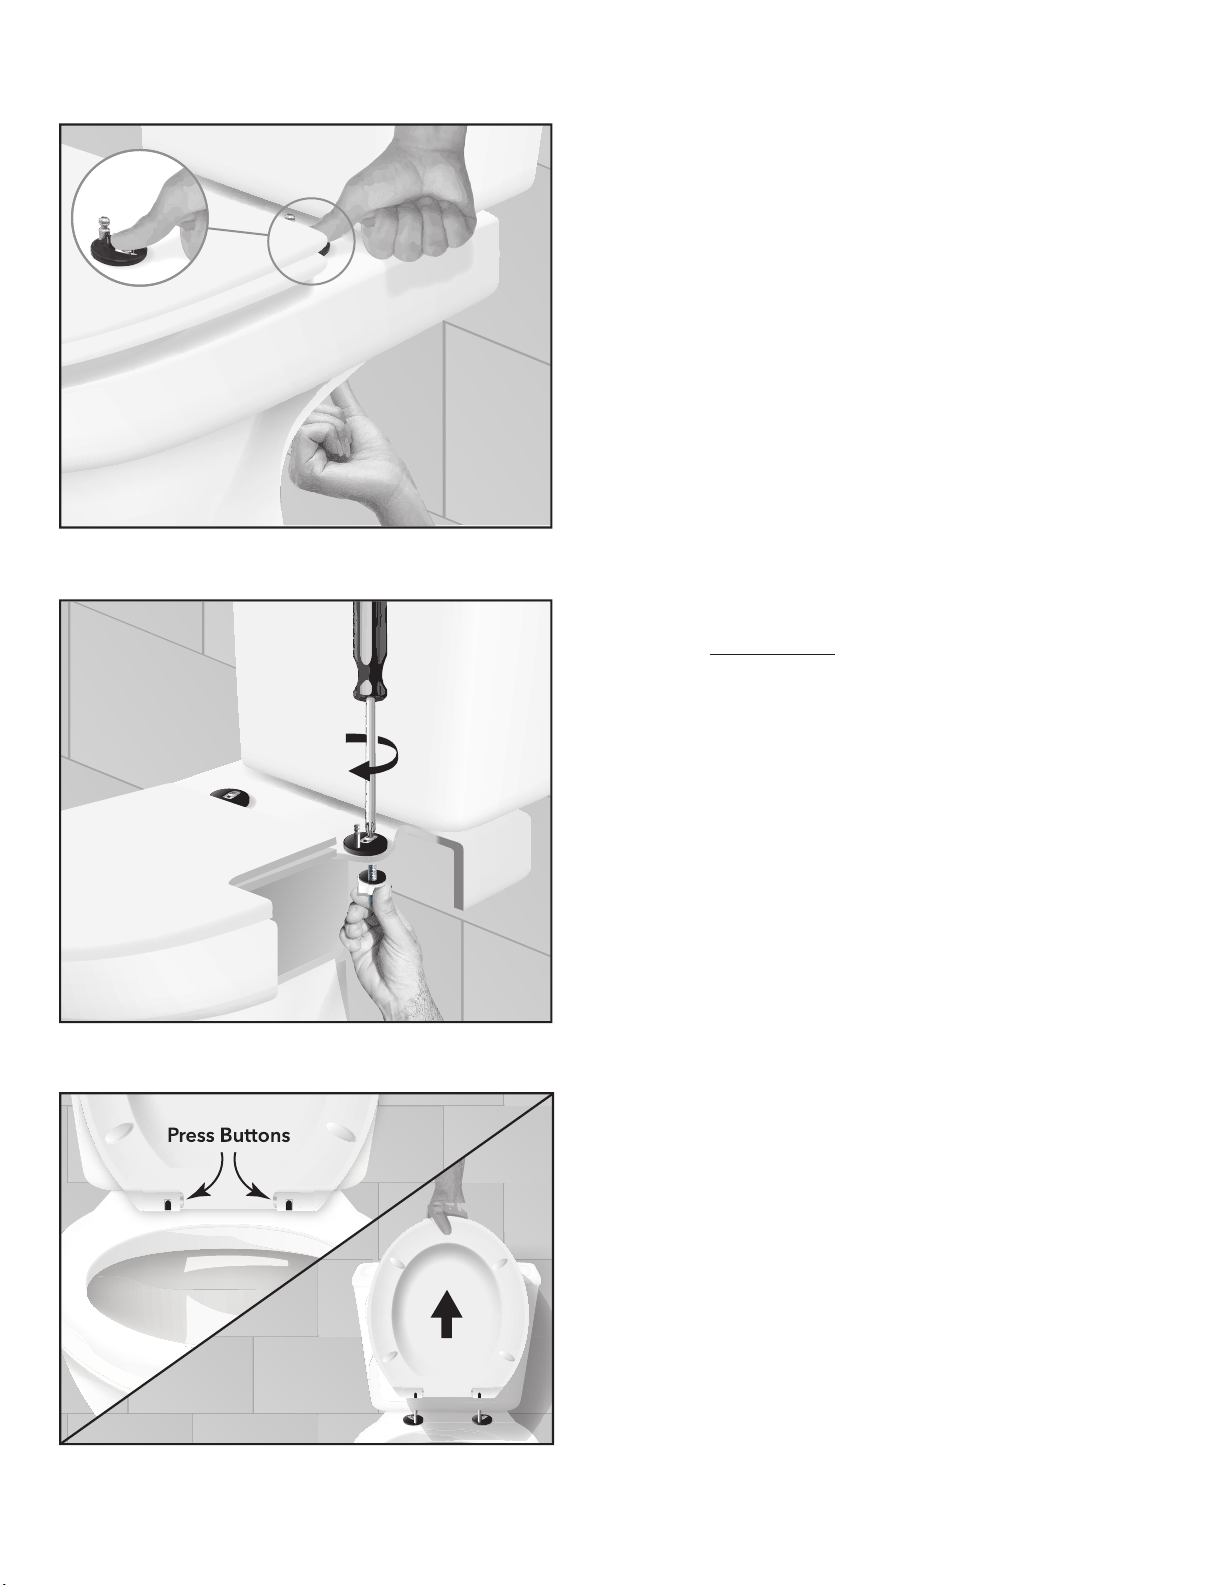
4. 4. Attach seat (Quick-Release mechanism).
Carefully lower seat (holes) onto mounting posts.
NOTE: If posts are not perfectly aligned, move seat
or mounting base(s) so both posts can be inserted
at the same time (lift mounting bases to unstick from
the bowl, if necessary). As the seat lowers onto the
posts, you will hear “click(s)” as the seat locks onto
the posts.
Tip: If one post locks before the other post is
inserted, don’t worry or try to unlock it, move
the seat and/or mounting bases so the other
post can be inserted.
NOTE: Quick Release is “unlocked” by pressing
the buttons (see diagram 4). If a button is pressed
before attaching the seat, don’t worry, it will pop
“out” (lock) when the seat is attached.
Questions? Visit BathRoyale.com or call (704) 589-1009
Installation Instructions
6
7. Hand-tighten wing nuts.
Put nger or thumb on screw head and push down
to prevent screw from turning.
Tip: Be sure the seat does not move.
8. Double check seat alignment and tighten
screws very rmly.
Important: To tighten properly, it is necessary
to hold wing nuts beneath while tightening with
screwdriver.
Tip: If screw heads are obstructed by the seat,
remove seat for nal tightening (see next
step).
9. Remove seat using Quick Release.
a. With seat and cover open, press 1 button, then
the other. (Pressing the buttons ‘unlocks’ the
seat).
b. Lift straight up with one or both hands. (You will
hear ‘clicks’ as the seat slips off the posts very
easily).
Tip: 1. If difcult, re-check post alignment.
2. Mounting surface must be level, so
mounting bases lay at and mounting posts
point straight up.
8.
7.
9a.
9b.

Questions? Visit BathRoyale.com or call (704) 589-1009
Installation Instructions
7
10. Place mounting base covers on mounting
bases.
Tip: If you prefer stainless steel covers, brushed
nickel and polished chrome nishes are sold
separately at BathRoyale.com.
11. Replace seat.
Align holes with mounting posts and carefully
lower seat back into place. You will hear ‘clicks’ as
the seat locks onto posts.
NOTE: Do not push hard or force seat onto posts.
(If difcult, re-check alignment of posts and holes).
Tip: Practice removing seat (Step 9) and replacing
seat (Step 11).
CARE & CLEANING TIP: DO NOT spray or saturate the mounting bases. (Doing so may
cause seat to move out of position). Spray your cloth rst, then wipe.
Troubleshooting Tips:
a. Rear bumpers are not supposed to touch the bowl until person is seated.
b. If seat or lid do not stay open, adjust the seat forward (see Step 6). Increasing the length also
increases layback angle. Make sure tank lid is pushed back as far as possible.
c. See more tips and installation video at BathRoyale.com.
11.
10.
88530-D
12.22.2020 © 2020 Marcobelle Company. All Rights Reserved
This manual suits for next models
1
Table of contents
Other Bath Royale Bathroom Fixture manuals

Popular Bathroom Fixture manuals by other brands

Kohler
Kohler Mira Sport Max J03G Installation and user guide

Moen
Moen 186117 Series installation guide

Hans Grohe
Hans Grohe Raindance Showerpipe 27235000 Instructions for use/assembly instructions

Signature Hardware
Signature Hardware ROUND SWIVEL BODY SPRAY 948942 Install

fine fixtures
fine fixtures AC3TH installation manual

LIXIL
LIXIL HP50 Series quick start guide


