BATHCO Vanity User manual

Contents
Getting started 01
Required tools & materials 01
Vanity installation 01
Hinge adjustment 02
Soft close drawers 03
Trouble shooting 04
Plumbing recommendations 04
Cleaning & maintenance 04
Bath Co Warranty 05
Vanity
Installation
Instructions

1
Vanity Installation
PLEASE READ CAREFULLY — IT IS RECOMMENDED THAT A
QUALIFIED, LICENSED TRADES PERSON INSTALL YOUR UNIT.
ENSURE INSTRUCTIONS ARE PASSED TO HOMEOWNER.
01. Prior to installation it is important to inspect the unit to ensure
no damage has occurred in transit. If damage has occurred, or a
visible defect exists, do not proceed with installation and advise
supplier immediately.
Note: Manufacturer will not be liable for any installation, removal
or re-decorating costs. The warranty will be null and void if
damage occurred during or after installation.
02. Check the wall is straight, (not bowed or twisted). Ensure unit
is square against the wall before securing. Door and drawer
alignment could be affected otherwise.
03. For wall hung units: Decide appropriate height for top of unit,
about 900mm. Measure distance from top of unit to top of solid
back allowing for the china top. Mark this distance down from
total height allowed for unit, e.g. if distance from top to solid back
is X mm, measure X mm down from the recommended 900mm
(refer to image 03).
For Tall Cabinets with a hanging rail, measure from top of unit to
bottom of fixing rail. Mark distance on wall as mentioned for solid
back units. Fix bottom of hanging rail above mark.
04. Drill holes for pipes in base/rear of unit with appropriate size
hole saws.
05. Position unit over pipes in correct position. Check level with
spirit level.
03
X
Getting Started
All goods must be checked prior to installation. If defects are found
due to manufacturing faults then goods MUST NOT be installed.
The merchant must inform the manufacturer.
If there is a proven manufacturing defect i.e. outside of tolerance
and the installation is carried out then, the manufacturer will replace
the item. However, the installation costs will be the responsibility
of the installer.
When installing the cabinets – the drawers and doors may need to be
adjusted, due to movement throughout carrying the goods. Please view
the instructions below on hinge adjustment and drawer adjustment.
Any wall to which product is fixed must be of suitable construction to
support that product’s weight.
Required Tools
& Materials
Spirit level
Tape measure
Screwdriver & screws
Caulking gun
Pencil
Drill & bits
Masking tape
Silicone Sealant
Cleaning materials
2
It is the responsibility of the licensed installer to make any adjustments to align doors and drawers after installation
if required.
Note: All fittings have been factory set and should not need adjustment. Check that the unit has not been twisted
during installation before making adjustments. Drawer fronts on some models may be adjusted, if necessary refer
to manufacturer.
Depth Adjustment Height Adjustment Side Adjustment
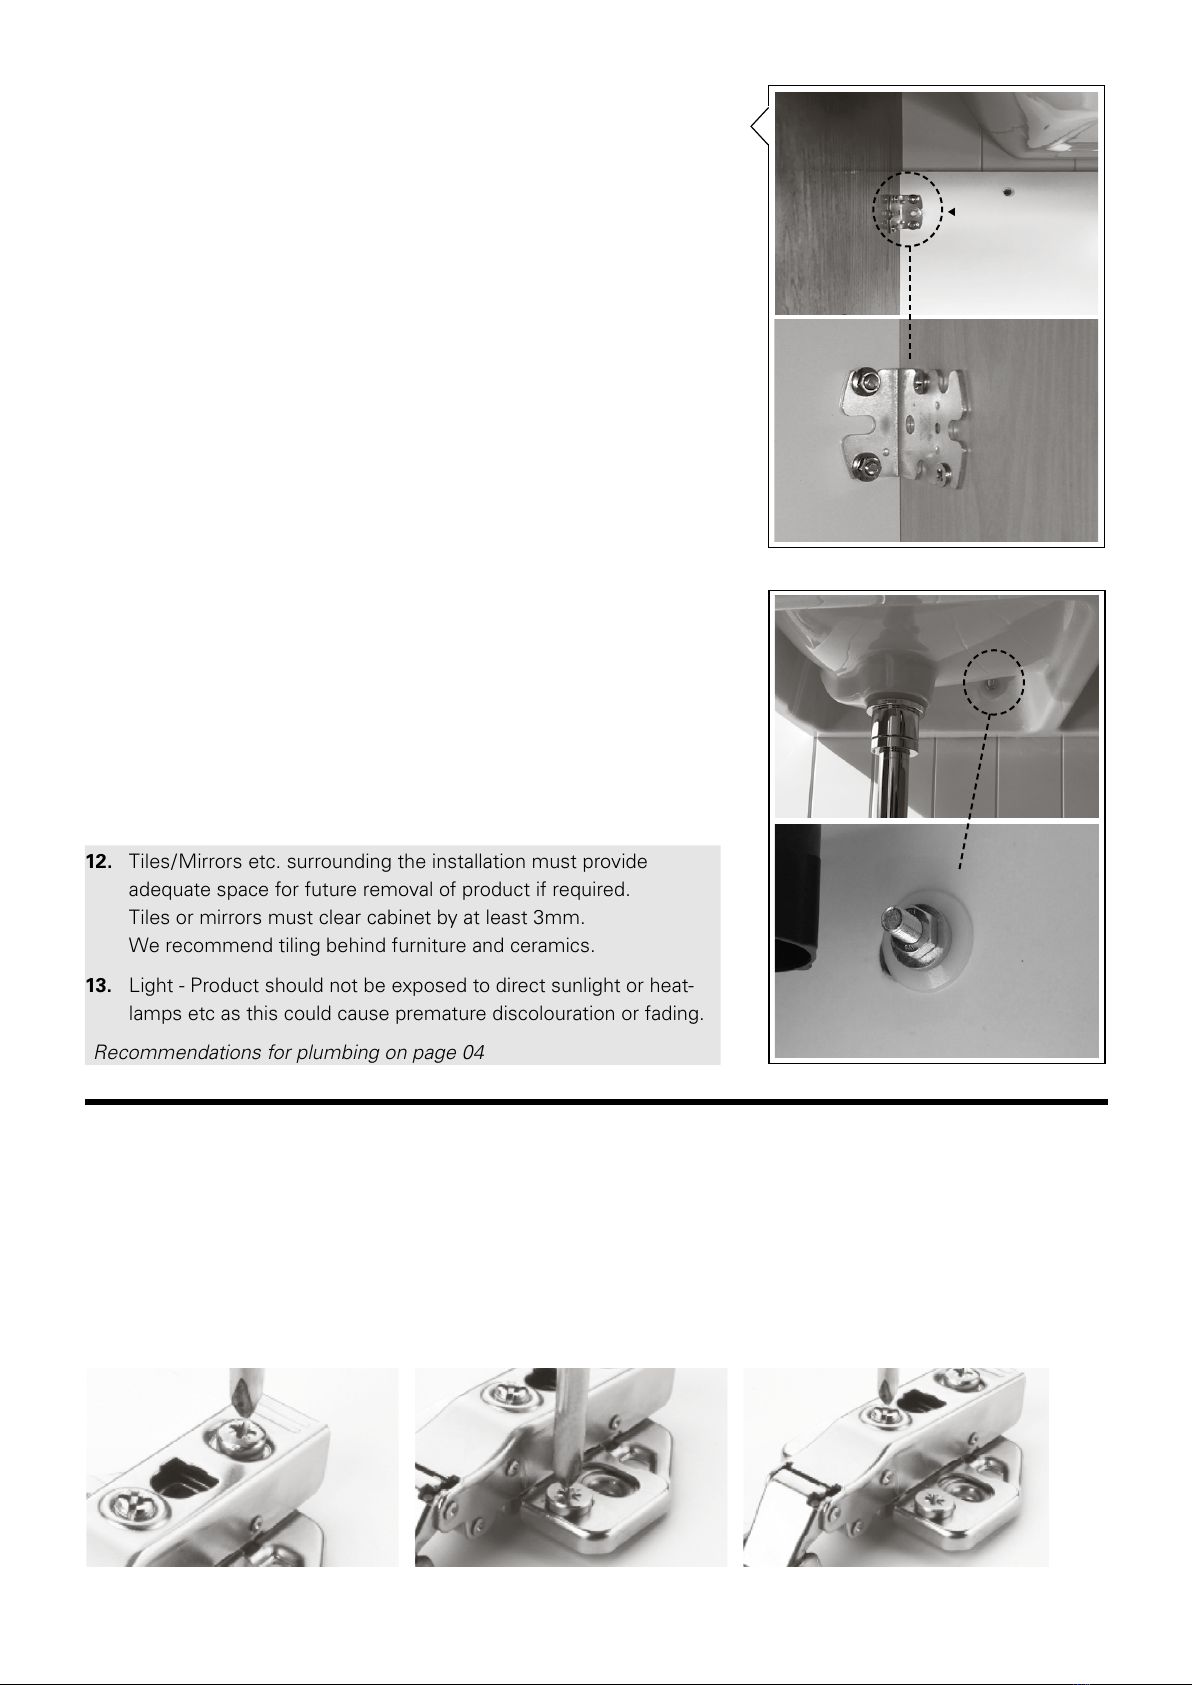
06. Securely fasten unit to wall through the back, no further than
100mm from end of cabinet. Upper fixings no lower than 50mm
from top of back. It is a requirement to fasten the cabinet through
the steel bracket in the top corner of unit (refer to image 06).
07. Tops with allowance for bolts must be fixed through
bolt holes. Tops without fixing holes should be secured with
silicone only.
7a. As ceramic tops are not perfectly flat (may vary up to 5mm),
due to the manufacturing process, it may be necessary to pack
the tops up to stop movement or avoid the doors or drawers
binding. Up to a 5mm tolerance is acceptable.
08. Seal all edges where water penetration may occur, i.e. between
top, wall and floor etc. (Materials used in the construction of
bathroom furniture are water-resistant not waterproof). Ensure
silicone is used according to manufacturers’ instructions.
DO NOT use adhesive, this will void warranty.
09. Where a separate basin is to be fitted it is essential that the
basin must be centered over the cutout and be fully sealed to the
cabinet and top to prevent any water penetration.
10. Always fix separate shelf to drawer unit module with connectors,
if ordered as a combination.
11. Adjust doors/drawers if required, as there may have been some
movement during transportation or installation, (refer to Hinge
Adjustment). However, first check that the unit has not been
twisted during installation.
12. Tiles/Mirrors etc. surrounding the installation must provide
adequate space for future removal of product if required.
Tiles or mirrors must clear cabinet by at least 3mm.
We recommend tiling behind furniture and ceramics.
13. Light - Product should not be exposed to direct sunlight or heat-
lamps etc as this could cause premature discolouration or fading.
Recommendations for plumbing on page 04
06
07
Hinge Adjustment
Secure here
3
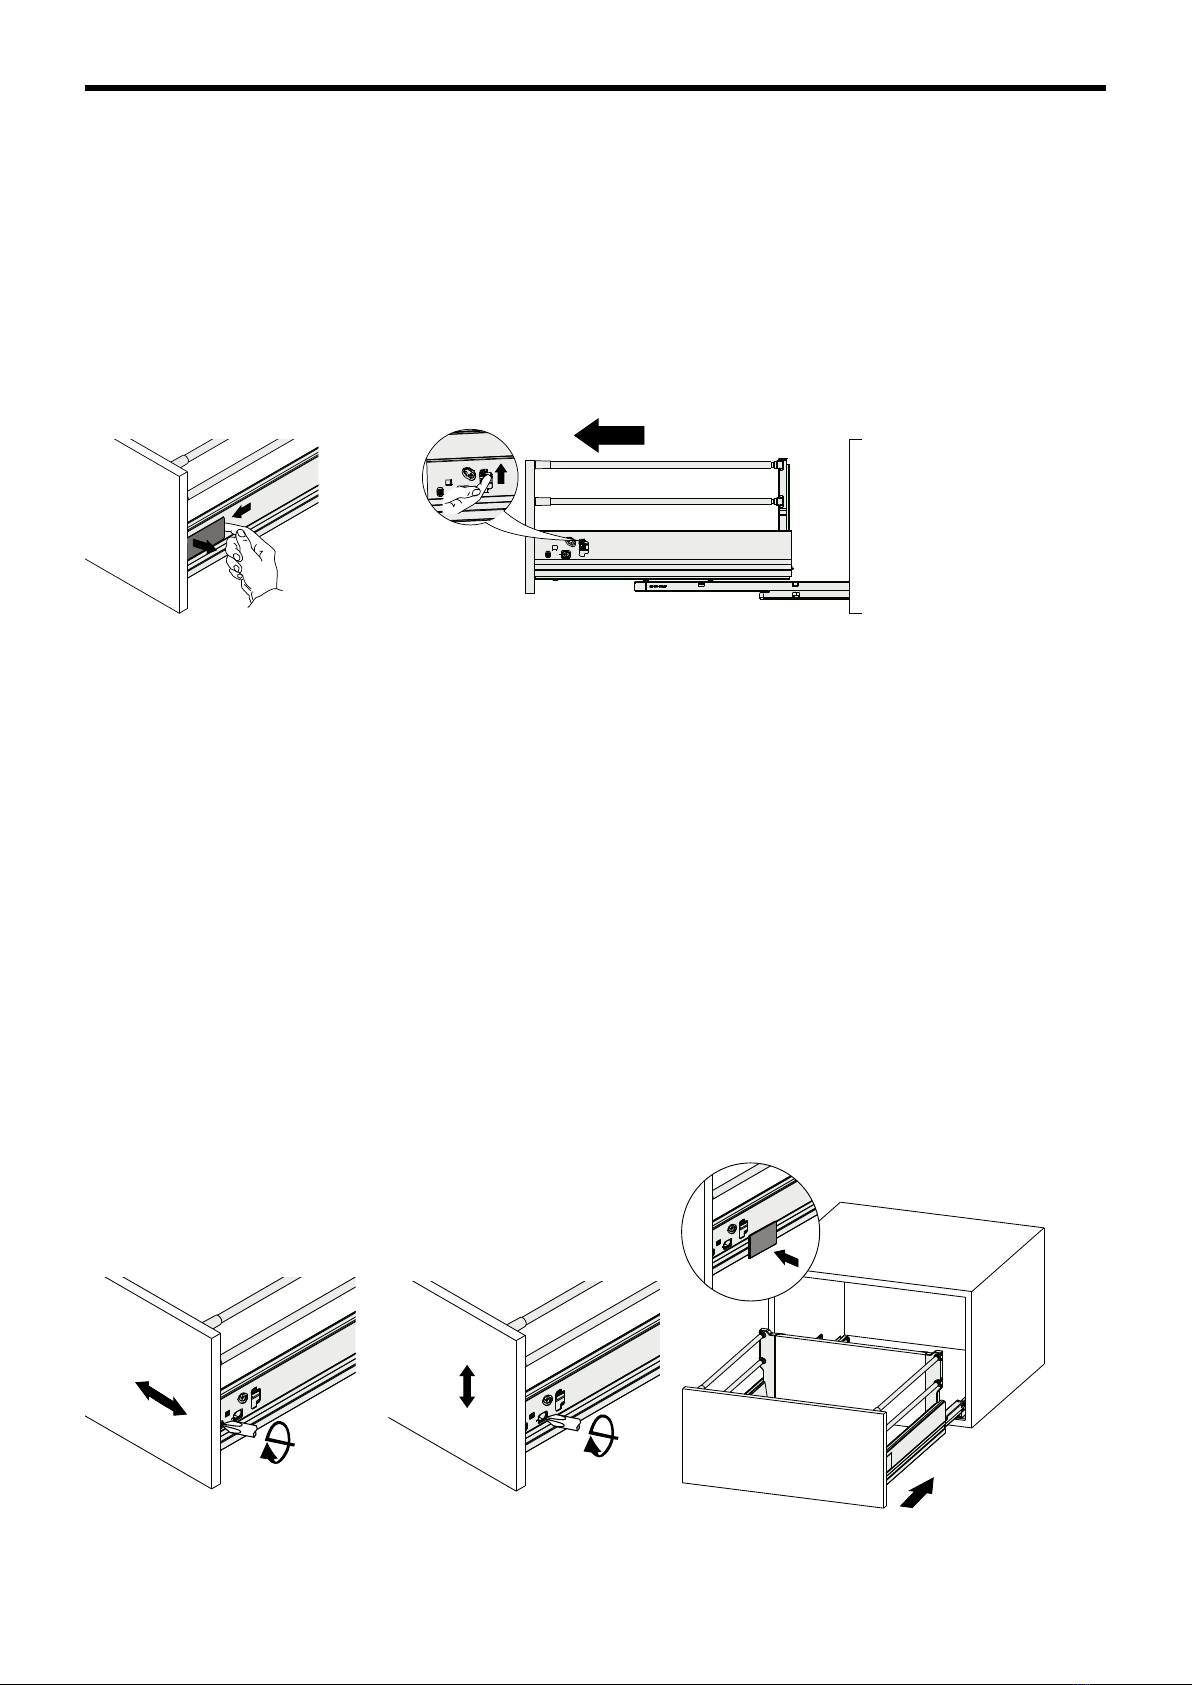
Soft Close Drawers
When a cabinet has soft close drawers, the drawers will need to be removed prior to installation of the cabinet.
Please view the following instructions on how to remove the drawers.
Removal
When you pull the drawer out you will notice a grey label on each side of the drawer (as per below diagram).
When the label on each side is removed – it will reveal a small lever on each side of the drawer. Both levers
are to be pulled up at the same time, then slide the drawer out slowly towards you.
Remove cover cap Release drawer from the slide, pull out the drawer
(Failure to do this will damage the drawer running mechanism)
Drawer re-installation
Push runners into cabinet, place drawer body on runners and push in firmly. Two clicks should be heard as drawer
sides click into place. Replace drawer front as per reverse of diagram above.
Engaging the soft-close mechanism
Put the drawer back in half way – close the drawer. Then pull the drawer back towards you. Underneath the
drawer you will feel a small tab. This is on each side of the drawer. Pull the tab towards you and at the same time
push the front of the drawer back. This will engage the soft close mechanism.
Adjustment
Check the unit is square on the wall before making adjustments.
Adjust drawer rails to ensure top and bottom drawer face align giving a flush close.
Clockwise = in, anticlockwise = out.
P re s s - in
Left/Right Adjustment Height Adjustment Fit cover caps

4
Trouble Shooting
What happens if my soft close drawer is not closing properly?
It means that your soft close drawer is not engaged correctly. Follow the instructions on page 03 to
re-engage the soft close mechanism.
Why is my soft close drawer making a noise on closing, and not closing smoothly?
If the release tabs on the drawer are not lifted properly, then this may cause the cog to strip on the soft close
mechanism. Please contact Bath Co Customer Services for a replacement. This is not covered under warranty.
What are the dimensions of the cabinets – internal and external?
All dimensions can be found on our website – www.bathco.co.nz or in our brochures.
Can I get an extra tap hole in my vanity top?
Yes – most tops we can put an extra tap hole in. This can be done at an extra cost of $60.00+GST per tap hole.
How to cut out a sink hole in Kordura surfaces?
These hybrid solid surfaces hold colour throughout and can be easily cut or drilled with a router, jigsaw or holesaw.
Plumbing Recommendations
»Single drawer units are designed to be plumbed with a bottle trap.
»Waste is not to be over-tightened to avoid stress on basin or top.
»A Contoured waste complete with a washer set top and bottom must be used on all
basins so as not to void the warranty
»We do not recommend the use of silicone when installing the contoured waste.
»Basin overflow must line up with waste opening.
»Waste overflow hole opening must not be blocked by sealant.
»Basins with fixing holes must be bolted back to the wall separately from the vanity unit.
Cleaning & Maintenance
»To maintain the finish on your unit and top, only use a soft cloth, or a weak solution of non-abrasive detergent.
Do not use cleaners that incorporate isopropyl alcohol. Polymarble tops should only be cleaned with soapy
water and a soft cloth.
Kordura Surfaces: Regular cleaning is recommended. Use soapy water and a soft cloth when cleaning surface.
Do not use product with high alkaline & ph levels. Contact Bath Co directly to provide guidelines to polish
scratched and heavy stains.
»To restore accidental scratches, burns etc. on gloss painted finishes, rub gently with a very light cutting
compound. On matt or timber finishes contact the manufacturer.
»Mirrors should be cleaned with diluted methylated spirits only (dilute 1:10).
Remove all moisture caused by splashes, wet hands, or steam with a chamois or soft cloth after use.
Do not wipe the exposed edge of the mirror.
»To avoid deterioration; it is important mirrors are kept dry of any moisture.
»Bath Co warranty on mirrors applies for one year from the date of purchase.
Table of contents
Other BATHCO Indoor Furnishing manuals

Popular Indoor Furnishing manuals by other brands

Regency
Regency LWMS3015 Assembly instructions

Furniture of America
Furniture of America CM7751C Assembly instructions

Safavieh Furniture
Safavieh Furniture Estella CNS5731 manual

PLACES OF STYLE
PLACES OF STYLE Ovalfuss Assembly instruction

Trasman
Trasman 1138 Bo1 Assembly manual

Costway
Costway JV10856 manual


