Bathology PreciseTemp 320 User manual

PreciseTemp 320
Digital Steam / Sauna
Room Thermometer
Installation and Operating Instructions

BATHOLOGYby
PreciseTemp 320
Dimensions
The PreciseTemp 320 Digital Steam/Sauna Room Thermometer is designed to simplify steam and sauna room
operation and provide bathers with the information they need to make informed decisions regarding the
environment they are electing to bathe in. Mounted near the environment entry, the PreciseTemp 320 will
provide precise and reliable temperature readings to reduce operating complaints and facilitate steam and
sauna room/equipment troubleshooting.
Specifications
3.5” outside
diameter
3.16” diameter bolt
circle
0.26” diameter for
sensor cable
0.0938” diameter
holes 120° apart
2.64”
1.06”
3.5”
Figure 1 Figure 2
Material: Stainless steel body with clear plastic face
Depth: 1"
Diameter: 3-1/2"
Battery: G-13A, 1.5V, Button Cell
Sensor Cable: 8’ or 20’ Tethered (non-spliceable)
Sensor Guard: 5-1/8”W x 1-1/4”D x 2-3/8”L
Front
Side
Profile Rear Flange
Package Includes
Thermometer Installation
Select a thermometer mounting location, outside
the bathing environment, adjacent to the entry
and at a height for comfortable bather view.
Drill a 3/8” diameter hole for sensor run.
Select a thermometer sensor mounting location
inside the bathing environment 4” down from
finished ceiling. Drill a 3/8“ diamter hole for sensor.
Route sensor into bathing environment location
and mount thermometer with provided anchors
and hardware (flangeless). Use a 3/16” drill bit
should the anchors be utilized.
1.
2.
3.
Sensor and Sensor Guard Installation
Read instructions in their entirety before starting
installation.
Once the finished wall materials are installed,
place supplied template (page 4) in location of
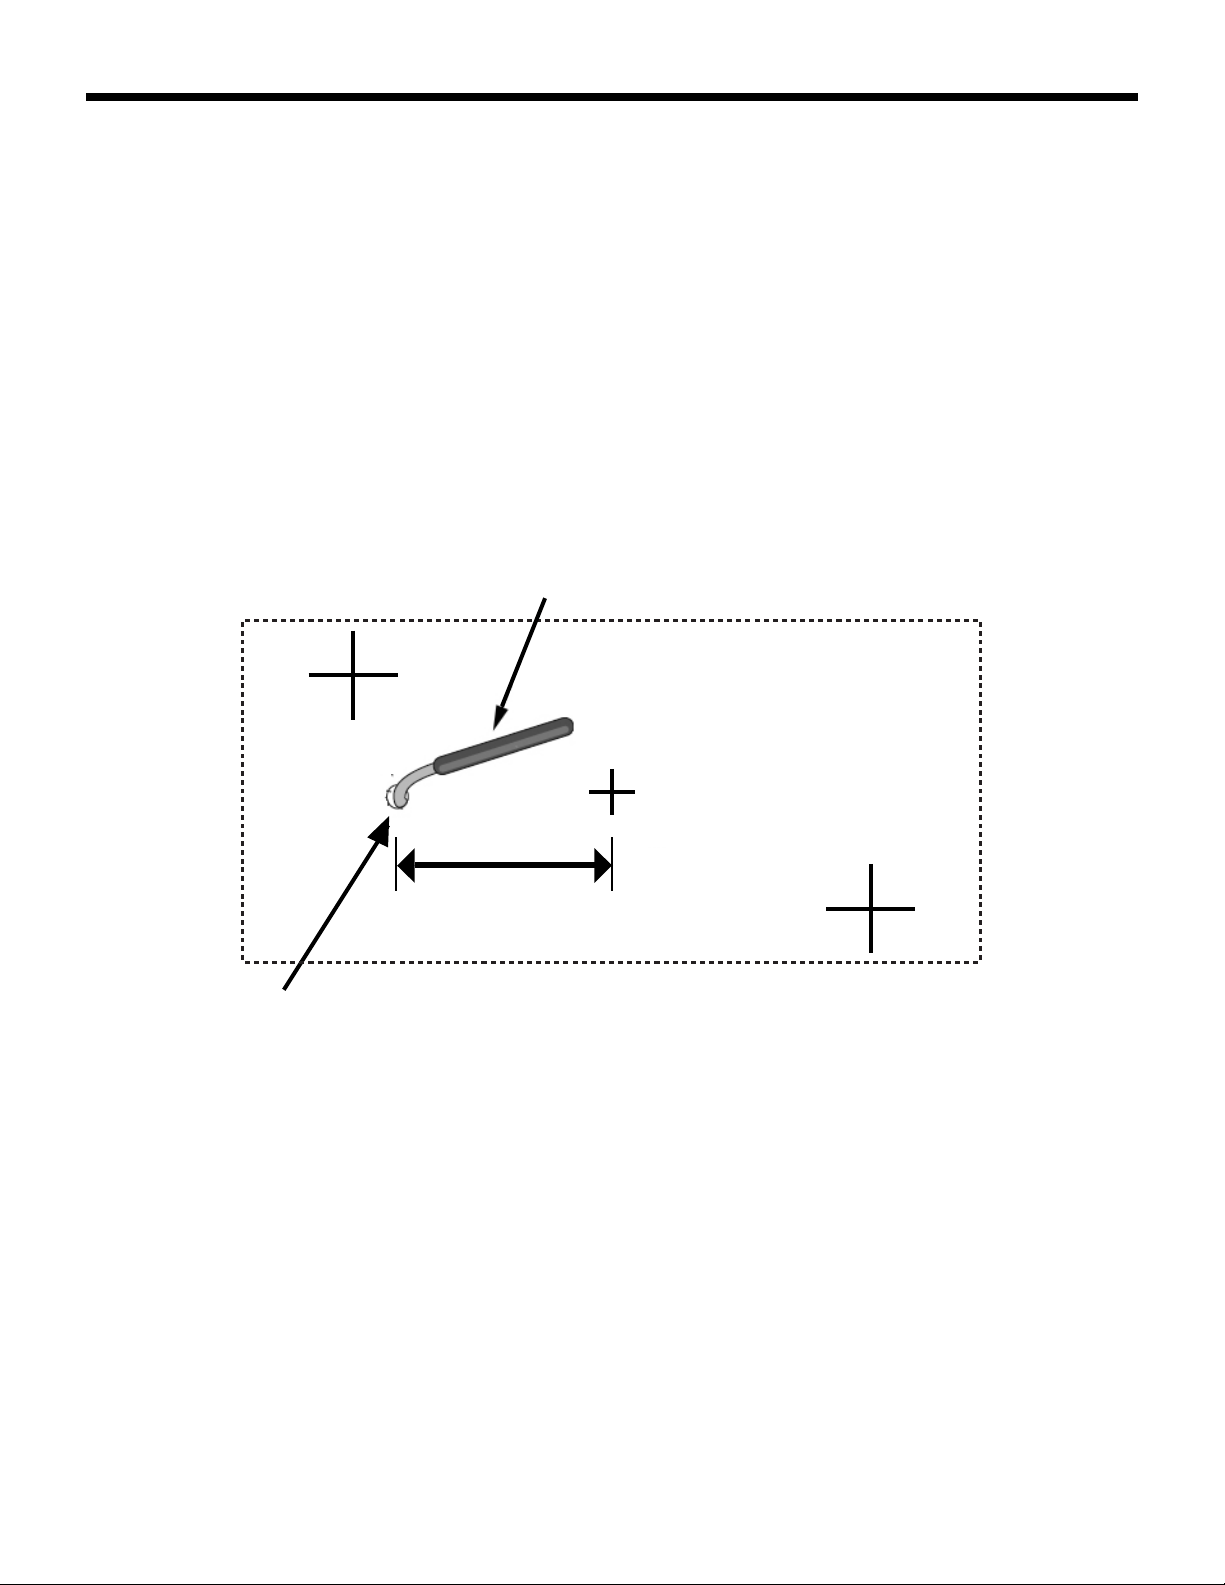
mounting. Center of template should be orient-
ed 1-1/2” to the right of sensor wire exit.
Level template against level line.
Affix template to wall with tape.
Recheck for level and drill (3/16” drill bit) at
designated “+” locations on template.
Apply silicon dab over corner and center sensor
mount anchor holes.
Tap wall anchors (flange) into holes with
hammer.
1.
2.
3.
4.
5.
6.
- Drill
-3/16” drill bit
- 3/8” drill bit
-Hammer
- 7/64 Hex drive wrench
-Safety goggles
- Level
- Tape
Tools Required:
For safety purposes, use safety goggles
at all times.
Check for piping/electrical before
drilling.
2
- (1) Digital Thermometer with tethered sensor
- (1) Sensor guard, stainless steel
- (3) Wall anchors, flangeless (Digital thermometer)
- (3) 3/4” Flangeless screws (Digital thermometer)
- (3) Wall anchors, flange ((1) Sensor mount, (2) Sensor guard)
- (3) 1” Flange screws ((1) Sensor mount, (2) Sensor guard)
- (1) Sensor screw mount
- (1) Sensor tie
- (1) RTV silicon sealant, 1 oz tube
- (1) Mounting template
- Installation and operation manual

BATHOLOGYby
Apply silicone into and around entire top of
sensor guard anchors (flange) before inserting
screws (flange), creating a seal between anchor
and wall.
Attach screws (flange) into the corner wall
anchors (flange) leaving 1/8” gap from screw
head to wall.
Fasten sensor screw mount to the center wall
anchor.
Feed sensor tie through sensor screw mount
and secure sensor in place.
Apply silicone around wire exit area to create a
water-tight seal.
Line up holes on rear of sensor guard with
screws.
Slide sensor guard slightly to the left until screw
heads are visible.
Tighten screws.
Allow silicone to cure for 24 hours before
exposing product to any source of moisture.
7.
8.
9.
10.
11.
12.
13.
14.
15.
Sensor and Sensor Guard Installation (cont.)
There is a trimpot located on the back of the
PreciseTemp 320 for easy recalibration. Remove
tape covering the trimpot and F/C switch. Compare
the display with a temerature standard (NIST,
certified mercury thermometer, etc.). Adjust the
trimpot so that the meter’s digital display matches
the temperature standard (see Figure 3). Replace
the tape after calibration.
F°/C° Switch
Calibration Trimpot
Battery
Figure 3
Thermometer Calibration
3
Product Care
For routine cleaning simply use a soft damp cloth
and common household soap. Use a damp cloth
to wipe clean, then dry. Clean product frequently to
avoid calcium deposits on surfaces. Use only mild
soap based detergents. Never use abrasive
cleaners, bleach, disinfectants or cleaning products
containing alcohol, ammonia, hydrochloric or
phosphoric acids as they will damage the product’s
finish.
Battery Replacement
Remove back cover screws (4) to expose internal
PCB assembly. Remove battery and replace with
G-13A, 1.5V button cell battery. Replace back
cover.
Note: When replacing back cover, be sure that the
snaps line up with the holes in the case and that the
wire is positioned correctly in its “cut out”.
Farenheit/Centigrade Operation
There is a switch located on the back of the
PreciseTemp 320 for easy farenheit to centigrade
conversion. Remove tape covering the switch and
simply flip the switch to the desired scale of
operation (see Figure 3). Replace tape after using
the F/C switch.
900-0503-1014
PreciseTemp 320
BATHOLOGY
rediscover bathing
A division of Bathing Brands, Inc.
www.Bathology.com 847-465-1070
Sensor
1.5”
Level Line
Sensor Guard Mount Template
Sensor Wire Exit
4


