BATTERIES PLUS X2 POWER SLC10002A User manual
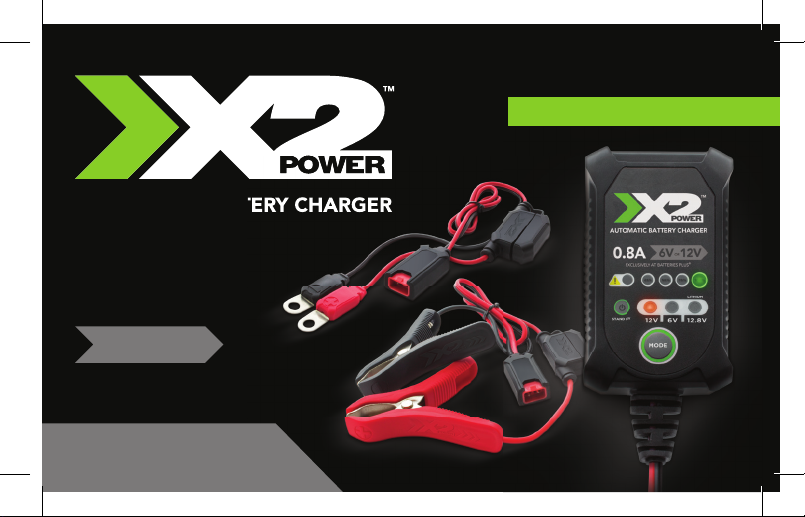
AUTOMATIC BATTERY CHARGER
INSTRUCTION MANUAL
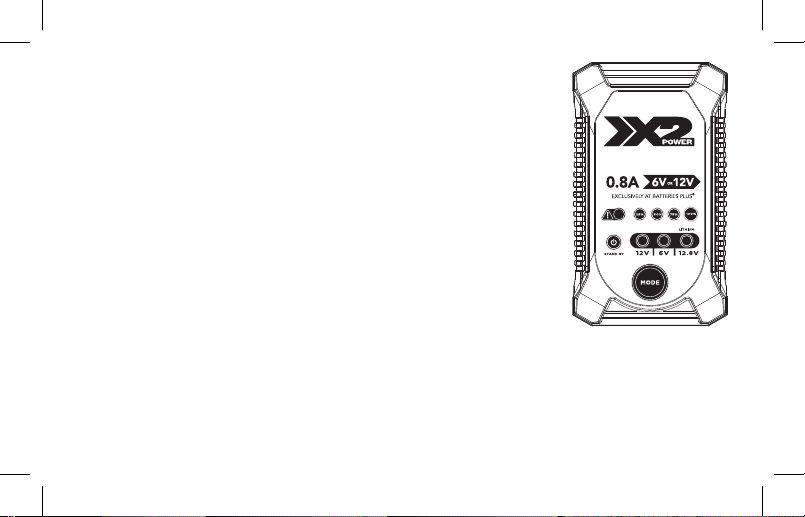
0.8A
6VOR 12V
SLC10002A
AUTOMATIC BATTERY CHARGER
EXCLUSIVELY AT BATTERIES PLUS®
Input:
110-120V AC 60 Hz 0.3A
Output:
12V DC 0.8A
6V DC 0.8A
12.8V DC 0.8A
Charges:
1 - 6/12V Lead Acid Flooded, Gel, Maintenance-Free,
AGM Batteries 2Ah - 26Ah
1 - 12.8V Lithium Iron Phosphate (LiFePO4) 2Ah-15Ah
Thank you for purchasing our product. Read the instruction manual
thoroughly before use and keep the manual for future reference.
IMPORTANT SAFETY INSTRUCTIONS – SAVE THESE INSTRUCTIONS
1. SAVE THESE INSTRUCTIONS. DANGER - TO REDUCE THE RISK OF FIRE OR ELECTRIC
SHOCK, CAREFULLY FOLLOW THESE INSTRUCTIONS.
2. This charger is intended for use with with 6/12V Lead Acid Flooded, Gel, Maintenance-Free, AGM
Batteries 2Ah-26Ah and LiFePO4 2Ah – 15Ah lithium iron phosphate batteries only. Attempting to
charge other types of batteries may cause personal injury and damage to the charger.
3. Do not expose charger to rain, snow or moisture.
AUTOMATIC BATTERY CHARGER
TM

4. Operate charger only in well-ventilated areas.
Batteries generate explosive gases during
normal operation.
5. Wear eye protection when operating charger.
6. Never use an extension cord or any
attachment not recommended by
manufacturer, otherwise this may result in a
risk of fire, electric shock or personal injury.
7. It is recommended that you periodically
check the battery charger while charging.
8. To reduce risk of damage to electric plug
and cord, pull by the plug rather than cord
when disconnecting charger.
9. Do not attempt to charge damaged or
frozen batteries.
10. Do not operate the charger if the cord or
plug has been damaged or if the charger
has been subjected to shock or damage.
Take it to a qualified technician for repair.
11. Do not disassemble the charger. Incorrect
reassembly may result in a risk of electric
shock or fire.
12. Unplug the charger from power source before
attempting any maintenance or cleaning. Use
lint-free cloth to clean the surface, do not
immerse into water.
13. This charger is not intended for use by
children or persons with reduced physical,
sensory or mental capabilities, or lack of ex-
perience and knowledge without supervision.
14. WARNING - RISK OF EXPLOSIVE GASES
WORKING IN VICINITY OF A LEAD-ACID
BATTERY IS DANGEROUS. BATTERIES
GENERATE EXPLOSIVE GASES DURING
NORMAL BATTERY OPERATION. FOR
THIS REASON, IT IS OF UTMOST
IMPORTANCE THAT YOU FOLLOW THE
INSTRUCTIONS EACH TIME YOU USE
THE CHARGER. To reduce risk of battery
explosion, follow these instructions and
those published by the battery manufacturer
and the manufacturer of any equipment you

intend to use in the vicinity of the battery.
Review cautionary marking on these
products and on engine.
SAFETY & PRECAUTIONS
1. Someone should be within range of your
voice or close enough to come to your aid
if you have an accident.
2. Have plenty of fresh water and soap nearby
in case battery acid contacts skin, clothing
or eyes.
3. Wear complete eye protection and clothing
protection. Avoid touching eyes while
working near battery.
4. If battery acid contacts skin or clothing,
wash immediately with soap and water. If
acid enters eye, immediately flood eye with
running cold water for at least 10 minutes
and get medical attention immediately.
5. NEVER smoke or allow a spark or flame
in vicinity of battery or engine.
6. Remove all jewelry and other metallic items
from your hands and body when working
with batteries. Metal may spark or create a
short circuit resulting in electrical shock, fire
or explosion which may result in injury, death
or property damage.
7. Always use non-conductive or insulated
tools when working with any battery.
8. Use charger for charging LEAD-ACID or
LITHIUM IRON PHOSPHATE batteries
only. Do not attempt to charge any other
type of battery. Charging other battery
types may cause injury to persons and
damage to property.
9. NEVER USE THE RECOVER MODE FOR
A LITHIUM IRON PHOSPHATE BATTERY.
WARNING: Cancer and Reproductive
Harm - www.P65Warnings.ca.gov.

LOCATION
Locate the charger as far away from the battery as
possible. Do not place the charger directly above
the battery as gases from battery will corrode and
damage charger. Do not allow battery acid to come
in contact with charger. Do not operate the charger in
a closed-in area or an area with restricted ventilation.
Do not set battery on top of charger.
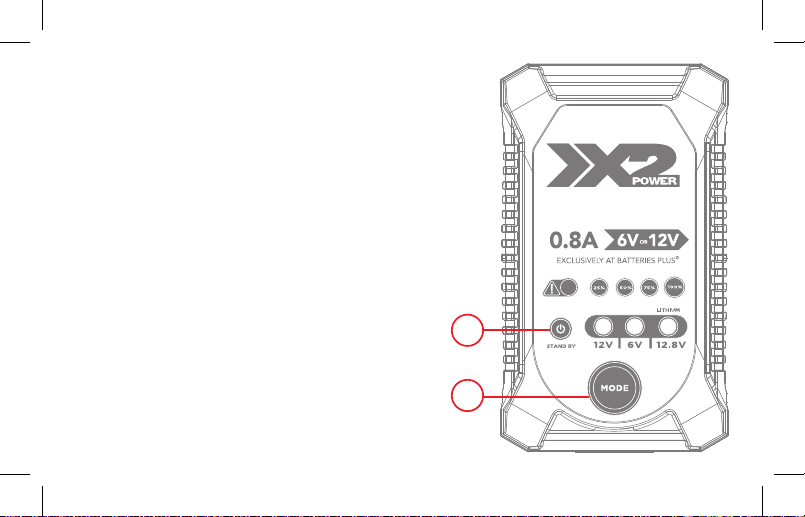
CHARGING MODES
The SLC10002A has three (3) modes. The Lithium
charge mode requires the mode button to be pressed
and held for three (3) seconds to enter the enhanced
mode. This “Enhanced” mode requires your full
attention before selecting. 1 2 3
AUTOMATIC BATTERY CHARGER
TM

Do not operate the charger until you confirm the appropriate charge mode for your battery.
Here is a brief description.
CHARGING MODES
# VOLTAGE MODE DESCRIPTION OUTPUT BATTERY
SIZE
112V Normal For charging 12-volt Flooded, Gel,
Maintenance-Free batteries. 14.5V / 0.8A 2Ah-26Ah
26V Normal
For charging 6-volt Flooded, Gel,
Maintenance-Free batteries. When
selected, the LED will illuminate. 7.3V / 0.8A 2Ah-26Ah
312.8V Lithium
Press & Hold Mode
For charging 12.8-volt lithium iron
phosphate batteries. Lithium mode
will only function if the battery voltage
is 11.6V or greater. When selected,
the LED will illuminate.
14.5V / 0.8A 2Ah-15Ah

CONNECTING TO BATTERY
1. Set any charger switches to “off” position
and remove AC cord from electric outlet
before connecting or disconnecting DC
output clamps or eyelets. Never allow
clamps or eyelets to touch each other.
2. Identify the correct polarity of the battery
terminals. The positive battery terminal is
typically marked with (POS, P, +). The
negative terminal is typically marked with
(NEG, N, -).
3. Position cords and cables to reduce risk
of damage by hood, door or moving parts
(including fan blades, belts, and pulleys)
or other parts that could cause injury
to persons.
4. Do not connect to carburetor, fuel lines,
or sheet-metal body parts.
5. Determine which post of battery is grounded
(connected) to the chassis. If negative post is
grounded to the chassis (as in most vehicles)
see (6). If positive post is grounded to the
chassis, see (7).
6. For Negative-grounded vehicle, connect
POSITIVE (RED) clamp or eyelet connector
from battery charger to POSITIVE (POS, P, +)
post of battery. Connect NEGATIVE (BLACK)
clamp or eyelet connector from battery
charger to the NEGATIVE (NEG, N, -)
post of battery.
7. For Positive grounded vehicle, connect
NEGATIVE (BLACK) clamp or eyelet
connector from battery charger to
NEGATIVE (NEG, N, –) post of battery.
Connect POSITIVE (RED) clamp or eyelet
connector from battery charger to the
POSITIVE (POS, P, +) post of battery.
8. When disconnecting charger, turn switches
to off, disconnect AC cord, remove
connectors in reverse sequence from
connecting procedure.
PREPARING TO CHARGE
1. If necessary to remove battery from vehicle
to charge, always remove grounded terminal
from battery first. Make sure all accessories
in the vehicle are off, so as not to cause
an arc.
2. Be sure area around battery is well ventilated
while battery is being charged.
3. Clean battery terminals. Be careful to keep
corrosion from coming in contact with eyes.
4. Study all battery manufacturer’s specific
precautions while charging and
recommended rates of charge.
5. Determine voltage of battery by referring to
vehicle owner’s manual and make sure that
the output voltage selector switch is set at
correct voltage. If charger has adjustable
charge rate, charge battery initially at
lowest rate.
CHARGING TIMES
BATTERY SIZE (AH) 12V/6V APPROX. CHARGE TIME (HOURS)
4 5.5
811
16 22
26 36
THE BATTERY CHARGER MUST BE CONNECTED TO THE
BATTERY ACCORDING TO THE INSTRUCTIONS ABOVE.
STARTING THE CHARGING PROCESS:
Once you have established that the battery clamps or eyelets
have been correctly connected, you can start the charging
process. To do so, insert the charger plug into the AC socket.
The charger will start in Stand by mode, indicated by the
STAND BY LED (1).
Press the MODE BUTTON (2)to select the appropriate charge
mode (press and hold for three seconds to enter an enhanced
charge mode) for the voltage and chemistry of your battery.
The selected charge mode LED will illuminate.
AUTOMATIC BATTERY CHARGER
TM
1
2

STATE OF CHARGE INDICATORS
The state-of-charge (SOC) LED display has four (4) SOC indicators.
LED EXPLANATION
25% Red LED
The LED will ash when the battery is less than
25% charged. When the battery is 25%
charged, the LED will be solid.
50% Orange LED
The LED will ash when the battery is less
than 50% charged. When the battery is 50%
charged, the LED will be solid.
75% Yellow LED
The LED will ash when the battery is less than
75% charged. When the battery is 75%
charged, the LED will be solid.
100% Green LED
The LED will ash when the battery is less than
100% charged. When the battery is 100%
charged, the LED will be solid.
25%
50%
75%
100%

ERROR REASON/SOLUTION
Standard Charging
Mode
The battery is not accepting a charge.
Change charge mode to Recovery Mode.
Recovery Mode The battery cannot be recovered.
Battery capacity may be too high for the selected mode.
Verify the battery capacity and charge mode. If battery
capacity is in range, change charge mode to Recovery Mode.
Battery voltage is too high or too low for the selected mode.
Verify the battery voltage and charge mode.
Reverse polarity. Reverse the battery connections.
TROUBLESHOOTING
Error conditions are indicated in the LED display.
Solid Red LED
Flashing Yellow LED
Solid Yellow LED
Flashing Red LED

This device complies with part 15 of the FCC Rules.
Operation is subject to the following two conditions: (1) This device may not cause harmful
interference, and (2) This device must accept any interference received, including interference that
may cause undesired operation. Changes or modifications not expressly approved by the Party
responsible for compliance could void the user’s authority to operate the equipment.
Limited 5 Year Warranty: This product is warranted to be free of defects in material and
workmanship for 5 years from date of purchase, dated receipt required. Defective product will be
replaced or substituted with a product of equal value. This is your sole remedy in lieu of all other
remedies, including consequential damages (see website for additional terms and conditions).
Some states do not allow the exclusion or limitation of incidental or consequential damages, so
the above limitation or exclusion may not apply to you. For warranty service, call 1-888-9-ASCENT.
This warranty gives you specific legal rights, and you may also have other rights, which may vary
from state to state.
batteriesplus.com
Replacement and recycling at Batteries Plus®
Distributed by
Ascent Battery Supply, LLC.
1325 Walnut Ridge Drive
Hartland, Wisconsin 53029
1-888-9 ASCENT
© 2021 Batteries Plus, LLC
Made in China.
Table of contents
Other BATTERIES PLUS Batteries Charger manuals


