Baum VisioDesk User manual

VisioDesk
User Guide
Item number: 106010H04
User guide version: 1.5
English 06/2017


About BAUM 3
About BAUM
BAUM Retec AG has been a leading provider of products and services
for blind and visually impaired people for more than 35 years. The high
quality and innovative braille products, desktop magnifiers, reading
machines, and software solutions are developed and manufactured in
Germany, and are ideal for educational, professional and private use.
Our Mission
“We believe in independence for every person who is blind or visually
impaired. We passionately apply our skills and experiences toward
developing solutions that reinforce success at school and work, and
improve quality of life.
We always question the way things have been done in the past. We
explore new and innovative ways to solve problems. Our approach
includes ergonomics, thoughtful design, and materials that meet the
highest quality standards. We care deeply about our customers, and help
and support them as much as we can. We care about our employees
too, and support them to reach their highest potential, ensuring a secure
and lasting working environment.
We develop innovative technology solutions that provide independence
for people who are blind or visually impaired. Our high-quality solutions
allow visually impaired people to magnify their world, and blind people to
access electronic and print content with speech or braille output.”
Wolfgang Baum, Chief Executive

Contents 4
Contents
1ABOUT THIS USER GUIDE .............................................................................................5
2ABOUT..............................................................................................................................6
3BEFORE YOU BEGIN ......................................................................................................7
WHAT COMES IN THE BOX?........................................................................................73.1
4HOW TO POSITION VISIODESK ON YOUR DESK ........................................................8
5CAMERA POSITIONS ....................................................................................................11
6POWER ADAPTOR ........................................................................................................12
7VISIODESK CONTROL PANEL.....................................................................................13
8VISIODESK CONTROL PANEL BUTTONS – QUICK REFERENCE............................14
9BECOMING FAMILIAR WITH YOUR NEW VISIODESK ...............................................15
SWITCH OFF LIGHT ..................................................................................................189.1
AUTOFOCUS ...........................................................................................................199.2
ALTERNATIVE SET OF FALSE COLOURS.....................................................................209.3
10 EXTERNAL CONNECTIONS OF VISIODESK...............................................................21
USB OUTPUT .........................................................................................................2110.1
VIDEO OUTPUT........................................................................................................2110.2
VIDEO INPUT ...........................................................................................................2210.3
11 COMMON PROBLEMS AND SOLUTIONS ...................................................................23
12 DEFECTS AND REPAIR ................................................................................................24
13 SERVICE BOX................................................................................................................25
14 COMPLIANCES..............................................................................................................26
CE CONFORMITY ....................................................................................................2614.1
FCC CONFORMITY..................................................................................................2614.2
ENVIRONMENTALLY FRIENDLY DISPOSAL ACCORDING TO EU-DIRECTIVE 2012/19/EU2714.3
15 WARRANTY ...................................................................................................................29
16 FOR YOUR SAFETY ......................................................................................................30
17 TECHNICAL SPECIFICATIONS ....................................................................................33

About this user guide 5
1 About this user guide
Thank you for purchasing a VisioDesk from BAUM Retec. The purpose
of this manual is to provide the end user and/or their service provider
with details on how to use VisioDesk.
VisioDesk is a high-quality, German-made portable video magnifier,
which will provide you many years of reliable service. This manual
contains everything you need to know to use your new device.
As you will learn, VisioDesk is very easy to use. In addition to
instructions on how to operate VisioDesk, this manual also includes
recommendations for how to position your device, what to do if anything
goes wrong with the device, and important safety guidelines.
We suggest that you store this manual in a safe place for future
reference.
Notice for End Users in Germany/Europe
This manual is a part of the VisioDesk product, and should be kept with
the product at all times. In the event your VisioDesk is ever sold to a new
end user, this manual must be provided to them.
Copyright Notice
Copyright © 2017 BAUM Retec AG, Industriestr. 15, 74909
Meckesheim, Germany. All rights reserved. No part of this publication
may be reproduced or distributed in any form or by any means, or stored
in a database or retrieval system, without prior written permission from
BAUM Retec AG.
All efforts have been made to ensure that information contained in this
document is correct at the time of issue. Neither BAUM Retec AG nor its
representatives assume any responsibility for errors or omissions. Nor is
any liability assumed for damages resulting from the use of information
contained herein.
Licenses and trademarks
All licenses and trademarks are the property of their respective owners.

About 6
2 About
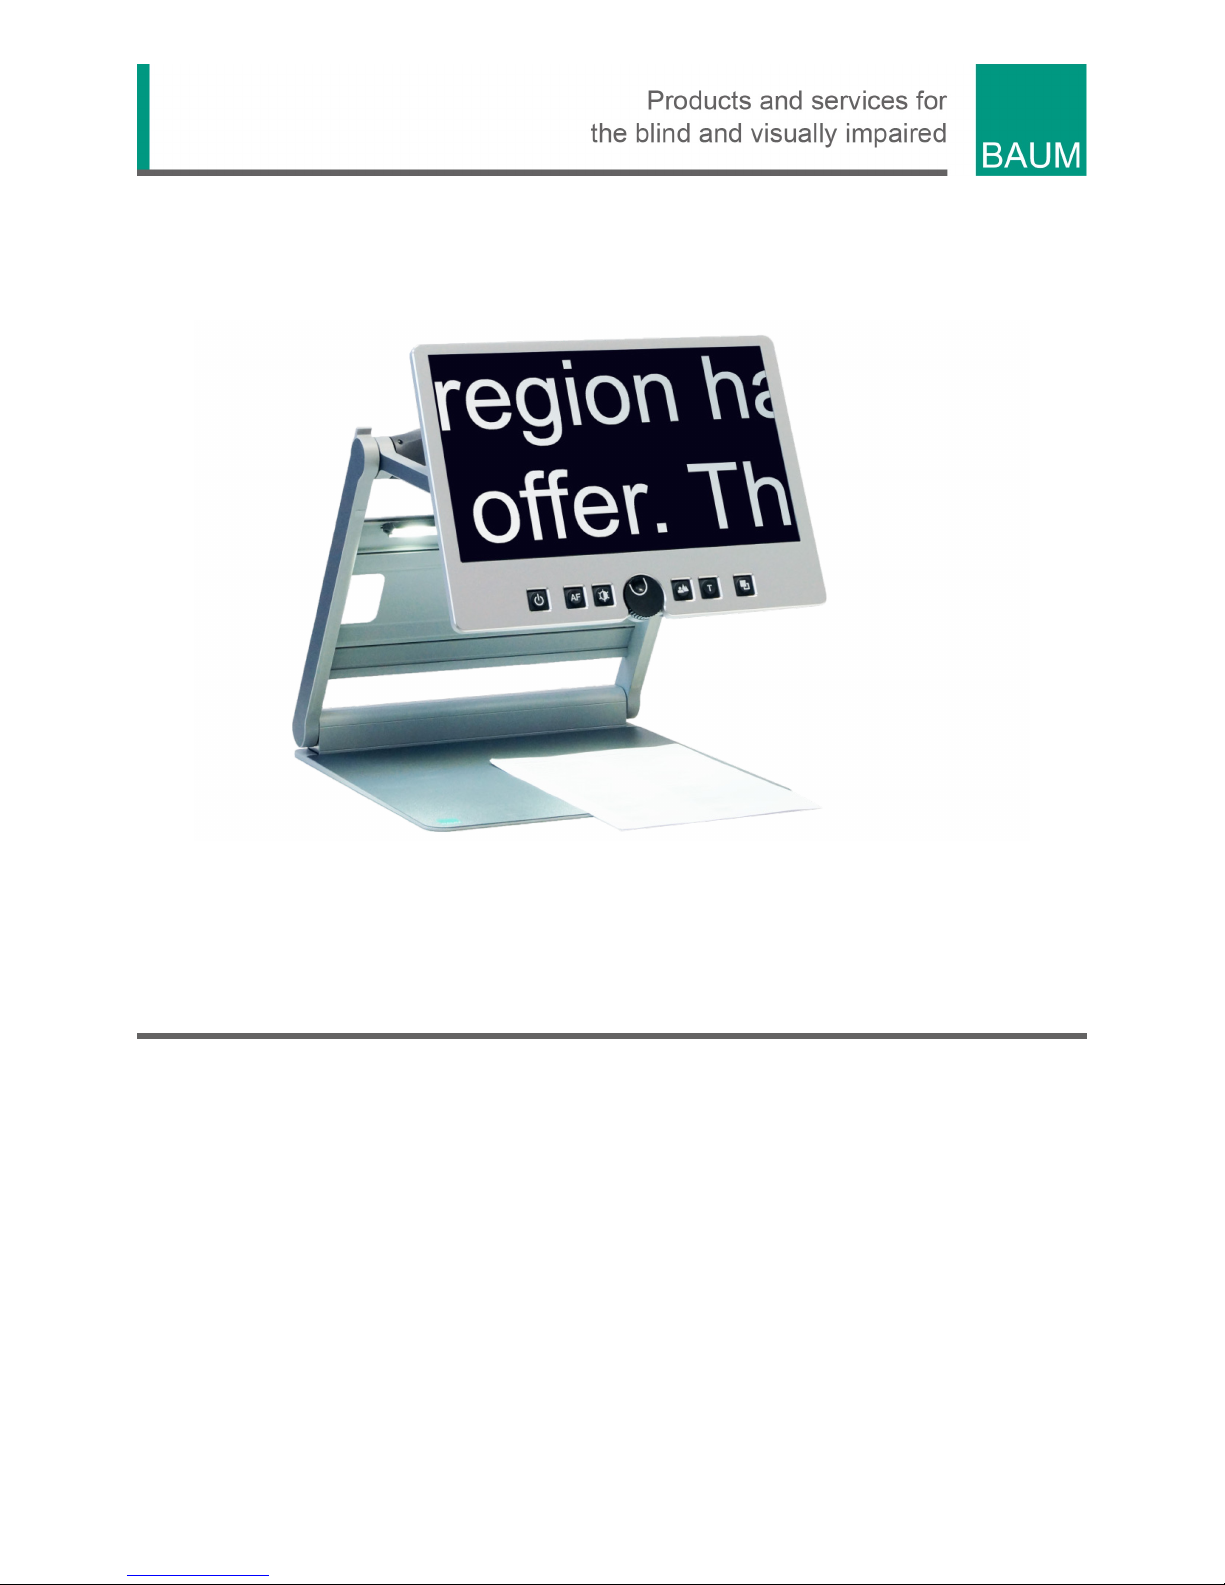
Beautifully designed, high quality, very portable, simple to use, yet
powerful – this is the definition of VISIO. VisioBook and VisioDesk are
the smallest and most flexible members of the VISIO family.
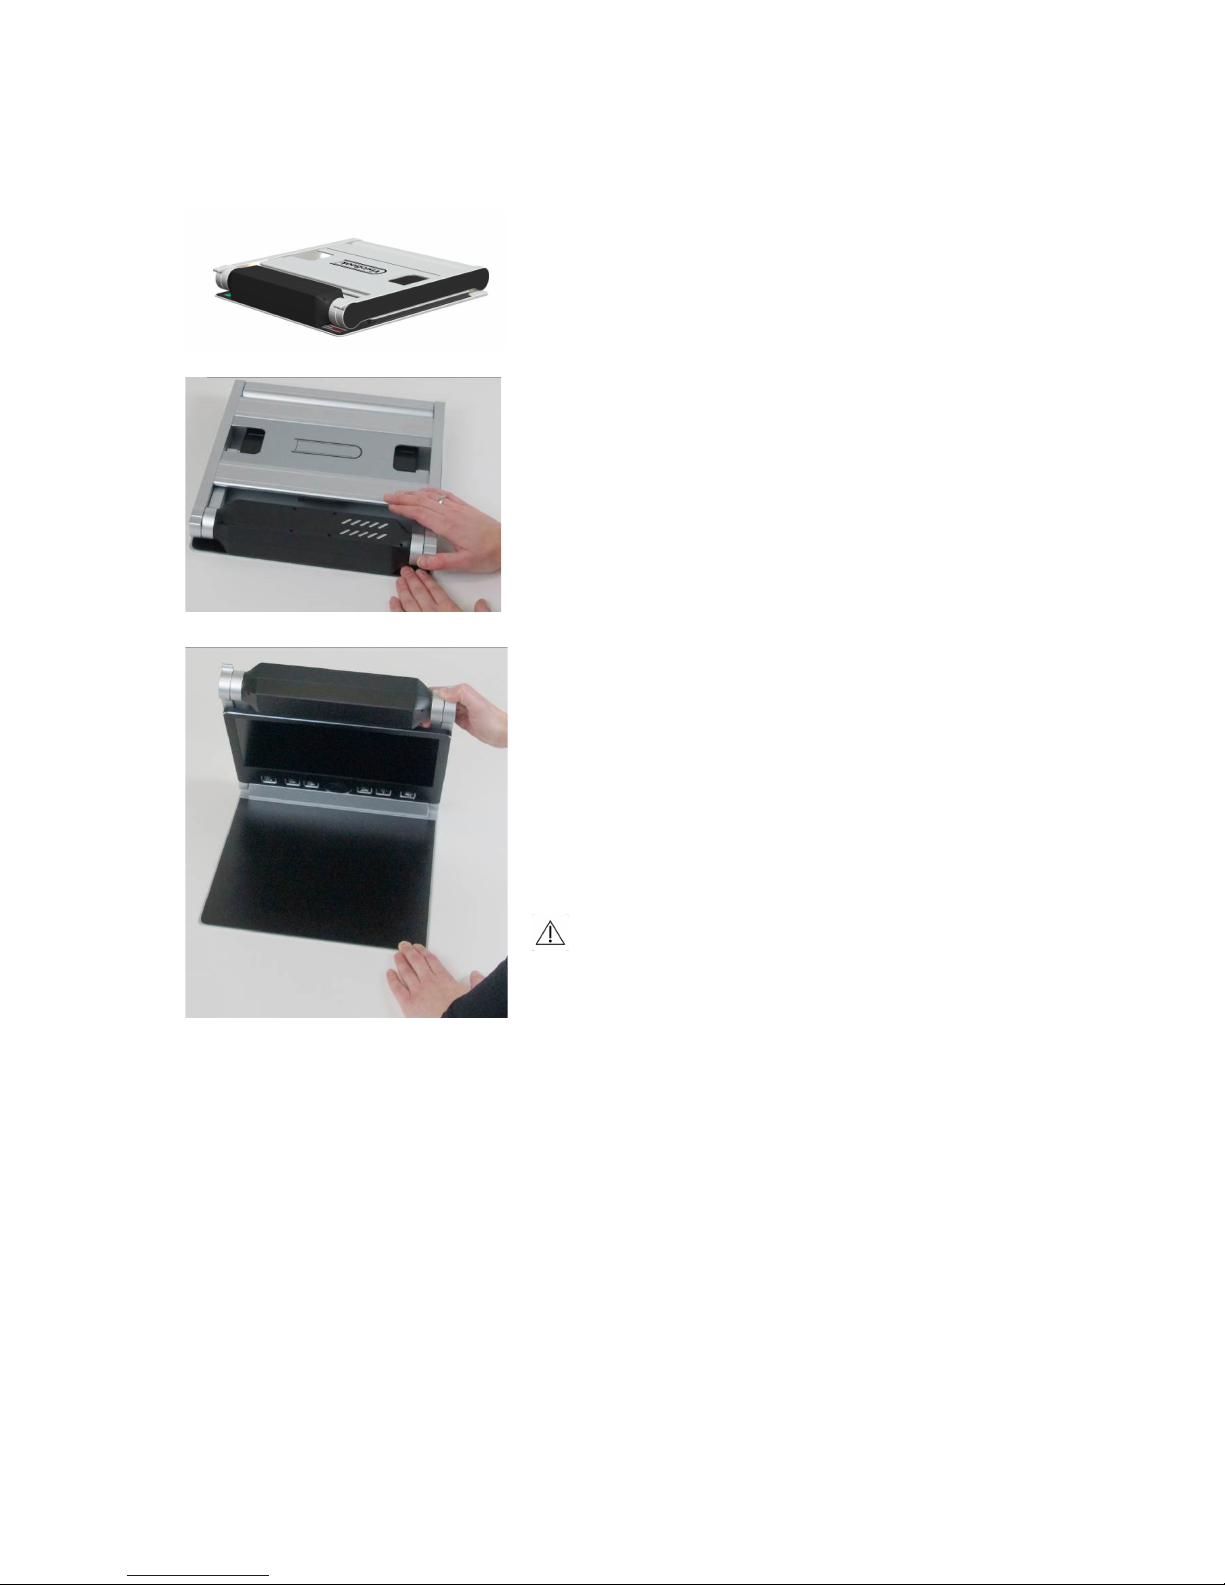
VisioDesk can be folded flat when not in use, which combined with being
lightweight (10.5 lbs. / 4.8 kg) makes for an extremely portable device.
Best of all, VisioDesk is battery powered, running for 6 hours before you
need to recharge it.
VisioDesk features a full HD camera, a 15.6” display (16:9 format, full
HD), with high contrast and power saving LED backlight. Thanks to the
full HD camera VisioDesk provides a bright and crisp image even at the
smallest magnification level. This is especially helpful for users with
retinitis pigmentosa (RP).
Despite being one of the smallest and lightweight devices, VisioDesk
provides the type of functionality you expect from a basic CCTV reader.
VisioDesk displays magnified text and images in your choice of full
colour, black on white, or white on black and a variety of false colours.
Autofocus is provided as well as optional fix focus for hand writing and
filling in forms. Thanks to its image optimizer feature VisioBook will
always provide an optimum image quality, ensuring that text is always
crisp and clear.
The VisioDesk camera can be pivoted in 4 four positions. So besides
viewing down on a sheet of paper, you may also use the distance view or
mirror positions of the camera. The display screen can be easily adjusted
to the height and angle you prefer.
VisioDesk will, in most cases, take documents of poor quality (e.g. faint
print, crumpled or dirty paper, etc.) and magnify them in high contrast.
However, despite all of our technical efforts, there will be some
documents that cannot be displayed properly. In these rare instances,
the full colour setting is the best setting.

Before you begin 7
3 Before you begin
Please read the safety instructions at the end of this manual and check
the contents of the packaging.
What comes in the box?3.1
1 VisioDesk
1 carrying bag
1 Power Adaptor
1 User Manual
1 Cleaning cloth for camera window and display

How to position VisioDesk on your desk 8
4 How to position VisioDesk on your desk
Place folded VisioDesk on the table, with
the front end approximately 8 inches (20
cm) from the edge of table.
Hold down base plate with one hand while
thumb of other hand grabs front corner of
one of the arms.
Lift arm until you feel it snap into position.
Warning: To avoid touching the
camera window, do not lift from the
camera housing!

How to position VisioDesk on your desk 9
Now place your hands on both sides of
display.
Pull display towards your body…
…while swinging it slightly upwards.

How to position VisioDesk on your desk 10
Adjust display to your preferred height and
tilt.
Grab side of camera and pivot camera
from transport position in downward
position directing slightly to you. Camera
now faces towards front edge of base.
From transport position, this is the second
snap in position.
If you want to fold VisioDesk shut, proceed in reverse order. Pivot the
VisioDesk camera unit to the transport position for folding. This is the
second snap in position. The two rubber straps will then rest on the
bottom plate when shut. VisioDesk will switch off automatically once the
device is folded shut.

Camera positions 11
5 Camera positions
After unfolding VisioDesk, the camera can be pivoted to 4 positions. The
close up lens will slide in automatically if required.
Snap in position directing straight down on ground plate. For viewing
small objects.
The next snap in position is the normal reading position. The camera
unit is tilted slightly to the front. This is for normal reading (any image
distortion will automatically be corrected as the autofocus takes
effect). The camera looks toward the front edge of the base. In other
words, if you put a page on the base, the camera will look at the
bottom of the page. Thus by moving the paper (up, down, left, right),
you can read the entire page.
Far view position to the front, camera facing away from user, for
reading from a black board etc. Camera does not snap in allowing you
to adjust viewing angle.
Mirror position. Pull display down below camera and pivot camera
window to front, so your face will be shown on display. This position
also does not snap in.
The third snap in position is the transport position. Camera faces
down parallel to the arm. Wen folded shut, the two rubber straps on
camera will rest on the base, preventing it from scratches.

Power Adaptor 12
6 Power Adaptor
If you want to use VisioDesk for an extended period of time, or if you
need to charge the battery, connect one end of the power adaptor into
the back of your VisioDesk, and then plug the other end in to a power
outlet. The power control light on VisioDesk will turn orange while
charging of the battery takes place, and turn green when charging is
complete.
VisioDesk can be operated while charging of the battery takes place.
Charging will automatically end once the battery is full, so you can leave
it connected as long as you like.
When fully charged, the battery in VisioDesk provides about 5 hours of
continuous operation before you need to connect to a power outlet.
After power on or on a short press on the power button the battery
level will be shown as a battery symbol on the right side oft he display.
Battery is full, if symbol is filled completely. If power supply is connected
and charging, the battery symbol is filled with a flash sign.

VisioDesk Control Panel 13
7 VisioDesk Control Panel

VisioDesk Control panel buttons – quick reference 14
8 VisioDesk Control panel buttons – quick
reference
Power
Short press (until lights are on) will power up device.
Short press to show battery level.
Long press will switch off.
Auto Focus
Toggles Auto Focus on and off.
Auto focus on has always a sharp image.
Auto Focus off is for taking handwritten notes.
Image optimizer
selects one of five image quality optimizer settings for
viewing critical documents with low contrast or bad print.
Long press turns on/off light.
Zoom
Turn the circular dial counter-clockwise to decrease
magnification, and clockwise to increase magnification.
Picture
For viewing pictures or reading documents in true colours.
Also recommended for reading poor quality print and for
writing.
If PC is connected, toggle between PC image and camera
image.
Text - Reverse
Use text mode for reading. Contrast is enhanced so
reading is easier. Press again to toggle foreground and
background colours.
False Colours
In text mode: Press to cycle through 7 false colour modes.
(Use text button to reverse foreground and background).
White on black is recommended for reading.
In picture mode: toggle white balance between warm
reddish white, neutral white and cold bluish white.

Becoming Familiar With Your New VisioDesk 15
9 Becoming Familiar With Your New
VisioDesk
You have already learned how to position VisioDesk on your desk, and
how to connect VisioDesk to the power adaptor. You can adjust height
and tilt of the display to your preferred position so that you can
comfortably view the screen.
Now, switch on VisioDesk and use it for the first time.
The control panel is located right below the screen. It consists of only
six buttons and a circular dial.
The power buttonis located in the lower left corner. A short press of
this button will switch VisioDesk on. As soon as the lights turn on, you
can release the power button. The display shows a start-up screen, after
a few seconds VisioDesk shows a magnified image. the battery level is
shown for a few seconds.
A short press on the power button will show the battery level again at
any time. The battery is full if the battery symbol is completely filled. A
flash sign on the battery symbol shows it is charging.
You can switch VisioDesk off by pressing the power button for more
than one second. This helps avoid accidentally switching off VisioDesk.
Now, let’s practice switching the device on and off a couple of times, and
then leave it switched on to proceed to the next step.
Place a document on the base
plate. We suggest something
coloured, such as a brochure or
magazine with text and images.
You can align a document
horizontally by moving it against
the silver rim in the back of the
base plate.

Becoming Familiar With Your New VisioDesk 16
Let’s try the other buttons on the control panel. We have already learned
the power button, which you found in the lower left corner.
Direct your attention toward the lower middle part of the control panel.
There you will find a circular dial with a ridged edge. You may also notice
a small indented circle on the front face of the dial. This is the zoom
control dial, which controls magnification. Turning this dial clockwise
will increase magnification, while turning it counter clockwise will
decrease magnification. Turn the zoom control counter clockwise to the
start position to obtain minimum magnification now. The indented circle
will be at the 7 o’clock position when the dial is at the start position.
The minimum zoom level is not primarily intended for reading; rather, it
provides you with a better overview on the document structure. Thus you
can easily find the position you want to view at higher magnifications.
Now, press the picture button . This button is located to the right of
the zoom control dial. Pressing this button will set VisioDesk to true
colour.
The true colours are ideal for viewing images and also serves well for
reading poor quality print, and for writing or filling in forms. It provides all
natural colours in all shades.
Now, move the paper until you see one of the images of your document
appear on the screen. If the image is too small, increase the
magnification by turning the zoom control clockwise. If you get lost and
do not know where you are on the document, decrease magnification,
find your place on the page, and then increase magnification again.
NOTE: if you are using high levels of magnification, you may find it
easier to increase magnification in increments, make adjustments to the
placement of your document, and then repeat. If you move quickly from
the smallest to the largest magnification, what was once in the middle of
the screen will have disappeared.

Becoming Familiar With Your New VisioDesk 17
Move the paper to a position where you see some text on the display.
Now press the text button . The text button is located to the right of
the picture button it is the second button to the right of the zoom control
dial.
The image will be displayed in high contrast now and in two false colours
only.
Press the text button again to reverse the image. In this mode, letters are
much clearer and brighter with higher contrast, whereas in true colours
you see all colours and shades of grey.
You see the difference? Black on white and white on black or any other
false colours in Text mode will show crisper characters in higher
contrast, whereas the true colour mode shows you real colours and all
shades of grey.
You do not like the colours shown in text mode? No problem! Let us
change them. You have a selection of seven false colour combinations
and with reversing foreground and background you will have 14 different
colour options. Try out by pressing the false colour button . This is
the rightmost button on the control panel. Each time you press it, the
colours will change. After you went through all 7 options it will start over
again. If you want to reverse foreground and background, press the text
button.
The available false colours are black-white, black-yellow, black-cyan,
black-green, black-magenta, blue-white and blue-yellow.
Select the colours you prefer with the false colour button and press the
text button for reversing foreground and background until you find the
option you prefer.
In picture mode, the false colour button has a different function. There
you may change the white balance. Press this button to toggle between
a warm reddish white, especially for viewing photos, a neutral white or a
cold bluish white that is good for reading coloured texts.

Becoming Familiar With Your New VisioDesk 18
Now choose the setting you prefer for reading. Take all the time you
need to find out the best setting for your needs. Most users prefer white
characters on black background.
Note: VisioDesk remembers the last used colour setting that you made
before you turned it off.
Now that you have found your preferred settings, let us try to read some
more complex examples with poor quality print. In most cases, the
automatic contrast feature in VisioDesk will magnify your document and
present it in high contrast with crisp characters. Sometimes however, the
automatic contrast will not find the best setting. That may likely happen
with documents where the print quality is poor, or with coloured
characters that are printed on a coloured background. In these cases
you may want to experiment with the image optimiser button to find
the best settings. This is the third button from the left, directly left to the
zoom knob. The image optimiser button selects one of five levels of
optimisation. So if you do not get a good quality representation on
VisioBook’s display, simply press this button several times until you get
the best result.
This button works in picture mode as well as in text mode.
Note: You will often find the previous setting was the best one, so the
trick to get one step back is by pressing the button four more times.
Switch off light9.1
When reading glossy paper or self-lighted displays like such of mobile
phones, then VisioBook’s light may cause reflections or blinding effects
on the camera image. In such cases you should switch off the light by a
long press on the image optimizer button . One more long press will
switch the light back on again.

Becoming Familiar With Your New VisioDesk 19
Autofocus9.2
VisioDesk has a permanent autofocus which is always active at power
on. That means, no matter how thick a book or how curved a page might
be, VisioDesk will always focus on the part displayed and thus always
present a sharp image on the display. This feature is also helpful when
reading text on a curved surface, such as a can or a medicine bottle. So
this is the setting you usually will prefer.
However, sometimes you want to fill in forms or crossword puzzles or
you want to paint your nails or view three-dimensional objects. This is
where fixed focus comes into play.
First, let us find that button. The auto focus button is the second
button from the left. Press it to toggle auto focus on and off. On the
screen “AF ON“ or “AF OFF” will be displayed for a few seconds
respectively.
Let us test how this works. If you have already played with this button,
press the auto focus button once or twice and check for “AF ON” being
displayed to make sure, automatic focus is on. VisioBook will magnify the
document on the base plate and display a sharp image. Put your hand
on the document now. VisioBook will magnify your hand and you see the
skin of your hand is focused now while the characters on your document
are blurred. The same may happen when you want to fill in a form.
Instead of showing sharp letters, VisioBook may focus on the back of
your hand holding a pencil. If you remove your hand, the characters are
sharp again.
So let us try the same with fixed focus now. Place a form on the base
plate. If VisioBook does not show sharp characters, press the auto focus
button. “AF ON“ will be displayed. Now that the characters are sharp,
press the auto focus button again to switch it off. “AF OFF“ will be
displayed. If you fill in the form with a pencil now, VisioBook will always
stay in focus on the characters and not on your hand. Once finished, do
not forget to turn auto focus on again by pressing the auto focus button.

Becoming Familiar With Your New VisioDesk 20
Alternative set of false colours9.3
VisioBook comes with two sets of 7 false colours each. The standard set
has very bright intense colours, with high contrast. This is appropriate for
most users.
The standard colours are: black-white, black-yellow, black-cyan, black-
green, black-magenta, blue-white and blue-yellow.
For special needs, there is a second set of softer colours with less
contrast. This is especially helpful if you are sensitive to blinding effects
from high intensity light.
The alternative colours are: black-white, black-ivory, black-soft yellow,
black-soft peach, black-soft pink, blue-ivory, blue-white.
To switch between the two sets, press picture button and text button
simultaneously while pressing the power button on power on.
VisioBook will remember this setting, so you only have to do this once.
Table of contents
Other Baum Magnifier manuals