Baux Industries GROW KIT 2 ft x 4 ft User manual

2 ft x 4 ft
GROW KIT
ASSEMBLY INSTRUCTIONS
2 of 10
Thank you for purchasing
Baüx Industries Grow Kit
Your indoor cultivation starts now!
Read and follow the instructions to assemble your Grow Kit.
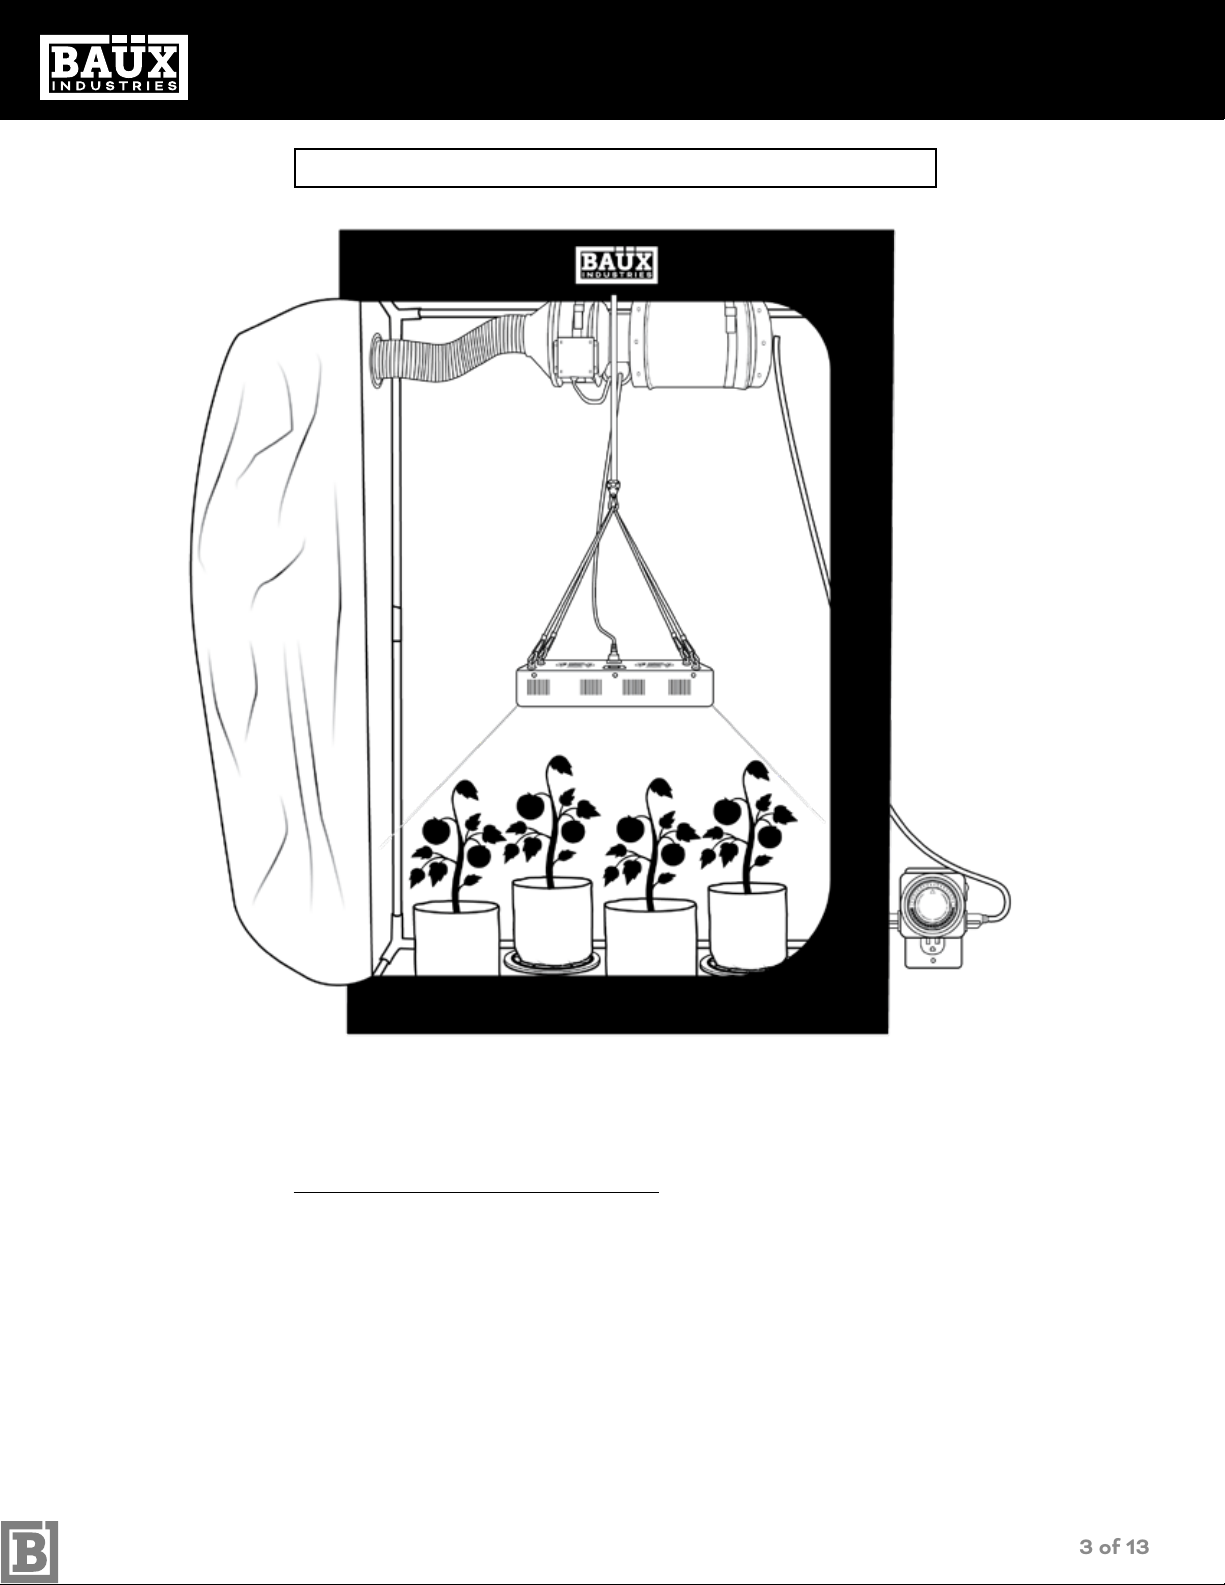
GROW KIT OVERVIEW
SETTING UP YOUR GROW TENT
SETTING UP YOUR FAN
& FILTER
ATTACHING THE CARABINERS
SETTING UP YOUR LED
GROW LIGHT
SETTING UP YOUR DUAL
OUTLET TIMER
SETTING UP YOUR PLANT POTS
WARRANTY
3
4 -5
6
7
8-9
10
11
12
C O N T E N T S
01_19_Baüx Industries_PRINT_Grow Kit instructions_2x4-v1
3 of 13
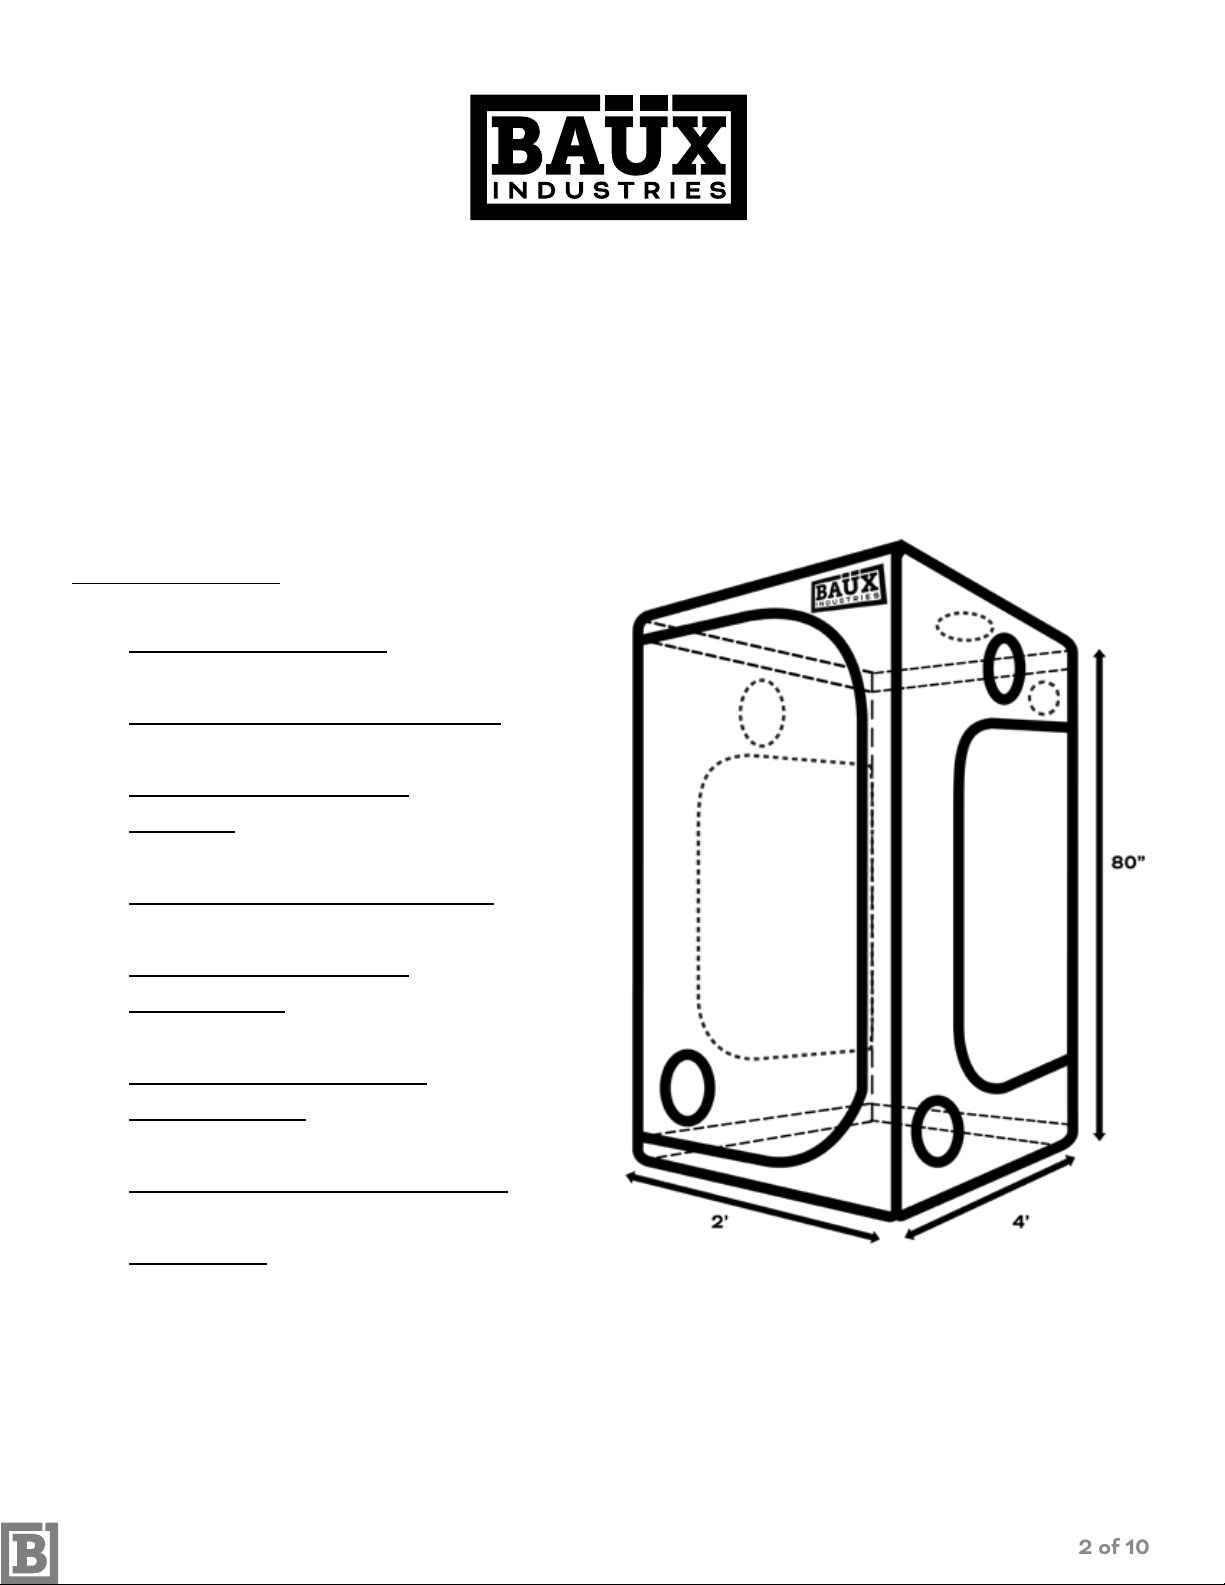
GROW KIT OVERVIEW
2 ft x 4 ft GROW KIT ASSEMBLY INSTRUCTIONS
• 2’ x 4’ x 80” Grow Tent
• 1/8 Rope Ratchet (1 pair)
• 300W Full Spectrum LED Light
• 3 Gallon Fabric Pot (x4)
• 3 Gallon Saucer (x4)
• 4” In-line Plastic Fan
• 4” x 10’ Ducting
*Illustration purpose only. Some components sold separately. Please see “Accessories Included” for
complete list of what’s included within the Grow Kit package.
• 4” Hose Clamps (x2)
• Aluminium Foil Tape
• Charcoal Filter 200 CFM
• Dual Outlet Timer
• Filter Cover
• Fan / Filter Straps (x4)
ACCESSORIES INCLUDED:

01_19_Baüx Industries_PRINT_Grow Kit instructions_2x4-v1
4 of 13
2 ft x 4 ft GROW KIT ASSEMBLY INSTRUCTIONS
STEP 1
Connect the grow tent framework ensuring
that the poles are seated properly in the corner
connectors. It may be necessary to gently twist
the poles back and forth until the connection
tabs pop-out and lock into place. Ensure that
the corner sections with the two holes
connect to “B” and “C” poles.
STEP 2
Lay out the outer grow tent canvas, making
sure all the zips are completely undone.
STEP 3
Pull the outer grow tent over the constructed
framework, ensuring that the tent oor is open.
Illustrated below.
Continued on next page...
SETTING UP YOUR GROW TENT
PACKING LIST

01_19_Baüx Industries_PRINT_Grow Kit instructions_2x4-v1
5 of 13
2 ft x 4 ft GROW KIT ASSEMBLY INSTRUCTIONS
STEP 4
Zip up the front of the tent half way
as illustrated.
STEP 5
Lie the grow tent on its side and slide the
base of the canvas over the bottom of the
framework. Close all zips and stand the grow
tent back up
STEP 6
Unzip the front door and place the water proof
tray into the bottom of the tent. Locate the
velcro tabs around the outside top edge
of the tray and fasten them to the tent
framework
STEP 7
Fit the ceiling hanging bars inside the tent as
illustrated.
01_19_Baüx Industries_PRINT_Grow Kit instructions_2x4-v1
6 of 13
2 ft x 4 ft GROW KIT ASSEMBLY INSTRUCTIONS
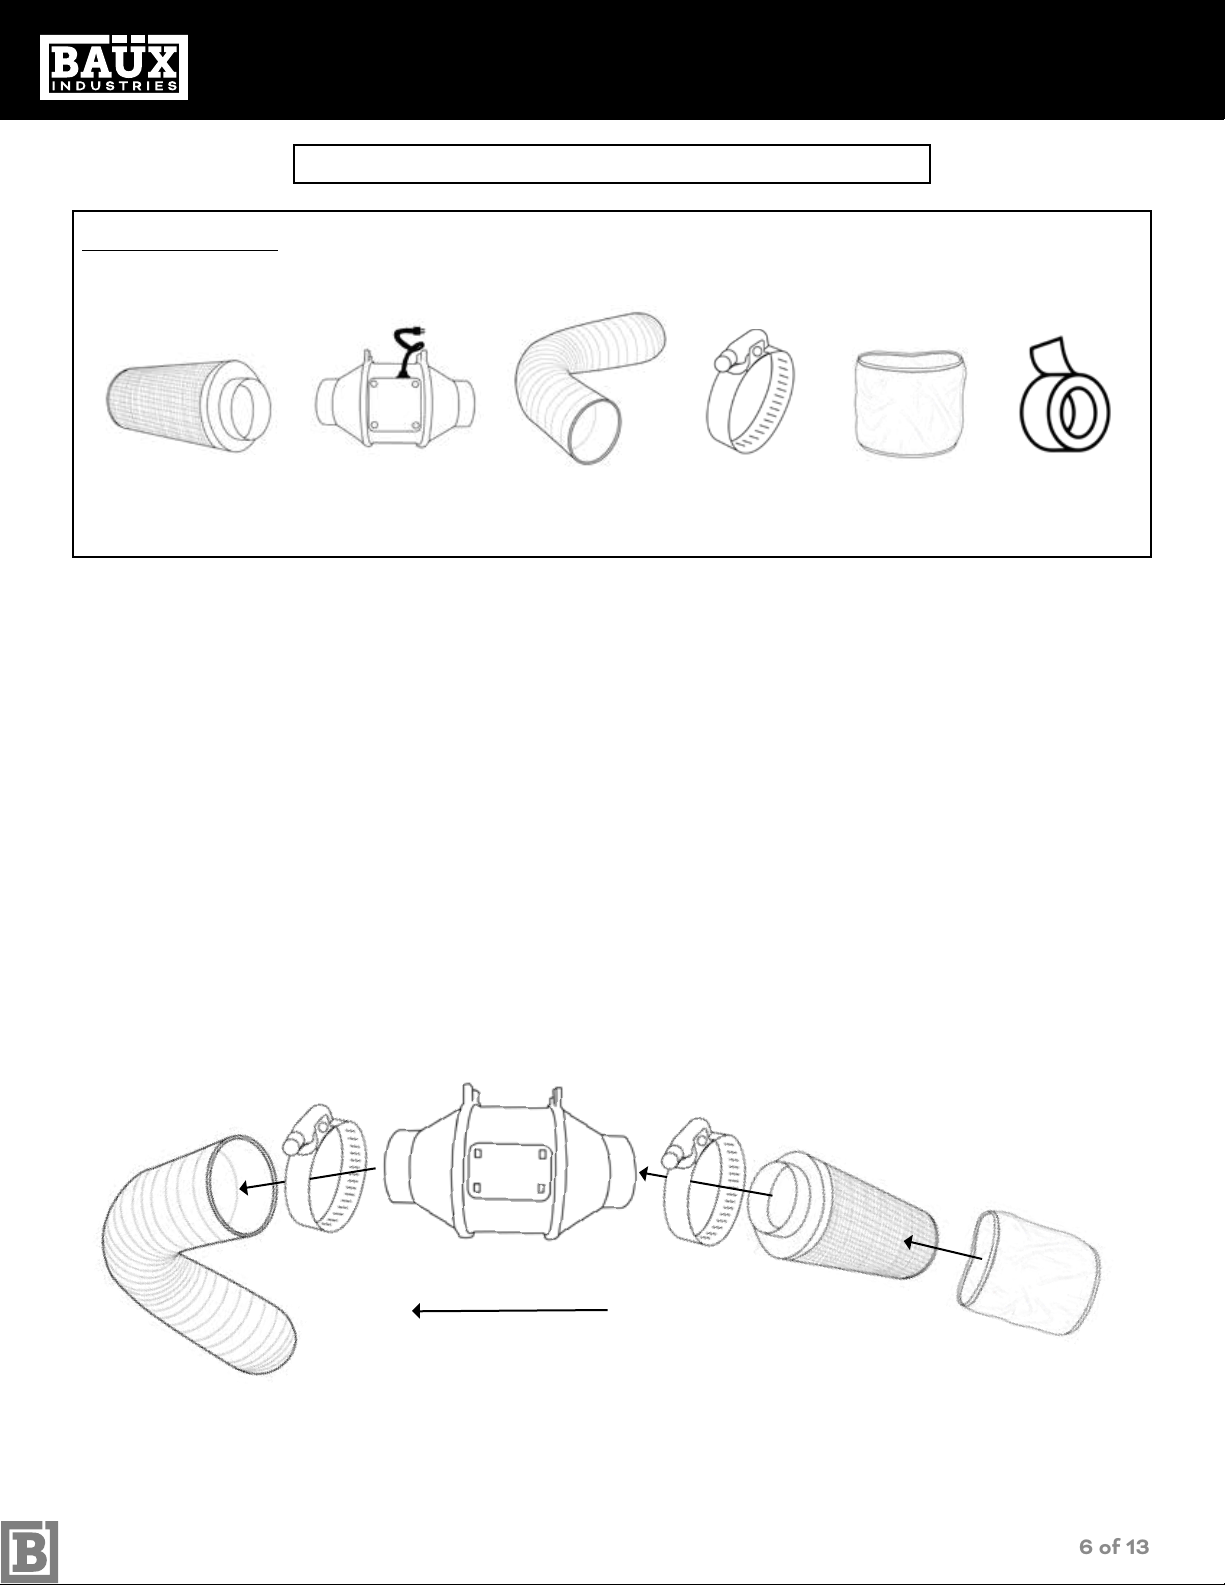
SETTING UP YOUR FAN & FILTER
STEP 1
Unpack and clean your lter with a damp cloth, ensure that you are far away from your grow
space before installation.
STEP 2
When installing your Charcoal Filter always minimize the distance between the fan and the lter.
Avoid having excessive ducting, turns or elbows in the airow between the lter and the exhaust
fan. Use the foil tape to secure the point where the in-line fan and charcoal lter meet for
extra stability.
STEP 3
For best performance attach the fan to the lter, so that the dirty air is pulled through the lter
and into the exhaust air duct.
Sequence of equipment: Charcoal Filter > In-line Fan > Exhaust Duct.
Clean the surface of your lter and wash the pre-lters regularly to prevent dust and debris from
clogging the surface of the lter.
Charcoal Filter
200 CFM
4” In-line
Plastic Fan
4” x 10” Ducting 2x Hose Clamp Filter Cover Aluminium
Foil Tape
NOTES: Carbon Filter odor scrubbing properties are negatively affected by humidity.
Always keeping the humidity below 75% (50%-60%) is ideal during the owering cycle.
This will keep your owers healthy with less chance of bud rot, mold, mildew outbreaks and will
help your carbon lter scrub odors in the most efcient way possible.
PACKING LIST
Direction of airow
01_19_Baüx Industries_PRINT_Grow Kit instructions_2x4-v1
7 of 13
2 ft x 4 ft GROW KIT ASSEMBLY INSTRUCTIONS
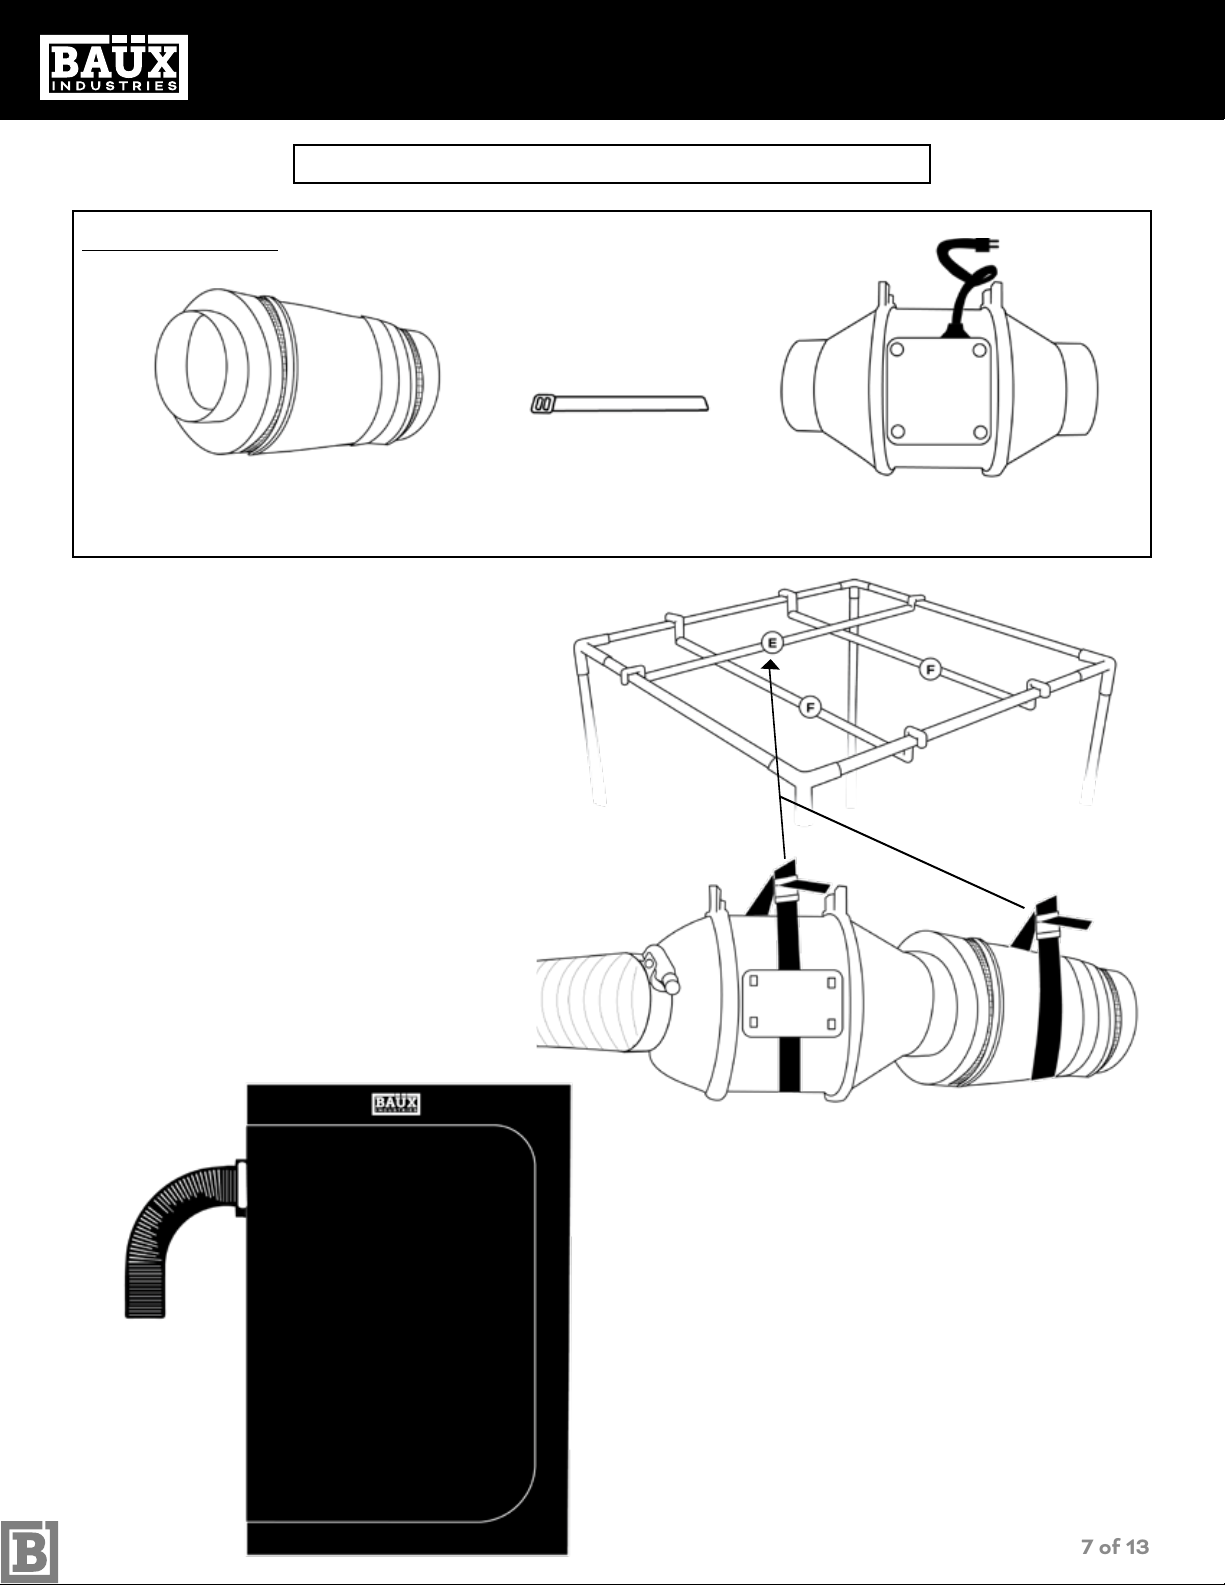
ATTACHING THE CARABINERS
STEP 1
Secure straps to pole “E” (upto 4).
Leave room to slide the in-line fan and
charcoal lter through.
STEP 2
Slide the in-line fan and charcoal lter into
the straps.
STEP 3
Ensure that the In-line fan and Charcoal lter
are secure and at a desired height.
STEP 4
Place Ducting through tent hole.
As illustrated below.
Charcoal Filter Plus Cover In-line Fan
PACKING LIST
4x Fan / Filter Straps

01_19_Baüx Industries_PRINT_Grow Kit instructions_2x4-v1
8 of 13
LED SPECIFICATIONS
2 ft x 4 ft GROW KIT ASSEMBLY INSTRUCTIONS
STEP 1
Unpackage and connect the stainless steel hanging kit per illustration
below.
Continued on next page...
SETTING UP YOUR LED GROW LIGHT
DISCLAIMER
• Lamp is not waterproof and is for Indoor use only
• Use the grow light in a well ventilated place
• When in use, do not look at the light directly.
Use appropriate protective spectrum eye wear at all times.
1x LED Grow Light 1x Power Cord 1x Stainless Steel Hanging Kit
PACKING LIST
Rope Ratchet

01_19_Baüx Industries_PRINT_Grow Kit instructions_2x4-v1
9 of 13
STEP 2
Loop the rope ratchet over pole “F” on the grow tent outer structure.
Ensure that the light is in the middle of the tent.
STEP 3
Attach rope ratchet to the carabiner on the stainless steel hanging kit.
Adjust the rope ratchet until you’re at desired height.
STEP 4
Make sure the light is at the correct distance from your canopy to avoid
burning your plants. As plants grow, adjust distance between the LED
xture and plant canopy. (Use the LED Specications chart in the
product user manual)
STEP 5
To release, press lever above ratchet wheel
CAUTION: Remove suspended object before pressing release lever.
2 ft x 4 ft GROW KIT ASSEMBLY INSTRUCTIONS
SETTING UP YOUR LED GROW LIGHT
NOTE: Ensure that LED lights on pole “F” are
situated in the middle of the grow tent.
As illustrated on the left.
01_19_Baüx Industries_PRINT_Grow Kit instructions_2x4-v1
10 of 13
2 ft x 4 ft GROW KIT ASSEMBLY INSTRUCTIONS
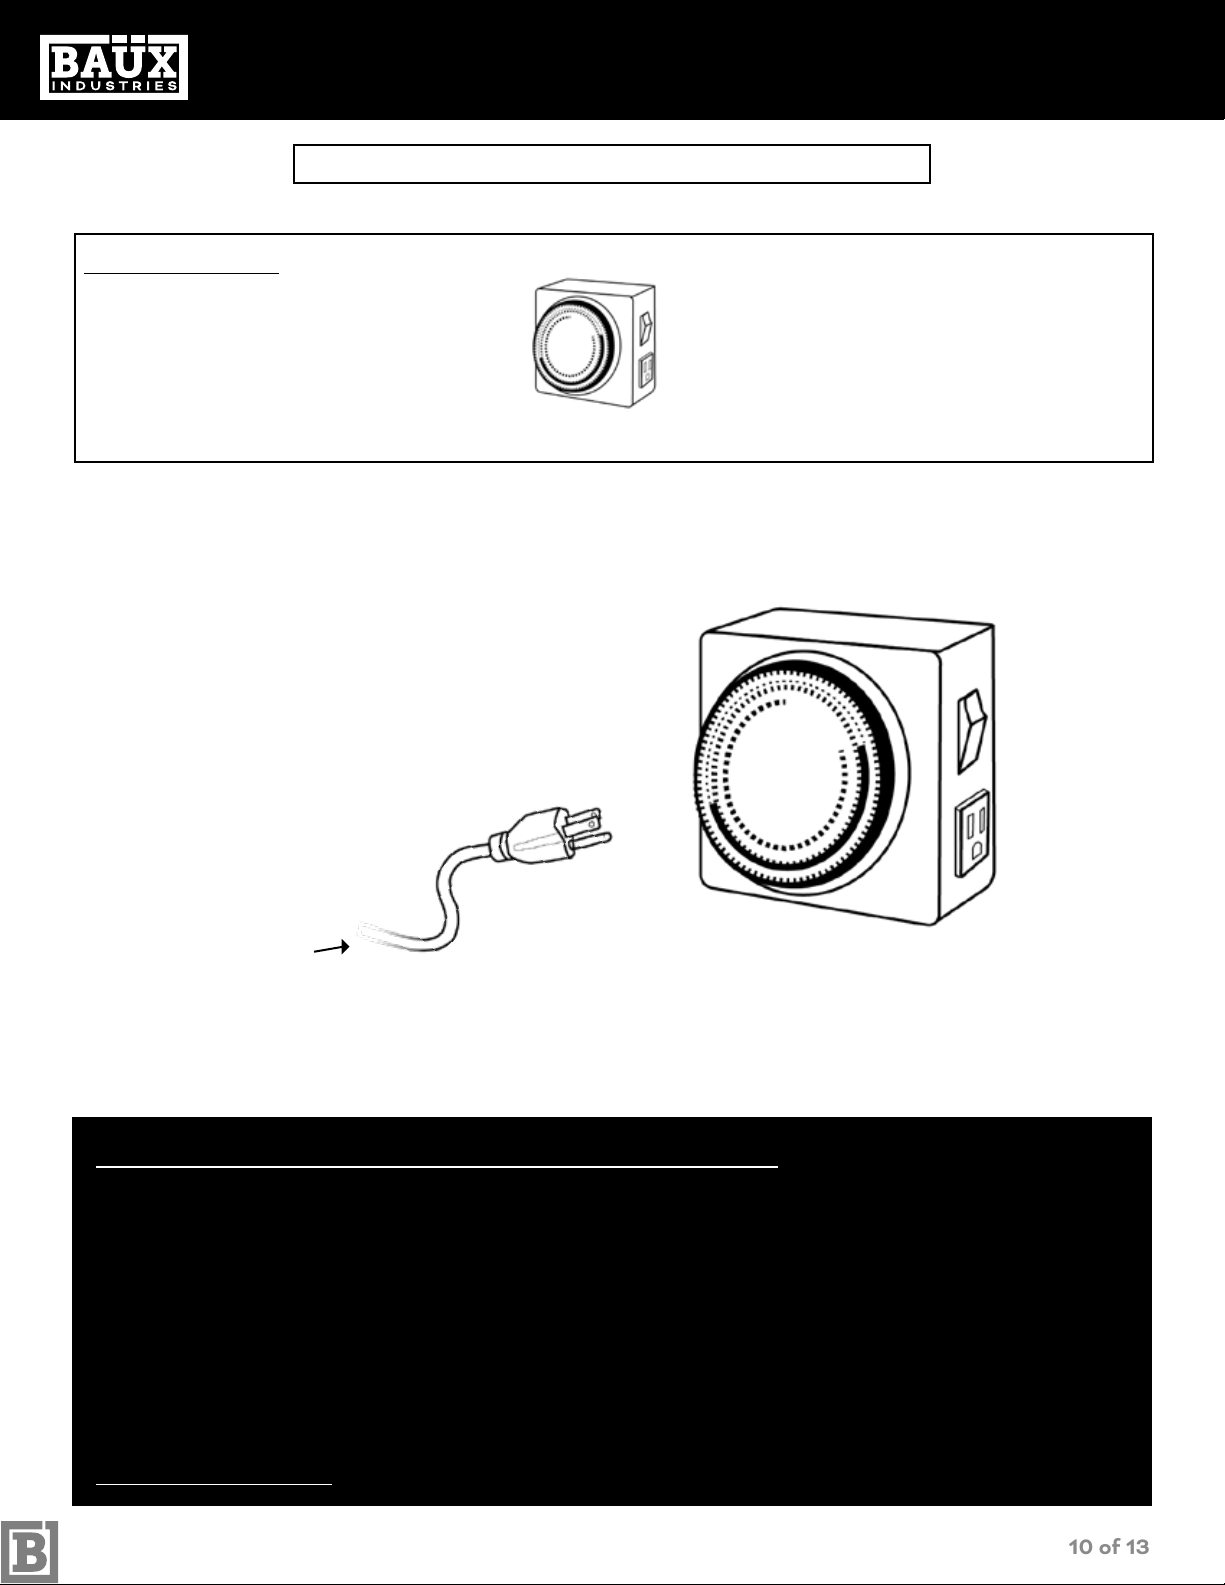
DUAL OUTLET TIMER OPERATING INSTRUCTIONS
STEP 1 Ensure timer is disconnected from mains.
STEP 2 Push down the segments according to how long you require the appliance to stay on.
Each segment is 15 minutes.
STEP 3 Turn the timer dial until the pointer is set to the correct time.
STEP 4 Plug in your LED light/s ONLY into the dual outlet timer and then the timer to the main socket then switch
the socket on.
STEP 5 Override the timer by moving the switch on the side.
FOR INDOOR USE ONLY.
PACKING LIST
SETTING UP YOUR DUAL OUTLET TIMER
Dual Outlet Timer
LED light/s ONLY
01_19_Baüx Industries_PRINT_Grow Kit instructions_2x4-v1
11 of 13
2 ft x 4 ft GROW KIT ASSEMBLY INSTRUCTIONS
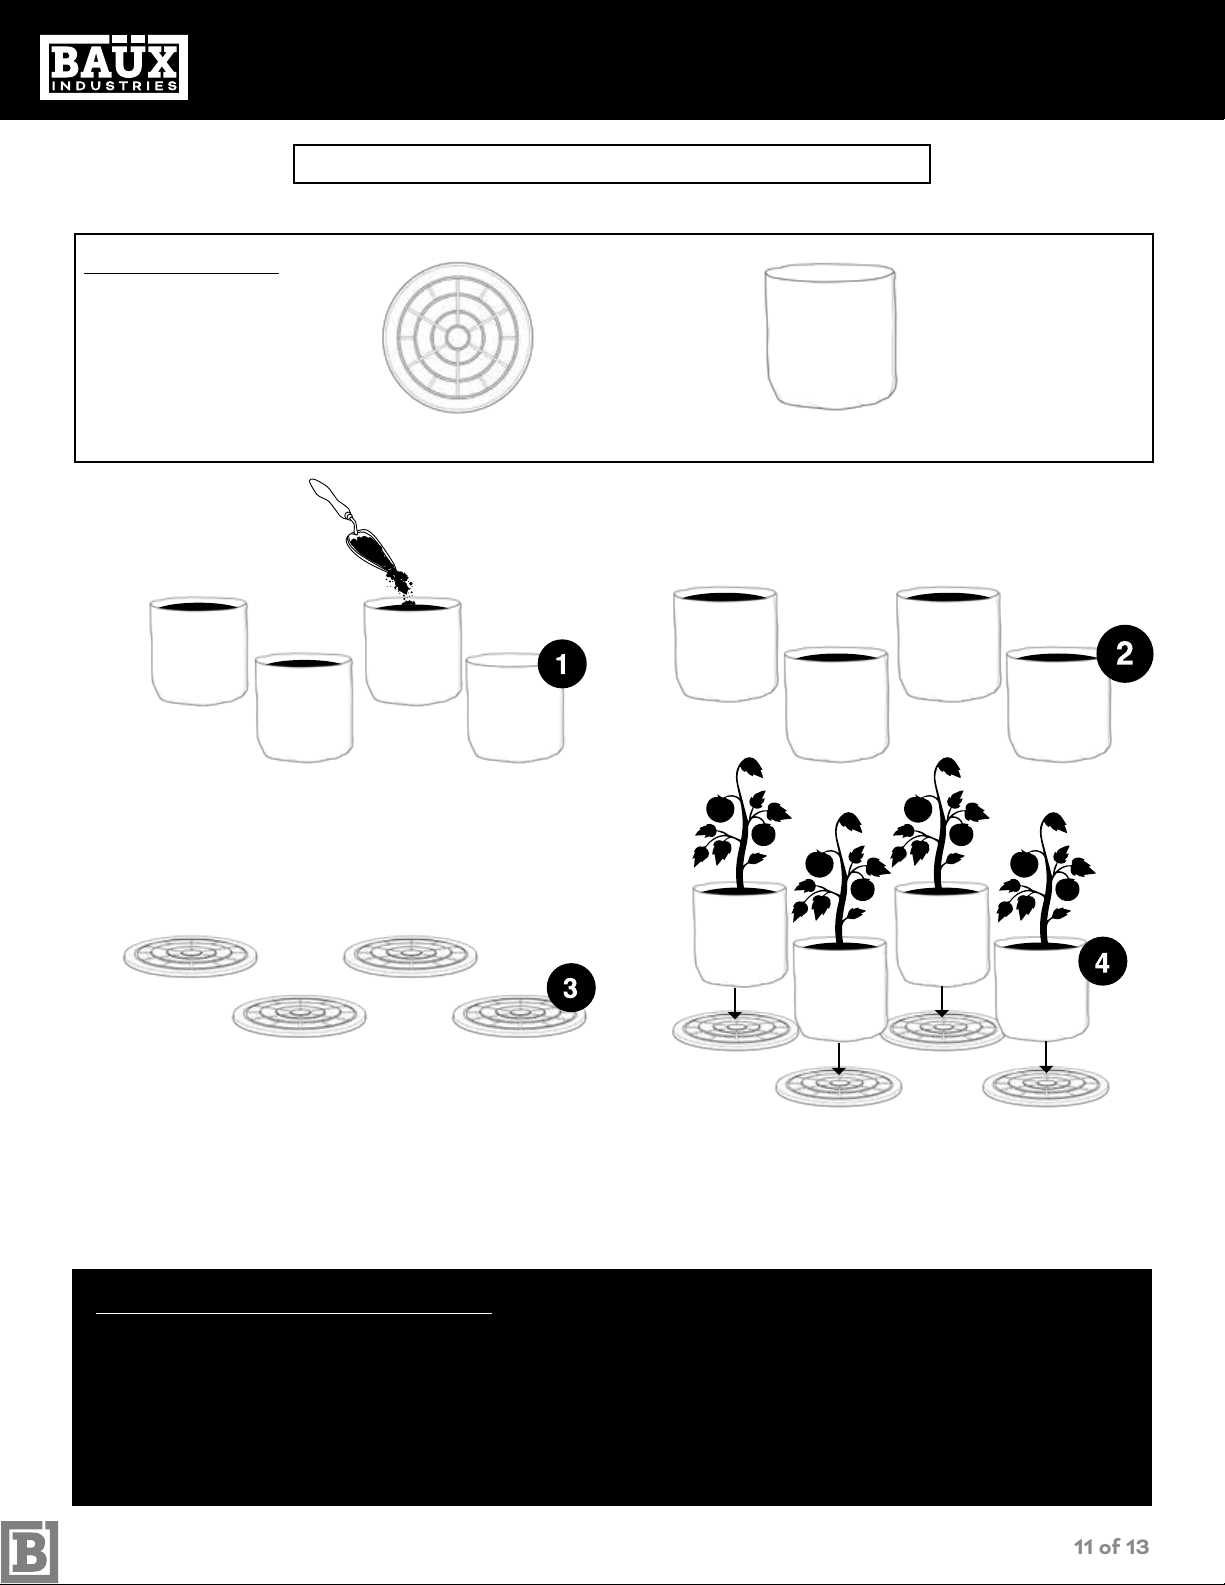
PACKING LIST
SETTING UP YOUR PLANT POTS
4x 3 Gallon Fabric Pot
4x 3 Gallon Saucer
POT LAYOUT INSTRUCTIONS
STEP 1 Fill pots with your preferred soil medium.
STEP 2 Transplant plants into soil medium.
STEP 3 Lay out saucers on the oor of the grow tent.
STEP 4 Place fabric pots with plants onto saucers.

01_19_Baüx Industries_PRINT_Grow Kit instructions_2x4-v1
12 of 13
Baux Industries
2 ft x 4 ft GROW KIT ASSEMBLY INSTRUCTIONS
Products are warranted to the original purchaser to be free from defects in material
and workmanship under normal use and regular service and maintenance for a
period of (1) year from the date of original purchase receipt and will be replaced
or repaired by Baüx Industries. Products repaired or replaced during the warranty
period shall be covered by the foregoing warranty for the remainder of the
original warranty period or ninety (90) days from the date of repair or shipment,
whichever is longer. Baüx Industries has the right to refuse warranty claims if: no
original purchase receipt provided, abuse or neglect to product(s) or alterations/
modications are made. The maximum liability under this limited warranty shall
not exceed the actual purchase price paid for the product. To the maximum extent
permitted by law, Baüx Industries is not responsible for direct, special, incidental
or consequential damages resulting from any breach of warranty or condition,
or under any other legal theory. Some countries, provinces, districts or states do
not allow the exclusion or limitation or relief special, incidental, consequential or
indirect damages, or the limitation of liability to specied amounts, so the about
limitations or exclusions may not apply to you. To initiate a claim, please contact
Baüx Industries to be issued an RMA number.
WWW.BAÜXINDUSTRIES.COM
WARRANTY
LIMITED 1 YEAR WARRANTY

2 ft x 4 ft
GROW KIT
ASSEMBLY INSTRUCTIONS
Table of contents
Other Baux Industries Greenhouse Kit manuals

Popular Greenhouse Kit manuals by other brands

One Stop Gardens
One Stop Gardens ONE STEP GARDEN 92050 Assembly & operating instructions

Dancover
Dancover ASTRA GH120150 manual

Elite Greenhouses
Elite Greenhouses TITAN 1000 Instructions & Illustrations

ClearSpan
ClearSpan Premium Solar Star instruction manual

ClearSpan
ClearSpan 104903 Assembly instructions

Mercia Garden Products
Mercia Garden Products 04GREEN0806SD-V6 manual


KING CANOPY
KING CANOPY Hercules HCGH1020 manual

AeroGarden
AeroGarden AeroGarden 507320-0000 quick start guide

Harvest Right
Harvest Right 3V 24 instructions

Harbor Freight Tools
Harbor Freight Tools 94515 Assembly instructions

Vitavia
Vitavia Venus 2500 Assembly instructions

ClearSpan
ClearSpan Majestic Greenhouse manual